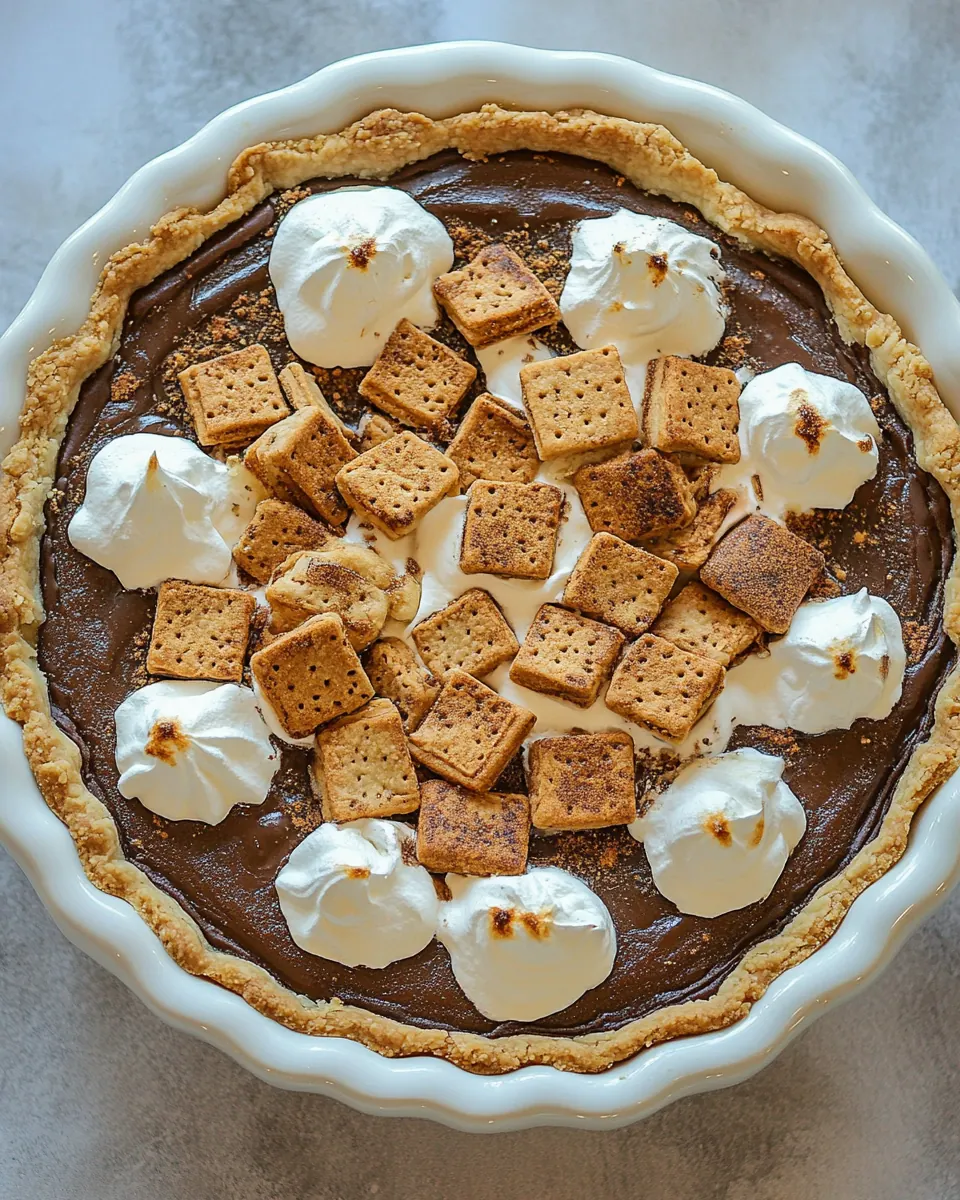
S’mores Pie
S’mores Pie is one of those desserts that instantly takes me back to sticky fingers and late night campfire stories, and I still feel that warm, sweet tug every time I bake it. The very first time I made this, I was aiming for a nostalgic crowd pleaser for a summer backyard get together, and the pie arrived with bubbling marshmallow and melting chocolate that made everyone stop talking. That quiet pause, when a fork lifts a warm, oozing slice, is why I keep coming back to it.
When I bake S’mores Pie I like to think of it as a grown up treat that remembers its childhood roots. The contrast between a crumbly graham crumb crust and the pillowy marshmallow center always surprises guests, and I enjoy the slight chaos of imperfectly placed dough disks, where chocolate peeks through like hidden treasure. I often tell a quick story about the first time I learned to fold dough with my sister, and that memory makes the process sweeter.
Recipe Snapshot
35 mins
10 mins
25 mins
Easy
320 kcal
American
Gluten-Free, Low FODMAP
Desserts
9 inch pie pan, Large mixing bowl, Measuring cups, Spatula, Oven
What You’ll Enjoy About This S’mores Pie
It captures campfire nostalgia in a single slice
I love how S’mores Pie recreates the smoky sweet memory of toasting marshmallows, without the need for an open flame. For me, that emotional pull is the first reason this recipe works so well, it brings back summer nights and simple joy.
Textural contrast keeps every bite interesting
The crunchy crumb crust, the gooey marshmallow creme, and the melting chocolate provide a trio of textures. I always emphasize that contrast when serving, because it’s what keeps guests coming back for another forkful.
Simple ingredients, impressive results
This pie relies on pantry staples like all purpose flour and graham cracker crumbs, yet it looks like a showstopper. I appreciate recipes that do the heavy lifting with minimal fuss, and this is one of them.
Easy to scale for a crowd
I often double the batter for big gatherings, and the formula holds up. The technique is forgiving, so even someone with limited baking experience can produce a dessert that looks and tastes special.
Flexible finishing touches
Whether you scatter extra chocolate squares on top or let it cool for a cleaner slice, this pie adapts to your moment. I like to leave some choices to the cook, it makes the dish feel personal.
Ingredients for S’mores Pie
These ingredients come together to build that classic s’mores experience, but in pie form. The crust provides a crunchy backbone, the marshmallow creme creates an irresistibly gooey center, and the chocolate adds the deep cocoa notes that make each bite feel decadent. I treat the ingredients as a team where each player has a clear job, and when they work together the result is balanced and crowd friendly.
- 1/2 cup unsalted butter, softened: Creamed until light and smooth, provides richness and helps bind the crust and filling while contributing tender texture and buttery flavor to the pie.
- 1/2 cup white sugar: Granulated to add sweetness and help with creaming, balancing the butter while contributing to structure and slight caramelization during baking.
- 1 large egg: Beaten and incorporated to provide structure and moisture, aiding in emulsifying the butter and sugar for a cohesive dough and tender crumb.
- 1 teaspoon vanilla extract: Added for aromatic flavor, enhances the overall sweetness and rounds out the buttery and chocolate notes with a warm, floral vanilla character.
- 1 cup all-purpose flour: Mixed into the dough to provide bulk and structure, all-purpose flour creates the network that holds the crust and filling together and determines texture.
- 1 cup graham cracker crumbs: Combined with melted butter or dough ingredients to create the graham crust base, offering sweet, slightly crunchy, crunchy graham flavor and stability.
- 1 teaspoon baking powder: Leavening when blended into the crust or batter, introduces gentle lift and lightness to prevent a dense texture and ensure a tender bite.
- 1 cup marshmallow creme: Spreadable and gooey, provides marshmallow richness and a smooth, sticky layer that melts into the filling for classic s'mores creaminess.
- 4 whole, 1.55 Oz Bars Hershey's Chocolate Bars, Unwrapped: Broken into pieces to add rich milk chocolate flavor; melts into the warm pie for pockets of chocolatey creaminess and nostalgic s'mores taste.
- 1 cup mini marshmallows: Sprinkled on top for toasted bite and chew, mini marshmallows create a toasted, pillowy finish that complements the chocolate and creamy layers.
How to Make S’mores Pie
This recipe is approachable and rewarding, and I like to walk you through it with practical, sensory guidance. The steps below expand on the directions with clear cues so you can judge doneness by sight, sound, and feel. Keep a watchful eye near the end of baking, marshmallows brown quickly and you want a deep golden color without burning.
- Preheat oven to 350°F and spray a 9" pie pan with baking spray.: You will smell a faint warm, slightly toasty scent as the oven reaches temperature, and the air in the kitchen will feel like it anticipates baking. This step is essential because an oven that is not fully heated can cause uneven browning of the crust and undercooked filling. A light coating of baking spray prevents sticking, which lets the slice release cleanly when served. A common mistake is putting the pie into an oven that is still warming, which can lead to a soggy bottom and uneven texture.
- In a large bowl, beat together the butter and sugar. Add the egg and vanilla and mix to combine. Stir in flour, graham cracker crumbs and baking powder.: At this stage you will notice the butter and sugar becoming creamy, with a faint sweet aroma; the dough then takes on a sandy texture as you fold in the graham cracker crumbs and flour . The goal is a cohesive dough that still feels tender, not sticky. Mixing too vigorously once the flour is added can develop gluten and make the crust tough, so stop as soon as the ingredients are incorporated. If the dough seems dry, a splash of room temperature water can help, but avoid overhydrating.
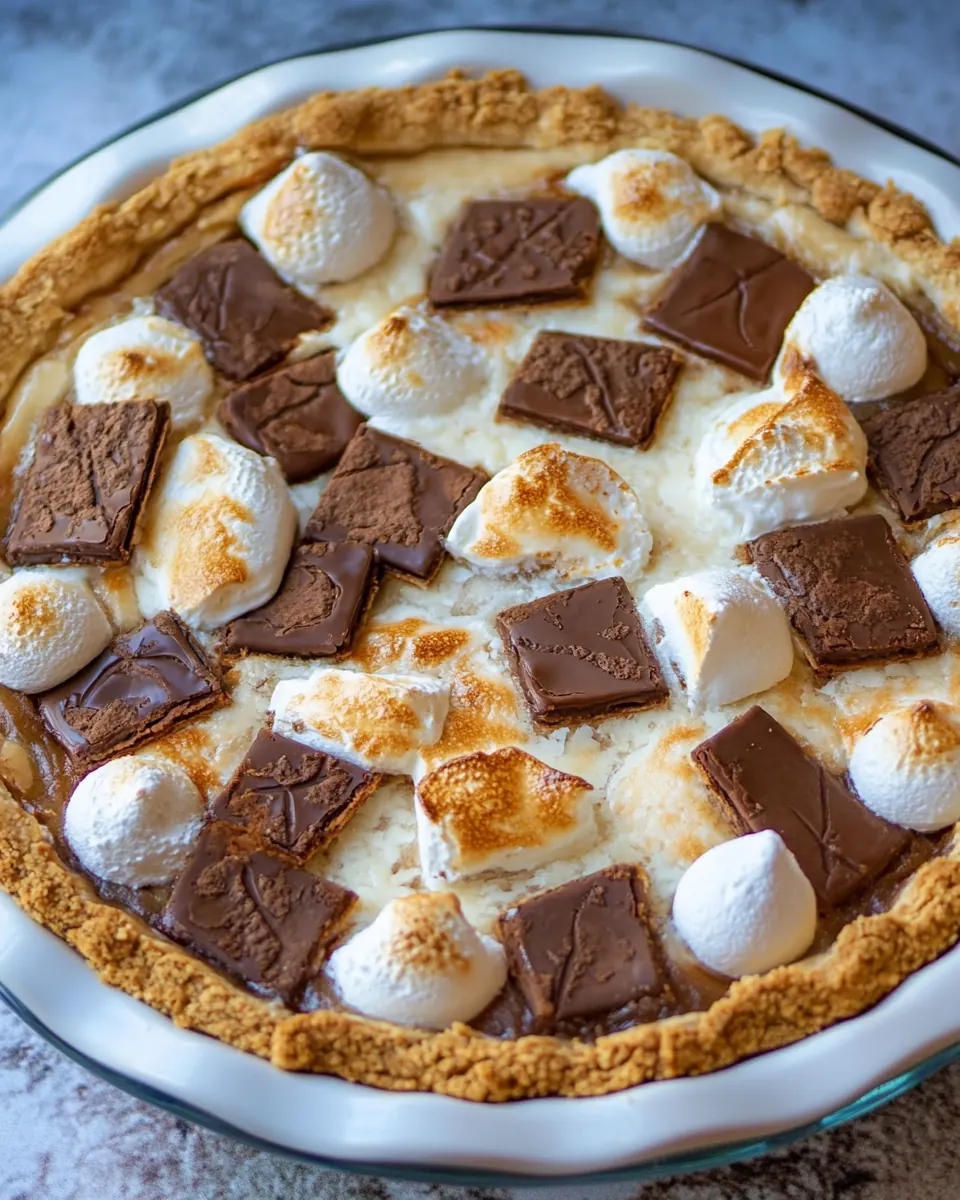
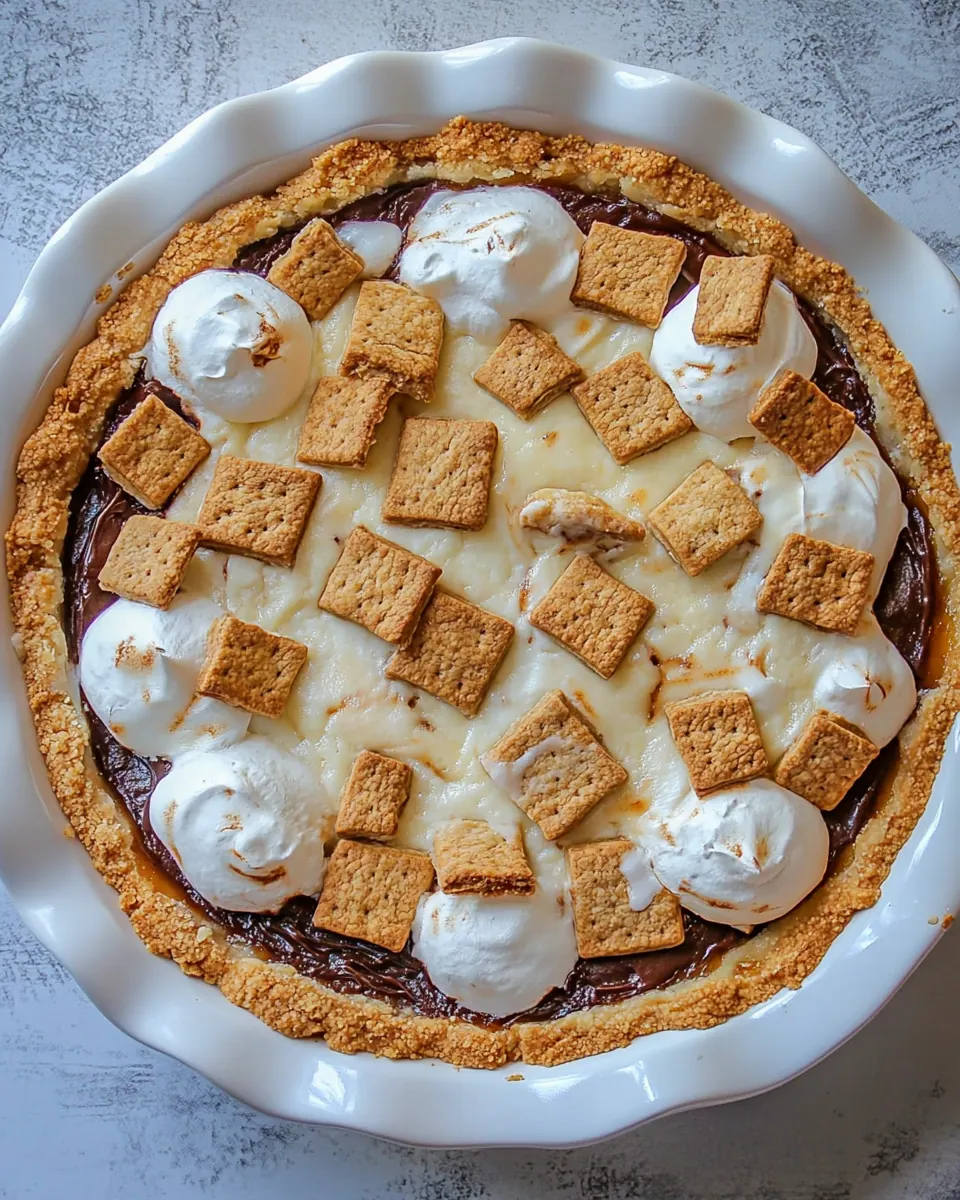
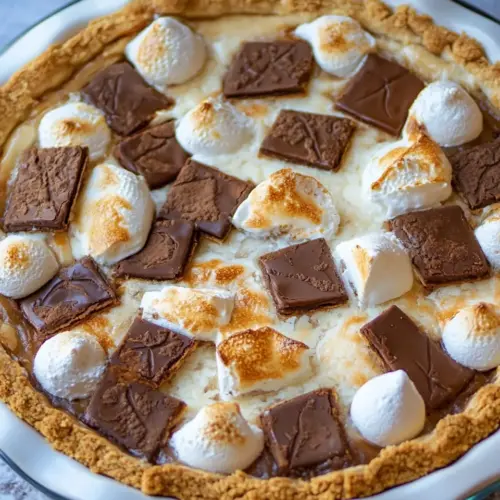
- Take 2/3 of the dough and press on the bottom and up the sides of the prepared pie pan. Carefully spread the marshmallow creme over the bottom crust. Cover the marshmallow creme with chocolate squares. I used about 3 1/4 of the chocolate bars and saved the rest for topping after baked. Sprinkle 1 cup of marshmallows on top.: When pressing the dough into the pan you'll feel it give under your fingers and hear a faint crumbling sound as it compacts into a smooth surface; aim for even thickness so the crust bakes evenly. Spreading the marshmallow creme will create a glossy, slightly sticky layer that resists sliding, and placing the chocolate squares on top ensures pockets of melting chocolate throughout. The mini marshmallows should be scattered to form a light, even cover that will puff and brown. Avoid pressing the filling too deep into the crust, which can cause the bottom to become soggy.
- Take remaining dough. Flatten dough in hand making disks and cover the top of the marshmallows trying to cover as well as possible. It will not be completely covered and the marshmallows and chocolate will show through a little bit. Sprinkle a few marshmallows on top.: As you shape the dough disks you'll feel a pliable texture that holds together, and the top will look rustic as the filling peeks through. This uneven covering is charming, it allows the marshmallow to caramelize and the chocolate to bubble visibly. A common issue is pressing the dough too thin which can burn quickly, so keep small patches thicker where needed to shield exposed marshmallows during baking.
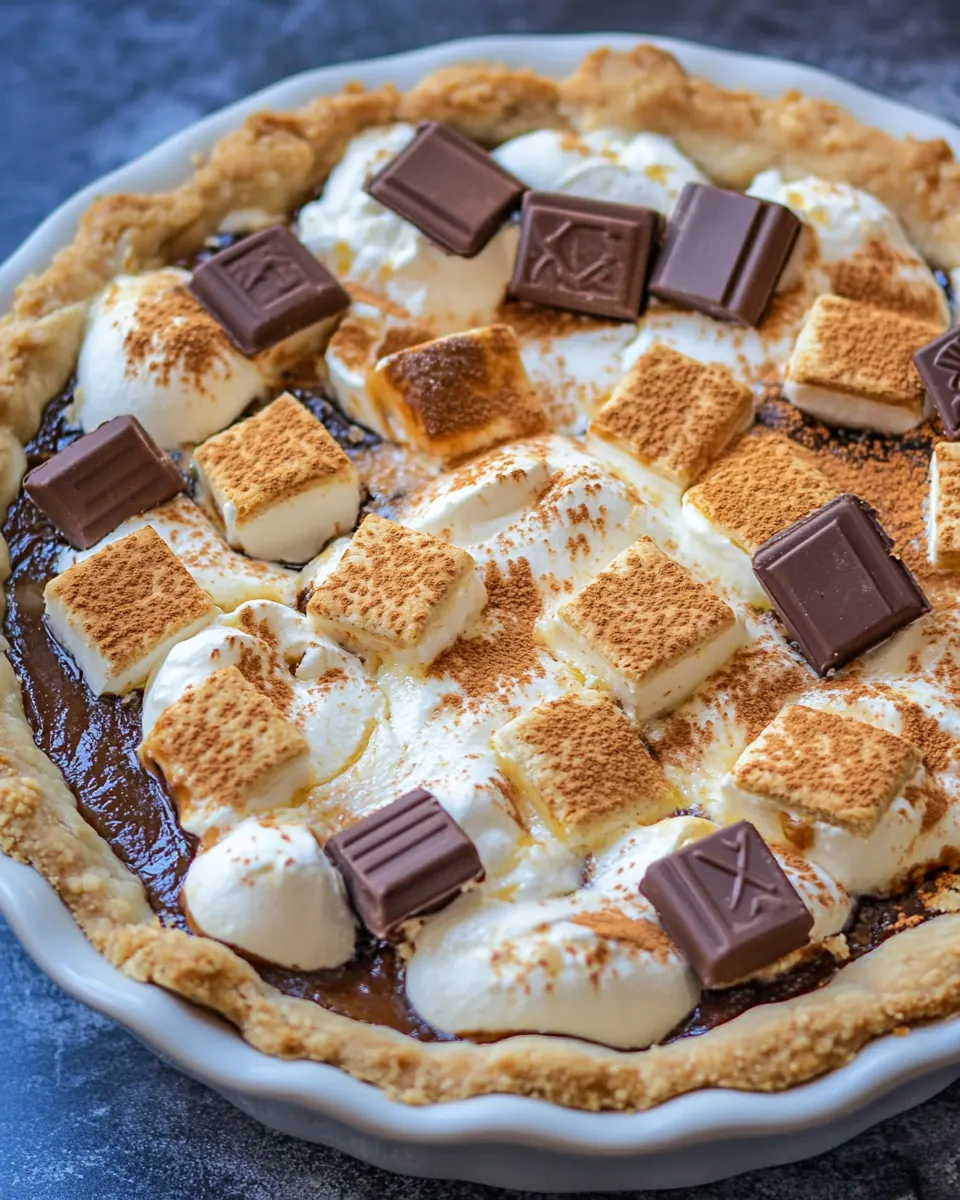
- Bake for 15-20 minutes or until graham cracker dough and marshmallows are golden brown.: In the oven you will hear a quiet settling, and the kitchen will begin to smell of toasted sugar and warm graham notes as the marshmallows puff and the crust takes on color. Watch for a deep golden brown on the marshmallows and the edges of the crust looking firm to the touch; those are the visual cues that signal doneness. Overbaking will cause the marshmallows to dry out and the crust to become brittle, so remove the pie when you see that perfect caramelized color.
- Remove from oven. Let cool for about 5-10 minutes and then place the remaining chocolate squares on top in a scattered pattern. If you add the chocolate too soon the heat will melt them in a puddle. Let pie cool for an additional 20 minutes before slicing so that it is not as messy. Can be eaten slightly warm or at room temperature.: After baking the aroma will be rich and toasty, and letting the pie rest allows steam to dissipate so the filling firms slightly. When you add reserved chocolate squares, they should soften but not fully melt, providing glossy pockets on the surface; if you wait too long they will not adhere. Slicing too early leads to a runny filling and messy slices, so patience pays off. If the pie feels too soft, chilling briefly will help it slice cleaner without sacrificing that warm, gooey character.
Helpful Hints
I like to keep a few practical notes close at hand when making S’mores Pie. These hints focus on timing, texture, and presentation so your pie looks and tastes like it belongs at a special occasion. Below are expanded tips that reflect how I actually cook and finish this dessert in a busy kitchen.
- Room Temperature Ingredients: Allow the butter and egg to sit at room temperature for about 15 to 20 minutes before starting. This helps them incorporate smoothly, producing a tender dough without overmixing.
- Even Pressing: When pressing the crust, use the bottom of a measuring cup to create consistent thickness. This avoids thin spots that burn while the center is still setting, and gives you an even, golden crust all around.
- Marshmallow Handling: Use a small offset spatula to spread the marshmallow creme. A lightly damp spatula prevents sticking and yields a glossy, even layer that browns predictably in the oven.
- Chocolate Placement: Reserve some chocolate for topping after baking. Adding it too early will make it melt into a puddle, while adding it too late may prevent it from softening slightly, so aim for a 5 to 10 minute resting window.
- Watch the Marshmallows: Marshmallows can go from golden to burnt quickly. Set a 15 minute timer and check at 15 minutes, then every 2 minutes until the desired golden peaks appear.
- Serving Temperature: This pie is lovely slightly warm or at room temperature. If you need cleaner slices, chill it for 15 to 20 minutes after the initial cool down to firm the filling without losing the gooey texture.
What to Serve Alongside S’mores Pie
This dessert is a natural fit for relaxed gatherings and seasonal celebrations, and pairing it thoughtfully elevates the experience. Below are ideas for accompaniments, occasions, and storage suggestions that complement the sweet, toasty character of the pie. Each suggestion highlights a practical serving style to help you plan.
- Fresh Berries: Serve a small bowl of tart berries on the side to cut through the sweetness, their bright acidity refreshes the palate between rich bites.
- Cold Coffee or Milk: Offer glasses of cold milk or chilled coffee, both of which balance the sweet, gooey filling and make the dessert feel indulgent yet familiar.
- Outdoor Summer Gatherings: This pie shines at casual backyard parties or summer potlucks, especially when you want a nostalgic dessert that is simple to transport and serve.
- Holiday Table Addition: Place it on dessert spreads for holidays where a playful, family friendly treat is welcome, it pairs well with lighter pastries and fruit plates.
- Storage Tips: Cover loosely and store at room temperature for up to one day, or refrigerate for up to three days. To refresh slightly warm slices, pop them in a 300°F oven for a few minutes until the filling softens.
- Seasonal Pairings: In summer, pair with iced beverages and light salads. In cooler months, offer warm beverages and spiced cookies to complement the toasted notes.
FAQ
Conclusion
What makes this S’mores Pie special is how it distills campfire flavors into a shareable, home baked dessert with minimal fuss. The combination of a crumbly graham style crust, gooey marshmallow center, and pockets of melted chocolate creates a familiar, comforting bite every time. I encourage you to try it for your next summer gathering or cozy night in, let the process be relaxed and enjoy how quickly it becomes a crowd favorite. Take your time with the cooling stages so slices present beautifully, and savor the smiles it inspires.
S'mores Pie
Equipment
- 9-inch pie pan
- Large Mixing Bowl
- Measuring Cups
- Spatula
- Oven
Ingredients
- 1/2 cup unsalted butter, softened Creamed until light and smooth, provides richness and helps bind the crust and filling while contributing tender texture and buttery flavor to the pie.
- 1/2 cup white sugar Granulated to add sweetness and help with creaming, balancing the butter while contributing to structure and slight caramelization during baking.
- 1 large egg Beaten and incorporated to provide structure and moisture, aiding in emulsifying the butter and sugar for a cohesive dough and tender crumb.
- 1 teaspoon vanilla extract Added for aromatic flavor, enhances the overall sweetness and rounds out the buttery and chocolate notes with a warm, floral vanilla character.
- 1 cup all-purpose flour Mixed into the dough to provide bulk and structure, all-purpose flour creates the network that holds the crust and filling together and determines texture.
- 1 cup graham cracker crumbs Combined with melted butter or dough ingredients to create the graham crust base, offering sweet, slightly crunchy, crunchy graham flavor and stability.
- 1 teaspoon baking powder Leavening when blended into the crust or batter, introduces gentle lift and lightness to prevent a dense texture and ensure a tender bite.
- 1 cup marshmallow creme Spreadable and gooey, provides marshmallow richness and a smooth, sticky layer that melts into the filling for classic s'mores creaminess.
- 4 whole, 1.55 Oz Bars Hershey's Chocolate Bars, Unwrapped Broken into pieces to add rich milk chocolate flavor; melts into the warm pie for pockets of chocolatey creaminess and nostalgic s'mores taste.
- 1 cup mini marshmallows Sprinkled on top for toasted bite and chew, mini marshmallows create a toasted, pillowy finish that complements the chocolate and creamy layers.
Instructions
- Preheat oven to 350°F and spray a 9" pie pan with baking spray.: You will smell a faint warm, slightly toasty scent as the oven reaches temperature, and the air in the kitchen will feel like it anticipates baking. This step is essential because an oven that is not fully heated can cause uneven browning of the crust and undercooked filling. A light coating of baking spray prevents sticking, which lets the slice release cleanly when served. A common mistake is putting the pie into an oven that is still warming, which can lead to a soggy bottom and uneven texture.
- In a large bowl, beat together the butter and sugar. Add the egg and vanilla and mix to combine. Stir in flour, graham cracker crumbs and baking powder.: At this stage you will notice the butter and sugar becoming creamy, with a faint sweet aroma; the dough then takes on a sandy texture as you fold in the graham cracker crumbs and flour . The goal is a cohesive dough that still feels tender, not sticky. Mixing too vigorously once the flour is added can develop gluten and make the crust tough, so stop as soon as the ingredients are incorporated. If the dough seems dry, a splash of room temperature water can help, but avoid overhydrating.
- Take 2/3 of the dough and press on the bottom and up the sides of the prepared pie pan. Carefully spread the marshmallow creme over the bottom crust. Cover the marshmallow creme with chocolate squares. I used about 3 1/4 of the chocolate bars and saved the rest for topping after baked. Sprinkle 1 cup of marshmallows on top.: When pressing the dough into the pan you'll feel it give under your fingers and hear a faint crumbling sound as it compacts into a smooth surface; aim for even thickness so the crust bakes evenly. Spreading the marshmallow creme will create a glossy, slightly sticky layer that resists sliding, and placing the chocolate squares on top ensures pockets of melting chocolate throughout. The mini marshmallows should be scattered to form a light, even cover that will puff and brown. Avoid pressing the filling too deep into the crust, which can cause the bottom to become soggy.
- Take remaining dough. Flatten dough in hand making disks and cover the top of the marshmallows trying to cover as well as possible. It will not be completely covered and the marshmallows and chocolate will show through a little bit. Sprinkle a few marshmallows on top.: As you shape the dough disks you'll feel a pliable texture that holds together, and the top will look rustic as the filling peeks through. This uneven covering is charming, it allows the marshmallow to caramelize and the chocolate to bubble visibly. A common issue is pressing the dough too thin which can burn quickly, so keep small patches thicker where needed to shield exposed marshmallows during baking.
- Bake for 15-20 minutes or until graham cracker dough and marshmallows are golden brown.: In the oven you will hear a quiet settling, and the kitchen will begin to smell of toasted sugar and warm graham notes as the marshmallows puff and the crust takes on color. Watch for a deep golden brown on the marshmallows and the edges of the crust looking firm to the touch; those are the visual cues that signal doneness. Overbaking will cause the marshmallows to dry out and the crust to become brittle, so remove the pie when you see that perfect caramelized color.
- Remove from oven. Let cool for about 5-10 minutes and then place the remaining chocolate squares on top in a scattered pattern. If you add the chocolate too soon the heat will melt them in a puddle. Let pie cool for an additional 20 minutes before slicing so that it is not as messy. Can be eaten slightly warm or at room temperature.: After baking the aroma will be rich and toasty, and letting the pie rest allows steam to dissipate so the filling firms slightly. When you add reserved chocolate squares, they should soften but not fully melt, providing glossy pockets on the surface; if you wait too long they will not adhere. Slicing too early leads to a runny filling and messy slices, so patience pays off. If the pie feels too soft, chilling briefly will help it slice cleaner without sacrificing that warm, gooey character.
Notes
- Room Temperature Ingredients: Allow the butter and egg to sit at room temperature for about 15 to 20 minutes before starting. This helps them incorporate smoothly, producing a tender dough without overmixing.
- Even Pressing: When pressing the crust, use the bottom of a measuring cup to create consistent thickness. This avoids thin spots that burn while the center is still setting, and gives you an even, golden crust all around.
- Marshmallow Handling: Use a small offset spatula to spread the marshmallow creme. A lightly damp spatula prevents sticking and yields a glossy, even layer that browns predictably in the oven.
- Chocolate Placement: Reserve some chocolate for topping after baking. Adding it too early will make it melt into a puddle, while adding it too late may prevent it from softening slightly, so aim for a 5 to 10 minute resting window.
- Watch the Marshmallows: Marshmallows can go from golden to burnt quickly. Set a 15 minute timer and check at 15 minutes, then every 2 minutes until the desired golden peaks appear.
- Serving Temperature: This pie is lovely slightly warm or at room temperature. If you need cleaner slices, chill it for 15 to 20 minutes after the initial cool down to firm the filling without losing the gooey texture.