Marinated Cauliflower Antipasto Salad
Marinated Cauliflower Antipasto Salad has been a fridge staple in my kitchen ever since I first learned to trust bold, briny flavors paired with crisp, just-tender vegetables.
One sunny afternoon years ago I brought a bowl of this salad to a neighborhood potluck and watched it disappear faster than any dessert on the table. I remember standing by the counter as people came back for seconds, mentioning how the cauliflower kept its bite while soaking up the lively vinaigrette. That moment taught me how a simple technique, like an attentive blanch and a slow marinade, can transform humble cauliflower into something that sings alongside cured meats and cheeses.
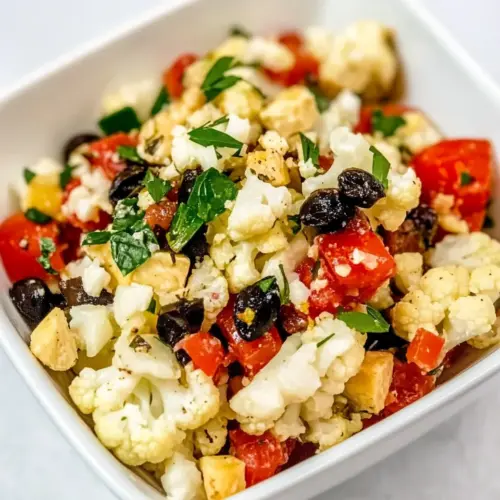
I often make a double batch and keep one in the fridge for easy lunches. When I open the container, the aromas of olive oil, lemon, and capers hit first, then the visual contrast of white cauliflower, red peppers, and dark olives makes the dish irresistible. Friends tell me it tastes like summer in a jar, and I confess I agree, especially when I use jarred roasted red peppers and briny capers to punch up the flavor.
This recipe is forgiving, sociable, and full of texture, which is why it shows up at picnics, casual dinners, and buffet-style gatherings. I love how the marinating step lets the flavors meld, so every forkful is layered rather than one-note. Over time I’ve tuned the technique to make sure the salad never turns watery, because water means bland, and we do not want that here.
Recipe Snapshot
24 mins
20 mins
4 mins
Medium
200 kcal
Italian
Keto, Gluten-Free
Salads
Steamer insert, Large pot, Colander, Mixing bowl, Ziploc bag
Why This Marinated Cauliflower Antipasto Salad Works
Bright, balanced flavor
I adore how Marinated Cauliflower Antipasto Salad balances tangy, salty, and sweet notes. The capers and olives bring that punch of brine, the roasted red peppers add a gentle sweetness, and the vinaigrette ties everything together. Every bite feels intentionally seasoned, not accidental, and that harmony keeps me reaching for more.
Texture driven
What makes me keep coming back is texture. The quick steaming leaves the cauliflower tender yet slightly crisp, while the Provolone cheese and salami strips offer chew and richness. The contrast between the softer marinated pieces and the firm, sliced meats creates a mouthfeel that is endlessly satisfying.
Make-ahead magic
I often prepare this salad hours ahead because the flavors deepen in the fridge. Marinating is more than convenience, it is flavor maturation. I appreciate recipes that improve with time, and this one rewards patience with a lively, cohesive bowl that tastes like it had a whole day to get to know itself.
Versatile serving options
I’ve served this as a centerpiece salad, a side at weeknight dinners, and a contribution to holiday spreads. It pairs with grilled proteins or stands proud on its own. That versatility means I usually have the ingredients on hand, and it adapts easily to different occasions without losing its identity.
Simple technique, big payoff
The methods here are straightforward: a quick steam, a careful drying, and a patient marinade. You do not need complicated equipment or a long ingredient list to get a result that looks and tastes impressive. I love recipes that elevate pantry and produce with just a few smart moves, and this salad is a prime example.
What to Buy for Marinated Cauliflower Antipasto Salad
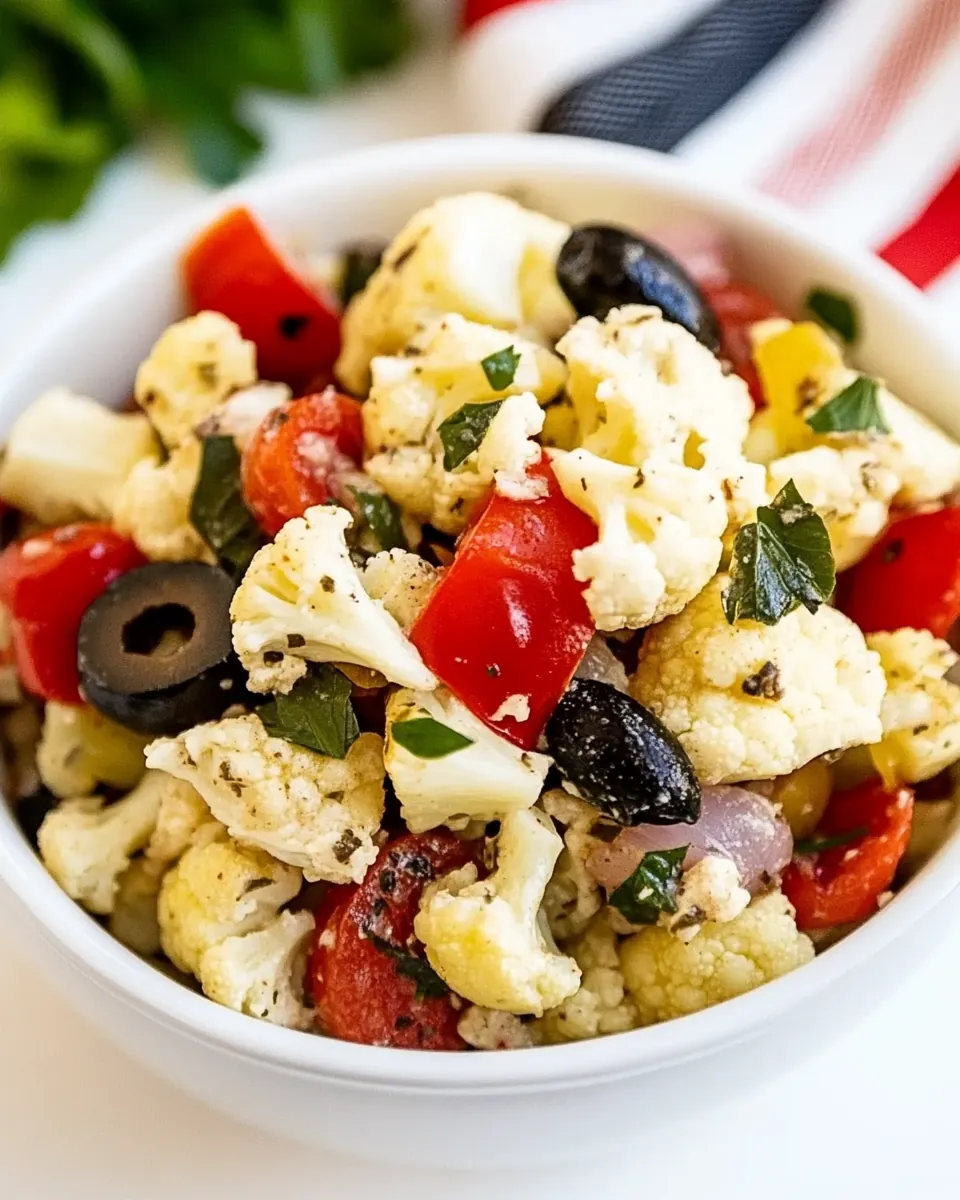
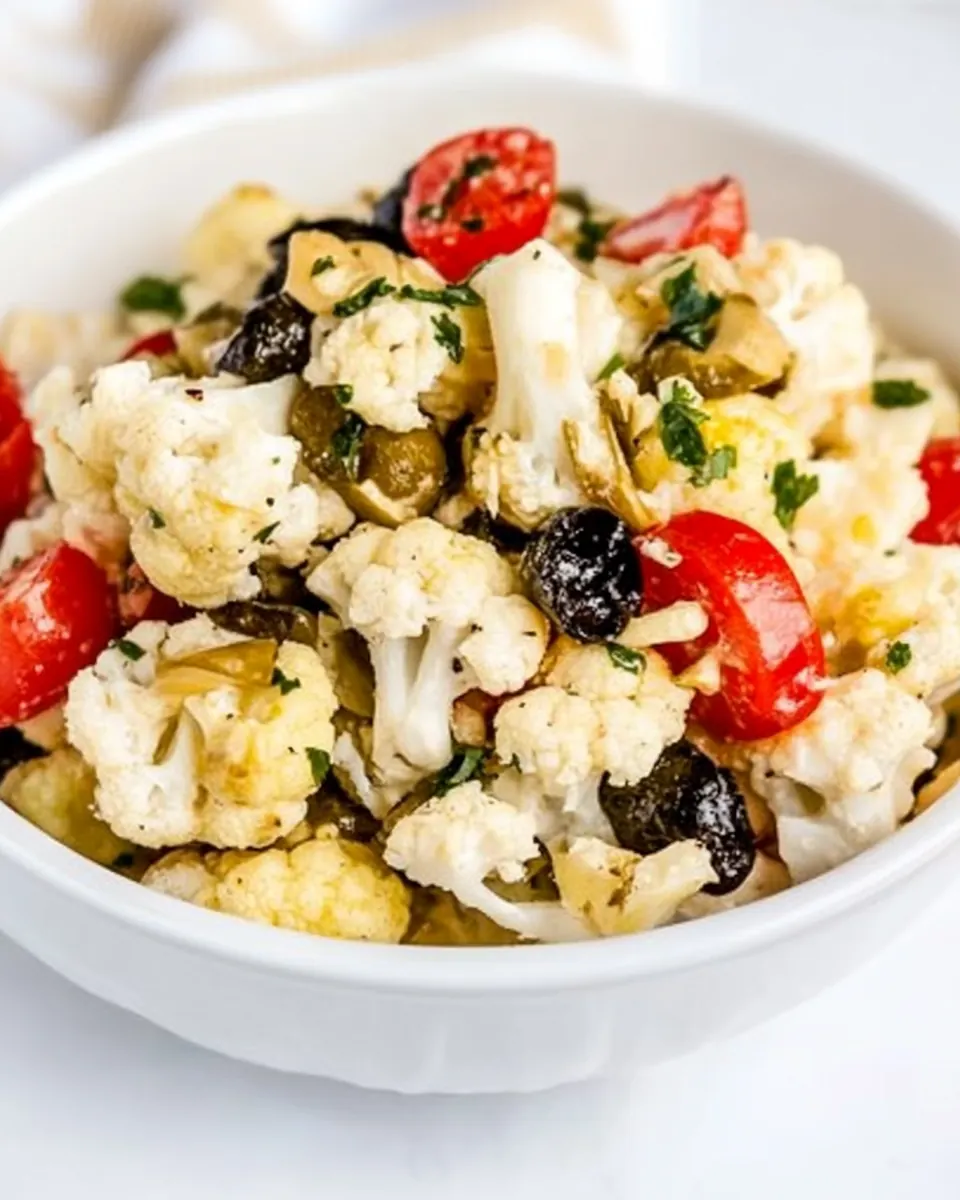
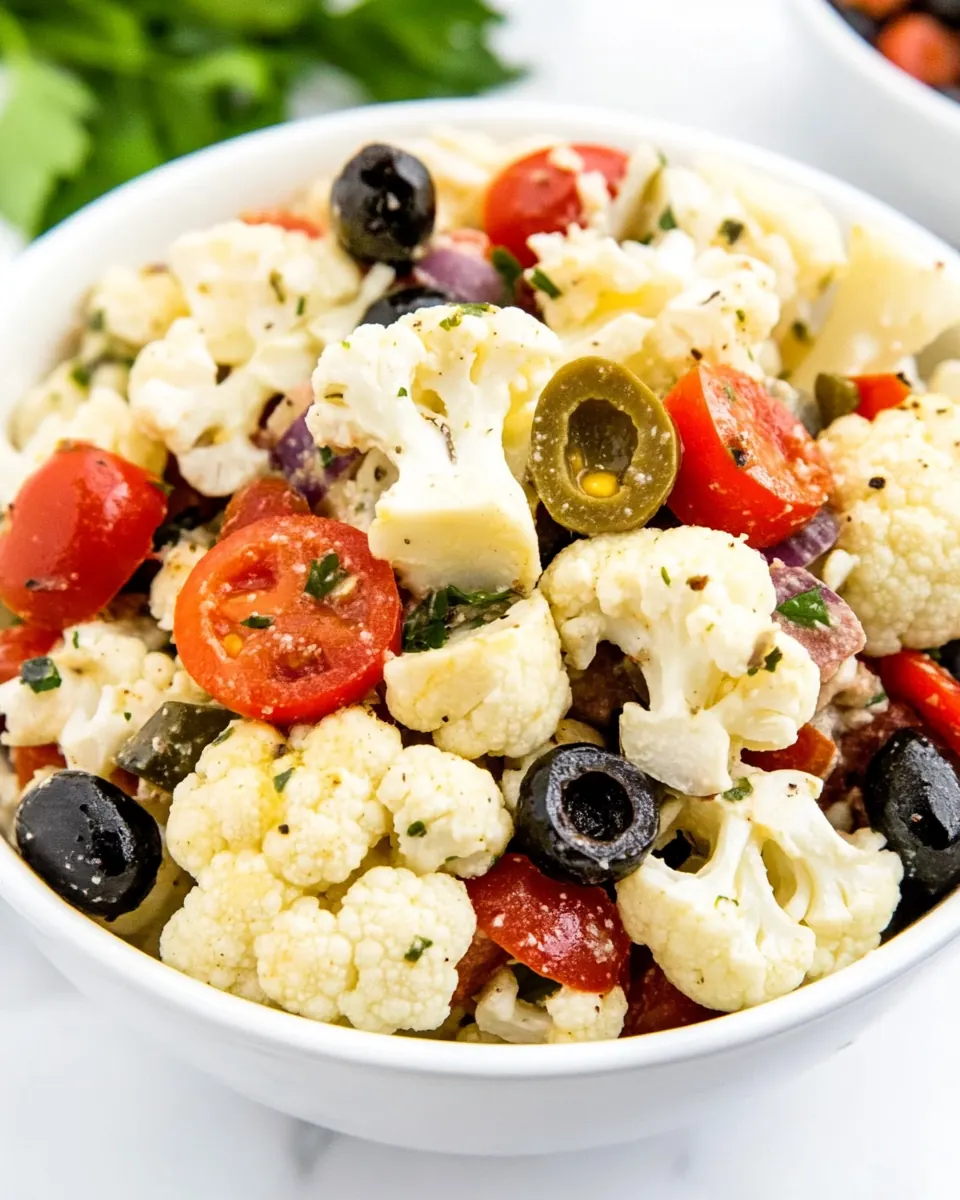
These ingredients work together by layering brine, fat, acidity, and texture. The star is cauliflower, which soaks up the vinaigrette while retaining a pleasant bite. The cured and preserved items add savory depth, while the cheese contributes creaminess. Think of each component as a teammate: the vegetables provide structure, the marinated items supply umami, and the dressing ties everything together.
- 4 cups chopped raw cauliflower: Chopped to bite-sized pieces and providing a crisp, mildly sweet base that soaks up marinade flavors; adds bulk, texture, and a neutral canvas to balance stronger antipasto elements.
- 1 cup marinated mushrooms, sliced: Sliced and marinated to deliver tender, savory umami with a slightly tangy finish; contributes moisture and depth while complementing the cauliflower’s crunch.
- 2 oz . salami, cut into short strips: Cut into short strips to offer savory, cured richness and a salty, spiced punch; supplies protein and a chewy contrast that enhances the antipasto character.
- 2 oz . Provolone cheese, cut into short strips: Cut into short strips to introduce creamy, mild, and slightly tangy dairy notes; brings richness and helps mellow the saltiness of cured meats and olives.
- 6 oz . can black olives, drained and cut in half: Drained and halved to provide briny, slightly bitter pockets of flavor and a soft, tender texture; adds concentrated olive taste that ties together Mediterranean elements.
- 12 oz . jar roasted red peppers, drained and cut into strips: Drained and cut into strips to contribute sweet, smoky, roasted pepper flavor and vibrant color; imparts acidity and soft texture that brightens the overall salad.
- 3 T capers, drained (more or less to taste): Drained and used sparingly to add concentrated briny, lemony, and floral bursts; offers a piquant hit that lifts flavors and balances richer components when adjusted to taste.
Preparation Steps for Marinated Cauliflower Antipasto Salad
I like to walk through these steps like a small ritual, so each action leads to better flavor. The directions below take you from steaming to marinating to tossing, and I explain the sensory cues and common pitfalls so your salad turns out crisp, bright, and well balanced.
- Prepare a pan with a few inches of water, with a steamer insert in the pan. (You can also use an electric vegetable steamer if you’re lucky enough to have one!): Steam begins with the quiet hiss of boiling water and the gentle heat that softens cauliflower without turning it limp. You want the water level low enough that it will not touch the steamer basket, so the vegetables cook by steam not by simmering. This preserves the cauliflower's structure and fresh vegetal aroma. A common mistake is using too much water, which leads to soggy florets, so check the depth before heating. If you hear a rolling boil before adding the cauliflower , turn the heat down slightly to maintain a steady steam instead of violent bubbling.
- Bring water to boil while you cut up the cauliflower.: The kettle's rising steam signals readiness, and chopping the cauliflower into bite sized florets should be done quickly to keep the work efficient. Freshly cut edges can oxidize slightly but that will not affect flavor, just appearance. Keep a steady rhythm with a sharp knife to make uniform pieces so they cook evenly. Avoid taking too long at this step, because uneven pieces will lead to overcooked bits alongside undercooked ones.
- Cut out the core of the cauliflower and discard and cut cauliflower into bite sized pieces.: The core is dense and cooks slower than the florets, so removing it ensures even tenderness. When you slice into uniform florets, they will steam at a consistent rate and produce a satisfying, slightly crisp texture. Look for a pale, clean cut surface and firm stems; a floppy or watery stem can signal older produce. A common error is leaving large chunks that stay underdone, so aim for similar sized pieces for the best outcome.
- When the water is boiling, add the cauliflower to the steamer or steamer basket and cook just 4 minutes. (Test a piece of cauliflower to be sure it’s tender but still slightly crisp.): At four minutes you should smell a faint vegetal sweetness and see the florets lighten slightly, showing they are tender yet still resilient to the bite. This short steaming time preserves the cauliflower's integrity so it can hold up during marination. Overcooking will yield mushy pieces that soak up too much dressing and become limp, so test a piece after four minutes and stop when it yields to the fork with a slight resistance.
- Dump cauliflower into a colander placed in the sink and let it drain well.: The sound of water draining and the sight of trimmed florets in a colander are cues the steaming step is complete. Gravity helps remove excess moisture, but simply dumping is not enough; letting it sit is important. The main mistake here is rushing the draining, which leads to watery salad later. Allow at least a minute or two so surface water runs off before towel drying.
- While the cauliflower drains, whisk together vinaigrette dressing, olive oil, lemon juice (I used my fresh-frozen lemon juice), caper juice, and dried oregano to make the dressing.: You will notice the dressing develop a glossy sheen as oil emulsifies with the acid, and the aroma of lemon and oregano should pop right away. The citrus brightens the oil, while the caper juice adds a savory lift. Whisk until the vinaigrette looks homogeneous and slightly thickened, which helps it cling to the cauliflower . A common slip is under-seasoning at this stage, so taste and adjust saltiness because the marinated components will pull flavors together.
- When cauliflower has drained well, put a double layer of paper towels on the counter, spread cauliflower out on the towels and pat dry with more towels. Be sure to get the cauliflower as dry as you can get it, or the salad will be watery.: The tactile step of patting the florets removes lingering water, and you should feel the pieces dry to the touch. This is crucial because excess moisture dilutes the dressing and makes the salad watery. If the pieces still feel damp, press gently with another towel until dry. A frequent mistake is skipping this and wondering why the salad becomes diluted, so be thorough here for peak flavor concentration.
- Put the dried cauliflower into a large Ziploc bag with about half the dressing and let cauliflower marinate in the fridge, preferably for 4-6 hours or as long as all day. (Minimum marinating time is 2-3 hours if you don’t plan far enough ahead.): As the bag chills, the cauliflower will soak up the vinaigrette and change color slightly, indicating infusion. The refrigerator cools and slows enzymatic processes while allowing flavors to meld, creating a more integrated bite. Marinating too briefly leaves flavors undeveloped, while marinating too long may soften texture excessively, so aim for that 4 to 6 hour sweet spot when possible. Turn the bag occasionally to ensure even coating.
- When you’re ready to assemble the salad, slice the salami, Provolone, and drained red peppers into strips, slice mushrooms, and drain olives and cut in half. Measure out the capers.: The slicing rhythm is important here, producing uniform strips that mix well with the marinated florets. You want the salami and Provolone cheese to be bite sized so every forkful combines protein, fat, and vegetable. Watch for excess liquid from the peppers or mushrooms, and drain thoroughly to avoid soggy bites. A common oversight is uneven slicing, which leads to inconsistent mouthfeel across servings.
- Put the marinated cauliflower in a large bowl and toss with the salami strips, Provolone strips, red pepper strips, sliced mushrooms, olives, and capers.: Tossing releases the dressing's aroma and distributes flavors visually and texturally. You should hear a soft rustle as ingredients mingle, and see a glossy coating over pieces. Toss gently to avoid breaking soft florets, ensuring each component remains distinct. Overmixing can bruise the vegetables and flatten the presentation, so stop when components are evenly combined.
- Add more dressing until the salad is as moist as you prefer. (You may not want all the dressing.): The dressing should glisten on the surface, making each piece shine without puddles at the bottom of the bowl. Taste as you go, because the marinated items and capers will influence how much additional dressing you need. A typical error is adding too much at once; instead, drizzle and toss incrementally until the balance feels right for your palate.
- Season to taste with salt and fresh-ground black pepper and serve.: The finishing seasoning sharpens the salad, and freshly ground black pepper adds aromatic heat that complements the briny notes. Taste before adding salt because the salami , olives , and capers already contribute sodium. Over-salting is easy here, so season lightly and adjust after a final taste. Serve chilled or at cool room temperature for best flavor clarity.
- This salad can be made several hours ahead and will also keep in the fridge for a few days.: The storage life is one of its charms, as flavors continue to develop in the cold. When refrigerated, the salad becomes tighter in flavor and slices of Provolone cheese soften and mingle with the dressing. Store in an airtight container and stir before serving to redistribute dressing, and avoid keeping it beyond a few days to preserve texture and brightness. A typical mistake is leaving it out too long, which can reduce freshness, so refrigerate promptly between uses.
Ways to Adapt This Recipe
This salad is flexible and forgiving, so small swaps or adjustments can tailor it to different occasions. Below are thoughtful tips that preserve the identity of Marinated Cauliflower Antipasto Salad while giving you options for texture, intensity, and timing.
- Boost the brine: If you want a punchier profile, increase the capers slightly, but add them gradually and taste as you go to avoid over brining the whole salad.
- Shorten marinating: When you are pressed for time, marinate for a minimum of two hours to still get noticeable flavor improvement compared to no marination at all.
- Make it ahead: Prepare the cauliflower and dressing a day ahead, keep them separate, then combine ingredients a few hours before serving to maintain texture.
- Control moisture: After steaming, spread the florets on towels and press lightly until they feel dry to the touch; this keeps the vinaigrette concentrated on the surface rather than diluted.
- Adjust salt wisely: Because the salad contains salty components like salami and olives, add finishing salt sparingly and rely on a final tasting to guide adjustments.
- Even slices: Cut salami, Provolone cheese, and red peppers into consistent strips so every forkful includes multiple elements for balance.
- Refresh before serving: If refrigerated overnight, toss the salad once more and add a small extra drizzle of dressing to revive the glossy finish and aroma before presenting.
Best Served With
This salad works brilliantly across a range of meals and gatherings, and thinking about accompaniments helps you present it in context. Below are practical serving ideas, seasonal notes, and storage guidance, each designed to make the most of Marinated Cauliflower Antipasto Salad.
- As a party platter centerpiece: Arrange the salad on a large platter surrounded by crusty bread or crackers for guests to help themselves, making it ideal for casual buffets or potlucks.
- At lunch: Serve a generous portion with a simple green salad on the side for a light midday meal that still feels substantial and satisfying.
- For dinner sides: Pair with grilled vegetables or a roasted protein to add variety to an evening plate, especially when you want a cold, vinegary contrast to warm mains.
- During Ramadan or guests gatherings: Offer this as part of an iftar spread where its bold flavors complement other savory dishes and offer an easy, make ahead option.
- Storage tips: Keep the salad in an airtight container in the fridge for up to three days, and stir before serving to redistribute any settled dressing.
- Seasonal pairings: In summer, highlight the roasted red peppers and serve with fresh tomatoes; in cooler months, lean on marinated items to lend depth and body to the bowl.
- Presentation note: Garnish with a few extra capers or a light drizzle of dressing before serving to give the salad a fresh, finished look.
FAQ
Conclusion
This recipe stands out because it turns simple steamed cauliflower into a savory, textured antipasto that improves with time. Its balance of brine, acid, and tender crunch makes it flexible enough for casual meals or party spreads. Give it a try and allow a few hours of marinating to let the flavors harmonize; you will likely find it becomes one of your go to make ahead dishes. I hope you enjoy the bright, savory contrast and the effortless way it elevates weeknight dinners or potluck contributions.
Marinated Cauliflower Antipasto Salad
Equipment
- Steamer insert
- Large Pot
- Colander
- Mixing Bowl
- Ziploc bag
Ingredients
- 4 cups chopped raw cauliflower Chopped to bite-sized pieces and providing a crisp, mildly sweet base that soaks up marinade flavors; adds bulk, texture, and a neutral canvas to balance stronger antipasto elements.
- 1 cup marinated mushrooms, sliced Sliced and marinated to deliver tender, savory umami with a slightly tangy finish; contributes moisture and depth while complementing the cauliflower’s crunch.
- 2 oz . salami, cut into short strips Cut into short strips to offer savory, cured richness and a salty, spiced punch; supplies protein and a chewy contrast that enhances the antipasto character.
- 2 oz . Provolone cheese, cut into short strips Cut into short strips to introduce creamy, mild, and slightly tangy dairy notes; brings richness and helps mellow the saltiness of cured meats and olives.
- 6 oz . can black olives, drained and cut in half Drained and halved to provide briny, slightly bitter pockets of flavor and a soft, tender texture; adds concentrated olive taste that ties together Mediterranean elements.
- 12 oz . jar roasted red peppers, drained and cut into strips Drained and cut into strips to contribute sweet, smoky, roasted pepper flavor and vibrant color; imparts acidity and soft texture that brightens the overall salad.
- 3 T capers, drained (more or less to taste) Drained and used sparingly to add concentrated briny, lemony, and floral bursts; offers a piquant hit that lifts flavors and balances richer components when adjusted to taste.
Instructions
- Prepare a pan with a few inches of water, with a steamer insert in the pan. (You can also use an electric vegetable steamer if you’re lucky enough to have one!): Steam begins with the quiet hiss of boiling water and the gentle heat that softens cauliflower without turning it limp. You want the water level low enough that it will not touch the steamer basket, so the vegetables cook by steam not by simmering. This preserves the cauliflower's structure and fresh vegetal aroma. A common mistake is using too much water, which leads to soggy florets, so check the depth before heating. If you hear a rolling boil before adding the cauliflower , turn the heat down slightly to maintain a steady steam instead of violent bubbling.
- Bring water to boil while you cut up the cauliflower.: The kettle's rising steam signals readiness, and chopping the cauliflower into bite sized florets should be done quickly to keep the work efficient. Freshly cut edges can oxidize slightly but that will not affect flavor, just appearance. Keep a steady rhythm with a sharp knife to make uniform pieces so they cook evenly. Avoid taking too long at this step, because uneven pieces will lead to overcooked bits alongside undercooked ones.
- Cut out the core of the cauliflower and discard and cut cauliflower into bite sized pieces.: The core is dense and cooks slower than the florets, so removing it ensures even tenderness. When you slice into uniform florets, they will steam at a consistent rate and produce a satisfying, slightly crisp texture. Look for a pale, clean cut surface and firm stems; a floppy or watery stem can signal older produce. A common error is leaving large chunks that stay underdone, so aim for similar sized pieces for the best outcome.
- When the water is boiling, add the cauliflower to the steamer or steamer basket and cook just 4 minutes. (Test a piece of cauliflower to be sure it’s tender but still slightly crisp.): At four minutes you should smell a faint vegetal sweetness and see the florets lighten slightly, showing they are tender yet still resilient to the bite. This short steaming time preserves the cauliflower's integrity so it can hold up during marination. Overcooking will yield mushy pieces that soak up too much dressing and become limp, so test a piece after four minutes and stop when it yields to the fork with a slight resistance.
- Dump cauliflower into a colander placed in the sink and let it drain well.: The sound of water draining and the sight of trimmed florets in a colander are cues the steaming step is complete. Gravity helps remove excess moisture, but simply dumping is not enough; letting it sit is important. The main mistake here is rushing the draining, which leads to watery salad later. Allow at least a minute or two so surface water runs off before towel drying.
- While the cauliflower drains, whisk together vinaigrette dressing, olive oil, lemon juice (I used my fresh-frozen lemon juice), caper juice, and dried oregano to make the dressing.: You will notice the dressing develop a glossy sheen as oil emulsifies with the acid, and the aroma of lemon and oregano should pop right away. The citrus brightens the oil, while the caper juice adds a savory lift. Whisk until the vinaigrette looks homogeneous and slightly thickened, which helps it cling to the cauliflower . A common slip is under-seasoning at this stage, so taste and adjust saltiness because the marinated components will pull flavors together.
- When cauliflower has drained well, put a double layer of paper towels on the counter, spread cauliflower out on the towels and pat dry with more towels. Be sure to get the cauliflower as dry as you can get it, or the salad will be watery.: The tactile step of patting the florets removes lingering water, and you should feel the pieces dry to the touch. This is crucial because excess moisture dilutes the dressing and makes the salad watery. If the pieces still feel damp, press gently with another towel until dry. A frequent mistake is skipping this and wondering why the salad becomes diluted, so be thorough here for peak flavor concentration.
- Put the dried cauliflower into a large Ziploc bag with about half the dressing and let cauliflower marinate in the fridge, preferably for 4-6 hours or as long as all day. (Minimum marinating time is 2-3 hours if you don’t plan far enough ahead.): As the bag chills, the cauliflower will soak up the vinaigrette and change color slightly, indicating infusion. The refrigerator cools and slows enzymatic processes while allowing flavors to meld, creating a more integrated bite. Marinating too briefly leaves flavors undeveloped, while marinating too long may soften texture excessively, so aim for that 4 to 6 hour sweet spot when possible. Turn the bag occasionally to ensure even coating.
- When you’re ready to assemble the salad, slice the salami, Provolone, and drained red peppers into strips, slice mushrooms, and drain olives and cut in half. Measure out the capers.: The slicing rhythm is important here, producing uniform strips that mix well with the marinated florets. You want the salami and Provolone cheese to be bite sized so every forkful combines protein, fat, and vegetable. Watch for excess liquid from the peppers or mushrooms, and drain thoroughly to avoid soggy bites. A common oversight is uneven slicing, which leads to inconsistent mouthfeel across servings.
- Put the marinated cauliflower in a large bowl and toss with the salami strips, Provolone strips, red pepper strips, sliced mushrooms, olives, and capers.: Tossing releases the dressing's aroma and distributes flavors visually and texturally. You should hear a soft rustle as ingredients mingle, and see a glossy coating over pieces. Toss gently to avoid breaking soft florets, ensuring each component remains distinct. Overmixing can bruise the vegetables and flatten the presentation, so stop when components are evenly combined.
- Add more dressing until the salad is as moist as you prefer. (You may not want all the dressing.): The dressing should glisten on the surface, making each piece shine without puddles at the bottom of the bowl. Taste as you go, because the marinated items and capers will influence how much additional dressing you need. A typical error is adding too much at once; instead, drizzle and toss incrementally until the balance feels right for your palate.
- Season to taste with salt and fresh-ground black pepper and serve.: The finishing seasoning sharpens the salad, and freshly ground black pepper adds aromatic heat that complements the briny notes. Taste before adding salt because the salami , olives , and capers already contribute sodium. Over-salting is easy here, so season lightly and adjust after a final taste. Serve chilled or at cool room temperature for best flavor clarity.
- This salad can be made several hours ahead and will also keep in the fridge for a few days.: The storage life is one of its charms, as flavors continue to develop in the cold. When refrigerated, the salad becomes tighter in flavor and slices of Provolone cheese soften and mingle with the dressing. Store in an airtight container and stir before serving to redistribute dressing, and avoid keeping it beyond a few days to preserve texture and brightness. A typical mistake is leaving it out too long, which can reduce freshness, so refrigerate promptly between uses.
Notes
- Boost the brine: If you want a punchier profile, increase the capers slightly, but add them gradually and taste as you go to avoid over brining the whole salad.
- Shorten marinating: When you are pressed for time, marinate for a minimum of two hours to still get noticeable flavor improvement compared to no marination at all.
- Make it ahead: Prepare the cauliflower and dressing a day ahead, keep them separate, then combine ingredients a few hours before serving to maintain texture.
- Control moisture: After steaming, spread the florets on towels and press lightly until they feel dry to the touch; this keeps the vinaigrette concentrated on the surface rather than diluted.
- Adjust salt wisely: Because the salad contains salty components like salami and olives, add finishing salt sparingly and rely on a final tasting to guide adjustments.
- Even slices: Cut salami, Provolone cheese, and red peppers into consistent strips so every forkful includes multiple elements for balance.
- Refresh before serving: If refrigerated overnight, toss the salad once more and add a small extra drizzle of dressing to revive the glossy finish and aroma before presenting.