
Steamed Hard Boiled Eggs
Steamed Hard Boiled Eggs have a way of sneaking into my busiest mornings and calmest brunches alike, turning a simple ritual into something quietly satisfying. I still remember the first time I tried steaming eggs instead of boiling them, and how the shells came off with hardly any fuss, the whites tender and the yolks perfectly set. That small kitchen victory stuck with me, and now I reach for steaming when I want reliable eggs without the drama of cracked shells.
Some mornings I am rushing out the door and need quick protein, other days I slow down and make a little plate of halved eggs, sprinkle on herbs, and sip tea while I read. Steaming fits both moods. It’s efficient, and somehow the eggs taste cleaner, more focused on the egg itself. Over time I’ve learned a few little moves that keep the peel from clinging and the centers from going chalky, and I enjoy sharing those discoveries with friends who swear they’ll never boil the old way again.
Recipe Snapshot
20 mins
5 mins
15 mins
Easy
210 kcal
American
Keto, Paleo
Breakfast
Large pot, Steamer insert or basket, Large bowl for ice bath
The Magic of This Steamed Hard Boiled Eggs
Consistently Easy Results
I love that Steamed Hard Boiled Eggs almost never betray you. When I need perfectly cooked yolks for a salad or sandwich, steaming gives consistent heat around every egg, so you get uniform texture without babysitting a bubbling pot.
Effort Saving Technique
Using a steamer just feels clever, because you use less water and waste less heat. I appreciate how hands off it is, you can set a timer and prepare other parts of the meal, which makes this method great for busy mornings.
Cleaner Peeling
One of the best reasons I keep coming back to this approach is how rarely the shell sticks. The steam seems to separate the membrane from the white more gently, which means fewer nicks and prettier halves when I plate them.
Textural Advantage
The texture of a steamed egg white is slightly silkier to me, and the yolk sets in a way that is firm yet not dry. That balance matters when I serve them with a sprinkle of salt, pepper, or herbs like the Chives called for in the recipe.
Versatility at the Table
These eggs slide into many meals. I use them for quick breakfasts, picnic salads, or as a simple appetizer. They are forgiving, travel well, and pair beautifully with bright garnishes, which makes them a practical staple in my kitchen.
Ingredient List for Steamed Hard Boiled Eggs
For me, the philosophy behind this ingredient list is simplicity. A few focused items highlight the egg itself, while a light finishing touch brings brightness and a hint of color. The key players are the eggs for texture and substance, the salt and pepper to lift flavors, and the Chives to add a fresh, onion like snap that complements the creamy yolk.
- 3 large eggs: Provide structure and protein while creating firm, fully set yolks and whites when steamed; careful timing yields creamy yolks and prevents overcooking. Add natural richness and mouthfeel to salads, breakfast plates, or snacks after steaming. Offer portable, nutrient-dense bites that store well in the refrigerator for several days.
- pinch of salt and pepper: Season lightly to enhance natural egg flavor and balance richness without overpowering delicate nuances; apply sparingly to avoid masking other components. Contribute basic seasoning that sharpens taste perception and brings out subtle savory notes in each bite.
- Chives chopped (for garnish): Add bright, mild onion-like freshness as a finishing touch to contrast the richness of the eggs; sprinkle just before serving to preserve color and delicate texture. Provide visual appeal and a hint of herbaceous aroma that elevates simple preparations.
The Process for Making Steamed Hard Boiled Eggs
These directions walk you through every small detail I use to guarantee success. I like to narrate what you should see, hear, and smell so you can tell when things are right. Keep a bowl of ice water nearby, it is essential for stopping the cooking instantly and helping the eggs peel cleanly.
- Place a steamer insert inside a large pot with water and bring to a boil over high heat. Add the eggs to the steamer basket, cover, and cook for about 15 minutes for hard-boiled eggs.: Listen for the steady, rolling boil and watch for large bubbles breaking the surface, that indicates the water is energetic enough to produce consistent steam. The smell is neutral, a faint metallic note from the pot, while the rising steam should be visible when you lift the lid. This step matters because vigorous steam provides even heat around each egg, preventing overcooking on one side. A common mistake is to fill the pot with too much water, which reduces steam and can cause the eggs to sit in water instead of being steamed. To troubleshoot, ensure the water level sits below the steamer insert and allow a minute for the steam to build before adding eggs.
- While the eggs are being steamed, prepare a large bowl filled with ice cubes and water. Once the eggs are done, transfer them to the ice-water bath. Allow to cool for at least 10 minutes before peeling.: As the eggs heat, you may hear a soft tapping sound as small temperature differences cause the shell and membrane to settle. Visually the eggs will not change dramatically, but you may notice the pot lid fogging up from the intense steam. The reason timing is important is that precise cook time yields yolks that are set through without turning dry and chalky. Avoid guessing times, many folks undercook by a few minutes and end up with jammy centers instead of firm yolks. If you suspect your stove runs hot or cool, test with one egg first to calibrate timing.
- Gently tap the eggs all over to crack the shell. Remove the shell with your fingers.: The ice bath should be cold enough to stop all residual cooking instantly, bringing the internal temperature down quickly. You will notice the steam dissipate when you move the eggs to the ice bath, and the eggs will feel noticeably firmer to the touch after a couple of minutes. This thermal shock helps the membrane separate from the shell for easier peeling. A common error is using only cold tap water without ice, which cools too slowly and allows carryover cooking, potentially leading to overdone yolks. Keep plenty of ice on hand so the bath stays cold for the full ten minutes.
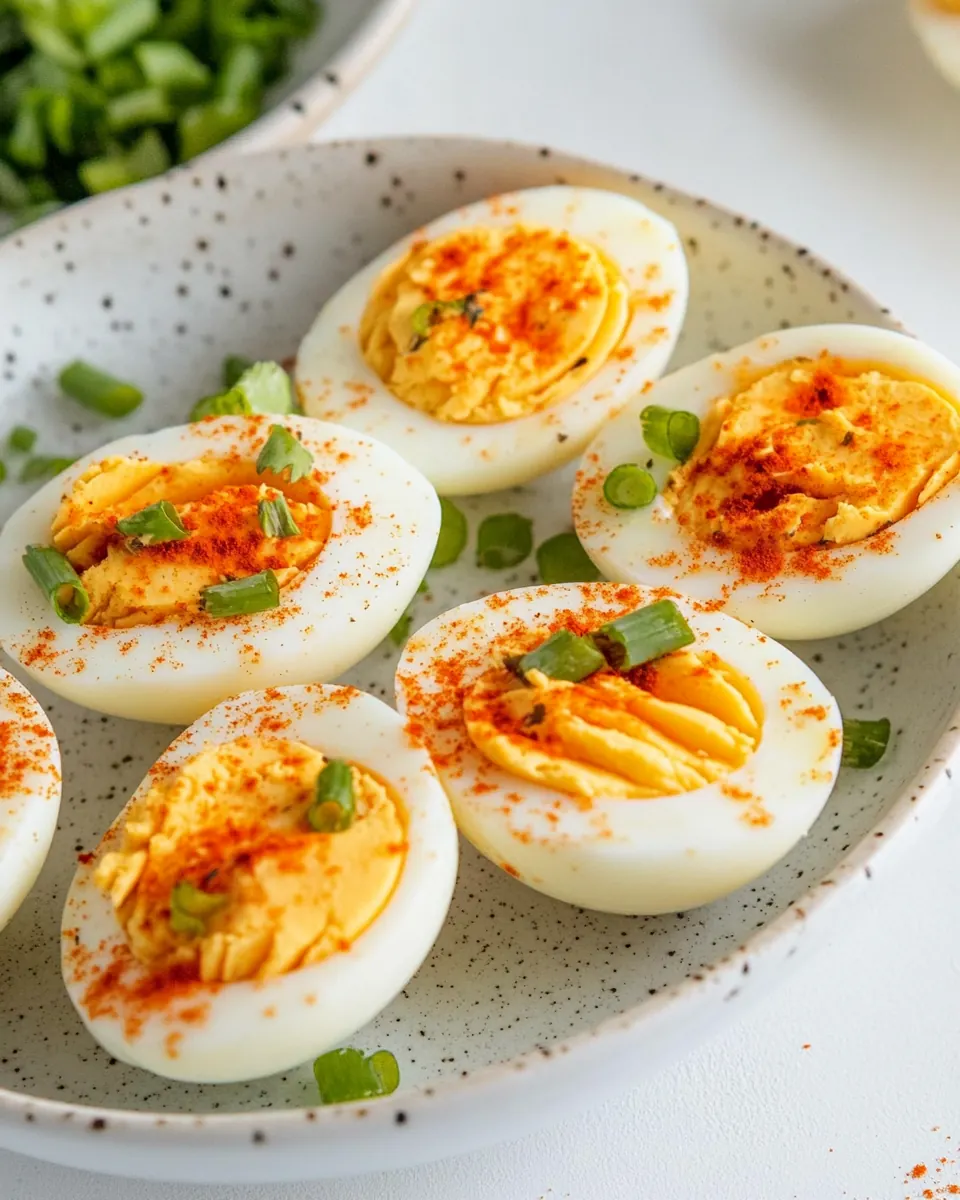
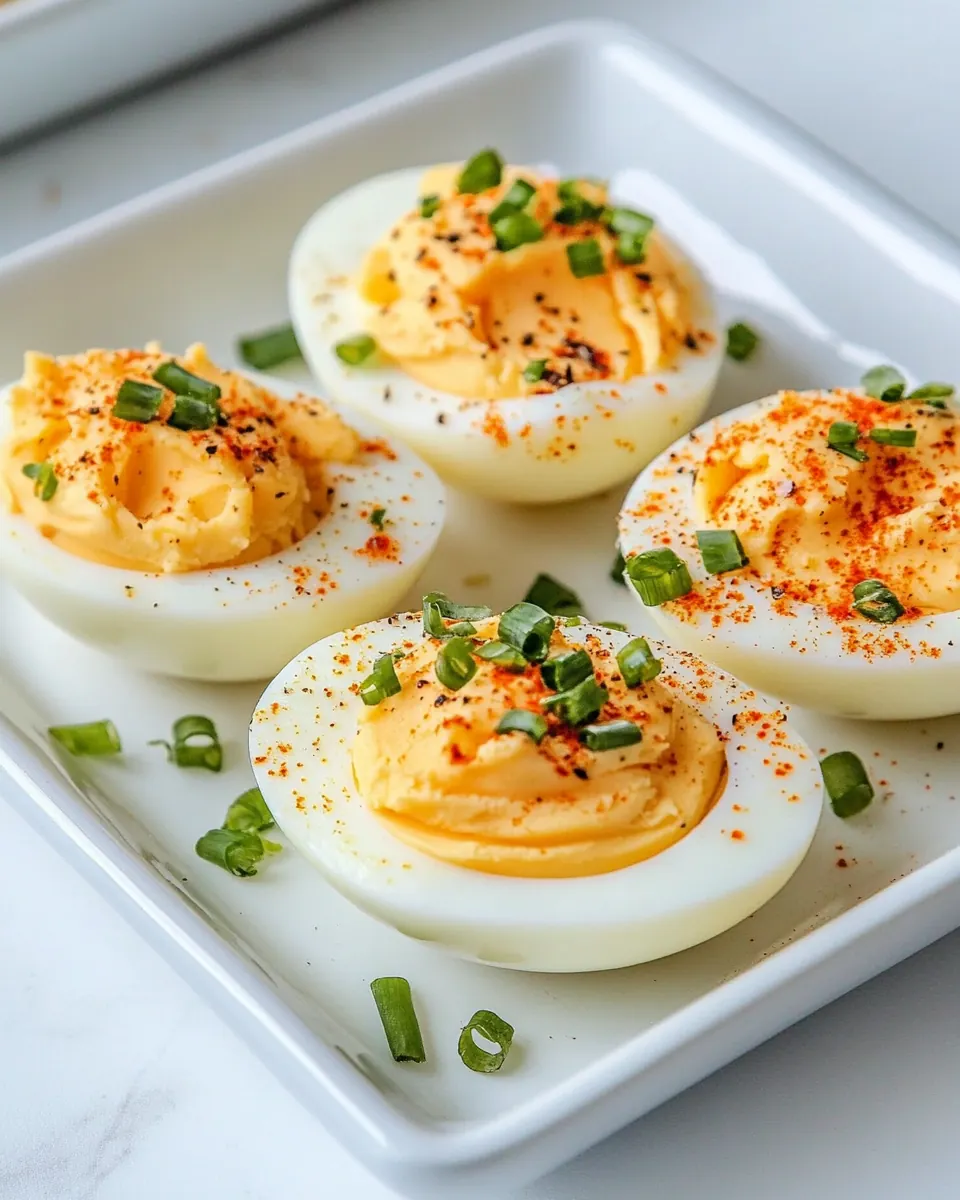
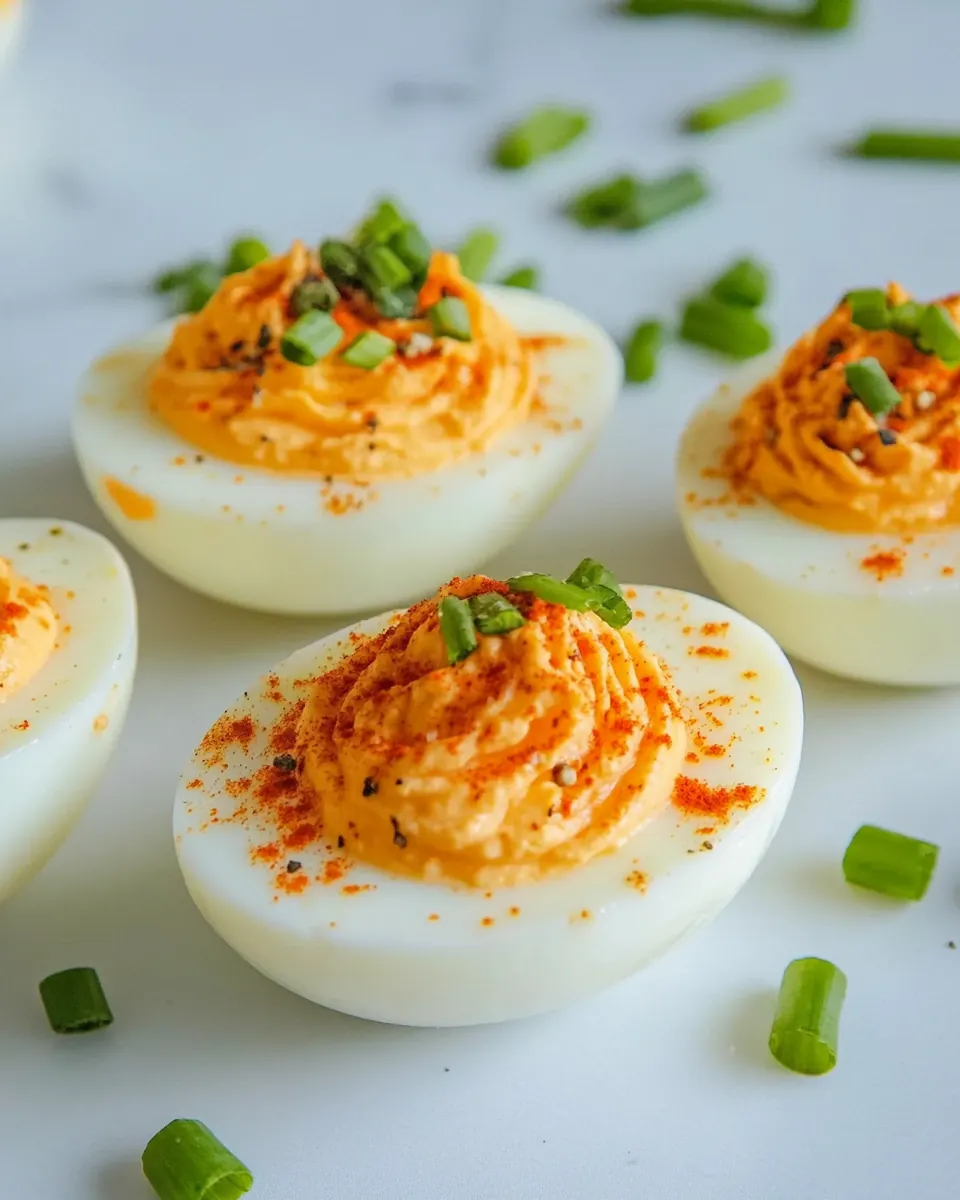
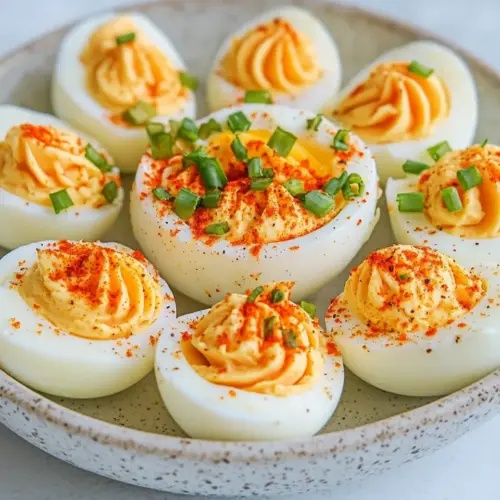
- Cut the steamed eggs in half and sprinkle with a pinch of salt and pepper. Garnish with chopped chives.: When you lower the eggs into the ice water, you might hear a soft plop and see the surface slightly ripple. The rapid cooling firms the white and sets the yolk texture exactly where you want it. After a few minutes the egg surface becomes easier to handle, and you will notice little condensation beads on the shell that make gripping easier for cracking. If you skip this stage, the eggs will continue to cook and the yolk texture will shift toward dry. Avoid overcrowding the ice bath, use a bowl large enough so eggs chill evenly.
- Allow to cool for at least 10 minutes before peeling: Give the eggs time to settle and fully cool, the membrane relaxes as it chills making peeling cleaner. During this wait you might find the kitchen smells faintly of warm egg fat, which dissipates quickly. Rushing the peel right away often leads to ragged whites; patience pays off here. If you try to peel too soon, the shell may cling stubbornly, so set a timer and use the full rest period for best results.
- Gently tap the eggs all over to crack the shell: When you tap, you'll hear a crisp crack, and fine fissures will spider across the shell, which is the cue to start peeling. The tactile feedback tells you how evenly the shell fractured, and a gentle roll of the egg on the counter can widen the cracks for easier removal. This technique works because it creates many small entry points for your fingers to get beneath the membrane. A frequent misstep is tapping too hard, which can indent the white and make peeling messier. Tap with controlled force, just enough to break the shell.
- Remove the shell with your fingers: As you peel, you may notice a thin translucent membrane separating from the white, that is what you want to lift away cleanly. Work under lukewarm running water if needed, it helps flush away tiny shell fragments and eases removal. The goal is smooth, intact halves with minimal pitting of the white, which looks more appetizing. Peeled eggs that have lots of nicks usually mean the shell was too fresh or the bath was too warm; adjust for next time by chilling longer or using slightly older eggs.
- Cut the steamed eggs in half and sprinkle with a pinch of salt and pepper: When you slice an egg, listen for a quiet, satisfying give as the knife passes through the set white and yields the yolk. The yolk should be evenly colored and free of a green ring, which indicates overcooking. The tiny crystals of salt and the bite of pepper enhance the egg's natural richness, and visually they make the halves pop. Avoid using heavy seasonings that overpower the delicate egg flavor. If the yolk seems crumbly, you may have cooked slightly too long, so shave a minute off next time.
- Garnish with chopped chives: Sprinkling fresh Chives adds a delicate onion note and a bright color contrast that invites the first bite. The aroma of fresh herbs right before serving is a small finish that elevates simple dishes into something special. Apply them last so they retain their texture and visual appeal. If chopped too early, they can wilt and become limp, losing their charm and bite.
Customization Ideas
I like to think of these small riffs as ways to personalize the simple pleasure of Steamed Hard Boiled Eggs. Below are practical variations and finishing touches you can try, each designed to keep the technique intact while changing the final mood of the dish.
- Herbed finishing Add other mild fresh herbs like parsley or dill in place of Chives for a different aromatic profile, chopping them finely and scattering them just before serving to preserve their bright flavor.
- Spiced sprinkle Try a tiny pinch of smoked paprika or a citrus zest on top if you want a hint of warmth or brightness, applying sparingly to avoid overpowering the egg’s delicate taste.
- Layered serving Serve the halved eggs on a bed of crisp greens or with thinly sliced cucumber for a refreshing contrast in texture and temperature, keeping the egg as the centerpiece.
- Meal prep Store peeled, cooled eggs in a sealed container with cold water in the fridge for up to four days, refreshing the water daily to maintain freshness and ease of use for quick snacks or salads.
- Textural tweak For creamier yolks, reduce steaming time slightly and test with one egg first to find your preferred level of creaminess, noting that carryover cooking will continue until they hit the ice bath.
Serving Options for Steamed Hard Boiled Eggs
These eggs are wonderfully adaptable at the table, working for breakfasts, lunches, and light dinners. I often pair them with simple sides and think about texture contrasts to elevate the experience. Below are serving ideas, storage notes, and occasion suggestions that help these eggs shine.
- Breakfast plate Arrange halved eggs with a scattering of Chives alongside toast and fresh fruit for a balanced morning meal that is both satisfying and easy to assemble.
- Salad topper Quarter the eggs and nestle them atop leafy greens to add protein and creaminess, dressing the salad lightly so the egg flavor remains central.
- Picnic snack Pack peeled eggs in a chilled container for a portable protein option, keeping them cushioned so they do not bump and crack during transport.
- Ramadan or communal meals These eggs make a neutral, beloved contribution to communal tables during special occasions, offering a simple, familiar bite that complements richer dishes.
- Storage tips Keep cooled, unpeeled eggs refrigerated up to one week, or peeled eggs submerged in fresh cold water in a sealed container for up to four days, changing the water daily to preserve texture and flavor.
- Seasonal pairings In spring and summer, pair with bright herbs and fresh vegetables; in cooler months, serve with heartier grains or roasted vegetables to add warmth and depth.
FAQ
Conclusion
Steamed Hard Boiled Eggs stand out because they deliver reliable texture, easier peeling, and quick preparation with minimal fuss. If you appreciate small kitchen wins that elevate everyday meals, give this steaming method a try; after a few batches you will notice how often you reach for it. It is a gentle, efficient technique that fits into busy mornings, casual lunches, or communal spreads, and the clean presentation makes simple eggs feel thoughtfully plated. Try them once, then experiment with tiny finishing touches to make them your own.
Steamed Hard Boiled Eggs
Equipment
- Large Pot
- Steamer insert or basket
- Large bowl for ice bath
Ingredients
- 3 large eggs Provide structure and protein while creating firm, fully set yolks and whites when steamed; careful timing yields creamy yolks and prevents overcooking. Add natural richness and mouthfeel to salads, breakfast plates, or snacks after steaming. Offer portable, nutrient-dense bites that store well in the refrigerator for several days.
- pinch of salt and pepper Season lightly to enhance natural egg flavor and balance richness without overpowering delicate nuances; apply sparingly to avoid masking other components. Contribute basic seasoning that sharpens taste perception and brings out subtle savory notes in each bite.
- Chives chopped (for garnish) Add bright, mild onion-like freshness as a finishing touch to contrast the richness of the eggs; sprinkle just before serving to preserve color and delicate texture. Provide visual appeal and a hint of herbaceous aroma that elevates simple preparations.
Instructions
- Place a steamer insert inside a large pot with water and bring to a boil over high heat. Add the eggs to the steamer basket, cover, and cook for about 15 minutes for hard-boiled eggs.: Listen for the steady, rolling boil and watch for large bubbles breaking the surface, that indicates the water is energetic enough to produce consistent steam. The smell is neutral, a faint metallic note from the pot, while the rising steam should be visible when you lift the lid. This step matters because vigorous steam provides even heat around each egg, preventing overcooking on one side. A common mistake is to fill the pot with too much water, which reduces steam and can cause the eggs to sit in water instead of being steamed. To troubleshoot, ensure the water level sits below the steamer insert and allow a minute for the steam to build before adding eggs.
- While the eggs are being steamed, prepare a large bowl filled with ice cubes and water. Once the eggs are done, transfer them to the ice-water bath. Allow to cool for at least 10 minutes before peeling.: As the eggs heat, you may hear a soft tapping sound as small temperature differences cause the shell and membrane to settle. Visually the eggs will not change dramatically, but you may notice the pot lid fogging up from the intense steam. The reason timing is important is that precise cook time yields yolks that are set through without turning dry and chalky. Avoid guessing times, many folks undercook by a few minutes and end up with jammy centers instead of firm yolks. If you suspect your stove runs hot or cool, test with one egg first to calibrate timing.
- Gently tap the eggs all over to crack the shell. Remove the shell with your fingers.: The ice bath should be cold enough to stop all residual cooking instantly, bringing the internal temperature down quickly. You will notice the steam dissipate when you move the eggs to the ice bath, and the eggs will feel noticeably firmer to the touch after a couple of minutes. This thermal shock helps the membrane separate from the shell for easier peeling. A common error is using only cold tap water without ice, which cools too slowly and allows carryover cooking, potentially leading to overdone yolks. Keep plenty of ice on hand so the bath stays cold for the full ten minutes.
- Cut the steamed eggs in half and sprinkle with a pinch of salt and pepper. Garnish with chopped chives.: When you lower the eggs into the ice water, you might hear a soft plop and see the surface slightly ripple. The rapid cooling firms the white and sets the yolk texture exactly where you want it. After a few minutes the egg surface becomes easier to handle, and you will notice little condensation beads on the shell that make gripping easier for cracking. If you skip this stage, the eggs will continue to cook and the yolk texture will shift toward dry. Avoid overcrowding the ice bath, use a bowl large enough so eggs chill evenly.
- Allow to cool for at least 10 minutes before peeling: Give the eggs time to settle and fully cool, the membrane relaxes as it chills making peeling cleaner. During this wait you might find the kitchen smells faintly of warm egg fat, which dissipates quickly. Rushing the peel right away often leads to ragged whites; patience pays off here. If you try to peel too soon, the shell may cling stubbornly, so set a timer and use the full rest period for best results.
- Gently tap the eggs all over to crack the shell: When you tap, you'll hear a crisp crack, and fine fissures will spider across the shell, which is the cue to start peeling. The tactile feedback tells you how evenly the shell fractured, and a gentle roll of the egg on the counter can widen the cracks for easier removal. This technique works because it creates many small entry points for your fingers to get beneath the membrane. A frequent misstep is tapping too hard, which can indent the white and make peeling messier. Tap with controlled force, just enough to break the shell.
- Remove the shell with your fingers: As you peel, you may notice a thin translucent membrane separating from the white, that is what you want to lift away cleanly. Work under lukewarm running water if needed, it helps flush away tiny shell fragments and eases removal. The goal is smooth, intact halves with minimal pitting of the white, which looks more appetizing. Peeled eggs that have lots of nicks usually mean the shell was too fresh or the bath was too warm; adjust for next time by chilling longer or using slightly older eggs.
- Cut the steamed eggs in half and sprinkle with a pinch of salt and pepper: When you slice an egg, listen for a quiet, satisfying give as the knife passes through the set white and yields the yolk. The yolk should be evenly colored and free of a green ring, which indicates overcooking. The tiny crystals of salt and the bite of pepper enhance the egg's natural richness, and visually they make the halves pop. Avoid using heavy seasonings that overpower the delicate egg flavor. If the yolk seems crumbly, you may have cooked slightly too long, so shave a minute off next time.
- Garnish with chopped chives: Sprinkling fresh Chives adds a delicate onion note and a bright color contrast that invites the first bite. The aroma of fresh herbs right before serving is a small finish that elevates simple dishes into something special. Apply them last so they retain their texture and visual appeal. If chopped too early, they can wilt and become limp, losing their charm and bite.
Notes
- Herbed finishing Add other mild fresh herbs like parsley or dill in place of Chives for a different aromatic profile, chopping them finely and scattering them just before serving to preserve their bright flavor.
- Spiced sprinkle Try a tiny pinch of smoked paprika or a citrus zest on top if you want a hint of warmth or brightness, applying sparingly to avoid overpowering the egg's delicate taste.
- Layered serving Serve the halved eggs on a bed of crisp greens or with thinly sliced cucumber for a refreshing contrast in texture and temperature, keeping the egg as the centerpiece.
- Meal prep Store peeled, cooled eggs in a sealed container with cold water in the fridge for up to four days, refreshing the water daily to maintain freshness and ease of use for quick snacks or salads.
- Textural tweak For creamier yolks, reduce steaming time slightly and test with one egg first to find your preferred level of creaminess, noting that carryover cooking will continue until they hit the ice bath.