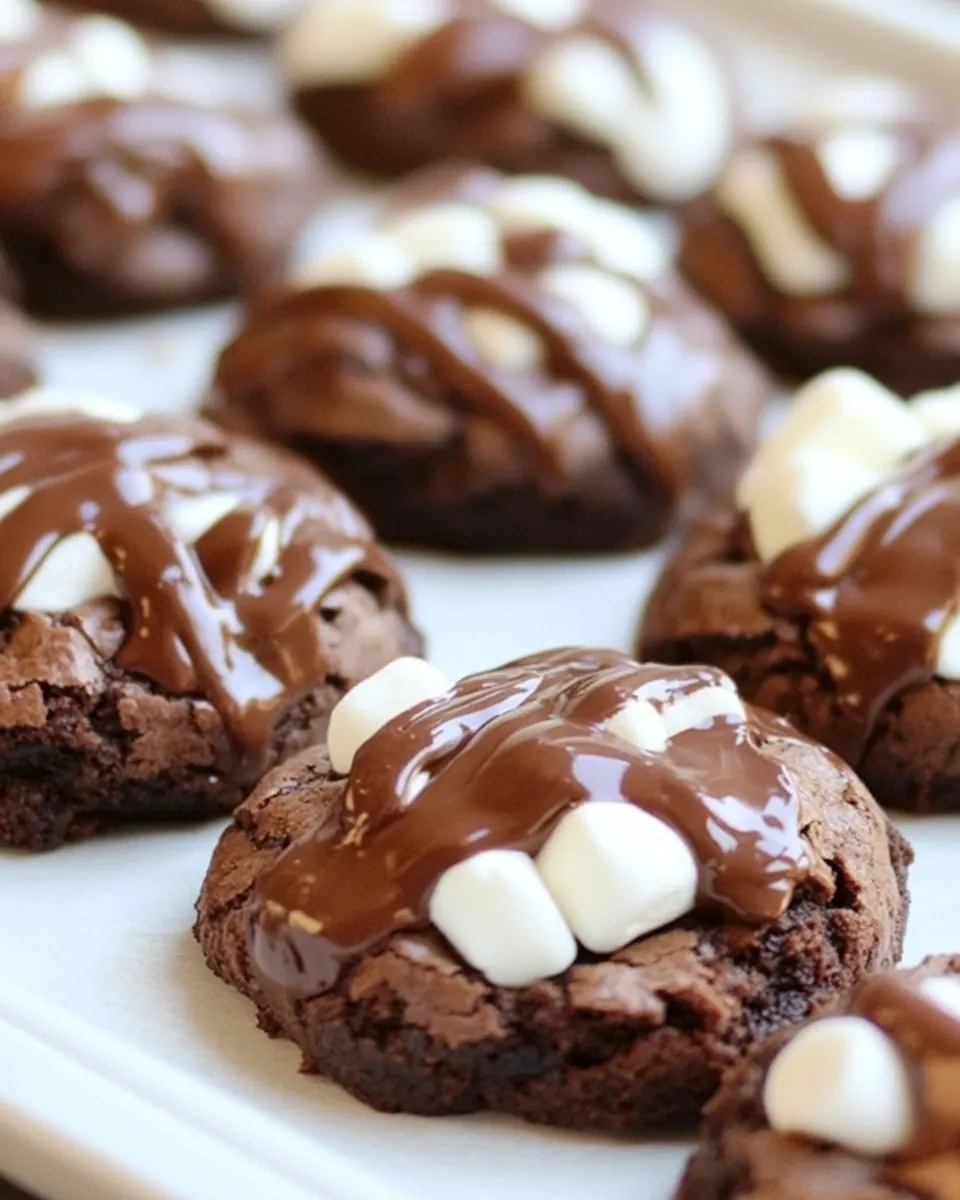
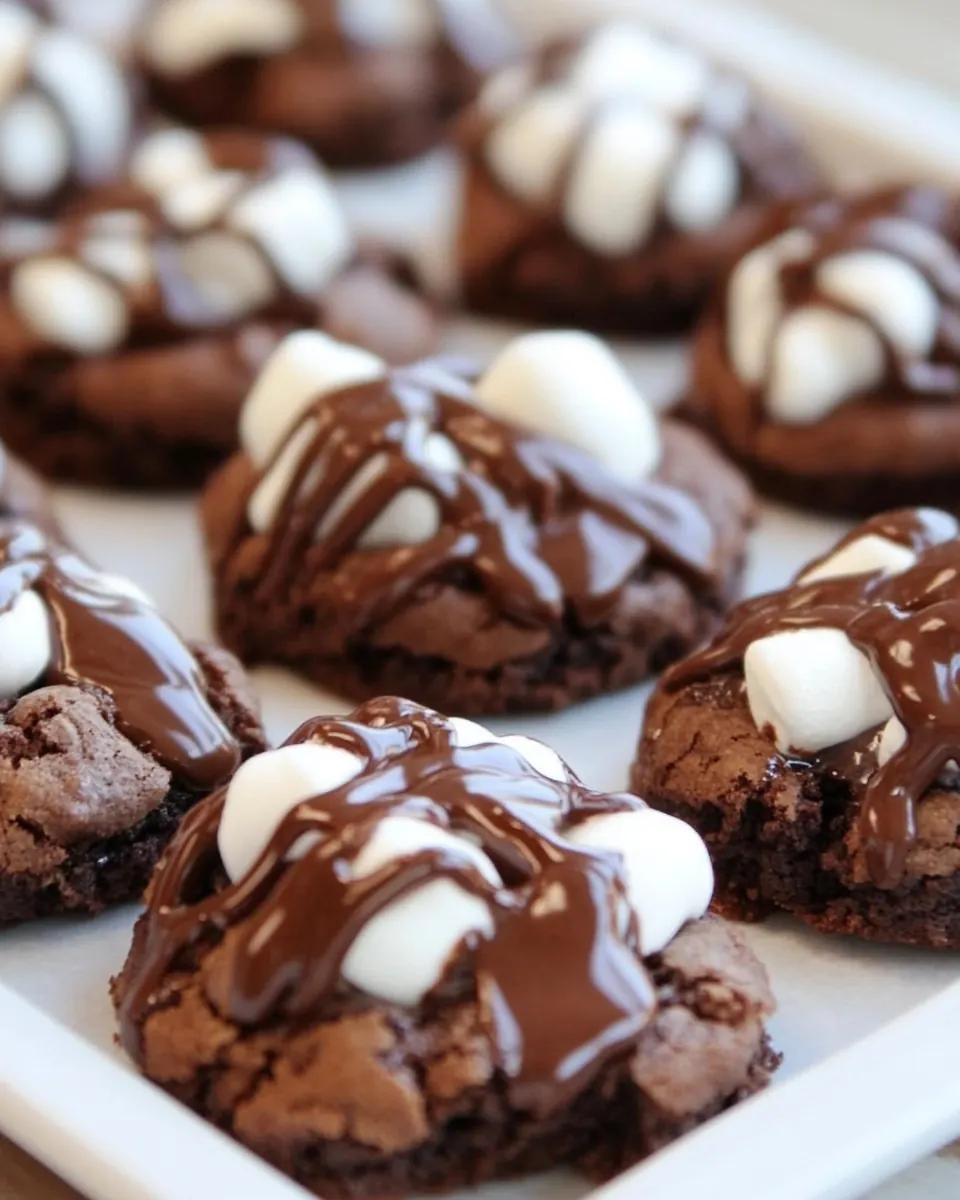
Marshmallow Brownie Cookies
Marshmallow Brownie Cookies arrived in my life on a rainy afternoon when I wanted something that felt like dessert and snack all at once. I remember pulling an old boxed brownie mix from the pantry and thinking about how to make it more playful than a pan of brownies, and the idea of pressing soft, pillowy marshmallows into fudgy cookie rounds felt instantly right. I baked a first small batch for my neighbor who was juggling work and kids, and watching the kids press sticky marshmallows into warm cookies sealed the deal.
From that first tray, the recipe became my go to for casual get togethers and last minute treats. The cookies bridge two textures I adore, the slightly crisp edge and gooey center, and they travel well in a container. I love how they pair with simple coffee or a chilled milk, and how the chocolate drizzle on top adds an extra layer of nostalgia.
When I test this version I focus on small details, like spacing the cookie mounds so they bake into tidy rounds, and moving the rack higher to coax the marshmallows into that glossy softened top without burning them. You will notice in the steps I talk through sensory cues and troubleshooting, because I want you to feel confident when you bake these. Over the years I adapted the technique to use easy pantry staples, and it reliably produces chewy centers with toasted sweet peaks of marshmallow.
Recipe Snapshot
50 mins
20 mins
30 mins
Medium
150 kcal
American
Gluten-Free, Low FODMAP
Desserts
Mixing bowl, Cookie sheet, Microwave safe bowl, Cooling rack, Measuring cups
What’s Great About This Marshmallow Brownie Cookies
They combine two favorites into one
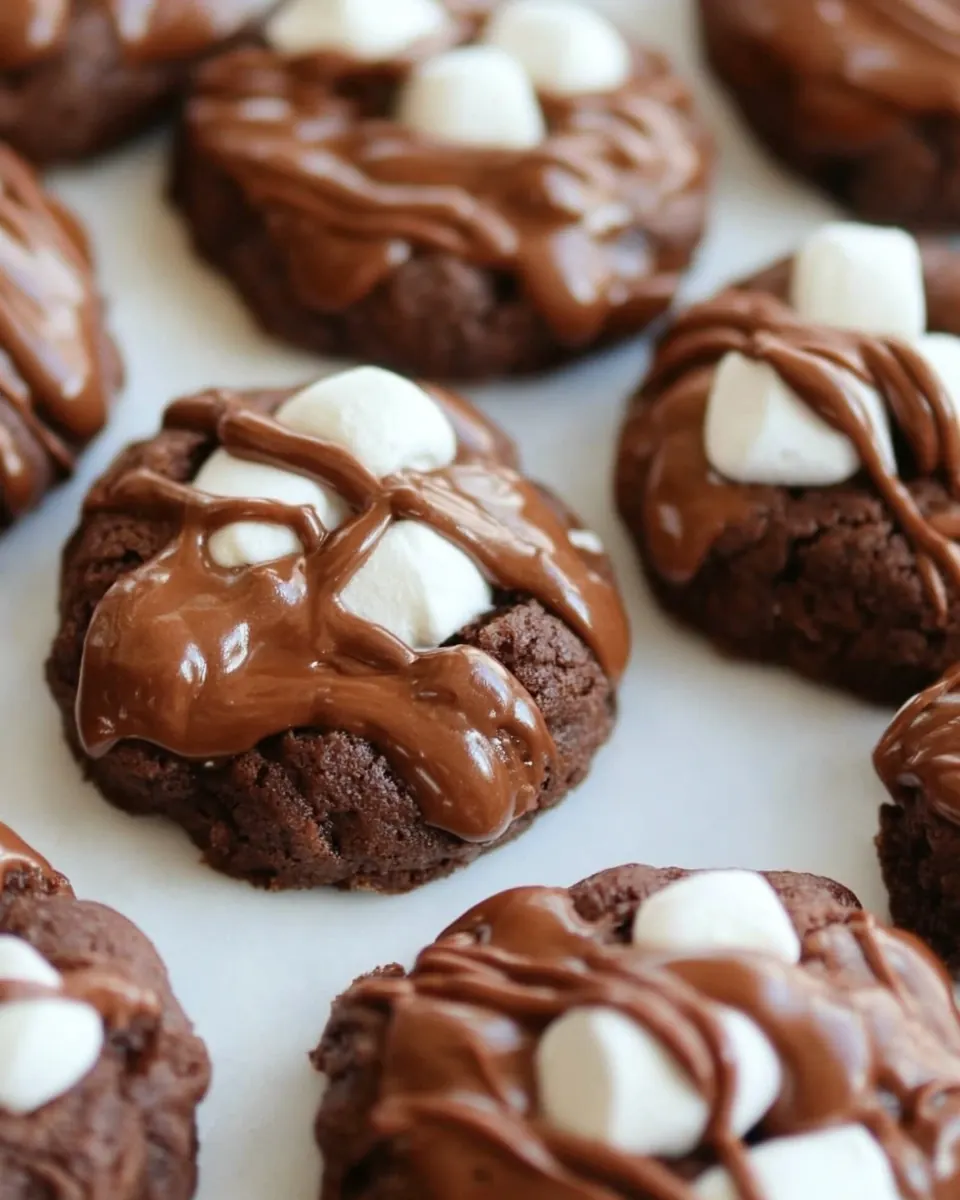
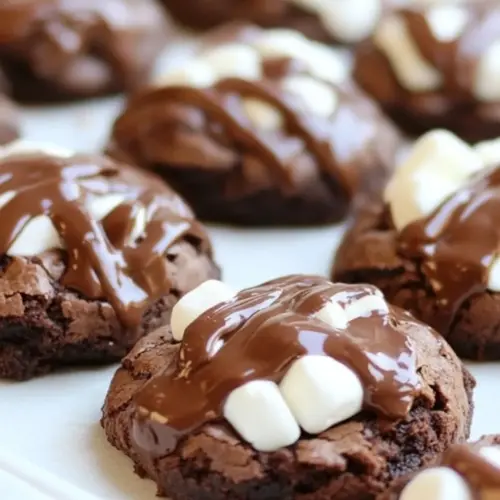
I adore how Marshmallow Brownie Cookies merge the fudgy depth of a brownie with the playful chew of a cookie. The contrast between a slightly crisp edge and a gooey center keeps every bite interesting, and I always find myself reaching for another because the textures are so satisfying.
Simple pantry ingredients, big payoff
We keep the ingredient list friendly and familiar, so these feel like an easy indulgence rather than a project. Using boxed brownie mix as a base speeds things up, while a touch of all purpose flour and brown sugar stabilize the dough so the cookies hold their shape. When I am short on time, this recipe is a lifesaver.
Great for crowds and gifting
I often make a double batch because these cookies travel well. They stack neatly in boxes, and the soft marshmallow tops survive short trips. I’ve gifted them at school events and potlucks, and people always ask for the recipe because they look impressive but are surprisingly easy.
Playful finishing touches
The melted chocolate chips drizzle is optional, but it adds a glossy, chocolatey note that upgrades the presentation. When I drizzle the warm chocolate, the aroma fills the kitchen and the final result looks bakery worthy. Small details like this make serving them feel special without adding much effort.
Adaptable and forgiving
These cookies are forgiving of slight timing differences and small measuring slips, which is why I love them for busy afternoons. If your oven runs hot or cool, the texture will still be delightful as long as you watch for the marshmallows to soften and the edges to set. I’ve found a few simple adjustments keep results consistent.
Ingredients Required for Marshmallow Brownie Cookies
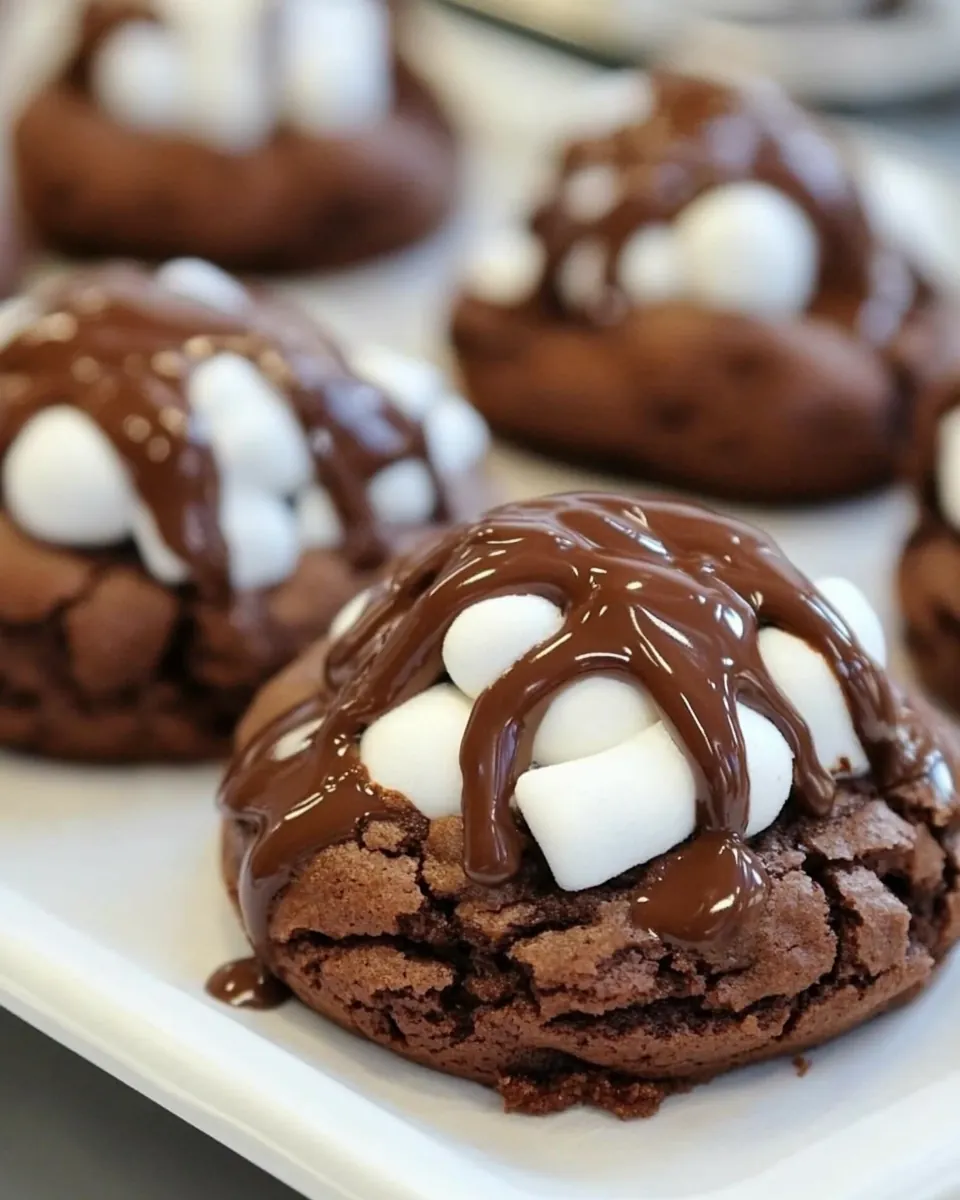
These ingredients work together to make a cookie that is fudgy, structured, and sweet. The boxed brownie mix supplies intense chocolate flavor and the base fudgy texture, while the all purpose flour gives the dough body so the cookies hold a round shape. Brown sugar and butter add chew and richness, and the marshmallows bring that playful, gooey top. The final drizzle of melted chocolate chips melds everything visually and taste wise.
- 1 (18.3 oz) pkg brownie mix (I used Betty Crocker fudge brownie mix): Provides a chocolate-rich base and packaged convenience, contributing fudgy structure and concentrated cocoa flavor to the dough; follow package instructions combined with other dry ingredients for consistent results. Helps ensure predictable texture and depth while streamlining preparation when making these cookies.
- 1 1/4 cups all-purpose flour: Adds bulk and structure to the batter, balancing the brownie mix to create a sturdier cookie rather than a cakey result; contributes gluten that helps hold the cookie shape during baking. Use measured amount to maintain the intended chew and prevent overly dense cookies.
- 1/4 cup packed light-brown sugar: Contributes mild caramelized sweetness and moisture to round out the chocolate flavors, enhancing the overall sweetness without overpowering; packed brown sugar also aids in creating a chewier texture. Incorporate evenly to promote consistent browning and tender crumb.
- 1/4 tsp salt: Enhances overall flavor balance by offsetting sweetness and strengthening gluten structure slightly, which helps define the cookie edges; also activates leavening if present in the brownie mix. Use the small amount specified to avoid salting out the sweet flavors.
- 2 large eggs: Provides richness and protein that contribute to structure, lift, and moisture in the cookies; eggs help bind ingredients and create a tender interior. Beat slightly before adding for even incorporation and improved texture.
- 2 tbsp milk: Adds a touch of liquid to adjust dough consistency, ensuring the batter is workable and not overly dry; contributes subtle milk solids for flavor and tenderness. Use as directed to achieve a pliable dough that holds marshmallows and chips.
- 1/2 cup unsalted butter, melted: Supplies fat for richness, flavor, and tenderness while promoting fudgy, moist texture; melted butter also helps distribute flavor evenly throughout the batter. Cool slightly before mixing to avoid cooking the eggs when incorporated.
- 1 tsp vanilla extract: Contributes aromatic sweetness and enhances chocolate flavors, rounding out the overall profile; vanilla helps deepen perceived sweetness without adding sugar. Add with wet ingredients for even flavor distribution.
- 2 cups mini marshmallows: Provides soft, pillowy sweetness and textural contrast, melting slightly to create gooey pockets in the baked cookies; mini size ensures even distribution throughout the dough. Fold in gently to avoid breaking them up before baking.
- 3/4 cups semi-sweet chocolate chips: Adds concentrated chocolate chunks that melt into pockets of bittersweet flavor, improving texture and chocolate intensity; semi–sweet chips complement the brownie base without becoming cloying. Stir in toward the end to maintain some chip shape for bite.
- 3 tbsp butter: Offers additional butter for melting into a glaze or coating, contributing shine and a richer mouthfeel when combined with water for a drizzle or sauce; enhances overall indulgence. Melt and mix with water until smooth before applying to cooled cookies if desired.
- 3 tbsp water: Provides liquid to emulsify with butter, creating a thin, glossy drizzle or sauce that can be brushed or drizzled over cookies; water thins fat for easier spreading while preserving shine. Combine with melted butter and whisk until smooth for finishing touch.
Step by Step Instructions for Marshmallow Brownie Cookies
I love walking through these steps with you, noting the little sensory cues that mean you are on the right track. Below I expand each direction into a detailed, hands on narrative so you can bake with confidence and avoid the common missteps I have learned from.
- Preheat oven to 350 degrees. Butter a cookie sheet and set aside. In a large mixing bowl, whisk together brownie mix, flour, brown sugar and salt. Add in eggs and milk and stir with a large spoon. Add in melted butter and vanilla and stir until well blended.: As you heat your oven to 350 degrees , you should notice the faint hum and the slight warm smell that begins to develop in the kitchen. This temperature gives the cookies enough heat to set the edges while keeping centers soft, which is crucial for the fudgy texture we want. If your oven takes a while to stabilize, give it an extra five minutes to ensure consistent results across racks. A common mistake is not preheating thoroughly, which can cause uneven spreading and underbaked centers.
- Spoon dough by heaping tablespoonfuls onto greased cookie sheet (you can fit 12 per sheet). Bake for 9 minutes and remove from oven and top each cookie with about 6 – 7 marshmallows (you may have to push down on the marshmallows slightly to keep them from rolling off).: When you grease the cookie sheet with a thin layer of butter , the surface will feel smooth and slightly tacky, helping the cookies release easily after baking. Butter also promotes browning on the underside, creating that pleasant slightly crisp base. Avoid using too much grease, or the bottoms can brown too quickly and become greasy. If you skip greasing entirely, cookies can stick and break when you try to remove them.
- Move oven rack near the top of the oven and return cookies to oven to bake 2 more minutes until marshmallows soften. Remove from oven and set cookies aside. In a small microwave safe mixing bowl combine chocolate chips, butter and water.: Whisking these dry components together distributes the brownie mix , all purpose flour , brown sugar , and salt so the dough will be uniformly flavored and textured. You will see the sugar loosen and the mix take on a homogenous darker tone as you combine them. This step prevents streaks of unmixed dry ingredients, which can lead to pockets of flour or overly sweet spots. A common error is to skip thorough mixing, which results in inconsistent texture in each cookie.
- Microwave chocolate on 50% in 30 intervals stirring after each interval until melted and smooth. Pour mixture into a small ziploc bag. Cut a small tip off the end and drizzle over marshmallow brownies cookies. Store cookies in an airtight container.: As you incorporate the eggs and milk , the mixture will begin to darken and become more cohesive, and you may hear a slight dragging sound as the spoon pulls through the thicker batter. The liquid binds the dry ingredients and starts forming the dough’s body. Stir until mostly combined but avoid over mixing, which can make the cookies tough. If the batter looks curdled, mixing a bit more gently usually brings it together without toughening it.
- Add in melted butter and vanilla and stir until well blended.: Pouring in the warm melted butter followed by vanilla extract will make the dough glossy and slightly looser. The butter enriches the dough and encourages that tender, chewy center, while the vanilla boosts aroma. Stir until you see the batter shine and no dry bits remain. A frequent mistake is adding butter that is too hot, which can cook the eggs; allow it to cool slightly before adding to avoid this.
- Spoon dough by heaping tablespoonfuls onto greased cookie sheet (you can fit 12 per sheet).: Scooping heaping tablespoonfuls creates uniform mounds that bake into nicely rounded cookies. As you place them on the tray, you will notice the dough holds a soft peak and does not spread much initially. Leave space between mounds so they do not merge. A mistake many make is overcrowding the sheet, which causes irregular shapes and uneven baking; stick to about 12 per sheet for even heat circulation.
- Bake for 9 minutes and remove from oven and top each cookie with about 6 to 7 marshmallows (you may have to push down on the marshmallows slightly to keep them from rolling off).: When the cookies have baked for about 9 minutes , the edges should look set and slightly firm while the centers still appear soft and glossy, and you may smell a deep chocolate aroma. Remove them and quickly top each with about six to seven mini marshmallows , pressing lightly so they adhere. The marshmallows will sit proudly on top and start to soften, rather than melt away. A common misstep is leaving them in too long at this stage, which can cause the marshmallows to discolor rather than become glossy and soft.
- Move oven rack near the top of the oven and return cookies to oven to bake 2 more minutes until marshmallows soften.: Shifting the cookies higher in the oven sends dry heat to the tops, encouraging the marshmallows to puff and develop a glossy softened surface within about 2 minutes . Watch them closely, because they can go from perfectly softened to browned in seconds. You should hear a faint crackle and see the marshmallows swell slightly. A typical error is not moving the rack, which can prevent the marshmallows from softening quickly and can extend baking time, potentially drying out the cookie.
- Remove from oven and set cookies aside.: Once the marshmallows look glossy and slightly puffy, remove the sheet and set it on a cooling rack so the bottoms stop cooking from residual heat. The cookies will firm up as they cool but remain gooey inside. If you try to move them too soon, the marshmallows and cookie base may tear, so allow them a few minutes to stabilize. Rushing this step often leads to misshapen cookies.
- In a small microwave safe mixing bowl combine chocolate chips, butter and water.: Combining semi sweet chocolate chips , a small amount of butter , and water creates a smooth drizzle that glazes the tops. Before microwaving, stir them together so they start to soften uniformly. This mixture will smell rich and chocolaty as it melts, adding an inviting aroma to the kitchen. If you overdo the water, the drizzle can be too thin, so add it sparingly.
- Microwave chocolate on 50 percent in 30 intervals stirring after each interval until melted and smooth.: Gently heating the chocolate at 50 percent power in thirty second bursts and stirring prevents scorching and promotes a glossy finish. You will see the chips soften and then melt into a silky ribbon when stirred. It should flow easily for piping into a bag. A common mistake is microwaving at full power, which can cause grainy, seized chocolate; low power and patience are the keys to shiny drizzle.
- Pour mixture into a small ziploc bag.: Transferring the warm chocolate into a small ziploc bag gives you a quick, simple piping tool. As you squeeze, the chocolate should glide toward the cut tip smoothly, making thin ribbons. If the chocolate is too cool and thick, warm it briefly to regain fluidity. Cutting too large a hole will produce blobs instead of delicate drizzles, so start small and enlarge if necessary.
- Cut a small tip off the end and drizzle over marshmallow brownies cookies.: With a tiny cut at the bag tip, drizzle the warm chocolate back and forth over the glossy marshmallow tops. The chocolate will set into fine lines that contrast with the white marshmallow and deep cookie. Take a moment to watch the ribbons form, because that visual completes the cookie. If the drizzle sets too quickly, warm it gently to restore flow; if it is too runny, let it cool a bit before continuing.
- Store cookies in an airtight container.: Once cooled, place the cookies in an airtight container to preserve chew and prevent the marshmallow from drying out. You will notice they remain soft for several days at room temperature, and stacking with parchment layers helps maintain their appearance. A common mistake is leaving them uncovered, which leads to stale texture and sticky marshmallow surfaces.
Change It Up
I like to offer simple variations and serving ideas that still respect the original ingredients. Below are practical tips and tweaks you can try without changing the soul of the recipe. Each tip begins with a bold phrase to highlight the main idea.
- Mix the batter gently: Over mixing can lead to dense cookies, so stir just until ingredients come together to keep centers tender and fudgy.
- Try different brownie mix brands: Brands vary in sweetness and cocoa intensity, so sample a different mix if you want a deeper or lighter chocolate profile, adjusting sugar slightly if needed.
- Toast marshmallows slightly: For a subtle toasted flavor, watch the marshmallows closely under the broiler for a few seconds, but be careful as they brown quickly and can become tough.
- Pipe a decorative drizzle: Use a small piping bag or ziploc to create fine chocolate lines that look professional and add an extra chocolate pop to each cookie.
- Pack for gifting: Layer cookies between parchment in a box for a neat presentation that protects the marshmallow tops during transport.
- Adjust cookie size: Make mini cookies by using a half tablespoon scoop for bite sized treats, perfect for parties or graze plates.
- Keep a test cookie: Bake one extra to test for doneness and adjust the next tray if your oven runs hot or cool, which helps maintain consistent results.
What Goes Well With This Marshmallow Brownie Cookies
These cookies are versatile for many occasions, from casual snacks to festive treats. The list below outlines pairing ideas, occasions, storage methods, and seasonal notes, so you can plan how to present and enjoy them. I include practical serving styles and storage tips to keep them tasting their best.
- Serve with cold milk: A classic pairing, the coolness of milk complements the warm chocolate and soft marshmallow texture, ideal for an afternoon snack or kids gatherings.
- Package for parties: Stack cookies in parchment lined boxes for potlucks or bake sales; they travel well and make an attractive contribution for casual events.
- Occasion friendly: These are perfect for school events, weekend bake sales, and cozy family movie nights, offering nostalgic flavors that suit relaxed, friendly gatherings.
- Seasonal pairing: Although great year round, they make a fun winter or holiday treat when you want something sweet and comforting without formal plating.
- Storage tips: Store in an airtight container at room temperature for up to three days to preserve the marshmallow softness; for longer storage, freeze in a single layer with parchment between and thaw gently.
- Serving style: Arrange on a simple platter with a few napkins or parchment squares so guests can enjoy sticky fingers without fuss, and highlight the chocolate drizzle for a polished look.
FAQ
Conclusion
These Marshmallow Brownie Cookies shine because they combine fudgy brownie flavor with the playful chew of marshmallows, finished with a glossy chocolate drizzle. Give them a try when you want an easy yet memorable treat to share with friends or family. I hope you enjoy the warm aroma as much as the first sticky bite, and that these become one of your trusted recipes for casual entertaining and quick sweet fixes.
Marshmallow Brownie Cookies
Equipment
- Mixing Bowl
- Cookie Sheet
- Microwave-safe Bowl
- Cooling rack
- Measuring Cups
Ingredients
- 1 (18.3 oz) pkg brownie mix (I used Betty Crocker fudge brownie mix) Provides a chocolate-rich base and packaged convenience, contributing fudgy structure and concentrated cocoa flavor to the dough; follow package instructions combined with other dry ingredients for consistent results. Helps ensure predictable texture and depth while streamlining preparation when making these cookies.
- 1 1/4 cups all-purpose flour Adds bulk and structure to the batter, balancing the brownie mix to create a sturdier cookie rather than a cakey result; contributes gluten that helps hold the cookie shape during baking. Use measured amount to maintain the intended chew and prevent overly dense cookies.
- 1/4 cup packed light-brown sugar Contributes mild caramelized sweetness and moisture to round out the chocolate flavors, enhancing the overall sweetness without overpowering; packed brown sugar also aids in creating a chewier texture. Incorporate evenly to promote consistent browning and tender crumb.
- 1/4 tsp salt Enhances overall flavor balance by offsetting sweetness and strengthening gluten structure slightly, which helps define the cookie edges; also activates leavening if present in the brownie mix. Use the small amount specified to avoid salting out the sweet flavors.
- 2 large eggs Provides richness and protein that contribute to structure, lift, and moisture in the cookies; eggs help bind ingredients and create a tender interior. Beat slightly before adding for even incorporation and improved texture.
- 2 tbsp milk Adds a touch of liquid to adjust dough consistency, ensuring the batter is workable and not overly dry; contributes subtle milk solids for flavor and tenderness. Use as directed to achieve a pliable dough that holds marshmallows and chips.
- 1/2 cup unsalted butter, melted Supplies fat for richness, flavor, and tenderness while promoting fudgy, moist texture; melted butter also helps distribute flavor evenly throughout the batter. Cool slightly before mixing to avoid cooking the eggs when incorporated.
- 1 tsp vanilla extract Contributes aromatic sweetness and enhances chocolate flavors, rounding out the overall profile; vanilla helps deepen perceived sweetness without adding sugar. Add with wet ingredients for even flavor distribution.
- 2 cups mini marshmallows Provides soft, pillowy sweetness and textural contrast, melting slightly to create gooey pockets in the baked cookies; mini size ensures even distribution throughout the dough. Fold in gently to avoid breaking them up before baking.
- 3/4 cups semi-sweet chocolate chips Adds concentrated chocolate chunks that melt into pockets of bittersweet flavor, improving texture and chocolate intensity; semi-sweet chips complement the brownie base without becoming cloying. Stir in toward the end to maintain some chip shape for bite.
- 3 tbsp butter Offers additional butter for melting into a glaze or coating, contributing shine and a richer mouthfeel when combined with water for a drizzle or sauce; enhances overall indulgence. Melt and mix with water until smooth before applying to cooled cookies if desired.
- 3 tbsp water Provides liquid to emulsify with butter, creating a thin, glossy drizzle or sauce that can be brushed or drizzled over cookies; water thins fat for easier spreading while preserving shine. Combine with melted butter and whisk until smooth for finishing touch.
Instructions
- Preheat oven to 350 degrees. Butter a cookie sheet and set aside. In a large mixing bowl, whisk together brownie mix, flour, brown sugar and salt. Add in eggs and milk and stir with a large spoon. Add in melted butter and vanilla and stir until well blended.: As you heat your oven to 350 degrees , you should notice the faint hum and the slight warm smell that begins to develop in the kitchen. This temperature gives the cookies enough heat to set the edges while keeping centers soft, which is crucial for the fudgy texture we want. If your oven takes a while to stabilize, give it an extra five minutes to ensure consistent results across racks. A common mistake is not preheating thoroughly, which can cause uneven spreading and underbaked centers.
- Spoon dough by heaping tablespoonfuls onto greased cookie sheet (you can fit 12 per sheet). Bake for 9 minutes and remove from oven and top each cookie with about 6 - 7 marshmallows (you may have to push down on the marshmallows slightly to keep them from rolling off).: When you grease the cookie sheet with a thin layer of butter , the surface will feel smooth and slightly tacky, helping the cookies release easily after baking. Butter also promotes browning on the underside, creating that pleasant slightly crisp base. Avoid using too much grease, or the bottoms can brown too quickly and become greasy. If you skip greasing entirely, cookies can stick and break when you try to remove them.
- Move oven rack near the top of the oven and return cookies to oven to bake 2 more minutes until marshmallows soften. Remove from oven and set cookies aside. In a small microwave safe mixing bowl combine chocolate chips, butter and water.: Whisking these dry components together distributes the brownie mix , all purpose flour , brown sugar , and salt so the dough will be uniformly flavored and textured. You will see the sugar loosen and the mix take on a homogenous darker tone as you combine them. This step prevents streaks of unmixed dry ingredients, which can lead to pockets of flour or overly sweet spots. A common error is to skip thorough mixing, which results in inconsistent texture in each cookie.
- Microwave chocolate on 50% in 30 intervals stirring after each interval until melted and smooth. Pour mixture into a small ziploc bag. Cut a small tip off the end and drizzle over marshmallow brownies cookies. Store cookies in an airtight container.: As you incorporate the eggs and milk , the mixture will begin to darken and become more cohesive, and you may hear a slight dragging sound as the spoon pulls through the thicker batter. The liquid binds the dry ingredients and starts forming the dough’s body. Stir until mostly combined but avoid over mixing, which can make the cookies tough. If the batter looks curdled, mixing a bit more gently usually brings it together without toughening it.
- Add in melted butter and vanilla and stir until well blended.: Pouring in the warm melted butter followed by vanilla extract will make the dough glossy and slightly looser. The butter enriches the dough and encourages that tender, chewy center, while the vanilla boosts aroma. Stir until you see the batter shine and no dry bits remain. A frequent mistake is adding butter that is too hot, which can cook the eggs; allow it to cool slightly before adding to avoid this.
- Spoon dough by heaping tablespoonfuls onto greased cookie sheet (you can fit 12 per sheet).: Scooping heaping tablespoonfuls creates uniform mounds that bake into nicely rounded cookies. As you place them on the tray, you will notice the dough holds a soft peak and does not spread much initially. Leave space between mounds so they do not merge. A mistake many make is overcrowding the sheet, which causes irregular shapes and uneven baking; stick to about 12 per sheet for even heat circulation.
- Bake for 9 minutes and remove from oven and top each cookie with about 6 to 7 marshmallows (you may have to push down on the marshmallows slightly to keep them from rolling off).: When the cookies have baked for about 9 minutes , the edges should look set and slightly firm while the centers still appear soft and glossy, and you may smell a deep chocolate aroma. Remove them and quickly top each with about six to seven mini marshmallows , pressing lightly so they adhere. The marshmallows will sit proudly on top and start to soften, rather than melt away. A common misstep is leaving them in too long at this stage, which can cause the marshmallows to discolor rather than become glossy and soft.
- Move oven rack near the top of the oven and return cookies to oven to bake 2 more minutes until marshmallows soften.: Shifting the cookies higher in the oven sends dry heat to the tops, encouraging the marshmallows to puff and develop a glossy softened surface within about 2 minutes . Watch them closely, because they can go from perfectly softened to browned in seconds. You should hear a faint crackle and see the marshmallows swell slightly. A typical error is not moving the rack, which can prevent the marshmallows from softening quickly and can extend baking time, potentially drying out the cookie.
- Remove from oven and set cookies aside.: Once the marshmallows look glossy and slightly puffy, remove the sheet and set it on a cooling rack so the bottoms stop cooking from residual heat. The cookies will firm up as they cool but remain gooey inside. If you try to move them too soon, the marshmallows and cookie base may tear, so allow them a few minutes to stabilize. Rushing this step often leads to misshapen cookies.
- In a small microwave safe mixing bowl combine chocolate chips, butter and water.: Combining semi sweet chocolate chips , a small amount of butter , and water creates a smooth drizzle that glazes the tops. Before microwaving, stir them together so they start to soften uniformly. This mixture will smell rich and chocolaty as it melts, adding an inviting aroma to the kitchen. If you overdo the water, the drizzle can be too thin, so add it sparingly.
- Microwave chocolate on 50 percent in 30 intervals stirring after each interval until melted and smooth.: Gently heating the chocolate at 50 percent power in thirty second bursts and stirring prevents scorching and promotes a glossy finish. You will see the chips soften and then melt into a silky ribbon when stirred. It should flow easily for piping into a bag. A common mistake is microwaving at full power, which can cause grainy, seized chocolate; low power and patience are the keys to shiny drizzle.
- Pour mixture into a small ziploc bag.: Transferring the warm chocolate into a small ziploc bag gives you a quick, simple piping tool. As you squeeze, the chocolate should glide toward the cut tip smoothly, making thin ribbons. If the chocolate is too cool and thick, warm it briefly to regain fluidity. Cutting too large a hole will produce blobs instead of delicate drizzles, so start small and enlarge if necessary.
- Cut a small tip off the end and drizzle over marshmallow brownies cookies.: With a tiny cut at the bag tip, drizzle the warm chocolate back and forth over the glossy marshmallow tops. The chocolate will set into fine lines that contrast with the white marshmallow and deep cookie. Take a moment to watch the ribbons form, because that visual completes the cookie. If the drizzle sets too quickly, warm it gently to restore flow; if it is too runny, let it cool a bit before continuing.
- Store cookies in an airtight container.: Once cooled, place the cookies in an airtight container to preserve chew and prevent the marshmallow from drying out. You will notice they remain soft for several days at room temperature, and stacking with parchment layers helps maintain their appearance. A common mistake is leaving them uncovered, which leads to stale texture and sticky marshmallow surfaces.
Notes
- Mix the batter gently: Over mixing can lead to dense cookies, so stir just until ingredients come together to keep centers tender and fudgy.
- Try different brownie mix brands: Brands vary in sweetness and cocoa intensity, so sample a different mix if you want a deeper or lighter chocolate profile, adjusting sugar slightly if needed.
- Toast marshmallows slightly: For a subtle toasted flavor, watch the marshmallows closely under the broiler for a few seconds, but be careful as they brown quickly and can become tough.
- Pipe a decorative drizzle: Use a small piping bag or ziploc to create fine chocolate lines that look professional and add an extra chocolate pop to each cookie.
- Pack for gifting: Layer cookies between parchment in a box for a neat presentation that protects the marshmallow tops during transport.
- Adjust cookie size: Make mini cookies by using a half tablespoon scoop for bite sized treats, perfect for parties or graze plates.
- Keep a test cookie: Bake one extra to test for doneness and adjust the next tray if your oven runs hot or cool, which helps maintain consistent results.