Christmas Tree Cupcakes
Christmas Tree Cupcakes are one of those recipes I turn to whenever the house needs an instant lift, because they bring both whimsy and a burst of holiday cheer to the table. The first time I made these, I was juggling a tray of warm cupcakes and a toddler desperate to help, and somehow those crooked green cones with tiny yellow stars felt more triumphant than any perfectly frosted cake I had ever attempted. I still laugh at how the first batch had a few lopsided trees, but everyone loved them anyway, and that taught me something about festive baking, namely that personality beats perfection more often than not.
Over the years I learned small tricks that make these cupcakes both easier and more impressive. I keep my eggs at room temperature for a silkier batter, and I always chill the mixing bowl before whipping the heavy cream so the peaks form quickly and stay put. When I host cookie exchanges and school parties I love that these cupcakes double as edible centerpieces. Guests often comment on the little surprise you can tuck into the cones, and kids adore the reveal as much as the frosting itself. That playful element makes these more than a dessert, they become a party activity.
What I appreciate most is how adaptable the concept is. You can make the base cupcakes your go to vanilla, chocolate, or anything you prefer, and the assembly remains simple and satisfying. Even if you are new to piping, a few practice strokes and a steady hand will have you finishing a dozen decorated trees in no time. I tend to pair them with simple drinks and let the cupcakes do the visual heavy lifting. They are my go to when I want something festive, approachable, and reliably fun.
Recipe Snapshot
35 mins
15 mins
20 mins
Hard
250 kcal
American
Gluten-Free, Low FODMAP
Desserts
Stand mixer or handheld mixer, Whisk attachment, 12-count cupcake pan, Cupcake liners, Piping bag and star tip
Why Try This Christmas Tree Cupcakes
They are playful and visual
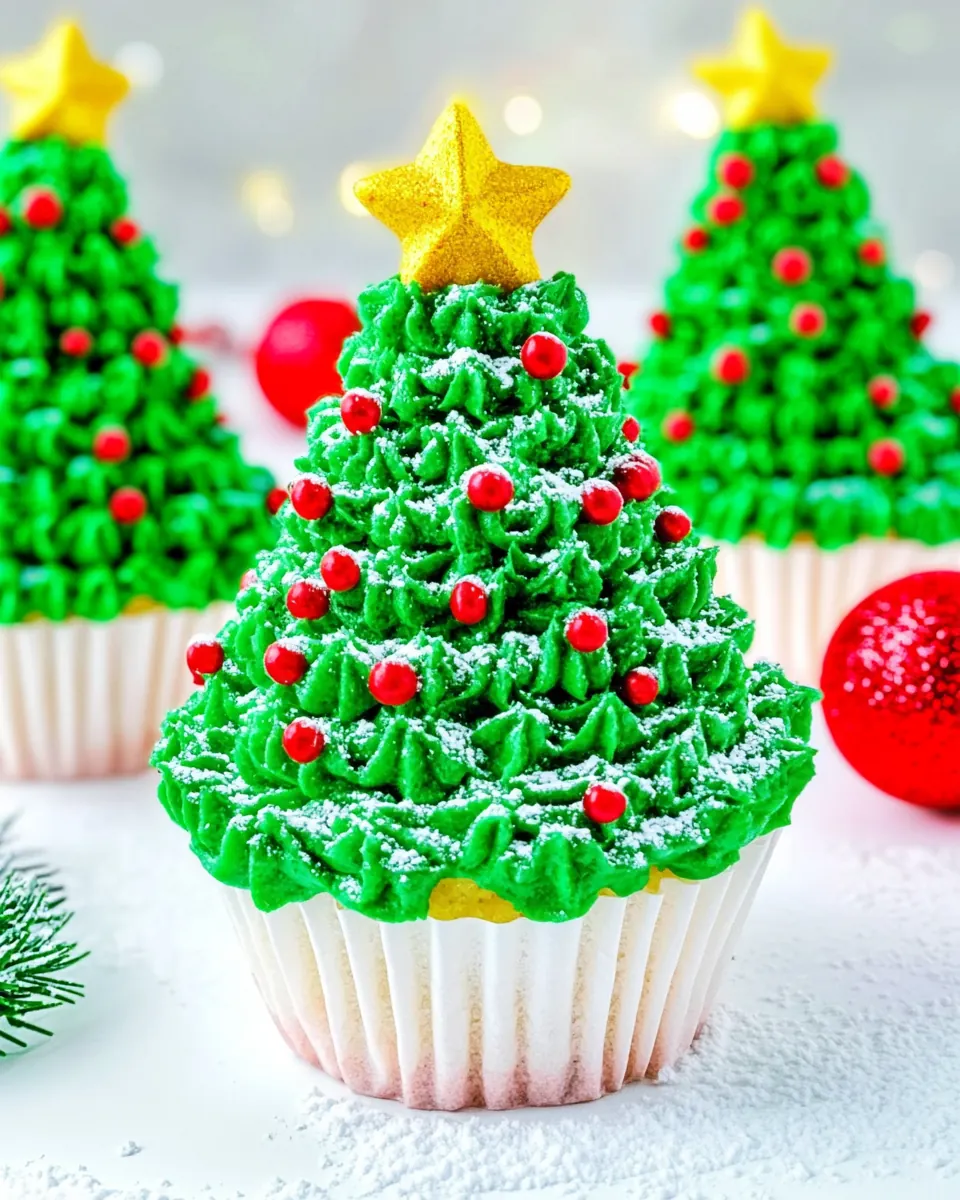
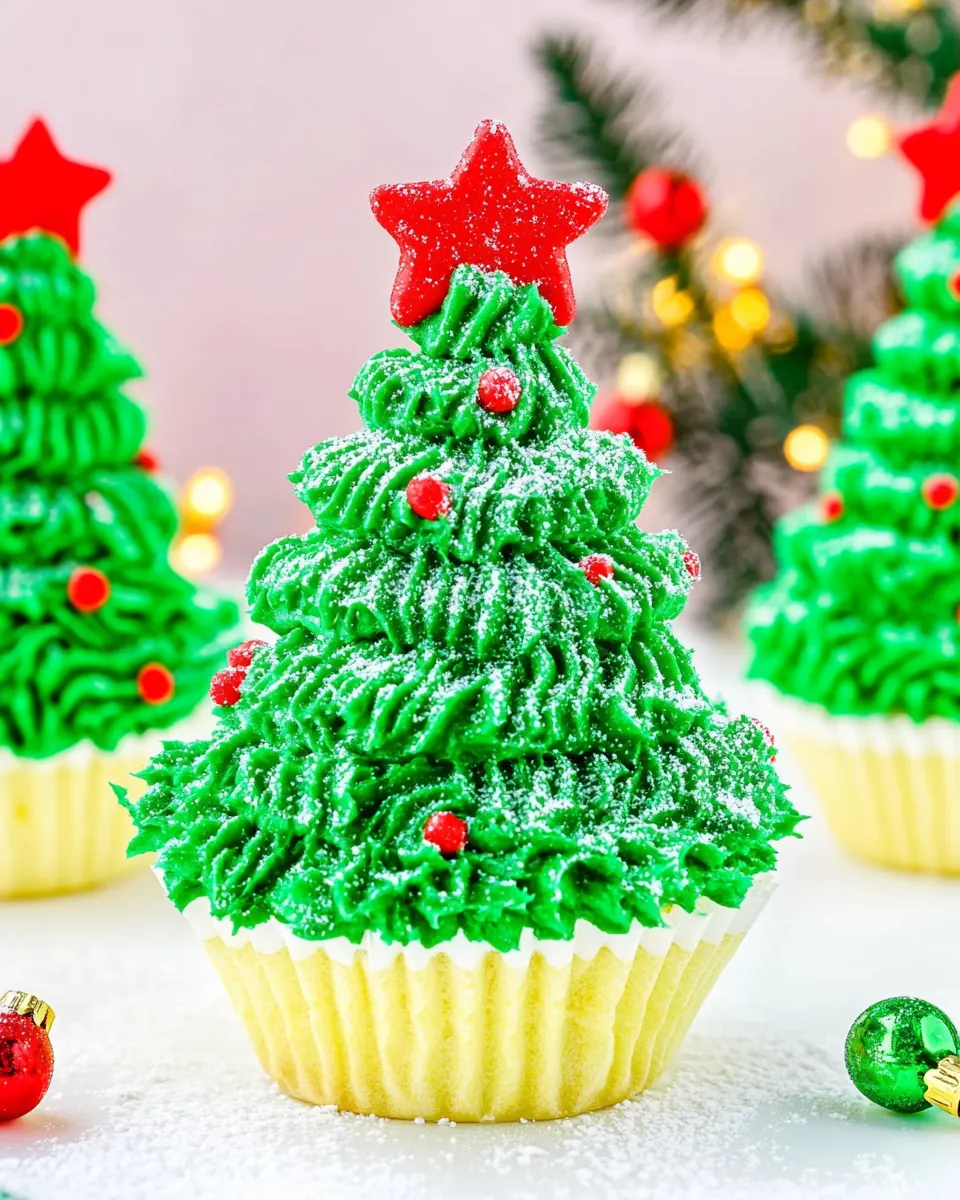
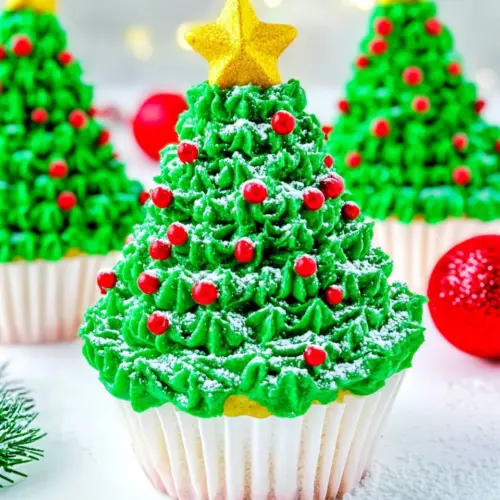
I adore how Christmas Tree Cupcakes turn ordinary cupcakes into tiny holiday sculptures. The use of an inverted cone creates instant height and drama, and piping green whipped cream into star shapes builds texture that looks impressive without complicated techniques. This visual impact makes them perfect for parties where a big centerpiece is impractical.
Kid friendly and interactive
I’ve made these with children more times than I can count, and they relish filling cones with little surprises and helping with the green frosting. The hands on element means the recipe doubles as an activity, keeping little hands busy while adults mingle. It is a great way to introduce simple baking skills and keep enthusiasm high.
Quick to make with everyday pantry items
The ingredients list reads like a well stocked pantry: all-purpose flour, granulated sugar, eggs, and a splash of oil. Nothing exotic is required, so you can assemble these without a special trip to the store. That practicality is one reason I reach for this recipe when time is short but I want a festive result.
Customizable and forgiving
Whether you want intense gel coloring or a softer pastel, the recipe accommodates adjustments. You can tuck candies inside the cones for a playful surprise, and the whipped cream frosting is forgiving if you slightly underbeat or overbeat it, as long as you follow the chilling tips. I find small imperfections add to the homemade charm.
Make ahead friendly
I often bake the cupcakes a day ahead and finish decorating the next day. The cupcakes stay moist and the whipped topping holds well when refrigerated. For gatherings, this staggered approach helps me manage time and reduces last minute stress, which is always a relief during the busy holiday season.
What’s In This Christmas Tree Cupcakes
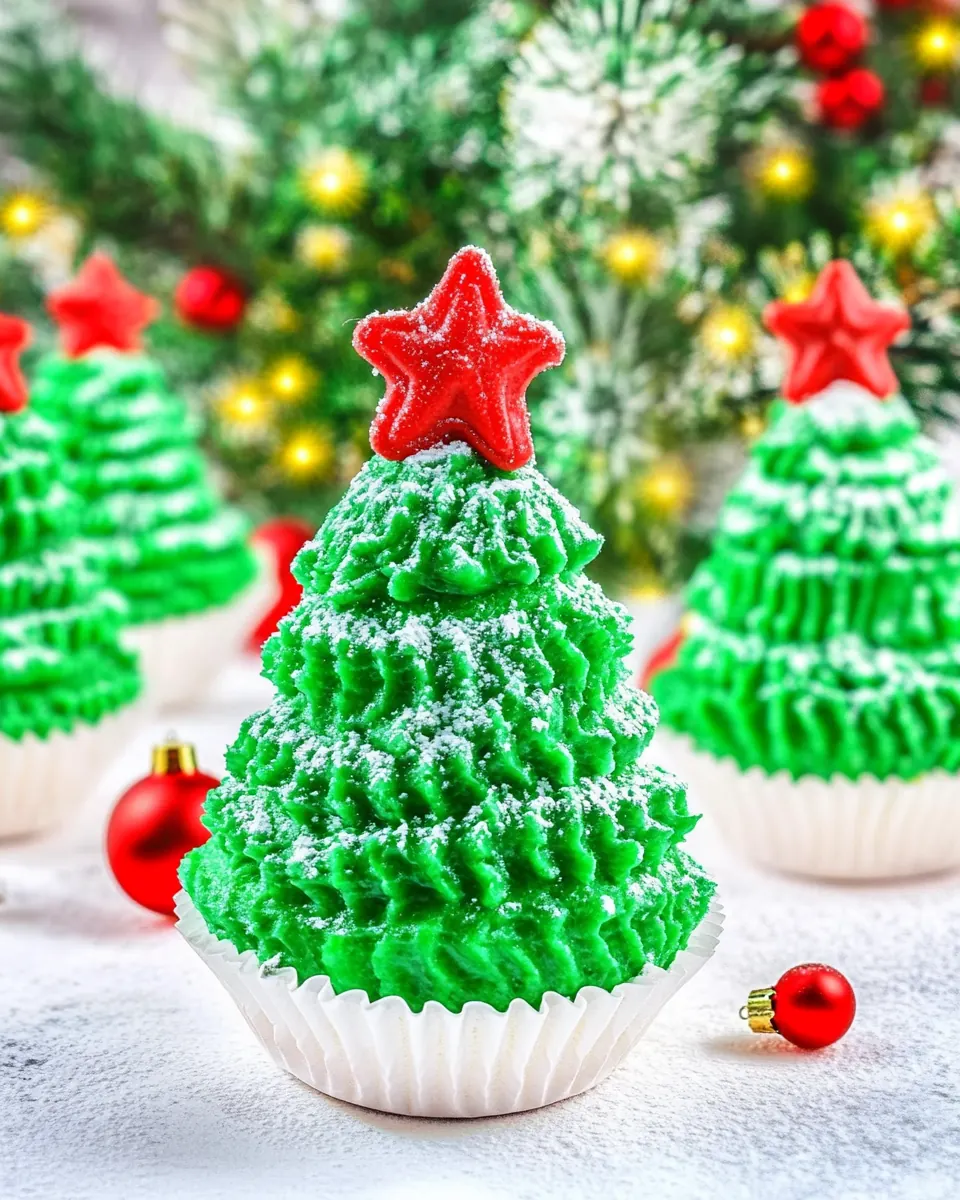
These components come together to create texture, structure, and that snowy, festive look we crave during the holidays. The batter ingredients form a tender crumb, while the whipped cream provides a light, airy frosting canvas for piping. The cones add whimsical height and a crunchy contrast to the soft cupcake beneath, and small decorative touches like a yellow star finish the visual story.
- 2 large eggs, at room temp: Whisk together to provide structure and moisture while helping the batter rise and bind other ingredients; bring to room temperature for even incorporation and better volume.
- 1/2 cup vegetable or canola oil: Add for tender crumb and moist texture while carrying flavors; choose neutral vegetable or canola oil to avoid altering the cupcake taste.
- 3/4 cup granulated sugar: Sweeten the batter and help with browning while contributing to a fine crumb; adjust slightly for desired sweetness and texture.
- 1 to 2 teaspoons pure vanilla extract: Flavor the batter with warm, aromatic vanilla; use pure extract for the cleanest flavor and add gradually to taste between 1 and 2 teaspoons.
- 1 1/2 cups all-purpose flour: Provide the bulk and body of the cupcakes and combine with leaveners to form the cake matrix; whisk or sift for even distribution and to avoid lumps.
- 1 1/2 teaspoons baking powder: Leaven the batter by creating gas bubbles that expand during baking; measure precisely to ensure proper rise without a bitter aftertaste.
- 1 teaspoon baking soda: React with acidic components to produce lift and a tender texture; use the stated amount to balance with baking powder for optimal crumb.
- 1 teaspoon salt: Season the cupcakes subtly and enhance overall flavor balance; dissolve well into the wet ingredients to avoid pockets of salt.
- 1 cup heavy or whipping cream, very cold** (See Notes): Whip into stiff peaks to create a stable, airy frosting base that is rich and smooth; keep very cold to facilitate whipping and structure retention.
- 1/4 cup confectioners' sugar: Sweeten and stabilize the whipped cream while adding a silky mouthfeel; sift before adding to prevent lumps and ensure even sweetness.
- 1/2 teaspoon pure vanilla extract: Enhance the whipped cream frosting with a concentrated vanilla aroma; add a small amount to avoid overpowering the cream's delicate flavor.
- 12 pointed-tip sugar cookie ice cream cones: Provide a festive, tree-shaped base for piped frosting and offer a crunchy, sweet cone texture; use pointed-tip sugar cookie cones for easy decorating.
- Green food coloring, as desired: Tint the whipped cream frosting to a festive green for Christmas tree appearance; add a few drops at a time until the desired shade is achieved.
- Yellow stars, for decorating (optional): Top the finished trees with small yellow stars for a classic holiday touch and visual contrast; place gently to avoid damaging the frosting.
How to Make Christmas Tree Cupcakes
These instructions move from batter to beautiful presentation with approachable steps. I like to keep the workflow streamlined: bake the cupcakes, whip the cream while they cool, then assemble and pipe the tree shapes. A little organization and chilled equipment make all the difference.
- Preheat oven to 350 F and line a standard 12-count cupcake pan with foil red or green cupcake liners; set aside.: As you preheat the oven, you will notice the warm, dry scent of the oven coming to life and the liners add a festive edge before you even start. The reason for preheating is to ensure the oven reaches the correct temperature so the cupcakes rise evenly, with a consistent dome. A common pitfall is not preheating, which causes uneven baking and denser centers. Make sure the rack is placed in the center of the oven for even heat circulation.
- To a large bowl, add the eggs, oil, sugar, and whisk to combine.: When whisking the eggs , oil , and granulated sugar , you'll hear a gentle rustling from the whisk and see the mixture become glossy and slightly thickened, which helps trap air for lift. This step builds the base emulsion that supports the batter, so whisk until homogeneous but avoid incorporating too much air. Overwhisking can lead to a fragile structure that collapses in the oven.
- Add the vanilla and whisk to combine.: Adding the vanilla extract at this stage releases a warm, fragrant aroma that perfumes the batter and elevates the flavor profile. It helps distribute that flavor evenly throughout the cupcakes. Do not add an excessive amount as it can overpower the delicate crumb.
- Add the flour, baking powder, baking soda, salt, and stir until just combined; don't overmix.: When you fold in the all-purpose flour along with baking powder , baking soda , and salt , the batter will change from glossy to slightly thicker and more matte. This signals that gluten is developing; stirring just until there are no streaks ensures tenderness. A frequent mistake is overmixing, which creates a tougher cupcake with tunnels or dense spots.
- Evenly divide batter into prepared pan making sure to fill each cavity about 2/3-full.: As you portion batter, you'll notice how it settles and levels out; filling to two thirds gives room for lift without spilling. Even division ensures consistent baking time and uniform size for decorating later. Filling too full results in overflow and uneven shapes, while underfilling yields tiny cupcakes that sit oddly beneath the cone.
- Bake for about 18 to 20 minutes, or until cupcakes are done. They're done when the center is set, springy to the touch, and a toothpick inserted in the center comes out clean or with a few moist crumbs. Tip – For optimal results, bake on the center oven rack and rotate once midway through for the most even baking.: During baking you will smell a sweet, bready aroma and see the tops turn a light golden. The cupcakes are ready when the center springs back to a gentle touch and a toothpick comes out clean or with a few moist crumbs. This technique prevents overbaking which dries them out. Avoid opening the oven door early and often, which can cause collapse from sudden temperature shifts.
- Allow cupcakes to cool in the pan while you make the whipped cream.: Cooling in the pan lets residual heat finish the crumb without continued oven exposure, and you will notice steam dissipate as they cool. Leaving them too long in the pan can make removal trickier, so transfer to a rack after ten to fifteen minutes if you prefer quicker cooling. A common error is frosting hot cupcakes, which melts the frosting and ruins shape.
- To the bowl (a chilled bowl is better) of a stand mixer fitted with the whisk attachment or handheld electric mixer fitted with the whisk attachment, add the cream, confectioners' sugar, vanilla, and beat on high speed for about 90 to 120 seconds, or until stiff peaks form; stop to scrape down the bowl as necessary.: As you whip the very cold heavy cream , you will hear a change from a liquid slosh to a thicker, billowy sound and see soft peaks form that eventually become firm. The whipped cream should hold a defined peak when you lift the whisk. The cold bowl and beaters speed this process and yield more stable peaks. Underwhipping gives runny frosting, while overwhipping can turn the cream grainy or into butter.
- Using a butter knife or spoon, spread a thin layer of whipped cream over the top of each cupcake.: Spreading a light base coat of the whipped cream helps the cone adhere and provides an initial layer for better piping adhesion. You will feel a smooth, cool texture as you spread it. Skipping this base coat can make the cone sit unstable and cause sliding when piping heavier frosting layers.
- Add an inverted ice cream cone*** (See Notes) to the top of each cupcake, using the whipped cream to help secure it; set aside.: When you place the pointed-tip cone gently onto the whipped cream, it creates an architectural silhouette that resembles a tree. The whipped cream acts like edible glue, so press just enough to secure without compressing the cupcake beneath. Forcing the cone too hard can crack the cupcake or displace the frosting.
- To the remaining whipped cream, add green food coloring, as desired until desired shape is achieved. Tip – I recommend gel food coloring for the most intense green color results. Mix well to make sure it's evenly combined.: As you fold in green food coloring , watch the cream shift from white to vibrant green, and mix until the hue is even. Gel coloring gives richer saturation without thinning, so add gradually until you reach the perfect tone. Rushing or adding too much liquid color can make the cream loose and difficult to pipe.
- Spread a thin layer of green whipped cream over the ice cream cones on the top of each cupcake.: This thin green coat smooths out the cone and provides a base for the piped stars, creating a cohesive green tree look. You will feel the coolness of the cream against the cone and notice the color beginning to unify the surface. If the layer is too thick, piping detail can become lost, while too thin a layer risks uneven piping adhesion.
- Add the green food coloring to a silicone piping bag fitted with a coupler (or your favorite style of piping bag) and a star tip.: Preparing the piping bag organizes your workflow and ensures a controlled, consistent delivery of frosting. You will sense the tension in the bag as you squeeze, which gives you feedback on how much pressure to apply. An incorrect tip size can change the scale of the stars, so choose a tip that produces defined dollops without clogging.
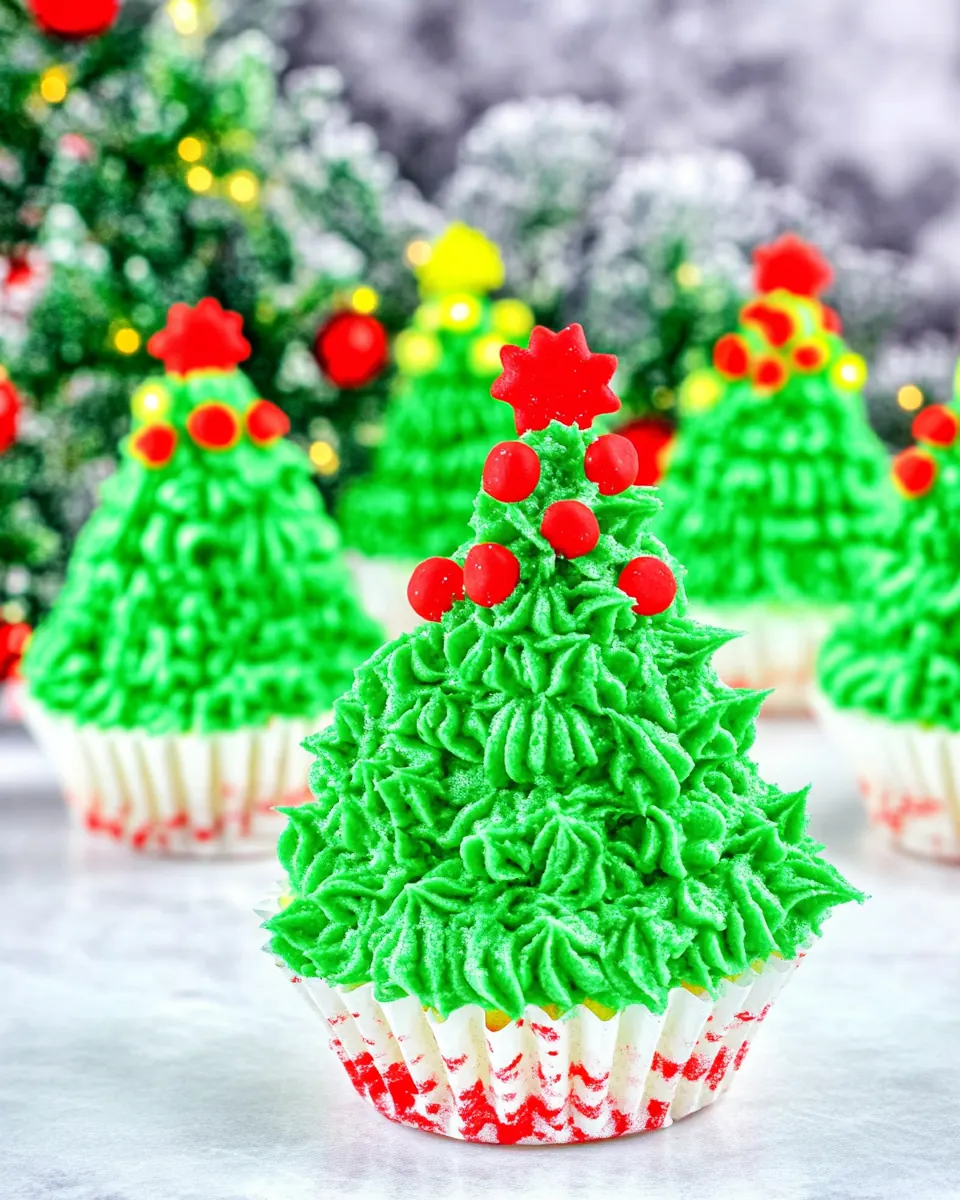
- Beginning at the base of the cone (largest part), pipe star-shaped dollops and work your way up, piping star-shaped dollops as you go; repeat process with all 12 cupcakes.: As you pipe, you will hear a gentle hiss and feel the bag's pressure as the stars form, building the tree in textured layers. The visual cue is a gradual tapering toward the top, creating a believable tree silhouette. Keep the bag steady and restart at the base if you make a misplaced star rather than overworking the area, which can warm the frosting and cause it to lose shape.
- Optionally, add a yellow star at the top of each Christmas tree for a more festive look.: Placing a tiny yellow star finishes the tree and provides a bright focal point. Press lightly so it sits on the peak without sinking. Overloading with heavy decorations can weigh down the piped frosting and reduce its visual impact.
- Serve immediately or store airtight in the fridge before serving. Cupcakes will keep airtight in the fridge for up to 5 days.: When you serve, the scent of fresh whipped cream and warm cake is at its most inviting. If storing, place cupcakes airtight to preserve moisture and the integrity of the frosting; they will keep well for up to five days. Leaving them exposed in the fridge can lead to drying or absorbing other odors, so airtight storage is crucial.
Ways to Adapt This Recipe
These tweaks let you tailor Christmas Tree Cupcakes to your occasion, skills, and flavor preferences. Below are creative, practical ways to adapt the recipe without changing the essential assembly or ingredient list.
- Double the whipped cream if you are not experienced with piping, as noted in the recipe. Having extra frosting prevents mismatched shades if you need to tint more later, and it gives you more margin for decorative mistakes.
- Use gel food coloring for a more intense green without thinning the whipped cream. Start with a small amount and mix thoroughly, testing on a spoon until you reach the desired hue.
- Pre-fill cones with small candies if you want a hidden surprise. Fill about halfway with mini candies or chips, then invert quickly onto the frosted cupcake to seal them inside.
- Chill your bowl and utensils before whipping the heavy cream. Cold equipment helps the cream whip faster and reach stiff peaks more reliably, which is crucial for piping defined stars.
- Pipe on a chilled surface to keep the whipped cream firm while you work. If your kitchen is warm, refrigerate the assembled cupcakes briefly between sets to help the frosting hold its shape.
- Practice star piping on parchment paper before decorating your cupcakes. This builds muscle memory and helps you time the pressure needed for consistent stars without wasting frosting.
Serving This Christmas Tree Cupcakes
These cupcakes are both a dessert and a centerpiece, so serving them well adds to the experience. Below are ideas for occasions, pairings, storage, and presentation that will make your display feel thoughtful and festive.
- Holiday parties: Arrange the cupcakes on a tiered stand for visual impact and allow guests to help themselves. The vertical cones make a dramatic display that doubles as decor.
- Family gatherings: Serve them after a holiday meal with simple beverages so the cupcakes remain the focal point. They work well for both casual and slightly more formal spreads.
- Kids events: Let children decorate their own cones as an activity station. Provide extra green frosting and small yellow stars so they can personalize each tree.
- Storing leftovers: Keep cupcakes airtight in the refrigerator to preserve the whipped cream texture. Place them in a container where the cones will not press against the lid to protect the piping.
- Make ahead strategy: Bake the cupcakes a day ahead and store unfrosted. Whip and tint the cream the next day, then assemble to keep the cones crisp and the frosting fresh.
- Seasonal pairings: These cupcakes fit winter celebrations especially well, pairing nicely with warm beverages and simple fruit platters that balance the sweet, creamy flavors.
FAQ
Conclusion
These Christmas Tree Cupcakes stand out because they combine simple cupcake baking with playful assembly to create an instantly festive treat. They are approachable enough for bakers of all skill levels and versatile enough to adapt to different party scenarios. I encourage you to try them at your next holiday gathering, whether you are making them with kids or preparing a show stopping dessert for guests. The bright green frosting, crunchy cones, and tiny yellow stars create a joyful presentation that brings smiles and makes memories.
Christmas Tree Cupcakes
Equipment
- Stand mixer or handheld mixer
- Whisk attachment
- 12-count cupcake pan
- cupcake liners
- Piping bag and star tip
Ingredients
- 2 large eggs, at room temp Whisk together to provide structure and moisture while helping the batter rise and bind other ingredients; bring to room temperature for even incorporation and better volume.
- 1/2 cup vegetable or canola oil Add for tender crumb and moist texture while carrying flavors; choose neutral vegetable or canola oil to avoid altering the cupcake taste.
- 3/4 cup granulated sugar Sweeten the batter and help with browning while contributing to a fine crumb; adjust slightly for desired sweetness and texture.
- 1 to 2 teaspoons pure vanilla extract Flavor the batter with warm, aromatic vanilla; use pure extract for the cleanest flavor and add gradually to taste between 1 and 2 teaspoons.
- 1 1/2 cups all-purpose flour Provide the bulk and body of the cupcakes and combine with leaveners to form the cake matrix; whisk or sift for even distribution and to avoid lumps.
- 1 1/2 teaspoons baking powder Leaven the batter by creating gas bubbles that expand during baking; measure precisely to ensure proper rise without a bitter aftertaste.
- 1 teaspoon baking soda React with acidic components to produce lift and a tender texture; use the stated amount to balance with baking powder for optimal crumb.
- 1 teaspoon salt Season the cupcakes subtly and enhance overall flavor balance; dissolve well into the wet ingredients to avoid pockets of salt.
- 1 cup heavy or whipping cream, very cold** (See Notes) Whip into stiff peaks to create a stable, airy frosting base that is rich and smooth; keep very cold to facilitate whipping and structure retention.
- 1/4 cup confectioners' sugar Sweeten and stabilize the whipped cream while adding a silky mouthfeel; sift before adding to prevent lumps and ensure even sweetness.
- 1/2 teaspoon pure vanilla extract Enhance the whipped cream frosting with a concentrated vanilla aroma; add a small amount to avoid overpowering the cream's delicate flavor.
- 12 pointed-tip sugar cookie ice cream cones Provide a festive, tree-shaped base for piped frosting and offer a crunchy, sweet cone texture; use pointed-tip sugar cookie cones for easy decorating.
- Green food coloring, as desired Tint the whipped cream frosting to a festive green for Christmas tree appearance; add a few drops at a time until the desired shade is achieved.
- Yellow stars, optional for decorating Top the finished trees with small yellow stars for a classic holiday touch and visual contrast; place gently to avoid damaging the frosting.
Instructions
- Preheat oven to 350 F and line a standard 12-count cupcake pan with foil red or green cupcake liners; set aside.: As you preheat the oven, you will notice the warm, dry scent of the oven coming to life and the liners add a festive edge before you even start. The reason for preheating is to ensure the oven reaches the correct temperature so the cupcakes rise evenly, with a consistent dome. A common pitfall is not preheating, which causes uneven baking and denser centers. Make sure the rack is placed in the center of the oven for even heat circulation.
- To a large bowl, add the eggs, oil, sugar, and whisk to combine.: When whisking the eggs , oil , and granulated sugar , you'll hear a gentle rustling from the whisk and see the mixture become glossy and slightly thickened, which helps trap air for lift. This step builds the base emulsion that supports the batter, so whisk until homogeneous but avoid incorporating too much air. Overwhisking can lead to a fragile structure that collapses in the oven.
- Add the vanilla and whisk to combine.: Adding the vanilla extract at this stage releases a warm, fragrant aroma that perfumes the batter and elevates the flavor profile. It helps distribute that flavor evenly throughout the cupcakes. Do not add an excessive amount as it can overpower the delicate crumb.
- Add the flour, baking powder, baking soda, salt, and stir until just combined; don't overmix.: When you fold in the all-purpose flour along with baking powder , baking soda , and salt , the batter will change from glossy to slightly thicker and more matte. This signals that gluten is developing; stirring just until there are no streaks ensures tenderness. A frequent mistake is overmixing, which creates a tougher cupcake with tunnels or dense spots.
- Evenly divide batter into prepared pan making sure to fill each cavity about 2/3-full.: As you portion batter, you'll notice how it settles and levels out; filling to two thirds gives room for lift without spilling. Even division ensures consistent baking time and uniform size for decorating later. Filling too full results in overflow and uneven shapes, while underfilling yields tiny cupcakes that sit oddly beneath the cone.
- Bake for about 18 to 20 minutes, or until cupcakes are done. They're done when the center is set, springy to the touch, and a toothpick inserted in the center comes out clean or with a few moist crumbs. Tip - For optimal results, bake on the center oven rack and rotate once midway through for the most even baking.: During baking you will smell a sweet, bready aroma and see the tops turn a light golden. The cupcakes are ready when the center springs back to a gentle touch and a toothpick comes out clean or with a few moist crumbs. This technique prevents overbaking which dries them out. Avoid opening the oven door early and often, which can cause collapse from sudden temperature shifts.
- Allow cupcakes to cool in the pan while you make the whipped cream.: Cooling in the pan lets residual heat finish the crumb without continued oven exposure, and you will notice steam dissipate as they cool. Leaving them too long in the pan can make removal trickier, so transfer to a rack after ten to fifteen minutes if you prefer quicker cooling. A common error is frosting hot cupcakes, which melts the frosting and ruins shape.
- To the bowl (a chilled bowl is better) of a stand mixer fitted with the whisk attachment or handheld electric mixer fitted with the whisk attachment, add the cream, confectioners' sugar, vanilla, and beat on high speed for about 90 to 120 seconds, or until stiff peaks form; stop to scrape down the bowl as necessary.: As you whip the very cold heavy cream , you will hear a change from a liquid slosh to a thicker, billowy sound and see soft peaks form that eventually become firm. The whipped cream should hold a defined peak when you lift the whisk. The cold bowl and beaters speed this process and yield more stable peaks. Underwhipping gives runny frosting, while overwhipping can turn the cream grainy or into butter.
- Using a butter knife or spoon, spread a thin layer of whipped cream over the top of each cupcake.: Spreading a light base coat of the whipped cream helps the cone adhere and provides an initial layer for better piping adhesion. You will feel a smooth, cool texture as you spread it. Skipping this base coat can make the cone sit unstable and cause sliding when piping heavier frosting layers.
- Add an inverted ice cream cone*** (See Notes) to the top of each cupcake, using the whipped cream to help secure it; set aside.: When you place the pointed-tip cone gently onto the whipped cream, it creates an architectural silhouette that resembles a tree. The whipped cream acts like edible glue, so press just enough to secure without compressing the cupcake beneath. Forcing the cone too hard can crack the cupcake or displace the frosting.
- To the remaining whipped cream, add green food coloring, as desired until desired shape is achieved. Tip - I recommend gel food coloring for the most intense green color results. Mix well to make sure it's evenly combined.: As you fold in green food coloring , watch the cream shift from white to vibrant green, and mix until the hue is even. Gel coloring gives richer saturation without thinning, so add gradually until you reach the perfect tone. Rushing or adding too much liquid color can make the cream loose and difficult to pipe.
- Spread a thin layer of green whipped cream over the ice cream cones on the top of each cupcake.: This thin green coat smooths out the cone and provides a base for the piped stars, creating a cohesive green tree look. You will feel the coolness of the cream against the cone and notice the color beginning to unify the surface. If the layer is too thick, piping detail can become lost, while too thin a layer risks uneven piping adhesion.
- Add the green food coloring to a silicone piping bag fitted with a coupler (or your favorite style of piping bag) and a star tip.: Preparing the piping bag organizes your workflow and ensures a controlled, consistent delivery of frosting. You will sense the tension in the bag as you squeeze, which gives you feedback on how much pressure to apply. An incorrect tip size can change the scale of the stars, so choose a tip that produces defined dollops without clogging.
- Beginning at the base of the cone (largest part), pipe star-shaped dollops and work your way up, piping star-shaped dollops as you go; repeat process with all 12 cupcakes.: As you pipe, you will hear a gentle hiss and feel the bag's pressure as the stars form, building the tree in textured layers. The visual cue is a gradual tapering toward the top, creating a believable tree silhouette. Keep the bag steady and restart at the base if you make a misplaced star rather than overworking the area, which can warm the frosting and cause it to lose shape.
- Optionally, add a yellow star at the top of each Christmas tree for a more festive look.: Placing a tiny yellow star finishes the tree and provides a bright focal point. Press lightly so it sits on the peak without sinking. Overloading with heavy decorations can weigh down the piped frosting and reduce its visual impact.
- Serve immediately or store airtight in the fridge before serving. Cupcakes will keep airtight in the fridge for up to 5 days.: When you serve, the scent of fresh whipped cream and warm cake is at its most inviting. If storing, place cupcakes airtight to preserve moisture and the integrity of the frosting; they will keep well for up to five days. Leaving them exposed in the fridge can lead to drying or absorbing other odors, so airtight storage is crucial.
Notes
- Double the whipped cream if you are not experienced with piping, as noted in the recipe. Having extra frosting prevents mismatched shades if you need to tint more later, and it gives you more margin for decorative mistakes.
- Use gel food coloring for a more intense green without thinning the whipped cream. Start with a small amount and mix thoroughly, testing on a spoon until you reach the desired hue.
- Pre-fill cones with small candies if you want a hidden surprise. Fill about halfway with mini candies or chips, then invert quickly onto the frosted cupcake to seal them inside.
- Chill your bowl and utensils before whipping the heavy cream. Cold equipment helps the cream whip faster and reach stiff peaks more reliably, which is crucial for piping defined stars.
- Pipe on a chilled surface to keep the whipped cream firm while you work. If your kitchen is warm, refrigerate the assembled cupcakes briefly between sets to help the frosting hold its shape.
- Practice star piping on parchment paper before decorating your cupcakes. This builds muscle memory and helps you time the pressure needed for consistent stars without wasting frosting.