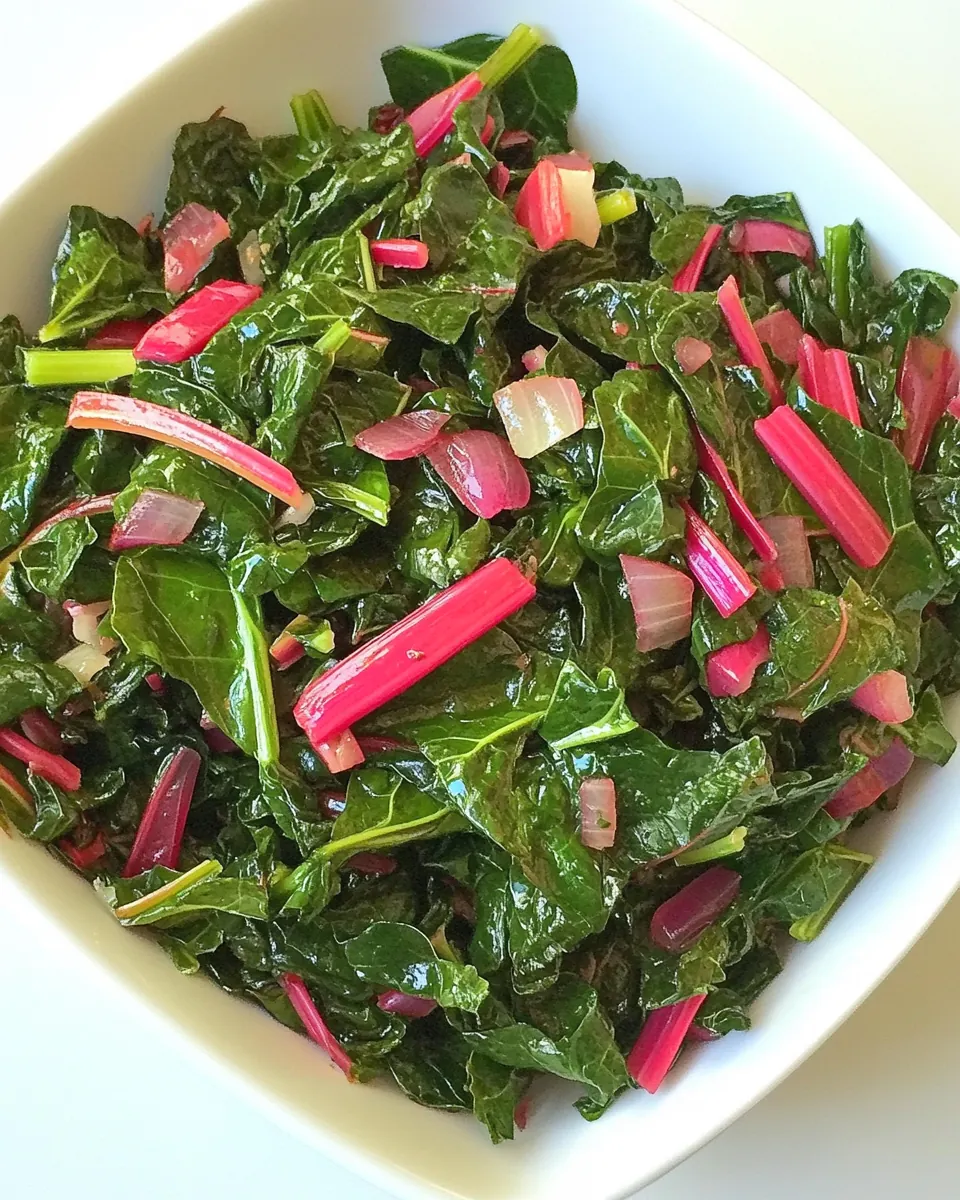
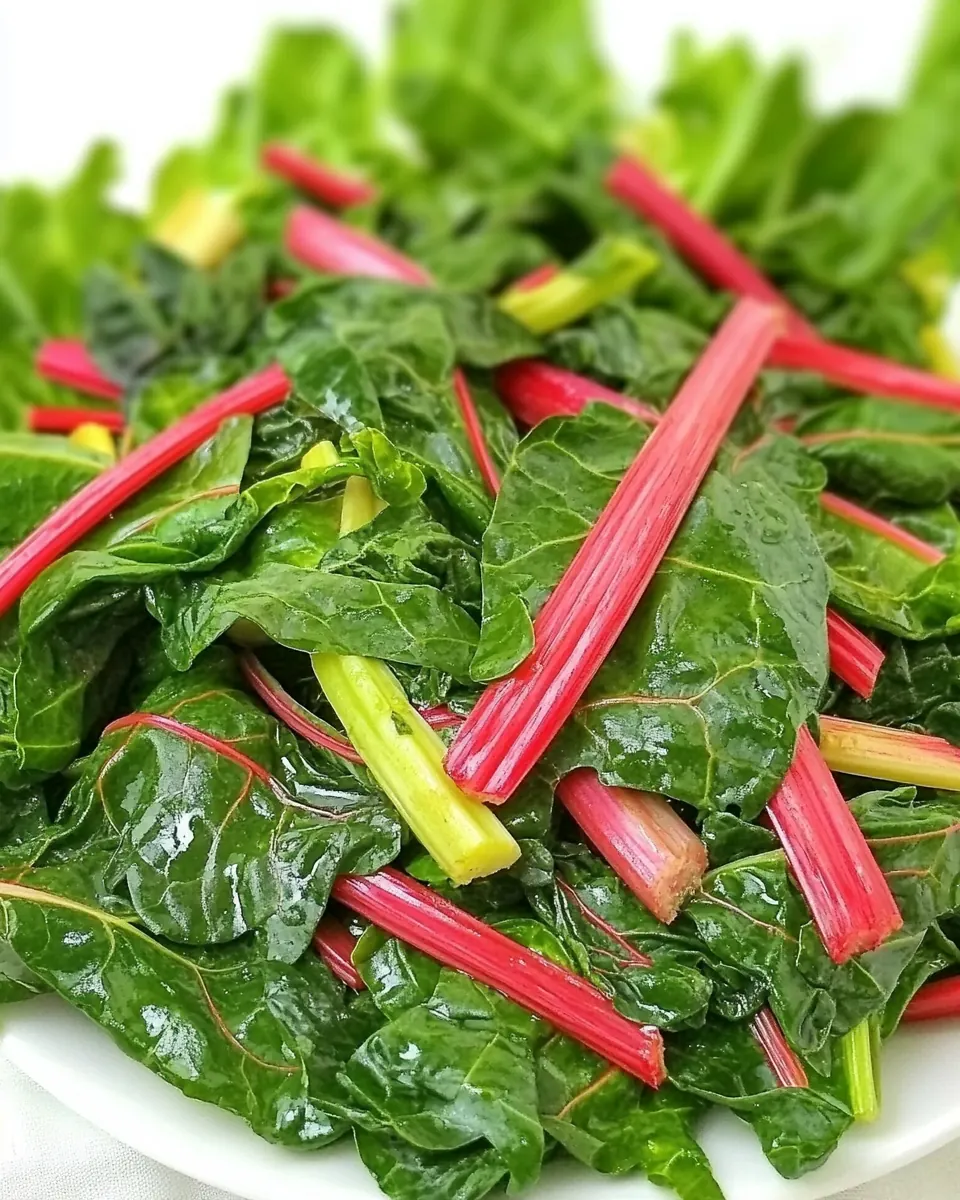
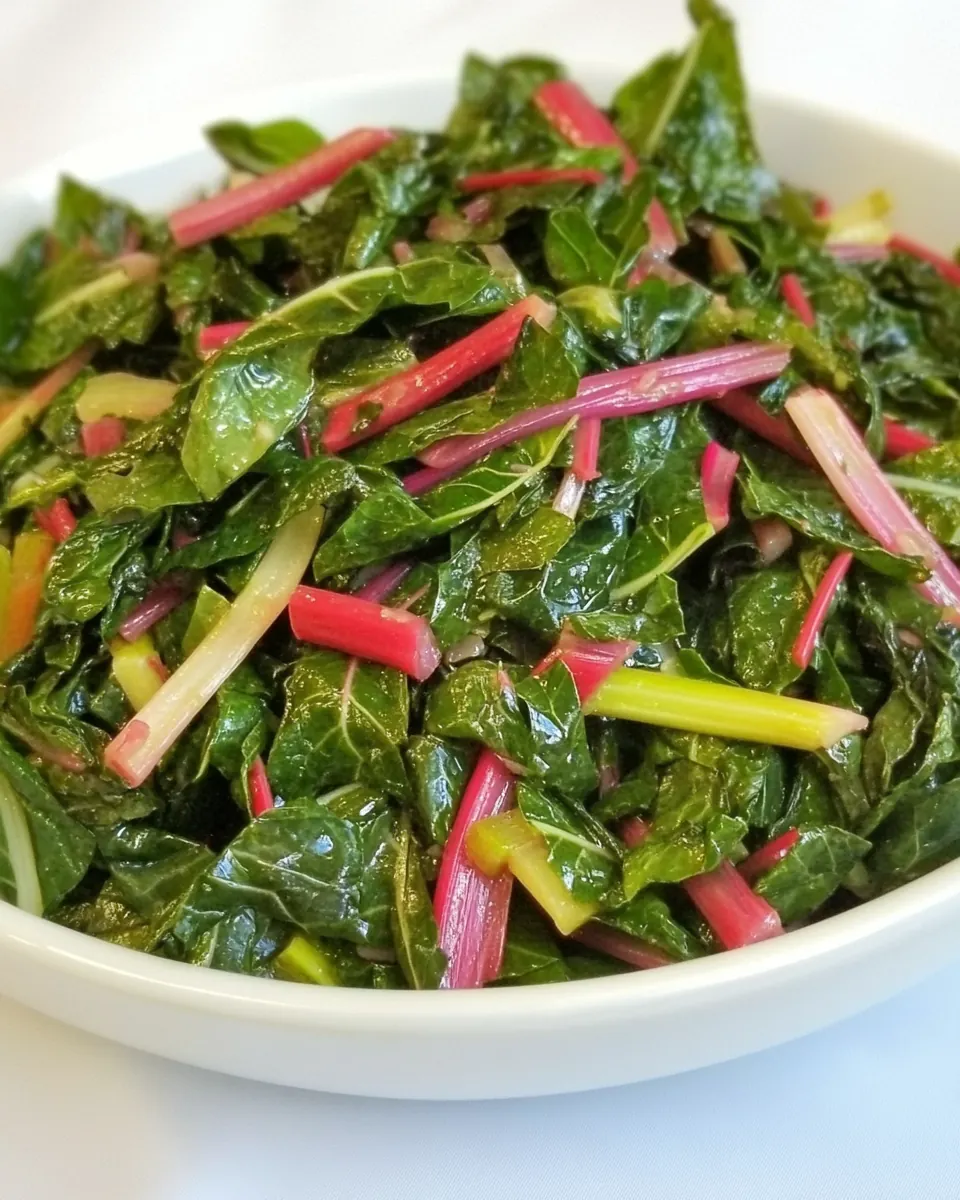
Rainbow Swiss Chard
Rainbow Swiss Chard has been a comforting weeknight favorite in my kitchen since I first spotted its jewel tone stems at a farmers market years ago.
I remember buying a big bunch because the colors pulled me in, and then getting home and having to figure out what would honor those vibrant stems and tender leaves. That first pan of greens taught me a lot about balance, timing, and how a few simple pantry staples can coax out deep savory notes from humble produce. Over time I refined the approach so the stems cook through, the leaves finish tender, and the garlic and olive oil become the supporting cast rather than overpowering stars.
Some evenings I make this when I want something fast but satisfying, other times I prepare it to add to a grain bowl or to spoon alongside roasted vegetables. I love how the texture shifts from crisp stems to silky leaves in such a short time, and I almost always find myself adjusting the seasoning as I taste along the way. Whether you are feeding yourself or sharing with friends, this recipe highlights the natural sweetness and minerality of the chard without fuss.
Recipe Snapshot
20 mins
10 mins
10 mins
Medium
150 kcal
American
Vegan, Gluten-Free
Side Dishes
Sauté pan, Knife, Spatula
Why This Rainbow Swiss Chard Is a Winner
Vibrant visual appeal
I never tire of serving a skillet full of Rainbow Swiss Chard because the colorful stems make any plate look special. That immediate visual lift matters when you want a dish that reads fresh and seasonal, and it makes guests curious before they even taste it.
Speed and simplicity
I value recipes I can pull together between meetings or after errands, and this one shines there. With just a handful of pantry items like olive oil and garlic, you get big flavor in a little time, which is perfect for busy weeknights or when you want something nourishing fast.
Flexible accompaniment
One thing I appreciate is how well Rainbow Swiss Chard plays with other foods. It pairs beautifully with grains, beans, or a simple protein, so I often stretch it into different meals without changing the base method. That adaptability makes it a go to for meal prep and last minute plate building.
Textural contrast
The technique of cooking stems first then adding leaves gives a satisfying bite contrast, and I like how that keeps each mouthful interesting. The stems add a pleasant chew while the leaves wilt into softness, creating a balanced mouthfeel that feels intentional.
Seasonal and nourishing
I love that this recipe highlights a spring crop but works year round. The greens bring vitamins and fiber, while the light seasoning keeps the profile bright and clean. For anyone wanting an easy way to eat more vegetables, this is a reliable, flavorful option.
What to Gather for Rainbow Swiss Chard
These ingredients are intentionally scarce, so each one has a clear job. The Rainbow Swiss Chard is the hero, while the garlic and olive oil provide aromatic and savory depth. A pinch of red pepper flakes lifts the flavor if you want heat, and salt and pepper finish everything so the natural sweetness of the greens shines.
- 1 pound rainbow Swiss chard, washed and thoroughly dried: Provide the leafy base and vibrant color for the dish, offering a slightly earthy, mildly bitter flavor that softens when cooked. Chop or tear into bite-sized pieces to ensure even wilting and easy eating; stems can be cooked a bit longer for tenderness. Packed with vitamins A, C, and K, it contributes nutrition and bulk to the finished side.
- 2 cloves garlic, smashed and chopped: Add pungent aromatics and savory depth by releasing essential oils when smashed and chopped; garlic browns quickly, lending a nutty, caramelized note. Sauté briefly with oil to mellow harshness and integrate flavor throughout the greens. Small pieces distribute flavor evenly and enhance overall aroma.
- 1/2 tsp red pepper flakes (optional): Contribute optional heat and a touch of smoky spice that elevates the flavor profile without overpowering the chard. Sprinkle sparingly while sautéing to toast the flakes and release capsaicin, adjusting quantity to personal heat preference. Works well to balance richness from oil and enhance savory notes.
- 2 tsp olive oil: Provide the cooking fat necessary to sauté garlic and wilt the Swiss chard, promoting even heat transfer and flavor melding. Use a moderate amount to coat the pan and prevent sticking while allowing ingredients to brown lightly for complexity. Choose extra-virgin or regular olive oil for a fruity, slightly peppery undertone.
- Salt and fresh pepper to taste: Season to taste with salt and freshly ground pepper to enhance natural flavors, balance bitterness, and provide finishing contrast. Add salt incrementally during cooking to draw out moisture and concentrate flavor, then adjust with pepper at the end for bright, aromatic lift. Proper seasoning transforms simple greens into a well-rounded side.
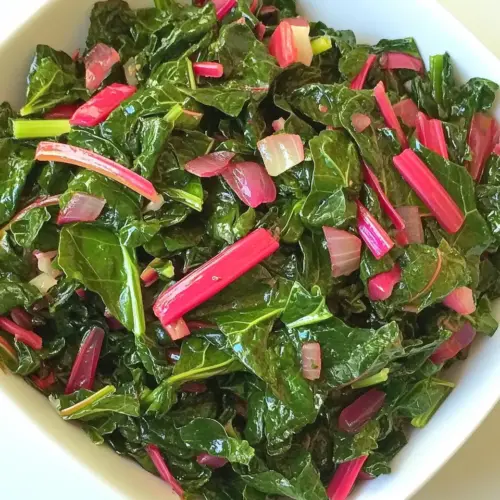
Directions for Rainbow Swiss Chard
I like to think of these steps as a short ritual: wake the oil, flavor the pan with garlic, tenderize the stems, then finish the leaves so everything is harmonized. Follow the sensory cues more than the clock, and you will end up with bright, well seasoned greens.
- Heat the oil over medium heat in a sauté pan.: You will smell the faint fruitiness of olive oil as it warms, and the surface of the pan may shimmer slightly when it is ready. This step matters because a properly warmed pan ensures the garlic sizzles on contact rather than stewing, which preserves its sweet aromas. A common mistake is using too high heat, which can burn the oil and make the dish bitter, so keep the burner at medium and watch for gentle ripples on the oil surface.
- Smash the garlic clove with the side of a knife and add it to the pan.: When the garlic hits the hot oil you should hear a quick, delicate sizzle and the aroma will bloom immediately. The smashed bits release oils that flavor the entire pan, creating a fragrant base for the greens. Avoid leaving the garlic unattended, because it can brown in seconds; if it edges toward dark brown, remove it briefly or lower the heat to prevent bitterness.
- Add red pepper flakes if using, sauté the garlic lightly in the oil until it becomes golden.: The tiny pops of red pepper will toast and add smoky warmth, while the garlic should turn a light golden hue rather than dark brown. This color indicates a sweet, nutty flavor. If the garlic blacks, it will lend a harsh taste, so keep the heat moderated and stir constantly during this brief stage.
- Chop the stems into small pieces and add to the oil.: As the chopped stems hit the pan you will notice a sharper vegetal scent and a firmer texture under your spatula. Cooking the stems first ensures they soften fully and do not remain fibrous when the leaves are added. A common misstep is adding leaves too early, which causes the stems to stay underdone, so give the stems their own time to cook.
- Mix and add a drop of water and cover.: The tiny splash of water helps create steam that speeds the softening of the stems without steaming the leaves later. You may hear a gentle hiss as the water meets the hot pan, and within a minute the pan will carry a warm, concentrated aroma. Overdoing the water will steam the greens and dilute flavor, so use only a small amount.
- Cook about 4-5 minutes.: During these minutes you should see the stems turn more translucent and tender, and the pan aroma will shift from raw vegetal to richer, sweet notes. This timeframe is important so the stems reach the right texture, and testing a piece for tenderness is more reliable than strict timing. If the stems still feel firm, extend the cooking by a minute or two, but avoid overcooking which makes them mushy.
- Chop the leaves and add to the pan.: Freshly chopped leaves release vegetal perfume when torn or cut, and when added they wilt quickly into the pan creating a layered aroma. Adding the leaves after the stems prevents them from becoming limp and overcooked, preserving a silky texture. A frequent error is overcrowding the pan with leaves, which can lead to steaming instead of sautéing; add them in batches if needed.
- Sauté until just wilted, stirring frequently.: You will see the leaves collapse and their color deepen to a glossy, darker green, and the sound will be a soft, almost imperceptible sizzle. Stirring keeps cooking even and helps the leaves finish without turning soggy. If you stop stirring, pockets may overcook, so keep the spatula moving for even tenderness.
- Season with salt and pepper.: As the final touch the seasoning brightens the whole pan and balances any bitter notes. Taste a leaf and adjust salt and pepper gradually, because you can always add more but cannot take it away. A common mistake is over salting earlier in the process, so I prefer to season at the end and taste before serving.
Ways to Customize

This section helps you adapt the base approach to match your pantry or mood. Small adjustments keep the core method intact while offering new textures and flavors that still respect the simplicity of Rainbow Swiss Chard.
- Add a squeeze of citrus to brighten the finished greens and enhance their natural sweetness.
- Include red pepper flakes for warming heat, adding them with the garlic so they bloom in the oil.
- Finish with a drizzle of good olive oil off the heat to add a silky mouthfeel and deepen the overall aroma.
- Serve over warm grains like rice or bulgur to turn the greens into a heartier main for a light meal.
- Keep it simple and skip optional seasonings if you prefer a very clean, vegetable forward plate.
How to Serve Rainbow Swiss Chard
This dish is versatile and can be plated in many ways: as a side with roasted or grilled mains, tossed into warm grains, or spooned alongside a simple protein. Its bright colors and tender texture make it suitable for casual dinners or more festive gatherings.
- As a side for weeknight dinners place a generous scoop adjacent to roasted vegetables or grilled proteins for a quick balanced plate.
- In grain bowls toss the cooked chard with warm rice or quinoa and a drizzle of extra virgin olive oil for a nourishing bowl lunch.
- For seasonal gatherings serve on a large platter to highlight the colorful stems as part of a shared vegetable spread during spring entertaining.
- Storage tip refrigerate leftovers in an airtight container for up to three days, reheat gently to avoid overcooking.
- Serving style finish with a light sprinkle of cracked black pepper and a final tiny drizzle of oil for shine and mouthfeel.
FAQ
Conclusion
What makes this recipe special is its simplicity and the way it showcases the natural flavor and texture of the chard, with minimal hands on time and maximum visual impact. I encourage you to give it a try on a busy weeknight or to dress it up for guests, because the technique is forgiving and the rewards are immediate. It is an approachable, reliable way to enjoy seasonal greens that will likely become one of your quick favorites.
Rainbow Swiss Chard
Equipment
- Sauté Pan
- Knife
- Spatula
Ingredients
- 1 pound rainbow Swiss chard, washed and thoroughly dried Provide the leafy base and vibrant color for the dish, offering a slightly earthy, mildly bitter flavor that softens when cooked. Chop or tear into bite-sized pieces to ensure even wilting and easy eating; stems can be cooked a bit longer for tenderness. Packed with vitamins A, C, and K, it contributes nutrition and bulk to the finished side.
- 2 cloves garlic, smashed and chopped Add pungent aromatics and savory depth by releasing essential oils when smashed and chopped; garlic browns quickly, lending a nutty, caramelized note. Sauté briefly with oil to mellow harshness and integrate flavor throughout the greens. Small pieces distribute flavor evenly and enhance overall aroma.
- 1/2 tsp red pepper flakes, optional Contribute optional heat and a touch of smoky spice that elevates the flavor profile without overpowering the chard. Sprinkle sparingly while sautéing to toast the flakes and release capsaicin, adjusting quantity to personal heat preference. Works well to balance richness from oil and enhance savory notes.
- 2 tsp olive oil Provide the cooking fat necessary to sauté garlic and wilt the Swiss chard, promoting even heat transfer and flavor melding. Use a moderate amount to coat the pan and prevent sticking while allowing ingredients to brown lightly for complexity. Choose extra-virgin or regular olive oil for a fruity, slightly peppery undertone.
- Salt and fresh pepper to taste Season to taste with salt and freshly ground pepper to enhance natural flavors, balance bitterness, and provide finishing contrast. Add salt incrementally during cooking to draw out moisture and concentrate flavor, then adjust with pepper at the end for bright, aromatic lift. Proper seasoning transforms simple greens into a well-rounded side.
Instructions
- Heat the oil over medium heat in a sauté pan.: You will smell the faint fruitiness of olive oil as it warms, and the surface of the pan may shimmer slightly when it is ready. This step matters because a properly warmed pan ensures the garlic sizzles on contact rather than stewing, which preserves its sweet aromas. A common mistake is using too high heat, which can burn the oil and make the dish bitter, so keep the burner at medium and watch for gentle ripples on the oil surface.
- Smash the garlic clove with the side of a knife and add it to the pan.: When the garlic hits the hot oil you should hear a quick, delicate sizzle and the aroma will bloom immediately. The smashed bits release oils that flavor the entire pan, creating a fragrant base for the greens. Avoid leaving the garlic unattended, because it can brown in seconds; if it edges toward dark brown, remove it briefly or lower the heat to prevent bitterness.
- Add red pepper flakes if using, sauté the garlic lightly in the oil until it becomes golden.: The tiny pops of red pepper will toast and add smoky warmth, while the garlic should turn a light golden hue rather than dark brown. This color indicates a sweet, nutty flavor. If the garlic blacks, it will lend a harsh taste, so keep the heat moderated and stir constantly during this brief stage.
- Chop the stems into small pieces and add to the oil.: As the chopped stems hit the pan you will notice a sharper vegetal scent and a firmer texture under your spatula. Cooking the stems first ensures they soften fully and do not remain fibrous when the leaves are added. A common misstep is adding leaves too early, which causes the stems to stay underdone, so give the stems their own time to cook.
- Mix and add a drop of water and cover.: The tiny splash of water helps create steam that speeds the softening of the stems without steaming the leaves later. You may hear a gentle hiss as the water meets the hot pan, and within a minute the pan will carry a warm, concentrated aroma. Overdoing the water will steam the greens and dilute flavor, so use only a small amount.
- Cook about 4-5 minutes.: During these minutes you should see the stems turn more translucent and tender, and the pan aroma will shift from raw vegetal to richer, sweet notes. This timeframe is important so the stems reach the right texture, and testing a piece for tenderness is more reliable than strict timing. If the stems still feel firm, extend the cooking by a minute or two, but avoid overcooking which makes them mushy.
- Chop the leaves and add to the pan.: Freshly chopped leaves release vegetal perfume when torn or cut, and when added they wilt quickly into the pan creating a layered aroma. Adding the leaves after the stems prevents them from becoming limp and overcooked, preserving a silky texture. A frequent error is overcrowding the pan with leaves, which can lead to steaming instead of sautéing; add them in batches if needed.
- Sauté until just wilted, stirring frequently.: You will see the leaves collapse and their color deepen to a glossy, darker green, and the sound will be a soft, almost imperceptible sizzle. Stirring keeps cooking even and helps the leaves finish without turning soggy. If you stop stirring, pockets may overcook, so keep the spatula moving for even tenderness.
- Season with salt and pepper.: As the final touch the seasoning brightens the whole pan and balances any bitter notes. Taste a leaf and adjust salt and pepper gradually, because you can always add more but cannot take it away. A common mistake is over salting earlier in the process, so I prefer to season at the end and taste before serving.
Notes
- Add a squeeze of citrus to brighten the finished greens and enhance their natural sweetness.
- Include red pepper flakes for warming heat, adding them with the garlic so they bloom in the oil.
- Finish with a drizzle of good olive oil off the heat to add a silky mouthfeel and deepen the overall aroma.
- Serve over warm grains like rice or bulgur to turn the greens into a heartier main for a light meal.
- Keep it simple and skip optional seasonings if you prefer a very clean, vegetable forward plate.