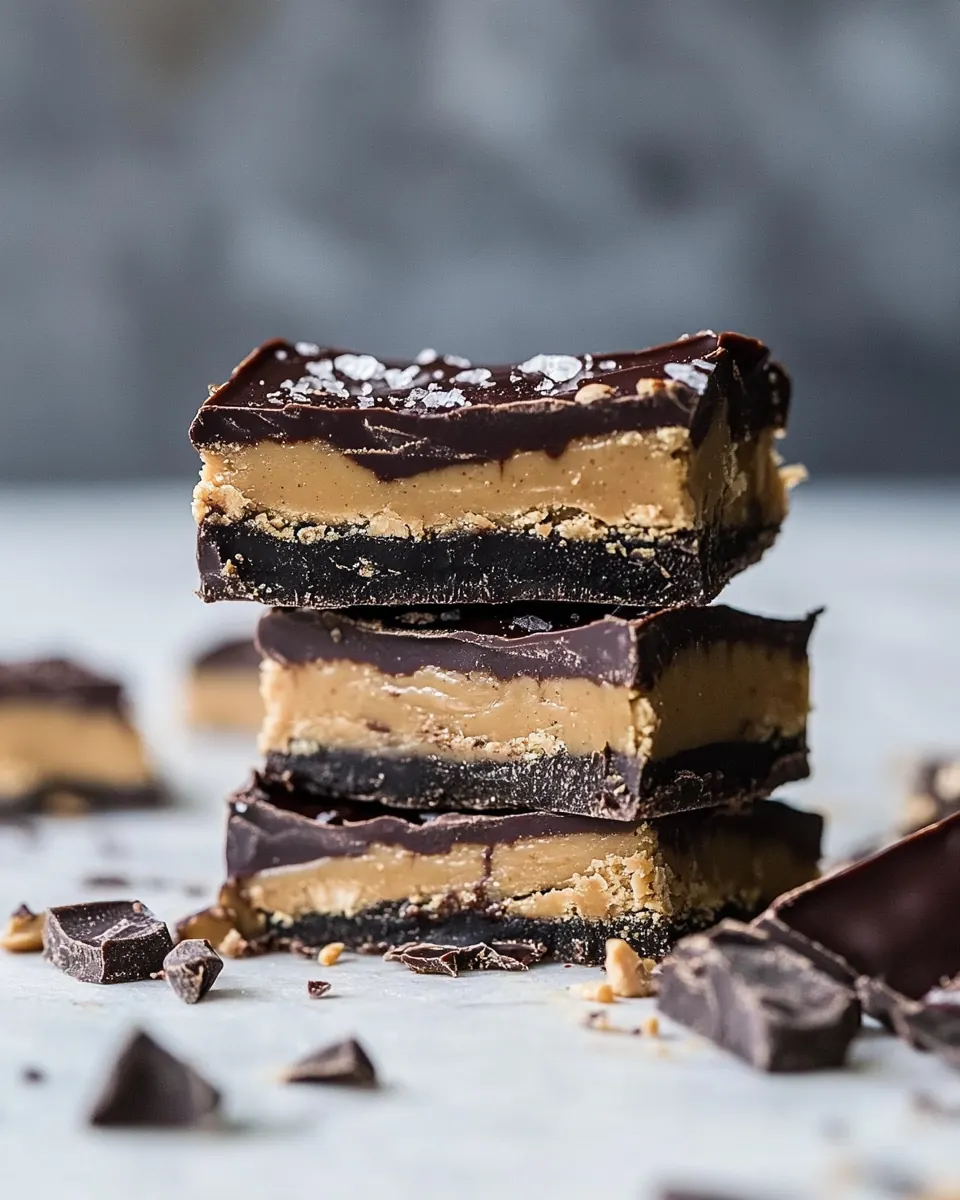
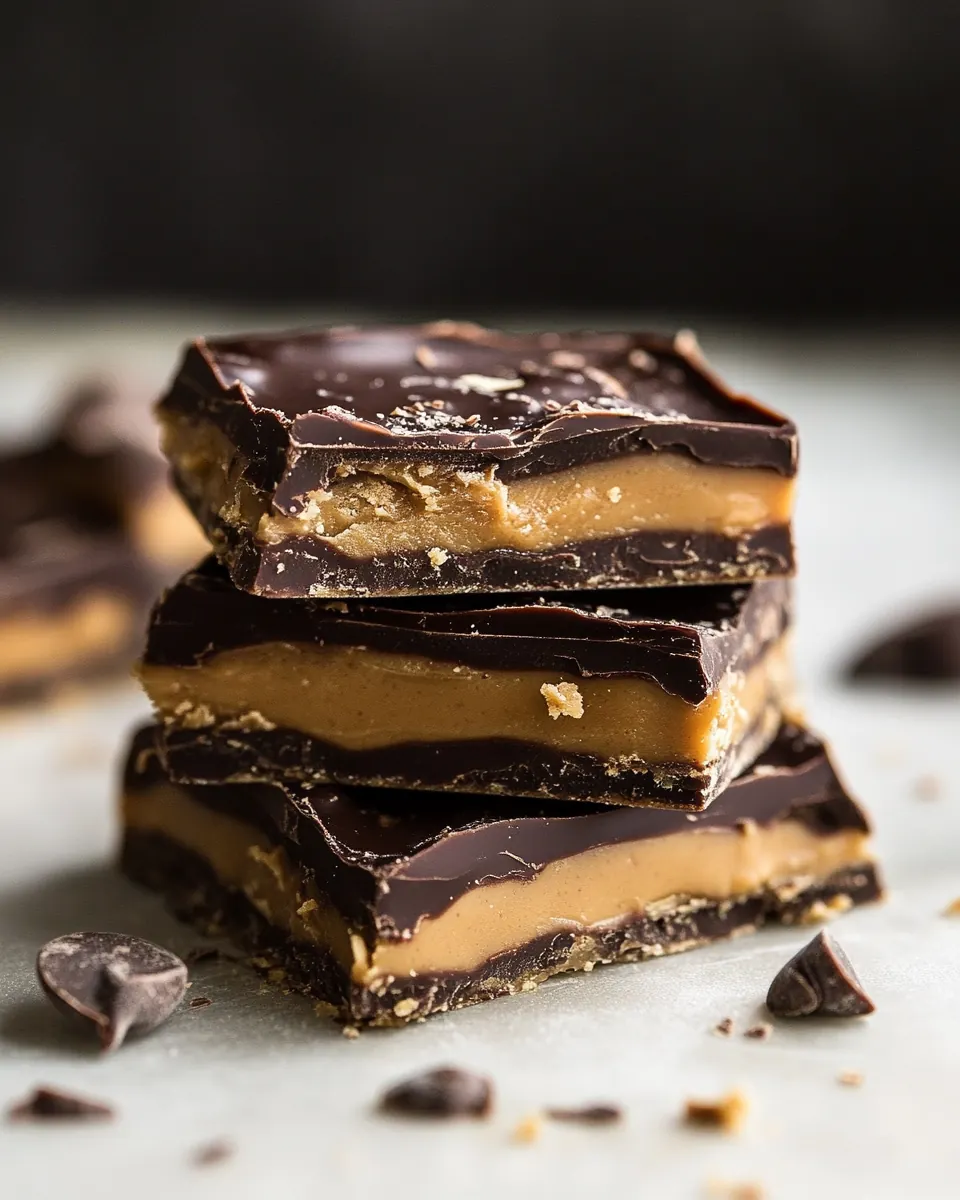
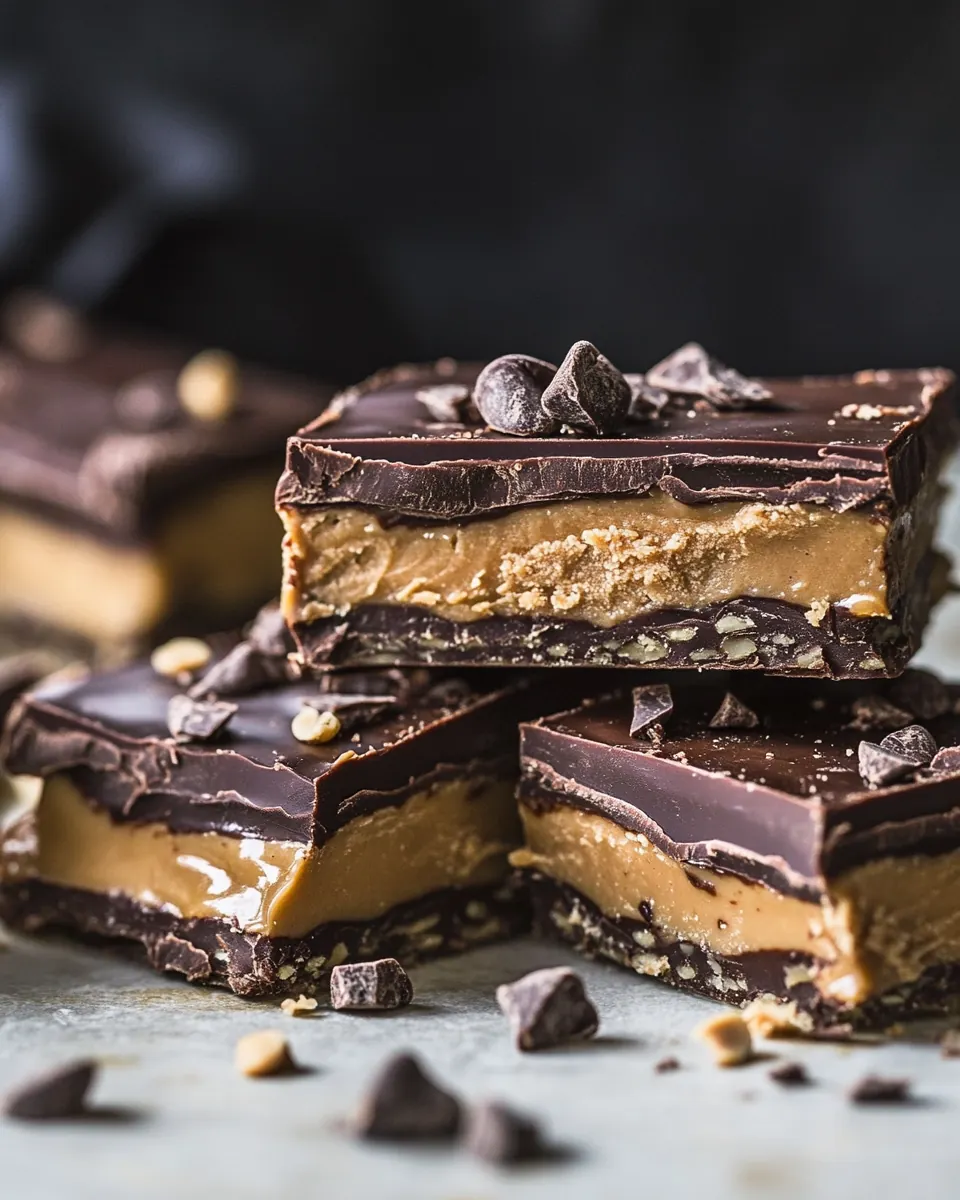
5 Ingredient Triple Decker Chocolate Peanut Butter Bars
5 Ingredient Triple Decker Chocolate Peanut Butter Bars is the kind of recipe that makes my kitchen smell like a candy shop and sends everyone in the house to the counter with a curious grin.
I first made 5 Ingredient Triple Decker Chocolate Peanut Butter Bars on a gray afternoon when a neighbor dropped off a bag of fresh cookies and I wanted to return the favor with something homemade but fuss free. I remember the way the chocolate set up in glossy layers, and how the peanut butter filling tasted both silky and substantial, the kind of treat that disappears way faster than it should. That day I learned that a little planning, a shallow pan, and a freezer are all you need to create something that looks impressive yet takes almost no effort.
Every time I bring these 5 Ingredient Triple Decker Chocolate Peanut Butter Bars to a gathering, someone inevitably asks if they are from a bakery. I tell them the truth, that the magic is really in simple technique, not a secret ingredient. I like to make a batch on a Monday and stash them in the fridge to brighten the whole week, and I love how adaptable they are when I want a sweeter or less sweet finishing touch. If you enjoy bold peanut butter flavor paired with creamy chocolate, these bars will quickly become a go to recipe in your rotation.
Recipe Snapshot
45 mins
15 mins
30 mins
Medium
250 kcal
American
Gluten-Free, Low FODMAP
Desserts
8 x 8 inch square pan, Parchment paper, Microwave safe bowl, Spatula, Mixing bowl, Knife
Why We Love This 5 Ingredient Triple Decker Chocolate Peanut Butter Bars
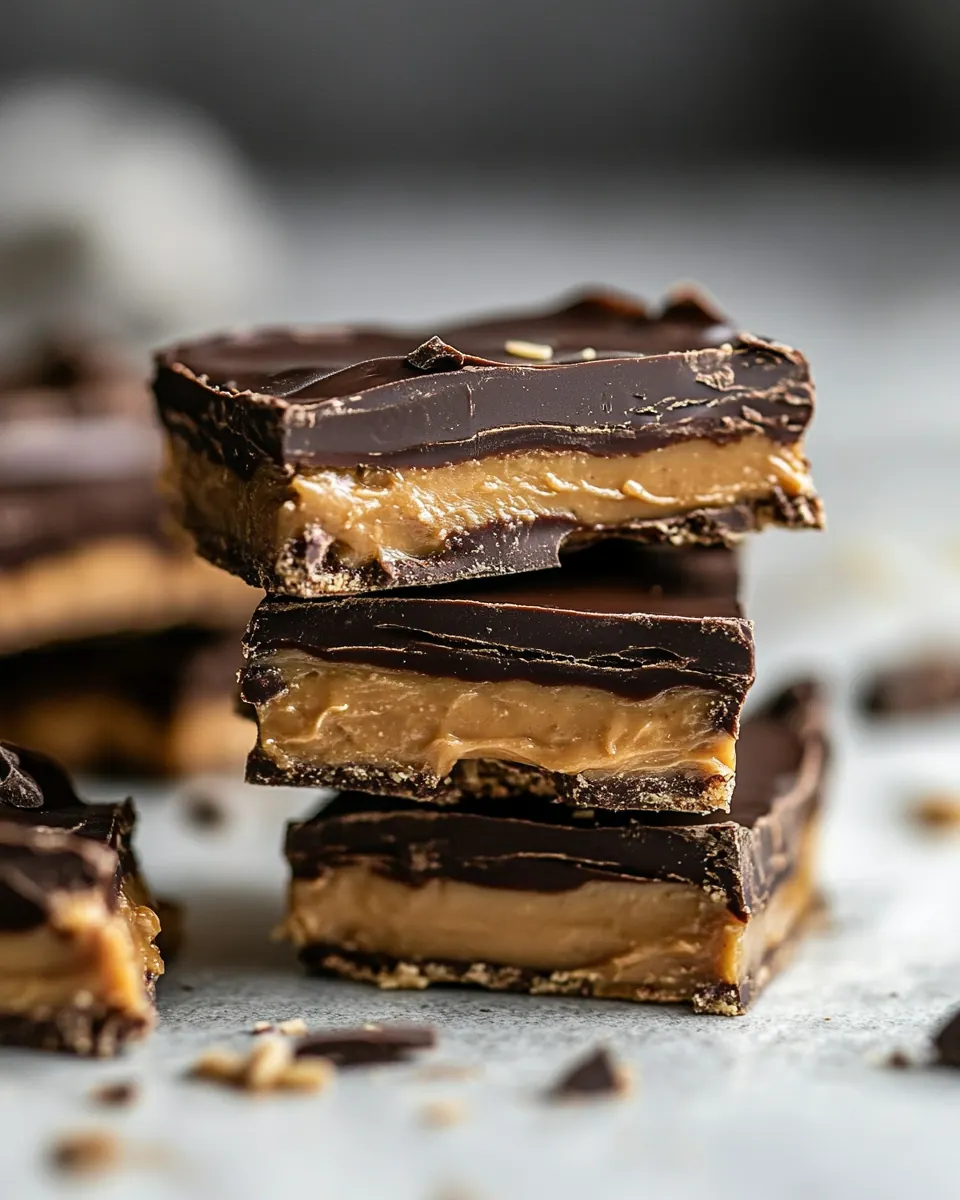
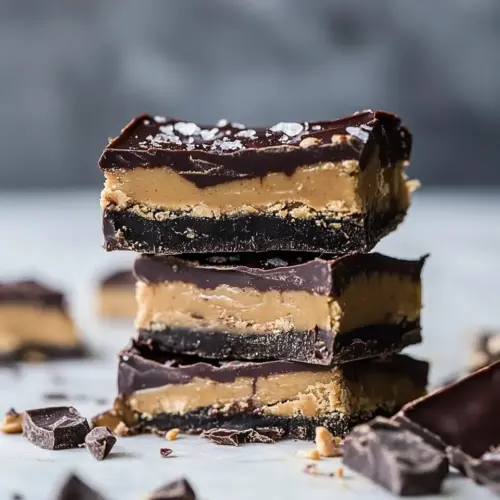
The Layered Chocolate Wow Factor
I love how the three layers create an instant “wow” without complicated steps. The first and final chocolate layers provide a smooth, shiny shell that contrasts with the slightly denser peanut butter middle. I tell friends, it’s the glossy top that makes them think you spent hours, even though it only takes a few melting sessions.
Simple Ingredients, Big Flavor
We only need five ingredients, yet each one pulls its weight. butter adds richness and a tender bite, peanut butter brings creamy, nutty depth, and the chocolate chips deliver that satisfying snap and cocoa aroma. Because the list is short, each component shines, and you can easily taste adjustments when you tweak sweetness or texture.
Fast Assembly, Foolproof Results
I appreciate recipes that respect a busy life. These bars set quickly in the freezer and fridge, so you get satisfying results in under an hour and a half. Freezing between layers helps build clean strata, which is what makes them look polished. I often make them when I want an impressive dessert in a short window.
Texture Play That Everyone Loves
The contrast between the glossy chocolate shells and the creamy peanut butter center is irresistible. When you bite in, the initial snap of chocolate gives way to a soft, spreadable center that feels indulgent but balanced. That combination keeps people reaching for seconds.
Kid Friendly and Crowd Ready
These bars are a crowd pleaser. Kids love the sweet chocolate and smooth filling, and hosts appreciate the easy portioning. I like making a pan for school events because they store well in the refrigerator, and you can slice them to any size you need without them falling apart.
Ingredient List for 5 Ingredient Triple Decker Chocolate Peanut Butter Bars
These ingredients are intentionally minimal, each contributing a clear purpose. The chocolate creates structure and shine, the peanut butter offers creamy, nutty flavor, butter gives a tender mouthfeel, vanilla extract lifts the profile with aromatic warmth, and the confectioners‘ sugar controls sweetness and texture. Together they form a balanced bar that is both rich and manageable to slice.
- 1 stick (1/2 cup) salted butter, at room temperature: Creamy and softened to room temperature, provides rich fat and moisture that makes the filling smooth and helps bind ingredients together. Adds a subtle salty richness that balances the sweetness and enhances overall texture when creamed with peanut butter.
- 1 1/2 cup s + 4 tablespoons creamy peanut butter: Smooth and spreadable peanut butter adds nutty flavor, protein, and a thick, cohesive structure to the layers. Contributes both creaminess and a slightly oily texture that helps the bars hold their shape while delivering classic peanut butter taste.
- 2 teaspoons vanilla extract: Aromatic vanilla extract imparts warm, sweet floral notes that brighten and deepen the overall flavor profile. Acts as a flavor enhancer, tying together the buttery and nutty elements without adding bulk.
- 1 2 cups confectioners' sugar using more or less to your taste: Powdered sugar sweetens and helps thicken the peanut butter layer, creating a firm, sliceable consistency when mixed to taste. Also contributes a fine, dust-like texture that integrates smoothly for a clean, stable filling.
- 3 cups semi sweet or milk chocolate chips: Semi–sweet or milk chocolate chips melt into a glossy, rich coating that forms the top and bottom layers of the bars. Provide chocolatey depth, sweetness balance, and a firm set once cooled to create the classic triple-decker contrast.
The Method for 5 Ingredient Triple Decker Chocolate Peanut Butter Bars
These bars come together through a few focused melting and chilling sessions. I like to work methodically, melting chocolate in short bursts and chilling between layers to ensure clean strata. The step by step below expands each instruction so you can rely on sensory cues and avoid common pitfalls.
- Line an 8 x 8 inch square pan with parchment paper. In a small bowl, melt together 1 1/2 cups chocolate chips and 2 tablespoons peanut butter in the microwave until melted. Pour the chocolate into the prepared pan and tap against the counter until the chocolate is in an even layer. Transfer to the freezer for 15 minutes to set. Meanwhile, in a large mixing bowl, beat together the butter, 1 1/2 cups creamy peanut butter, vanilla, and 1 cup confectioners' sugar until smooth and creamy. Taste and add more confectioners' sugar to your liking. Spoon the peanut butter mixture over the chocolate layer into a smooth layer. Transfer to the freezer for 15 minutes to set. Melt the remaining 1 1/2 cups chocolate chips and 2 tablespoons peanut butter in the microwave until melted. Pour the chocolate over the peanut butter layer, smooth the chocolate out into an even layer. Cover and place in the fridge for 1 hour or until set. Slice into bars. Keep bars stored in the fridge for up to 1 week.: The aroma of fresh parchment and a clean pan reduces sticking and makes removal effortless. Press the paper into the corners and leave an overhang so you can lift the whole slab out later. A common mistake is using wax paper which can slip, so stick with parchment. You'll know you're ready when the paper sits flat and the pan feels prepared to receive warm chocolate.
- Melt together 1 1/2 cups chocolate chips and 2 tablespoons peanut butter in the microwave until melted.: You should notice the chocolate softening and a faint roasted cocoa scent while stirring. Heat in short 15 to 20 second bursts, stirring between each burst to smooth the mixture and prevent scorching. If the chocolate becomes grainy, it was overheated; stop heating and stir in a small extra spoon of peanut butter to bring it back together. The sound is silent, but visually you want a glossy, pourable texture with no streaks.
- Pour the chocolate into the prepared pan and tap against the counter until the chocolate is in an even layer.: When you pour, watch the chocolate flow and flatten it with a small spatula if needed. Tapping helps air bubbles rise and creates an even surface that will set smoothly. If you skip tapping, you may get tiny bubbles or uneven spots that show when set. The surface should look glossy and uniform before chilling.
- Transfer to the freezer for 15 minutes to set.: The freezer gives a fast, firm set and produces a neat boundary for the next layer. After about 15 minutes the chilled chocolate will stop glistening and feel firm to the touch through the parchment. Avoid leaving it too long where it can become frosty, because that makes the top appear dull; 15 minutes is usually perfect for a cold, stable base.
- Meanwhile, in a large mixing bowl, beat together the butter, 1 1/2 cups creamy peanut butter, vanilla, and 1 cup confectioners' sugar until smooth and creamy.: As you beat, you'll smell the sweet nuttiness and see the mixture whip to a pale, silky texture. The motion incorporates air so the filling is light instead of dense. If the mixture looks looser than you'd expect, it likely needs more confectioners' sugar to achieve a scoopable consistency. Avoid overbeating which can make it slightly greasy.
- Taste and add more confectioners' sugar to your liking.: This step lets you control sweetness and body. Take a small taste to judge sugar level and texture, then add more confectioners' sugar a bit at a time until you reach a balance between flavor and firmness. If you add too much, the filling becomes dry, so add conservatively and re-test after each addition. Your filling should be scoopable and hold shape when spooned.
- Spoon the peanut butter mixture over the chocolate layer into a smooth layer.: Use a spatula to gently spread the filling, aiming for an even thickness that covers the chocolate completely. Listen for the quiet scrape of the spatula and watch the surface become uniformly opaque. If you press too hard, you can dent the chocolate base, so spread with a light hand. A smooth, even surface signals a good set later.
- Transfer to the freezer for 15 minutes to set.: Chilling the filling firms it so the final chocolate top won't mix into the center. The cold helps preserve distinct layers and makes slicing cleaner later. If you skip chilling, the top chocolate can sink or ripple. After 15 minutes, the filling should not squish under gentle pressure.
- Melt the remaining 1 1/2 cups chocolate chips and 2 tablespoons peanut butter in the microwave until melted.: Repeat the gentle heating process, stirring to a glossy finish and inhaling that cocoa aroma. This top layer should be smooth and pourable, and adding the peanut butter helps maintain shine. Overheated chocolate will look dull and grainy, so avoid long microwave bursts.
- Pour the chocolate over the peanut butter layer, smooth the chocolate out into an even layer.: Pour slowly in the center and use an offset spatula to coax the chocolate toward the edges. You want a uniform glossy finish that seals the bar. If the chocolate is too thick, warm it slightly and stir to loosen. A perfectly smoothed top will show a mirror like sheen when set.
- Cover and place in the fridge for 1 hour or until set.: The fridge slowly brings the bar to a stable set without shocking it, which helps prevent bloom or cracking. After about an hour the top will be firm and have reduced shine from cooling, but will still slice cleanly. If left overnight it will still be fine, but allow a brief thaw before cutting to avoid crumbly edges.
- Slice into bars.: Use a warm, dry knife for best slices, wiping the blade between cuts for clean edges. The first slice gives you clues about the internal set and texture. If the filling appears too soft, a quick 10 minute return to the freezer will firm things up. Aim for consistent widths so the bars look uniform when plated.
- Keep bars stored in the fridge for up to 1 week.: Proper storage keeps them tasting fresh and prevents the chocolate from sweating. Place the bars in an airtight container with parchment layers to prevent sticking. A common mistake is leaving them at room temperature too long, which softens the filling and makes the chocolate bloom. Chilled storage preserves texture and flavor.
Make It Your Own
These tips help you personalize 5 Ingredient Triple Decker Chocolate Peanut Butter Bars while keeping the technique reliable. Small adjustments in chilling and sweetness let you craft the exact texture and balance you prefer.
- Chill strategically: Freeze each layer just until set to create sharp, clean strata without causing frost on the chocolate.
- Pick your chocolate: Choose semi sweet for balance or milk chocolate for a creamier, sweeter finish, and be mindful that higher quality chips melt smoother.
- Control sweetness: Start with 1 cup of confectioners’ sugar and add gradually if you want a stiffer filling or a sweeter profile.
- Knife technique: Run a sharp knife under hot water, dry it, and slice in a single confident motion to get neat bars.
- Storage advice: Keep the bars chilled in an airtight container for up to one week to maintain texture and prevent condensation.
Best Served With
These bars are versatile and fit many occasions, from casual snacking to special gatherings. Here are thoughtful serving ideas and practical pairings to help you plan how to present them.
- Party platters: Arrange 5 Ingredient Triple Decker Chocolate Peanut Butter Bars on a platter with small paper liners so guests can grab a bar without sticky fingers.
- After school snack: Serve chilled with a cold glass of milk for a classic treat that kids love.
- Gift giving: Stack bars in a box with parchment layers and tie with ribbon for a homemade gift that feels luxe.
- Seasonal occasions: These bars work well for holidays and potlucks because they hold up in a cooler and slice into tidy portions.
- Storage tips: Keep bars refrigerated in an airtight container and separate layers with parchment to avoid sticking, and label with a date so you use them within one week.
- Serving presentation: Let bars sit for a few minutes at room temperature before serving if you want a slightly softer bite, or serve chilled for a firmer texture.
FAQ
Conclusion
What makes these bars special is their layered contrast of glossy chocolate and a silky peanut butter center, all achieved with only five pantry staples. They are quick to assemble, forgiving to make, and adaptable to your sweetness preference, which makes them a reliable go to for gatherings or a weeknight treat. Give them a try the next time you want a homemade dessert that looks polished but requires minimal time, and enjoy sharing a tray that will likely disappear faster than you expect.
5 Ingredient Triple Decker Chocolate Peanut Butter Bars
Equipment
- 8 x 8 inch square pan
- Parchment Paper
- Microwave-safe Bowl
- Spatula
- Mixing Bowl
- Knife
Ingredients
- 1 stick (1/2 cup) salted butter, at room temperature Creamy and softened to room temperature, provides rich fat and moisture that makes the filling smooth and helps bind ingredients together. Adds a subtle salty richness that balances the sweetness and enhances overall texture when creamed with peanut butter.
- 1 1/2 cup s + 4 tablespoons creamy peanut butter Smooth and spreadable peanut butter adds nutty flavor, protein, and a thick, cohesive structure to the layers. Contributes both creaminess and a slightly oily texture that helps the bars hold their shape while delivering classic peanut butter taste.
- 2 teaspoons vanilla extract Aromatic vanilla extract imparts warm, sweet floral notes that brighten and deepen the overall flavor profile. Acts as a flavor enhancer, tying together the buttery and nutty elements without adding bulk.
- 1 -2 cups confectioners' sugar using more or less to your taste Powdered sugar sweetens and helps thicken the peanut butter layer, creating a firm, sliceable consistency when mixed to taste. Also contributes a fine, dust-like texture that integrates smoothly for a clean, stable filling.
- 3 cups semi sweet or milk chocolate chips Semi-sweet or milk chocolate chips melt into a glossy, rich coating that forms the top and bottom layers of the bars. Provide chocolatey depth, sweetness balance, and a firm set once cooled to create the classic triple-decker contrast.
Instructions
- Line an 8 x 8 inch square pan with parchment paper. In a small bowl, melt together 1 1/2 cups chocolate chips and 2 tablespoons peanut butter in the microwave until melted. Pour the chocolate into the prepared pan and tap against the counter until the chocolate is in an even layer. Transfer to the freezer for 15 minutes to set. Meanwhile, in a large mixing bowl, beat together the butter, 1 1/2 cups creamy peanut butter, vanilla, and 1 cup confectioners' sugar until smooth and creamy. Taste and add more confectioners' sugar to your liking. Spoon the peanut butter mixture over the chocolate layer into a smooth layer. Transfer to the freezer for 15 minutes to set. Melt the remaining 1 1/2 cups chocolate chips and 2 tablespoons peanut butter in the microwave until melted. Pour the chocolate over the peanut butter layer, smooth the chocolate out into an even layer. Cover and place in the fridge for 1 hour or until set. Slice into bars. Keep bars stored in the fridge for up to 1 week.: The aroma of fresh parchment and a clean pan reduces sticking and makes removal effortless. Press the paper into the corners and leave an overhang so you can lift the whole slab out later. A common mistake is using wax paper which can slip, so stick with parchment. You'll know you're ready when the paper sits flat and the pan feels prepared to receive warm chocolate.
- Melt together 1 1/2 cups chocolate chips and 2 tablespoons peanut butter in the microwave until melted.: You should notice the chocolate softening and a faint roasted cocoa scent while stirring. Heat in short 15 to 20 second bursts, stirring between each burst to smooth the mixture and prevent scorching. If the chocolate becomes grainy, it was overheated; stop heating and stir in a small extra spoon of peanut butter to bring it back together. The sound is silent, but visually you want a glossy, pourable texture with no streaks.
- Pour the chocolate into the prepared pan and tap against the counter until the chocolate is in an even layer.: When you pour, watch the chocolate flow and flatten it with a small spatula if needed. Tapping helps air bubbles rise and creates an even surface that will set smoothly. If you skip tapping, you may get tiny bubbles or uneven spots that show when set. The surface should look glossy and uniform before chilling.
- Transfer to the freezer for 15 minutes to set.: The freezer gives a fast, firm set and produces a neat boundary for the next layer. After about 15 minutes the chilled chocolate will stop glistening and feel firm to the touch through the parchment. Avoid leaving it too long where it can become frosty, because that makes the top appear dull; 15 minutes is usually perfect for a cold, stable base.
- Meanwhile, in a large mixing bowl, beat together the butter, 1 1/2 cups creamy peanut butter, vanilla, and 1 cup confectioners' sugar until smooth and creamy.: As you beat, you'll smell the sweet nuttiness and see the mixture whip to a pale, silky texture. The motion incorporates air so the filling is light instead of dense. If the mixture looks looser than you'd expect, it likely needs more confectioners' sugar to achieve a scoopable consistency. Avoid overbeating which can make it slightly greasy.
- Taste and add more confectioners' sugar to your liking.: This step lets you control sweetness and body. Take a small taste to judge sugar level and texture, then add more confectioners' sugar a bit at a time until you reach a balance between flavor and firmness. If you add too much, the filling becomes dry, so add conservatively and re-test after each addition. Your filling should be scoopable and hold shape when spooned.
- Spoon the peanut butter mixture over the chocolate layer into a smooth layer.: Use a spatula to gently spread the filling, aiming for an even thickness that covers the chocolate completely. Listen for the quiet scrape of the spatula and watch the surface become uniformly opaque. If you press too hard, you can dent the chocolate base, so spread with a light hand. A smooth, even surface signals a good set later.
- Transfer to the freezer for 15 minutes to set.: Chilling the filling firms it so the final chocolate top won't mix into the center. The cold helps preserve distinct layers and makes slicing cleaner later. If you skip chilling, the top chocolate can sink or ripple. After 15 minutes, the filling should not squish under gentle pressure.
- Melt the remaining 1 1/2 cups chocolate chips and 2 tablespoons peanut butter in the microwave until melted.: Repeat the gentle heating process, stirring to a glossy finish and inhaling that cocoa aroma. This top layer should be smooth and pourable, and adding the peanut butter helps maintain shine. Overheated chocolate will look dull and grainy, so avoid long microwave bursts.
- Pour the chocolate over the peanut butter layer, smooth the chocolate out into an even layer.: Pour slowly in the center and use an offset spatula to coax the chocolate toward the edges. You want a uniform glossy finish that seals the bar. If the chocolate is too thick, warm it slightly and stir to loosen. A perfectly smoothed top will show a mirror like sheen when set.
- Cover and place in the fridge for 1 hour or until set.: The fridge slowly brings the bar to a stable set without shocking it, which helps prevent bloom or cracking. After about an hour the top will be firm and have reduced shine from cooling, but will still slice cleanly. If left overnight it will still be fine, but allow a brief thaw before cutting to avoid crumbly edges.
- Slice into bars.: Use a warm, dry knife for best slices, wiping the blade between cuts for clean edges. The first slice gives you clues about the internal set and texture. If the filling appears too soft, a quick 10 minute return to the freezer will firm things up. Aim for consistent widths so the bars look uniform when plated.
- Keep bars stored in the fridge for up to 1 week.: Proper storage keeps them tasting fresh and prevents the chocolate from sweating. Place the bars in an airtight container with parchment layers to prevent sticking. A common mistake is leaving them at room temperature too long, which softens the filling and makes the chocolate bloom. Chilled storage preserves texture and flavor.
Notes
- Chill strategically: Freeze each layer just until set to create sharp, clean strata without causing frost on the chocolate.
- Pick your chocolate: Choose semi sweet for balance or milk chocolate for a creamier, sweeter finish, and be mindful that higher quality chips melt smoother.
- Control sweetness: Start with 1 cup of confectioners' sugar and add gradually if you want a stiffer filling or a sweeter profile.
- Knife technique: Run a sharp knife under hot water, dry it, and slice in a single confident motion to get neat bars.
- Storage advice: Keep the bars chilled in an airtight container for up to one week to maintain texture and prevent condensation.