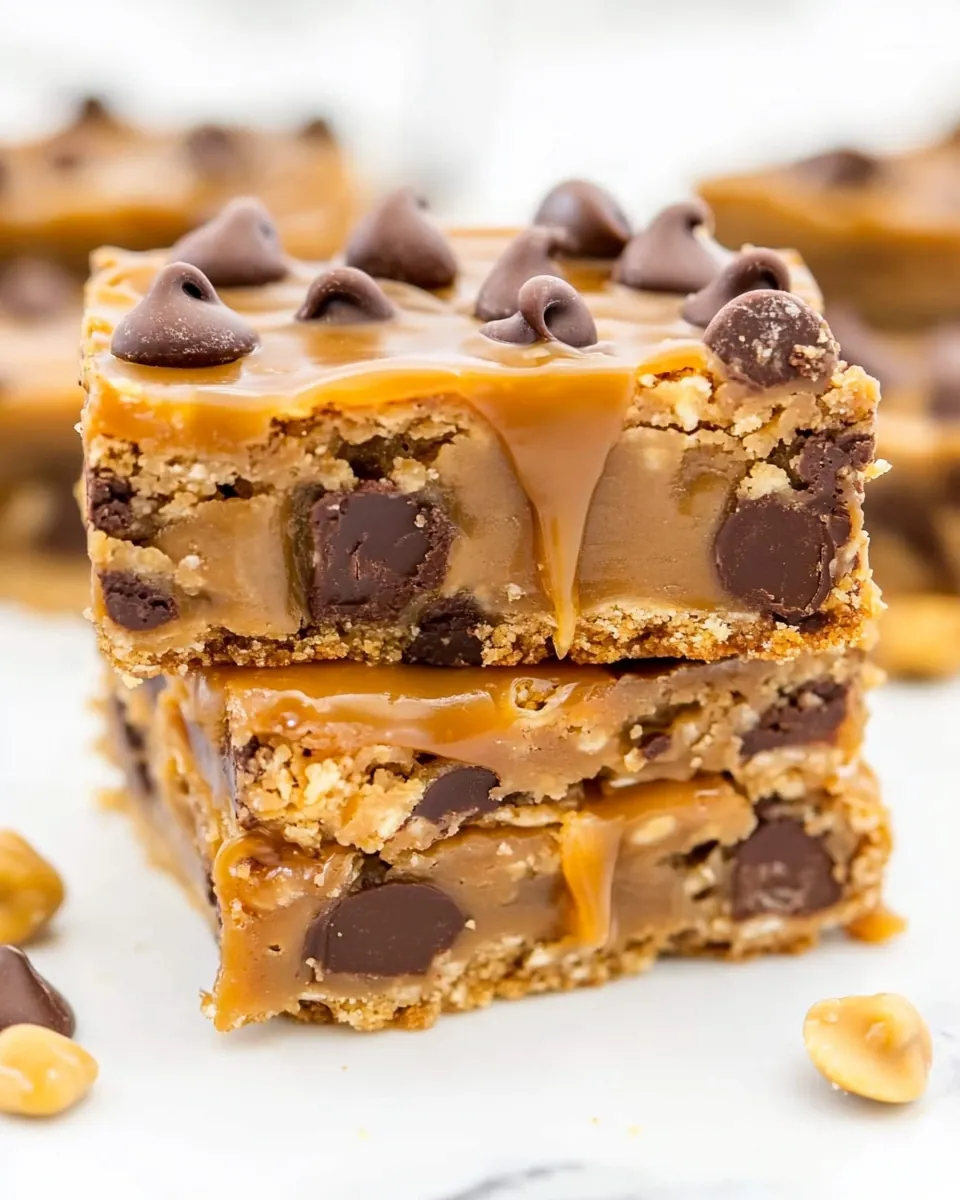
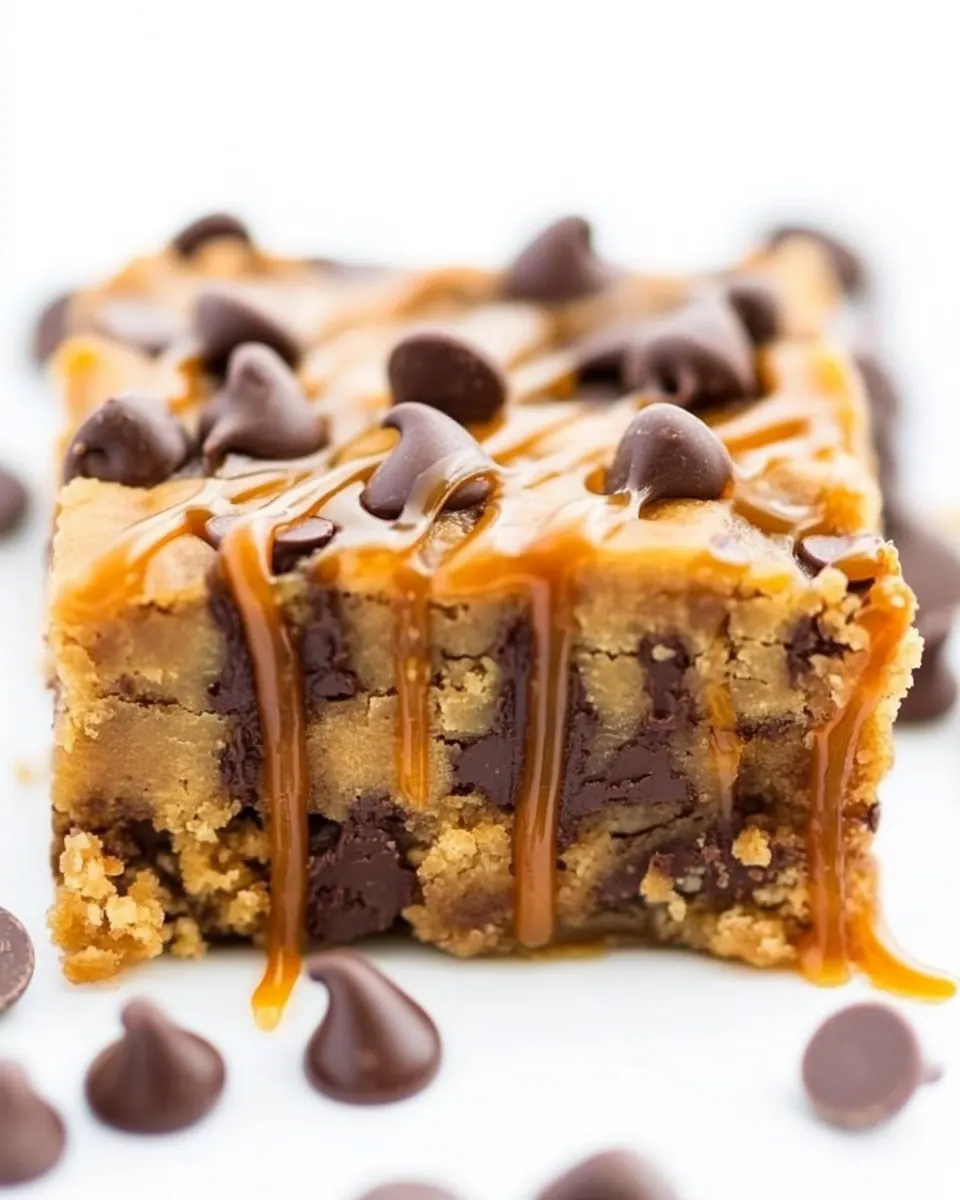
Salted Caramel Peanut Butter Chocolate Chip Bars
Salted Caramel Peanut Butter Chocolate Chip Bars came into my life on a rainy Saturday when I needed something that could cheer up a gloomy afternoon and feed a small, desperate crowd. I was elbow deep in pantry ingredients, nostalgic for the kind of bar cookie my grandmother used to tuck into lunchboxes, and this mash up of peanut butter, chocolate chips, and sticky salted caramel sauce felt like the perfect sweet apology to the weather. I remember the first batch coming out warm and glossy, the top dotted with melty chocolate chips, and the kitchen filling with a buttery, toffee like scent that made everyone pause what they were doing.
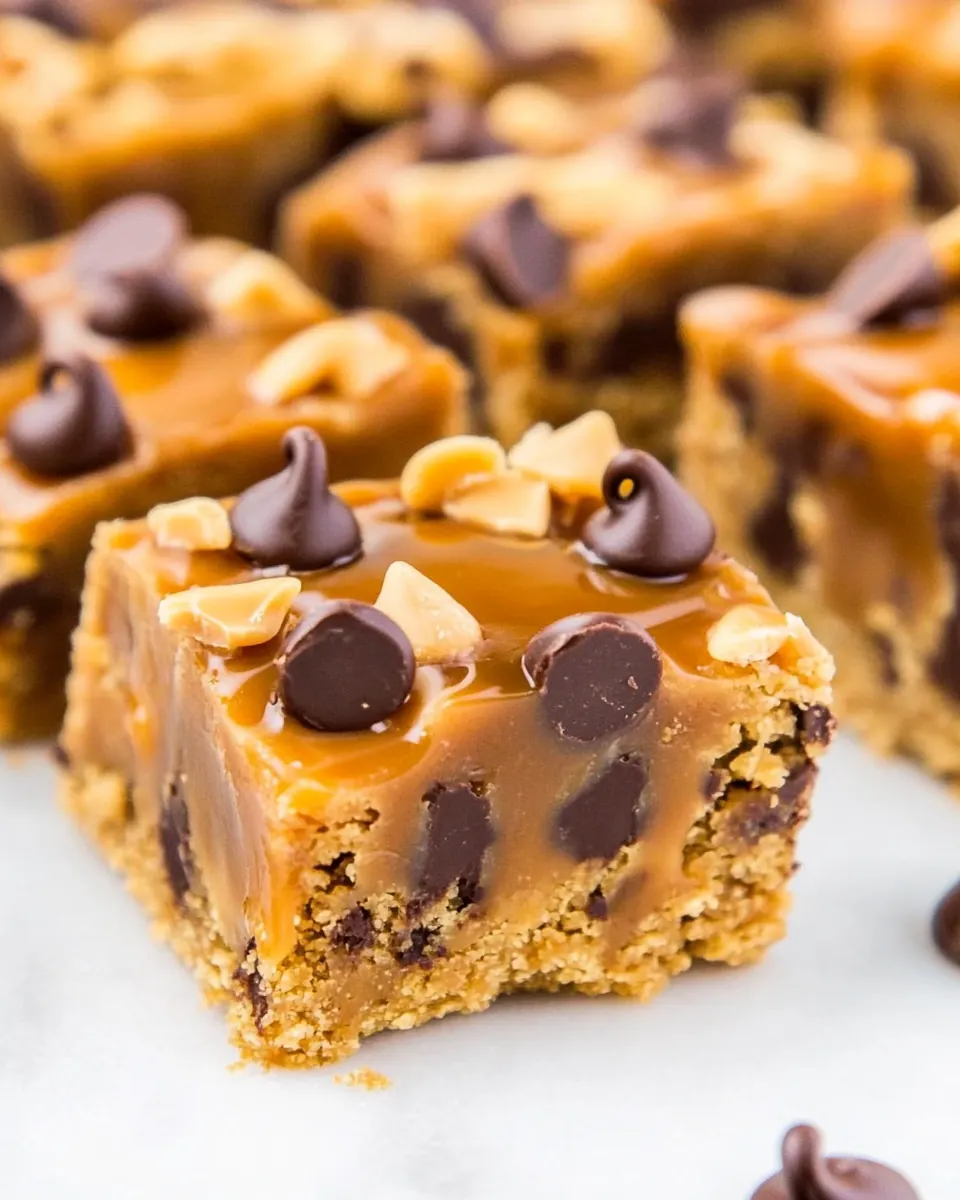
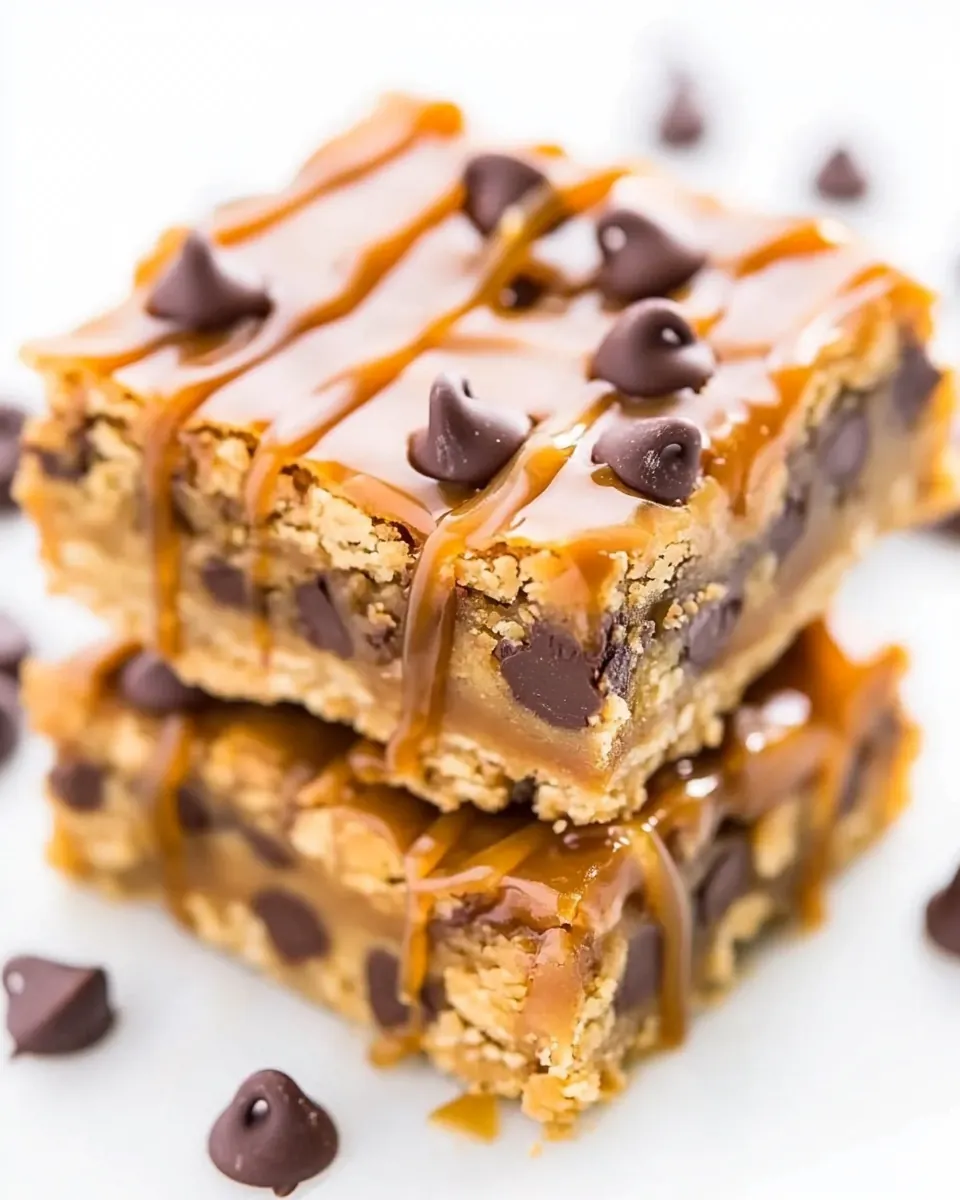
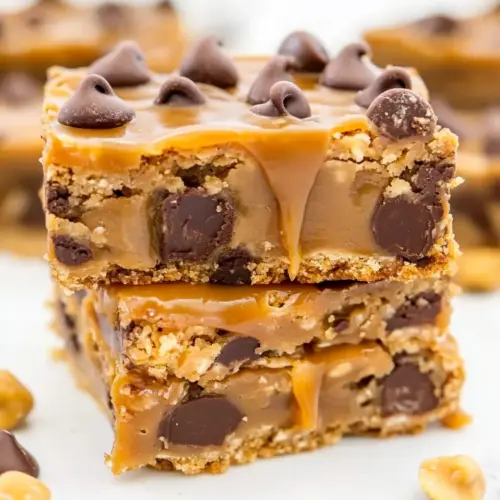
What I love about these bars is how uncomplicated they are, yet how deeply satisfying each bite becomes. The texture is just right, slightly chewy in the center, with crisp edges that hold up to a generous drizzle of salted caramel sauce. I like to imagine packing a few in a picnic box, or passing the pan around at a casual get together where no one expects perfection, but everyone notices the first taste. There is a comforting familiarity to the combination of peanut butter and chocolate chips, and the salted caramel lifts it into something a little more grown up.
Recipe Snapshot
27 mins
5 mins
22 mins
Medium
200 kcal
American
Gluten-Free, Low FODMAP
Desserts
8-by-8-inch baking pan, Aluminum foil, Microwave-safe bowl, Spatula, Whisk
What’s Great About This Salted Caramel Peanut Butter Chocolate Chip Bars
Rich, layered flavor that feels nostalgic yet new
I find the interplay of peanut butter and salted caramel sauce irresistible, it brings a deep, nutty backbone while the caramel adds a sweet smoky note. The chocolate chips add bursts of bittersweet contrast, and together they create a multi dimensional bite that keeps you reaching for more.
Effortless assembly for busy days
These bars require minimal bowls and no fancy techniques, which I appreciate on nights when I want impressive results without a big time commitment. Melting the unsalted butter and whisking in the wet ingredients is simple, and the batter comes together quickly, making this a go to recipe when I need something fast and reliable.
Texture that balances chew and tender crumb
The combination of all purpose flour and a slightly underbaked center yields bars that are chewy in the middle with just enough structure to slice cleanly. I love the way the edges get a gentle crispness, while the inside stays soft, especially after resting and cooling so the bars firm up properly.
Customizable and forgiving
You can dial things up or down easily, whether that means adding more chocolate chips on top for visual drama, or adjusting the salt to make the caramel pop against the sweetness. I often sprinkle a tad more salt if the caramel is particularly sweet, and it transforms the flavor balance.
Great for sharing and storing
These bars travel well, keep at room temperature for several days, and freeze beautifully for longer storage. I often make a double batch when friends are coming over, because they disappear faster than I expect, and they make excellent gifts when wrapped in parchment.
Everything You Need for Salted Caramel Peanut Butter Chocolate Chip Bars
I like to think of the ingredient list as a small team where each player has a clear job. The unsalted butter provides richness and helps the bars set, while the egg binds and adds tenderness. The star duo of SKIPPY Peanut Butter Spread with Salted Caramel and light brown sugar brings both flavor and chew. All purpose flour forms the structure, and salt sharpens the sweet notes. Finally, the scattering of chocolate chips and the finishing drizzle of salted caramel sauce create texture and a glossy, irresistible finish.
- 1/2 cup unsalted butter, 1 stick, melted: Melted to provide rich fat and moisture, helping bind the bars and create a tender, chewy texture when baked; contributes a golden flavor and aids in dissolving sugars for proper caramelization.
- 1 large egg: Beaten to add structure and lift, creating a cohesive batter by binding ingredients together; contributes moisture and helps achieve a tender crumb while setting during baking.
- 1/3 heaping cup SKIPPY Peanut Butter Spread with Salted Caramel: Stirred in to deliver concentrated salted caramel and peanut flavor while providing additional creaminess and moisture; enhances overall sweetness and adds a distinctive savory-sweet note throughout the bars.
- 1 cup light brown sugar, packed: Packed to supply deep molasses notes and moisture, contributing chewiness and color; helps balance sweetness and supports tender texture by interacting with fats and eggs.
- 1 tablespoon vanilla extract: Added to impart aromatic sweetness and depth, rounding out flavors with warm vanilla notes; enhances perception of sweetness and complements the caramel and chocolate components.
- 1 cup all-purpose flour: Sifted or mixed to form the structural base, supplying gluten and bulk that hold the bars together; controls texture and density when combined with liquids and fats.
- 1/2 teaspoons salt, or to taste: Measured to season and enhance flavors, balancing sweetness and elevating other ingredients while controlling overall taste; helps accentuate caramel and chocolate notes when adjusted to preference.
- 1 cup semi-sweet chocolate chips + 2 tablespoons, for sprinkling: Folded in to provide pockets of melty chocolate and textural contrast, distributing sweetness and richness throughout the bars; extra chips reserved for sprinkling create appealing glossy, melty toppers.
- salted caramel sauce, for drizzling (homemade or storebought): Drizzled to finish with glossy, sticky sweetness and a salty-sweet contrast that enhances the peanut butter and chocolate; adds visual appeal and concentrated caramel flavor on each serving.
How to Assemble Salted Caramel Peanut Butter Chocolate Chip Bars
These bars come together quickly, and a little attention at each step rewards you with texture and shine. I like to keep my tools organized, and to check visual cues as I go, because the difference between a great bar and an overdone one is often subtle. Below I expand each instruction into sensory rich guidance so you can feel confident at the oven door.
- Preheat oven to 350 F. Line an 8-by-8-inch baking pan with aluminum foil, spray with cooking spray; set aside.: The moment you set the oven to 350 F you create a reliable, even heat that bakes the bars through without burning the edges. You should hear the faint hum of the oven as it comes to temperature, and the interior light will glow steady when the heat settles. Lining the 8-by-8-inch baking pan with aluminum foil makes removal and slicing so much easier, and a light spray of cooking spray prevents sticking. A common mistake is skipping foil, which can make the bars difficult to lift from the pan cleanly.
- In a large, microwave-safe bowl melt the butter, about 1 minute on high power.: As you melt the unsalted butter in the microwave, watch for it to become fully liquid with golden flecks, and listen for a soft bubbling at the edges. Stir it briefly to distribute heat evenly. If it is too hot when you proceed, it can cook the egg later, so let it settle briefly. Avoid overheating; burnt butter will give an off taste.
- Wait momentarily before adding the egg so you don’t scramble it. Add the egg, peanut butter, brown sugar, vanilla, and whisk until smooth.: After allowing the butter to cool slightly, add the egg , SKIPPY Peanut Butter Spread with Salted Caramel , light brown sugar , and vanilla extract . Whisk until the mixture becomes glossy and homogenous. You should feel the batter thicken and see a uniform tan color with no streaks of raw egg or blobs of peanut butter . The aroma will be sweet and toasty, and whisking helps dissolve sugar for a smoother texture. A pitfall is adding the egg too soon into hot butter, which causes curdling.
- Add the flour, salt, and stir until just combined, don’t overmix.: Gently fold in the all purpose flour and salt , mixing just until there are no dry patches. You want the batter to hold together without developing gluten, which means stopping when the last veins of flour disappear. The batter should be slightly thick, glossy, and cling to the spatula. Overmixing will yield dense, tough bars, so resist the urge to continue beyond the point of incorporation.
- Stir in 1 cup chocolate chips.: When you fold in the main portion of chocolate chips , you ll hear soft clinks as they tumble into the batter and see pockets of dark contrast against the tan dough. This step distributes melty chocolate throughout the bars, giving molten islands after baking. Make sure the chips are evenly dispersed so each bite has chocolate. A common error is dumping chips all at once without folding, which can cluster them unevenly.
- Turn batter out into prepared pan, smoothing the top lightly with a spatula.: Scrape the batter into the lined 8-by-8-inch baking pan and smooth the top with a spatula until mostly even. The batter should spread easily but not be runny; you want a uniform layer about three quarters of an inch thick. Smoothing ensures even baking and uniform slices. If you press too hard you may compact the crumb and lose tenderness, so be gentle.
- Evenly sprinkle with 2 tablespoons chocolate chips, smoothing them lightly with a spatula or tapping down lightly with your fingertips.: Scatter the remaining chocolate chips on top for a pretty finish, then gently press them in so they adhere. Visually, this creates glossy, melty pockets and ensures the chips do not burn on the surface. The small taps should be gentle; pressing too deeply embeds them and reduces the visual contrast.
- Bake for about 20 to 22 minutes, or until done. A toothpick inserted in the center should come out clean, or with a few moist crumbs, but no batter. Bars firm up as they cool. Allow bars to cool in pan for at least 1 hour before drizzling with salted caramel, slicing, and serving. Bars will keep airtight at room temperature for up to 1 week, or in the freezer for up to 6 months.: During baking you ll smell rich butter and caramelized sugar filling the oven, and the surface will turn a warm golden brown. Listen for a low, steady heat hum; the edges may puff a touch and set sooner than the center. Use a toothpick inserted into the center to check doneness, it should come out with a few moist crumbs but not wet batter. The bars continue to set as they rest, so cooling in the 8-by-8-inch baking pan for at least 1 hour is essential before adding the salted caramel sauce . Rushing to slice while warm can make them fall apart, and overbaking will dry them out, so time is everything.
Customization Ideas
These Salted Caramel Peanut Butter Chocolate Chip Bars are forgiving and welcome small tweaks to match your pantry or preferences. Below are practical, flavor forward ideas to adapt sweetness, texture, and presentation without changing the essential recipe.
- Add crunch: Sprinkle chopped toasted nuts on top after baking for contrast, being mindful that nuts will change shelf life slightly.
- More caramel: Use a drizzle bottle to make an even, decorative lattice of salted caramel sauce across the cooled bars for dramatic plating.
- Chocolate swap: Use dark chocolate chips if you prefer less sweetness, which enhances the salted caramel note.
- Peanut butter heat: Warm the SKIPPY Peanut Butter Spread with Salted Caramel briefly if its stiff, this helps it incorporate smoothly into the batter.
- Make ahead: Freeze whole bars or individual slices, wrapped tightly, for quick thaw and serve options later.
Serving Ideas for Salted Caramel Peanut Butter Chocolate Chip Bars
These bars work equally well for casual snack times or as a simple dessert at gatherings. Below are serving suggestions and practical storage and pairing ideas to help you present them beautifully and keep them tasting their best.
- Casual snack: Serve at room temperature on a small platter with a few extra chocolate chips scattered nearby for a relaxed coffee break.
- Party platter: Cut into small squares and arrange on a board with other sweets for an effortless dessert spread.
- Gift giving: Stack wrapped bars in parchment and tie with twine for a lovely homemade gift that travels well.
- Storage: Keep airtight at room temperature for up to 1 week, or freeze for up to 6 months, thawing at room temperature before serving.
- Occasions: Great for bake sales, potlucks, brunches, or cozy evenings when you want a comforting sweet to share.
- Serving temperature: Drizzle the salted caramel sauce over fully cooled bars so slices hold their shape and the caramel stays glossy.
FAQ
Conclusion
These Salted Caramel Peanut Butter Chocolate Chip Bars stand out because they blend nostalgic comfort with sophisticated balance, pairing peanut butter and chocolate chips with a glossy salted caramel sauce finish. Try them when you want a simple, crowd pleasing dessert that travels well and stores easily. I hope you enjoy how the textures and flavors come together, and that this recipe becomes one you reach for when you want something reliably delicious and just a little special.
Salted Caramel Peanut Butter Chocolate Chip Bars
Equipment
- 8-by-8-inch baking pan
- Aluminum Foil
- Microwave-safe Bowl
- Spatula
- Whisk
Ingredients
- 1/2 cup unsalted butter, 1 stick, melted Melted to provide rich fat and moisture, helping bind the bars and create a tender, chewy texture when baked; contributes a golden flavor and aids in dissolving sugars for proper caramelization.
- 1 large egg Beaten to add structure and lift, creating a cohesive batter by binding ingredients together; contributes moisture and helps achieve a tender crumb while setting during baking.
- 1/3 heaping cup SKIPPY Peanut Butter Spread with Salted Caramel Stirred in to deliver concentrated salted caramel and peanut flavor while providing additional creaminess and moisture; enhances overall sweetness and adds a distinctive savory-sweet note throughout the bars.
- 1 cup light brown sugar, packed Packed to supply deep molasses notes and moisture, contributing chewiness and color; helps balance sweetness and supports tender texture by interacting with fats and eggs.
- 1 tablespoon vanilla extract Added to impart aromatic sweetness and depth, rounding out flavors with warm vanilla notes; enhances perception of sweetness and complements the caramel and chocolate components.
- 1 cup all-purpose flour Sifted or mixed to form the structural base, supplying gluten and bulk that hold the bars together; controls texture and density when combined with liquids and fats.
- 1/2 teaspoons salt, or to taste Measured to season and enhance flavors, balancing sweetness and elevating other ingredients while controlling overall taste; helps accentuate caramel and chocolate notes when adjusted to preference.
- 1 cup semi-sweet chocolate chips + 2 tablespoons, for sprinkling Folded in to provide pockets of melty chocolate and textural contrast, distributing sweetness and richness throughout the bars; extra chips reserved for sprinkling create appealing glossy, melty toppers.
- salted caramel sauce, for drizzling (homemade or storebought) Drizzled to finish with glossy, sticky sweetness and a salty-sweet contrast that enhances the peanut butter and chocolate; adds visual appeal and concentrated caramel flavor on each serving.
Instructions
- Preheat oven to 350 F. Line an 8-by-8-inch baking pan with aluminum foil, spray with cooking spray; set aside.: The moment you set the oven to 350 F you create a reliable, even heat that bakes the bars through without burning the edges. You should hear the faint hum of the oven as it comes to temperature, and the interior light will glow steady when the heat settles. Lining the 8-by-8-inch baking pan with aluminum foil makes removal and slicing so much easier, and a light spray of cooking spray prevents sticking. A common mistake is skipping foil, which can make the bars difficult to lift from the pan cleanly.
- In a large, microwave-safe bowl melt the butter, about 1 minute on high power.: As you melt the unsalted butter in the microwave, watch for it to become fully liquid with golden flecks, and listen for a soft bubbling at the edges. Stir it briefly to distribute heat evenly. If it is too hot when you proceed, it can cook the egg later, so let it settle briefly. Avoid overheating; burnt butter will give an off taste.
- Wait momentarily before adding the egg so you don’t scramble it. Add the egg, peanut butter, brown sugar, vanilla, and whisk until smooth.: After allowing the butter to cool slightly, add the egg , SKIPPY Peanut Butter Spread with Salted Caramel , light brown sugar , and vanilla extract . Whisk until the mixture becomes glossy and homogenous. You should feel the batter thicken and see a uniform tan color with no streaks of raw egg or blobs of peanut butter . The aroma will be sweet and toasty, and whisking helps dissolve sugar for a smoother texture. A pitfall is adding the egg too soon into hot butter, which causes curdling.
- Add the flour, salt, and stir until just combined, don’t overmix.: Gently fold in the all purpose flour and salt , mixing just until there are no dry patches. You want the batter to hold together without developing gluten, which means stopping when the last veins of flour disappear. The batter should be slightly thick, glossy, and cling to the spatula. Overmixing will yield dense, tough bars, so resist the urge to continue beyond the point of incorporation.
- Stir in 1 cup chocolate chips.: When you fold in the main portion of chocolate chips , you ll hear soft clinks as they tumble into the batter and see pockets of dark contrast against the tan dough. This step distributes melty chocolate throughout the bars, giving molten islands after baking. Make sure the chips are evenly dispersed so each bite has chocolate. A common error is dumping chips all at once without folding, which can cluster them unevenly.
- Turn batter out into prepared pan, smoothing the top lightly with a spatula.: Scrape the batter into the lined 8-by-8-inch baking pan and smooth the top with a spatula until mostly even. The batter should spread easily but not be runny; you want a uniform layer about three quarters of an inch thick. Smoothing ensures even baking and uniform slices. If you press too hard you may compact the crumb and lose tenderness, so be gentle.
- Evenly sprinkle with 2 tablespoons chocolate chips, smoothing them lightly with a spatula or tapping down lightly with your fingertips.: Scatter the remaining chocolate chips on top for a pretty finish, then gently press them in so they adhere. Visually, this creates glossy, melty pockets and ensures the chips do not burn on the surface. The small taps should be gentle; pressing too deeply embeds them and reduces the visual contrast.
- Bake for about 20 to 22 minutes, or until done. A toothpick inserted in the center should come out clean, or with a few moist crumbs, but no batter. Bars firm up as they cool. Allow bars to cool in pan for at least 1 hour before drizzling with salted caramel, slicing, and serving. Bars will keep airtight at room temperature for up to 1 week, or in the freezer for up to 6 months.: During baking you ll smell rich butter and caramelized sugar filling the oven, and the surface will turn a warm golden brown. Listen for a low, steady heat hum; the edges may puff a touch and set sooner than the center. Use a toothpick inserted into the center to check doneness, it should come out with a few moist crumbs but not wet batter. The bars continue to set as they rest, so cooling in the 8-by-8-inch baking pan for at least 1 hour is essential before adding the salted caramel sauce . Rushing to slice while warm can make them fall apart, and overbaking will dry them out, so time is everything.
Notes
- Add crunch: Sprinkle chopped toasted nuts on top after baking for contrast, being mindful that nuts will change shelf life slightly.
- More caramel: Use a drizzle bottle to make an even, decorative lattice of salted caramel sauce across the cooled bars for dramatic plating.
- Chocolate swap: Use dark chocolate chips if you prefer less sweetness, which enhances the salted caramel note.
- Peanut butter heat: Warm the SKIPPY Peanut Butter Spread with Salted Caramel briefly if its stiff, this helps it incorporate smoothly into the batter.
- Make ahead: Freeze whole bars or individual slices, wrapped tightly, for quick thaw and serve options later.