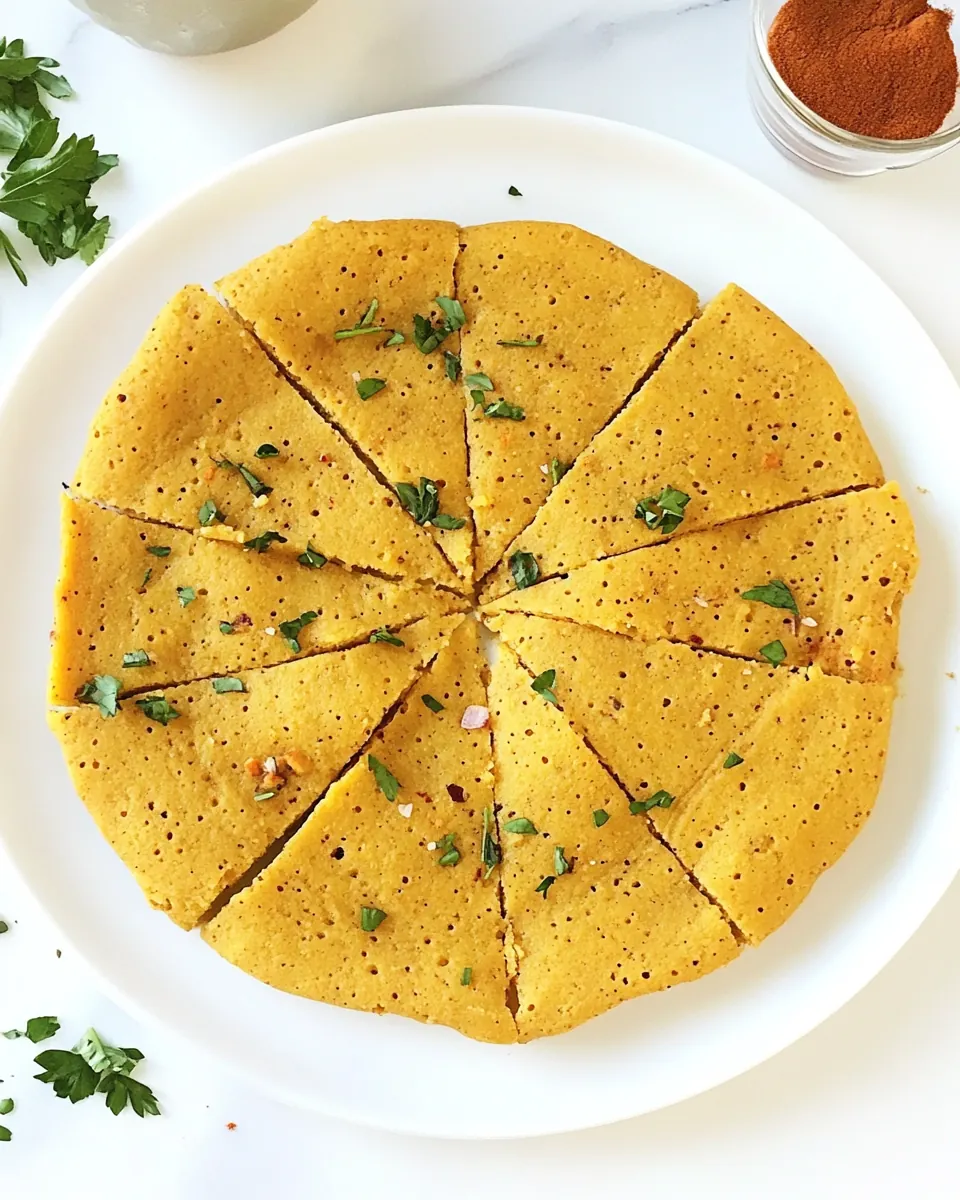
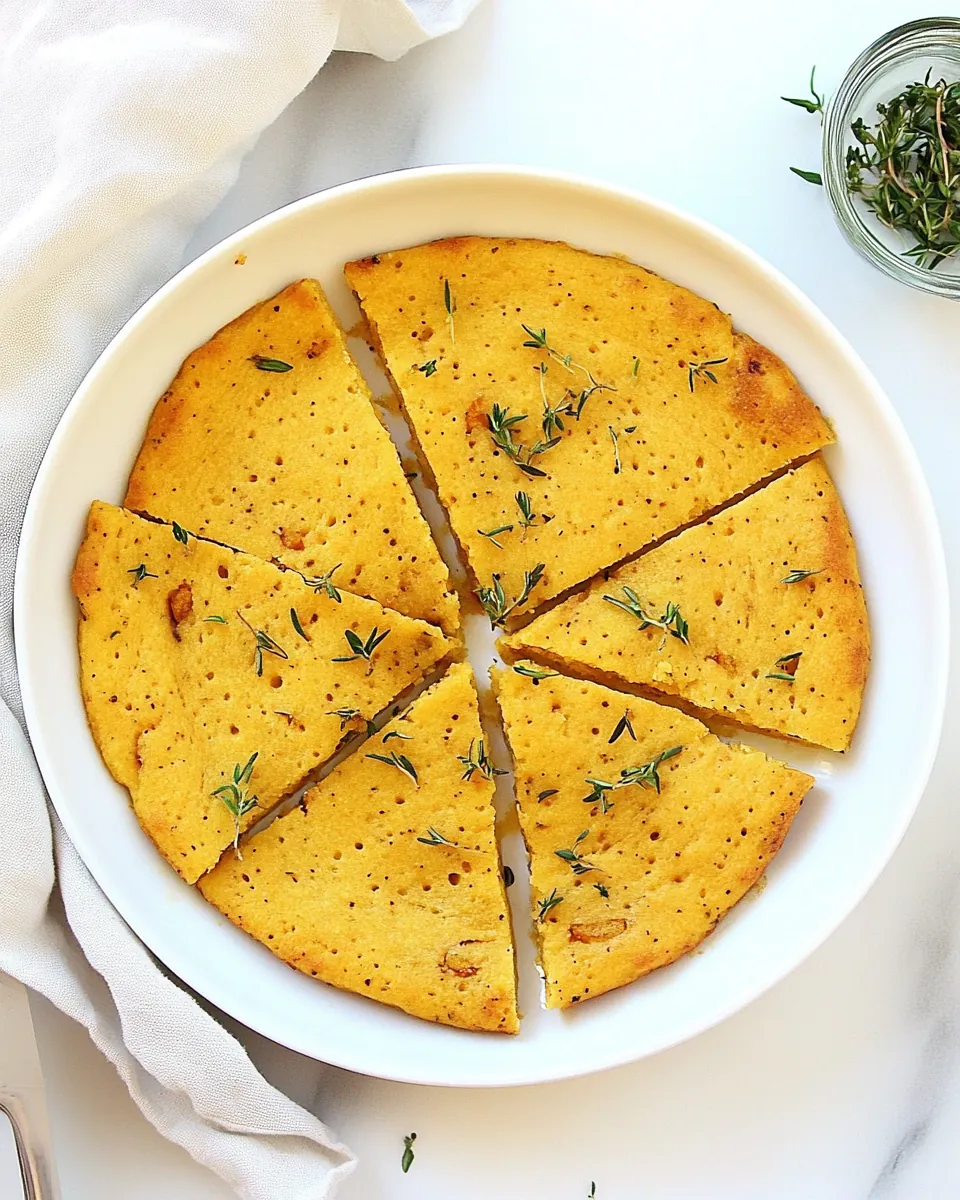
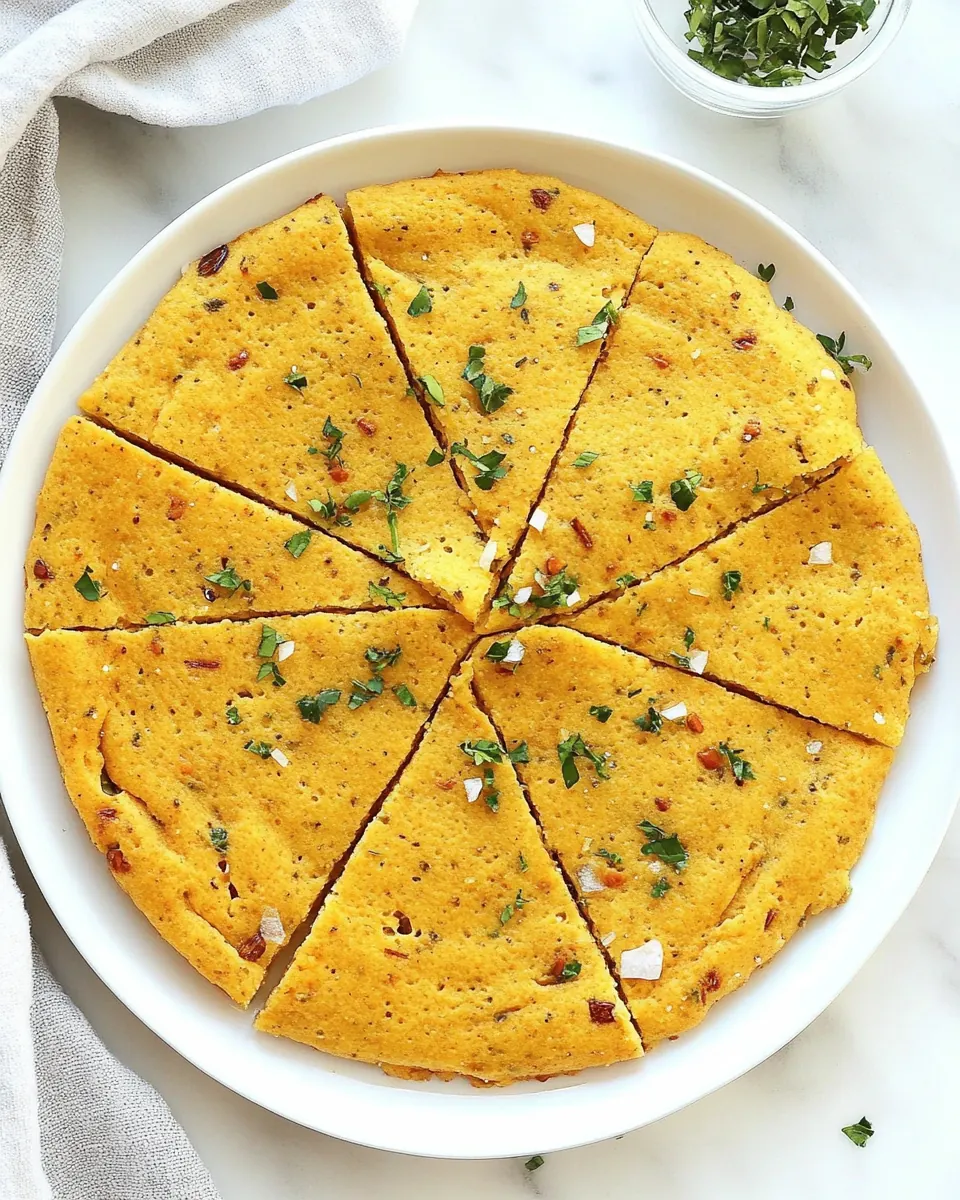
Socca
Socca has been a quiet obsession of mine ever since a dusty Provençal market handed me a hot, fragile wedge wrapped in paper on a humid afternoon. I still remember that first bite, where the slightly nutty aroma of chickpea flour met a whisper of crisp oil, and the contrast between the thin, crackling edges and the tender center made me stop and savor the moment. That瞬間 taught me how a few humble pantry items can sing when treated simply and with respect.
I make Socca for lazy Sundays and for last minute guests because it feels like sharing a secret. I like to let the batter rest long enough so the flavors calm and the texture becomes velvety, then I crank the oven so the pan is screaming hot, which gives those craggy, lacy edges I love. Over time I learned little habits, like letting the skillet heat in the oven and using just enough olive oil to encourage blistering and release. Those small choices make a huge difference.
Sometimes we tear off wedges and eat them plain, sometimes we dip them into bright condiments, and sometimes I fold them around roasted veggies for a light supper. Each time, Socca feels honest, approachable, and a tiny bit theatrical when it comes sizzling from the oven. You can make it ahead, reheat it gently, or fold it around whatever seasonal produce you have, and it still holds its character. I love that versatility, and I think you will too.
Recipe Snapshot
55 mins
30 mins
25 mins
Medium
200 kcal
Mediterranean
Vegan, Gluten-Free
Appetizers
Cast iron skillet, Oven mitts, Whisk, Mixing bowl, Spatula, Pizza cutter
What We Adore About This Socca
It is deeply simple
I adore Socca because it highlights how a few quality ingredients can shine without fuss. With just chickpea flour, water, olive oil, and salt, you get a batter that behaves more like a delicate pancake than a heavy bread. That simplicity lets each component be tasted, and I find that when I focus on technique the results are far greater than the sum of parts.
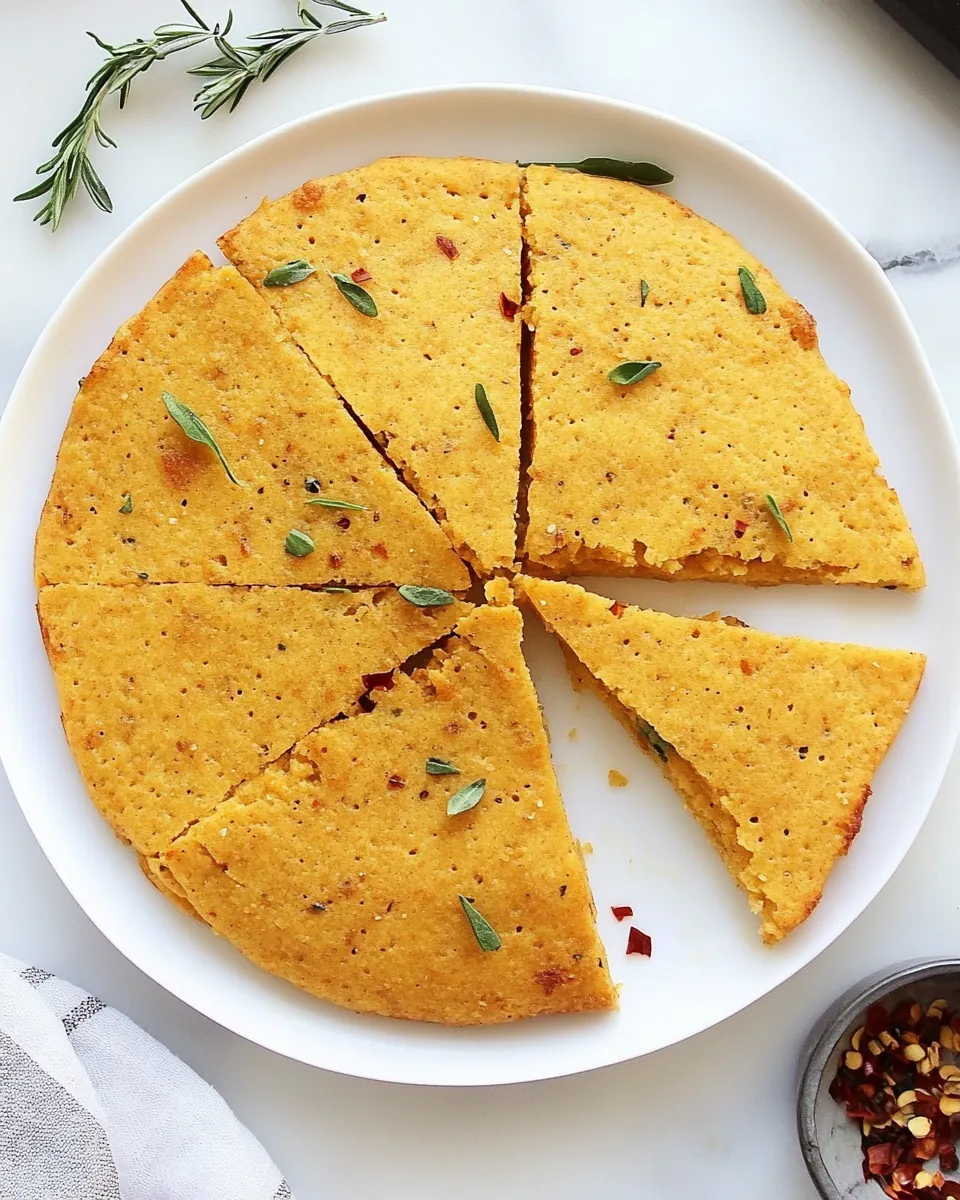
Texture contrast is everything
What keeps me coming back is the contrast between crunchy, lacy edges and a soft center. When the pan is properly heated, the bottom crisps quickly and forms those golden ridges I crave. The interplay between the crispy rim and supple middle is what makes every bite interesting, and it gives a rustic, artisanal feel even though it is straightforward to make.
It is endlessly adaptable
I love that Socca works across meals. Serve it warm as an appetizer, fold it for a quick breakfast, or use it as a base for tapas style toppings. Because the flavor profile is clean and slightly nutty, it pairs beautifully with bright herbs and tangy dips, and you can repurpose leftovers in creative ways.
Make ahead convenience
One of my favorite reasons to keep this recipe on standby is how nicely the batter behaves when rested. It improves in the fridge overnight, so you can mix it in the evening and bake the next day. That hands off quality is a lifesaver when I am juggling a busy schedule and still want something impressive on the table.
Minimal gear, maximum impact
Finally, the technique is forgiving. You do not need a fuss of equipment to get showy results. A hot oven and a well oiled skillet make the difference, and once you master that one step you can reliably produce crisp, golden Socca every time. I keep returning to this recipe because it is honest, satisfying, and reliably comforting.
What to Gather for Socca
The ingredient list for Socca is terse by design, and that is part of the charm. Each item plays a clear role: the chickpea flour provides the nutty backbone and structure, the water adjusts the batter to a thin, crepe like consistency, the olive oil adds flavor and encourages crisping, and the salt lifts the whole thing. Together they form a batter that bakes into a lacy, savory flatbread that can be dressed up or enjoyed plain.
- 1 cup chickpea flour (109 grams): Provides a high-protein, nutty base for the socca batter and contributes structure and body when hydrated and cooked into a thin pancake. Offers a naturally gluten-free option that browns nicely, creating crisp edges while keeping the interior tender when baked or pan-fried.
- 1 cup water (8 ounces): Creates the batter’s fluid consistency so the chickpea flour can fully hydrate, allowing a smooth pourable texture and even cooking. Helps dissolve the salt and distribute the flour for a uniform batter, and room-temperature water encourages proper batter resting and hydration.
- 1.5 tablespoons olive oil (18 grams; plus more for greasing the pan): Adds richness and helps the socca develop a golden, crisp surface by frying or baking at high heat; a small amount incorporated into the batter also improves mouthfeel. Serves as the greasing agent for the pan to prevent sticking and promote even browning along the edges.
- 3/4 teaspoon fine sea salt (5 grams; I use Real Salt brand): Enhances overall flavor by seasoning the batter and elevating the savory notes of the chickpea base while helping to balance the richness of the oil. Dissolves readily in the batter to ensure consistent salting and can be adjusted to taste for desired seasoning intensity.
Instructions for Socca
These instructions turn a short ingredient list into a dramatic, crispy flatbread. I like to work methodically, resting the batter so the texture smooths and heating the skillet until it is almost smoking, because that is what guarantees those golden, blistered edges. Read each step slowly so you can recognize the sensory cues that tell you the batter and pan are ready.
- In a large bowl, combine the chickpea flour, water, olive oil, and salt. Use a whisk to stir it together, and break up any lumps. Set it aside to rest for 30 minutes or more. (You can set it in the fridge overnight, if you want to make this in advance.): As the batter comes together you will notice a satin sheen and a few tiny bubbles forming on the surface, a sign that the mixture has the right hydration. The resting period relaxes the proteins in the chickpea flour and allows the mixture to hydrate fully, which yields a tender center after baking. If you skip resting you risk a grainy texture and uneven cooking. A common error at this stage is not whisking thoroughly, leaving stubborn clumps; tackle any lumps by pressing them against the bowl with the whisk so the batter is uniformly smooth.
- Preheat the oven to 450ºF and place a 10-inch cast iron skillet inside, to heat up at the same time. When the batter is done resting, use oven mitts to remove the skillet from the oven, and pour roughly 1/2 tablespoon of olive oil into the pan. Swirl it around, to make sure the bottom and sides of the pan are coated well, then pour the batter into the skillet.: When the oven and skillet are screaming hot you will hear a faint sizzle the instant the batter hits the pan, and that sound is what creates the blistered, lacy crust. Heating the pan first ensures the bottom sets quickly and becomes golden, rather than soaking up oil and turning greasy. A pitfall here is using too cool a pan, which will lead to a soggy base, so make sure the skillet is thoroughly preheated and use sturdy oven mitts when handling the hot cast iron.
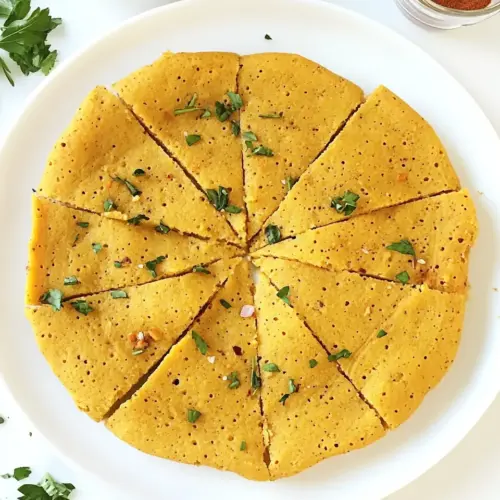
- Bake at 450ºF for 20 to 25 minutes, or until the edges of the socca look golden and crispy. Remove the pan from the oven, and use a spatula to lift the socca out of the pan. (It should be very easy to remove.): As it bakes you will see the batter rise slightly and form tiny, irregular bubbles; the aroma will shift from raw flour to a warm, nutty scent, and the edges should become deeply golden and crisp. This visual transformation is the best indicator of doneness because times can vary by oven. If you pull it too early the center will be soft and under set; too late and it will dry out. A frequent mistake is opening the oven repeatedly, so trust the visual cues and keep the door closed until the edges are crisp and the top is set.
- Use a pizza cutter to slice the socca into slices, and serve warm with your favorite toppings or dip. Leftover socca can be stored in an airtight container in the fridge for up to 5 days.: Warm slices have a slightly tender middle and fragile, crisp edges that shatter pleasantly when you bite them; the aroma remains toasty and inviting. Serving it warm accentuates the contrast between textures, while cooling makes it chewier and easier to store. When reheating, a quick turn in a hot skillet restores crispness. A common misstep is refrigerating without sealing, which causes the surface to dry and lose that fresh, baked appeal, so use an airtight container for storage.
Helpful Hints
I like to keep a few reliable habits that make every batch of Socca better. These small decisions about rest, heat, and oil translate directly into texture and flavor. Below I expand each practical tip so you can use them every time you bake.
- Resting matters: Give the batter at least 30 minutes to hydrate fully, which produces a silkier interior and more reliable crisping at the edges.
- Skillet temperature: Preheat your cast iron in the oven so that it is properly hot, the instant sizzle when the batter hits the surface forms the lacy, golden crust you want.
- Oil placement: Coat the pan well with olive oil before adding batter; the oil promotes blistering and creates a natural nonstick layer for easy release.
- Visual cues over time: Rely on seeing golden, browned edges and a set top rather than strictly timing, since ovens and pans vary in heat delivery.
- Make ahead: Batter can rest overnight in the fridge, which makes Socca convenient for entertaining and often improves texture.
Great Combinations for Socca
Socca works in many contexts, from casual snacking to composed plates. You can keep it simple or dress it up depending on the occasion. Below are thoughtful pairing ideas, storage suggestions, and serving styles that help you get the most from each batch.
- Casual snack: Serve warm wedges with a bright dip and let guests tear and share, ideal for relaxed gatherings or as a starter.
- Weeknight meal: Fold slices around roasted vegetables or a simple salad for a fast, balanced dinner that fills without heaviness.
- Brunch option: Offer Socca alongside eggs and fresh herbs for a light brunch that still feels special and approachable.
- Entertaining: Prepare the batter ahead, bake just before guests arrive, and keep warm in a low oven so you can serve hot, crisp wedges throughout the evening.
- Storage tips: Keep leftovers in an airtight container for up to five days and reheat briefly in a hot skillet to restore the crisp edge before serving.
- Seasonal pairings: Use it as a platform for seasonal toppings, like spring greens or late summer roasted vegetables, to match the produce you have on hand.
FAQ
Conclusion
Socca stands out because it transforms four humble ingredients into a crispy, nutty flatbread with surprising depth and charm. Give it a try and you will find it an easy, satisfying option for everything from a snack to a light meal. I encourage you to experiment with resting times and pan temperature, and to enjoy the ritual of pulling a warm, blistered wedge straight from the skillet with someone you care about.
Socca
Equipment
- Cast-Iron Skillet
- Oven mitts
- Whisk
- Mixing Bowl
- Spatula
- Pizza Cutter
Ingredients
- 1 cup chickpea flour (109 grams) Provides a high-protein, nutty base for the socca batter and contributes structure and body when hydrated and cooked into a thin pancake. Offers a naturally gluten-free option that browns nicely, creating crisp edges while keeping the interior tender when baked or pan-fried.
- 1 cup water (8 ounces) Creates the batter’s fluid consistency so the chickpea flour can fully hydrate, allowing a smooth pourable texture and even cooking. Helps dissolve the salt and distribute the flour for a uniform batter, and room-temperature water encourages proper batter resting and hydration.
- 1.5 tablespoons olive oil (18 grams; plus more for greasing the pan) Adds richness and helps the socca develop a golden, crisp surface by frying or baking at high heat; a small amount incorporated into the batter also improves mouthfeel. Serves as the greasing agent for the pan to prevent sticking and promote even browning along the edges.
- 3/4 teaspoon fine sea salt (5 grams; I use Real Salt brand) Enhances overall flavor by seasoning the batter and elevating the savory notes of the chickpea base while helping to balance the richness of the oil. Dissolves readily in the batter to ensure consistent salting and can be adjusted to taste for desired seasoning intensity.
Instructions
- In a large bowl, combine the chickpea flour, water, olive oil, and salt. Use a whisk to stir it together, and break up any lumps. Set it aside to rest for 30 minutes or more. (You can set it in the fridge overnight, if you want to make this in advance.): As the batter comes together you will notice a satin sheen and a few tiny bubbles forming on the surface, a sign that the mixture has the right hydration. The resting period relaxes the proteins in the chickpea flour and allows the mixture to hydrate fully, which yields a tender center after baking. If you skip resting you risk a grainy texture and uneven cooking. A common error at this stage is not whisking thoroughly, leaving stubborn clumps; tackle any lumps by pressing them against the bowl with the whisk so the batter is uniformly smooth.
- Preheat the oven to 450ºF and place a 10-inch cast iron skillet inside, to heat up at the same time. When the batter is done resting, use oven mitts to remove the skillet from the oven, and pour roughly 1/2 tablespoon of olive oil into the pan. Swirl it around, to make sure the bottom and sides of the pan are coated well, then pour the batter into the skillet.: When the oven and skillet are screaming hot you will hear a faint sizzle the instant the batter hits the pan, and that sound is what creates the blistered, lacy crust. Heating the pan first ensures the bottom sets quickly and becomes golden, rather than soaking up oil and turning greasy. A pitfall here is using too cool a pan, which will lead to a soggy base, so make sure the skillet is thoroughly preheated and use sturdy oven mitts when handling the hot cast iron.
- Bake at 450ºF for 20 to 25 minutes, or until the edges of the socca look golden and crispy. Remove the pan from the oven, and use a spatula to lift the socca out of the pan. (It should be very easy to remove.): As it bakes you will see the batter rise slightly and form tiny, irregular bubbles; the aroma will shift from raw flour to a warm, nutty scent, and the edges should become deeply golden and crisp. This visual transformation is the best indicator of doneness because times can vary by oven. If you pull it too early the center will be soft and under set; too late and it will dry out. A frequent mistake is opening the oven repeatedly, so trust the visual cues and keep the door closed until the edges are crisp and the top is set.
- Use a pizza cutter to slice the socca into slices, and serve warm with your favorite toppings or dip. Leftover socca can be stored in an airtight container in the fridge for up to 5 days.: Warm slices have a slightly tender middle and fragile, crisp edges that shatter pleasantly when you bite them; the aroma remains toasty and inviting. Serving it warm accentuates the contrast between textures, while cooling makes it chewier and easier to store. When reheating, a quick turn in a hot skillet restores crispness. A common misstep is refrigerating without sealing, which causes the surface to dry and lose that fresh, baked appeal, so use an airtight container for storage.
Notes
- Resting matters: Give the batter at least 30 minutes to hydrate fully, which produces a silkier interior and more reliable crisping at the edges.
- Skillet temperature: Preheat your cast iron in the oven so that it is properly hot, the instant sizzle when the batter hits the surface forms the lacy, golden crust you want.
- Oil placement: Coat the pan well with olive oil before adding batter; the oil promotes blistering and creates a natural nonstick layer for easy release.
- Visual cues over time: Rely on seeing golden, browned edges and a set top rather than strictly timing, since ovens and pans vary in heat delivery.
- Make ahead: Batter can rest overnight in the fridge, which makes Socca convenient for entertaining and often improves texture.