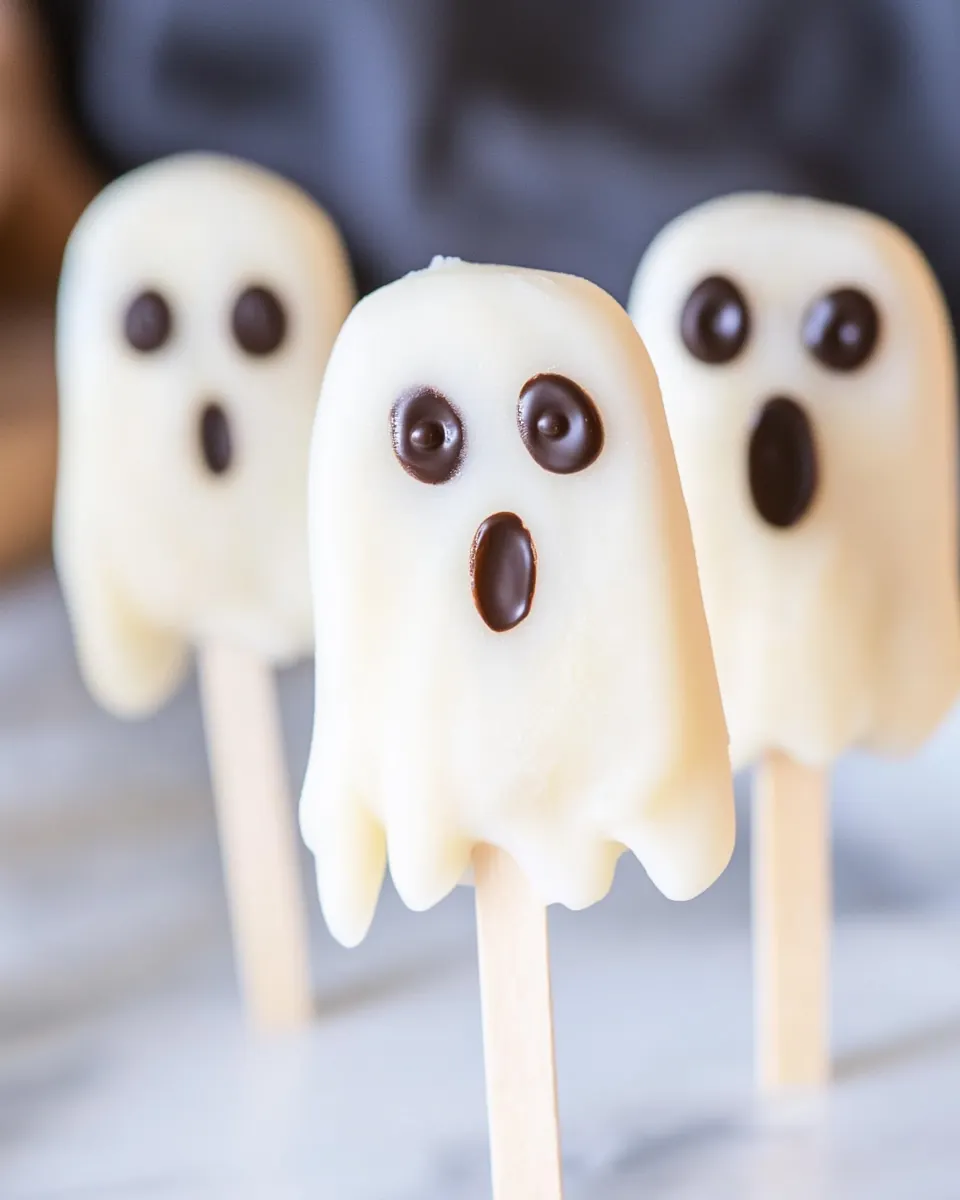
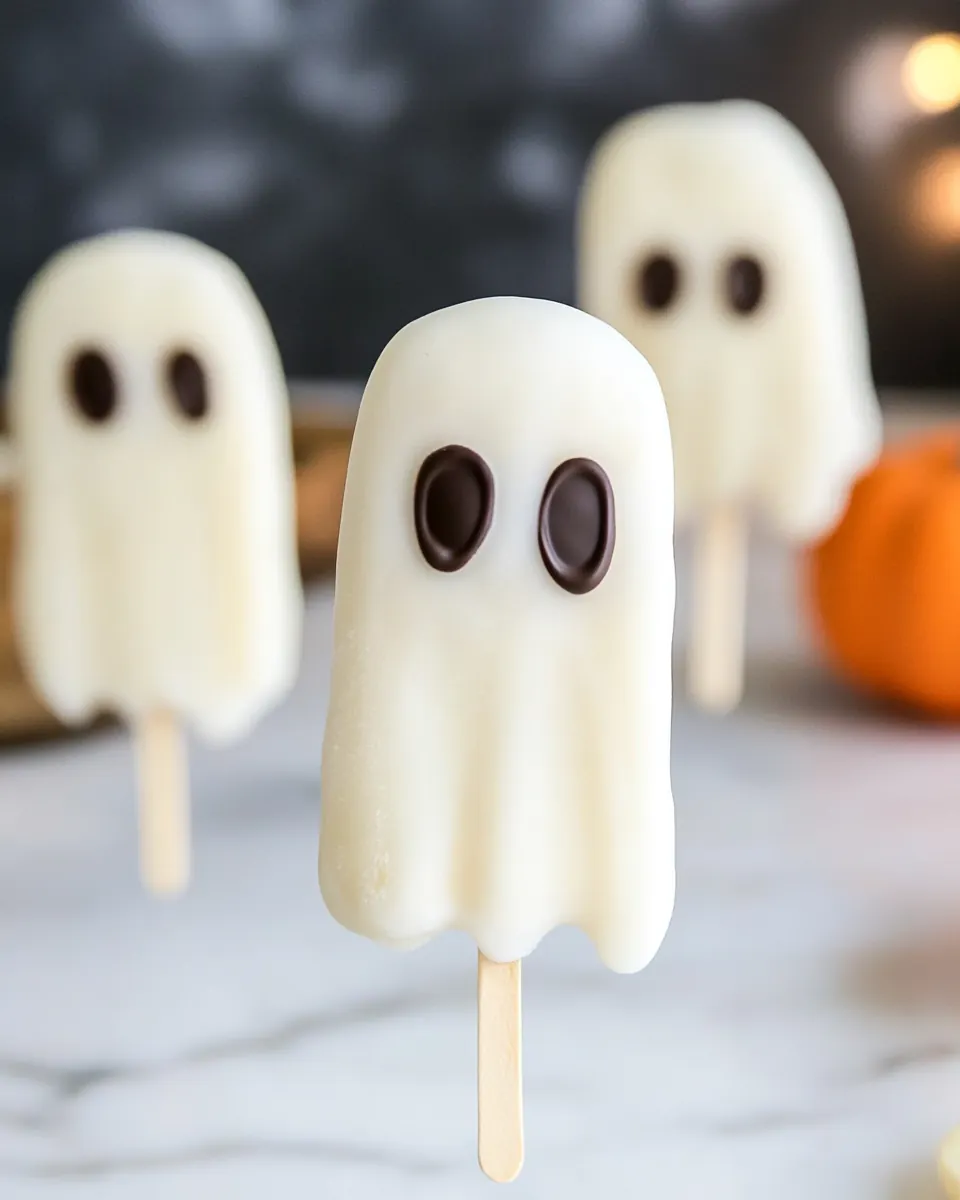
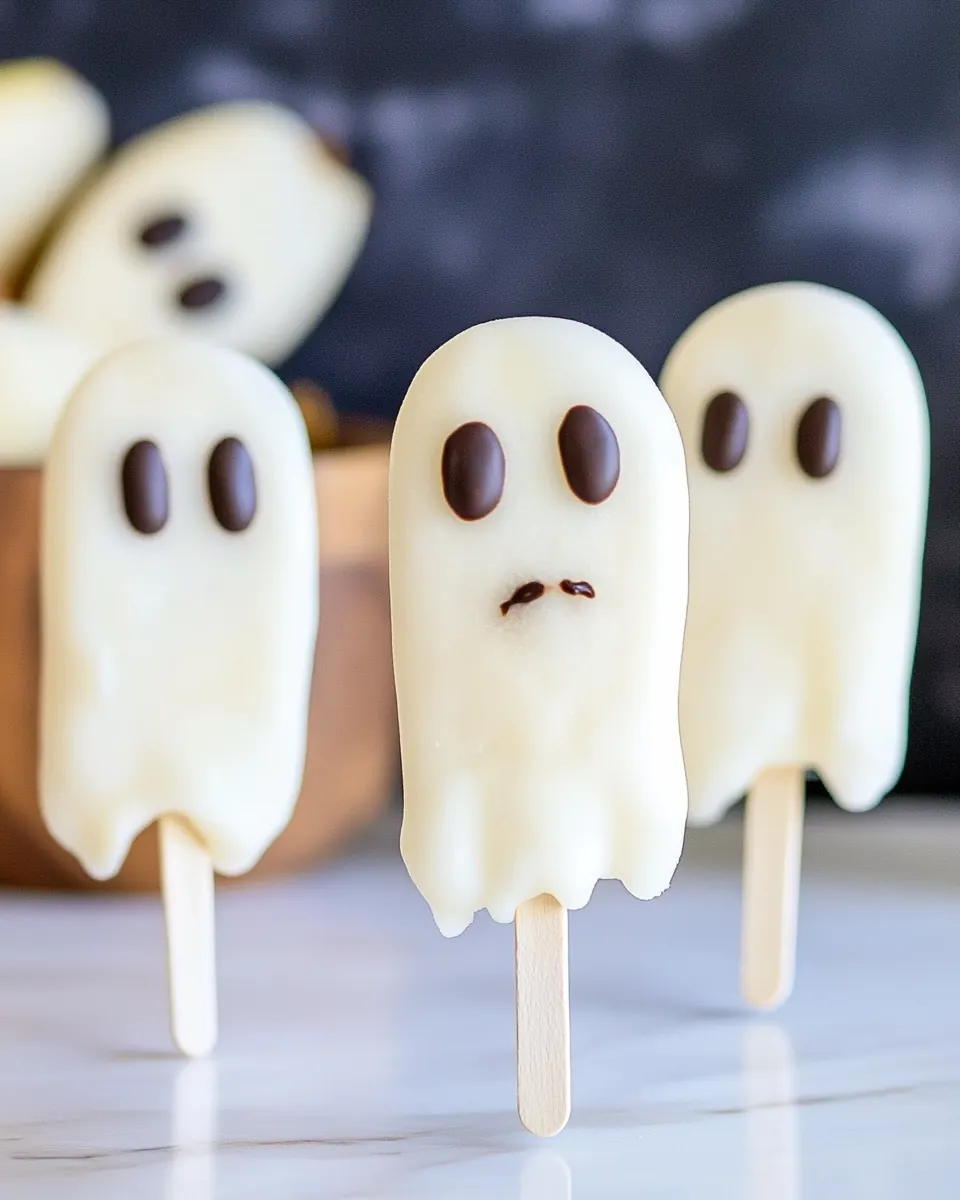
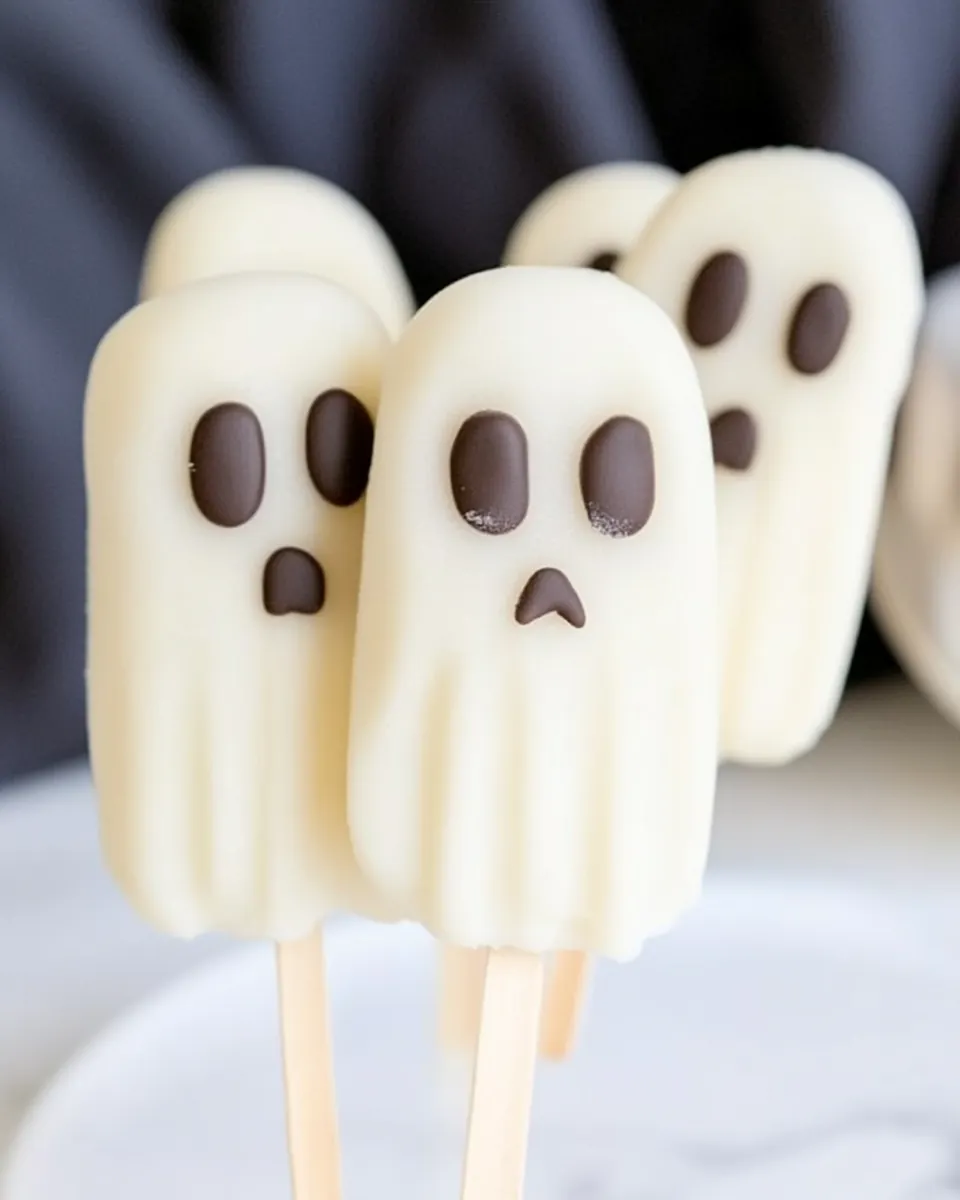
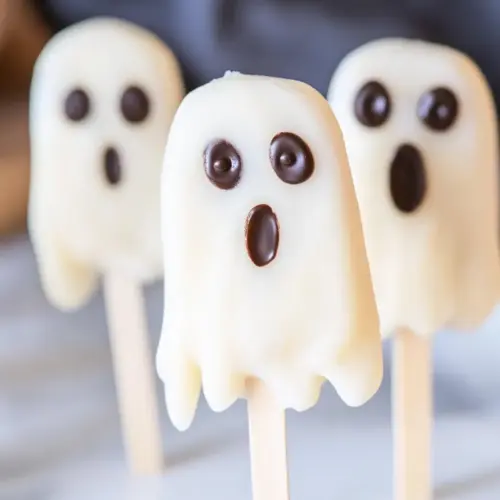
Frozen Chocolate Banana Ghost Pops
Frozen Chocolate Banana Ghost Pops became my go to Halloween treat the year my neighbor’s kids knocked on the door sticky from sticky candy and begging for something a little less sugar charged. I still remember assembling those first little ghosts on the kitchen counter, my hands cold from working with chocolate while laughter filtered in from the porch, and thinking how something so simple could feel festive and special. That night I experimented with presentation, adjusting the chocolate thickness until the white chocolate set with just the right sheen, and I still reach for that same method every October when I want a playful, low fuss dessert.
I learned to treat the process like a small ritual. I would slice the banana into quarters, steady the popsicle sticks, and place them on a single layer so each ghost stood proud in the freezer. Melting the white chocolate gently in short bursts helped me keep control, preventing grainy texture and giving a smooth coating that freezes into a satisfying snap. Guests always comment on how these look almost professional, even though they come together in a handful of easy steps.
Recipe Snapshot
2 hr 20 mins
60 mins
80 mins
Hard
150 kcal
American
Paleo, Vegan
Desserts
Microwave, Coffee mug, Cookie sheet, Wax paper, Knife
Why This Frozen Chocolate Banana Ghost Pops Is a Winner
They are spooky but kid friendly
I love that Frozen Chocolate Banana Ghost Pops are playful without being over the top, so kids adore them and parents breathe easier. The recipe swaps out sticky candy for real banana, giving a natural sweetness that still feels treat like. I often watch little faces light up as the tiny chocolate chip eyes go on, and that reaction reminds me why I keep this in my seasonal rotation.
Quick to assemble, yet satisfying
From my perspective, there is a delightful contrast between the cold banana center and the crisp snap of set white chocolate. You do need to freeze the fruit, but active hands on time is minimal, which makes these perfect for last minute parties. I like that they are simple enough to make with kids helping, so the time investment feels social as well as culinary.
Versatile for decoration and portions
What stands out to me is how easy these are to dress up, and how consistent the result is. The mini chocolate chips for the eyes add just enough detail to give personality, and you can make four uniform pieces from a single banana. That portion control is useful when hosting a group, since everyone gets a tidy, uniform ghost pop.
Textural pleasure
I appreciate the play of textures here. The creamy cold banana contrasts with the firm set of the white chocolate coating, delivering a snack that feels decadent despite its simplicity. In my kitchen, this balance is what transforms basic ingredients into a memorable treat.
Easy to store and prepare ahead
One final reason I keep this in my repertoire is practicality. You can make a batch ahead and keep them frozen until guests arrive, which reduces last minute stress. I often prepare extras for the freezer, because they travel well and stay crisp when handled correctly.
Ingredients for Frozen Chocolate Banana Ghost Pops
These few ingredients work like a tiny team. The banana provides natural sweetness and a creamy frozen center, while the white chocolate creates a thin, crisp shell that contrasts with the soft fruit. The mini chocolate chips are the simple flourish that turns a frozen snack into a ghost, and the popsicle sticks make them playful and portable. Together they deliver texture, ease, and a lot of charm.
- 1 medium banana: Peel and slice to provide a creamy, naturally sweet base for the frozen pops; its soft texture freezes well and pairs nicely with chocolate coatings. Use ripe bananas for best sweetness and smooth consistency when forming the ghost shapes.
- 1 cup good quality white chocolate*, or candy melts: Melt gently to create a smooth, glossy coating that hardens around the banana for a sweet, decorative exterior; white chocolate or candy melts offer a neutral canvas for ghost designs. Temper or warm slowly to prevent scorching and ensure even coverage over the frozen banana surfaces.
- 8 mini chocolate chips, for eyes: Place as tiny details to form expressive eyes that give the pops their ghostly character; mini chocolate chips stick easily into the melted coating and hold shape as it sets. Use two per pop for a classic ghost face appearance.
- 4 popsicle sticks: Insert to provide a convenient handle for holding and dipping the pops; popsicle sticks stabilize the banana pieces while freezing and make them easy to serve. Choose sturdy sticks that fit snugly into the banana without splitting.
How to Make Frozen Chocolate Banana Ghost Pops
These steps are intentionally straightforward, but each moment matters to achieve that crisp coating and playful appearance. I walk you through my exact approach, sharing sensory cues and common pitfalls so your pops look and taste their best. Take your time with freezing and melting, and you will be rewarded with crisp, photo ready ghost pops.
- Cut banana in half lengthwise, then in half to make four quarters. Insert popsicle sticks into bananas, and freeze bananas on a wax paper lined cookie sheet.: The cut surface should be smooth and slightly moist, which indicates freshness. You want clean, even quarters so each pop freezes uniformly and looks tidy once coated. I like to use a sharp knife and a steady hand, pressing gently to avoid bruising the flesh. If the banana feels too soft as you slice, chill it briefly in the fridge before cutting, because overly soft fruit can smear during assembly. A common mistake here is making uneven pieces which freeze at different rates and can lead to inconsistent coatings.
- When the bananas are frozen, fill a coffee mug with chocolate. Melt chocolate in the microwave 30 seconds at a time, stirring until the chocolate is melted and soft.: When you press the popsicle sticks in, listen for a faint give, not a squelch, that tells you the stick is secure but the fruit is not torn. Placing them on a single layer on wax paper prevents sticking and helps air circulate for even freezing. I position them flat so the stick is perpendicular to the cut surface, which gives balance when dipping. Avoid stacking pieces, because crowded bananas can freeze together and ruin the shape. One troubleshooting tip is to test a piece after an hour to ensure the center is solid enough to hold the stick firmly.
- Dip the bananas one at a time into the chocolate, scraping off the excess chocolate from the back of the banana, and place it on a cookie sheet lined with wax paper.: A mug concentrates the white chocolate so you can dip neatly, and its vertical sides support the banana as you coat it. The texture of the melted chocolate should be glossy and pourable, not syrupy or grainy. If the chocolate looks dull or clumpy, stir more and warm gently in short bursts. I find stirring in one direction helps smooth out any lumps. Avoid overheating, which will cause the chocolate to seize and become unusable. If that happens, adding a tiny splash of neutral oil can revive it, but prevention is better than repair.
- Quickly add the chocolate chips for the eyes before the chocolate hardens (you have to work quickly here).: The key sensory cue is a silky shine and a warm but not hot temperature. After the first 30 seconds, stir thoroughly, scraping the mug sides so residual unmelted bits incorporate. Continue in shorter bursts if needed, pausing to stir, because the residual heat will finish melting the chocolate without cooking it. When stirring, watch for uniform fluidity, and test by dipping a spoon to see if the chocolate coats thinly. A common error is rushing the microwave time, which produces grainy texture and dull appearance.
- Return to the freezer until frozen and ready to eat. Eat frozen.: As you dip, the sound is almost silent except for the faint glug of chocolate as it detaches, and the visual cue is a smooth sheen covering the banana. Use a spoon to help coat hard to reach spots and then scrape the back of the banana against the mug rim to remove excess, which prevents heavy drips. Lay each pop gently on the wax paper so the coating sets without pooling. If you notice thick blobs, you can gently tilt the piece to redistribute before it hardens. Avoid lingering in the chocolate, because overcoating makes freezing take longer and can create an uneven shell.
- Quickly add the chocolate chips for the eyes before the chocolate hardens: Timing is everything here, because the melted coating firms rapidly against the cold banana . Press the mini chocolate chips into place with a fingertip or the back of a spoon, spacing them to create expressive faces. You should feel a slight tack when they adhere, and the chips should sit flush rather than sinking. If the chocolate begins to set too fast, work with smaller batches so you can embellish before it hardens. A frequent slip up is waiting too long, which results in chips that fall off or sit awkwardly.
- Return to the freezer until frozen and ready to eat: Place the finished pops back on the wax paper, spacing them so air circulates and the coating firms uniformly. The freezer will convert the glossy chocolate into a crisp shell that snaps when bitten, while the banana becomes cold and creamy inside. I wait at least 30 minutes to ensure they are thoroughly chilled, though longer is fine for parties. If you handle them too soon you risk fingerprints or soft spots in the coating, so be patient. One mistake to avoid is stacking the pops which can lead to melted spots or smashed decorations.
- Eat frozen: When you bite into one, you should hear a faint snap from the set white chocolate , followed by the cold, creamy texture of the banana . The flavor is sweet and fresh, with the chocolate providing a pleasant contrast. Serve them straight from the freezer on a chilled plate to keep them firm, and encourage guests to enjoy them promptly so they do not soften. If a pop begins to thaw, return it to the freezer to preserve texture instead of refreezing after partial thawing which can make the banana grainy.
Expert Tips about Frozen Chocolate Banana Ghost Pops
I like to share tips that save time and improve texture, because these simple pops really shine when small details are handled well. Below are practical suggestions I use every season to get uniform, photo ready ghosts. Read through and pick the ones that fit your kitchen and timeline.
- Choose slightly firm bananas — Firmer fruit slices freeze better and give a creamier result after dipping, preventing mushy centers when guests bite into them.
- Temper your melting time — Heat the white chocolate in short bursts and stir thoroughly, because gentle heat preserves a glossy, smooth coating without burning.
- Use a mug for dipping — A narrow container reduces splash and makes it easier to control the coating thickness when you dip each piece.
- Press chips immediately — Add the mini chocolate chips while the chocolate is still wet to ensure they adhere firmly and sit neatly as eyes.
- Freeze on a single layer — Spacing pops apart prevents sticking and allows the coating to set evenly, producing consistent texture across all pieces.
- Plan for timing — Finish assembly close to serving time when possible, but extras freeze well so you can prep ahead without losing quality.
What Complements This Frozen Chocolate Banana Ghost Pops
These little ghosts are playful and portable, so think about pairings that enhance their frozen simplicity. Serve them on a platter for Halloween gatherings, or tuck them into lunch boxes for a seasonal surprise. They pair well with light, warm beverages for contrast, and their compact size makes them ideal for buffet style events. Below are practical serving ideas and seasonal notes to help you present them beautifully.
- Plate arrangement — Arrange the pops on a chilled platter lined with parchment, spacing them evenly for visual appeal and to keep them firm longer during serving.
- Party snack — These are perfect for Halloween parties and children friendly events, offering a healthier treat option that still feels festive.
- Occasions — Great for seasonal gatherings, school events, or a light dessert after a meal, their portion size makes them convenient for buffets or dessert tables.
- Storage tips — Store them in a single layer in an airtight container in the freezer to avoid condensation and preserve the crisp shell.
- Transporting — Use a cooler or insulated bag if you need to move them to a party, keeping them frozen until serving to maintain texture.
- Seasonal pairing — Serve them during autumn or summer celebrations when the cold, fruity center is especially refreshing, and the Halloween theme fits the mood.
FAQ
Conclusion
Frozen Chocolate Banana Ghost Pops stand out because they transform four simple ingredients into a fun, textural treat that is both kid friendly and impressively photogenic. Try them at your next seasonal gathering to offer a playful dessert that is quick to assemble and easy to portion. These pops are forgiving, adaptable, and a great way to make something memorable without a lot of fuss, so grab your bananas and white chocolate and enjoy making a batch for family or friends.
Frozen Chocolate Banana Ghost Pops
Equipment
- Microwave
- Coffee mug
- Cookie Sheet
- Wax paper
- Knife
Ingredients
- 1 medium banana Peel and slice to provide a creamy, naturally sweet base for the frozen pops; its soft texture freezes well and pairs nicely with chocolate coatings. Use ripe bananas for best sweetness and smooth consistency when forming the ghost shapes.
- 1 cup good quality white chocolate*, or candy melts Melt gently to create a smooth, glossy coating that hardens around the banana for a sweet, decorative exterior; white chocolate or candy melts offer a neutral canvas for ghost designs. Temper or warm slowly to prevent scorching and ensure even coverage over the frozen banana surfaces.
- 8 mini chocolate chips, for eyes Place as tiny details to form expressive eyes that give the pops their ghostly character; mini chocolate chips stick easily into the melted coating and hold shape as it sets. Use two per pop for a classic ghost face appearance.
- 4 popsicle sticks Insert to provide a convenient handle for holding and dipping the pops; popsicle sticks stabilize the banana pieces while freezing and make them easy to serve. Choose sturdy sticks that fit snugly into the banana without splitting.
Instructions
- Cut banana in half lengthwise, then in half to make four quarters. Insert popsicle sticks into bananas, and freeze bananas on a wax paper lined cookie sheet.: The cut surface should be smooth and slightly moist, which indicates freshness. You want clean, even quarters so each pop freezes uniformly and looks tidy once coated. I like to use a sharp knife and a steady hand, pressing gently to avoid bruising the flesh. If the banana feels too soft as you slice, chill it briefly in the fridge before cutting, because overly soft fruit can smear during assembly. A common mistake here is making uneven pieces which freeze at different rates and can lead to inconsistent coatings.
- When the bananas are frozen, fill a coffee mug with chocolate. Melt chocolate in the microwave 30 seconds at a time, stirring until the chocolate is melted and soft.: When you press the popsicle sticks in, listen for a faint give, not a squelch, that tells you the stick is secure but the fruit is not torn. Placing them on a single layer on wax paper prevents sticking and helps air circulate for even freezing. I position them flat so the stick is perpendicular to the cut surface, which gives balance when dipping. Avoid stacking pieces, because crowded bananas can freeze together and ruin the shape. One troubleshooting tip is to test a piece after an hour to ensure the center is solid enough to hold the stick firmly.
- Dip the bananas one at a time into the chocolate, scraping off the excess chocolate from the back of the banana, and place it on a cookie sheet lined with wax paper.: A mug concentrates the white chocolate so you can dip neatly, and its vertical sides support the banana as you coat it. The texture of the melted chocolate should be glossy and pourable, not syrupy or grainy. If the chocolate looks dull or clumpy, stir more and warm gently in short bursts. I find stirring in one direction helps smooth out any lumps. Avoid overheating, which will cause the chocolate to seize and become unusable. If that happens, adding a tiny splash of neutral oil can revive it, but prevention is better than repair.
- Quickly add the chocolate chips for the eyes before the chocolate hardens (you have to work quickly here).: The key sensory cue is a silky shine and a warm but not hot temperature. After the first 30 seconds, stir thoroughly, scraping the mug sides so residual unmelted bits incorporate. Continue in shorter bursts if needed, pausing to stir, because the residual heat will finish melting the chocolate without cooking it. When stirring, watch for uniform fluidity, and test by dipping a spoon to see if the chocolate coats thinly. A common error is rushing the microwave time, which produces grainy texture and dull appearance.
- Return to the freezer until frozen and ready to eat. Eat frozen.: As you dip, the sound is almost silent except for the faint glug of chocolate as it detaches, and the visual cue is a smooth sheen covering the banana. Use a spoon to help coat hard to reach spots and then scrape the back of the banana against the mug rim to remove excess, which prevents heavy drips. Lay each pop gently on the wax paper so the coating sets without pooling. If you notice thick blobs, you can gently tilt the piece to redistribute before it hardens. Avoid lingering in the chocolate, because overcoating makes freezing take longer and can create an uneven shell.
- Quickly add the chocolate chips for the eyes before the chocolate hardens: Timing is everything here, because the melted coating firms rapidly against the cold banana . Press the mini chocolate chips into place with a fingertip or the back of a spoon, spacing them to create expressive faces. You should feel a slight tack when they adhere, and the chips should sit flush rather than sinking. If the chocolate begins to set too fast, work with smaller batches so you can embellish before it hardens. A frequent slip up is waiting too long, which results in chips that fall off or sit awkwardly.
- Return to the freezer until frozen and ready to eat: Place the finished pops back on the wax paper, spacing them so air circulates and the coating firms uniformly. The freezer will convert the glossy chocolate into a crisp shell that snaps when bitten, while the banana becomes cold and creamy inside. I wait at least 30 minutes to ensure they are thoroughly chilled, though longer is fine for parties. If you handle them too soon you risk fingerprints or soft spots in the coating, so be patient. One mistake to avoid is stacking the pops which can lead to melted spots or smashed decorations.
- Eat frozen: When you bite into one, you should hear a faint snap from the set white chocolate , followed by the cold, creamy texture of the banana . The flavor is sweet and fresh, with the chocolate providing a pleasant contrast. Serve them straight from the freezer on a chilled plate to keep them firm, and encourage guests to enjoy them promptly so they do not soften. If a pop begins to thaw, return it to the freezer to preserve texture instead of refreezing after partial thawing which can make the banana grainy.
Notes
- Choose slightly firm bananas — Firmer fruit slices freeze better and give a creamier result after dipping, preventing mushy centers when guests bite into them.
- Temper your melting time — Heat the white chocolate in short bursts and stir thoroughly, because gentle heat preserves a glossy, smooth coating without burning.
- Use a mug for dipping — A narrow container reduces splash and makes it easier to control the coating thickness when you dip each piece.
- Press chips immediately — Add the mini chocolate chips while the chocolate is still wet to ensure they adhere firmly and sit neatly as eyes.
- Freeze on a single layer — Spacing pops apart prevents sticking and allows the coating to set evenly, producing consistent texture across all pieces.
- Plan for timing — Finish assembly close to serving time when possible, but extras freeze well so you can prep ahead without losing quality.