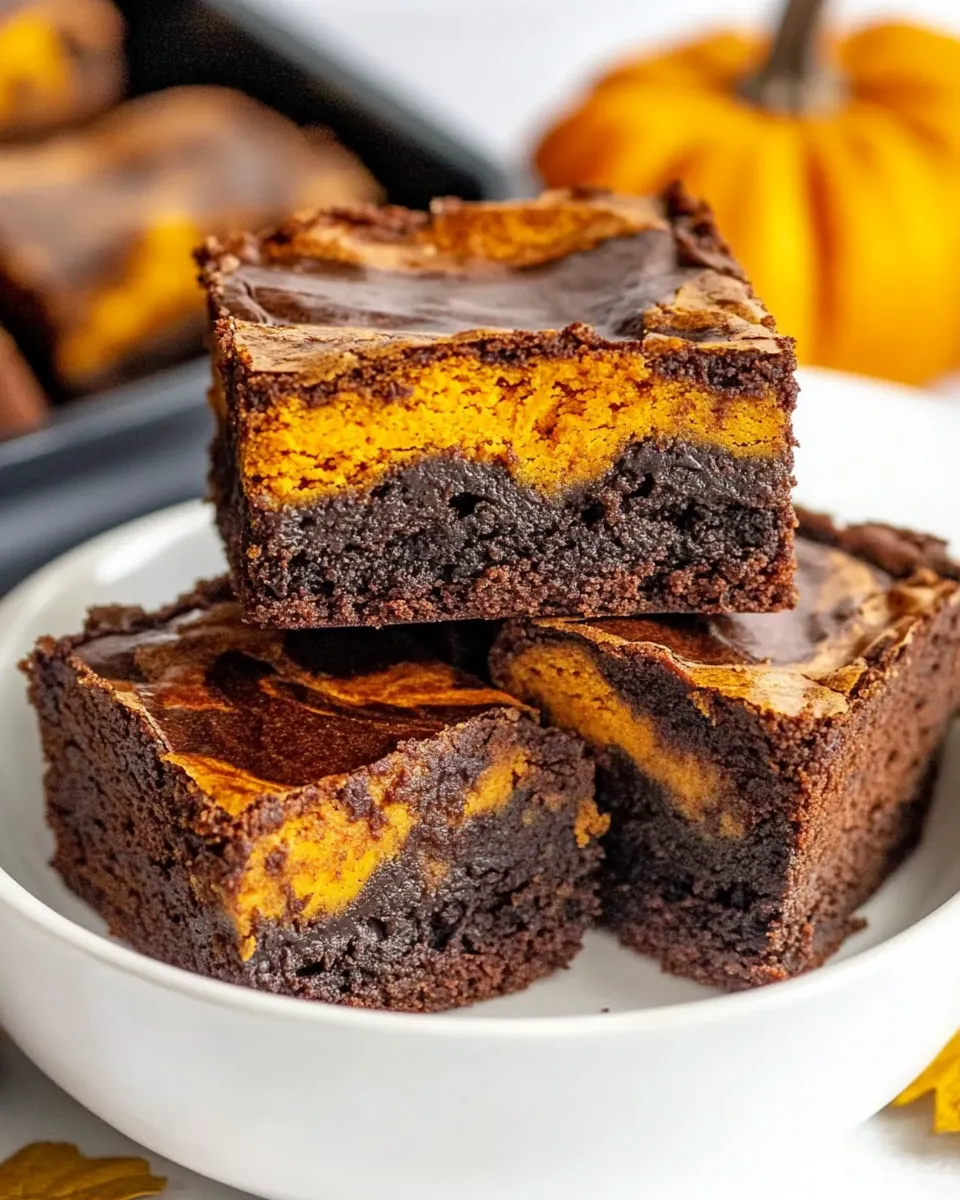
Swirled Pumpkin Brownies
Swirled Pumpkin Brownies are the kind of dessert that makes the kitchen smell like the coziest corner of a bakery and invites everyone to linger at the counter while cooling racks do their quiet work.
I first made Swirled Pumpkin Brownies on an overcast autumn afternoon when I wanted something that bridged the line between fudgy chocolate and the warm spice of pumpkin without leaning fully into either. I remember stirring melted butter into sugar and watching the bowl catch the light as the mixture smoothed out, while the pumpkin batter waited like a silky surprise. Family members wandered through the house, drawn by the scent of pumpkin and pumpkin pie spice, and by the time I slid the pan into the oven the chatter had turned into anticipatory quiet.
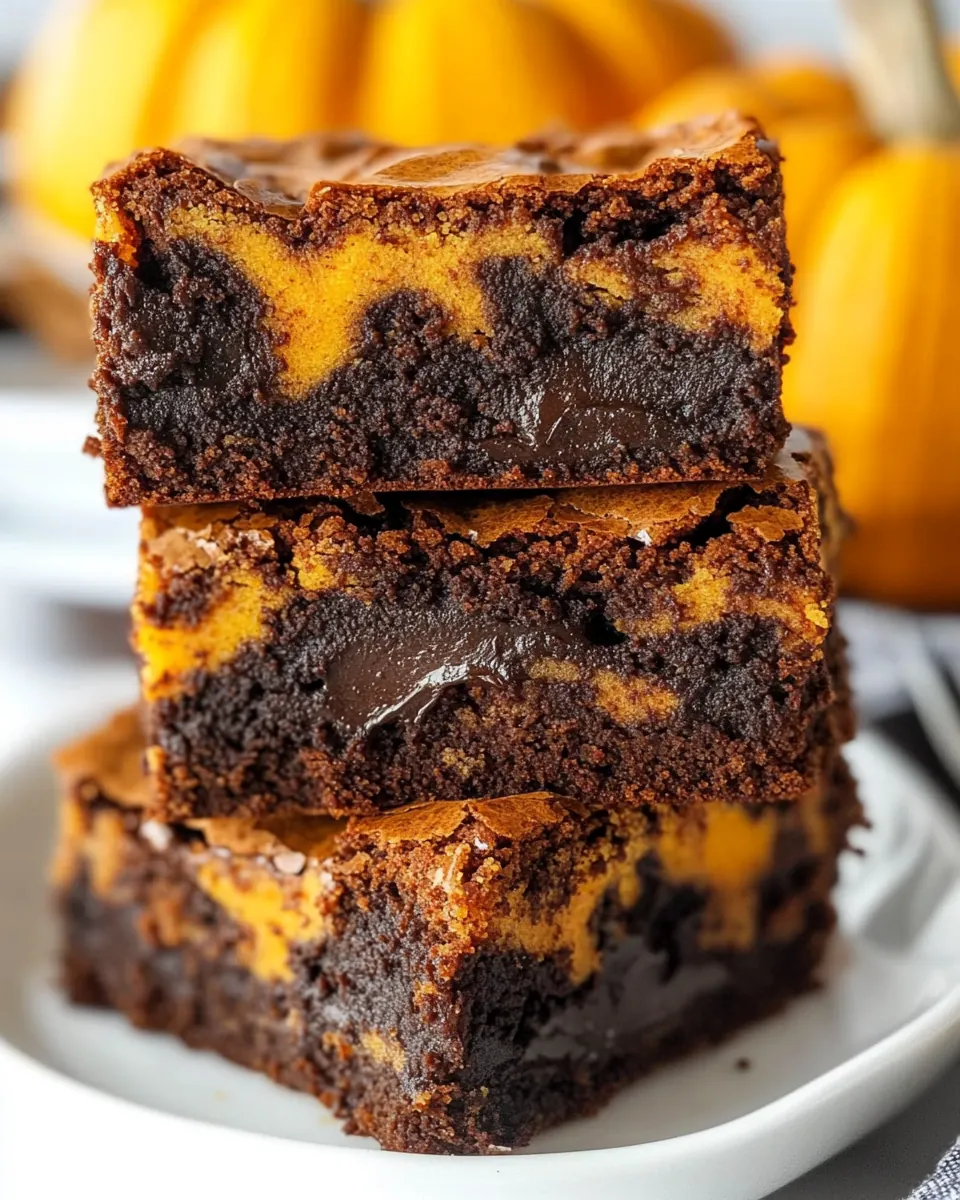
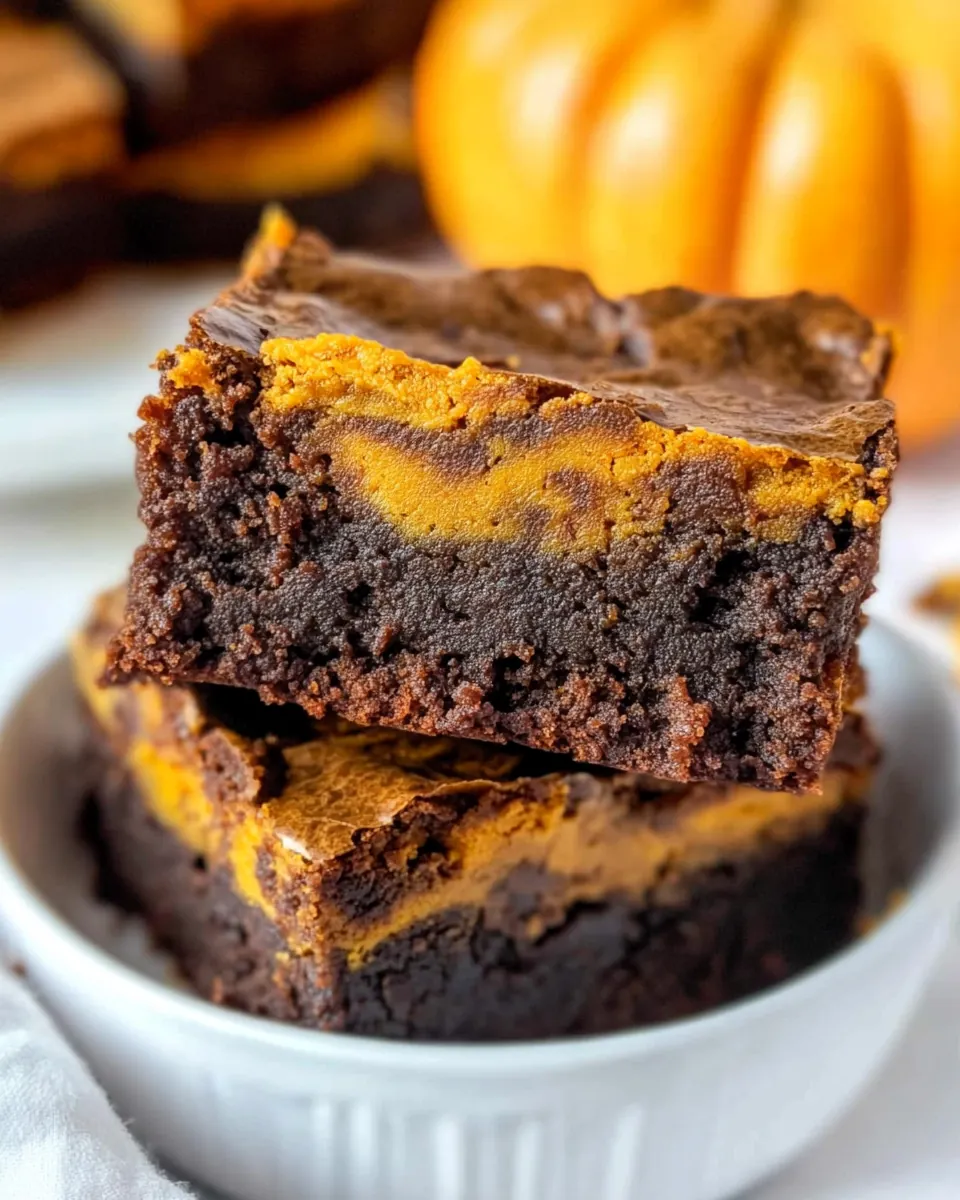
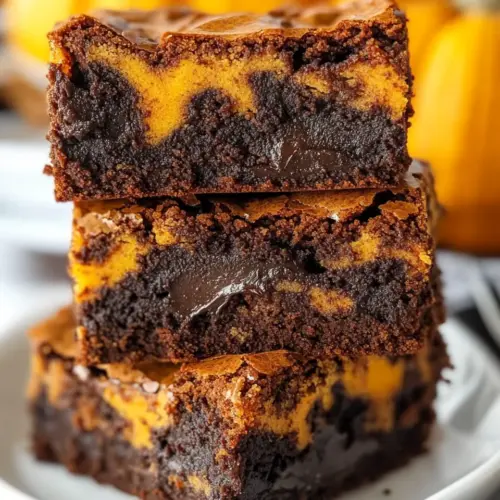
After baking, the top developed a thin, slightly crackly sheen that gives way to tender, chewy crumbs beneath, and that swirl of cocoa and pumpkin makes each bite a tiny decision between chocolate and spice. I love serving these squares at potlucks and holiday gatherings because they travel well, slice neatly when fully cooled, and usually disappear before the coffee is finished. Over the years I learned a couple of tricks to keep the textures balanced, and I enjoy swapping stories with guests while I cut the pan into pieces. These brownies have become my easy answer to fall get togethers, a treat that feels both nostalgic and a little playful, and every time I make them I find a new reason to smile when someone takes that first bite.
Recipe Snapshot
50 mins
20 mins
30 mins
Medium
200 kcal
American
Gluten-Free, Low FODMAP
Desserts
9 inch square pan, Mixing Bowls, Whisk
Why Try This Swirled Pumpkin Brownies
1. A Winning Texture Contrast
I adore how Swirled Pumpkin Brownies manage to be fudgy and tender at the same time. The chocolate half brings that dense, almost chewy bite I crave, while the pumpkin side stays moist and tender, so every forkful has contrast. When I bake these, the visual swirl hints at the mouthfeel, and guests always comment on how each square somehow offers two experiences at once.
2. Seasonal Comfort Without Being Over the Top
We get the comforting warmth of pumpkin and pumpkin pie spice without being overwhelmed by overtly holiday flavors. I love that this recipe fits a weeknight dessert, a school bake sale, or a Thanksgiving contribution. It’s familiar but not predictable, and that keeps people coming back for seconds.
3. Simple Pantry Friendly Ingredients
This recipe depends on pantry staples like all purpose flour, granulated sugar, and unsalted butter, so it’s easy to pull together even when plans change. I’ve found that the ingredient list is forgiving, and small adjustments in stirring or timing rarely derail the result. That reliability makes it my go to when I need something satisfying with minimal stress.
4. Beautiful Presentation With Little Effort
The swirl technique looks fancy, yet it is effortless. A few scoops and a gentle knife swirl create an attractive top that feels like you spent much longer on presentation than you did. I often bring these to gatherings because they look like a bakery treat, but they are extremely straightforward to make at home.
5. Crowd Pleaser Versatility
I like that Swirled Pumpkin Brownies please both chocolate lovers and spice fans. They slice into neat squares that are easy to plate for parties, or to wrap individually for gifts. Whenever I need a dessert that will vanish, this is the one I reach for.
Everything You Need for Swirled Pumpkin Brownies

The ingredient list for Swirled Pumpkin Brownies is intentionally straightforward. These components work in harmony: the butter and sugar build the fudgy base and shine, while the pumpkin and pumpkin pie spice bring moisture and autumnal warmth. The cocoa and chocolate chips give depth and pockets of melty chocolate that balance the tender pumpkin portion. Together they form a dessert that is comforting, textured, and reliably delicious.
- 3/4 cup (170 g) unsalted butter, melted: Melted to provide rich fat and sheen, helps create a fudgy brownie texture while carrying flavor; incorporate warm melted butter into batter to blend smoothly with sugar and eggs for proper emulsion.
- 2 cups (400 g) granulated sugar: Granulated to sweeten the batter uniformly and assist with structure through creaming with butter and eggs; measure precisely and stir until dissolved to avoid grainy texture in finished brownies.
- 4 large eggs at room temperature: Beaten at room temperature to add moisture, richness, and lift while binding ingredients; ensure eggs are fully mixed into the batter so they incorporate evenly and contribute to a tender crumb.
- 1 teaspoon pure vanilla extract: Added to enhance and balance flavor with warm, aromatic notes; stir in with wet ingredients to distribute its scent throughout the brownies without overpowering pumpkin or chocolate.
- 1 1/2 cups (180 g) all-purpose flour: Sifted or whisked to provide the base structure and bulk, contributing gluten for chew and stability; combine gently with wet ingredients to avoid overmixing and keep brownies tender.
- 1/2 teaspoon salt: Measured to control seasoning and balance sweetness, ensuring the chocolate and pumpkin flavors are highlighted; dissolve thoroughly into the dry mix to prevent salty pockets and uneven taste.
- 1 cup (240 g) pumpkin puree, not pumpkin pie filling: Folded in as a smooth, moist component that adds pumpkin flavor and moisture without extra sugar; use pure pumpkin puree, not pie filling, to avoid altering sweetness and spice levels.
- 2 teaspoons pumpkin pie spice: Sprinkled to introduce warm, autumnal spice complexity and complement pumpkin; mix into the pumpkin portion or dry ingredients to distribute the blend of cinnamon, nutmeg, and cloves evenly.
- 1/2 cup (40 g) unsweetened cocoa powder: Cocoa-based to deliver deep chocolate flavor and color while contributing to the batter's structure; whisk with dry ingredients to remove lumps and intensify the chocolate profile of the brownies.
- 1/2 cup (100 g) semisweet chocolate chips: Scattered to add pockets of melty chocolate and texture contrast throughout the brownies; fold in at the end to prevent sinkage and to preserve distinct chocolate bites after baking.
Recipe Steps for Swirled Pumpkin Brownies
These steps are straightforward but pay attention to temperature and texture cues. I find that working methodically and using sensory cues ensures consistent results each time. Keep your tools ready, and plan to let the brownies cool completely before slicing so they hold their shape.
- Preheat the oven to 350°F (180°C), or 160°C for a fan oven. Line a 9×9 inch (23×23 cm) baking pan with parchment paper and set aside.: Warm air will surround the batter immediately, and you should smell a faint, neutral oven scent once it reaches temperature. Proper preheating ensures even rise and consistent set across the pan, so don’t skip waiting until the oven is fully up to temp. A common mistake is rushing this step, which can lead to uneven bake where edges are done but the center remains undercooked; always verify with an oven thermometer if your oven runs hot or cool.
- In a large bowl, whisk together the melted butter and granulated sugar until smooth. Add the eggs and vanilla and whisk well.: You will feel the mixture thicken and see it change from glossy to slightly more aerated as eggs are incorporated. The aroma becomes buttery and sweet, and the surface gains a smooth sheen. This step creates the base structure and sweetness, so whisk until homogenous but avoid vigorous beating after the flour goes in to keep a fudgy texture. Overwhipping here can trap too much air and produce a cake like crumb instead of classic brownie density.
- Add the flour and salt and mix until no dry streaks remain.: As you fold in all purpose flour and salt , the batter will shift from glossy to slightly thicker and more satiny. Stop when you can no longer see dry patches, because overmixing develops gluten and makes the brownies tougher. A common pitfall is mixing until perfectly smooth; a few small streaks are fine as they will disappear during gentle subsequent mixing. Use a spatula and fold rather than aggressive stirring for the tenderest result.
- Divide the mixture in half. Add the pumpkin puree and pumpkin spice to one half and mix. Add the cocoa powder to the other half and mix well.: When you split the batter, note the differences: the pumpkin side will smell warmly spiced and become silky and slightly looser, while the cocoa side will take on a deep, chocolatey aroma and dark color. Mixing the pumpkin in gives moisture and lift, whereas incorporating cocoa powder will thicken the other half. A typical error is adding too much pumpkin or overmixing the cocoa side, which can upset the balance; measure carefully and fold gently until uniform.
- Alternate adding scoops of the two batters to the prepared pan and swirl with a knife to make a pretty swirled design.: As you dollop batter, you will see a mosaic of orange and chocolate build up. Use a knife to make sweeping motions across the surface, creating visible ribbons of each batter. The sound is silent but the visual change is immediate; stop swirling once you have a pleasing pattern because excessive swirling blends the batters and erases contrast. A common mistake is over swirling, which yields a single toned bar rather than distinct swirls.
- Sprinkle the chocolate chips on top and bake in the preheated oven for 25-30 minutes, until a toothpick inserted into the center comes out clean.: As the pan bakes the kitchen will begin to smell of warm spice and chocolate, and the top will develop a slight sheen with tiny cracks. The edges will set first, and you will notice a gentle pull away from the sides of the parchment when they are ready. Check at 25 minutes and look for a set center that still has a faintly soft spring; that ensures a fudgy interior. Baking too long dries the squares, so watch carefully near the end of the time window.
- Allow to cool completely before slicing and serving.: Cooling is when the structure solidifies and slices cleanly, and the aroma mellows into a balanced scent of chocolate and spice. If you attempt to cut while warm the squares will crumble or smear, losing that neat presentation. Patience here pays off, and using the parchment "handles" helps lift the whole slab from the pan for precise trimming. A typical error is rushing to serve warm, which creates a messy plate and a disappointed baker; wait until cooled for the best results.
Recipe Tips about Swirled Pumpkin Brownies
These tips come from repeated tests and the small adjustments I make each time I bake Swirled Pumpkin Brownies. They help with texture, presentation, and consistency across different ovens and pans.
- Measure ingredients accurately Using a kitchen scale for flour and sugar yields consistent texture, especially important for brownies where a little extra flour can make them cakier.
- Cool fully before slicing Allow the pan to reach room temperature then chill briefly if you want ultra clean slices; this firms up the crumb for tidy squares.
- Use quality cocoa A good unsweetened cocoa powder makes the chocolate half taste richer and prevents flat, one dimensional flavor.
- Don’t over swirl Stop after two or three passes with the knife so the two batters remain distinct and each bite shows contrast.
- Line the pan well Parchment overhang makes it simple to lift the slab out and trim neat edges without damaging the top crust.
- Check doneness early Begin testing at 25 minutes and look for a slightly soft center, overbaking dries the brownies and reduces chewiness.
What Complements This Swirled Pumpkin Brownies
Swirled Pumpkin Brownies are versatile to serve, whether at casual gatherings or holiday dessert tables. They pair well with hot beverages, travel well for potlucks, and can be styled for cozy autumn occasions. Think about textures and temperatures when plating, and consider simple garnishes to echo the flavors already in the bar.
- Warm beverages Serve alongside a hot cup of coffee or spiced tea to echo the warm notes of pumpkin pie spice and balance the sweetness.
- Simple plating Place a single brownie square on a small dessert plate with a dusting of cocoa or a few extra chocolate chips for an elegant touch.
- Party tray Arrange cut squares on a platter for gatherings, spacing them slightly so guests can grab easily without smudging the tops.
- Storage Keep in an airtight container at room temperature for up to three days, or refrigerate to extend to five days; allow to come to room temperature before serving for best texture.
- Gifting Wrap individual squares in parchment and tie with twine for a thoughtful homemade gift during the fall season.
- Occasions Ideal for Thanksgiving dessert tables, autumn potlucks, bake sales, or an indulgent weeknight treat when you want something cozy and shareable.
- Seasonal pairing The warm spice profile makes these brownies perfect alongside other fall desserts like spiced cookies or spiced fruit compotes, complementing rather than competing.
FAQ
Conclusion
What makes these brownies special is their ability to deliver two beloved flavors in one neat square, marrying fudgy chocolate with warmly spiced pumpkin. You should try them because they are approachable, travel well, and consistently please a crowd while feeling a little bit unexpected. Give the recipe a go on a crisp afternoon and enjoy the way the aromas and textures come together, then share the plates and the compliments with friends and family.
Swirled Pumpkin Brownies
Equipment
- 9 inch square pan
- Mixing Bowls
- Whisk
Ingredients
- 3/4 cup (170 g) unsalted butter, melted Melted to provide rich fat and sheen, helps create a fudgy brownie texture while carrying flavor; incorporate warm melted butter into batter to blend smoothly with sugar and eggs for proper emulsion.
- 2 cups (400 g) granulated sugar Granulated to sweeten the batter uniformly and assist with structure through creaming with butter and eggs; measure precisely and stir until dissolved to avoid grainy texture in finished brownies.
- 4 large eggs at room temperature Beaten at room temperature to add moisture, richness, and lift while binding ingredients; ensure eggs are fully mixed into the batter so they incorporate evenly and contribute to a tender crumb.
- 1 teaspoon pure vanilla extract Added to enhance and balance flavor with warm, aromatic notes; stir in with wet ingredients to distribute its scent throughout the brownies without overpowering pumpkin or chocolate.
- 1 1/2 cups (180 g) all-purpose flour Sifted or whisked to provide the base structure and bulk, contributing gluten for chew and stability; combine gently with wet ingredients to avoid overmixing and keep brownies tender.
- 1/2 teaspoon salt Measured to control seasoning and balance sweetness, ensuring the chocolate and pumpkin flavors are highlighted; dissolve thoroughly into the dry mix to prevent salty pockets and uneven taste.
- 1 cup (240 g) pumpkin puree, not pumpkin pie filling Folded in as a smooth, moist component that adds pumpkin flavor and moisture without extra sugar; use pure pumpkin puree, not pie filling, to avoid altering sweetness and spice levels.
- 2 teaspoons pumpkin pie spice Sprinkled to introduce warm, autumnal spice complexity and complement pumpkin; mix into the pumpkin portion or dry ingredients to distribute the blend of cinnamon, nutmeg, and cloves evenly.
- 1/2 cup (40 g) unsweetened cocoa powder Cocoa-based to deliver deep chocolate flavor and color while contributing to the batter's structure; whisk with dry ingredients to remove lumps and intensify the chocolate profile of the brownies.
- 1/2 cup (100 g) semisweet chocolate chips Scattered to add pockets of melty chocolate and texture contrast throughout the brownies; fold in at the end to prevent sinkage and to preserve distinct chocolate bites after baking.
Instructions
- Preheat the oven to 350°F (180°C), or 160°C for a fan oven. Line a 9×9 inch (23×23 cm) baking pan with parchment paper and set aside.: Warm air will surround the batter immediately, and you should smell a faint, neutral oven scent once it reaches temperature. Proper preheating ensures even rise and consistent set across the pan, so don’t skip waiting until the oven is fully up to temp. A common mistake is rushing this step, which can lead to uneven bake where edges are done but the center remains undercooked; always verify with an oven thermometer if your oven runs hot or cool.
- In a large bowl, whisk together the melted butter and granulated sugar until smooth. Add the eggs and vanilla and whisk well.: You will feel the mixture thicken and see it change from glossy to slightly more aerated as eggs are incorporated. The aroma becomes buttery and sweet, and the surface gains a smooth sheen. This step creates the base structure and sweetness, so whisk until homogenous but avoid vigorous beating after the flour goes in to keep a fudgy texture. Overwhipping here can trap too much air and produce a cake like crumb instead of classic brownie density.
- Add the flour and salt and mix until no dry streaks remain.: As you fold in all purpose flour and salt , the batter will shift from glossy to slightly thicker and more satiny. Stop when you can no longer see dry patches, because overmixing develops gluten and makes the brownies tougher. A common pitfall is mixing until perfectly smooth; a few small streaks are fine as they will disappear during gentle subsequent mixing. Use a spatula and fold rather than aggressive stirring for the tenderest result.
- Divide the mixture in half. Add the pumpkin puree and pumpkin spice to one half and mix. Add the cocoa powder to the other half and mix well.: When you split the batter, note the differences: the pumpkin side will smell warmly spiced and become silky and slightly looser, while the cocoa side will take on a deep, chocolatey aroma and dark color. Mixing the pumpkin in gives moisture and lift, whereas incorporating cocoa powder will thicken the other half. A typical error is adding too much pumpkin or overmixing the cocoa side, which can upset the balance; measure carefully and fold gently until uniform.
- Alternate adding scoops of the two batters to the prepared pan and swirl with a knife to make a pretty swirled design.: As you dollop batter, you will see a mosaic of orange and chocolate build up. Use a knife to make sweeping motions across the surface, creating visible ribbons of each batter. The sound is silent but the visual change is immediate; stop swirling once you have a pleasing pattern because excessive swirling blends the batters and erases contrast. A common mistake is over swirling, which yields a single toned bar rather than distinct swirls.
- Sprinkle the chocolate chips on top and bake in the preheated oven for 25-30 minutes, until a toothpick inserted into the center comes out clean.: As the pan bakes the kitchen will begin to smell of warm spice and chocolate, and the top will develop a slight sheen with tiny cracks. The edges will set first, and you will notice a gentle pull away from the sides of the parchment when they are ready. Check at 25 minutes and look for a set center that still has a faintly soft spring; that ensures a fudgy interior. Baking too long dries the squares, so watch carefully near the end of the time window.
- Allow to cool completely before slicing and serving.: Cooling is when the structure solidifies and slices cleanly, and the aroma mellows into a balanced scent of chocolate and spice. If you attempt to cut while warm the squares will crumble or smear, losing that neat presentation. Patience here pays off, and using the parchment "handles" helps lift the whole slab from the pan for precise trimming. A typical error is rushing to serve warm, which creates a messy plate and a disappointed baker; wait until cooled for the best results.
Notes
- Measure ingredients accurately Using a kitchen scale for flour and sugar yields consistent texture, especially important for brownies where a little extra flour can make them cakier.
- Cool fully before slicing Allow the pan to reach room temperature then chill briefly if you want ultra clean slices; this firms up the crumb for tidy squares.
- Use quality cocoa A good unsweetened cocoa powder makes the chocolate half taste richer and prevents flat, one dimensional flavor.
- Don’t over swirl Stop after two or three passes with the knife so the two batters remain distinct and each bite shows contrast.
- Line the pan well Parchment overhang makes it simple to lift the slab out and trim neat edges without damaging the top crust.
- Check doneness early Begin testing at 25 minutes and look for a slightly soft center, overbaking dries the brownies and reduces chewiness.