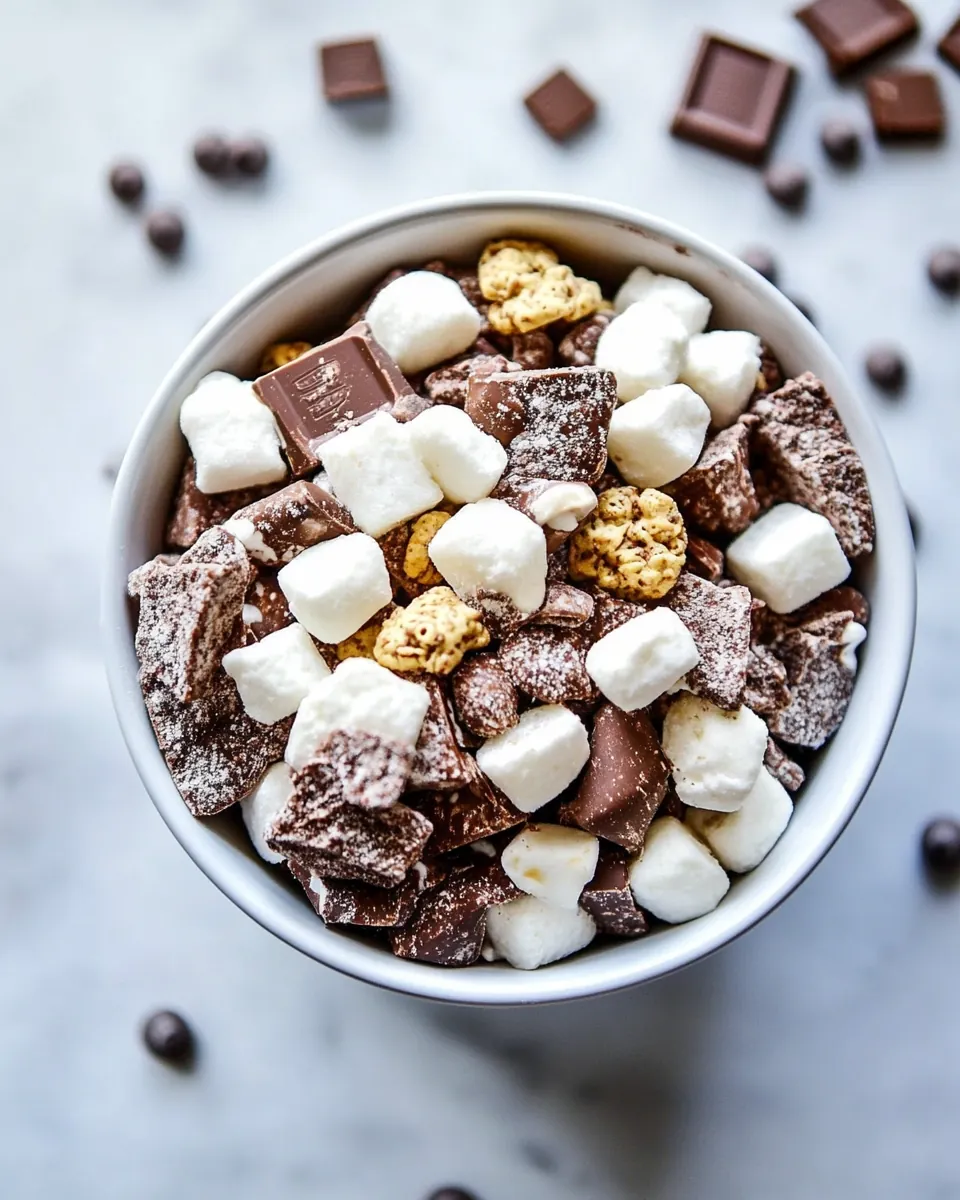
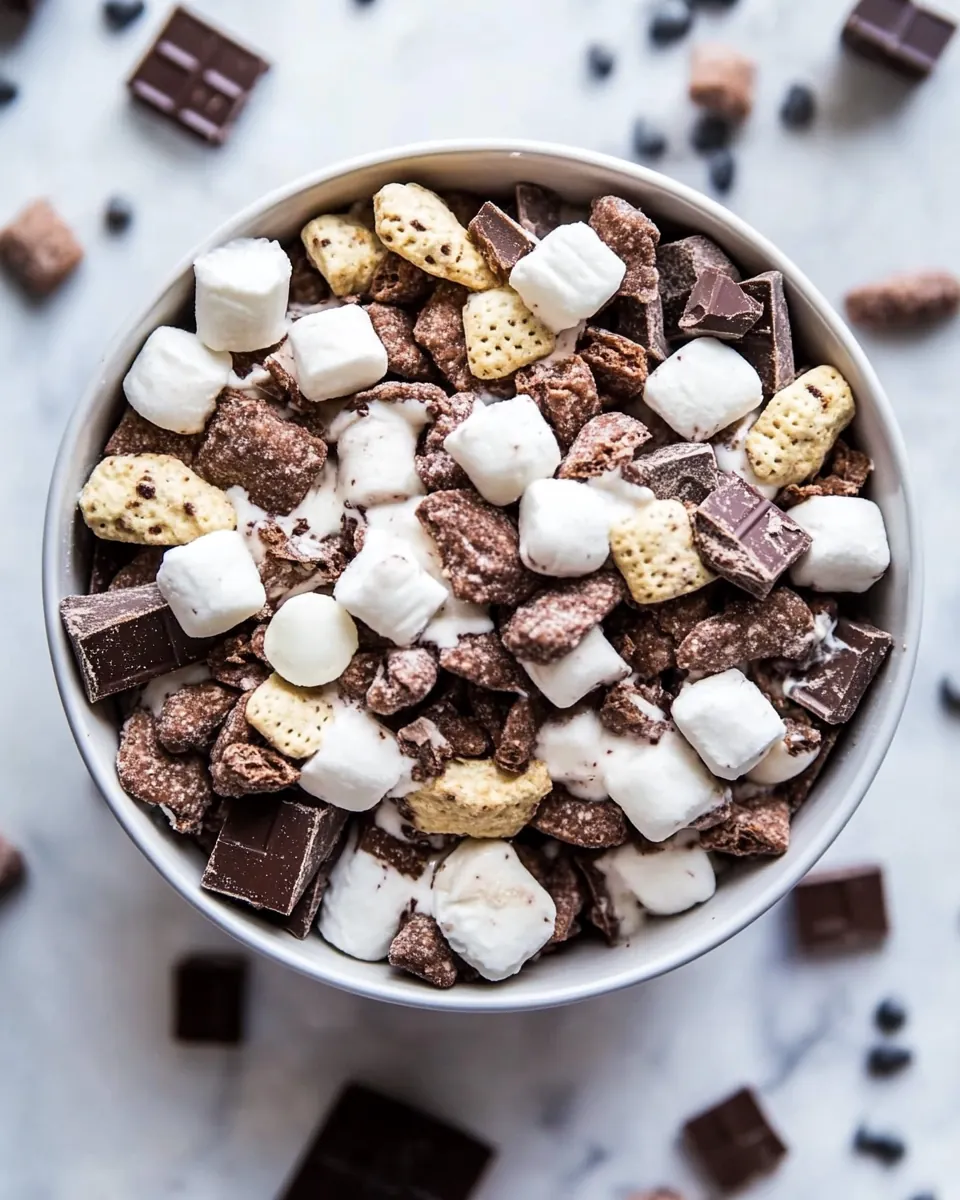
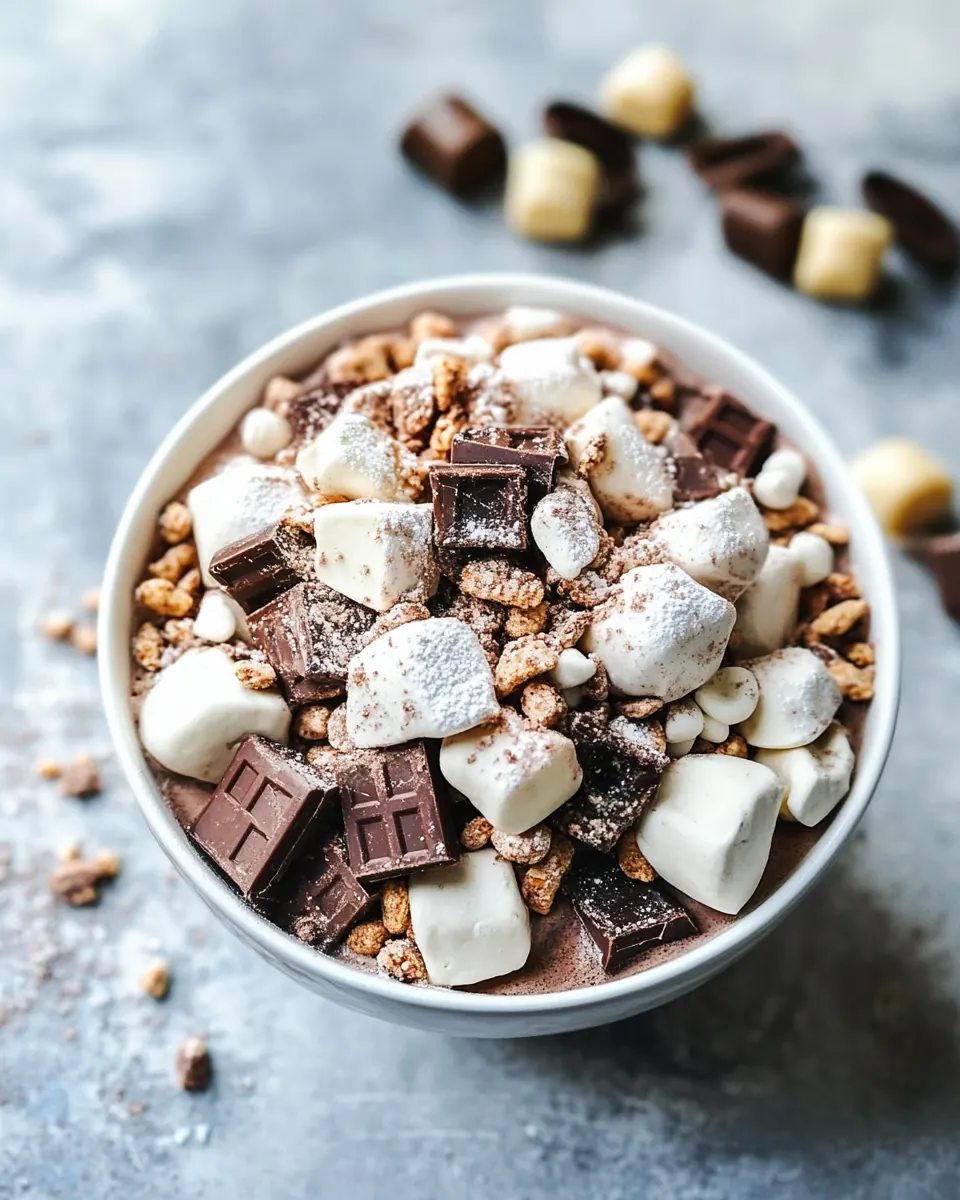
Hot Chocolate Snack Mix
Hot Chocolate Snack Mix is the sort of treat I reach for when I crave cozy textures and nostalgic flavors all at once. I first made this in a tiny kitchen while hosting a small movie night, and the way the warm cocoa scent mingled with melted chocolate made everyone pause mid conversation. That evening, the mix disappeared so fast that I swore I would always keep the recipe on hand for last minute gatherings and impromptu gifts.
Over time I’ve adapted the process to be fuss free, and the recipe below reflects tricks I learned after several batches, including the best way to coat the cereal evenly and how to keep the marshmallow bits from turning chewy too soon. The balance of crunchy Chocolate Chex cereal, a dusting of sweet mix, and the pockets of melty milk chocolate chips and white chocolate chips gives you layered textures in every handful. I like making a big tray early in the day so the flavors have a few hours to mingle, even though it is tempting to dig in the moment the white chocolate sets.
When I package portions into small bags for neighbors, I always tuck a note suggesting they enjoy it with a mug of hot cocoa, though honestly it stands up perfectly on its own. If you are planning this for a party, assemble the components ahead of time and do the coating steps just before guests arrive for the freshest crunch. The optional add ins let you tailor the mix to your crowd, whether you want extra candy or a delicate cookie crunch.
Recipe Snapshot
40 mins
20 mins
20 mins
Medium
200 kcal
American
Gluten-Free, Low FODMAP
Desserts
Large sheet pan (15 x 21), Silicone baking mat or parchment paper
What Makes This Hot Chocolate Snack Mix Special
Comforting crunch and nostalgic flavor
I love how Hot Chocolate Snack Mix brings back childhood moments, but with an adult polish. The combination of Chocolate Chex cereal and melted milk chocolate chips creates a familiar base while the hot cocoa dusting adds an extra layer of warmth. For me, this is comfort in a bowl, and it travels well, which makes it perfect for small gatherings.
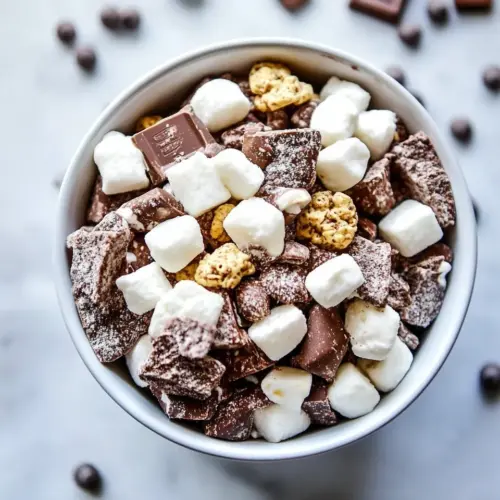
Textural contrast that keeps you coming back
One of the biggest reasons I adore this recipe is the play of textures. The cereal stays crisp under the chocolate if handled gently, the white chocolate coated marshmallows give soft pops, and optional crunchy additions add another dimension. Each bite has an element of surprise, and that makes sharing much more fun.
Ridiculously easy to scale and share
I’ve doubled and tripled this mix many times without a second thought. Because the technique is simple, I can make large batches quickly using a sheet pan and a big freezer bag for shaking, so it is ideal for parties or gifting. The steps are forgiving, so you can involve kids or friends without worrying about precision.
Flexible for personal tastes
What I appreciate is how the recipe welcomes customization. The core components remain the same, but you can swap or add items to suit allergies or preferences. I often leave one bowl plain for folks who prefer less sweetness, and that small gesture always pays off.
Quick to prepare, big on impact
This mix requires modest hands on time but yields an impressive result. The melting and coating techniques are straightforward, yet they transform pantry staples into a party worthy treat. I find it ideal for impromptu entertaining when you want to offer something memorable without fuss.
Shopping List for Hot Chocolate Snack Mix
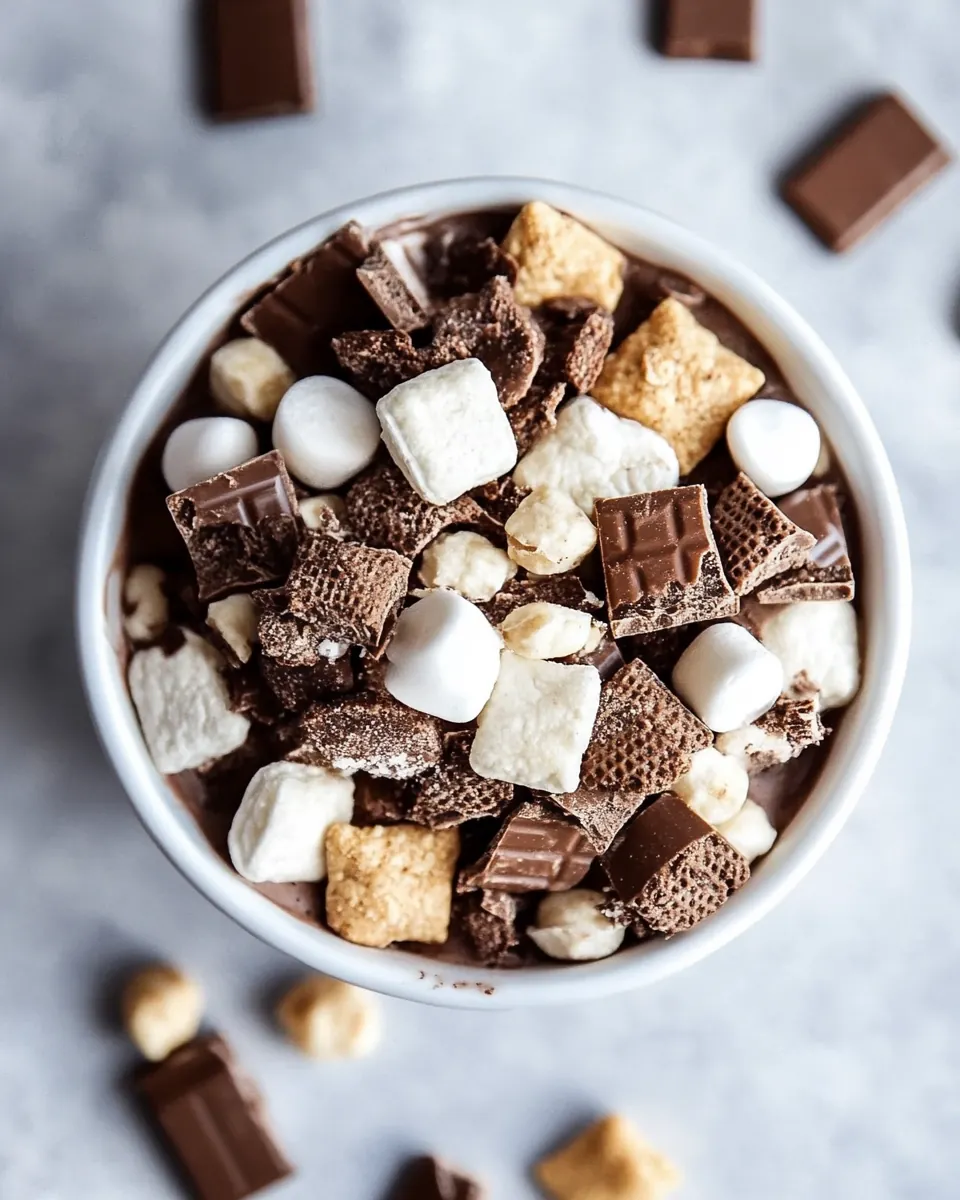
The philosophy behind these ingredients is simple: combine a sturdy crunchy base with layers of chocolate and a sweet dusting so each bite feels indulgent but familiar. The key players are the Chocolate Chex cereal which provides structure, the milk chocolate chips and white chocolate chips that bring melt and richness, and the powdered mix that ties everything together with a hot cocoa note. Small amounts of coconut oil help chocolates melt smoothly and give a glossy coating, while the miniature marshmallows offer a soft contrast.
- 8 cups Chocolate Chex cereal: Provide a crunchy, chocolate-flavored base that carries the mix; helps absorb coatings and gives volume for snacking. Works as the primary vehicle for sweet coatings and mix-ins, balancing textures between crisp and gooey. Ensures each bite delivers a cereal foundation that pairs well with chocolate and marshmallow elements.
- 1 cup powdered sugar: Add a fine, snowy coating that sweetens and lightly dusts the cereal for a festive appearance and subtle texture. Acts as a dry binder to help melted chocolate and cocoa mix adhere to the cereal pieces. Contributes a sweet finish that contrasts with richer chocolate components.
- 1/3 cup Hot chocolate mix with marshmallows, 1 and 1/2 packets: Infuse a concentrated hot chocolate flavor and tiny marshmallow bits throughout the mix, adding nostalgic warmth and extra sweetness. Provide cocoa, sugar, and mini marshmallow texture to enhance the overall hot chocolate profile. Bring a distinct spiced-cocoa taste that complements both milk and white chocolate elements.
- 2 cups milk chocolate chips: Deliver rich, creamy chocolate pockets that melt and set to bind coatings onto the cereal, increasing indulgence and depth of flavor. Offer a smooth mouthfeel and chocolate intensity that contrasts with the powdered sugar dusting. Serve as a primary binder when melted with a small amount of oil to coat the cereal evenly.
- 2 tablespoons coconut oil: Facilitate smooth melting and thinning of chocolate when combined with chips, producing a glossy coating that distributes evenly over cereal. Lower the chocolate's viscosity so it can be drizzled or mixed without seizing, and add a hint of coconut aroma if used. Help the melted chocolate set with a satin finish once cooled.
- 1 cup white chocolate chips: Provide sweet, creamy contrast to milk chocolate and contribute to visual appeal with bright white pieces throughout the mix. Melt into a smoother, sweeter coating that can be used for drizzling or for binding dusted cereal pieces together. Balance flavors by adding a milder cocoa butter-based sweetness.
- 1 tablespoon coconut oil: Assist in melting white chocolate smoothly by reducing thickness and preventing graininess when heated gently. Help achieve a pourable consistency for drizzling or mixing into the cereal without overheating the chocolate. Contribute a neutral oily texture that ensures even coating and proper setting.
- 2 cups miniature marshmallows: Introduce soft, pillowy texture and classic hot chocolate marshmallow appeal, adding chewiness amid crunchy cereal and chocolate. Provide bursts of sweetness and a nostalgic element, melting slightly into warm coatings or remaining intact for contrast. Enhance the mix’s sensory variety with light, airy pieces.
- additions see note 1 (optional): Offer flexibility for customization such as nuts, pretzels, or candy to tailor flavor, texture, and appearance to personal preference. Allow alteration of sweetness, saltiness, or crunch level depending on additions chosen, and enable seasonal or dietary variations. Serve as guidance for optional enhancements without altering the core recipe.
Preparation Steps for Hot Chocolate Snack Mix
I like to walk through these steps as if we are making the mix together in my kitchen, keeping things relaxed and clear. The process moves from measuring and melting to coating and chilling, and each stage benefits from a little patience. Have your sheet pan ready and a large bag for shaking since those simple tools make assembly effortless.
- Line a large sheet pan with a silicone liner or parchment paper and set aside. Set out a large (2-gallon) freezer bag and a very large bowl.: The surface preparation matters because cooled chocolate clusters and marshmallow pieces need a nonstick base to release cleanly. When you set up the liner, notice the subtle sheen that prevents sticking, and listen for the quietness of a ready workspace, which means you can move quickly once melted chocolate is poured. A common mistake is skipping this step and trying to pry hardened chocolate off a metal pan, which can damage pieces and make cleanup harder. If your liner shifts while spreading pieces, press it gently so it lies flat before placing the marshmallows.
- Measure out the cereal into the large bowl and set aside.: Having the proper containers keeps the coating phase tidy and effective. The thin plastic walls of a freezer bag allow the powder mix to cling to the cereal when shaken, while a big bowl gives room to stir without spillover. You should feel confident moving the bowl; if it feels unstable, transfer to a deeper container to avoid mess. Avoid using a small bag for shaking since overcrowding prevents even coating and increases breakage of cereal pieces.
- In a small bowl, add the hot cocoa mix and powdered sugar. Stir to combine. Pour into the prepared freezer bag.: Taking a moment to measure accurately ensures the cocoa and chocolate ratios stay balanced, which affects both flavor and texture. As you pour the Chocolate Chex cereal , watch for uniform pieces and listen for the hollow crunch that indicates freshness. One pitfall is compacting the cereal when scooping, which can lead to uneven coating and limp clusters; scoop gently and level with the back of a spoon.
- In medium microwave-safe bowl, add the milk chocolate chips and 2 tablespoons coconut oil. Microwave, in bursts of 15 seconds, stirring between each burst for 15 seconds, or until chocolate is fully melted and smooth. Once fully melted and smooth, pour over the measured cereal. Gently stir to generously coat the cereal in the melted chocolate.: Combining the dry components first means the powdered mix will distribute evenly when shaken with the cereal, so each bite carries that warming cocoa note. When you dump the mixture into the bag, notice the fragrant cocoa scent rising, which signals a well balanced powder blend. A frequent error is leaving clumps, so stir well and break up any lumps before adding to the bag, otherwise they will leave streaks of sweetness rather than an even coating.
- Pour cereal into the bag on top of the powdered sugar and hot cocoa mix. Seal the bag (do not squeeze air out of the bag) and shake to coat the cereal in the mix. Once cereal is generously coated, pour back into a large bowl or serving bowl. Set aside.: The sensory cues here are crucial, the chocolate should transform from glossy chips to a velvety pool with a smooth shine, and you will smell a deep chocolate aroma that signals readiness. Stirring between short microwave bursts prevents overheating and graininess, producing a silky texture that clings to the Chocolate Chex cereal . When mixing, you should hear gentle scraping as the chocolate folds over the cereal, and you will see glossy strands that indicate even coverage. Avoid microwaving too long in one go, or the chocolate can seize and become gritty, which ruins the mouthfeel. If you notice graininess, remove from heat and stir briskly, or add a tiny splash more of coconut oil to loosen it slightly.
- White Chocolate Marshmallows: In a small microwave-safe bowl, combine the white chocolate chips and 1 tablespoon coconut oil. Melt, in bursts of 15 seconds, stirring between each burst for 15 seconds or until white chocolate is fully melted and smooth. Stir the marshmallows into the white chocolate until marshmallows are well coated. Spread the marshmallows onto the prepared pan. Put the pan in the fridge or freezer for about 10 minutes or let the tray stand at room temperature for 30 minutes until chocolate is set. Gently break apart and add to the serving bowl.: Sealing the bag without squeezing lets the mixture move freely and promotes even distribution of the powdered mix, while vigorous but controlled shaking ensures tiny crevices in the cereal pick up coating. As you shake, listen to the soft swish and feel the weight shift, which means the powder is adhering. A typical mistake is over squeezing the bag to remove air which compresses the cereal and leads to crushed pieces and uneven coating; leave some space so the contents tumble. After pouring back into a bowl, inspect for sticky clumps and break them up gently with a spatula so serving feels light and crisp.
- If desired, add any other toppings such as the dehydrated marshmallows, Sno-Cap candies, or broken up pirouette cookies.: The contrast here is the soft chew of miniature marshmallows wrapped in glossy white chocolate, which sets into small clusters. You will see the marshmallows go from bright white to lightly glossy as they absorb the white chocolate, and the coolness of the fridge gives a satisfying snap to the coating when it is ready. Watch the melting closely; white chocolate can go from smooth to grainy quickly if overheated, so short bursts and patient stirring are essential. A common misstep is trying to unmold pieces before the chocolate is set, which can smear coatings and create awkward shapes; chilling times mentioned help avoid this.
- If desired add any other toppings such as the dehydrated marshmallows Sno Cap candies or broken up pirouette cookies: Adding extras should be done thoughtfully so the texture balance remains intact. These toppings bring candy pops or delicate cookie crumbs that elevate the mix visually and texturally, and you might hear a pleasant crack as cookies break into the mix. The danger here is adding too much of any one item which overwhelms the base; sprinkle in small amounts and taste as you go. If any topping is fragile, add it right before serving to keep it crisp and attractive.
Helpful Hints
I like giving practical, hands on tips that prevent common slip ups and make the process smoother. These hints are drawn from repeated batches and aim to keep your mix glossy, crisp, and easy to scale.
- Measure cereal gently so pieces remain intact for the best crunchy texture, and avoid compacting when scooping into the bowl.
- Microwave in short bursts when melting both milk and white chocolate to preserve smoothness and avoid burning or seizing.
- Use the freezer bag method for coating with powdered sugar and hot cocoa mix to get an even dusting without a huge mess.
- Chill coated marshmallows on a lined sheet pan until set so they break into neat clusters when you handle them.
- Keep optional add ins separate until serving if they are fragile or could soften the mix, that way you preserve maximum crispness.
- Store without marshmallows for longer if you need to make the mix ahead, since marshmallows shorten shelf life at room temperature.
Best Served With
This mix shines when presented casually with a warm beverage or packaged as a small gift. Below I describe pairing ideas, occasions, and storage notes so you can present it beautifully and keep leftovers in good shape.
- Serve in small paper cones or cellophane bags at parties for easy grab and go portions, which makes them ideal for movie nights or classroom treats.
- Pair with a warm mug of cocoa during winter gatherings, the overlapping chocolate notes create a comforting pairing that guests will love.
- Offer alongside simple cookies if you want a dessert table with variety, the mix provides textural contrast to soft baked goods.
- Gift in airtight tins for neighbors or coworkers, include a note suggesting same day enjoyment if marshmallows are included.
- Store leftovers without marshmallows in airtight containers at room temperature for up to a week to maintain the cereal crispness.
- Freeze for longer storage in sealed bags up to three months, then thaw at room temperature when ready to serve for convenience.
FAQ
Conclusion
What makes this Hot Chocolate Snack Mix special is how it layers familiar cocoa flavors with contrasting textures to create a snack that feels both playful and indulgent. It requires simple pantry ingredients and straightforward steps, yet the result is impressive for parties, gifting, or cozy nights at home. Give it a try the next time you want an easy, shareable treat, and adjust the optional additions to reflect your crowd. I hope you enjoy putting it together as much as I do when I assemble a big bowl for friends.
Hot Chocolate Snack Mix
Equipment
- Large sheet pan (15" x 21")
- Silicone baking mat or parchment paper
Ingredients
- 8 cups Chocolate Chex cereal Provide a crunchy, chocolate-flavored base that carries the mix; helps absorb coatings and gives volume for snacking. Works as the primary vehicle for sweet coatings and mix-ins, balancing textures between crisp and gooey. Ensures each bite delivers a cereal foundation that pairs well with chocolate and marshmallow elements.
- 1 cup powdered sugar Add a fine, snowy coating that sweetens and lightly dusts the cereal for a festive appearance and subtle texture. Acts as a dry binder to help melted chocolate and cocoa mix adhere to the cereal pieces. Contributes a sweet finish that contrasts with richer chocolate components.
- 1/3 cup Hot chocolate mix with marshmallows, 1 and 1/2 packets Infuse a concentrated hot chocolate flavor and tiny marshmallow bits throughout the mix, adding nostalgic warmth and extra sweetness. Provide cocoa, sugar, and mini marshmallow texture to enhance the overall hot chocolate profile. Bring a distinct spiced-cocoa taste that complements both milk and white chocolate elements.
- 2 cups milk chocolate chips Deliver rich, creamy chocolate pockets that melt and set to bind coatings onto the cereal, increasing indulgence and depth of flavor. Offer a smooth mouthfeel and chocolate intensity that contrasts with the powdered sugar dusting. Serve as a primary binder when melted with a small amount of oil to coat the cereal evenly.
- 2 tablespoons coconut oil Facilitate smooth melting and thinning of chocolate when combined with chips, producing a glossy coating that distributes evenly over cereal. Lower the chocolate's viscosity so it can be drizzled or mixed without seizing, and add a hint of coconut aroma if used. Help the melted chocolate set with a satin finish once cooled.
- 1 cup white chocolate chips Provide sweet, creamy contrast to milk chocolate and contribute to visual appeal with bright white pieces throughout the mix. Melt into a smoother, sweeter coating that can be used for drizzling or for binding dusted cereal pieces together. Balance flavors by adding a milder cocoa butter-based sweetness.
- 1 tablespoon coconut oil Assist in melting white chocolate smoothly by reducing thickness and preventing graininess when heated gently. Help achieve a pourable consistency for drizzling or mixing into the cereal without overheating the chocolate. Contribute a neutral oily texture that ensures even coating and proper setting.
- 2 cups miniature marshmallows Introduce soft, pillowy texture and classic hot chocolate marshmallow appeal, adding chewiness amid crunchy cereal and chocolate. Provide bursts of sweetness and a nostalgic element, melting slightly into warm coatings or remaining intact for contrast. Enhance the mix’s sensory variety with light, airy pieces.
- Optional additions see note 1 Offer flexibility for customization such as nuts, pretzels, or candy to tailor flavor, texture, and appearance to personal preference. Allow alteration of sweetness, saltiness, or crunch level depending on additions chosen, and enable seasonal or dietary variations. Serve as guidance for optional enhancements without altering the core recipe.
Instructions
- Line a large sheet pan with a silicone liner or parchment paper and set aside. Set out a large (2-gallon) freezer bag and a very large bowl.: The surface preparation matters because cooled chocolate clusters and marshmallow pieces need a nonstick base to release cleanly. When you set up the liner, notice the subtle sheen that prevents sticking, and listen for the quietness of a ready workspace, which means you can move quickly once melted chocolate is poured. A common mistake is skipping this step and trying to pry hardened chocolate off a metal pan, which can damage pieces and make cleanup harder. If your liner shifts while spreading pieces, press it gently so it lies flat before placing the marshmallows.
- Measure out the cereal into the large bowl and set aside.: Having the proper containers keeps the coating phase tidy and effective. The thin plastic walls of a freezer bag allow the powder mix to cling to the cereal when shaken, while a big bowl gives room to stir without spillover. You should feel confident moving the bowl; if it feels unstable, transfer to a deeper container to avoid mess. Avoid using a small bag for shaking since overcrowding prevents even coating and increases breakage of cereal pieces.
- In a small bowl, add the hot cocoa mix and powdered sugar. Stir to combine. Pour into the prepared freezer bag.: Taking a moment to measure accurately ensures the cocoa and chocolate ratios stay balanced, which affects both flavor and texture. As you pour the Chocolate Chex cereal , watch for uniform pieces and listen for the hollow crunch that indicates freshness. One pitfall is compacting the cereal when scooping, which can lead to uneven coating and limp clusters; scoop gently and level with the back of a spoon.
- In medium microwave-safe bowl, add the milk chocolate chips and 2 tablespoons coconut oil. Microwave, in bursts of 15 seconds, stirring between each burst for 15 seconds, or until chocolate is fully melted and smooth. Once fully melted and smooth, pour over the measured cereal. Gently stir to generously coat the cereal in the melted chocolate.: Combining the dry components first means the powdered mix will distribute evenly when shaken with the cereal, so each bite carries that warming cocoa note. When you dump the mixture into the bag, notice the fragrant cocoa scent rising, which signals a well balanced powder blend. A frequent error is leaving clumps, so stir well and break up any lumps before adding to the bag, otherwise they will leave streaks of sweetness rather than an even coating.
- Pour cereal into the bag on top of the powdered sugar and hot cocoa mix. Seal the bag (do not squeeze air out of the bag) and shake to coat the cereal in the mix. Once cereal is generously coated, pour back into a large bowl or serving bowl. Set aside.: The sensory cues here are crucial, the chocolate should transform from glossy chips to a velvety pool with a smooth shine, and you will smell a deep chocolate aroma that signals readiness. Stirring between short microwave bursts prevents overheating and graininess, producing a silky texture that clings to the Chocolate Chex cereal . When mixing, you should hear gentle scraping as the chocolate folds over the cereal, and you will see glossy strands that indicate even coverage. Avoid microwaving too long in one go, or the chocolate can seize and become gritty, which ruins the mouthfeel. If you notice graininess, remove from heat and stir briskly, or add a tiny splash more of coconut oil to loosen it slightly.
- White Chocolate Marshmallows: In a small microwave-safe bowl, combine the white chocolate chips and 1 tablespoon coconut oil. Melt, in bursts of 15 seconds, stirring between each burst for 15 seconds or until white chocolate is fully melted and smooth. Stir the marshmallows into the white chocolate until marshmallows are well coated. Spread the marshmallows onto the prepared pan. Put the pan in the fridge or freezer for about 10 minutes or let the tray stand at room temperature for 30 minutes until chocolate is set. Gently break apart and add to the serving bowl.: Sealing the bag without squeezing lets the mixture move freely and promotes even distribution of the powdered mix, while vigorous but controlled shaking ensures tiny crevices in the cereal pick up coating. As you shake, listen to the soft swish and feel the weight shift, which means the powder is adhering. A typical mistake is over squeezing the bag to remove air which compresses the cereal and leads to crushed pieces and uneven coating; leave some space so the contents tumble. After pouring back into a bowl, inspect for sticky clumps and break them up gently with a spatula so serving feels light and crisp.
- If desired, add any other toppings such as the dehydrated marshmallows, Sno-Cap candies, or broken up pirouette cookies.: The contrast here is the soft chew of miniature marshmallows wrapped in glossy white chocolate, which sets into small clusters. You will see the marshmallows go from bright white to lightly glossy as they absorb the white chocolate, and the coolness of the fridge gives a satisfying snap to the coating when it is ready. Watch the melting closely; white chocolate can go from smooth to grainy quickly if overheated, so short bursts and patient stirring are essential. A common misstep is trying to unmold pieces before the chocolate is set, which can smear coatings and create awkward shapes; chilling times mentioned help avoid this.
- If desired add any other toppings such as the dehydrated marshmallows Sno Cap candies or broken up pirouette cookies: Adding extras should be done thoughtfully so the texture balance remains intact. These toppings bring candy pops or delicate cookie crumbs that elevate the mix visually and texturally, and you might hear a pleasant crack as cookies break into the mix. The danger here is adding too much of any one item which overwhelms the base; sprinkle in small amounts and taste as you go. If any topping is fragile, add it right before serving to keep it crisp and attractive.
Notes
- Measure cereal gently so pieces remain intact for the best crunchy texture, and avoid compacting when scooping into the bowl.
- Microwave in short bursts when melting both milk and white chocolate to preserve smoothness and avoid burning or seizing.
- Use the freezer bag method for coating with powdered sugar and hot cocoa mix to get an even dusting without a huge mess.
- Chill coated marshmallows on a lined sheet pan until set so they break into neat clusters when you handle them.
- Keep optional add ins separate until serving if they are fragile or could soften the mix, that way you preserve maximum crispness.
- Store without marshmallows for longer if you need to make the mix ahead, since marshmallows shorten shelf life at room temperature.