Strawberry Shortcake Bars
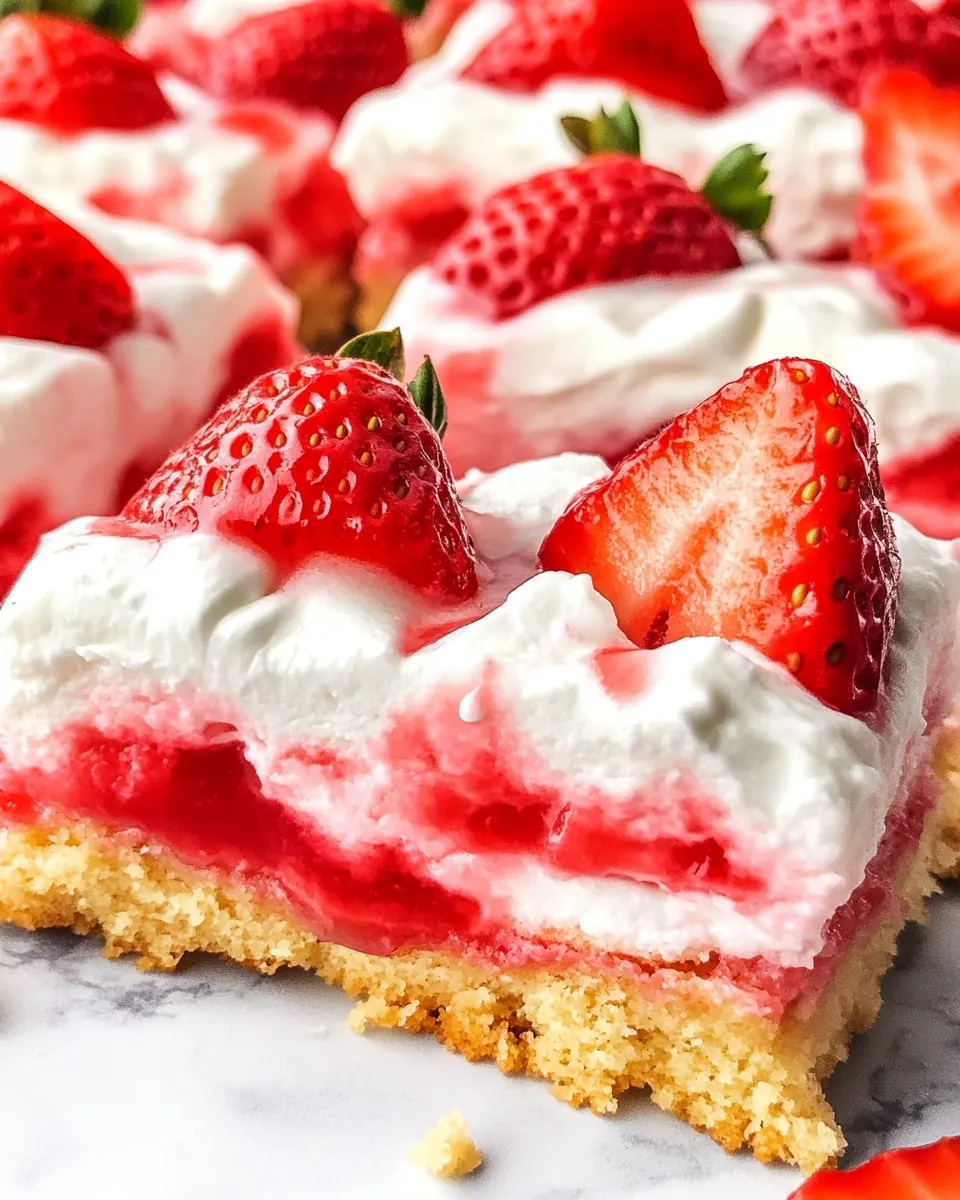
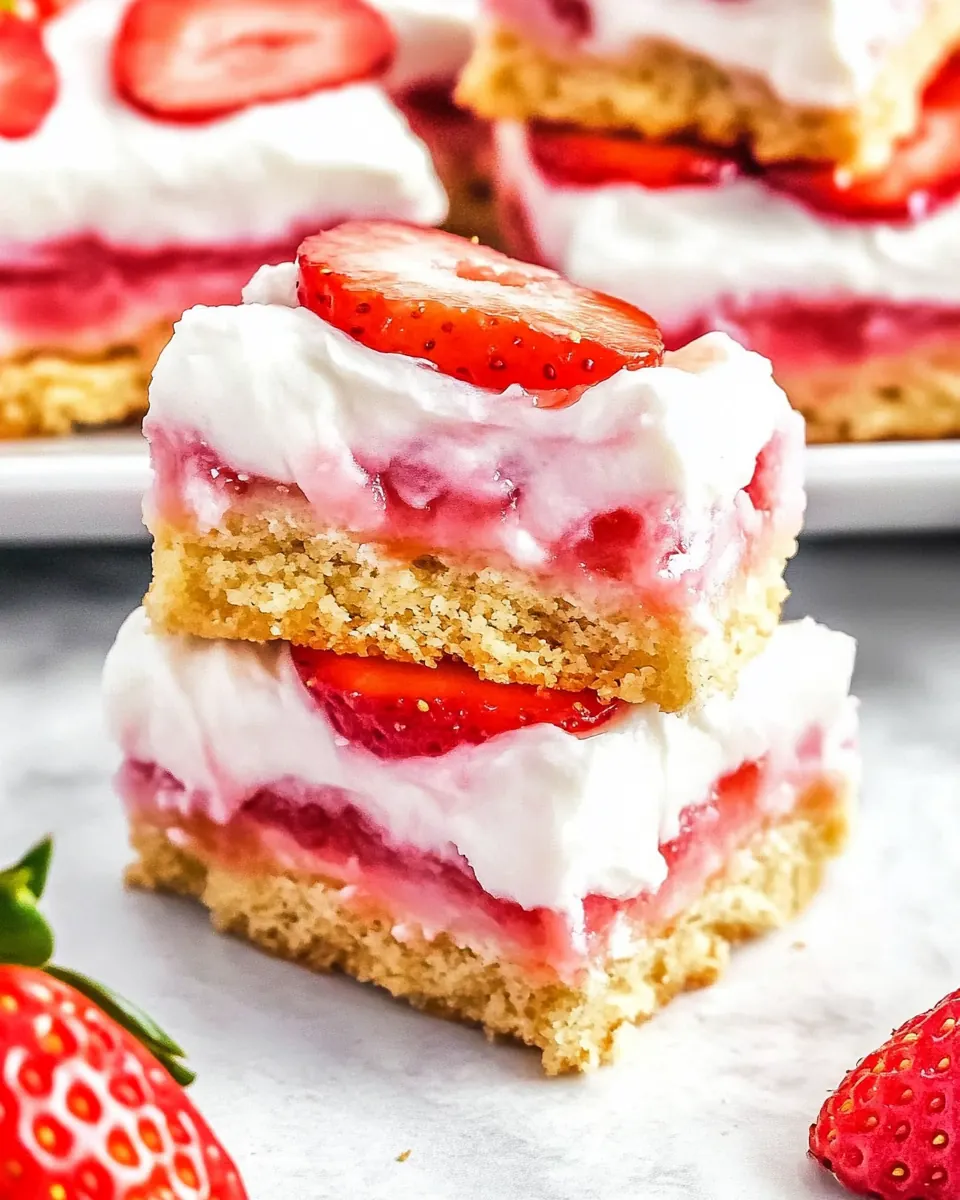
Strawberry Shortcake Bars came into my life the way most beloved things do, messy and unexpectedly sweet. I remember baking these the weekend my neighbor taught me how to hull strawberries properly, and the kitchen filled with a gentle, berry perfume that seemed to promise summer before it arrived. The first bite was a revelation, a buttery cake base meeting tangy-sweet cream cheese whipped with heavy cream, finished with bright, sliced strawberries that tasted like sunshine.
On another afternoon I brought a pan of these to a potluck and watched people disappear into the backyard with paper plates and satisfied grins. Seeing how quickly they vanished taught me that the combination of a soft cake layer, pillowy frosting, and fresh strawberries is almost universally adored. I like to think the secret is the way the chilled topping balances the warm, tender base, so every slice feels light yet indulgent.
When I make Strawberry Shortcake Bars for guests, I try to prep components separately so the final assembly is fast and fresh. That little extra patience keeps the strawberries vibrant and the whipped frosting airy instead of weepy. If you want an approachable dessert that still feels special, these bars are a keeper; they travel well, please a crowd, and they tell a story with each forkful.
Recipe Snapshot
50 mins
30 mins
20 mins
Medium
350 kcal
American
Gluten-Free, Low FODMAP
Desserts
9×13-inch pan, Mixer, Mixing bowls, Spatula
Why This Strawberry Shortcake Bars Is So Good
They hit classic flavors with effortless charm
I love that Strawberry Shortcake Bars capture the nostalgic pairing of strawberries and creamy topping in a simple bar format. There is no fuss with layers and tall cakes, just straightforward textures that remind me of summer fairs and family tables.
They are supremely easy to scale
When I need to feed a crowd, these bars are forgiving. The base uses yellow cake mix, which means I can double or halve quantities without complex conversions, and the recipe tolerates small hands stirring things up without disaster. That flexibility is a real win when time is tight.
The texture balance is satisfying
The contrast between the slightly crisp edges of the baked base and the cloudlike frosting is what keeps me coming back. I always aim for a base that is set but not overbaked, so the bars remain tender. That edge to center contrast makes every bite interesting.
Fresh fruit makes a big difference
Using ripe, hulled strawberries elevates these bars from good to memorable. I like the bright acid of the strawberries cutting through the rich whipped topping, and that burst of freshness is something I rarely skip. It also keeps the dessert feeling light, which many appreciate after a big meal.
They are perfect for make ahead plans
I often prepare the base and the frosting a day in advance, which lets me assemble right before serving so the strawberries stay vibrant. This recipe rewards a little planning and pays off with relaxed hosting and confident presentation.
Key Ingredients for Strawberry Shortcake Bars
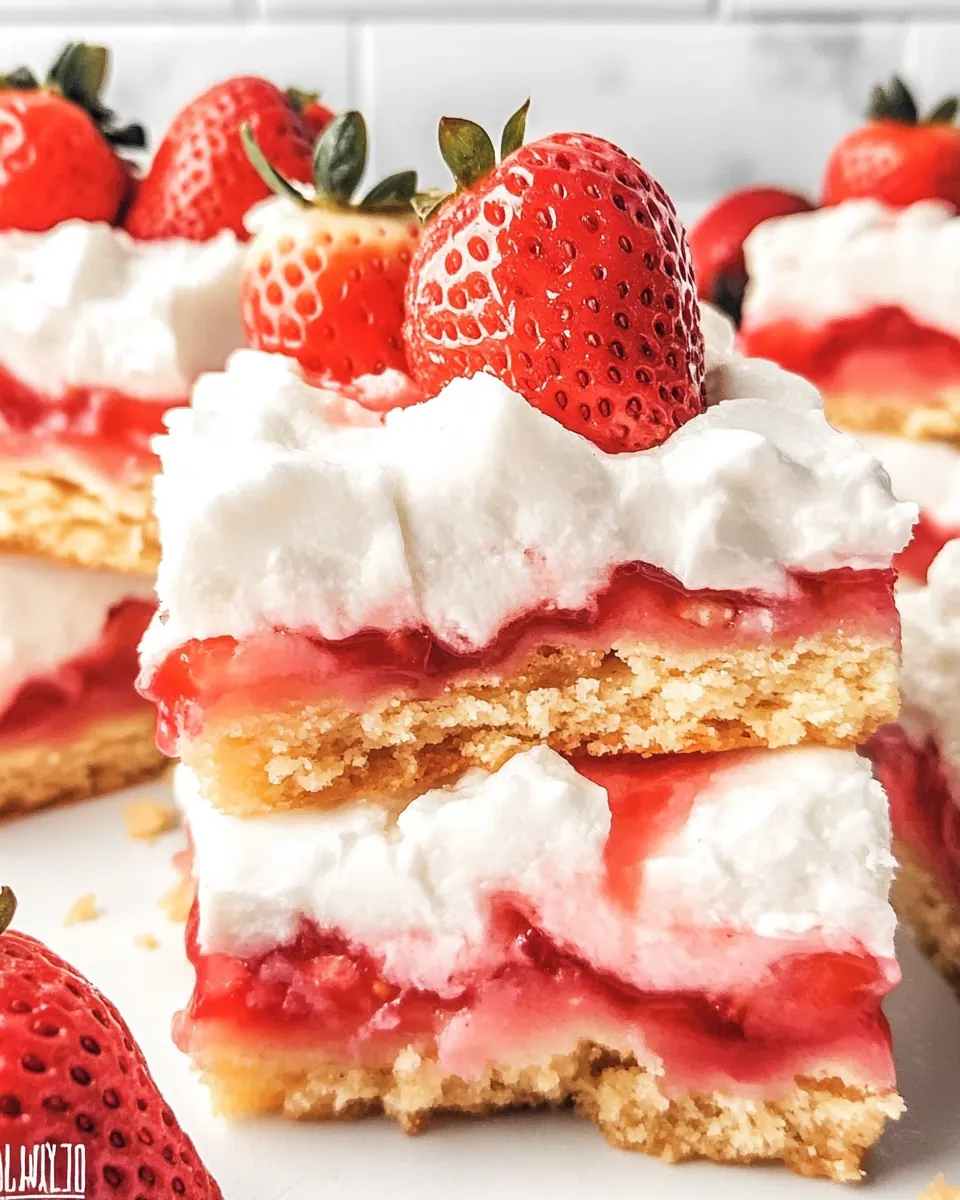
These ingredients are simple yet purposeful, each playing a clear role in the final bar. The boxed yellow cake mix provides structure and a reliably tender crumb. Butter adds richness and helps the base set with a compact texture. The eggs bind and contribute moisture. The cream cheese and powdered sugar form a tangy, sweet frosting base, while heavy whipping cream gives it lift and silkiness. Finally, the fresh strawberries bring brightness and a seasonal finish.
- 115.25 ounce yellow cake mix: Provide a light, sweet base that gives structure and crumb to the bars; use the cake mix as a convenient shortcut to create a tender crust and bottom layer while ensuring consistent texture and flavor throughout the dessert. Adjust pressing depth to form an even foundation before baking and layering other components on top to prevent sogginess.
- 1/2 cup (113 g) melted Challenge Unsalted Butter: Add rich, buttery moisture to the crust and help bind the cake mix into a cohesive dough; melted unsalted butter contributes flavor without additional saltiness so the sweetness of other layers remains balanced. Ensure butter is fully melted and evenly mixed to achieve a uniform, golden-brown bake.
- 2 large eggs: Bind the crust ingredients together while adding moisture and a bit of richness; eggs help leaven slightly and contribute to a stable structure that holds the bar shape after slicing. Beat lightly before incorporating to distribute yolks and whites evenly for consistent texture.
- 8 ounce (226 g) Challenge Cream Cheese, softened: Soften to a smooth, creamy consistency for the cheesecake-like middle layer; cream cheese provides tang and density that contrasts with the light cake base and whipped topping. Beat until smooth to eliminate lumps and ensure it spreads easily over the baked crust for a silky layer.
- 1 cup (113 g) powdered sugar: Sweeten and slightly thicken the cream cheese layer with a powdered sugar addition; it dissolves smoothly to create a uniform sweetness without grittiness. Sift or add gradually while mixing to control sweetness level and avoid overbeating that could loosen the filling.
- 1 teaspoon vanilla extract: Enhance flavor with a warm, aromatic note that complements strawberries and cream; vanilla extract rounds out the sweetness and elevates the overall aroma of the bars. Add when mixing the cream cheese or whipped layers to distribute its fragrance evenly.
- 2 cups (474 ml) heavy whipping cream: Whip into stiff peaks to create a light, airy topping that contrasts the dense cream cheese layer; heavy whipping cream provides volume and a creamy mouthfeel that balances sweetness and acidity. Chill both bowl and cream for best whipping results and fold gently to maintain airiness when combining.
- 1 pound strawberries hulled and sliced: Provide fresh, juicy brightness and natural sweetness as the fruit topping; hulled and sliced strawberries add color, texture, and a tart contrast to the creamy layers. Use ripe berries for optimal flavor and arrange evenly to ensure every bar gets fruit in each bite.
How to Assemble Strawberry Shortcake Bars
Assembling these bars is a joyful, sensory process that rewards patience. You will bake a golden base, whip a cloudlike frosting, and finish with sliced strawberries just before serving so everything stays fresh. Take your time with each stage and use the visual and tactile cues described below to ensure success.
- Preheat oven to 350°F. Line a 9×13-inch pan with foil or parchment paper and spray with nonstick cooking spray.: You will feel immediate warmth from the oven as it brings the baking environment up to temperature, and the scent of heated metal will be faint but reassuring. Properly lining the pan ensures the bars release cleanly, which matters for neat presentation, and spraying the liner prevents sticking around the edges. A common mistake is skipping the lining and then struggling to remove the bars; take the extra minute to line and spray for a flawless lift.
- Add cake mix, butter and eggs to a large bowl. Stir until combined. You can do this by hand or use a mixer.: When these ingredients meet, the aroma of butter mingles with the sweet dust of cake mix , and the batter will take on a soft, slightly glossy look. Using a mixer yields the smoothest batter quickly, while stirring by hand gives you control to avoid overmixing, which keeps the crumb tender. Watch for streaks of dry mix, and stop as soon as the mixture is uniform; overworking the batter is the typical error that produces chewy bars.
- Press batter evenly into prepared pan. Bake until light golden around the edges and no longer glossy, approximately 15-20 minutes. Cool completely before frosting.: Pressing the batter creates an even thickness so the bars bake uniformly, and you should feel slight resistance as the batter firms under your fingertips. During baking you will notice the edges turn a warm, golden color and the glossy sheen fade, signals the interior has set. If you remove the pan too soon, the center can be underbaked and collapse, so trust the visual cues rather than a strict timer.
- To make the frosting, beat cream cheese with powdered sugar and vanilla until smooth. Mix on high speed while adding heavy whipping cream, then mix until stiff peaks form.: The texture shifts from dense and slightly tacky to light and aerated as you incorporate the heavy whipping cream . You'll hear the mixer change tone, and the mixture will hold peaks that stand tall when you lift the whisk. This aeration is crucial for a fluffy mouthfeel that contrasts the base. Be careful not to overbeat, as the mixture can separate and become grainy.
- Frost bars as desired. Store leftover frosting in the refrigerator for up to 3 days.: Spreading the frosting creates a glossy, cloudlike blanket that invites the first slice, and you should feel a smooth resistance under your spatula as it levels. Chilling leftover frosting preserves its structure and flavor, and returning it to room temperature briefly makes it spreadable again. A frequent oversight is leaving frosting out too long, which can soften too much or shift texture; refrigerate promptly when not using.
- Just before serving, top bars with sliced strawberries. Slice and serve.: The final act brings vivid color and a fresh scent; sliced strawberries glisten and release a light berry perfume that wakes the entire dessert. Adding them right before serving keeps juices from soaking into the base and preserves bright texture. If you top too early, juices will penetrate the frosting and make the bars soggy, so time this step close to serving.
- Store bars in refrigerator for up to 24 hours once berries are added. Make bars up to 2 days in advance and frosting up to 2 days ahead. Don’t assemble until ready to serve.: Cooling and refrigeration maintain the frosting's structure and prevent spoilage, and you will notice the held-in chill when you slice through the bars. Preparing components ahead reduces stress, but assembling fresh retains the best texture contrast. A common misstep is assembling too far in advance, which sacrifices the pristine look and firm bite of the finished bars.
Pro Tips and Tweaks
Here are focused tips I rely on when I make Strawberry Shortcake Bars. They keep the process calm and ensure consistent results whether you bake for a family dessert or a crowd.
- Chill your bowl when whipping heavy whipping cream to get fluffier peaks faster and prevent overwhipping.
- Softened cream cheese matters because it blends into a velvety frosting; leave it at room temperature for at least 30 minutes before mixing.
- Spread frosting while cool so it holds texture; if the base is warm the frosting may slide and become thin.
- Prepare components ahead by baking the base and making the frosting up to 2 days earlier, then assemble close to serving for best freshness.
- Slice uniformly to ensure even bites; use a sharp knife and wipe it between cuts to keep edges clean.
How to Enjoy Strawberry Shortcake Bars
These bars are versatile and welcome at many occasions. Whether you serve them for afternoon tea, a spring potluck, or a light dessert after dinner, their easy format makes sharing simple. They also travel well when assembled carefully, and chilling before transport helps maintain shape.
- Serve chilled, straight from the refrigerator, for a refreshing texture contrast between the cool frosting and the tender base.
- Bring to potlucks in a lined baking pan, then slice and lift out using the foil or parchment for effortless plating.
- Occasions they suit include spring gatherings, birthdays, casual brunches, and holiday dessert tables where a lighter option is welcome.
- Storage works best refrigerated for up to 24 hours once berries are added, or up to 2 days assembled if berries are added just before serving.
- Presentation tip: arrange extra sliced strawberries on top right before serving and dust lightly with powdered sugar for a pretty finish.
- Seasonal pairing idea: these bars shine in spring and early summer when strawberries are at their peak, pairing well with iced tea or light coffee.
FAQ
Conclusion
Strawberry Shortcake Bars combine a tender, buttery base with a light, whipped frosting and fresh, vibrant strawberries, making them a reliably beloved dessert. I encourage you to try them for your next gathering or weekend treat, and to prep components in advance so you can assemble with ease and serve at peak freshness. They are approachable, forgiving, and deliver that perfect balance of creamy and fruity that guests will remember.
Strawberry Shortcake Bars
Equipment
- 9×13-inch pan
- Mixer
- Mixing Bowls
- Spatula
Ingredients
- 115.25 ounce yellow cake mix Provide a light, sweet base that gives structure and crumb to the bars; use the cake mix as a convenient shortcut to create a tender crust and bottom layer while ensuring consistent texture and flavor throughout the dessert. Adjust pressing depth to form an even foundation before baking and layering other components on top to prevent sogginess.
- 1/2 cup (113 g) melted Challenge Unsalted Butter Add rich, buttery moisture to the crust and help bind the cake mix into a cohesive dough; melted unsalted butter contributes flavor without additional saltiness so the sweetness of other layers remains balanced. Ensure butter is fully melted and evenly mixed to achieve a uniform, golden-brown bake.
- 2 large eggs Bind the crust ingredients together while adding moisture and a bit of richness; eggs help leaven slightly and contribute to a stable structure that holds the bar shape after slicing. Beat lightly before incorporating to distribute yolks and whites evenly for consistent texture.
- 8 ounce (226 g) Challenge Cream Cheese, softened Soften to a smooth, creamy consistency for the cheesecake-like middle layer; cream cheese provides tang and density that contrasts with the light cake base and whipped topping. Beat until smooth to eliminate lumps and ensure it spreads easily over the baked crust for a silky layer.
- 1 cup (113 g) powdered sugar Sweeten and slightly thicken the cream cheese layer with a powdered sugar addition; it dissolves smoothly to create a uniform sweetness without grittiness. Sift or add gradually while mixing to control sweetness level and avoid overbeating that could loosen the filling.
- 1 teaspoon vanilla extract Enhance flavor with a warm, aromatic note that complements strawberries and cream; vanilla extract rounds out the sweetness and elevates the overall aroma of the bars. Add when mixing the cream cheese or whipped layers to distribute its fragrance evenly.
- 2 cups (474 ml) heavy whipping cream Whip into stiff peaks to create a light, airy topping that contrasts the dense cream cheese layer; heavy whipping cream provides volume and a creamy mouthfeel that balances sweetness and acidity. Chill both bowl and cream for best whipping results and fold gently to maintain airiness when combining.
- 1 pound strawberries hulled and sliced Provide fresh, juicy brightness and natural sweetness as the fruit topping; hulled and sliced strawberries add color, texture, and a tart contrast to the creamy layers. Use ripe berries for optimal flavor and arrange evenly to ensure every bar gets fruit in each bite.
Instructions
- Preheat oven to 350°F. Line a 9×13-inch pan with foil or parchment paper and spray with nonstick cooking spray.: You will feel immediate warmth from the oven as it brings the baking environment up to temperature, and the scent of heated metal will be faint but reassuring. Properly lining the pan ensures the bars release cleanly, which matters for neat presentation, and spraying the liner prevents sticking around the edges. A common mistake is skipping the lining and then struggling to remove the bars; take the extra minute to line and spray for a flawless lift.
- Add cake mix, butter and eggs to a large bowl. Stir until combined. You can do this by hand or use a mixer.: When these ingredients meet, the aroma of butter mingles with the sweet dust of cake mix , and the batter will take on a soft, slightly glossy look. Using a mixer yields the smoothest batter quickly, while stirring by hand gives you control to avoid overmixing, which keeps the crumb tender. Watch for streaks of dry mix, and stop as soon as the mixture is uniform; overworking the batter is the typical error that produces chewy bars.
- Press batter evenly into prepared pan. Bake until light golden around the edges and no longer glossy, approximately 15-20 minutes. Cool completely before frosting.: Pressing the batter creates an even thickness so the bars bake uniformly, and you should feel slight resistance as the batter firms under your fingertips. During baking you will notice the edges turn a warm, golden color and the glossy sheen fade, signals the interior has set. If you remove the pan too soon, the center can be underbaked and collapse, so trust the visual cues rather than a strict timer.
- To make the frosting, beat cream cheese with powdered sugar and vanilla until smooth. Mix on high speed while adding heavy whipping cream, then mix until stiff peaks form.: The texture shifts from dense and slightly tacky to light and aerated as you incorporate the heavy whipping cream . You'll hear the mixer change tone, and the mixture will hold peaks that stand tall when you lift the whisk. This aeration is crucial for a fluffy mouthfeel that contrasts the base. Be careful not to overbeat, as the mixture can separate and become grainy.
- Frost bars as desired. Store leftover frosting in the refrigerator for up to 3 days.: Spreading the frosting creates a glossy, cloudlike blanket that invites the first slice, and you should feel a smooth resistance under your spatula as it levels. Chilling leftover frosting preserves its structure and flavor, and returning it to room temperature briefly makes it spreadable again. A frequent oversight is leaving frosting out too long, which can soften too much or shift texture; refrigerate promptly when not using.
- Just before serving, top bars with sliced strawberries. Slice and serve.: The final act brings vivid color and a fresh scent; sliced strawberries glisten and release a light berry perfume that wakes the entire dessert. Adding them right before serving keeps juices from soaking into the base and preserves bright texture. If you top too early, juices will penetrate the frosting and make the bars soggy, so time this step close to serving.
- Store bars in refrigerator for up to 24 hours once berries are added. Make bars up to 2 days in advance and frosting up to 2 days ahead. Don’t assemble until ready to serve.: Cooling and refrigeration maintain the frosting's structure and prevent spoilage, and you will notice the held-in chill when you slice through the bars. Preparing components ahead reduces stress, but assembling fresh retains the best texture contrast. A common misstep is assembling too far in advance, which sacrifices the pristine look and firm bite of the finished bars.
Notes
- Chill your bowl when whipping heavy whipping cream to get fluffier peaks faster and prevent overwhipping.
- Softened cream cheese matters because it blends into a velvety frosting; leave it at room temperature for at least 30 minutes before mixing.
- Spread frosting while cool so it holds texture; if the base is warm the frosting may slide and become thin.
- Prepare components ahead by baking the base and making the frosting up to 2 days earlier, then assemble close to serving for best freshness.
- Slice uniformly to ensure even bites; use a sharp knife and wipe it between cuts to keep edges clean.