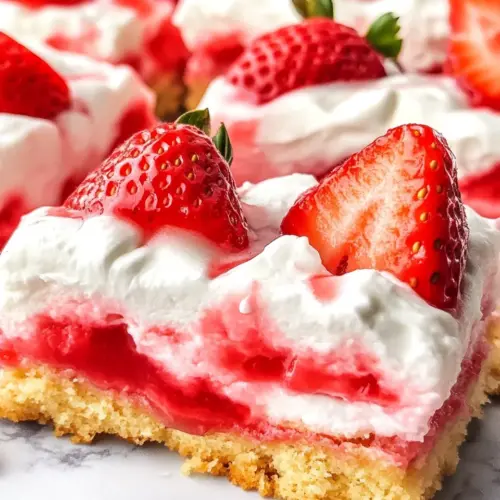
Strawberry Shortcake Bars
Strawberry Shortcake Bars are an easy, creamy dessert featuring a tender cake base, light whipped frosting, and bright fresh strawberries. The recipe is perfect for gatherings, offering a crisp edge and soft center with a refreshing fruit finish. Make ahead components for stress free hosting and enjoy a crowd pleasing treat that feels both nostalgic and modern.
Equipment
- 9×13-inch pan
- Mixer
- Mixing Bowls
- Spatula
Ingredients
- 115.25 ounce yellow cake mix Provide a light, sweet base that gives structure and crumb to the bars; use the cake mix as a convenient shortcut to create a tender crust and bottom layer while ensuring consistent texture and flavor throughout the dessert. Adjust pressing depth to form an even foundation before baking and layering other components on top to prevent sogginess.
- 1/2 cup (113 g) melted Challenge Unsalted Butter Add rich, buttery moisture to the crust and help bind the cake mix into a cohesive dough; melted unsalted butter contributes flavor without additional saltiness so the sweetness of other layers remains balanced. Ensure butter is fully melted and evenly mixed to achieve a uniform, golden-brown bake.
- 2 large eggs Bind the crust ingredients together while adding moisture and a bit of richness; eggs help leaven slightly and contribute to a stable structure that holds the bar shape after slicing. Beat lightly before incorporating to distribute yolks and whites evenly for consistent texture.
- 8 ounce (226 g) Challenge Cream Cheese, softened Soften to a smooth, creamy consistency for the cheesecake-like middle layer; cream cheese provides tang and density that contrasts with the light cake base and whipped topping. Beat until smooth to eliminate lumps and ensure it spreads easily over the baked crust for a silky layer.
- 1 cup (113 g) powdered sugar Sweeten and slightly thicken the cream cheese layer with a powdered sugar addition; it dissolves smoothly to create a uniform sweetness without grittiness. Sift or add gradually while mixing to control sweetness level and avoid overbeating that could loosen the filling.
- 1 teaspoon vanilla extract Enhance flavor with a warm, aromatic note that complements strawberries and cream; vanilla extract rounds out the sweetness and elevates the overall aroma of the bars. Add when mixing the cream cheese or whipped layers to distribute its fragrance evenly.
- 2 cups (474 ml) heavy whipping cream Whip into stiff peaks to create a light, airy topping that contrasts the dense cream cheese layer; heavy whipping cream provides volume and a creamy mouthfeel that balances sweetness and acidity. Chill both bowl and cream for best whipping results and fold gently to maintain airiness when combining.
- 1 pound strawberries hulled and sliced Provide fresh, juicy brightness and natural sweetness as the fruit topping; hulled and sliced strawberries add color, texture, and a tart contrast to the creamy layers. Use ripe berries for optimal flavor and arrange evenly to ensure every bar gets fruit in each bite.
Instructions
- Preheat oven to 350°F. Line a 9×13-inch pan with foil or parchment paper and spray with nonstick cooking spray.: You will feel immediate warmth from the oven as it brings the baking environment up to temperature, and the scent of heated metal will be faint but reassuring. Properly lining the pan ensures the bars release cleanly, which matters for neat presentation, and spraying the liner prevents sticking around the edges. A common mistake is skipping the lining and then struggling to remove the bars; take the extra minute to line and spray for a flawless lift.
- Add cake mix, butter and eggs to a large bowl. Stir until combined. You can do this by hand or use a mixer.: When these ingredients meet, the aroma of butter mingles with the sweet dust of cake mix , and the batter will take on a soft, slightly glossy look. Using a mixer yields the smoothest batter quickly, while stirring by hand gives you control to avoid overmixing, which keeps the crumb tender. Watch for streaks of dry mix, and stop as soon as the mixture is uniform; overworking the batter is the typical error that produces chewy bars.
- Press batter evenly into prepared pan. Bake until light golden around the edges and no longer glossy, approximately 15-20 minutes. Cool completely before frosting.: Pressing the batter creates an even thickness so the bars bake uniformly, and you should feel slight resistance as the batter firms under your fingertips. During baking you will notice the edges turn a warm, golden color and the glossy sheen fade, signals the interior has set. If you remove the pan too soon, the center can be underbaked and collapse, so trust the visual cues rather than a strict timer.
- To make the frosting, beat cream cheese with powdered sugar and vanilla until smooth. Mix on high speed while adding heavy whipping cream, then mix until stiff peaks form.: The texture shifts from dense and slightly tacky to light and aerated as you incorporate the heavy whipping cream . You'll hear the mixer change tone, and the mixture will hold peaks that stand tall when you lift the whisk. This aeration is crucial for a fluffy mouthfeel that contrasts the base. Be careful not to overbeat, as the mixture can separate and become grainy.
- Frost bars as desired. Store leftover frosting in the refrigerator for up to 3 days.: Spreading the frosting creates a glossy, cloudlike blanket that invites the first slice, and you should feel a smooth resistance under your spatula as it levels. Chilling leftover frosting preserves its structure and flavor, and returning it to room temperature briefly makes it spreadable again. A frequent oversight is leaving frosting out too long, which can soften too much or shift texture; refrigerate promptly when not using.
- Just before serving, top bars with sliced strawberries. Slice and serve.: The final act brings vivid color and a fresh scent; sliced strawberries glisten and release a light berry perfume that wakes the entire dessert. Adding them right before serving keeps juices from soaking into the base and preserves bright texture. If you top too early, juices will penetrate the frosting and make the bars soggy, so time this step close to serving.
- Store bars in refrigerator for up to 24 hours once berries are added. Make bars up to 2 days in advance and frosting up to 2 days ahead. Don’t assemble until ready to serve.: Cooling and refrigeration maintain the frosting's structure and prevent spoilage, and you will notice the held-in chill when you slice through the bars. Preparing components ahead reduces stress, but assembling fresh retains the best texture contrast. A common misstep is assembling too far in advance, which sacrifices the pristine look and firm bite of the finished bars.
Notes
- Chill your bowl when whipping heavy whipping cream to get fluffier peaks faster and prevent overwhipping.
- Softened cream cheese matters because it blends into a velvety frosting; leave it at room temperature for at least 30 minutes before mixing.
- Spread frosting while cool so it holds texture; if the base is warm the frosting may slide and become thin.
- Prepare components ahead by baking the base and making the frosting up to 2 days earlier, then assemble close to serving for best freshness.
- Slice uniformly to ensure even bites; use a sharp knife and wipe it between cuts to keep edges clean.