Rhubarb Berry Pie
Rhubarb Berry Pie has a way of arriving at my table like a memory, tart and bright, with that honest, rustic charm that makes people pause mid conversation. The first time I baked this, I was armed with a thrift store rolling pin and a stack of mismatched plates, convinced that a humble pie could steal the show at a spring potluck. I still remember the warm kitchen air, the faint floral scent from the garden, and the sound of frozen berries hitting the bowl with a soft thud as they met the fresh rhubarb.
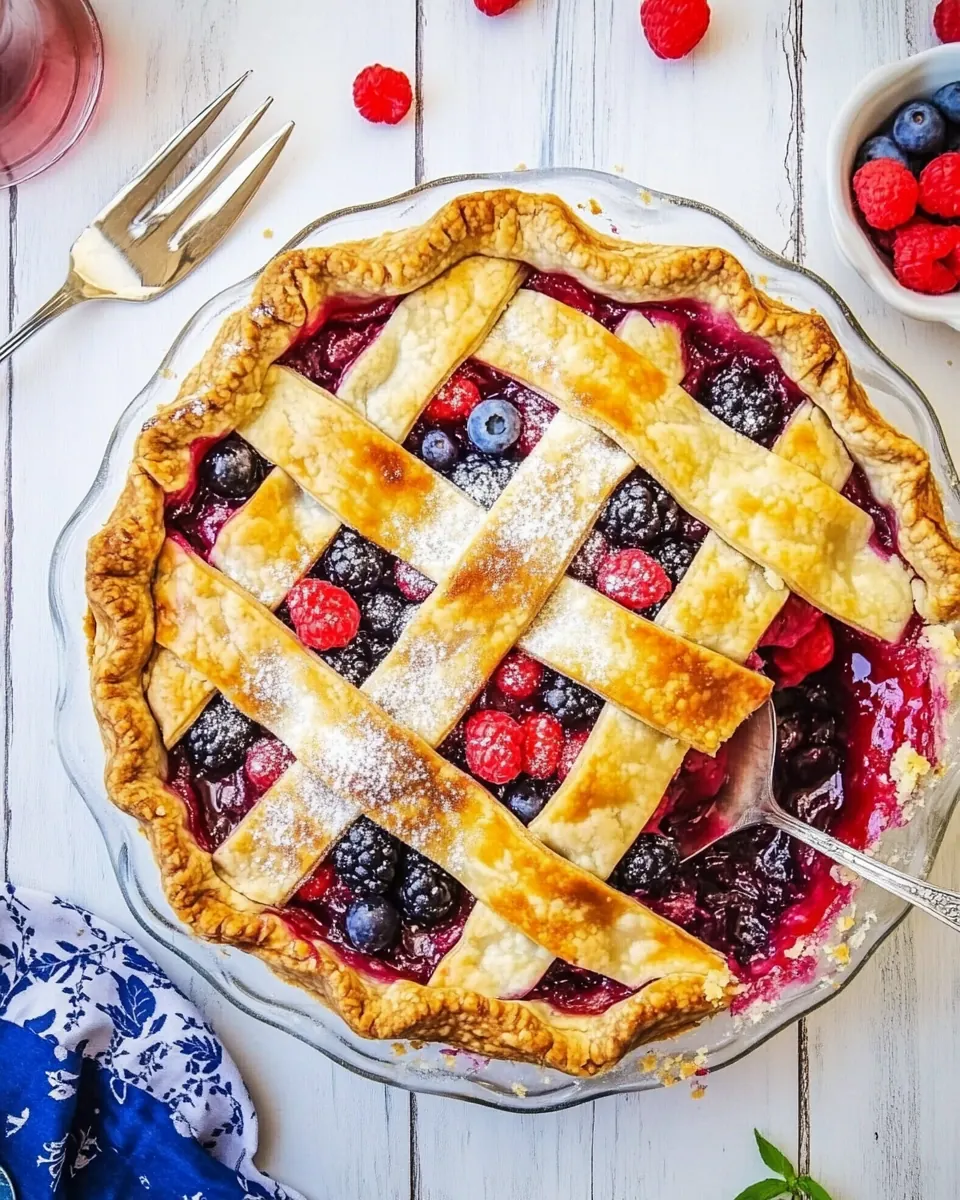
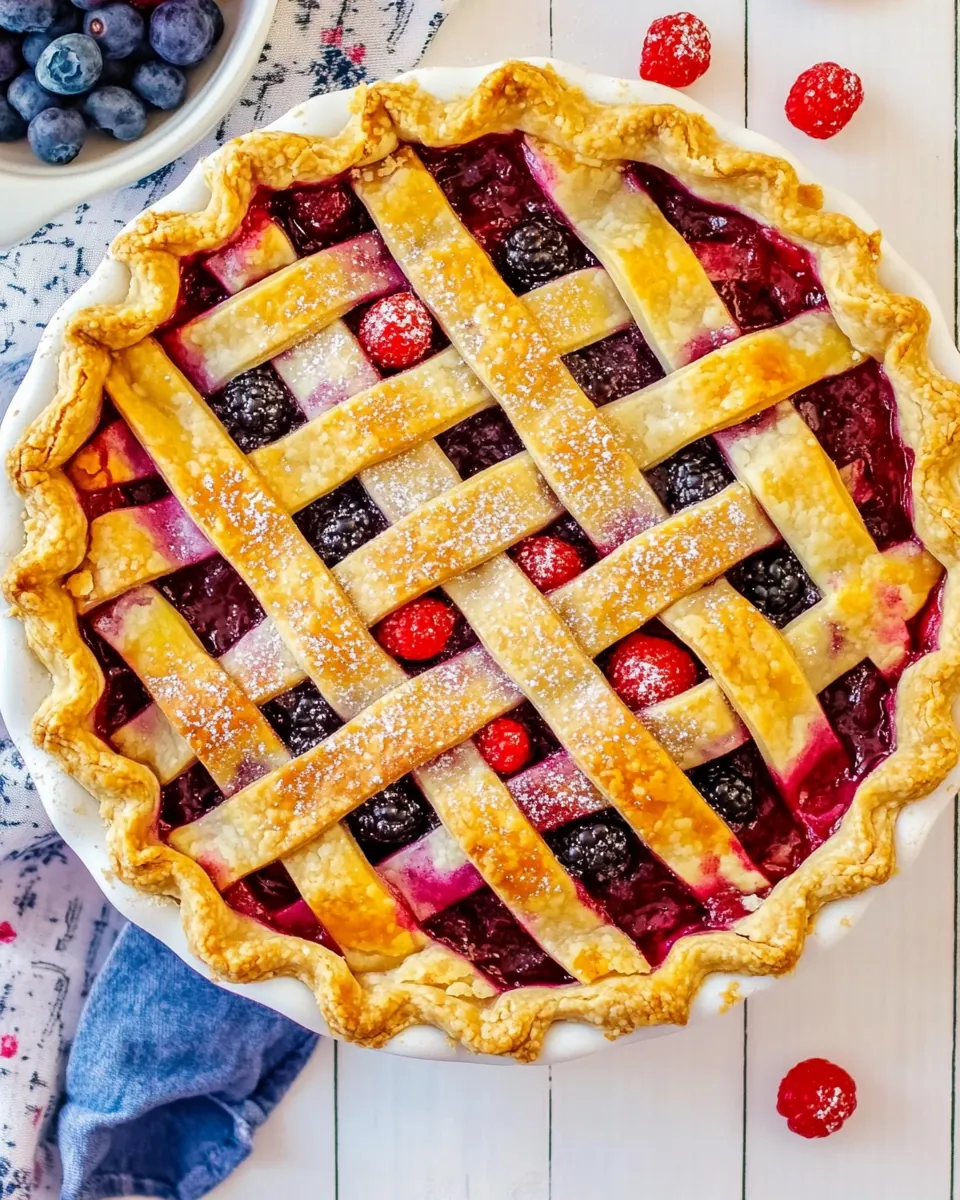
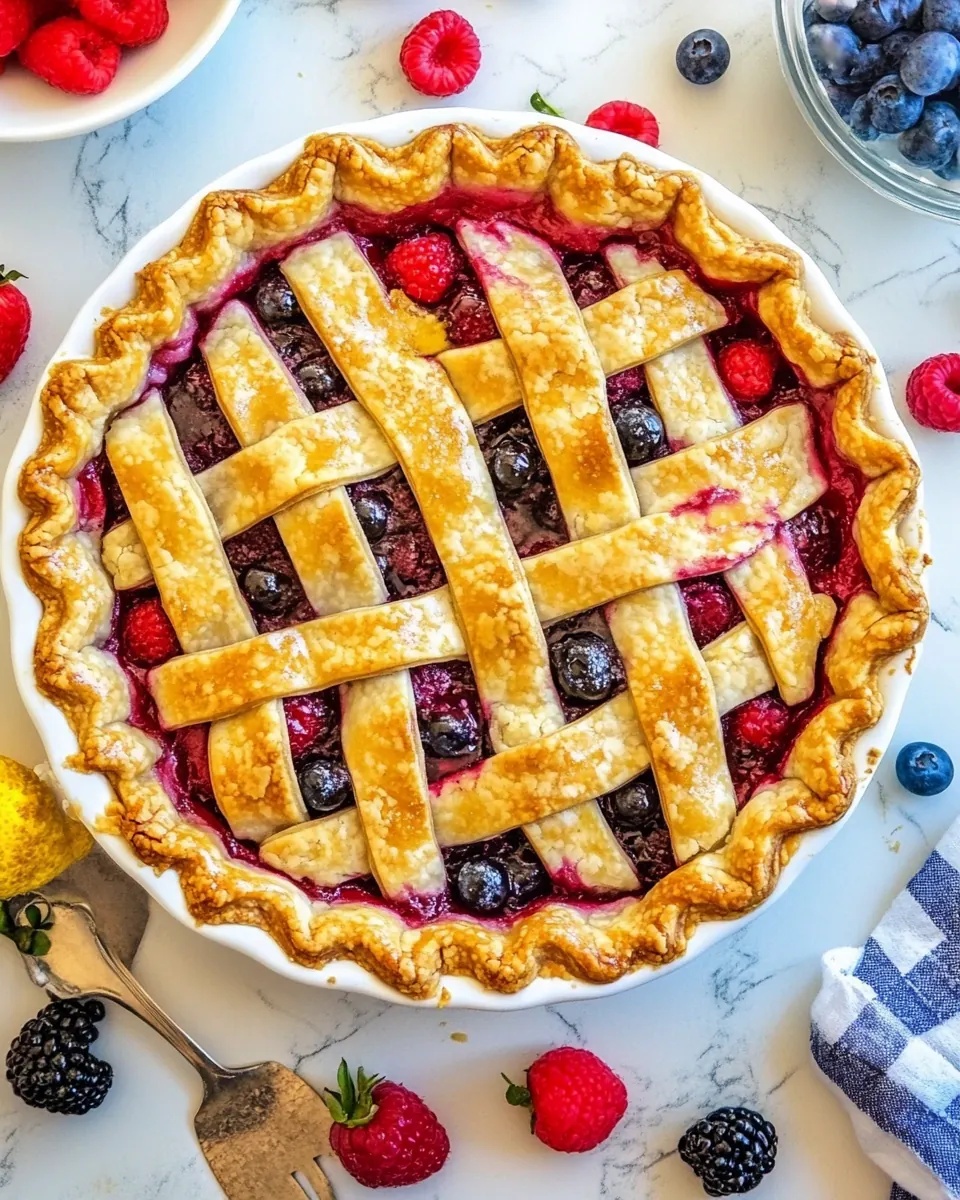
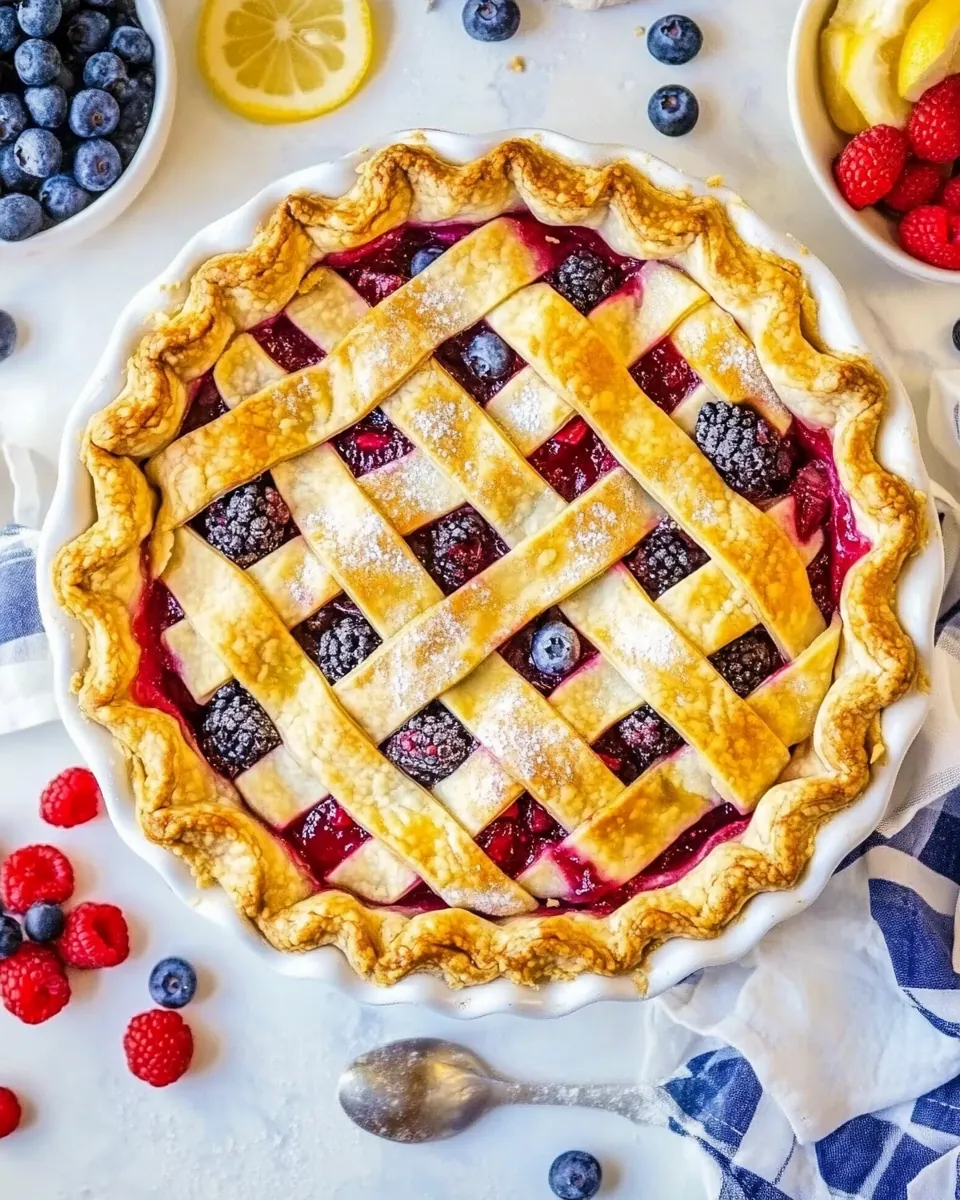
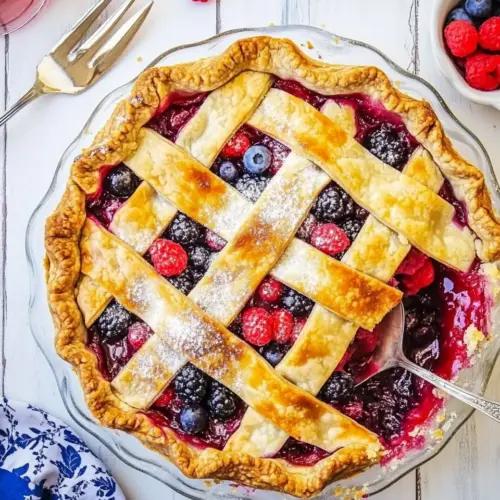
The combination of rhubarb and mixed berries feels both celebratory and grounded, like a handshake between seasons. I like to think of this pie as the dessert that insists on being shared. When I slice into it, a glossy, bubbling filling peeks through a handwoven lattice, steam curling up in a way that always draws a crowd. Each spoonful balances tangy and sweet, the filling thick but not gummy, the crust flaky and golden.
Over the years, I have tweaked small things that matter, like letting the filling rest so the tapioca can do its job, or preheating a sheet under the pie so the bottom never sulks in sogginess. Those tiny choices add up to something comforting and lively at once. I love serving this pie on an ordinary Tuesday and watching it make the day feel special.
Recipe Snapshot
1 hr 25 mins
20 mins
65 mins
Medium
250 kcal
American
Gluten-Free, Low FODMAP
Desserts
Baking Sheet, (9-inch) Glass Pie Plate, Large Bowl, Pizza Cutter, Wire Rack
Why This Rhubarb Berry Pie Shines
Bold seasonal flavor
I love how Rhubarb Berry Pie captures the sharp, aromatic bite of rhubarb alongside tender, juicy strawberries and blueberries. The interplay of tang and sugar is immediate, and it creates a bright profile that stands out after a rich meal. You get a summer in a slice even when the weather is still cool, and that contrast is exactly why I keep making it year after year.
Textural harmony
The structure in this recipe is what makes it sing. The lattice top provides a craggy, butter kissed crust, while the filling becomes thick and glossy thanks to the minute tapioca. I find this yields a filling that slices cleanly, so you get that satisfying forkful of yield followed by a gentle resistance from the crust. It feels indulgent without being heavy.
Flexible ingredient approach
I appreciate the recipe‘s forgiving nature. You can use a mix of fresh and frozen berries, and frozen rhubarb works just fine if fresh is scarce. That flexibility makes it practical when produce options change, and it reduces stress on busy days. I often swap proportions slightly based on what is at hand, and the pie still turns out reliably well.
Simple techniques, big payoff
There are no complicated tricks here, just straightforward steps that reward attention. Preheating a baking sheet, letting the filling sit to thicken, and shielding the crust with foil at the right moment are small moves that protect flavor and texture. These techniques are approachable, and they make me feel like I can hand this recipe to a friend who is new to baking and trust they will be proud of the outcome.
Shareable and memorable
Finally, this pie is social food. People gather around it, and it prompts conversation about gardens, grandparents, and favorite summer desserts. I enjoy how it makes ordinary moments into little celebrations, whether served for a holiday table or a quiet weekend treat.
Ingredient List for Rhubarb Berry Pie
I like to think of the ingredient list as the cast of characters in a short play. Each item has a clear part to play, from the structural role of the pie crusts to the tangy lead of rhubarb and the sweet supporting notes from the berries. The sugar and tapioca work quietly, coaxing juices into a silky, sliceable filling, while the beaten egg and sprinkling of extra sugar give the finish its golden sheen and gentle crunch.
- 1 package refrigerated pie crusts, should contain 2 crusts; alternatively make a double-crust homemade pie crust recipe: Provide a buttery, flaky base and top for the pie, enabling enclosure of the filling and browning during baking; choose refrigerated crusts for convenience or substitute a homemade double–crust recipe if preferred, taking care to keep dough cold for optimal texture.
- 3 cups rhubarb*, diced into 1 to 1.5-inch pieces: Add a tart, juicy backbone to the filling with diced stalks that soften and release bright flavor while baking; cut into 1 to 1.5-inch pieces so they cook evenly and contribute a pleasant balance to the sweet berries.
- 1 cup sliced strawberries**, I used some fresh/some frozen, either are fine: Bring sweet, fragrant notes and soft texture to the filling with sliced strawberries, which meld with rhubarb when heated; swap fresh or frozen depending on season and thaw frozen berries slightly before mixing for even distribution.
- 1 cup blueberries**, I used frozen, fresh are fine: Contribute concentrated color, flavor, and a touch of acidity through blueberries that burst while baking, enhancing overall berry complexity; use frozen or fresh berries as available and fold gently to avoid crushing.
- 1 cup granulated sugar, plus about 2 tablespoon for sprinkling: Provide primary sweetness to counterbalance tart rhubarb and berries, dissolving into the filling as it bakes; reserve about 2 tablespoons for sprinkling on the crust or lattice to create a sparkly, caramelized finish.
- 1 large egg, beaten: Create an egg wash to promote glossy, golden browning on the crust and help any sprinkled sugar adhere; beat thoroughly and brush over exposed dough just before baking for best appearance.
- 1 tablespoon quick-cooking or minute tapioca: Thicken the filling by absorbing excess juices released by rhubarb and berries during baking, helping prevent a runny pie; sprinkle evenly among fruit so the tapioca dispersedly gels as it heats.
- 1 tablespoon all-purpose flour, plus more for dusting counter: Offer additional thickening and a slight structural lift by absorbing moisture and binding filling components, and serve for dusting the counter when rolling crust; measure carefully to avoid gummy texture while ensuring proper consistency.
How to Assemble Rhubarb Berry Pie
Assembling this pie is a satisfying, tactile process that rewards patience. I like to move deliberately, keeping tools at hand, and treating each step as a small ritual. With that mindset, the pie comes together smoothly and the kitchen fills with warming, fruity aromas.
- Preheat oven to 375 F and place a baking sheet or pizza stone inside the oven to heat up as well.: As you preheat, you will notice the air in the oven warming and that subtle scent of dry heat, which is what begins crisping the bottom crust the minute the pie goes in. Heating a baking sheet or pizza stone creates direct contact that helps the crust firm quickly, preventing a soggy base. One common mistake is skipping the preheated surface, which often results in a softer bottom crust. Keep the oven door closed while it heats to maintain consistent temperature, and use an oven thermometer if your oven runs hot or cool to ensure accuracy.
- Allow the refrigerated pie crusts to soften for about 15 minutes on a clean counter before flouring your countertop as needing to prevent sticking, rolling out one pie crust, and draping it into a greased 9-inch glass pie plate; set aside.: When you let the dough relax, it becomes pliable, and the surface will feel cool and slightly tacky rather than stiff. This makes it easier to roll without tearing, and draping it into the pie plate should feel smooth as the crust settles into the curves. Pressing too hard or rolling while the dough is cold often causes cracks, which then require patching and can affect bake evenness. If the dough springs back, let it rest a few extra minutes to relax the gluten, and gently press it into the plate rather than stretching.
- While waiting for the pie crusts to come up to warm temp, to a large bowl, add the rhubarb, strawberries, blueberries, 1 cup sugar, egg, minute tapioca, flour, and gently stir together, and allow the mixture to stand for 15 to 30 minutes. This allows the fruit to release its natural juices and tapioca starch to start working to thicken them.: As the fruit mingles with the sugar and tapioca, you will see juices begin to glisten and small beads of liquid form at the bottom of the bowl, a sign the sugar is drawing moisture out. This resting time lets the tapioca hydrate and begin thickening, which is why the filling will set nicely rather than run. A common misstep is rushing to bake immediately, which can leave the filling too loose. Stir gently to avoid bruising the berries, and if the mixture seems too wet after resting, drain a little of the excess liquid before filling the crust.
- Meanwhile, sprinkle your counter with additional flour to prevent sticking, flatten the second crust with a rolling pin, and roll it out so that it's 12 inches in diameter.: Rolling out the top crust should feel smooth and even under the pin, with the dough expanding into a thin, uniform circle. The surface will appear slightly translucent in places when it is thin enough. Too much flour while rolling can make the crust dry and tough, so dust sparingly and lift the dough frequently to check for sticking. If the dough tears, press the edges together gently and smooth with your fingers; small repairs seal during baking.
- Using a pizza cutter/wheel, slice the crust into 1-inch wide strips, making 12 strips.: Cutting the strips cleanly produces crisp edges that brown uniformly, and the clean cut makes weaving the lattice straightforward. A pizza cutter glides through the dough with a quiet slicing sound; if the wheel drags, the dough is too soft and should be chilled briefly. Cutting strips of inconsistent width can create uneven browning and an irregular lattice, so aim for steady pressure and straight lines.
- Vertically slice 4 of those strips in half to create 8 thinner strips (1/2-inch each in width); leave these strips in pairs.: Halving a few strips gives you the narrower pieces that offer a delicate visual contrast in the lattice and hold up during weaving. Keep the paired strips together so you can alternate them as you work, and you will notice the varied widths create a pleasing pattern once baked. A typical error is losing track of which strips are halved, leading to mismatched pairs; arrange them neatly on your counter to avoid this.
- Arrange the strips in lattice design over filling.: As you weave the strips, the pie will begin to smell fruit forward and slightly sweet, and the lattice creates tiny windows where the filling peeks through. This step is about rhythm more than speed, and you will find that alternating thick and thin strips produces an attractive, balanced look. If you rush, the dough can stretch or tear, so work patiently, tucking ends under as you go to create an even edge. If a strip dries out while you work, dampen your fingers slightly to re moisten and press it back together.
- Seal and flute edges of the pie plate using your fingers.: Fluting the edge compresses the top and bottom crusts together, which helps hold juices in and gives the pie its classic presentation. When you press with your thumb and forefinger, you should feel the crust give and then snap into a ridged pattern. Avoid overworking the dough here as that can make the edge tougher; a gentle, confident touch is best. If the seam looks thin or the dough seems weak, fold the edge slightly and press again to strengthen the rim.
- Evenly sprinkle the top with about 2 tablespoons sugar.: The granulated sugar will glint on the surface and melt into tiny crystals that caramelize in the oven, producing a slight crunch and a glossy sheen. Sprinkle from a height for more even coverage, and you will hear a faint patter as the crystals land. Too much topping sugar can create a heavy crust surface, so keep to the recommended amount. If you prefer a more rustic look, scatter the sugar more sparingly rather than densely.
- Cover the entire pie plate with foil, place on the preheated baking sheet (helps guard against accidental overflow and also begins cooking the bottom crust immediately and prevents a soggy bottom) and bake for 40 minutes.: The foil tent protects the crust edges from burning and traps heat to start the filling bubbling, and the preheated sheet gives an immediate burst of heat to the bottom. You will notice steam escaping at the foil edges as the filling wakes up and begins to bubble, a good sign the thickening is progressing. A common oversight is not sealing the foil well enough around the rim, which can allow hot spots to brown too fast. Keep an eye on the oven and avoid opening it too frequently so the temperature remains steady.
- Remove the pie plate from the oven, remove the foil, and create a barrier of foil to just cover around the crust around the perimeter of the pie plate. This strategically placed foil helps prevent excess browning/burning. Bake for an additional 25 to 30 minutes, or until the filling is bubbling and the lattice crust is lightly golden browned. Watch your pie and not the clock, noting it could finish earlier/later than the estimates given and it's your job to watch it so it doesn't burn or come out underdone based on how your oven operates, fresh vs. frozen fruit, etc.: When you take off the full cover, the filling will usually be bubbling at the center and releasing a rich, fragrant steam that smells of cooked fruit and caramelized sugar. Shielding only the rim allows the lattice to brown nicely while protecting the edges from over color. Watch for bubbling, because if the pie is not bubbling in the center before you finish baking, the filling may be loose after cooling. One mistake is relying solely on the timer rather than observing visual cues; ovens vary, so use color and bubbling as your guide.
- Allow the pie to cool on a wire rack for about 2 hours at room temp before slicing and serving, or until completely set. You can accelerate this process by placing the pie in the fridge.: As the pie cools, the filling firms and the juices settle into a sliceable gel, and you will notice the glossy shine becoming slightly matt as it stabilizes. Cooling on a wire rack prevents condensation from softening the bottom crust and keeps air circulating. Cutting too soon is a common error, producing runny slices, so give it time to set; if impatient, chilling briefly in the fridge helps but may dull the fresh aroma slightly.
- Serve with ice cream, whipped cream or whipped topping, or plain. Store leftover pie well-covered (airtight) in the fridge for up to 5 days.: When you serve, the aroma of warm fruit and crisp pastry will be at its most inviting, and a scoop of cold accompaniment adds a pleasing temperature contrast and creaminess against the tangy filling. Store any leftovers wrapped tightly to protect the crust from absorbing fridge moisture, and note that the filling often becomes more cohesive after a night in the refrigerator. A common misstep is leaving the pie uncovered, which dulls the crust and can lead to a dry top.
Tips for Success
These tips are the little chef secrets I use every time I make Rhubarb Berry Pie. They focus on timing and texture so you get a glossy filling and a crisp crust.
- Choose the right fruit texture Allow frozen berries to partially thaw and drain any excess moisture from frozen rhubarb to avoid watering down the filling.
- Measure tapioca carefully Minute tapioca is powerful in small quantities, too much can make the filling gummy, so stick to the stated tablespoon amount.
- Warm your pie surface Place the pie on a preheated baking sheet or pizza stone to jump start the bottom crust and reduce sogginess.
- Rest the filling Let the combined fruit, sugar, and tapioca sit for 15 to 30 minutes so it can release juices and begin thickening before it hits the oven.
- Protect the crust strategically Cover the rim with foil after the first bake interval to keep the edge from burning while the center finishes bubbling.
Pairing Suggestions for Rhubarb Berry Pie
This pie pairs well with simple accompaniments and casual gatherings. The tartness of the rhubarb and the sweetness of the berries demand a cool creamy contrast, and the pie suits both relaxed and festive tables. Below are ideas for serving occasions, sides, and storage tips presented as a helpful list.
- Classic scoop Serve with a scoop of vanilla ice cream for temperature contrast and a creamy counterpoint to the tangy filling.
- Whipped finish A dollop of lightly sweetened whipped cream adds airy texture and a soft mouthfeel that complements the crisp crust.
- Simple coffee service Pair slices with strong coffee or tea during a brunch or afternoon gathering to balance sweetness.
- Seasonal occasions This is a great dessert for spring potlucks, garden parties, or holiday gatherings when rhubarb is available.
- Storage tips Cover tightly and refrigerate for up to 5 days, slices may be reheated briefly in a low oven to refresh the crust.
- Presentation idea Serve on a large wooden board for an informal gathering and allow guests to help themselves for a convivial vibe.
FAQ
Conclusion
What makes this pie special is the lively balance between tart rhubarb and sweet berries, wrapped in a flaky lattice that browns to a perfect golden. Give it a try because the technique is straightforward, and the small details like resting the filling and preheating the baking surface make a big difference in outcome. I hope this becomes one of your go to recipes for spring gatherings or a cozy weekend treat, bringing a bright, nostalgic flavor to your table.
Rhubarb Berry Pie
Equipment
- Baking Sheet
- (9-inch) Glass Pie Plate
- Large Bowl
- Pizza Cutter
- Wire Rack
Ingredients
- 1 package refrigerated pie crusts, should contain 2 crusts; alternatively make a double-crust homemade pie crust recipe Provide a buttery, flaky base and top for the pie, enabling enclosure of the filling and browning during baking; choose refrigerated crusts for convenience or substitute a homemade double-crust recipe if preferred, taking care to keep dough cold for optimal texture.
- 3 cups rhubarb*, diced into 1 to 1.5-inch pieces Add a tart, juicy backbone to the filling with diced stalks that soften and release bright flavor while baking; cut into 1 to 1.5-inch pieces so they cook evenly and contribute a pleasant balance to the sweet berries.
- 1 cup sliced strawberries**, I used some fresh/some frozen, either are fine Bring sweet, fragrant notes and soft texture to the filling with sliced strawberries, which meld with rhubarb when heated; swap fresh or frozen depending on season and thaw frozen berries slightly before mixing for even distribution.
- 1 cup blueberries**, I used frozen, fresh are fine Contribute concentrated color, flavor, and a touch of acidity through blueberries that burst while baking, enhancing overall berry complexity; use frozen or fresh berries as available and fold gently to avoid crushing.
- 1 cup granulated sugar, plus about 2 tablespoon for sprinkling Provide primary sweetness to counterbalance tart rhubarb and berries, dissolving into the filling as it bakes; reserve about 2 tablespoons for sprinkling on the crust or lattice to create a sparkly, caramelized finish.
- 1 large egg, beaten Create an egg wash to promote glossy, golden browning on the crust and help any sprinkled sugar adhere; beat thoroughly and brush over exposed dough just before baking for best appearance.
- 1 tablespoon quick-cooking or minute tapioca Thicken the filling by absorbing excess juices released by rhubarb and berries during baking, helping prevent a runny pie; sprinkle evenly among fruit so the tapioca dispersedly gels as it heats.
- 1 tablespoon all-purpose flour, plus more for dusting counter Offer additional thickening and a slight structural lift by absorbing moisture and binding filling components, and serve for dusting the counter when rolling crust; measure carefully to avoid gummy texture while ensuring proper consistency.
Instructions
- Preheat oven to 375 F and place a baking sheet or pizza stone inside the oven to heat up as well.: As you preheat, you will notice the air in the oven warming and that subtle scent of dry heat, which is what begins crisping the bottom crust the minute the pie goes in. Heating a baking sheet or pizza stone creates direct contact that helps the crust firm quickly, preventing a soggy base. One common mistake is skipping the preheated surface, which often results in a softer bottom crust. Keep the oven door closed while it heats to maintain consistent temperature, and use an oven thermometer if your oven runs hot or cool to ensure accuracy.
- Allow the refrigerated pie crusts to soften for about 15 minutes on a clean counter before flouring your countertop as needing to prevent sticking, rolling out one pie crust, and draping it into a greased 9-inch glass pie plate; set aside.: When you let the dough relax, it becomes pliable, and the surface will feel cool and slightly tacky rather than stiff. This makes it easier to roll without tearing, and draping it into the pie plate should feel smooth as the crust settles into the curves. Pressing too hard or rolling while the dough is cold often causes cracks, which then require patching and can affect bake evenness. If the dough springs back, let it rest a few extra minutes to relax the gluten, and gently press it into the plate rather than stretching.
- While waiting for the pie crusts to come up to warm temp, to a large bowl, add the rhubarb, strawberries, blueberries, 1 cup sugar, egg, minute tapioca, flour, and gently stir together, and allow the mixture to stand for 15 to 30 minutes. This allows the fruit to release its natural juices and tapioca starch to start working to thicken them.: As the fruit mingles with the sugar and tapioca, you will see juices begin to glisten and small beads of liquid form at the bottom of the bowl, a sign the sugar is drawing moisture out. This resting time lets the tapioca hydrate and begin thickening, which is why the filling will set nicely rather than run. A common misstep is rushing to bake immediately, which can leave the filling too loose. Stir gently to avoid bruising the berries, and if the mixture seems too wet after resting, drain a little of the excess liquid before filling the crust.
- Meanwhile, sprinkle your counter with additional flour to prevent sticking, flatten the second crust with a rolling pin, and roll it out so that it's 12 inches in diameter.: Rolling out the top crust should feel smooth and even under the pin, with the dough expanding into a thin, uniform circle. The surface will appear slightly translucent in places when it is thin enough. Too much flour while rolling can make the crust dry and tough, so dust sparingly and lift the dough frequently to check for sticking. If the dough tears, press the edges together gently and smooth with your fingers; small repairs seal during baking.
- Using a pizza cutter/wheel, slice the crust into 1-inch wide strips, making 12 strips.: Cutting the strips cleanly produces crisp edges that brown uniformly, and the clean cut makes weaving the lattice straightforward. A pizza cutter glides through the dough with a quiet slicing sound; if the wheel drags, the dough is too soft and should be chilled briefly. Cutting strips of inconsistent width can create uneven browning and an irregular lattice, so aim for steady pressure and straight lines.
- Vertically slice 4 of those strips in half to create 8 thinner strips (1/2-inch each in width); leave these strips in pairs.: Halving a few strips gives you the narrower pieces that offer a delicate visual contrast in the lattice and hold up during weaving. Keep the paired strips together so you can alternate them as you work, and you will notice the varied widths create a pleasing pattern once baked. A typical error is losing track of which strips are halved, leading to mismatched pairs; arrange them neatly on your counter to avoid this.
- Arrange the strips in lattice design over filling.: As you weave the strips, the pie will begin to smell fruit forward and slightly sweet, and the lattice creates tiny windows where the filling peeks through. This step is about rhythm more than speed, and you will find that alternating thick and thin strips produces an attractive, balanced look. If you rush, the dough can stretch or tear, so work patiently, tucking ends under as you go to create an even edge. If a strip dries out while you work, dampen your fingers slightly to re moisten and press it back together.
- Seal and flute edges of the pie plate using your fingers.: Fluting the edge compresses the top and bottom crusts together, which helps hold juices in and gives the pie its classic presentation. When you press with your thumb and forefinger, you should feel the crust give and then snap into a ridged pattern. Avoid overworking the dough here as that can make the edge tougher; a gentle, confident touch is best. If the seam looks thin or the dough seems weak, fold the edge slightly and press again to strengthen the rim.
- Evenly sprinkle the top with about 2 tablespoons sugar.: The granulated sugar will glint on the surface and melt into tiny crystals that caramelize in the oven, producing a slight crunch and a glossy sheen. Sprinkle from a height for more even coverage, and you will hear a faint patter as the crystals land. Too much topping sugar can create a heavy crust surface, so keep to the recommended amount. If you prefer a more rustic look, scatter the sugar more sparingly rather than densely.
- Cover the entire pie plate with foil, place on the preheated baking sheet (helps guard against accidental overflow and also begins cooking the bottom crust immediately and prevents a soggy bottom) and bake for 40 minutes.: The foil tent protects the crust edges from burning and traps heat to start the filling bubbling, and the preheated sheet gives an immediate burst of heat to the bottom. You will notice steam escaping at the foil edges as the filling wakes up and begins to bubble, a good sign the thickening is progressing. A common oversight is not sealing the foil well enough around the rim, which can allow hot spots to brown too fast. Keep an eye on the oven and avoid opening it too frequently so the temperature remains steady.
- Remove the pie plate from the oven, remove the foil, and create a barrier of foil to just cover around the crust around the perimeter of the pie plate. This strategically placed foil helps prevent excess browning/burning. Bake for an additional 25 to 30 minutes, or until the filling is bubbling and the lattice crust is lightly golden browned. Watch your pie and not the clock, noting it could finish earlier/later than the estimates given and it's your job to watch it so it doesn't burn or come out underdone based on how your oven operates, fresh vs. frozen fruit, etc.: When you take off the full cover, the filling will usually be bubbling at the center and releasing a rich, fragrant steam that smells of cooked fruit and caramelized sugar. Shielding only the rim allows the lattice to brown nicely while protecting the edges from over color. Watch for bubbling, because if the pie is not bubbling in the center before you finish baking, the filling may be loose after cooling. One mistake is relying solely on the timer rather than observing visual cues; ovens vary, so use color and bubbling as your guide.
- Allow the pie to cool on a wire rack for about 2 hours at room temp before slicing and serving, or until completely set. You can accelerate this process by placing the pie in the fridge.: As the pie cools, the filling firms and the juices settle into a sliceable gel, and you will notice the glossy shine becoming slightly matt as it stabilizes. Cooling on a wire rack prevents condensation from softening the bottom crust and keeps air circulating. Cutting too soon is a common error, producing runny slices, so give it time to set; if impatient, chilling briefly in the fridge helps but may dull the fresh aroma slightly.
- Serve with ice cream, whipped cream or whipped topping, or plain. Store leftover pie well-covered (airtight) in the fridge for up to 5 days.: When you serve, the aroma of warm fruit and crisp pastry will be at its most inviting, and a scoop of cold accompaniment adds a pleasing temperature contrast and creaminess against the tangy filling. Store any leftovers wrapped tightly to protect the crust from absorbing fridge moisture, and note that the filling often becomes more cohesive after a night in the refrigerator. A common misstep is leaving the pie uncovered, which dulls the crust and can lead to a dry top.
Notes
- Choose the right fruit texture Allow frozen berries to partially thaw and drain any excess moisture from frozen rhubarb to avoid watering down the filling.
- Measure tapioca carefully Minute tapioca is powerful in small quantities, too much can make the filling gummy, so stick to the stated tablespoon amount.
- Warm your pie surface Place the pie on a preheated baking sheet or pizza stone to jump start the bottom crust and reduce sogginess.
- Rest the filling Let the combined fruit, sugar, and tapioca sit for 15 to 30 minutes so it can release juices and begin thickening before it hits the oven.
- Protect the crust strategically Cover the rim with foil after the first bake interval to keep the edge from burning while the center finishes bubbling.