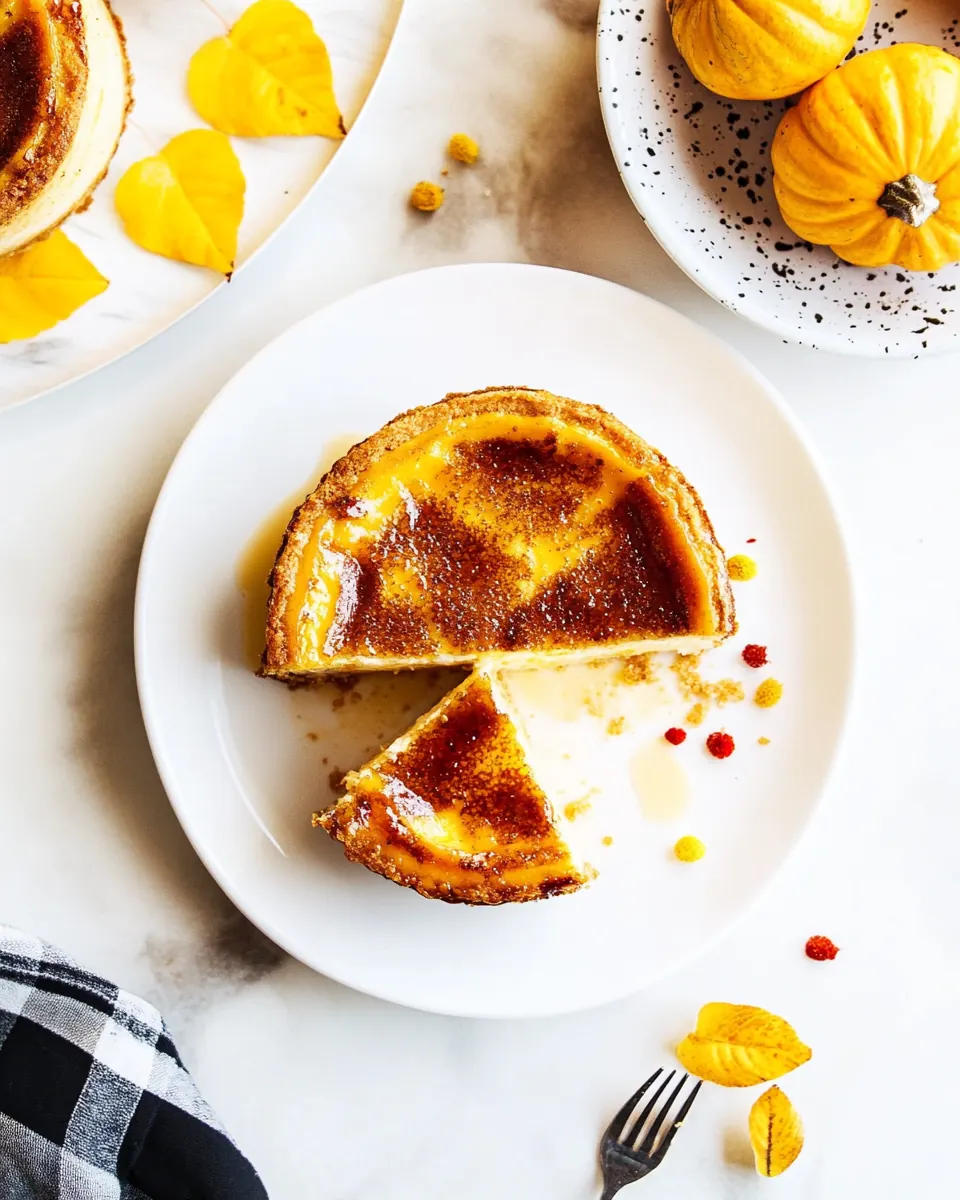
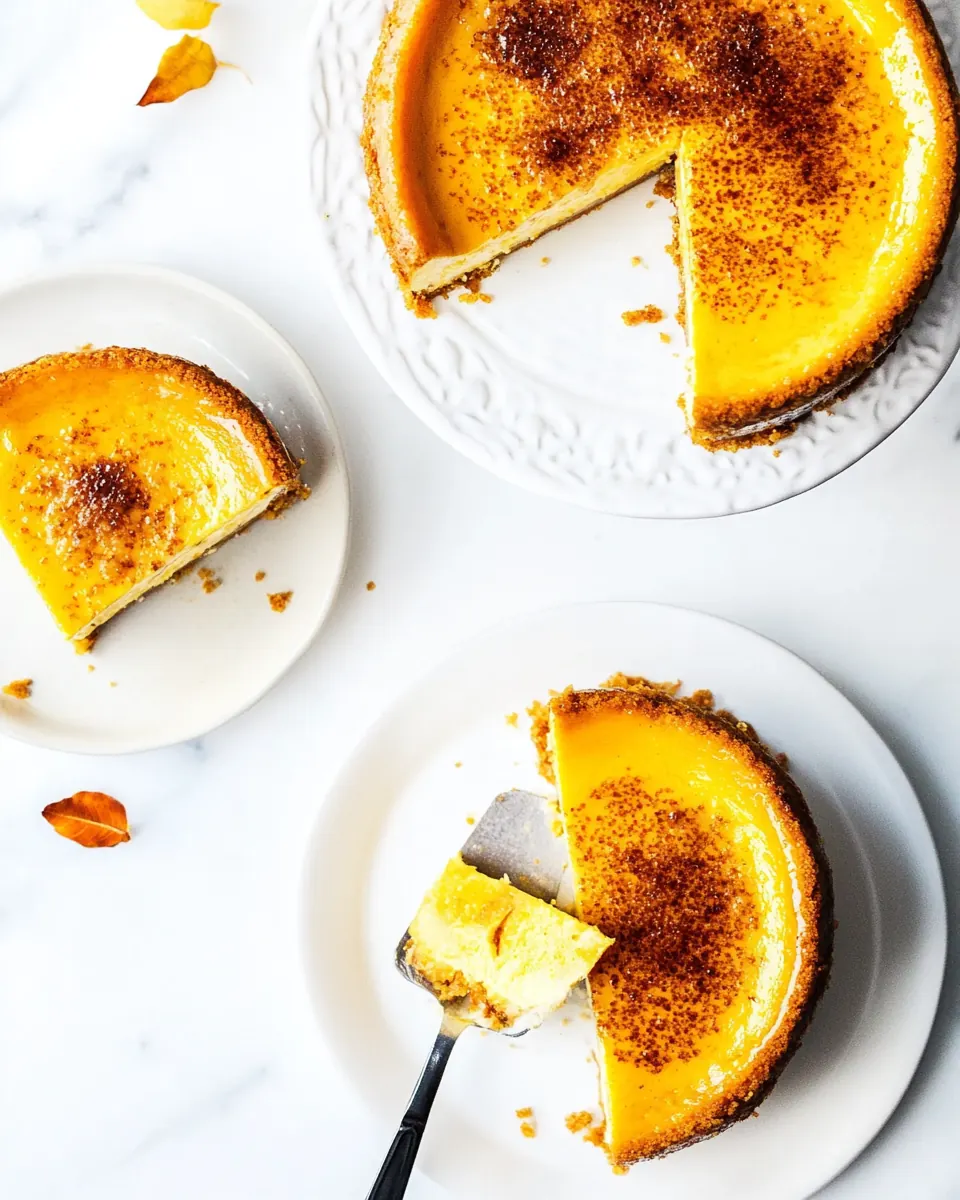
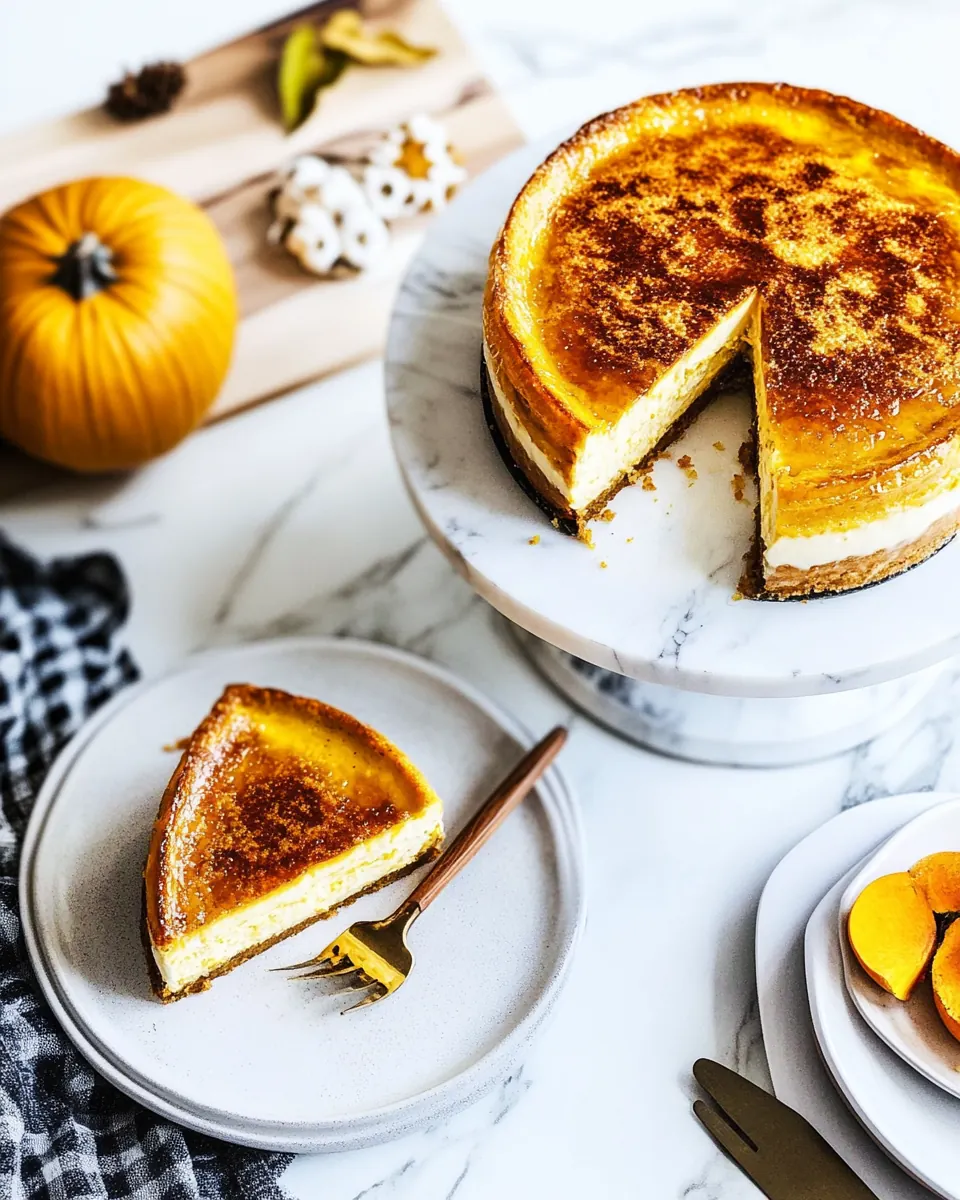
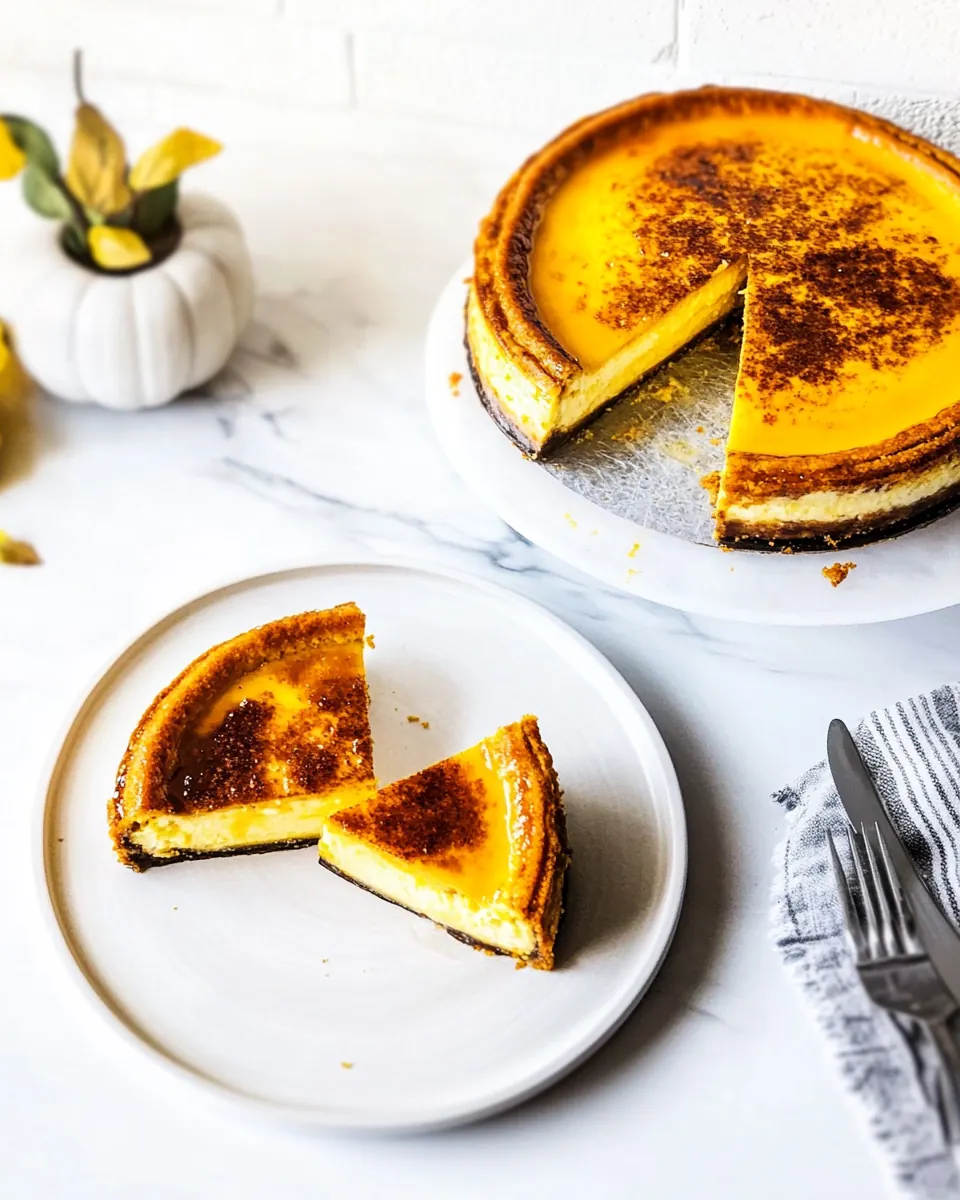
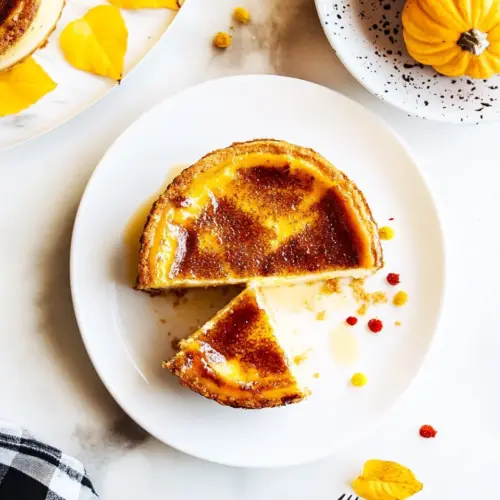
Pumpkin Creme Brulee Cheesecake
Pumpkin Creme Brulee Cheesecake is one of those desserts I bring out when I want to make a table fall silent for a moment, simply because the first forkful tends to do that.
I first baked this after a chaotic week when I craved something that felt both familiar and a little indulgent, a dessert that combined creamy richness and a crisp top. The memory of warm pumpkin spice wafting through my kitchen as the cheesecake baked is one I still reach for on cool mornings. That day, guests lingered at the table longer than planned, trading stories while reaching for another small slice. I learned that the contrast between the silken cream cheese base and the glassy brûlée sugar top turns an already great cheesecake into a theatrical finale for a meal.
Over time, I’ve refined the technique so the texture stays perfectly dense yet tender, and the brûlée layer cracks just right. I enjoy how the mellow sweetness of pumpkin plays with the tang of sour cream, and how a little patience in cooling rewards you with a clean slice every time. When friends ask why I make it, I tell them it is comfort with a flourish, something that feels homemade and special at once. If you love desserts that balance creamy texture and crunchy caramel, this one will become a seasonal favorite.
Recipe Snapshot
2 hr 5 mins
15 mins
110 mins
Hard
500 kcal
American
Gluten-Free, Low FODMAP
Desserts
Stand mixer, Food processor, 9 inch springform pan, Roasting pan, Kitchen torch, Offset spatula
Why This Pumpkin Creme Brulee Cheesecake Is So Good
Rich, layered textures that please everyone
I love how this Pumpkin Creme Brulee Cheesecake manages to combine a silky cream cheese interior with a crunchy brûlée crown. That contrast is what makes each bite memorable, and I often find people closing their eyes for a second as they savor the texture. The layers work together so the pumpkin does not overpower, and the fat from the cream cheese and sour cream creates a luxurious mouthfeel.
Deep, autumnal spice without being cloying
The addition of pumpkin pie spice and a measured dose of sugar brings out warm notes without being heavy. I appreciate how the spices amplify the natural character of the pumpkin, rather than masking it, making the profile ideal for fall gatherings and holidays.
Reliable structure that slices clean
Because the recipe calls for room temperature cream cheese and a proper water bath, the texture sets evenly. I find that following the cooling schedule ensures that slices keep their shape, which is great when serving a crowd or preparing ahead of time.
Impressive finish with simple tools
Caramelizing the sugar on top transforms the look and the experience. A kitchen torch gives you control, but you can use a broiler if needed. The dramatic crack of the brûlée layer makes an everyday cheesecake feel celebratory, and it is a trick I love to show off when entertaining.
Make ahead friendly for stress free hosting
This cheesecake rewards advance work. You can chill it overnight, and the flavor deepens as it rests. I often bake it a day ahead so I can focus on plating and company, instead of last minute oven battles.
Shopping List for Pumpkin Creme Brulee Cheesecake
These ingredients form a classic composition that balances crust, filling, and finish. The crust gives a toasty base, the filling provides creamy density and pumpkin warmth, and the sugar topping produces a crisp caramel shell. The key players are the graham crackers and butter for the crust, cream cheese and eggs for structure, and the pumpkin and spices for seasonality and flavor.
- 12 g graham crackers: Crush finely and form into the base to provide a crisp, sweet foundation for the cheesecake; combine with melted butter to bind and press evenly into the pan. Add subtle whole-grain flavor that complements the spiced pumpkin and creamy filling, ensuring a stable crust once chilled and baked.
- 3 tablespoons sugar: Sweeten and caramelize when sprinkled over the top or incorporated into the filling to enhance overall sweetness and contribute to the brûlée effect. Dissolve easily into wet mixtures to balance savory and spiced notes from other ingredients.
- 1 tablespoon packed light brown sugar: Add deep molasses sweetness and moisture when packed into recipes, boosting caramel and toffee-like flavors in the filling or crust. Provide complexity to the sweetness profile that pairs well with pumpkin and warm spices.
- 1/2 teaspoon cinnamon: Flavor warmly and aromatically to reinforce autumnal spice notes within the filling or crust; use sparingly to avoid overpowering. Blend seamlessly with pumpkin pie spice to create a cohesive spiced profile throughout the cheesecake.
- 1/4 teaspoon fine grain sea salt: Season subtly to lift and balance sweetness and spices while preventing flat or one-dimensional flavors; sprinkle into both crust and filling as directed. Help accentuate dairy and pumpkin notes without drawing attention to itself.
- 6 tablespoons unsalted butter, melted: Melt and bind dry crust ingredients together to set a firm, sliceable base; provide richness and a buttery mouthfeel. Help brown the crust slightly during baking for added depth and textural contrast with the creamy filling.
- 1 can (15 ounces) pumpkin (not pumpkin pie filling): Puree and supply the characteristic pumpkin flavor and moist body to the filling; choose not to use pumpkin pie filling to control sweetness and spice levels. Add natural moisture and color, working with spices and sugars to create a smooth custardy texture.
- 3 packages (24 ounces) cream cheese, at room temperature: Soften and create the dense, creamy structure of the cheesecake filling while contributing tang and richness; beat thoroughly at room temperature to avoid lumps. Provide the primary structure that sets during baking and chilling, delivering smooth mouthfeel.
- 3/4 cup packed light brown sugar: Sweeten and caramelize within the filling or on top when creating the brûlée layer, contributing molasses undertones that deepen flavor. Dissolve into the cream cheese for even sweetness and to balance pumpkin and spices.
- 2/3 cup sugar: Provide pure sweetness to round out the filling, helping achieve proper caramelization for the brûlée top; blend completely to avoid grittiness. Help regulate texture by affecting the custard’s firmness and browning during baking.
- 3/4 cup full fat sour cream, at room temperature: Contribute tang, creaminess, and slight acidity to balance rich cream cheese and sweet elements; smooth the filling and add silkiness when at room temperature. Help adjust overall richness and create a lighter mouthfeel in the dense cheesecake.
- 1 tablespoon pumpkin pie spice: Season and concentrate warm spice flavors, reinforcing pumpkin pie characteristics and rounding the filling’s spice profile. Blend with cinnamon and brown sugar to deliver familiar autumnal notes throughout the dessert.
- 1 tablespoon vanilla: Add aromatic depth and floral-vanilla sweetness to enhance the overall flavor profile; use pure extract for clarity and balance. Help lift heavier dairy and pumpkin flavors, making the filling taste brighter and more complex.
- 1/2 teaspoon fine grain sea salt: Season lightly to balance sweetness and enrich other flavors while preventing blandness; use the fine grain for even distribution within the filling. Complement other spices and dairy ingredients to ensure a well-seasoned custard.
- 5 eggs, at room temperature: Bind and set the custard structure while adding richness and silkiness; use room–temperature eggs to create a smooth, stable filling. Coagulate during baking to transform the mixture into a creamy, sliceable cheesecake while contributing to the brûlée’s custardy base.
Step by Step Instructions for Pumpkin Creme Brulee Cheesecake
These directions will walk you through building a stable, creamy cheesecake with a crisp brûlée finish. I like to keep the tone practical and encouraging while explaining why each action matters so you know what sensations and visual cues to watch for.
- Preheat an oven to 350°F and set an oven rack to the middle position.: As the oven warms, you may notice the faint clean smell of heating metal and insulation, which signals the environment is becoming stable for even baking. Preheating ensures the crust begins to set the moment it enters the oven, preventing sogginess. A cold oven can cause uneven rising and longer bake times, so resist the urge to skip this step. Common mistake to avoid, placing the pan too close to the element, can lead to hot spots and uneven browning.
- To make the crust, place graham crackers, sugars, cinnamon and sea salt in a food processor, and blitz until finely ground. Drizzle butter over the crumbs, and pulse a few times until mixture resembles wet sand. Press the crumbs into a 9-inch (9.5-inch also works) springform pan in an even layer. Bake for 10 minutes until the crust is golden brown and fragrant. Transfer to a cooling rack, and let cool completely before filling.: When you process these dry ingredients, you will hear a rapid whir and smell a warm, toasty note from the crushed graham crackers and cinnamon , which indicates the crumbs are ready. The finely ground texture lets the melted butter bind the crumbs uniformly, creating a cohesive layer that bakes to a tender crunch. Avoid over processing into a paste. If the crumbs feel greasy after adding butter , you likely added too much.
- Reduce oven heat to 325°. Wrap the springform pan in 2 layers of foil, making sure the foil comes all the way up the sides of the pan. Spoon pumpkin puree into a paper towel-lined strainer set over a bowl. Let the puree dry/drain while you prepare the cheesecake batter (at least 5 minutes).: The sound will soften as the butter coats the crumbs and you will see clumps forming, a sign the mixture will press and hold. This wet sand texture is crucial so the crust compacts and bakes evenly. If the mixture looks too dry, add a touch more butter , but too much will make a greasy crust, which is a common error to watch for.
- Add cream cheese and sugars to a stand mixer fitted with the paddle attachment. Beat on medium until light and fluffy (4 to 5 minutes). Scrape down the sides, add pumpkin, sour cream, pumpkin pie spice, vanilla and salt, and beat just until combined. Beat in eggs one at a time, scraping down the sides as needed. Remove the bowl from the stand mixer and give the mixture one last stir with a spatula to make sure everything at the bottom is well incorporated.: Pressing produces a compact foundation; you may feel the resistance under your palm as the crumbs compact. Aim for uniform thickness, especially at the edges, to avoid a thin rim that burns or a thick center that stays soft. A firm press is better than a light one, but do not over compress which can produce a dense texture. Uneven pressing is a frequent misstep that causes uneven baking.
- Pour the cream cheese mixture into the prepared springform pan, smoothing out the top with an offset spatula. Place the springform pan in a roasting pan, then transfer to the oven. Carefully fill the roasting pan with water until it reaches halfway up the side of the springform pan. Make sure you don’t let any of the water splash into the cheesecake. Bake cheesecake until the sides are set and there’s just a slight wobble in the middle (90 – 100 minutes) or until the center of the cheesecake registers 150°F.: During baking you will detect a toasty aroma and see the edges deepen in color, signals the crust is properly toasted. This short bake removes rawness and helps the crust set, so the filling does not soak into it. Pull it out when the color is golden rather than waiting for deep brown, which can lead to bitterness. A common mistake is underbaking, leaving a soggy base.
- Turn off the oven, crack the door, and let the cheesecake cool inside the oven for 1 hour. Carefully remove the foil, and let cool for 2 hours on a cooling rack. Cover the cheesecake with plastic wrap and chill completely in the refrigerator (8 hours or overnight).: Cooling prevents the hot crust from steaming the filling and ensures the batter rests on a stable base. You will notice the crust firm up and stop giving off warm steam when it is ready. Filling a hot crust can ruin texture, causing the filling to separate or be too runny, so patience here pays off. A rushed pour is the usual culprit for a compromised filling.
- When ready to serve, wrap the springform pan with a warm towel and let sit for 1 minute. Slowly unclasp the springform pan, and use an offset spatula to help release any stuck bits. Cut cheesecake into 8 even slices and transfer to serving plate. Sprinkle the tops of the slices with 1 tablespoon sugar. Using a kitchen torch, cook the sugar until deeply golden and blackened in spots. Sprinkle the tops of the slices with remaining sugar and repeat the torching process. The crème brûlée topping will soften as it sits, so it’s best to serve immediately after torching.: Lowering the temperature creates a gentler environment for the cheesecake, encouraging slow, even set without cracking. You may hear the oven element cycle less frequently, which is normal. A slow bake is essential for a silky interior. High heat will cause the edges to overcook while the center remains underdone, a typical mistake to avoid.
- Wrap the springform pan in 2 layers of foil, making sure the foil comes all the way up the sides of the pan.: Sealing the pan prevents water from the water bath from seeping in, so you will feel the foil snug around the pan and might notice the light crinkle sound. This step is vital to protect the filling from becoming soggy. Poorly sealed foil can let water in, which ruins the cheesecake texture.
- Spoon pumpkin puree into a paper towel-lined strainer set over a bowl.: As the puree drains, you will see a small amount of liquid collect in the bowl and the surface of the puree appear less glossy, indicating excess moisture is leaving. Removing excess liquid prevents the batter from becoming too loose and ensures a dense, not watery, filling. Skipping this can make the cheesecake too soft, a common error for many bakers.
- Let the puree dry/drain while you prepare the cheesecake batter (at least 5 minutes).: During this short rest, the air will slightly thicken the puree, and the concentrated pumpkin flavor will stand out more. This brief pause improves texture and reduces baking time variability. Rushing this step may lead to a thinner batter and a gummy set.
- Add cream cheese and sugars to a stand mixer fitted with the paddle attachment.: When you begin beating, you will notice the cream cheese lighten in color and achieve a fluffier texture after several minutes, which is the visual cue that air has been incorporated. Proper creaming lifts the batter and contributes to a tender crumb. Use the paddle, not the whisk, to avoid whipping too much air. A common mistake is starting with cold cream cheese , which creates lumps.
- Beat on medium until light and fluffy (4 to 5 minutes).: As you beat, the sound will shift to a steadier hum and the bowl sides will look cleaner as the mixture becomes homogenous and glossy. Lightness here aids a smooth mouthfeel. Overbeating can introduce large air pockets that lead to cracks, so stop when the texture is noticeably lighter.
- Scrape down the sides, add pumpkin, sour cream, pumpkin pie spice, vanilla and salt, and beat just until combined.: Scraping ensures no dense pockets remain at the bowl edges, and when you add the pumpkin and sour cream you will see a uniform orange tint develop. Mixing just until combined preserves the structure and avoids over aeration, which can result in collapse. Overmixing here is a frequent source of texture problems.
- Beat in eggs one at a time, scraping down the sides as needed.: Adding eggs slowly creates a silkier emulsion; you will notice the batter smooth out progressively with each egg. This technique prevents curdling and helps the cheesecake set evenly. If eggs are added all at once, the batter can split, which is a common mistake to avoid.
- Remove the bowl from the stand mixer and give the mixture one last stir with a spatula to make sure everything at the bottom is well incorporated.: Running the spatula along the bottom will reveal any remaining dense pockets, and you will feel the batter become uniformly smooth. This final manual check prevents unpleasant surprises in the bake. Skipping this often leaves unincorporated streaks.
- Pour the cream cheese mixture into the prepared springform pan, smoothing out the top with an offset spatula.: As you spread, the surface should look glossy and even; small air bubbles may rise and pop. A flat top ensures even baking and an attractive slice. Avoid tapping the pan aggressively to remove bubbles, which can force air deeper and cause cracks.
- Place the springform pan in a roasting pan, then transfer to the oven.: Setting the pan in a roasting pan makes filling with water easy and prevents wobbling during transport. You may hear a light scrape as you lower it in. This setup creates a gentle, moist heat that protects the texture. Using no water bath risks dry edges and overcooking.
- Carefully fill the roasting pan with water until it reaches halfway up the side of the springform pan.: Adding the water will hiss slightly as it hits the hot pan, and the steam will create a humid oven that reduces cracking and promotes a custardy set. The water should be warm, not boiling, to avoid thermal shock. A frequent misstep is overfilling so water seeps into the foil seal.
- Bake cheesecake until the sides are set and there’s just a slight wobble in the middle (90 to 100 minutes) or until the center of the cheesecake registers 150°F.: During this long bake you will notice the edges turn matte and the center retains a gentle jiggle, indicating a perfect set. The thermometer is the most reliable cue, helping you avoid overbaking which creates a dry texture. A common mistake is opening the oven repeatedly to check, which can cause uneven baking.
- Turn off the oven, crack the door, and let the cheesecake cool inside the oven for 1 hour.: Allowing a gradual cool prevents sudden contraction which leads to cracks, and the air will feel gradually less warm as the cake stabilizes. This patient step preserves a smooth top and even texture. Rapid cooling is the main cause of split cheesecakes.
- Carefully remove the foil, and let cool for 2 hours on a cooling rack.: As it cools further, the cake firms and the surface sets; you can gently press the center to confirm. Cooling on a rack allows air to circulate so the bottom does not trap steam. Covering too early can trap moisture and soften the crust, a common oversight.
- Cover the cheesecake with plastic wrap and chill completely in the refrigerator (8 hours or overnight).: Chilling solidifies the structure and deepens flavor; the texture will transform from warm and soft to a sliceable, dense creaminess. Over chilling slightly is fine, but freezing will alter texture. Not chilling long enough leads to a runny slice.
- When ready to serve, wrap the springform pan with a warm towel and let sit for 1 minute.: The warm towel eases release by slightly loosening the ring; you will feel the metal give as you unclip. This quick warmth prevents the filling from sticking to the pan sides. Forcing the ring open without warmth can tear the crust or filling.
- Slowly unclasp the springform pan, and use an offset spatula to help release any stuck bits.: Gently running the spatula around will preserve the clean edge, and you may feel small resistance where the crust meets the pan. The offset spatula is perfect for lifting without marring the surface. Rushing this can create ragged slices.
- Cut cheesecake into 8 even slices and transfer to serving plate.: A clean knife warmed under hot water and wiped between cuts will give neat slices and a glossy cross section. The first slice sets the pace, so take it steady. Using a cold knife or sawing motion can tear the filling, which is a typical error.
- Sprinkle the tops of the slices with 1 tablespoon sugar.: Lightly dusting the measured sugar creates the foundation for the brûlée layer, and it will look dry and even across the surface before torching. An even layer ensures consistent caramelization. Too much sugar can burn quickly, so measure carefully.
- Using a kitchen torch, cook the sugar until deeply golden and blackened in spots.: The torch produces a sharp, caramelizing scent and you will see the sugar melt into glossy amber with occasional black flecks. Move the flame continuously to avoid charring one spot. If you lack control, the sugar can burn, so steady motion is key.
- Sprinkle the tops of the slices with remaining sugar and repeat the torching process.: A second layer deepens the color and texture, giving you that satisfying audible crack when you tap the surface. Work quickly to torch both layers so the interior does not warm. Leaving the brûlée to sit too long softens it, so serve promptly after finishing.
Ways to Customize
Here are practical ways I like to make the recipe my own, depending on occasion and available tools. Each tip starts with a bold phrase to highlight the idea, then explains how to implement it and why it works.
- Adjust the crust sweetness by increasing or decreasing the sugars when making the crumb base; a touch more light brown sugar deepens flavor for those who like a caramel edge, while reducing sugar lets the pumpkin shine.
- Control spice intensity by dialing the pumpkin pie spice up or down; if you prefer a milder profile, reduce the measured amount slightly, or add a pinch more for a warming result that pairs well with cool evenings.
- Make ahead for easier hosting by baking and chilling the cheesecake the day before; it will slice cleaner and the flavors will meld, giving you more time to focus on serving.
- Use a broiler if you lack a torch by placing slices under the broiler briefly; keep the oven door cracked and watch constantly to prevent burning while still developing a browned, crisp top.
- Ensure even baking by using a water bath and a middle oven rack; the gentle, humid heat minimizes cracking and creates the custardy interior that defines a great cheesecake.
- Serve slightly chilled for the best texture, letting the cake sit at refrigerator temperature until firm but not icy; this preserves the creamy mouthfeel and supports clean slicing when plated.
What to Serve With Pumpkin Creme Brulee Cheesecake
This section covers pairing ideas and service tips that help present the dessert beautifully. Think about balance and seasonality when choosing accompaniments, and plan storage if you prepare ahead.
- Light coffee or tea provides a warm, slightly bitter counterpoint to the rich cream cheese and caramelized sugar, making it a classic pairing for dessert after dinner or during a cozy afternoon gathering.
- Whipped cream dollop adds a soft, airy contrast to the dense cheesecake and crisp brûlée top; use a lightly sweetened whipped cream to avoid competing with the dessert’s sugars.
- Fresh fruit accents like crisp apple slices or pear wedges complement the autumn spices, offering a bright, juicy contrast that helps balance richness on the plate.
- Serve at holiday dinners where the seasonal character of pumpkin makes this cheesecake a showpiece for Thanksgiving or fall celebrations, presented on a platter for sharing.
- Storage tips recommend keeping the cheesecake covered and chilled for up to three days; for longer storage, freeze slices wrapped tightly and thaw in the refrigerator to preserve texture.
- Portioning for a crowd by cutting into eight even slices ensures guests get satisfying portions, and plating with a small garnish keeps the presentation refined for formal dinners.
FAQ
Conclusion
This Pumpkin Creme Brulee Cheesecake is special because it balances a silky, spiced pumpkin filling with a crisp, caramelized sugar top that creates a beautiful contrast in every bite. I encourage you to try it for a holiday or cozy get together, because the make ahead nature and dramatic finish let you enjoy the moment rather than rush the dessert. Whether you torch the sugar yourself or use the broiler, the combination of creamy texture and crunchy crown makes it worth the effort, and guests will remember the sound of that first satisfying crack.
Pumpkin Creme Brulee Cheesecake
Equipment
- Stand mixer
- Food Processor
- 9-inch Springform Pan
- Roasting Pan
- kitchen torch
- Offset Spatula
Ingredients
- 12 g graham crackers Crush finely and form into the base to provide a crisp, sweet foundation for the cheesecake; combine with melted butter to bind and press evenly into the pan. Add subtle whole-grain flavor that complements the spiced pumpkin and creamy filling, ensuring a stable crust once chilled and baked.
- 3 tablespoons sugar Sweeten and caramelize when sprinkled over the top or incorporated into the filling to enhance overall sweetness and contribute to the brûlée effect. Dissolve easily into wet mixtures to balance savory and spiced notes from other ingredients.
- 1 tablespoon packed light brown sugar Add deep molasses sweetness and moisture when packed into recipes, boosting caramel and toffee-like flavors in the filling or crust. Provide complexity to the sweetness profile that pairs well with pumpkin and warm spices.
- 1/2 teaspoon cinnamon Flavor warmly and aromatically to reinforce autumnal spice notes within the filling or crust; use sparingly to avoid overpowering. Blend seamlessly with pumpkin pie spice to create a cohesive spiced profile throughout the cheesecake.
- 1/4 teaspoon fine grain sea salt Season subtly to lift and balance sweetness and spices while preventing flat or one-dimensional flavors; sprinkle into both crust and filling as directed. Help accentuate dairy and pumpkin notes without drawing attention to itself.
- 6 tablespoons unsalted butter, melted Melt and bind dry crust ingredients together to set a firm, sliceable base; provide richness and a buttery mouthfeel. Help brown the crust slightly during baking for added depth and textural contrast with the creamy filling.
- 1 can (15 ounces) pumpkin (not pumpkin pie filling) Puree and supply the characteristic pumpkin flavor and moist body to the filling; choose not to use pumpkin pie filling to control sweetness and spice levels. Add natural moisture and color, working with spices and sugars to create a smooth custardy texture.
- 3 packages (24 ounces) cream cheese, at room temperature Soften and create the dense, creamy structure of the cheesecake filling while contributing tang and richness; beat thoroughly at room temperature to avoid lumps. Provide the primary structure that sets during baking and chilling, delivering smooth mouthfeel.
- 3/4 cup packed light brown sugar Sweeten and caramelize within the filling or on top when creating the brûlée layer, contributing molasses undertones that deepen flavor. Dissolve into the cream cheese for even sweetness and to balance pumpkin and spices.
- 2/3 cup sugar Provide pure sweetness to round out the filling, helping achieve proper caramelization for the brûlée top; blend completely to avoid grittiness. Help regulate texture by affecting the custard’s firmness and browning during baking.
- 3/4 cup full fat sour cream, at room temperature Contribute tang, creaminess, and slight acidity to balance rich cream cheese and sweet elements; smooth the filling and add silkiness when at room temperature. Help adjust overall richness and create a lighter mouthfeel in the dense cheesecake.
- 1 tablespoon pumpkin pie spice Season and concentrate warm spice flavors, reinforcing pumpkin pie characteristics and rounding the filling’s spice profile. Blend with cinnamon and brown sugar to deliver familiar autumnal notes throughout the dessert.
- 1 tablespoon vanilla Add aromatic depth and floral-vanilla sweetness to enhance the overall flavor profile; use pure extract for clarity and balance. Help lift heavier dairy and pumpkin flavors, making the filling taste brighter and more complex.
- 1/2 teaspoon fine grain sea salt Season lightly to balance sweetness and enrich other flavors while preventing blandness; use the fine grain for even distribution within the filling. Complement other spices and dairy ingredients to ensure a well-seasoned custard.
- 5 eggs, at room temperature Bind and set the custard structure while adding richness and silkiness; use room-temperature eggs to create a smooth, stable filling. Coagulate during baking to transform the mixture into a creamy, sliceable cheesecake while contributing to the brûlée’s custardy base.
Instructions
- Preheat an oven to 350°F and set an oven rack to the middle position.: As the oven warms, you may notice the faint clean smell of heating metal and insulation, which signals the environment is becoming stable for even baking. Preheating ensures the crust begins to set the moment it enters the oven, preventing sogginess. A cold oven can cause uneven rising and longer bake times, so resist the urge to skip this step. Common mistake to avoid, placing the pan too close to the element, can lead to hot spots and uneven browning.
- To make the crust, place graham crackers, sugars, cinnamon and sea salt in a food processor, and blitz until finely ground. Drizzle butter over the crumbs, and pulse a few times until mixture resembles wet sand. Press the crumbs into a 9-inch (9.5-inch also works) springform pan in an even layer. Bake for 10 minutes until the crust is golden brown and fragrant. Transfer to a cooling rack, and let cool completely before filling.: When you process these dry ingredients, you will hear a rapid whir and smell a warm, toasty note from the crushed graham crackers and cinnamon , which indicates the crumbs are ready. The finely ground texture lets the melted butter bind the crumbs uniformly, creating a cohesive layer that bakes to a tender crunch. Avoid over processing into a paste. If the crumbs feel greasy after adding butter , you likely added too much.
- Reduce oven heat to 325°. Wrap the springform pan in 2 layers of foil, making sure the foil comes all the way up the sides of the pan. Spoon pumpkin puree into a paper towel-lined strainer set over a bowl. Let the puree dry/drain while you prepare the cheesecake batter (at least 5 minutes).: The sound will soften as the butter coats the crumbs and you will see clumps forming, a sign the mixture will press and hold. This wet sand texture is crucial so the crust compacts and bakes evenly. If the mixture looks too dry, add a touch more butter , but too much will make a greasy crust, which is a common error to watch for.
- Add cream cheese and sugars to a stand mixer fitted with the paddle attachment. Beat on medium until light and fluffy (4 to 5 minutes). Scrape down the sides, add pumpkin, sour cream, pumpkin pie spice, vanilla and salt, and beat just until combined. Beat in eggs one at a time, scraping down the sides as needed. Remove the bowl from the stand mixer and give the mixture one last stir with a spatula to make sure everything at the bottom is well incorporated.: Pressing produces a compact foundation; you may feel the resistance under your palm as the crumbs compact. Aim for uniform thickness, especially at the edges, to avoid a thin rim that burns or a thick center that stays soft. A firm press is better than a light one, but do not over compress which can produce a dense texture. Uneven pressing is a frequent misstep that causes uneven baking.
- Pour the cream cheese mixture into the prepared springform pan, smoothing out the top with an offset spatula. Place the springform pan in a roasting pan, then transfer to the oven. Carefully fill the roasting pan with water until it reaches halfway up the side of the springform pan. Make sure you don’t let any of the water splash into the cheesecake. Bake cheesecake until the sides are set and there’s just a slight wobble in the middle (90 - 100 minutes) or until the center of the cheesecake registers 150°F.: During baking you will detect a toasty aroma and see the edges deepen in color, signals the crust is properly toasted. This short bake removes rawness and helps the crust set, so the filling does not soak into it. Pull it out when the color is golden rather than waiting for deep brown, which can lead to bitterness. A common mistake is underbaking, leaving a soggy base.
- Turn off the oven, crack the door, and let the cheesecake cool inside the oven for 1 hour. Carefully remove the foil, and let cool for 2 hours on a cooling rack. Cover the cheesecake with plastic wrap and chill completely in the refrigerator (8 hours or overnight).: Cooling prevents the hot crust from steaming the filling and ensures the batter rests on a stable base. You will notice the crust firm up and stop giving off warm steam when it is ready. Filling a hot crust can ruin texture, causing the filling to separate or be too runny, so patience here pays off. A rushed pour is the usual culprit for a compromised filling.
- When ready to serve, wrap the springform pan with a warm towel and let sit for 1 minute. Slowly unclasp the springform pan, and use an offset spatula to help release any stuck bits. Cut cheesecake into 8 even slices and transfer to serving plate. Sprinkle the tops of the slices with 1 tablespoon sugar. Using a kitchen torch, cook the sugar until deeply golden and blackened in spots. Sprinkle the tops of the slices with remaining sugar and repeat the torching process. The crème brûlée topping will soften as it sits, so it’s best to serve immediately after torching.: Lowering the temperature creates a gentler environment for the cheesecake, encouraging slow, even set without cracking. You may hear the oven element cycle less frequently, which is normal. A slow bake is essential for a silky interior. High heat will cause the edges to overcook while the center remains underdone, a typical mistake to avoid.
- Wrap the springform pan in 2 layers of foil, making sure the foil comes all the way up the sides of the pan.: Sealing the pan prevents water from the water bath from seeping in, so you will feel the foil snug around the pan and might notice the light crinkle sound. This step is vital to protect the filling from becoming soggy. Poorly sealed foil can let water in, which ruins the cheesecake texture.
- Spoon pumpkin puree into a paper towel-lined strainer set over a bowl.: As the puree drains, you will see a small amount of liquid collect in the bowl and the surface of the puree appear less glossy, indicating excess moisture is leaving. Removing excess liquid prevents the batter from becoming too loose and ensures a dense, not watery, filling. Skipping this can make the cheesecake too soft, a common error for many bakers.
- Let the puree dry/drain while you prepare the cheesecake batter (at least 5 minutes).: During this short rest, the air will slightly thicken the puree, and the concentrated pumpkin flavor will stand out more. This brief pause improves texture and reduces baking time variability. Rushing this step may lead to a thinner batter and a gummy set.
- Add cream cheese and sugars to a stand mixer fitted with the paddle attachment.: When you begin beating, you will notice the cream cheese lighten in color and achieve a fluffier texture after several minutes, which is the visual cue that air has been incorporated. Proper creaming lifts the batter and contributes to a tender crumb. Use the paddle, not the whisk, to avoid whipping too much air. A common mistake is starting with cold cream cheese , which creates lumps.
- Beat on medium until light and fluffy (4 to 5 minutes).: As you beat, the sound will shift to a steadier hum and the bowl sides will look cleaner as the mixture becomes homogenous and glossy. Lightness here aids a smooth mouthfeel. Overbeating can introduce large air pockets that lead to cracks, so stop when the texture is noticeably lighter.
- Scrape down the sides, add pumpkin, sour cream, pumpkin pie spice, vanilla and salt, and beat just until combined.: Scraping ensures no dense pockets remain at the bowl edges, and when you add the pumpkin and sour cream you will see a uniform orange tint develop. Mixing just until combined preserves the structure and avoids over aeration, which can result in collapse. Overmixing here is a frequent source of texture problems.
- Beat in eggs one at a time, scraping down the sides as needed.: Adding eggs slowly creates a silkier emulsion; you will notice the batter smooth out progressively with each egg. This technique prevents curdling and helps the cheesecake set evenly. If eggs are added all at once, the batter can split, which is a common mistake to avoid.
- Remove the bowl from the stand mixer and give the mixture one last stir with a spatula to make sure everything at the bottom is well incorporated.: Running the spatula along the bottom will reveal any remaining dense pockets, and you will feel the batter become uniformly smooth. This final manual check prevents unpleasant surprises in the bake. Skipping this often leaves unincorporated streaks.
- Pour the cream cheese mixture into the prepared springform pan, smoothing out the top with an offset spatula.: As you spread, the surface should look glossy and even; small air bubbles may rise and pop. A flat top ensures even baking and an attractive slice. Avoid tapping the pan aggressively to remove bubbles, which can force air deeper and cause cracks.
- Place the springform pan in a roasting pan, then transfer to the oven.: Setting the pan in a roasting pan makes filling with water easy and prevents wobbling during transport. You may hear a light scrape as you lower it in. This setup creates a gentle, moist heat that protects the texture. Using no water bath risks dry edges and overcooking.
- Carefully fill the roasting pan with water until it reaches halfway up the side of the springform pan.: Adding the water will hiss slightly as it hits the hot pan, and the steam will create a humid oven that reduces cracking and promotes a custardy set. The water should be warm, not boiling, to avoid thermal shock. A frequent misstep is overfilling so water seeps into the foil seal.
- Bake cheesecake until the sides are set and there’s just a slight wobble in the middle (90 to 100 minutes) or until the center of the cheesecake registers 150°F.: During this long bake you will notice the edges turn matte and the center retains a gentle jiggle, indicating a perfect set. The thermometer is the most reliable cue, helping you avoid overbaking which creates a dry texture. A common mistake is opening the oven repeatedly to check, which can cause uneven baking.
- Turn off the oven, crack the door, and let the cheesecake cool inside the oven for 1 hour.: Allowing a gradual cool prevents sudden contraction which leads to cracks, and the air will feel gradually less warm as the cake stabilizes. This patient step preserves a smooth top and even texture. Rapid cooling is the main cause of split cheesecakes.
- Carefully remove the foil, and let cool for 2 hours on a cooling rack.: As it cools further, the cake firms and the surface sets; you can gently press the center to confirm. Cooling on a rack allows air to circulate so the bottom does not trap steam. Covering too early can trap moisture and soften the crust, a common oversight.
- Cover the cheesecake with plastic wrap and chill completely in the refrigerator (8 hours or overnight).: Chilling solidifies the structure and deepens flavor; the texture will transform from warm and soft to a sliceable, dense creaminess. Over chilling slightly is fine, but freezing will alter texture. Not chilling long enough leads to a runny slice.
- When ready to serve, wrap the springform pan with a warm towel and let sit for 1 minute.: The warm towel eases release by slightly loosening the ring; you will feel the metal give as you unclip. This quick warmth prevents the filling from sticking to the pan sides. Forcing the ring open without warmth can tear the crust or filling.
- Slowly unclasp the springform pan, and use an offset spatula to help release any stuck bits.: Gently running the spatula around will preserve the clean edge, and you may feel small resistance where the crust meets the pan. The offset spatula is perfect for lifting without marring the surface. Rushing this can create ragged slices.
- Cut cheesecake into 8 even slices and transfer to serving plate.: A clean knife warmed under hot water and wiped between cuts will give neat slices and a glossy cross section. The first slice sets the pace, so take it steady. Using a cold knife or sawing motion can tear the filling, which is a typical error.
- Sprinkle the tops of the slices with 1 tablespoon sugar.: Lightly dusting the measured sugar creates the foundation for the brûlée layer, and it will look dry and even across the surface before torching. An even layer ensures consistent caramelization. Too much sugar can burn quickly, so measure carefully.
- Using a kitchen torch, cook the sugar until deeply golden and blackened in spots.: The torch produces a sharp, caramelizing scent and you will see the sugar melt into glossy amber with occasional black flecks. Move the flame continuously to avoid charring one spot. If you lack control, the sugar can burn, so steady motion is key.
- Sprinkle the tops of the slices with remaining sugar and repeat the torching process.: A second layer deepens the color and texture, giving you that satisfying audible crack when you tap the surface. Work quickly to torch both layers so the interior does not warm. Leaving the brûlée to sit too long softens it, so serve promptly after finishing.
Notes
- Adjust the crust sweetness by increasing or decreasing the sugars when making the crumb base; a touch more light brown sugar deepens flavor for those who like a caramel edge, while reducing sugar lets the pumpkin shine.
- Control spice intensity by dialing the pumpkin pie spice up or down; if you prefer a milder profile, reduce the measured amount slightly, or add a pinch more for a warming result that pairs well with cool evenings.
- Make ahead for easier hosting by baking and chilling the cheesecake the day before; it will slice cleaner and the flavors will meld, giving you more time to focus on serving.
- Use a broiler if you lack a torch by placing slices under the broiler briefly; keep the oven door cracked and watch constantly to prevent burning while still developing a browned, crisp top.
- Ensure even baking by using a water bath and a middle oven rack; the gentle, humid heat minimizes cracking and creates the custardy interior that defines a great cheesecake.
- Serve slightly chilled for the best texture, letting the cake sit at refrigerator temperature until firm but not icy; this preserves the creamy mouthfeel and supports clean slicing when plated.