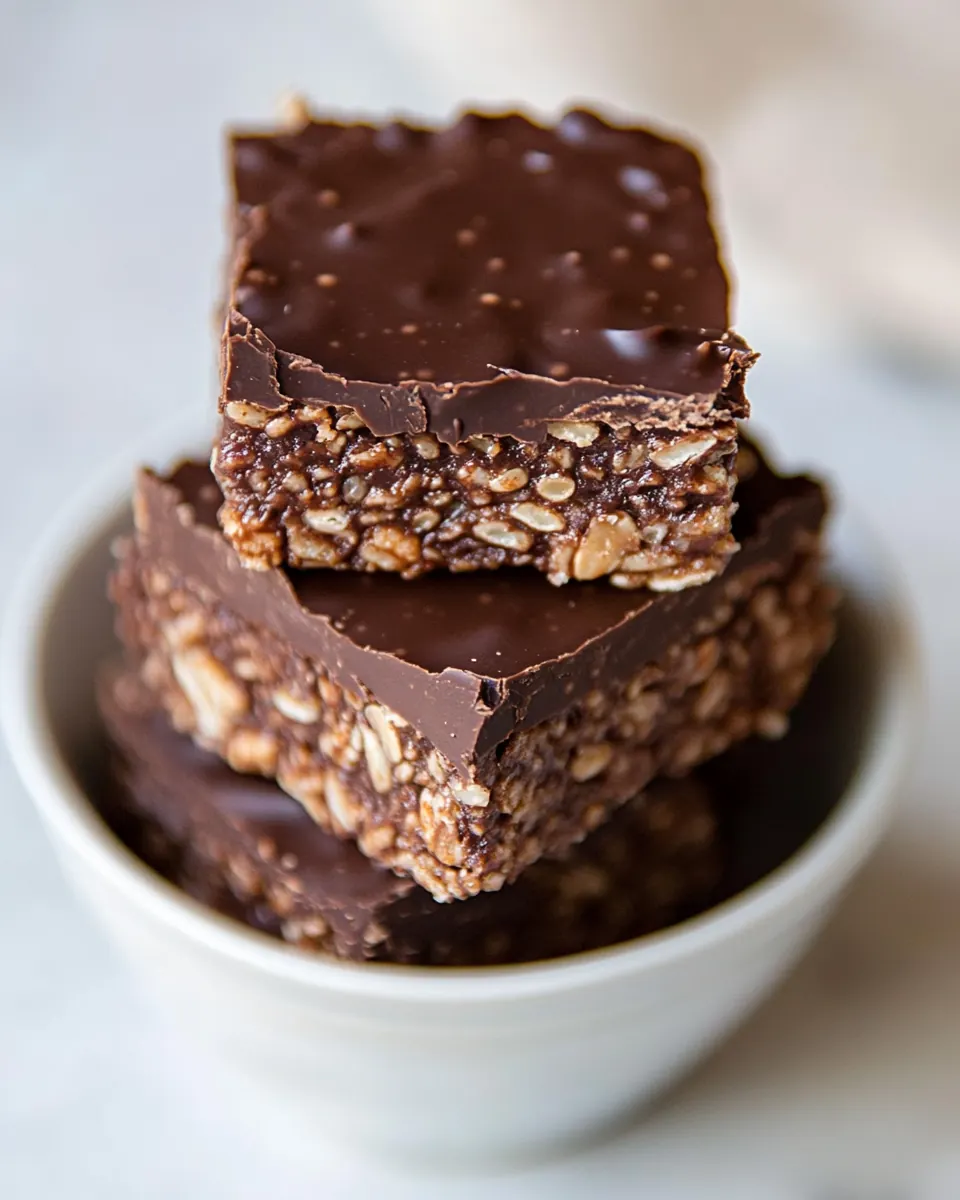
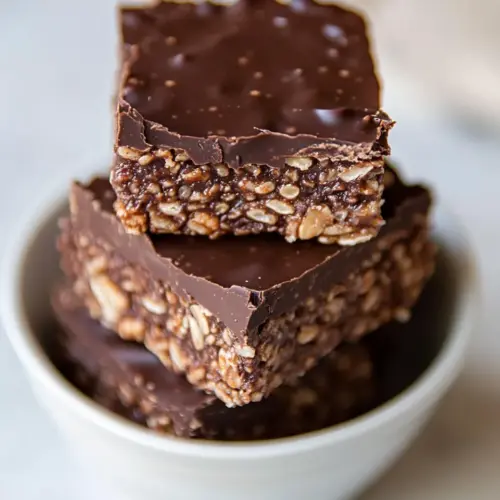
Chocolate Peanut Butter Rice Krispie Treats
Chocolate Peanut Butter Rice Krispie Treats have been my go to for potlucks and last minute sweet cravings because they hit that perfect sweet salty spot every time.
I still remember the first batch I made on a rainy afternoon when the power flickered and I decided dessert would be the one thing I could control. I warmed a sticky pot of peanut butter and pure maple syrup and the kitchen filled with a nutty, caramel aroma that made me smile. While the drizzle cooled, I crunched a spoonful of the crispy rice cereal and knew this would become a family favorite. The texture, the contrast between the fudgy layer and the crisp cereal, it all felt like comfort wrapped in a little square.
Over the years I learned a few small tricks that make these bars hold together better and taste more balanced, and I like to share those little moments when I write. I prefer a mix of creamy and slightly gritty peanut butter depending on mood, and there is something deeply satisfying about spreading warm, glossy semi sweet chocolate chips over the top, then letting everything chill to set. These treats travel well, they please kids and adults, and they store nicely so you can pull one out when you need a quick pick me up.
Recipe Snapshot
25 mins
10 mins
15 mins
Medium
200 kcal
American
Gluten-Free, Vegan
Desserts
Large pot, Large saucepan, 9 x 9 square pan, Mixing bowl, Spatula, Parchment paper, Sharp knife
The Appeal of This Chocolate Peanut Butter Rice Krispie Treats
Crunch and Cream in One Bite
I love how Chocolate Peanut Butter Rice Krispie Treats combine the airy crisp of crispy rice cereal with the creamy heft of peanut butter. Every bite gives a satisfying contrast, and the cocoa and chocolate layers add depth so you never feel like you are eating a one note snack.
Speed and Simplicity
One reason I keep these in my repertoire is how fast they come together. From the time I pull out a pot to the moment I pop the tray into the freezer, the process is remarkably short, which is perfect when I need a dessert in a pinch. The minimal ingredient list keeps things straightforward, and the technique is forgiving for busy cooks.
Customizable and Crowd Friendly
These bars adapt well to changes. I’ve tested swaps for the melted fat when I was out of butter, and the recipe still held up. Because they cut cleanly after chilling, they are ideal for packing into lunchboxes or bringing to gatherings without much fuss.
Texture Control
I enjoy how easy it is to tweak the chewiness. A touch more peanut butter makes them denser and more satisfying, while a slightly lighter hand yields a crispier bar. That level of control keeps me experimenting and sharing my favorite variations with friends.
Make Ahead Convenience
Finally, these bars are forgiving for planning. I often make them a day ahead, and the flavors meld and even improve after a short rest. That makes them a reliable option when I need dessert that can be prepared in advance without losing charm.
Shopping List for Chocolate Peanut Butter Rice Krispie Treats
The ingredient list here is honest and uncomplicated. Each item plays a clear role, from binding and sweetness to crunchy structure and glossy topping. I focus on quality where it matters most so the final bars have a balance of creamy, salty, and chocolatey notes.
- 1 1/2 cups unsweetened peanut butter: Provide creamy, binding fat and rich peanut flavor while helping the mixture hold its shape; balances sweetness and contributes a smooth, satisfying texture when melted and mixed with the cereal.
- 1/2 cup pure maple syrup: Sweeten naturally and add a touch of caramel-like depth; helps thin the peanut butter slightly so the mixture is easier to combine and sets with a pleasant chew.
- 1/2 cup butter or coconut oil melted: Melt to create a warm, fluid fat that loosens the peanut butter and maple syrup, helping ingredients fuse; contributes richness and can slightly firm the finished bars as they cool.
- 1 tsp pure vanilla extract (optional): Impart a warm, aromatic background note that enhances the nutty and chocolate flavors when included; optional but useful for rounding and elevating overall taste complexity.
- 1/3 cup cocoa powder: Add concentrated chocolate flavor and deepen the color while keeping the mixture relatively dry; cocoa powder intensifies the chocolate profile without adding sugar or fat.
- Pinch sea salt: Enhance and balance overall sweetness while heightening the flavors present; a pinch also supports complexity by bringing out both peanut and chocolate notes.
- 4 cups crispy rice cereal: Provide the crunchy, familiar cereal base and light texture that contrasts with the sticky peanut–chocolate mixture; carries the flavors and defines the treat's structure.
- 1 cup semi-sweet chocolate chips: Melt into a glossy coating to add extra chocolate richness and a smooth finish; helps deliver pockets of chocolate flavor and creates a pleasing contrast in texture.
- 1 cup semi-sweet chocolate chips: Serve as additional melting chocolate for coating, drizzling, or layering to increase chocolate intensity; contributes to a gooey, indulgent bite when warmed and spread.
- 3 tbsp coconut oil or butter: Act as a melting agent to thin chocolate chips for smoother drizzling or coating; adds a bit of shine and helps the chocolate set with a better texture and mouthfeel.
How to Prepare Chocolate Peanut Butter Rice Krispie Treats
These steps will guide you from warm pot to chilled bars. Read through once, then work steadily, paying attention to the visual and sensory cues I describe so you can tell when each stage is right.
- Add the peanut butter, pure maple syrup, butter, and vanilla extract to a large pot. Heat the large saucepan on the stove top over medium heat or low heat (depending on your burner), and stir well until everything is melted and completely combined. Once combined, remove the pot from the heat.: The moment you combine peanut butter with pure maple syrup and melted butter in a roomy pot, the mixture smells deeply nutty and slightly caramelized. As you gently warm it, expect the texture to loosen and shine, with small ribbons of syrup dissolving into the fat. This step matters because a uniform, glossy emulsion ensures the crispy rice cereal will coat evenly later. A common mistake is overheating, which can separate the oils, so keep the temperature moderate and stir continuously to maintain a smooth texture. If you notice small oil slicks, lower the heat and whisk briskly until it comes together.
- Stir in the cocoa powder and salt until combined.: As the pot warms, you will hear a faint sizzling and see the surface become glossy. The aroma will intensify, carrying toasted peanut notes and a gentle sweetness. Melting everything slowly is important because rapid, high heat can scorch the sugars or burn the peanut butter . Stirring keeps the mixture homogeneous and avoids hot pockets. A classic pitfall is leaving the pot unattended, which can produce burnt bits that ruin the flavor, so remain attentive and adjust the heat to maintain a gentle shimmer, not a boil.
- Add the crispy rice cereal and chocolate chips to the pot and gently fold everything together until all of the cereal is well-coated with the peanut butter chocolate mixture.: Pulling the pot off the burner at the right moment preserves the silky texture you worked to achieve. The residual warmth will continue to loosen the mixture without risking burnt flavors. You should see a cohesive, glossy blend that pours easily. Doing this step prevents overcooking, which could make the final bars too hard once chilled. If the mixture seems grainy, give it a final vigorous stir off heat to smooth it out before proceeding.
- Pour mixture to a parchment-lined 9” x 9” square pan and spread it into an even layer.: When you fold in the cocoa powder , the mixture deepens to a rich brown and a faint chocolate scent arrives, promising the fudgy base to come. The tiny crystals of cocoa will absorb some moisture, so stir until fully integrated and the texture feels even. The pinch of sea salt will elevate the flavors, balancing sweetness. A common error is adding cocoa too quickly and ending up with dry streaks, so sprinkle it gradually and whisk to avoid lumps.
- Microwave the chocolate chips and butter in a bowl for 20-second intervals, stirring well in between, until melted and creamy.: As you fold in the crispy rice cereal and semi sweet chocolate chips , you will notice the cereal absorb some of the coating, changing from loose flakes to unified clusters. Work gently to preserve the cereal's airiness while ensuring each piece gets a light coat. The chocolate chips will soften from the residual heat and create pockets of melty chocolate. Avoid overmixing, which can crush the cereal and make bars dense; instead use a folding motion until you see glossy coverage and no dry bits remain.
- Pour this mixture over the rice crispy treats and spread it evenly.: When you transfer the mixture to the lined pan, the surface should look cohesive and slightly shiny. Pat it evenly with a spatula or the back of a spoon to create a uniform thickness, which helps the bars set consistently. Pressing too hard compacts the cereal and yields a tougher texture, so aim for gentle, even pressure. Watch for any visible air gaps and smooth them out so the top will accept the melted chocolate glaze gracefully.
- Transfer the square baking dish of rice krispies to your freezer and freeze for at least 30 minutes, or until the chocolate has hardened and the rice krispies have set up.: As you heat the semi sweet chocolate chips with a bit more butter or coconut oil , you will see the chips soften then melt into a glossy, pourable chocolate. Stirring between short bursts prevents overheating and keeps the chocolate silky. The glossy sheen indicates it is ready; a dry, grainy appearance means it was overheated. If that happens, add a teaspoon of oil and stir until smooth.
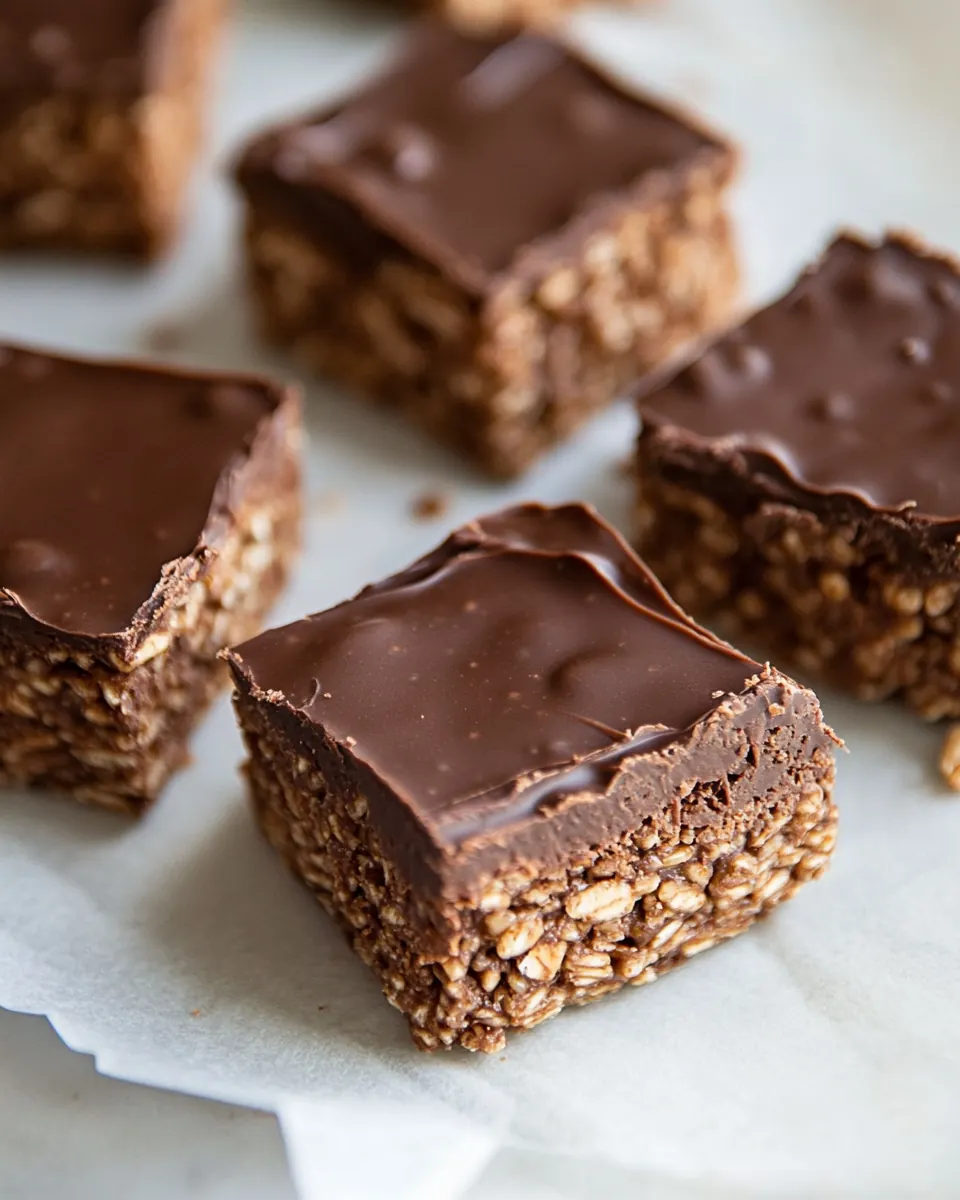
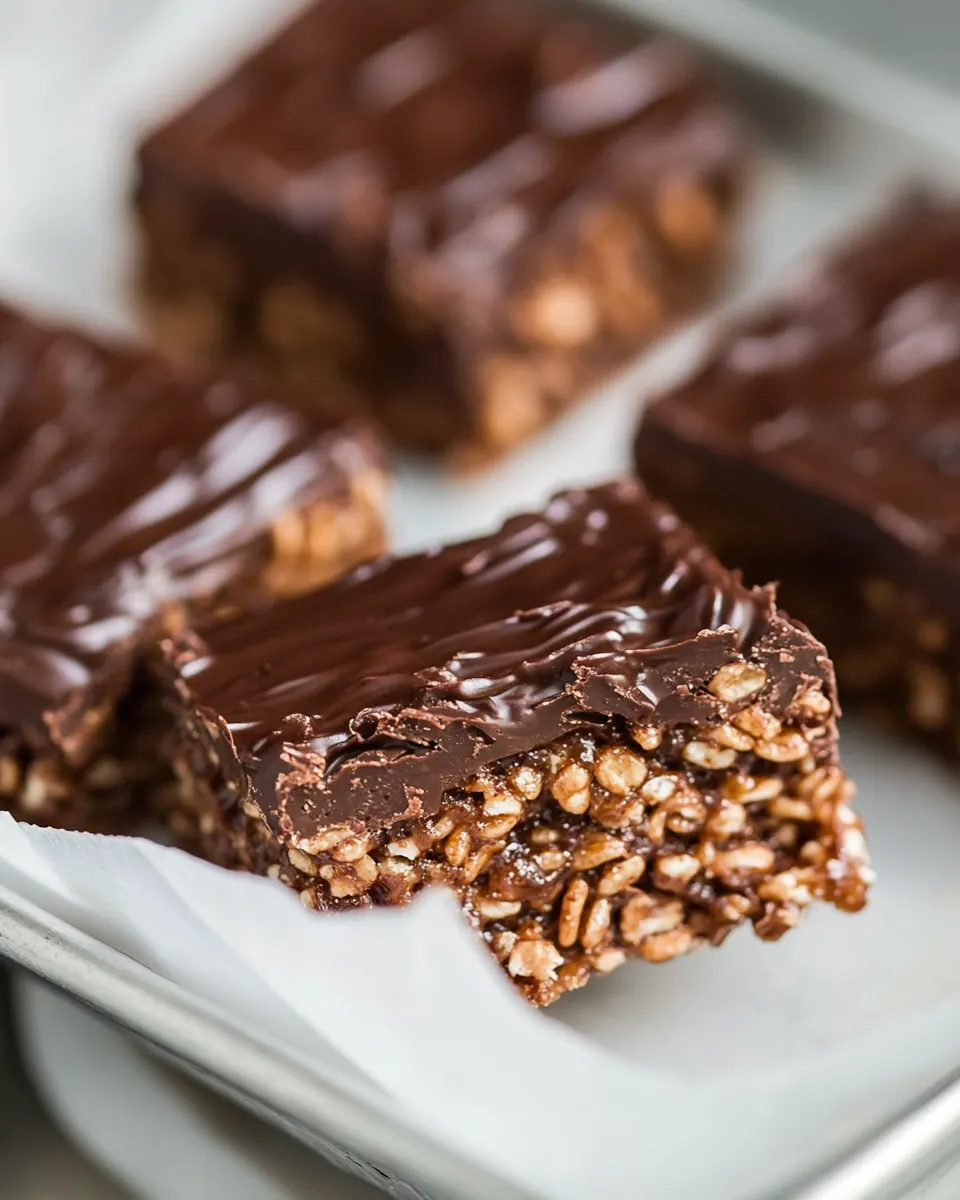
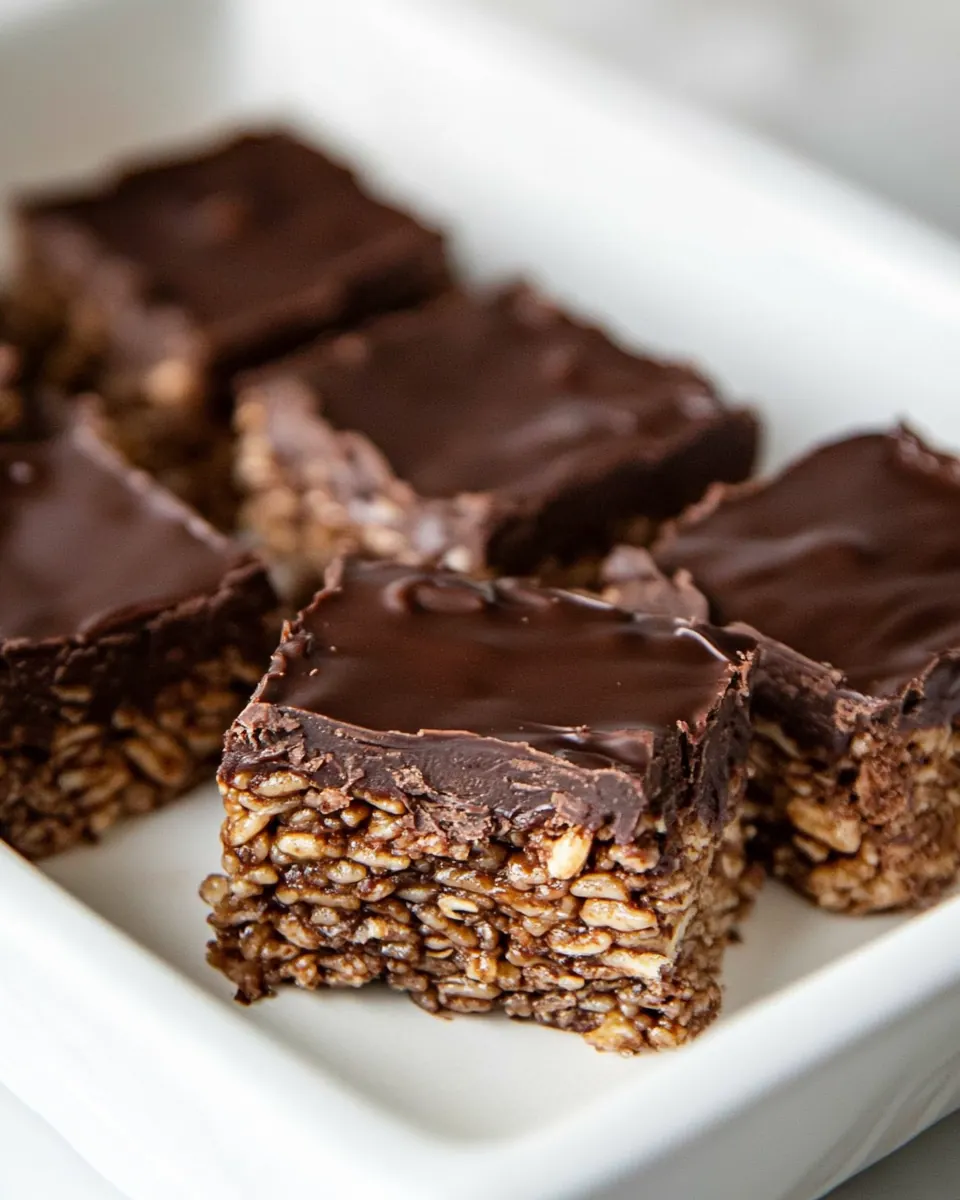
- Tug on the parchment paper to lift the bars out of the baking dish and move them to a cutting board. Use a sharp knife to carefully cut any size rice krispie treats you like.: Drizzling the warm chocolate over the set base, then spreading it, creates a smooth, shiny top that contrasts with the textured interior. The chocolate should flow easily and level out, creating a mirror finish if applied while still warm. If the chocolate firms too quickly, work in small sections and use a gentle hand so the top remains even. Avoid pressing into the base, which can disturb the cereal clusters beneath.
- Serve and enjoy!: Chilling in the freezer speeds up setting and gives you firmer bars that cut cleanly. You will notice the chocolate lose its glossy warmth and acquire a slight snap when tapped. Freezing helps the base knit together and stops any residual oil movement. A common mistake is leaving them in room temperature too long which can lead to squishy centers, so trust the chill time for best slicing results.
- Tug on the parchment paper to lift the bars out of the baking dish and move them to a cutting board: Lifting the set slab using the parchment is satisfying, and you will feel the firmness through the paper. Place it on a board and let it warm for a minute if the chocolate is very hard, which eases cutting. Use a sharp knife for clean edges, wiping it between cuts to prevent dragging crumbs. Cutting too soon or with a dull blade causes crumbling, so be patient and use steady pressure.
- Use a sharp knife to carefully cut any size rice krispie treats you like: When you slice, listen for a faint crisp snap from the chocolate top and a gentle crumble from the cereal interior. The contrast in textures is the reward for careful setting and cutting. If you want uniform pieces, measure lightly and use measured guides. Avoid sawing motions, which can tear; instead use a single confident press for each cut.
- Serve and enjoy: The first bite should reveal a creamy chocolate top, a peanut buttery middle, and a crisp cereal base, each layer contributing to a lively texture profile. Serve slightly chilled or at cool room temperature for best mouthfeel. A frequent oversight is storing them where they can soften, so keep them in a cool place until serving to maintain the intended contrast.
Making Adjustments
Small swaps can tailor these bars to what you have on hand. Below are practical tips that still honor the recipe integrity while enhancing texture and flavor.
- Swap fats carefully — If you choose coconut oil instead of butter, expect a slightly different mouthfeel and a hint of coconut aroma. Use the same measurement and melt gently to combine smoothly with the peanut butter.
- Adjust sweetness — If you prefer a less sweet bar, pick semi sweet chocolate with higher cocoa content or reduce the pure maple syrup by a tablespoon, testing texture as you go so binding remains strong.
- Use room temperature ingredients — Having your peanut butter and butter at room temp helps them emulsify faster when warming, producing a more cohesive mixture that coats the cereal evenly.
- Measure cereal by volume — Scoop the crispy rice cereal lightly into the measuring cup rather than packing it down to preserve the intended airy bite.
- Prevent sticking — Line the pan with parchment paper overhang for easy removal, and lightly press the mixture so it adheres to itself without compressing the cereal.
Best Served With
These bars are versatile for casual gatherings, packed lunches, and sweet trays. Below are serving suggestions, storage tips, and ideas for pairing depending on the occasion.
- Casual parties — Arrange Chocolate Peanut Butter Rice Krispie Treats on a platter for potlucks or coffee hours, they are easy to grab and do well at room temperature.
- Lunchbox friendly — Wrap individual squares in parchment or place them in small containers so they travel without sticking, a great treat for school or work.
- Make ahead hosting — Prepare these a day early and chill in an airtight container, they keep their texture and free up time the day of your event.
- Seasonal gifting — Stack squares in a box with parchment layers for thoughtful homemade gifts during holidays and gatherings.
- Storage — Store in an airtight container in the refrigerator for up to 10 days or freeze for up to three months, thaw in the fridge before serving to preserve texture.
FAQ
Conclusion
These Chocolate Peanut Butter Rice Krispie Treats shine because they balance creamy peanut butter, rich chocolate, and crisp cereal for a truly satisfying bite. I encourage you to try them when you need an easy, crowd pleasing sweet that holds up for parties and makes a great make ahead dessert. The recipe is forgiving, quick to pull together, and offers a mix of textures that keeps every bite interesting, so give it a go and see how it becomes a favorite in your home.
Chocolate Peanut Butter Rice Krispie Treats
Equipment
- Large Pot
- Large saucepan
- 9 x 9 square pan
- Mixing Bowl
- Spatula
- Parchment Paper
- Sharp Knife
Ingredients
- 1 1/2 cups unsweetened peanut butter Provide creamy, binding fat and rich peanut flavor while helping the mixture hold its shape; balances sweetness and contributes a smooth, satisfying texture when melted and mixed with the cereal.
- 1/2 cup pure maple syrup Sweeten naturally and add a touch of caramel-like depth; helps thin the peanut butter slightly so the mixture is easier to combine and sets with a pleasant chew.
- 1/2 cup butter or coconut oil melted Melt to create a warm, fluid fat that loosens the peanut butter and maple syrup, helping ingredients fuse; contributes richness and can slightly firm the finished bars as they cool.
- 1 tsp pure vanilla extract optional Impart a warm, aromatic background note that enhances the nutty and chocolate flavors when included; optional but useful for rounding and elevating overall taste complexity.
- 1/3 cup cocoa powder Add concentrated chocolate flavor and deepen the color while keeping the mixture relatively dry; cocoa powder intensifies the chocolate profile without adding sugar or fat.
- Pinch sea salt Enhance and balance overall sweetness while heightening the flavors present; a pinch also supports complexity by bringing out both peanut and chocolate notes.
- 4 cups crispy rice cereal Provide the crunchy, familiar cereal base and light texture that contrasts with the sticky peanut-chocolate mixture; carries the flavors and defines the treat's structure.
- 1 cup semi-sweet chocolate chips Melt into a glossy coating to add extra chocolate richness and a smooth finish; helps deliver pockets of chocolate flavor and creates a pleasing contrast in texture.
- 1 cup semi-sweet chocolate chips Serve as additional melting chocolate for coating, drizzling, or layering to increase chocolate intensity; contributes to a gooey, indulgent bite when warmed and spread.
- 3 tbsp coconut oil or butter Act as a melting agent to thin chocolate chips for smoother drizzling or coating; adds a bit of shine and helps the chocolate set with a better texture and mouthfeel.
Instructions
- Add the peanut butter, pure maple syrup, butter, and vanilla extract to a large pot. Heat the large saucepan on the stove top over medium heat or low heat (depending on your burner), and stir well until everything is melted and completely combined. Once combined, remove the pot from the heat.: The moment you combine peanut butter with pure maple syrup and melted butter in a roomy pot, the mixture smells deeply nutty and slightly caramelized. As you gently warm it, expect the texture to loosen and shine, with small ribbons of syrup dissolving into the fat. This step matters because a uniform, glossy emulsion ensures the crispy rice cereal will coat evenly later. A common mistake is overheating, which can separate the oils, so keep the temperature moderate and stir continuously to maintain a smooth texture. If you notice small oil slicks, lower the heat and whisk briskly until it comes together.
- Stir in the cocoa powder and salt until combined.: As the pot warms, you will hear a faint sizzling and see the surface become glossy. The aroma will intensify, carrying toasted peanut notes and a gentle sweetness. Melting everything slowly is important because rapid, high heat can scorch the sugars or burn the peanut butter . Stirring keeps the mixture homogeneous and avoids hot pockets. A classic pitfall is leaving the pot unattended, which can produce burnt bits that ruin the flavor, so remain attentive and adjust the heat to maintain a gentle shimmer, not a boil.
- Add the crispy rice cereal and chocolate chips to the pot and gently fold everything together until all of the cereal is well-coated with the peanut butter chocolate mixture.: Pulling the pot off the burner at the right moment preserves the silky texture you worked to achieve. The residual warmth will continue to loosen the mixture without risking burnt flavors. You should see a cohesive, glossy blend that pours easily. Doing this step prevents overcooking, which could make the final bars too hard once chilled. If the mixture seems grainy, give it a final vigorous stir off heat to smooth it out before proceeding.
- Pour mixture to a parchment-lined 9” x 9” square pan and spread it into an even layer.: When you fold in the cocoa powder , the mixture deepens to a rich brown and a faint chocolate scent arrives, promising the fudgy base to come. The tiny crystals of cocoa will absorb some moisture, so stir until fully integrated and the texture feels even. The pinch of sea salt will elevate the flavors, balancing sweetness. A common error is adding cocoa too quickly and ending up with dry streaks, so sprinkle it gradually and whisk to avoid lumps.
- Microwave the chocolate chips and butter in a bowl for 20-second intervals, stirring well in between, until melted and creamy.: As you fold in the crispy rice cereal and semi sweet chocolate chips , you will notice the cereal absorb some of the coating, changing from loose flakes to unified clusters. Work gently to preserve the cereal's airiness while ensuring each piece gets a light coat. The chocolate chips will soften from the residual heat and create pockets of melty chocolate. Avoid overmixing, which can crush the cereal and make bars dense; instead use a folding motion until you see glossy coverage and no dry bits remain.
- Pour this mixture over the rice crispy treats and spread it evenly.: When you transfer the mixture to the lined pan, the surface should look cohesive and slightly shiny. Pat it evenly with a spatula or the back of a spoon to create a uniform thickness, which helps the bars set consistently. Pressing too hard compacts the cereal and yields a tougher texture, so aim for gentle, even pressure. Watch for any visible air gaps and smooth them out so the top will accept the melted chocolate glaze gracefully.
- Transfer the square baking dish of rice krispies to your freezer and freeze for at least 30 minutes, or until the chocolate has hardened and the rice krispies have set up.: As you heat the semi sweet chocolate chips with a bit more butter or coconut oil , you will see the chips soften then melt into a glossy, pourable chocolate. Stirring between short bursts prevents overheating and keeps the chocolate silky. The glossy sheen indicates it is ready; a dry, grainy appearance means it was overheated. If that happens, add a teaspoon of oil and stir until smooth.
- Tug on the parchment paper to lift the bars out of the baking dish and move them to a cutting board. Use a sharp knife to carefully cut any size rice krispie treats you like.: Drizzling the warm chocolate over the set base, then spreading it, creates a smooth, shiny top that contrasts with the textured interior. The chocolate should flow easily and level out, creating a mirror finish if applied while still warm. If the chocolate firms too quickly, work in small sections and use a gentle hand so the top remains even. Avoid pressing into the base, which can disturb the cereal clusters beneath.
- Serve and enjoy!: Chilling in the freezer speeds up setting and gives you firmer bars that cut cleanly. You will notice the chocolate lose its glossy warmth and acquire a slight snap when tapped. Freezing helps the base knit together and stops any residual oil movement. A common mistake is leaving them in room temperature too long which can lead to squishy centers, so trust the chill time for best slicing results.
- Tug on the parchment paper to lift the bars out of the baking dish and move them to a cutting board: Lifting the set slab using the parchment is satisfying, and you will feel the firmness through the paper. Place it on a board and let it warm for a minute if the chocolate is very hard, which eases cutting. Use a sharp knife for clean edges, wiping it between cuts to prevent dragging crumbs. Cutting too soon or with a dull blade causes crumbling, so be patient and use steady pressure.
- Use a sharp knife to carefully cut any size rice krispie treats you like: When you slice, listen for a faint crisp snap from the chocolate top and a gentle crumble from the cereal interior. The contrast in textures is the reward for careful setting and cutting. If you want uniform pieces, measure lightly and use measured guides. Avoid sawing motions, which can tear; instead use a single confident press for each cut.
- Serve and enjoy: The first bite should reveal a creamy chocolate top, a peanut buttery middle, and a crisp cereal base, each layer contributing to a lively texture profile. Serve slightly chilled or at cool room temperature for best mouthfeel. A frequent oversight is storing them where they can soften, so keep them in a cool place until serving to maintain the intended contrast.
Notes
- Swap fats carefully — If you choose coconut oil instead of butter, expect a slightly different mouthfeel and a hint of coconut aroma. Use the same measurement and melt gently to combine smoothly with the peanut butter.
- Adjust sweetness — If you prefer a less sweet bar, pick semi sweet chocolate with higher cocoa content or reduce the pure maple syrup by a tablespoon, testing texture as you go so binding remains strong.
- Use room temperature ingredients — Having your peanut butter and butter at room temp helps them emulsify faster when warming, producing a more cohesive mixture that coats the cereal evenly.
- Measure cereal by volume — Scoop the crispy rice cereal lightly into the measuring cup rather than packing it down to preserve the intended airy bite.
- Prevent sticking — Line the pan with parchment paper overhang for easy removal, and lightly press the mixture so it adheres to itself without compressing the cereal.