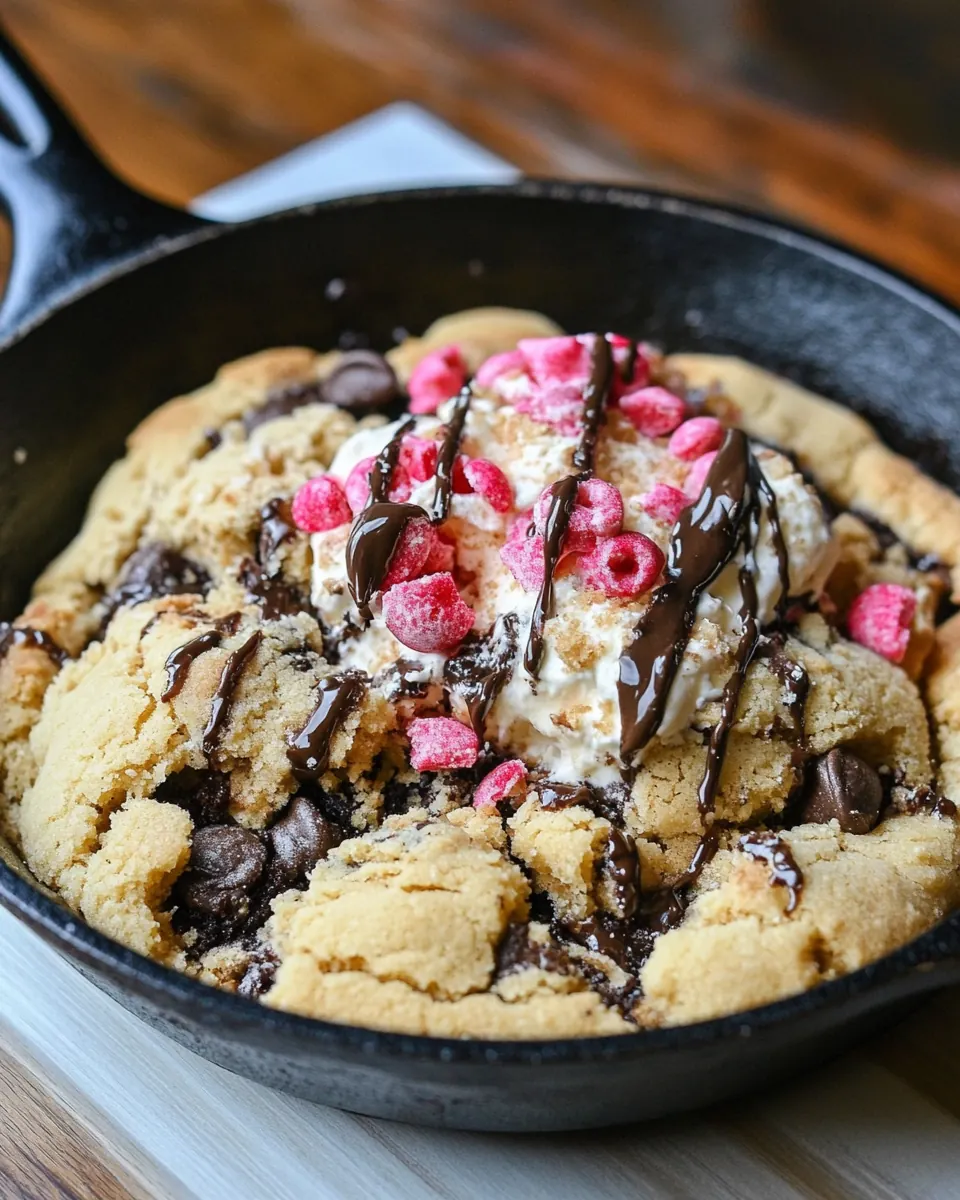
Peanut Butter Skillet Cookie Sundae
Peanut Butter Skillet Cookie Sundae is one of those comfort-forward desserts I turn to when I want to impress without fuss.
I remember the first time I pulled a warm skillet from the oven, its edges golden and the center still soft, and topped it with melting scoops of vanilla ice cream and ribbons of chocolate syrup. That moment when the cold and the warm meet, and the peanut butter aroma curls up and invites everyone to the table, is a reason I keep this recipe in heavy rotation. Over the years I’ve made it for game nights, late night cravings, and a handful of impromptu celebrations, and each time it feels effortless yet special.
What I love most is how forgiving the recipe is. You can press the dough into any 10 to 12 inch skillet, stash it in the oven while you set out toppings, and come back to a bubbling, fragrant centerpiece. Kids and grown ups both hover, spoons in hand, eager to add their favorite garnishes like toasted coconut or sprinkles. I often let guests choose their own sundae finishes because it makes the dessert interactive and fun.
There is a little theatricality to serving straight from the skillet, and that ritual transforms a simple cookie into a communal experience. Each spoonful pairs a slightly crisp edge with a gooey middle and a cool scoop of vanilla ice cream, punctuated by rich chocolate syrup and bursts of chewy toasted coconut or bright cherries. If you want a dessert that feels celebratory yet totally approachable, this is the one I reach for again and again.
Recipe Snapshot
45 mins
15 mins
30 mins
Medium
400 kcal
American
Gluten-Free, Low FODMAP
Desserts
12-inch oven-safe skillet, Mixing bowls, Whisk, Spatula
The Best Thing About This Peanut Butter Skillet Cookie Sundae
Big pan impact
I adore how a single skillet turns pantry staples into a showstopper. A warm Peanut Butter Skillet Cookie Sundae demands attention, and serving it straight from the pan makes the moment feel generous and unpretentious. You get a range of textures from one dish, which is wildly satisfying.
Speed and simplicity
From mixing to oven, the process is quick and manageable. I often mix the batter while catching up with friends, and the 25 to 30 minutes in the oven gives me time to arrange toppings. For busy weeknights or when I’m short on time I still want something celebratory, and this dish answers that call.
Customizable fun
The recipe is a playground for preferences. We can dial up the peanut butter for a nuttier profile or pile on toasted coconut for chew and aroma. Because each person can top their portion, it suits gatherings where everyone’s tastes differ.
Contrast of temperatures and textures
The warm, slightly underbaked center contrasts beautifully with cold vanilla ice cream and silky chocolate syrup. That contrast is why I keep coming back to this dessert, the moment the ice cream melts and mingles with the cookie is simply addictive.
Comfort with a touch of nostalgia
This dish evokes childhood sundaes and kitchen-baked cookies at the same time. When I serve Peanut Butter Skillet Cookie Sundae, people slow down and savor the shared experience, and that makes it a favorite for casual celebrations and cozy nights alike.
What You Need for Peanut Butter Skillet Cookie Sundae
These ingredients lean on classic pantry items that work together to create a cookie that is tender in the center and crisp at the edges. The key players are the flours and leavening for structure, the sugars for chew and browning, and the fats, including peanut butter and butter, for flavor and silkiness. The toppings transform the skillet cookie into a sundae, lending temperature contrast and playful textures.
- 2 cups all-purpose flour: Provide structure and bulk to the dough, enabling it to hold together while producing a tender crumb; sift or whisk to remove lumps and ensure even incorporation with wet ingredients. Reacts with leavening agents and fats to create the desired cookie texture when baked in a skillet.
- 1/2 teaspoon baking soda: Leaven lightly and promote rise in the cookie batter; dissolve evenly into dry ingredients so small air pockets form during baking. Balance with other leaveners and prevent overly dense results when used at the specified amount.
- 1/4 teaspoons salt: Enhance flavor and balance sweetness while slightly strengthening gluten networks; distribute evenly through dry ingredients to avoid salty pockets. Serve as a subtle seasoning that highlights the peanut and brown sugar notes in the skillet cookie.
- 8 tablespoons unsalted butter, melted: Add richness and moisture to the dough while contributing to a tender, slightly flaky texture once baked; melt to allow easier mixing with sugars and peanut butter. Help carry flavor and brown slightly in the skillet for a gently caramelized edge.
- 6 tablespoons peanut butter, melted: Contribute deep nutty flavor and additional fat for a moist, cohesive dough; melt to blend smoothly with butter and sugars for consistent texture. Impart authentic peanut butter aroma and help create a soft, chewy center in the skillet cookie.
- 1 cup loosely packed brown sugar: Provide deep molasses notes and moistness to the dough, helping to create chewiness and a complex sweet flavor; pack loosely to measure accurately. Work with granulated sugar to form caramelized edges and a tender interior.
- 1/2 cup granulated sugar: Supply sweetness and help with creaming into melted butter and peanut butter for a balanced sweetness profile; dissolve during mixing to produce even texture. Assist in browning and crisping the cookie edges in the skillet.
- 2 teaspoons vanilla extract: Impart aromatic depth and round out the sweetness while enhancing the overall flavor profile of the cookie; add with the wet ingredients for uniform distribution. Complement the peanut butter and brown sugar for a well-balanced dessert.
- 1 large egg + 1 large egg yolk, lightly beaten: Bind ingredients together and provide moisture and richness to the batter; beat lightly to incorporate without overworking the dough. Use both whole egg and yolk to add structure from the white and extra tenderness from the yolk.
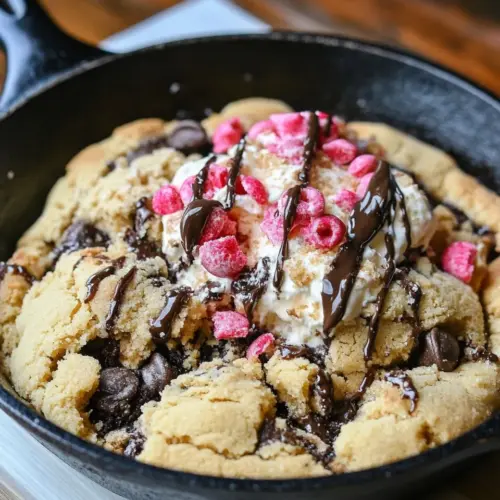
- vanilla ice cream: Offer a cool, creamy contrast to the warm skillet cookie when served as a sundae topping; choose a smooth vanilla to complement peanut and chocolate flavors. Melt slightly into the cookie for a luxurious texture contrast.
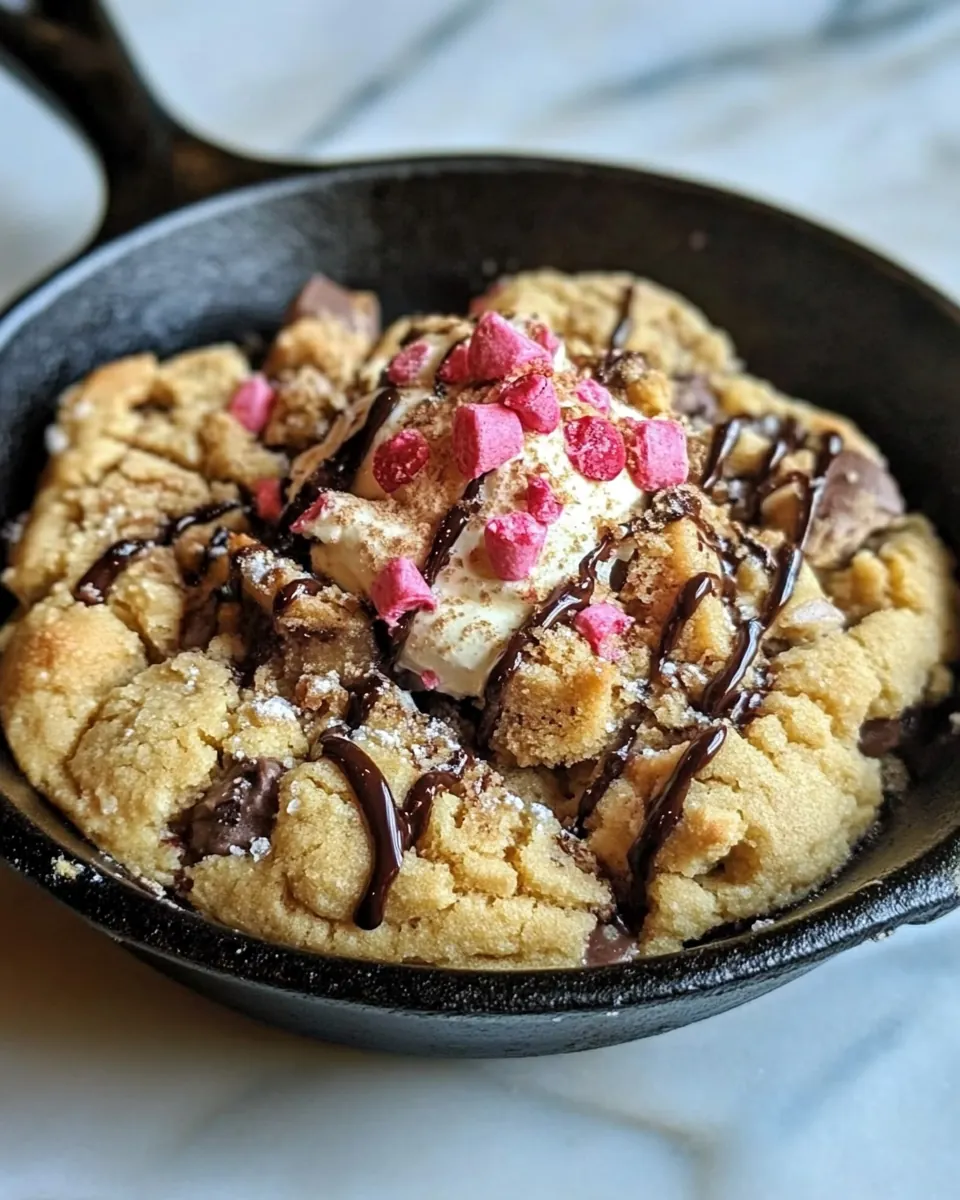
- chocolate syrup/hot fudge: Deliver a rich, chocolatey finish and sticky sweetness when drizzled over the warm skillet cookie and ice cream; warm before serving for easier pouring. Balance the peanut and vanilla flavors while adding visual appeal and decadence.
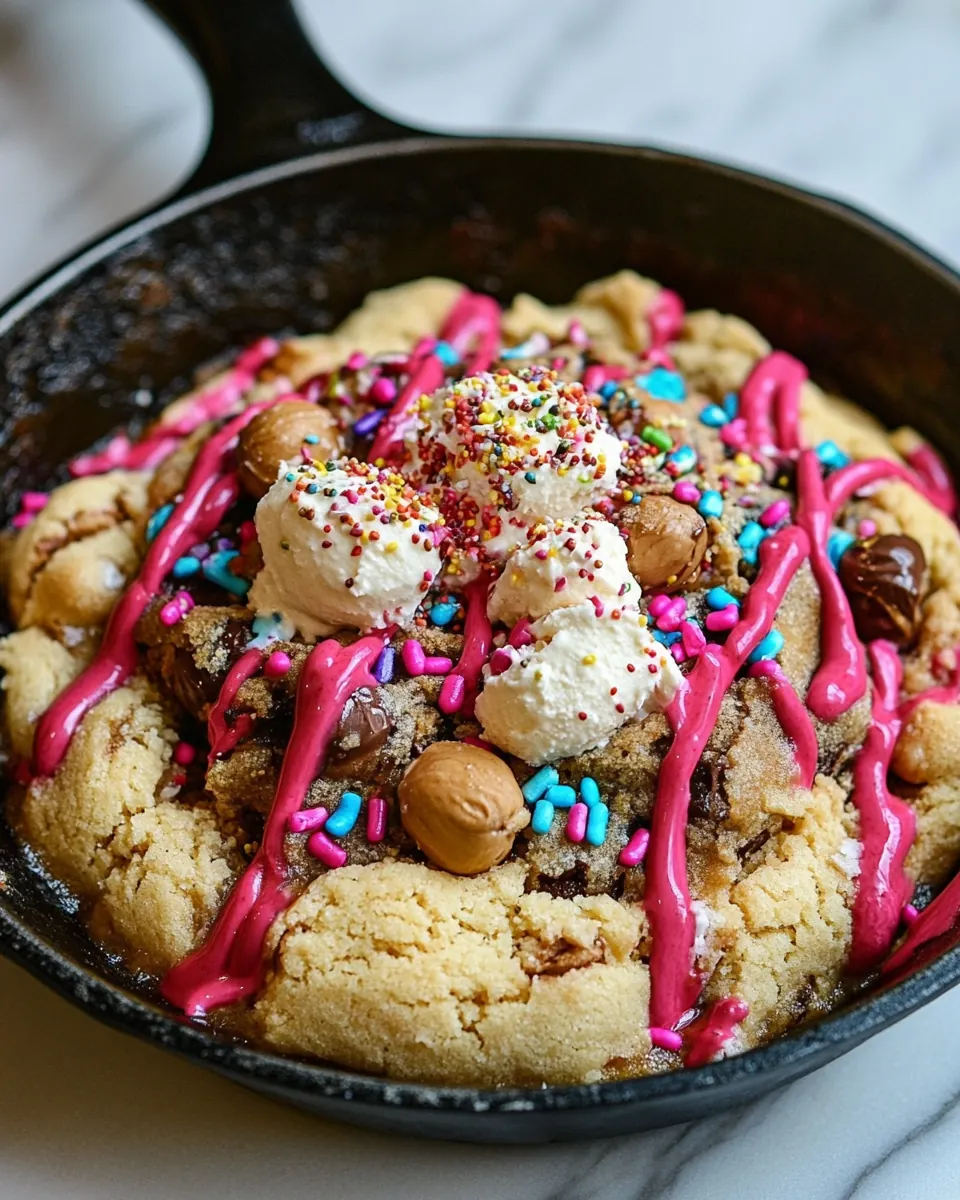
- toasted coconut: Add crunchy texture and a toasty, slightly sweet tropical flavor when sprinkled over the sundae; toast lightly to enhance aroma and crunch. Provide a pleasant contrast to the soft cookie and creamy ice cream.
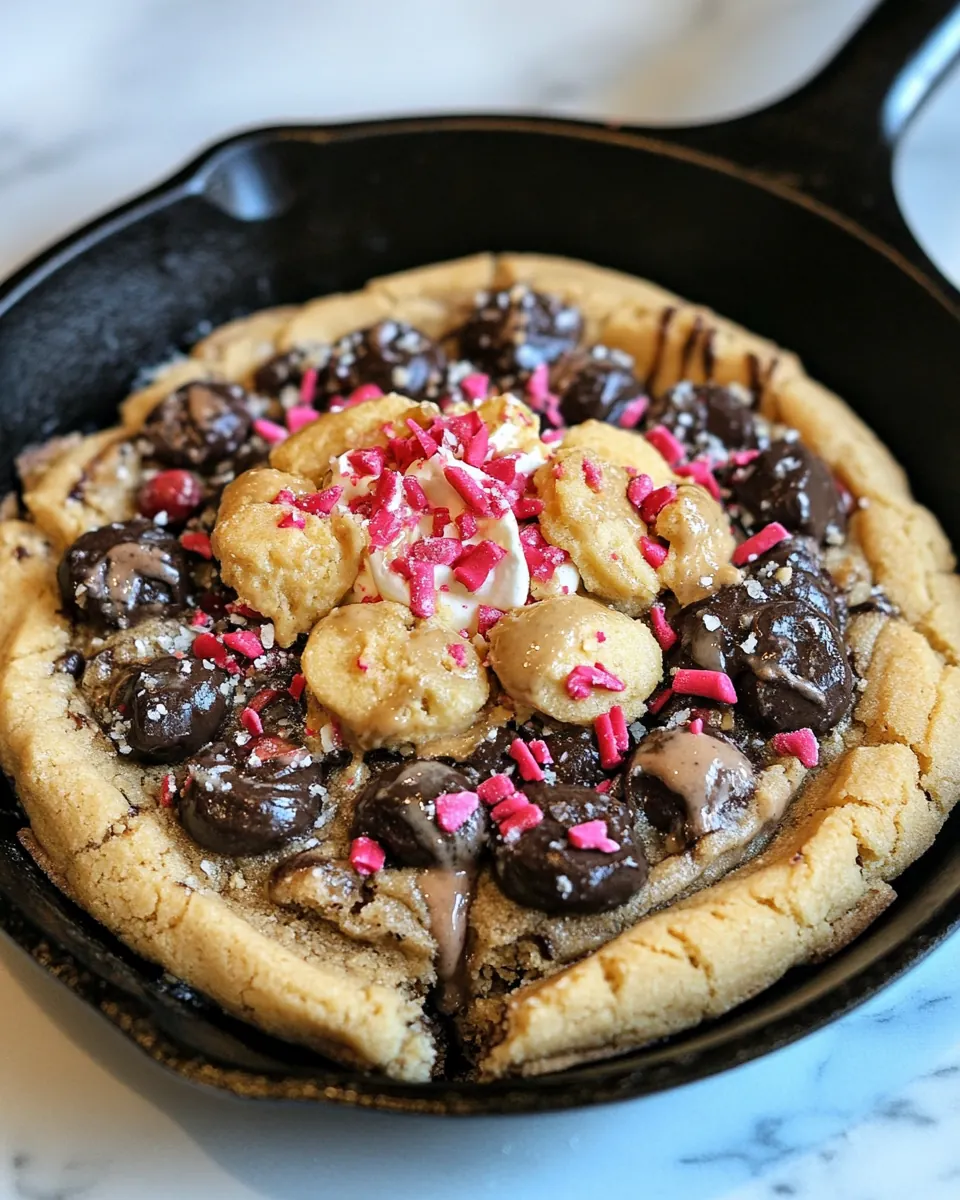
- sprinkles: Bring bright color and fun visual texture while adding a slight sugary crunch to each bite; sprinkle over the assembled sundae for festive presentation. Pair well with chocolate syrup and cherries for a classic sundae look.
- cherries: Provide a bright, slightly tart finish and classic sundae garnish that contrasts the rich peanut and chocolate flavors; place on top for an iconic presentation. Add a pop of color and a bit of acidity to cut through sweetness.
How to Assemble Peanut Butter Skillet Cookie Sundae
Assembling this dessert is straightforward and joyful. You will mix a forgiving dough, press it into a skillet, bake until the edges are set and the center yields slightly, then top with ice cream and your chosen finishes. Below are the detailed steps written from my kitchen to yours, with sensory cues and troubleshooting notes so you know what to expect at every turn.
- Preheat the oven to 350 degrees F. In a small bowl, stir together the flour, baking soda and salt. Set aside.: You will feel a small thrill as the kitchen begins to warm and the oven gauge approaches 350 degrees F , a temperature that encourages the edges to brown while the center stays soft and slightly gooey. The rising heat brings a dry, warm smell that readies the skillet for baking. Always allow the oven to fully reach temperature before placing the skillet inside because inserting it early can make the cookie underbaked and dense. A common mistake is relying on the oven light alone; use an oven thermometer if you suspect your oven runs cool or hot. When the oven is ready the center of the cookie will set but remain pliant after removing it, not wet or raw.
- In a large bowl, whisk together the butter, peanut butter and sugars until smooth. Stir in the vanilla extract. Add in the egg and mix until combined. Stir in the dry ingredients, even using your hands at the end if needed to form a dough.: The dry mixture should smell neutral, slightly floured, and feel fine and even when sifted or whisked. Whisking these ingredients together ensures the baking soda disperses, preventing pockets of uneven lift that could create odd bumps in the cookie. If your flour is clumpy, break it up with a fork or whisk; lumps can leave floury pockets in the baked cookie. Avoid overworking at this stage because aggressive mixing can develop too much gluten, yielding a tougher texture.
- Press the dough into a 12-inch oven-safe skillet. Bake the cookie for 25 to 30 minutes, or until it is set in the middle. If at any time the edges become too brown, tent the cookie with aluminum foil.: As you whisk melted butter , warm peanut butter , brown sugar , and granulated sugar , you will notice the mixture become glossy and uniform, with the sugars dissolving into the fats. The aroma should be deeply nutty and sweet, and the texture silky. This step is crucial because it determines the cookie base's tenderness and chew. If you use piping hot butter, you risk cooking the eggs later, so let the mix cool a little before adding them. A common error is not dissolving the brown sugar well, leaving grit in the dough, so give the whisking a patient minute until smooth.
- Serve the cookie hot with ice cream, hot fudge, toasted coconut, sprinkles and cherries!: Adding vanilla extract imparts a soft, floral warmth to the batter that complements the peanut butter . You'll notice an aromatic lift when you fold it in. Stirring gently is important so the aroma infuses evenly. If you skip this, the overall flavor can feel flat. Use a measuring spoon and add it directly to the bowl to ensure even distribution.
- Add in the egg and mix until combined: When you fold in the lightly beaten egg and the extra egg yolk , the batter will become thicker and more cohesive, glossy from the fats and slightly elastic. This step binds the ingredients and adds richness. Mix just enough to combine; overmixing will aerate the batter too much and change the final texture. If you see streaks of uncooked egg, continue mixing briefly, but avoid vigorous whipping. A typical downside is adding a warm egg to a very hot butter mixture, which can cook the egg, so ensure the butter blend is only warm.
- Stir in the dry ingredients: As you fold the flour mixture into the wet base, the dough will tighten and take on a cookie dough consistency, soft yet firm enough to shape. It should feel slightly tacky, not sticky, and the smell will deepen into a balanced blend of nutty and sweet notes. Use a spatula to fold gently until the last traces of flour disappear; sometimes I use my hands at the end to bring the dough together because the warmth of my palms helps it form evenly. A common mistake is overworking the dough here, which can produce a dense cookie, so stop once everything is incorporated and no flour streaks remain.
- Press the dough into a 12-inch oven-safe skillet: Pressing the dough distributes it into an even layer in the skillet, creating the contrast between crisp edges and a soft center. The tactile sensation is satisfying as the dough fills the pan, and you should aim for uniform thickness so it bakes evenly. If some areas are thicker, they will remain underbaked while thinner spots overbrown. Use slightly damp fingers or a piece of parchment to smooth the surface to avoid sticking. Avoid packing it too firmly, which can prevent the center from achieving the desired tenderness.
- Bake the cookie for 25 to 30 minutes, or until it is set in the middle: During baking you will see the edges rise and darken to a golden brown while the center still looks slightly soft and glossy. The kitchen will fill with a warm, nutty aroma and a caramelized scent from the sugars. I listen for a quiet settling sound as the center firms up; a gentle jiggle in the middle is perfect because it will continue to set after leaving the oven. If the edges brown too quickly, tent with aluminum foil to prevent burning. A typical trap is overbaking for a fully firm center which eliminates the gooey sundae experience, so remove the skillet when the center still yields slightly to touch.
- Tent the cookie with aluminum foil if the edges become too brown: Tent loosely and allow the center to finish baking without the rim overcooking. The foil reduces direct heat on the edges, preserving the contrast between chewy middle and crisp border. When I tent, the oven's internal steam softens the top a touch and helps the center set more gently. Beware of placing foil directly on the cookie which can mar the surface, always tent above it. Not tenting when needed can lead to burnt edges that taste bitter.
- Serve the cookie hot with ice cream, hot fudge, toasted coconut, sprinkles and cherries: The moment to serve is sensory heaven, as steam rises off the hot cookie and the cold vanilla ice cream begins to melt into pockets of warm dough, creating ribbons of creamy sauce. Drizzle warm chocolate syrup or hot fudge so it pools slightly into crevices, then sprinkle with toasted coconut , colorful sprinkles , and crown with cherries . Plate directly from the skillet for drama, and watch how the colors and textures play together. A common oversight is waiting too long to serve; the magic is in that immediate contrast, so bring it to the table while still warm for the best effect.
Pro Tips and Tweaks
This recipe rewards small adjustments and personal touches. Below are practical tips and tweaks I rely on to get consistent results and to adapt the dessert to the mood of the moment.
- Measure flour by spooning: Spoon and level your all-purpose flour into the cup to prevent packing, which keeps the cookie light rather than dense.
- Use room temperature eggs: Room temperature egg and yolk mix in more evenly, creating a silkier batter and preventing temperature shock to the fats.
- Gently melt peanut butter: Warm the peanut butter slowly so its oils reincorporate smoothly, avoiding gritty spots in the dough.
- Check oven variance: If your oven runs hot or cool, use an oven thermometer and adjust bake time to protect the edges and center balance.
- Toast coconut carefully: Toast toasted coconut in a dry skillet until golden, watching closely because it can color quickly from golden to burnt.
- Warm the syrup slightly: Heat chocolate syrup or hot fudge to a pourable warm temperature so it ribbons over the ice cream without completely melting it.
- Serve from the skillet: Presenting the dessert directly from a warm skillet creates drama and preserves warmth for sharing.
- Don’t overbake: Pull the cookie when the center still jiggles slightly, it will finish setting as it cools and retain a gooey interior.
- Stabilize toppings: Pat cherries dry before placing on top to avoid introducing extra moisture to the surface.
- Make ahead for ease: You can prepare the dough and refrigerate it, then press into the skillet and bake when ready to serve for fresh warmth.
What to Serve With Peanut Butter Skillet Cookie Sundae
This dessert is rich and indulgent, so pairings that add brightness or contrasting textures work beautifully. Below are ideas for occasions, sides, and storage so you can present the skillet with confidence.
- Casual dinner parties: Bring the skillet straight to the table after dinner, letting guests top their own portions with vanilla ice cream and chocolate syrup.
- Birthday celebrations: Serve with extra sprinkles and bright cherries for a playful, festive touch that doubles as a cake alternative for small gatherings.
- Family movie night: Portion warm into bowls and set a toppings bar with toasted coconut and sprinkles so everyone can customize their sundae.
- Storage tips: Leftover cookie can be wrapped tightly and stored at room temperature up to 2 days, though it loses some crispness. Reheat briefly in a warm oven to restore edge crisp before adding vanilla ice cream.
- Seasonal pairings: In warmer months serve slightly chilled toppings and fresh berries alongside the skillet to add brightness. In cooler months offer warmed hot fudge and extra toasted coconut for cozy comfort.
- Occasions: Perfect for game nights, impromptu guests, and nights when you want dessert that feels celebratory but comes together quickly.
FAQ
Conclusion
This Peanut Butter Skillet Cookie Sundae stands out because it marries warm, nutty cookie textures with cold, creamy ice cream for an irresistible contrast. It is a straightforward, crowd pleasing dessert that feels special without demanding advanced technique. Give it a try the next time you want a dessert that delivers both comfort and a bit of showmanship. Serve it straight from the skillet and watch how quickly everyone gathers for a shareable, memorable treat.
Peanut Butter Skillet Cookie Sundae
Equipment
- 12-inch oven-safe skillet
- Mixing Bowls
- Whisk
- Spatula
Ingredients
- 2 cups all-purpose flour Provide structure and bulk to the dough, enabling it to hold together while producing a tender crumb; sift or whisk to remove lumps and ensure even incorporation with wet ingredients. Reacts with leavening agents and fats to create the desired cookie texture when baked in a skillet.
- 1/2 teaspoon baking soda Leaven lightly and promote rise in the cookie batter; dissolve evenly into dry ingredients so small air pockets form during baking. Balance with other leaveners and prevent overly dense results when used at the specified amount.
- 1/4 teaspoons salt Enhance flavor and balance sweetness while slightly strengthening gluten networks; distribute evenly through dry ingredients to avoid salty pockets. Serve as a subtle seasoning that highlights the peanut and brown sugar notes in the skillet cookie.
- 8 tablespoons unsalted butter, melted Add richness and moisture to the dough while contributing to a tender, slightly flaky texture once baked; melt to allow easier mixing with sugars and peanut butter. Help carry flavor and brown slightly in the skillet for a gently caramelized edge.
- 6 tablespoons peanut butter, melted Contribute deep nutty flavor and additional fat for a moist, cohesive dough; melt to blend smoothly with butter and sugars for consistent texture. Impart authentic peanut butter aroma and help create a soft, chewy center in the skillet cookie.
- 1 cup loosely packed brown sugar Provide deep molasses notes and moistness to the dough, helping to create chewiness and a complex sweet flavor; pack loosely to measure accurately. Work with granulated sugar to form caramelized edges and a tender interior.
- 1/2 cup granulated sugar Supply sweetness and help with creaming into melted butter and peanut butter for a balanced sweetness profile; dissolve during mixing to produce even texture. Assist in browning and crisping the cookie edges in the skillet.
- 2 teaspoons vanilla extract Impart aromatic depth and round out the sweetness while enhancing the overall flavor profile of the cookie; add with the wet ingredients for uniform distribution. Complement the peanut butter and brown sugar for a well-balanced dessert.
- 1 large egg + 1 large egg yolk, lightly beaten Bind ingredients together and provide moisture and richness to the batter; beat lightly to incorporate without overworking the dough. Use both whole egg and yolk to add structure from the white and extra tenderness from the yolk.
- vanilla ice cream Offer a cool, creamy contrast to the warm skillet cookie when served as a sundae topping; choose a smooth vanilla to complement peanut and chocolate flavors. Melt slightly into the cookie for a luxurious texture contrast.
- chocolate syrup/hot fudge Deliver a rich, chocolatey finish and sticky sweetness when drizzled over the warm skillet cookie and ice cream; warm before serving for easier pouring. Balance the peanut and vanilla flavors while adding visual appeal and decadence.
- toasted coconut Add crunchy texture and a toasty, slightly sweet tropical flavor when sprinkled over the sundae; toast lightly to enhance aroma and crunch. Provide a pleasant contrast to the soft cookie and creamy ice cream.
- sprinkles Bring bright color and fun visual texture while adding a slight sugary crunch to each bite; sprinkle over the assembled sundae for festive presentation. Pair well with chocolate syrup and cherries for a classic sundae look.
- cherries Provide a bright, slightly tart finish and classic sundae garnish that contrasts the rich peanut and chocolate flavors; place on top for an iconic presentation. Add a pop of color and a bit of acidity to cut through sweetness.
Instructions
- Preheat the oven to 350 degrees F. In a small bowl, stir together the flour, baking soda and salt. Set aside.: You will feel a small thrill as the kitchen begins to warm and the oven gauge approaches 350 degrees F , a temperature that encourages the edges to brown while the center stays soft and slightly gooey. The rising heat brings a dry, warm smell that readies the skillet for baking. Always allow the oven to fully reach temperature before placing the skillet inside because inserting it early can make the cookie underbaked and dense. A common mistake is relying on the oven light alone; use an oven thermometer if you suspect your oven runs cool or hot. When the oven is ready the center of the cookie will set but remain pliant after removing it, not wet or raw.
- In a large bowl, whisk together the butter, peanut butter and sugars until smooth. Stir in the vanilla extract. Add in the egg and mix until combined. Stir in the dry ingredients, even using your hands at the end if needed to form a dough.: The dry mixture should smell neutral, slightly floured, and feel fine and even when sifted or whisked. Whisking these ingredients together ensures the baking soda disperses, preventing pockets of uneven lift that could create odd bumps in the cookie. If your flour is clumpy, break it up with a fork or whisk; lumps can leave floury pockets in the baked cookie. Avoid overworking at this stage because aggressive mixing can develop too much gluten, yielding a tougher texture.
- Press the dough into a 12-inch oven-safe skillet. Bake the cookie for 25 to 30 minutes, or until it is set in the middle. If at any time the edges become too brown, tent the cookie with aluminum foil.: As you whisk melted butter , warm peanut butter , brown sugar , and granulated sugar , you will notice the mixture become glossy and uniform, with the sugars dissolving into the fats. The aroma should be deeply nutty and sweet, and the texture silky. This step is crucial because it determines the cookie base's tenderness and chew. If you use piping hot butter, you risk cooking the eggs later, so let the mix cool a little before adding them. A common error is not dissolving the brown sugar well, leaving grit in the dough, so give the whisking a patient minute until smooth.
- Serve the cookie hot with ice cream, hot fudge, toasted coconut, sprinkles and cherries!: Adding vanilla extract imparts a soft, floral warmth to the batter that complements the peanut butter . You'll notice an aromatic lift when you fold it in. Stirring gently is important so the aroma infuses evenly. If you skip this, the overall flavor can feel flat. Use a measuring spoon and add it directly to the bowl to ensure even distribution.
- Add in the egg and mix until combined: When you fold in the lightly beaten egg and the extra egg yolk , the batter will become thicker and more cohesive, glossy from the fats and slightly elastic. This step binds the ingredients and adds richness. Mix just enough to combine; overmixing will aerate the batter too much and change the final texture. If you see streaks of uncooked egg, continue mixing briefly, but avoid vigorous whipping. A typical downside is adding a warm egg to a very hot butter mixture, which can cook the egg, so ensure the butter blend is only warm.
- Stir in the dry ingredients: As you fold the flour mixture into the wet base, the dough will tighten and take on a cookie dough consistency, soft yet firm enough to shape. It should feel slightly tacky, not sticky, and the smell will deepen into a balanced blend of nutty and sweet notes. Use a spatula to fold gently until the last traces of flour disappear; sometimes I use my hands at the end to bring the dough together because the warmth of my palms helps it form evenly. A common mistake is overworking the dough here, which can produce a dense cookie, so stop once everything is incorporated and no flour streaks remain.
- Press the dough into a 12-inch oven-safe skillet: Pressing the dough distributes it into an even layer in the skillet, creating the contrast between crisp edges and a soft center. The tactile sensation is satisfying as the dough fills the pan, and you should aim for uniform thickness so it bakes evenly. If some areas are thicker, they will remain underbaked while thinner spots overbrown. Use slightly damp fingers or a piece of parchment to smooth the surface to avoid sticking. Avoid packing it too firmly, which can prevent the center from achieving the desired tenderness.
- Bake the cookie for 25 to 30 minutes, or until it is set in the middle: During baking you will see the edges rise and darken to a golden brown while the center still looks slightly soft and glossy. The kitchen will fill with a warm, nutty aroma and a caramelized scent from the sugars. I listen for a quiet settling sound as the center firms up; a gentle jiggle in the middle is perfect because it will continue to set after leaving the oven. If the edges brown too quickly, tent with aluminum foil to prevent burning. A typical trap is overbaking for a fully firm center which eliminates the gooey sundae experience, so remove the skillet when the center still yields slightly to touch.
- Tent the cookie with aluminum foil if the edges become too brown: Tent loosely and allow the center to finish baking without the rim overcooking. The foil reduces direct heat on the edges, preserving the contrast between chewy middle and crisp border. When I tent, the oven's internal steam softens the top a touch and helps the center set more gently. Beware of placing foil directly on the cookie which can mar the surface, always tent above it. Not tenting when needed can lead to burnt edges that taste bitter.
- Serve the cookie hot with ice cream, hot fudge, toasted coconut, sprinkles and cherries: The moment to serve is sensory heaven, as steam rises off the hot cookie and the cold vanilla ice cream begins to melt into pockets of warm dough, creating ribbons of creamy sauce. Drizzle warm chocolate syrup or hot fudge so it pools slightly into crevices, then sprinkle with toasted coconut , colorful sprinkles , and crown with cherries . Plate directly from the skillet for drama, and watch how the colors and textures play together. A common oversight is waiting too long to serve; the magic is in that immediate contrast, so bring it to the table while still warm for the best effect.
Notes
- Measure flour by spooning: Spoon and level your all-purpose flour into the cup to prevent packing, which keeps the cookie light rather than dense.
- Use room temperature eggs: Room temperature egg and yolk mix in more evenly, creating a silkier batter and preventing temperature shock to the fats.
- Gently melt peanut butter: Warm the peanut butter slowly so its oils reincorporate smoothly, avoiding gritty spots in the dough.
- Check oven variance: If your oven runs hot or cool, use an oven thermometer and adjust bake time to protect the edges and center balance.
- Toast coconut carefully: Toast toasted coconut in a dry skillet until golden, watching closely because it can color quickly from golden to burnt.
- Warm the syrup slightly: Heat chocolate syrup or hot fudge to a pourable warm temperature so it ribbons over the ice cream without completely melting it.
- Serve from the skillet: Presenting the dessert directly from a warm skillet creates drama and preserves warmth for sharing.
- Don’t overbake: Pull the cookie when the center still jiggles slightly, it will finish setting as it cools and retain a gooey interior.
- Stabilize toppings: Pat cherries dry before placing on top to avoid introducing extra moisture to the surface.
- Make ahead for ease: You can prepare the dough and refrigerate it, then press into the skillet and bake when ready to serve for fresh warmth.