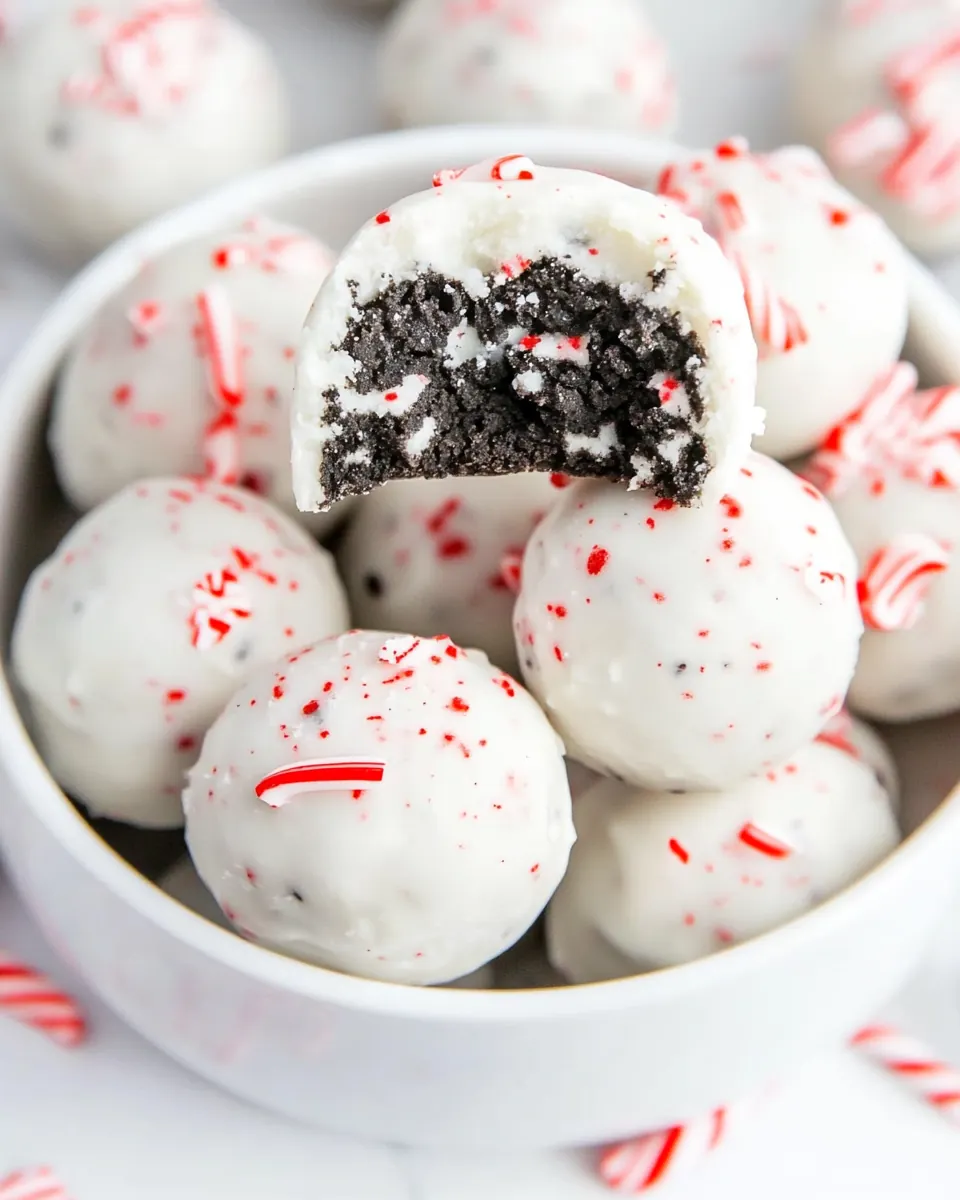
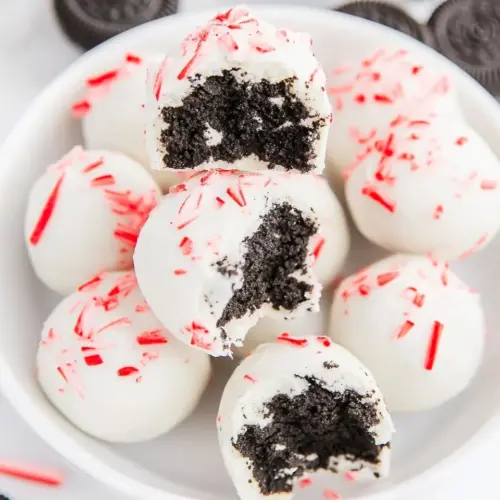
Peppermint Oreo Cookie Balls
Peppermint Oreo Cookie Balls are one of those treats I reach for every December, and they bring back a flood of kitchen memories. The first time I made them was on a snowy afternoon, sleeves rolled up, with a playlist of holiday songs and a mug of tea on the counter. I remember the quiet satisfaction of crushing those Oreo cookies into fine crumbs and the way the softened cream cheese transformed the crumbs into a glossy, pliable dough. They felt like edible ornaments, small and perfect to share with neighbors.
Over the years I have tweaked small things, like the scoop size and how I chill the truffles, because technique matters when you want a silky interior and a crisp white chocolate shell. I learned to trust the freeze to firm the centers so the coating sets neatly, and to sprinkle crushed peppermint right away so it adheres while the chocolate is still tacky. These are the little rituals that make the process feel warm and comforting.
Making Peppermint Oreo Cookie Balls is fast once you get the rhythm, but it still invites conversation, laughter, and the inevitable taste tests. I love that kids can help press the balls, while older family members handle the chocolate dipping with careful concentration. Sharing them at holiday gatherings always sparks compliments, and I find myself smiling as trays disappear.
Recipe Snapshot
1 hr 10 mins
30 mins
40 mins
Medium
120 kcal
American
Keto, Gluten-Free
Desserts
Food processor, Microwave safe bowl, Rimmed baking sheet, Parchment paper, Small cookie scoop, Fork
Why This Peppermint Oreo Cookie Balls Stands Out
1. Perfect no bake crowd pleaser
I’ve found Peppermint Oreo Cookie Balls shine because they require no baking yet deliver a bakery quality finish. You get the richness of finely crushed Oreo cookies bound with tangy cream cheese, and a crisp exterior from melted white chocolate. This combination makes them ideal for busy holiday prep when ovens are already full, and they travel well to parties and potlucks.
2. Texture contrast that delights
One of the reasons I return to this recipe is the contrast between the silky center and the snappy white chocolate shell. The short chill firms the dough just enough so each bite is creamy without being soggy, while the cooled coating offers a satisfying snap. I particularly appreciate how crushed peppermint on top adds a light crunch and an invigorating cool note that lifts the sweetness.
3. Simple ingredients, big payoff
There is real joy in recipes that use a handful of pantry staples to produce something memorable. With a package of Oreo cookies, softened cream cheese, and melting wafers, you can whip up many truffles in under an hour. The minimal ingredient list also makes substitutions easy depending on what you have on hand, which I often do when last minute guests arrive.
4. Fun to make with helpers
These truffles are perfect for involving friends or family. Rolling the balls is a tactile, meditative task for kids, while adults can manage the dipping. I love how everyone ends up with a job and a sense of ownership, and that shared activity creates memories as much as the treats themselves.
5. Holiday aesthetic and versatility
I make Peppermint Oreo Cookie Balls not only because they taste festive, but because they photograph beautifully and stack well on platters. You can dress them up for gifting or keep them casual for an everyday sweet. Their peppermint finish makes them especially appropriate for wintertime and Christmas celebrations.
Everything You Need for Peppermint Oreo Cookie Balls
These ingredients work like a tiny holiday orchestra. The star is the crushed Oreo cookies which provide structure and chocolate flavor, while the softened cream cheese brings creaminess and helps the crumbs bind into a scoopable dough. The peppermint note brightens the palate, and the white chocolate melting wafers create a glossy shell. A touch of coconut oil smooths the chocolate coating, and crushed peppermint candies add festive crunch and color.
- 36 Oreo cookies 14.3 ounce package, or other chocolate sandwich cookies: Crush into fine crumbs to provide the chocolate sandwich cookie base and deliver the classic Oreo flavor throughout the mixture; ensure even texture for proper binding with the cream cheese.
- 1 teaspoon peppermint extract if you have peppermint or mint Oreos, you can skip this ingredient: Add sparingly to impart a bright peppermint flavor that complements the chocolate; adjust or omit if using already mint-flavored cookies to avoid overpowering the mixture.
- 8 ounces cream cheese softened: Soften and beat until smooth to act as the binding and creamy element that holds the crushed cookies together while adding richness and slight tang.
- 1 1/2 cups peppermint candy cane white chocolate melting wafers or white chocolate, see notes: Melt gently to create a smooth coating that hardens around each formed ball, adding a sweet white chocolate layer with peppermint notes if using flavored melting wafers.
- 1 tablespoon coconut oil: Stir into the melted coating to thin and give the chocolate a glossy finish and better flow for dipping; helps the coating set with a smoother texture.
- peppermint candies crushed, for garnish: Finely crush and sprinkle over the coated balls to add crunchy texture, festive color, and an extra burst of peppermint flavor as a finishing garnish.
The Method for Peppermint Oreo Cookie Balls

These steps guide you through the process with a friendly, steady voice so you can feel confident from crumb to coating. I like to move deliberately, prepping my tools and working in stages so nothing feels rushed. Keep the chilled tray ready because timing during the chocolate step matters.
- Line a rimmed baking sheet with parchment paper.: The scent of a well prepared workspace sets the tone, and the parchment creates a nonstick landing for the truffles. You'll hear the rustle of the paper as you smooth it into place, and visually you want a clean surface so coated balls do not stick. This step avoids scrapped chocolate and frustrating removals later. A common misstep is skipping parchment, which can lead to stuck truffles and broken shells.
- Place cookies in food processor and mix until cookies turn into fine crumbs. See notes if you don’t have a food processor.: When you pulse the Oreo cookies , the motor hums and the crumbs fall like fine dust, smelling richly of cocoa. Aim for a sand like texture so the filling is smooth, and tap the processor to redistribute any larger bits. If you do not have a food processor, the bag and rolling pin method works but requires elbow grease. Over processing with cream cheese later can make the mixture too loose, so keep this step strictly to drying the cookies.
- Add cream cheese and peppermint extract to the cookie crumbs. Mix with a silicone spatula or with a hand mixer on low until a dough forms. Do not mix the mixture in the food processor as the cream cheese mixture can become too liquidy.: After combining flavors you will notice the aroma shift as the tangy cream cheese melts into the crumbs and the peppermint lifts the blend. Use a silicone spatula or low speed with a hand mixer to fold until the mixture holds together like play dough. The texture should be pliable not runny; if it becomes too loose that often means the cream cheese was too warm or overmixed. Avoid using the food processor now, as it can overwork and liquefy the mixture.
- Roll the dough into balls, about one tablespoon per truffle. I like to use this cookie scoop set, for this recipe you'll need the small cookie scoop. Place each truffle on the parchment paper-lined baking sheet so they are not touching. Freeze the truffles for at least 15 minutes.: Rolling is tactile and satisfying, with the dough warming slightly under your palms and taking on a glossy sheen. I use a small cookie scoop for uniform size, then gently roll between my palms to seal any seams. Place them spaced on the parchment lined sheet so they do not touch. Freeze for at least 15 minutes to firm the centers, this helps when dipping. A problem to avoid is making balls that are too large, which will be harder to coat evenly and may cause the shell to crack under weight.
- Add the peppermint white chocolate melting wafers and one tablespoon of coconut oil (optional) to a heatproof bowl. Place the bowl in the microwave and heat for a minute at half power, then stir. Continue heating the white chocolate in thirty-second increments until it forms a smooth white chocolate sauce.: The moment you begin melting the white chocolate you will notice the aroma change to sweet and creamy, and the texture moves from solid chips to a glossy pool. Heat gently in the microwave at half power, stirring frequently to distribute heat. The coconut oil helps the melted chocolate flow and gives a satin finish. If you heat too aggressively, the chocolate can seize and grain, so patience and stirring prevent that error.
- Remove truffles from the freezer. Place truffle balls into white chocolate one at a time to coat, using a fork so excess chocolate can drip off. Place each white chocolate-coated ball on parchment paper so they are not touching each other and immediately sprinkle with crushed peppermint before the chocolate begins to harden.: As you stir the slowly melting wafers, the mixture becomes silkier and thicker, the sound is the soft swish of spoon against glass. Continue in thirty second increments until perfectly smooth, testing the pour with a spoon to ensure it coats. The reason for low heat is to preserve the glossy texture; overheating destroys the emulsion. A common mistake is rushing this stage, which leads to lumpy or separated chocolate.
- Place the pan in the freezer for 15 minutes to help the chocolate to fully harden, then enjoy!: The cold centers will feel firm when you touch them lightly, and that temperature difference is what makes the shell set quickly when dipped. Work straight away so the centers stay chilled, otherwise the heat of the chocolate can melt the interior. If the centers warm up they will be more likely to collapse under the coating, so keep them in the freezer until you are ready to dip.
- Place truffle balls into white chocolate one at a time to coat: Using a fork, lower each chilled truffle into the melted white chocolate , letting excess drip back into the bowl. The dipping sound is quiet, but visually you should see a smooth, even layer form around the ball. Remove with care and place on parchment. Immediately sprinkle with crushed peppermint candies while the chocolate is still wet so they adhere. Rushing or dipping with warm centers will cause the shell to crack or the filling to ooze.
- Place each white chocolate coated ball on parchment paper so they are not touching each other and immediately sprinkle with crushed peppermint before the chocolate begins to harden: The little sparkle of crushed peppermint against glossy white chocolate is very satisfying visually, and the aroma becomes fresher. Doing this while the coating is tacky ensures the pieces stick firmly. If you wait until the chocolate fully hardens, the peppermint will slide off and look careless, so timing is important.
- Place the pan in the freezer for 15 minutes to help the chocolate to fully harden: The freezer helps the shell set quickly and gives a clean snap when you bite into the truffles. After chilling, the surface will appear matte and firm to the touch, and handling them will not leave fingerprints. Do not overfreeze for hours as extreme cold can cause condensation when they come back to room temperature, which may affect texture. A common error is leaving them in the freezer uncovered, which can invite odors to cling to the treats.
- Then enjoy: When you bite in you'll notice the contrast of cool, creamy center and crisp coating, with a refreshing hint of peppermint . Serve them slightly chilled for best texture, and expect them to disappear fast. If you find any truffles that did not set properly, place them back in the freezer briefly to firm up before serving.
Tips for Success

These tips collect hard learned shortcuts and troubleshooting notes so your batch turns out beautifully the first time. I rely on them every season and expand on each to help you avoid common pitfalls and get consistent results.
- Softening cream cheese If your cream cheese came straight from the fridge, let it sit at room temperature for about thirty minutes so it blends smoothly. Cold cream cheese will create lumps and require more vigorous mixing, which can overwork the mixture and make it greasy.
- Crushing cookies without a processor Put the Oreo cookies into a strong zip top bag and roll with a rolling pin until uniformly fine. This manual method gives you control, and you can stop when you reach the desired texture.
- Microwave melting technique Heat the white chocolate in short bursts at half power and stir between intervals. This prevents scorching and grainy chocolate, which ruins the smooth coating.
- Adding coconut oil One tablespoon of coconut oil helps the melted chocolate flow for dipping. Do not add more than recommended or the shell may remain soft and not set properly.
- Keeping truffles tidy Space the balls well on the parchment paper to avoid them touching and sticking together as they set. Use a fork to lift and tap off excess chocolate for a cleaner finish.
- Storing finished truffles Store in an airtight container in the refrigerator for up to two weeks, or freeze for longer storage. Bring to slightly chilled before serving for best texture and flavor.
What Complements This Peppermint Oreo Cookie Balls
These truffles pair beautifully with warm drinks, festive platters, and seasonal gatherings. Below I outline serving styles, occasions, and storage ideas to help you present them with confidence. Use the list to plan pairings for holiday parties or cozy nights in.
- Serving with beverages Pair Peppermint Oreo Cookie Balls with hot beverages like tea or coffee for a balancing contrast. The warm drink tempers the cold truffle and highlights the peppermint note.
- Party platter presentation Arrange the truffles on a tiered platter with festive liners for a holiday display. The white coating and red peppermint make them pop visually among other sweets.
- Gifting idea Box them in small kraft boxes with parchment and a ribbon for neighbor gifts. Keep the boxes chilled until gifting so the shells remain intact during transit.
- Storage tips Refrigerate in an airtight container for up to two weeks, or freeze for up to three months. Thaw in the fridge to avoid condensation forming on the coating.
- Occasions These are ideal for wintertime gatherings and Christmas celebrations, as their peppermint profile complements the season and festive menus.
- Portioning Because they are rich, serve them in small portions, one or two per person as a sweet finish after meals or as part of a dessert board.
FAQ
Conclusion
These Peppermint Oreo Cookie Balls stand out for their creamy, chocolatey centers and bright peppermint finish, making them a holiday favorite. Give them a try this season, whether you are gifting neighbors, hosting a cookie swap, or seeking an easy dessert to share. The recipe is forgiving yet rewarding, and once you make a batch you will understand why it becomes a go to for winter gatherings. Enjoy the process, and don’t be afraid to involve loved ones in rolling and decorating for extra fun.
Peppermint Oreo Cookie Balls
Equipment
- Food Processor
- Microwave-safe Bowl
- Rimmed Baking Sheet
- Parchment Paper
- Small Cookie Scoop
- Fork
Ingredients
- 36 Oreo cookies 14.3 ounce package, or other chocolate sandwich cookies Crush into fine crumbs to provide the chocolate sandwich cookie base and deliver the classic Oreo flavor throughout the mixture; ensure even texture for proper binding with the cream cheese.
- 1 teaspoon peppermint extract if you have peppermint or mint Oreos, you can skip this ingredient Add sparingly to impart a bright peppermint flavor that complements the chocolate; adjust or omit if using already mint-flavored cookies to avoid overpowering the mixture.
- 8 ounces cream cheese softened Soften and beat until smooth to act as the binding and creamy element that holds the crushed cookies together while adding richness and slight tang.
- 1 1/2 cups peppermint candy cane white chocolate melting wafers or white chocolate, see notes Melt gently to create a smooth coating that hardens around each formed ball, adding a sweet white chocolate layer with peppermint notes if using flavored melting wafers.
- 1 tablespoon coconut oil Stir into the melted coating to thin and give the chocolate a glossy finish and better flow for dipping; helps the coating set with a smoother texture.
- peppermint candies crushed, for garnish Finely crush and sprinkle over the coated balls to add crunchy texture, festive color, and an extra burst of peppermint flavor as a finishing garnish.
Instructions
- Line a rimmed baking sheet with parchment paper.: The scent of a well prepared workspace sets the tone, and the parchment creates a nonstick landing for the truffles. You'll hear the rustle of the paper as you smooth it into place, and visually you want a clean surface so coated balls do not stick. This step avoids scrapped chocolate and frustrating removals later. A common misstep is skipping parchment, which can lead to stuck truffles and broken shells.
- Place cookies in food processor and mix until cookies turn into fine crumbs. See notes if you don’t have a food processor.: When you pulse the Oreo cookies , the motor hums and the crumbs fall like fine dust, smelling richly of cocoa. Aim for a sand like texture so the filling is smooth, and tap the processor to redistribute any larger bits. If you do not have a food processor, the bag and rolling pin method works but requires elbow grease. Over processing with cream cheese later can make the mixture too loose, so keep this step strictly to drying the cookies.
- Add cream cheese and peppermint extract to the cookie crumbs. Mix with a silicone spatula or with a hand mixer on low until a dough forms. Do not mix the mixture in the food processor as the cream cheese mixture can become too liquidy.: After combining flavors you will notice the aroma shift as the tangy cream cheese melts into the crumbs and the peppermint lifts the blend. Use a silicone spatula or low speed with a hand mixer to fold until the mixture holds together like play dough. The texture should be pliable not runny; if it becomes too loose that often means the cream cheese was too warm or overmixed. Avoid using the food processor now, as it can overwork and liquefy the mixture.
- Roll the dough into balls, about one tablespoon per truffle. I like to use this cookie scoop set, for this recipe you'll need the small cookie scoop. Place each truffle on the parchment paper-lined baking sheet so they are not touching. Freeze the truffles for at least 15 minutes.: Rolling is tactile and satisfying, with the dough warming slightly under your palms and taking on a glossy sheen. I use a small cookie scoop for uniform size, then gently roll between my palms to seal any seams. Place them spaced on the parchment lined sheet so they do not touch. Freeze for at least 15 minutes to firm the centers, this helps when dipping. A problem to avoid is making balls that are too large, which will be harder to coat evenly and may cause the shell to crack under weight.
- Add the peppermint white chocolate melting wafers and one tablespoon of coconut oil (optional) to a heatproof bowl. Place the bowl in the microwave and heat for a minute at half power, then stir. Continue heating the white chocolate in thirty-second increments until it forms a smooth white chocolate sauce.: The moment you begin melting the white chocolate you will notice the aroma change to sweet and creamy, and the texture moves from solid chips to a glossy pool. Heat gently in the microwave at half power, stirring frequently to distribute heat. The coconut oil helps the melted chocolate flow and gives a satin finish. If you heat too aggressively, the chocolate can seize and grain, so patience and stirring prevent that error.
- Remove truffles from the freezer. Place truffle balls into white chocolate one at a time to coat, using a fork so excess chocolate can drip off. Place each white chocolate-coated ball on parchment paper so they are not touching each other and immediately sprinkle with crushed peppermint before the chocolate begins to harden.: As you stir the slowly melting wafers, the mixture becomes silkier and thicker, the sound is the soft swish of spoon against glass. Continue in thirty second increments until perfectly smooth, testing the pour with a spoon to ensure it coats. The reason for low heat is to preserve the glossy texture; overheating destroys the emulsion. A common mistake is rushing this stage, which leads to lumpy or separated chocolate.
- Place the pan in the freezer for 15 minutes to help the chocolate to fully harden, then enjoy!: The cold centers will feel firm when you touch them lightly, and that temperature difference is what makes the shell set quickly when dipped. Work straight away so the centers stay chilled, otherwise the heat of the chocolate can melt the interior. If the centers warm up they will be more likely to collapse under the coating, so keep them in the freezer until you are ready to dip.
- Place truffle balls into white chocolate one at a time to coat: Using a fork, lower each chilled truffle into the melted white chocolate , letting excess drip back into the bowl. The dipping sound is quiet, but visually you should see a smooth, even layer form around the ball. Remove with care and place on parchment. Immediately sprinkle with crushed peppermint candies while the chocolate is still wet so they adhere. Rushing or dipping with warm centers will cause the shell to crack or the filling to ooze.
- Place each white chocolate coated ball on parchment paper so they are not touching each other and immediately sprinkle with crushed peppermint before the chocolate begins to harden: The little sparkle of crushed peppermint against glossy white chocolate is very satisfying visually, and the aroma becomes fresher. Doing this while the coating is tacky ensures the pieces stick firmly. If you wait until the chocolate fully hardens, the peppermint will slide off and look careless, so timing is important.
- Place the pan in the freezer for 15 minutes to help the chocolate to fully harden: The freezer helps the shell set quickly and gives a clean snap when you bite into the truffles. After chilling, the surface will appear matte and firm to the touch, and handling them will not leave fingerprints. Do not overfreeze for hours as extreme cold can cause condensation when they come back to room temperature, which may affect texture. A common error is leaving them in the freezer uncovered, which can invite odors to cling to the treats.
- Then enjoy: When you bite in you'll notice the contrast of cool, creamy center and crisp coating, with a refreshing hint of peppermint . Serve them slightly chilled for best texture, and expect them to disappear fast. If you find any truffles that did not set properly, place them back in the freezer briefly to firm up before serving.
Notes
- Softening cream cheese If your cream cheese came straight from the fridge, let it sit at room temperature for about thirty minutes so it blends smoothly. Cold cream cheese will create lumps and require more vigorous mixing, which can overwork the mixture and make it greasy.
- Crushing cookies without a processor Put the Oreo cookies into a strong zip top bag and roll with a rolling pin until uniformly fine. This manual method gives you control, and you can stop when you reach the desired texture.
- Microwave melting technique Heat the white chocolate in short bursts at half power and stir between intervals. This prevents scorching and grainy chocolate, which ruins the smooth coating.
- Adding coconut oil One tablespoon of coconut oil helps the melted chocolate flow for dipping. Do not add more than recommended or the shell may remain soft and not set properly.
- Keeping truffles tidy Space the balls well on the parchment paper to avoid them touching and sticking together as they set. Use a fork to lift and tap off excess chocolate for a cleaner finish.
- Storing finished truffles Store in an airtight container in the refrigerator for up to two weeks, or freeze for longer storage. Bring to slightly chilled before serving for best texture and flavor.