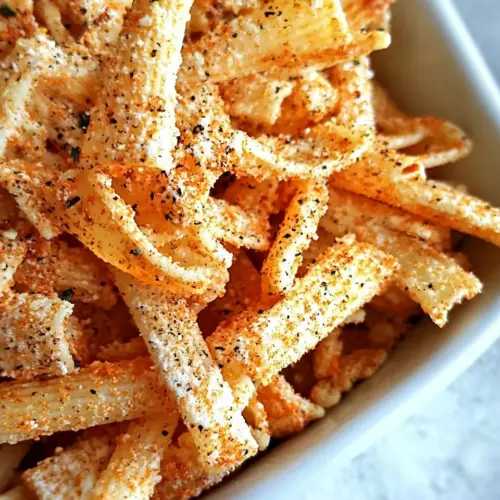
Pasta Chips
Pasta Chips started as a curious kitchen experiment that became an instant favorite in my home. The first time I made them I was cleaning out the pantry and found a lonely box of bowtie pasta, and rather than boiling it for dinner I tried turning it into a crunchy snack. From that first crisp bite I was hooked, and now I reach for this recipe whenever friends drop by or I want something playful and crunchy to nibble on while we chat.
That initial batch taught me a lot about texture and timing, because getting every piece uniformly crisp requires attention and small adjustments. Over a few tries I learned how much olive oil to use so the pasta crisps without becoming greasy, and why grated parmesan cheese behaves differently than shredded forms in the oven. I also experimented with different seasonings until I found combinations that really sing.
Making Pasta Chips is one of those joyful, hands on recipes that invites improvisation. I love prepping a big sheet pan, letting the oven do the work, and then tweaking the dipping sauces based on the mood. The process is quick enough to be casual, yet rewarding enough to serve at a gathering, and it gives you that satisfying crunch that keeps everyone reaching for more.
Recipe Snapshot
40 mins
10 mins
30 mins
Hard
250 kcal
Italian
Gluten-Free, Low FODMAP
Appetizers
Sheet Pan, Colander, Mixing Bowl, Air Fryer, Metal Spatula
Why This Pasta Chips Works
Crunchy Comfort
One reason I adore Pasta Chips is the texture contrast. When the edges blister and turn golden, you get that audible crunch that makes snacking feel celebratory. I always find myself smiling when the first pan comes out of the oven, that crackle under my teeth is addictive.
Simple Ingredients, Big Impact
These chips are made from pantry staples like bowtie pasta, olive oil, and grated parmesan cheese. The minimal ingredient list means you can whip them up without a grocery run, and each component plays a clear role. I appreciate recipes that don’t hide behind complexity, and these chips deliver bold results with very little fuss.
Versatile Serving Options
I love how adaptable Pasta Chips are. They pair brilliantly with tomato based dips, creamy sauces, or even a tangy yogurt dip. I’ll often change the seasoning profile depending on whether I want an herby snack or something with a spicy edge, and the same base technique supports all those variations.
Great for Gathering
When friends arrive unexpectedly, Pasta Chips save the day. They’re easy to scale, easy to share, and they travel well from oven to table. I’ve served them at casual game nights and garden parties, and they always disappear fast. That reliability is why I keep this recipe in my entertaining rotation.
Low Fuss, High Reward
The technique is forgiving, so you can focus on small tweaks instead of precision. I appreciate a recipe where one small change, like a bit more cheese or a slightly longer bake, adjusts the final result to your liking. That makes Pasta Chips a perfect recipe to customize and make your own.
Pasta Chips Ingredients

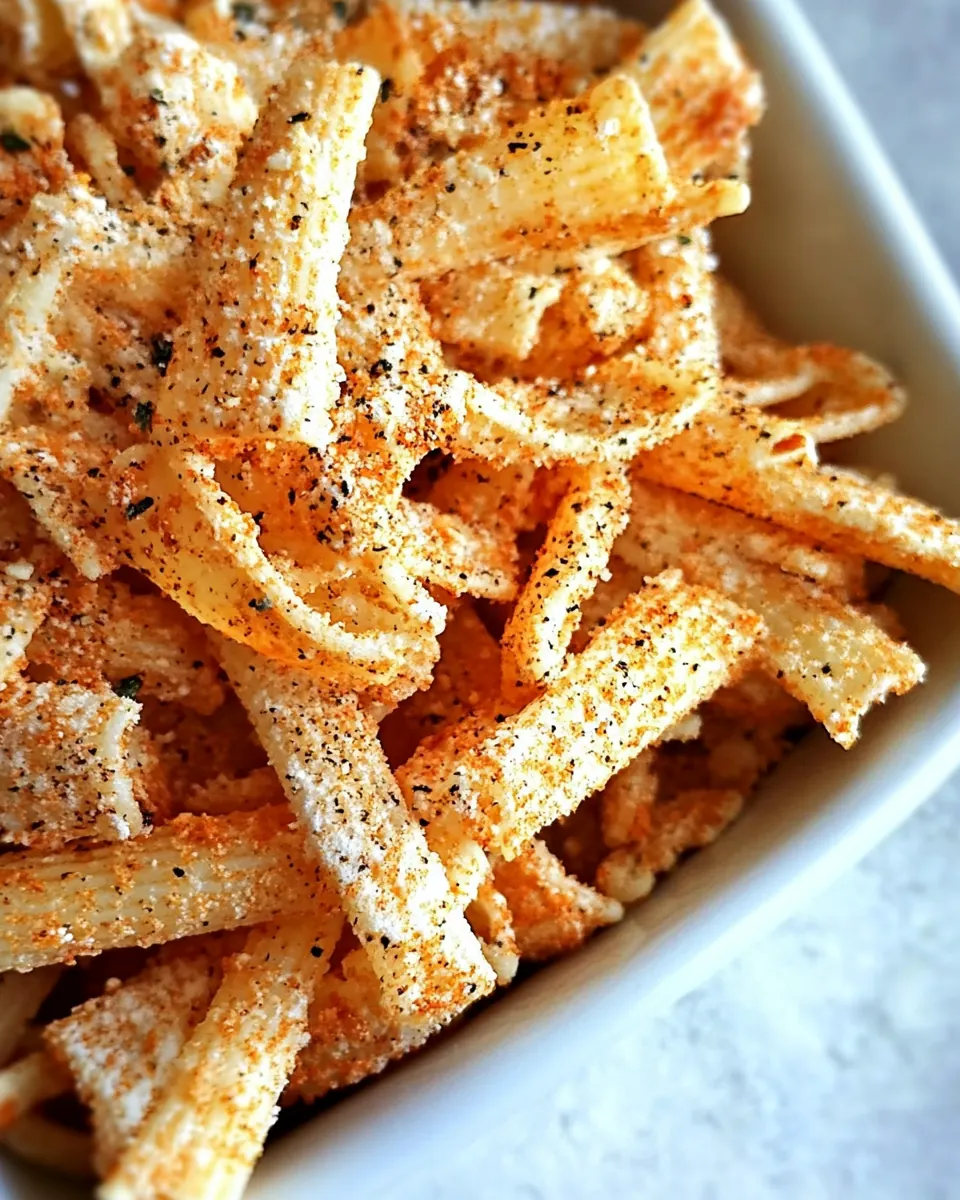
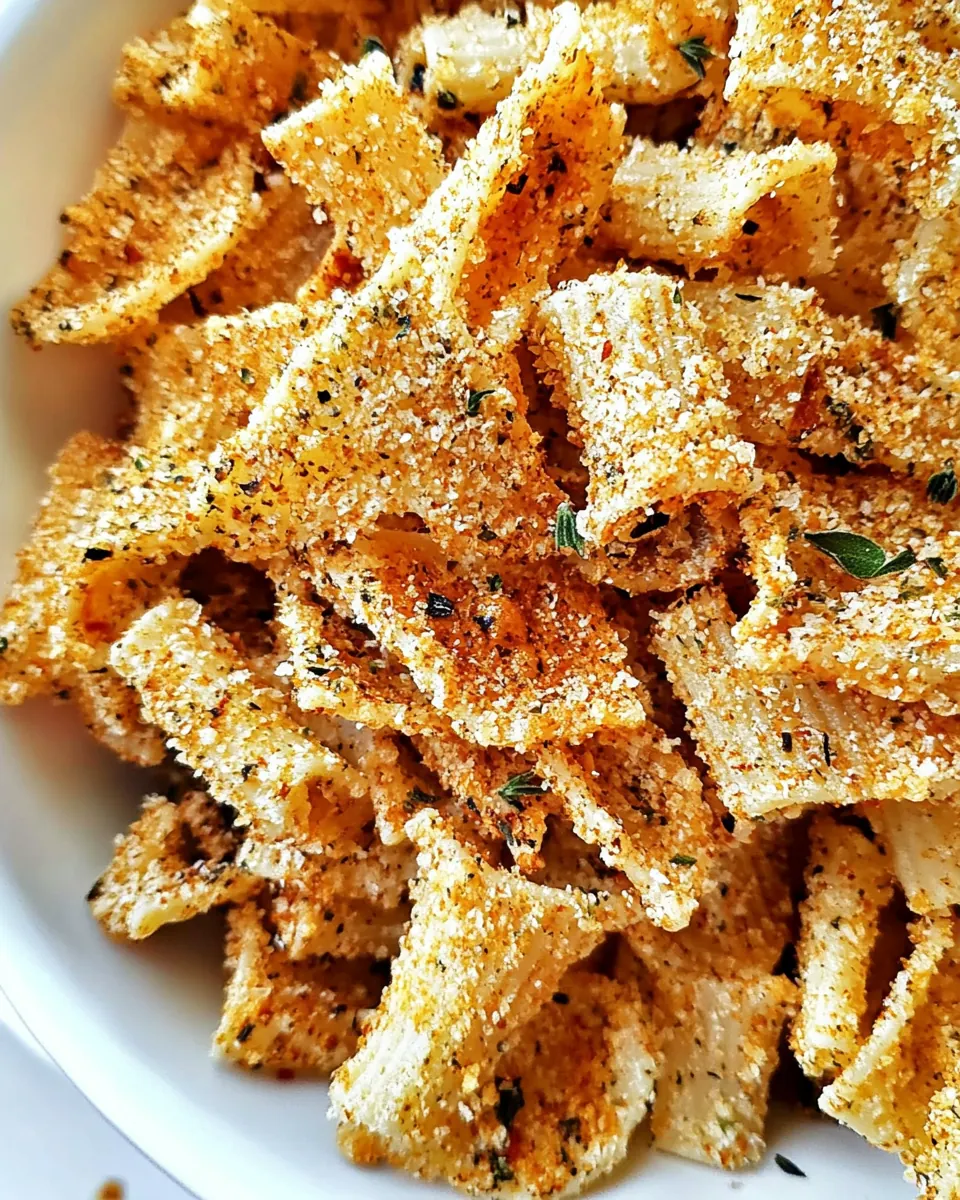
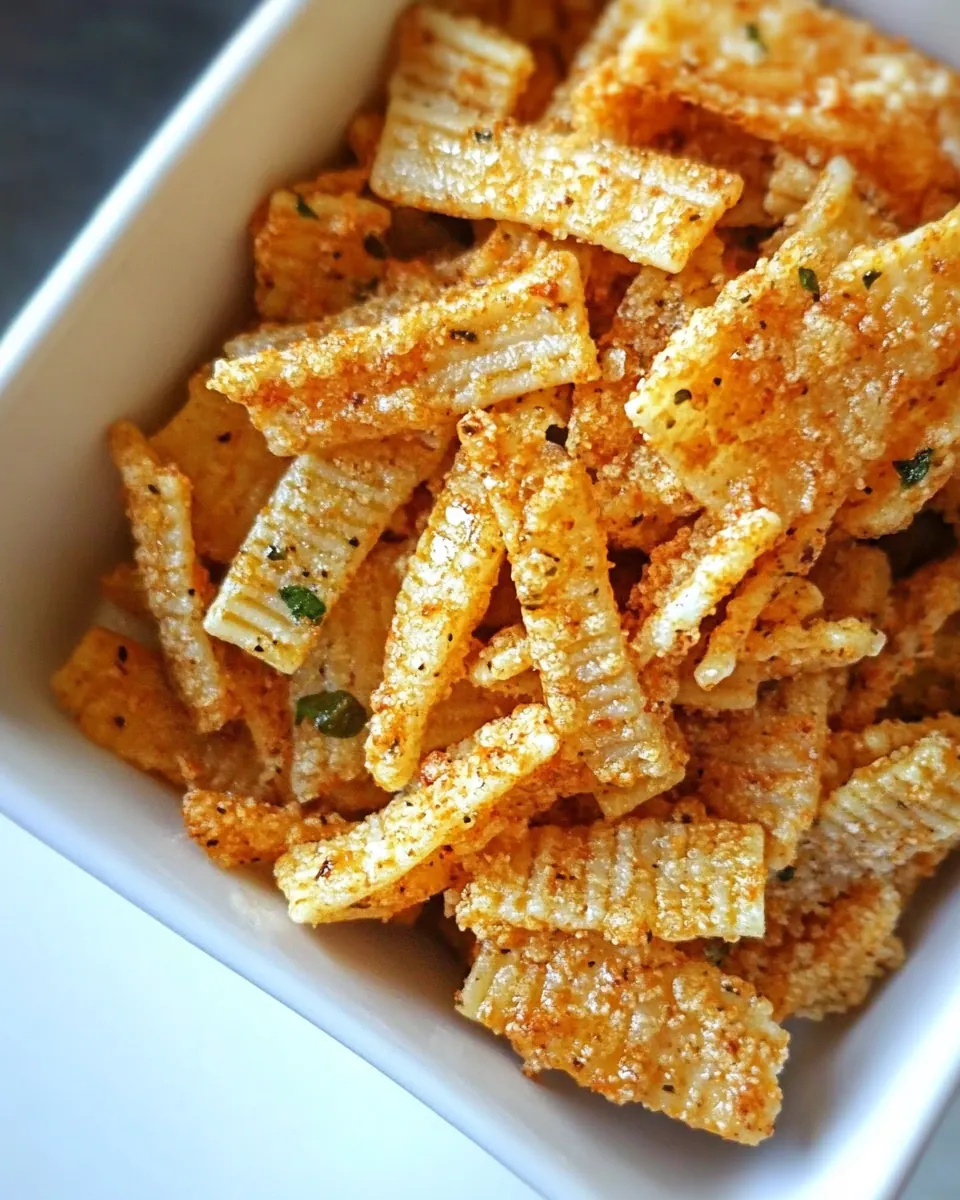
These ingredients reflect a philosophy of simplicity and purposeful flavor. Each item contributes to crispness, seasoning, or structural integrity. The bowtie pasta provides shape and texture, olive oil facilitates even browning and crunch, grated parmesan cheese adds savory saltiness and a slightly crisped coating, and the seasoning choice ties the flavor profile together.
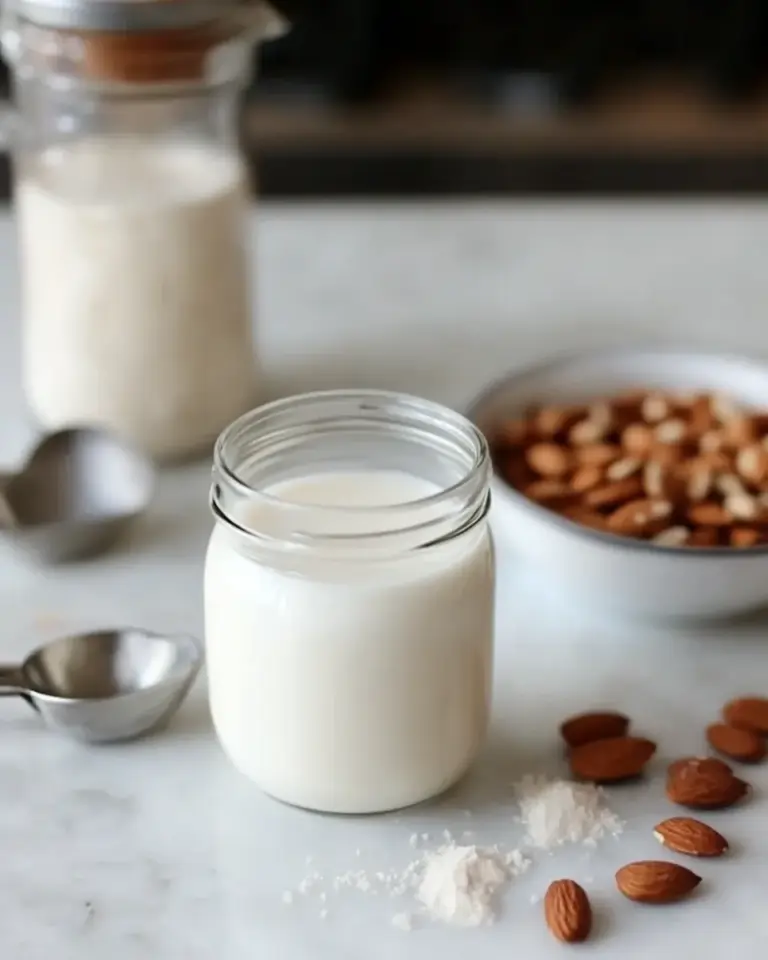
- 1 box Bowtie Pasta: Provide structure and crunch by cooking and baking bowtie pasta until crisp; shapes hold seasoning and create chip-like texture for snacking. Allow pieces to cool so they harden further and become satisfyingly crunchy while retaining a bit of bite. Serve as a vessel for coatings and dips.
- Olive Oil: Coat pasta lightly with olive oil to promote even browning and crispness during baking; oil helps seasonings adhere and enhances mouthfeel. Use just enough to prevent dryness without making chips greasy. Choose a quality extra-virgin for subtle flavor or a neutral oil to let coatings stand out.
- Grated Parmesan Cheese: Add savory, nutty depth by sprinkling grated Parmesan cheese over the oiled pasta before baking; cheese melts and crisps to form flavorful clusters. Parmesan contributes umami and a golden, slightly salty finish that elevates simple chips. Grate fresh for best melting and texture.
- Ranch or Italian Seasonings: Season chips with ranch or Italian seasonings to infuse herbaceous, tangy, or savory flavors; blends adhere to the oiled pasta and bake into the crust. Adjust the amount to balance saltiness and herbs for the desired flavor profile. Experiment with combinations for variety.
Cooking Method for Pasta Chips
These instructions are conversational and friendly, guiding you step by step. The method covers both oven and air fryer approaches, and I share timing ranges to help you hit your ideal crunch. Follow the sequence carefully and trust visual and auditory cues as you bake or air fry.
- Turn oven on 400 degrees to pre-heat.: The kitchen will start to fill with warmth and a faint metallic hum from the heating elements, signaling that the environment is ready to transform the pasta. Heating to 400 degrees ensures rapid browning on the pasta edges, which promotes crispness rather than slow drying. One reason this matters is if the oven is not fully preheated, the pasta will spend too long drying before it can brown, leaving it chewy. A common pitfall is opening the oven too often, which drops the temperature and extends bake time, so try to keep the door closed as much as possible.
- Boil pasta al dente according to instructions. Drain well and shake out excess water. Do not let pasta completely dry or it will stick to each other.: As the water approaches a lively simmer, the pasta will dance and release a faint wheaty scent. Cooking to al dente gives the pieces enough structural integrity so they hold up during baking and crisp rather than collapse. If you overcook, the pasta becomes fragile and can disintegrate in the oven, producing less satisfying texture. Drain thoroughly and shake off excess water because wet pasta will steam instead of crisping.
- Drizzle with olive oil and stir, covering all noodles. This is usually about a tablespoon to 2 tablespoons oil, depending on how much pasta you are making.: After the boil, the sound of the colander draining and the steam rising are good indicators that you removed most of the moisture. Leaving too much water will cause the pasta to clump and stick during tossing and baking. One easy error is letting the pasta sit in the colander long enough to cool and stick together, so move quickly to the oiling step.
- Smother with GRATED Parmesan cheese. If you use other types of cheeses (like shredded), it can become super messy in oven and bake onto the sheet as it melts.: Moisture balance is delicate here, the pasta should be dry enough to accept oil but still slightly tacky so seasonings adhere. If pieces dry out completely they can fuse together in the oven, creating clumps rather than individual chips. To avoid this, keep a small amount of residual steam and work efficiently during the next steps.
- Generously season with season of choice. The amounts are not overly sticky and you can put as little or as much as you want.: When you drizzle the olive oil , you should see a gentle sheen forming on the pasta surfaces as you stir. This thin coating is crucial for promoting even browning and helping the seasonings stick. If oil is applied unevenly you will notice patches that brown quickly beside pieces that remain pale. A common oversight is pouring the oil in one spot rather than distributing it, so toss thoroughly to ensure uniform coverage.
- Stir well so all noodles are covered.: Measure visually for consistency, and remember that more oil does not always mean better crunch. The aroma of the oil will be subtle once mixed, and the right amount yields a toasted, not oily, finish. Using too much will leave the chips limp and heavy, which defeats the purpose of a crispy snack.
- Dump pasta onto a sheet pan.: When you add grated parmesan cheese , you will notice the dry, granular texture sticking to the lightly oiled pasta. As it bakes, the cheese will melt and then crisp into golden flakes that enhance crunch and umami. Avoid substituting with shredded cheeses that can clump and fuse into a sticky mess on the pan, which makes removal difficult. One mistake to avoid is adding the cheese after baking, which deprives it of that crisped, toasty character.
- Place in 400 degree oven for 25-35 minutes. As oven times vary, pull when chips are at desired crunchiness. I have seen this recipe done with as little as 25 but my personal oven (gas) takes a full 35. Using a metal spatula, carefully remove chips.: The kettle like scent of melting cheese is pleasant, but shredded varieties create strings and pools that adhere to the sheet pan. That sticky residue can burn and complicate cleanup, and it changes the texture of individual chips. For cleaner results, stick to finely grated, dry cheeses that crisp instead of liquefying.
- Place in serving bowl.: Sprinkle your chosen Ranch or Italian Seasonings while the pasta is still tacky so the spices cling and toast in the heat. During baking the herbs will release aromatic oils that heighten the snack's overall profile. Over seasoning is a potential misstep, so start modestly and adjust on subsequent batches once you know how potent your blend is.
- Serve immediately with dip or sauce of choice.: This flexibility lets you tailor intensity, from a whisper of herb to a bold punch of flavor. As the spices heat, their scent will become more pronounced, which is a good sign they are toasting properly. The trouble arises when seasoning lumps together on wet pasta, so ensure even distribution by stirring thoroughly after sprinkling.
- Boil pasta al dente and drain well from excess water.: You should feel and see the coating on the pasta as you stir, with oil and cheese distributed across surfaces. Thorough stirring ensures consistent browning and flavor with each chip, avoiding bites that are under seasoned. A common error is stirring too roughly and breaking the pasta, so be gentle yet thorough.
- Drizzle 1-2 tablespoons of olive oil onto pasta and stir.: As the pasta fans out across the pan you will want individual pieces to lie mostly flat and not overlap excessively. The visual cue of even spacing signals that hot air can circulate and crisp the edges. Overcrowding is the primary culprit for uneven results, so if necessary use two pans or bake in batches for best crispness.
- Add seasoning of choice and parmesan cheese. In this case, we generously sprinkled on Ranch Seasoning.: During baking you will notice progressive color change from pale to golden, and occasional small blisters will form on the pasta surfaces. These visual cues indicate the transformation from soft to crisp. Because ovens vary, start checking at 25 minutes and listen for light crackling; leaving them too long will darken the cheese and can create bitterness.
- Place in air fryer on Temperature 400 for 12-15 minutes until golden brown. Stir every few minutes to make sure all pasta pieces get crispy. Timing may need to be adjusted based on how crispy you want the chips and how deep the air fryer basket is and may be up to 20 minutes.: The right moment to remove the pan is when the audio and visual cues line up, a light crackle and uniform golden hue. I often test a piece for texture to confirm. A frequent mistake is relying solely on time rather than these cues, so trust your senses for optimal results.
- Remove pasta from air fryer and add to serving bowl.: Your oven type and the sheet pan material influence timing, so use this as a guide not a rule. Gas ovens can circulate heat differently than electric ones, which explains the variance. If you find uneven browning, rotate the pan halfway through baking.
- Add side dish bowl marinara, pasta sauce or alfredo to dip.: When you lift the chips, their crispness should be audible and the underside should be uniformly browned. A thin metal spatula helps ease them from the pan without smashing the crispy edges. Avoid scraping harshly which can break delicate chips or leave cheese residue behind.
- Place in serving bowl: The moment you transfer them, the sound of chips settling and the warmed scent of herbs is inviting. Presenting them in a bowl encourages communal snacking and makes dipping easy. Try not to stack them too deep, since trapped steam can soften lower layers.
- Serve immediately with dip or sauce of choice: Fresh from the oven the chips are at peak texture, and serving right away preserves that delicate crunch. The temperatures and the contrast with a cool dip make the experience more dynamic. Waiting too long will allow moisture to soften the chips, so time your dips to be ready at the same moment.
- Boil pasta al dente and drain well from excess water: Reiterating this step emphasizes the importance of moisture control, which is pivotal for crisping. The tactile feedback of slightly firm pasta indicates readiness for oiling. Skipping this care leads to steam pockets during baking that prevent full crisping.
- Drizzle 1 to 2 tablespoons of olive oil onto pasta and stir: That measured amount ensures a light gloss and proper browning without excess oiliness. As you stir, observe how the pasta transitions from matte to glossier, which is your cue that oil coverage is even. Over-oiling can mute the crunch and make the chips feel heavy.
- Add seasoning of choice and parmesan cheese: Combining the Ranch Seasoning and parmesan cheese at this stage ensures the flavors mingle while the oven toasts them into deeper notes. The aroma will become more pronounced as the herbs heat. If you notice clumping, stir again to separate pieces and redistribute the coating.
- Place in air fryer on Temperature 400 for 12 to 15 minutes until golden brown: If using an air fryer you will hear intermittent crisping sounds as the hot air circulates, and the compact basket may produce quicker browning. Start checking around 12 minutes and stir every few minutes to promote even browning. Crowding the basket reduces airflow and leads to uneven texture, so work in small batches for best results.
- Stir every few minutes to make sure all pasta pieces get crispy: The tactile action of stirring helps expose different surfaces to direct heat, creating a uniformly crunchy batch. Expect some pieces to brown faster than others, and adjust stirring frequency based on how deep your fryer basket is. Not stirring enough is the top reason for uneven results in the air fryer.
- Timing may need to be adjusted based on how crispy you want the chips and how deep the air fryer basket is and may be up to 20 minutes: Personal preference dictates the final texture, so feel free to extend the time for extra crunch, watching carefully to avoid burning. Thicker layers or denser baskets require more time, so use visual cues and small taste tests to decide.
- Remove pasta from air fryer and add to serving bowl: The fresh, hot aroma is part of the joy, and moving chips to a bowl prevents residual heat from continuing to cook them in the basket, which can over crisp or burn. Let them cool briefly so they firm up completely before serving.
- Add side dish bowl marinara pasta sauce or alfredo to dip: Serving with a warm marinara or a creamy Alfredo introduces a pleasing temperature and texture contrast. The dipping sauce enhances each bite, and the combination of crunchy and saucy is satisfying. Avoid soggy pairings by offering sauces in a separate bowl rather than pouring them over the chips.
Tips for Success
I like to think of these tips as the small adjustments that turn good results into great ones. They focus on timing, texture, and small tricks I learned from repeating this recipe until it became a staple. Follow them to avoid common pitfalls and to refine the final crunch.
- Measure oil carefully so you get a thin, even coating, which produces crisp, not greasy, chips.
- Drain thoroughly because excess water prevents proper browning and causes clumping during baking.
- Spread in a single layer on the sheet pan to allow hot air to circulate and ensure uniform crisping.
- Use a metal spatula for removal to lift chips cleanly without breaking them or leaving cheese residue.
- Stir periodically in the air fryer to expose all pieces to circulating heat for even crunch.
- Serve immediately since the chips are at their best right out of the oven or fryer before steam softens them.
Serve This Pasta Chips With
These serving ideas explore pairing, occasions, and storage. The goal is to give you practical ways to present Pasta Chips for different moments and to preserve their crunch when needed.
- Marinara dip offers a classic tomato tang that complements the salty parmesan and herb seasoning, perfect for casual gatherings or game nights.
- Alfredo or creamy sauce provides a rich contrast, ideal when you want a decadent twist for a cozy evening snack.
- Greek yogurt or spinach dip gives a cool, tangy balance, suitable for summer entertaining or lighter snacking options.
- Serve warm on a platter for parties, placing dips in small bowls so guests can easily dunk without softening the entire batch.
- Occasions like casual game nights, movie nights, or potlucks are perfect since these chips travel well and pair with many dips.
- Storage tip is to cool completely then keep in an airtight container at room temperature for up to two days to retain as much crunch as possible.
- Seasonal pairing means using herb forward seasonings in spring and summer, and warming spice blends for fall gatherings to match the mood.
FAQ
Conclusion
What makes this recipe special is its simplicity and the joyful crunch it delivers from a few pantry staples. You get a playful snack that is customizable, shareable, and quick to prepare, making it perfect for impromptu gatherings or a cozy night in. Try making a batch and experiment with different seasonings and dips to discover your favorite combination, then share the results with friends or family for instant applause.
Pasta Chips
Equipment
- Sheet Pan
- Colander
- Mixing Bowl
- Air Fryer
- Metal spatula
Ingredients
- 1 box Bowtie Pasta Provide structure and crunch by cooking and baking bowtie pasta until crisp; shapes hold seasoning and create chip-like texture for snacking. Allow pieces to cool so they harden further and become satisfyingly crunchy while retaining a bit of bite. Serve as a vessel for coatings and dips.
- Olive Oil Coat pasta lightly with olive oil to promote even browning and crispness during baking; oil helps seasonings adhere and enhances mouthfeel. Use just enough to prevent dryness without making chips greasy. Choose a quality extra-virgin for subtle flavor or a neutral oil to let coatings stand out.
- Grated Parmesan Cheese Add savory, nutty depth by sprinkling grated Parmesan cheese over the oiled pasta before baking; cheese melts and crisps to form flavorful clusters. Parmesan contributes umami and a golden, slightly salty finish that elevates simple chips. Grate fresh for best melting and texture.
- Ranch or Italian Seasonings Season chips with ranch or Italian seasonings to infuse herbaceous, tangy, or savory flavors; blends adhere to the oiled pasta and bake into the crust. Adjust the amount to balance saltiness and herbs for the desired flavor profile. Experiment with combinations for variety.
Instructions
- Turn oven on 400 degrees to pre-heat.: The kitchen will start to fill with warmth and a faint metallic hum from the heating elements, signaling that the environment is ready to transform the pasta. Heating to 400 degrees ensures rapid browning on the pasta edges, which promotes crispness rather than slow drying. One reason this matters is if the oven is not fully preheated, the pasta will spend too long drying before it can brown, leaving it chewy. A common pitfall is opening the oven too often, which drops the temperature and extends bake time, so try to keep the door closed as much as possible.
- Boil pasta al dente according to instructions. Drain well and shake out excess water. Do not let pasta completely dry or it will stick to each other.: As the water approaches a lively simmer, the pasta will dance and release a faint wheaty scent. Cooking to al dente gives the pieces enough structural integrity so they hold up during baking and crisp rather than collapse. If you overcook, the pasta becomes fragile and can disintegrate in the oven, producing less satisfying texture. Drain thoroughly and shake off excess water because wet pasta will steam instead of crisping.
- Drizzle with olive oil and stir, covering all noodles. This is usually about a tablespoon to 2 tablespoons oil, depending on how much pasta you are making.: After the boil, the sound of the colander draining and the steam rising are good indicators that you removed most of the moisture. Leaving too much water will cause the pasta to clump and stick during tossing and baking. One easy error is letting the pasta sit in the colander long enough to cool and stick together, so move quickly to the oiling step.
- Smother with GRATED Parmesan cheese. If you use other types of cheeses (like shredded), it can become super messy in oven and bake onto the sheet as it melts.: Moisture balance is delicate here, the pasta should be dry enough to accept oil but still slightly tacky so seasonings adhere. If pieces dry out completely they can fuse together in the oven, creating clumps rather than individual chips. To avoid this, keep a small amount of residual steam and work efficiently during the next steps.
- Generously season with season of choice. The amounts are not overly sticky and you can put as little or as much as you want.: When you drizzle the olive oil , you should see a gentle sheen forming on the pasta surfaces as you stir. This thin coating is crucial for promoting even browning and helping the seasonings stick. If oil is applied unevenly you will notice patches that brown quickly beside pieces that remain pale. A common oversight is pouring the oil in one spot rather than distributing it, so toss thoroughly to ensure uniform coverage.
- Stir well so all noodles are covered.: Measure visually for consistency, and remember that more oil does not always mean better crunch. The aroma of the oil will be subtle once mixed, and the right amount yields a toasted, not oily, finish. Using too much will leave the chips limp and heavy, which defeats the purpose of a crispy snack.
- Dump pasta onto a sheet pan.: When you add grated parmesan cheese , you will notice the dry, granular texture sticking to the lightly oiled pasta. As it bakes, the cheese will melt and then crisp into golden flakes that enhance crunch and umami. Avoid substituting with shredded cheeses that can clump and fuse into a sticky mess on the pan, which makes removal difficult. One mistake to avoid is adding the cheese after baking, which deprives it of that crisped, toasty character.
- Place in 400 degree oven for 25-35 minutes. As oven times vary, pull when chips are at desired crunchiness. I have seen this recipe done with as little as 25 but my personal oven (gas) takes a full 35. Using a metal spatula, carefully remove chips.: The kettle like scent of melting cheese is pleasant, but shredded varieties create strings and pools that adhere to the sheet pan. That sticky residue can burn and complicate cleanup, and it changes the texture of individual chips. For cleaner results, stick to finely grated, dry cheeses that crisp instead of liquefying.
- Place in serving bowl.: Sprinkle your chosen Ranch or Italian Seasonings while the pasta is still tacky so the spices cling and toast in the heat. During baking the herbs will release aromatic oils that heighten the snack's overall profile. Over seasoning is a potential misstep, so start modestly and adjust on subsequent batches once you know how potent your blend is.
- Serve immediately with dip or sauce of choice.: This flexibility lets you tailor intensity, from a whisper of herb to a bold punch of flavor. As the spices heat, their scent will become more pronounced, which is a good sign they are toasting properly. The trouble arises when seasoning lumps together on wet pasta, so ensure even distribution by stirring thoroughly after sprinkling.
- Boil pasta al dente and drain well from excess water.: You should feel and see the coating on the pasta as you stir, with oil and cheese distributed across surfaces. Thorough stirring ensures consistent browning and flavor with each chip, avoiding bites that are under seasoned. A common error is stirring too roughly and breaking the pasta, so be gentle yet thorough.
- Drizzle 1-2 tablespoons of olive oil onto pasta and stir.: As the pasta fans out across the pan you will want individual pieces to lie mostly flat and not overlap excessively. The visual cue of even spacing signals that hot air can circulate and crisp the edges. Overcrowding is the primary culprit for uneven results, so if necessary use two pans or bake in batches for best crispness.
- Add seasoning of choice and parmesan cheese. In this case, we generously sprinkled on Ranch Seasoning.: During baking you will notice progressive color change from pale to golden, and occasional small blisters will form on the pasta surfaces. These visual cues indicate the transformation from soft to crisp. Because ovens vary, start checking at 25 minutes and listen for light crackling; leaving them too long will darken the cheese and can create bitterness.
- Place in air fryer on Temperature 400 for 12-15 minutes until golden brown. Stir every few minutes to make sure all pasta pieces get crispy. Timing may need to be adjusted based on how crispy you want the chips and how deep the air fryer basket is and may be up to 20 minutes.: The right moment to remove the pan is when the audio and visual cues line up, a light crackle and uniform golden hue. I often test a piece for texture to confirm. A frequent mistake is relying solely on time rather than these cues, so trust your senses for optimal results.
- Remove pasta from air fryer and add to serving bowl.: Your oven type and the sheet pan material influence timing, so use this as a guide not a rule. Gas ovens can circulate heat differently than electric ones, which explains the variance. If you find uneven browning, rotate the pan halfway through baking.
- Add side dish bowl marinara, pasta sauce or alfredo to dip.: When you lift the chips, their crispness should be audible and the underside should be uniformly browned. A thin metal spatula helps ease them from the pan without smashing the crispy edges. Avoid scraping harshly which can break delicate chips or leave cheese residue behind.
- Place in serving bowl: The moment you transfer them, the sound of chips settling and the warmed scent of herbs is inviting. Presenting them in a bowl encourages communal snacking and makes dipping easy. Try not to stack them too deep, since trapped steam can soften lower layers.
- Serve immediately with dip or sauce of choice: Fresh from the oven the chips are at peak texture, and serving right away preserves that delicate crunch. The temperatures and the contrast with a cool dip make the experience more dynamic. Waiting too long will allow moisture to soften the chips, so time your dips to be ready at the same moment.
- Boil pasta al dente and drain well from excess water: Reiterating this step emphasizes the importance of moisture control, which is pivotal for crisping. The tactile feedback of slightly firm pasta indicates readiness for oiling. Skipping this care leads to steam pockets during baking that prevent full crisping.
- Drizzle 1 to 2 tablespoons of olive oil onto pasta and stir: That measured amount ensures a light gloss and proper browning without excess oiliness. As you stir, observe how the pasta transitions from matte to glossier, which is your cue that oil coverage is even. Over-oiling can mute the crunch and make the chips feel heavy.
- Add seasoning of choice and parmesan cheese: Combining the Ranch Seasoning and parmesan cheese at this stage ensures the flavors mingle while the oven toasts them into deeper notes. The aroma will become more pronounced as the herbs heat. If you notice clumping, stir again to separate pieces and redistribute the coating.
- Place in air fryer on Temperature 400 for 12 to 15 minutes until golden brown: If using an air fryer you will hear intermittent crisping sounds as the hot air circulates, and the compact basket may produce quicker browning. Start checking around 12 minutes and stir every few minutes to promote even browning. Crowding the basket reduces airflow and leads to uneven texture, so work in small batches for best results.
- Stir every few minutes to make sure all pasta pieces get crispy: The tactile action of stirring helps expose different surfaces to direct heat, creating a uniformly crunchy batch. Expect some pieces to brown faster than others, and adjust stirring frequency based on how deep your fryer basket is. Not stirring enough is the top reason for uneven results in the air fryer.
- Timing may need to be adjusted based on how crispy you want the chips and how deep the air fryer basket is and may be up to 20 minutes: Personal preference dictates the final texture, so feel free to extend the time for extra crunch, watching carefully to avoid burning. Thicker layers or denser baskets require more time, so use visual cues and small taste tests to decide.
- Remove pasta from air fryer and add to serving bowl: The fresh, hot aroma is part of the joy, and moving chips to a bowl prevents residual heat from continuing to cook them in the basket, which can over crisp or burn. Let them cool briefly so they firm up completely before serving.
- Add side dish bowl marinara pasta sauce or alfredo to dip: Serving with a warm marinara or a creamy Alfredo introduces a pleasing temperature and texture contrast. The dipping sauce enhances each bite, and the combination of crunchy and saucy is satisfying. Avoid soggy pairings by offering sauces in a separate bowl rather than pouring them over the chips.
Notes
- Measure oil carefully so you get a thin, even coating, which produces crisp, not greasy, chips.
- Drain thoroughly because excess water prevents proper browning and causes clumping during baking.
- Spread in a single layer on the sheet pan to allow hot air to circulate and ensure uniform crisping.
- Use a metal spatula for removal to lift chips cleanly without breaking them or leaving cheese residue.
- Stir periodically in the air fryer to expose all pieces to circulating heat for even crunch.
- Serve immediately since the chips are at their best right out of the oven or fryer before steam softens them.