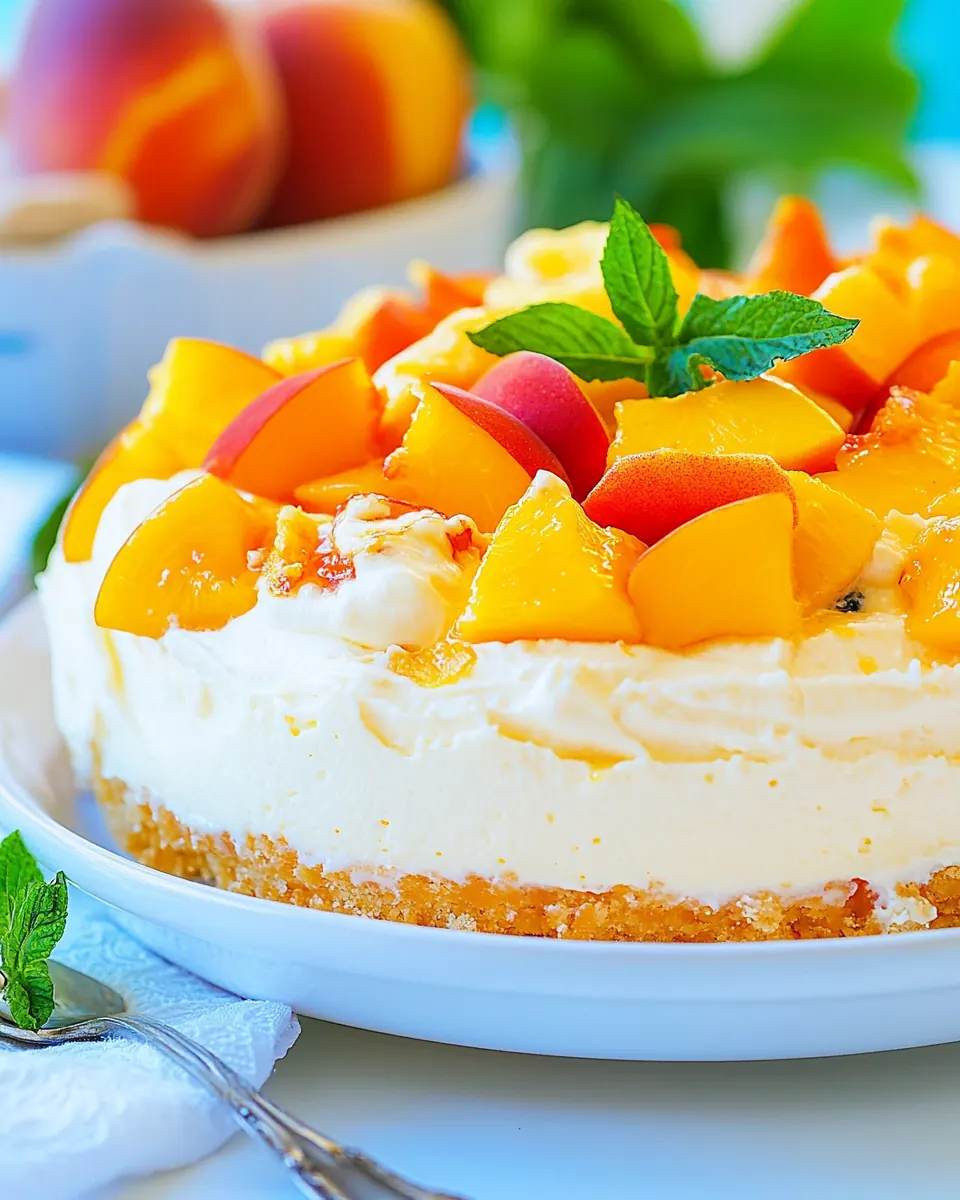
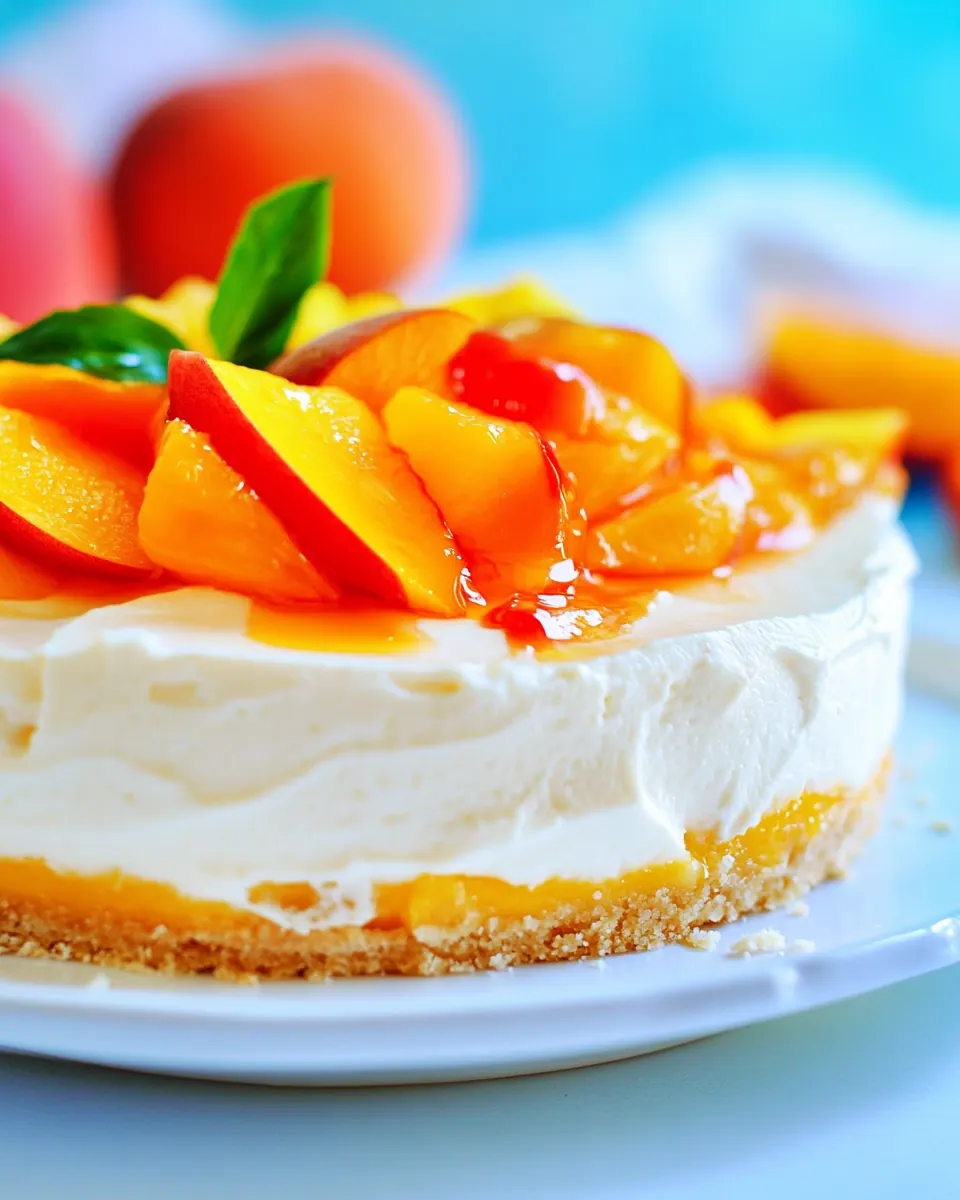
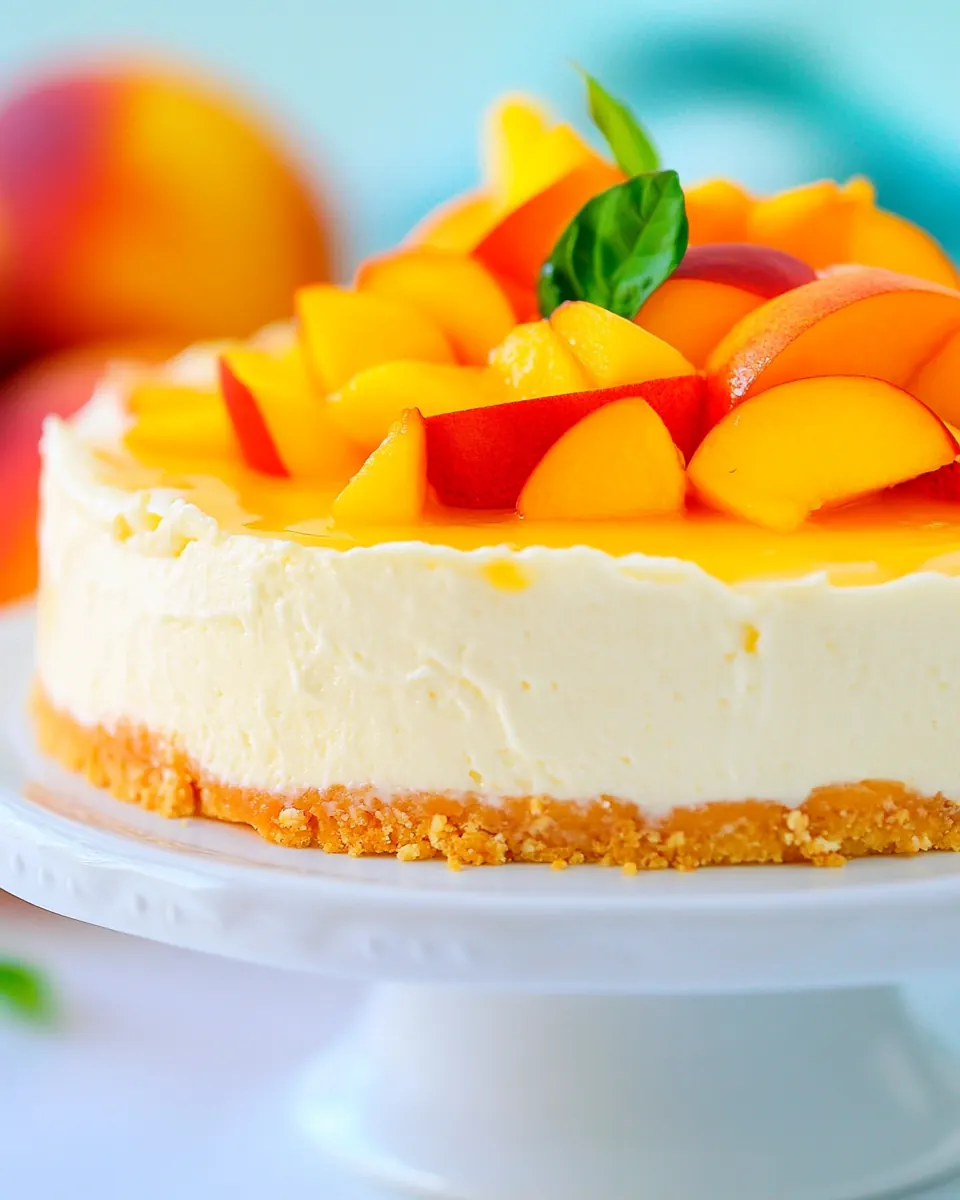
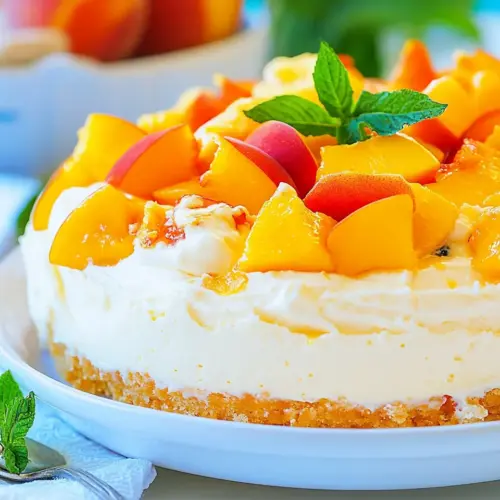
No Bake Peach Cheesecake
No Bake Peach Cheesecake is the kind of dessert that feels like a sunny afternoon folded into a forkful, and I still remember the first time I tasted a slice I had made for a neighborhood potluck. I was juggling a hot oven failure and a last minute promise to bring something cool and impressive, so I turned to a recipe that requires patience more than heat. The result was creamy, slightly tangy, and studded with tender pieces of peach that tasted like summer in every bite.
Over the years I have adapted the recipe to match the seasons, swapping peaches for other fruits when needed, but the core of the dish always stays the same: a crisp, buttery crust, a luxuriously smooth filling, and a fresh fruit note that keeps every bite from feeling heavy. When friends ask for a dessert they can make ahead for gatherings, this No Bake Peach Cheesecake is what I recommend, because it rewards the time spent chilling with perfect slices and minimal last minute fuss.
Recipe Snapshot
1 hr 30 mins
30 mins
60 mins
Medium
350 kcal
American
Gluten-Free, Low FODMAP
Desserts
springform pan or 9×13 inch cake pan, food processor, electric hand mixer or stand mixer, measuring cup, mixing bowls
Why You’ll Love This No Bake Peach Cheesecake
Bright, Seasonal Flavor
I love how No Bake Peach Cheesecake puts the spotlight on peach as the starring ingredient. Whether you use canned peach chunks or ripe fresh peach, that sweet stone fruit lifts the whole dessert and keeps it from feeling overly rich.
Silky No Bake Texture
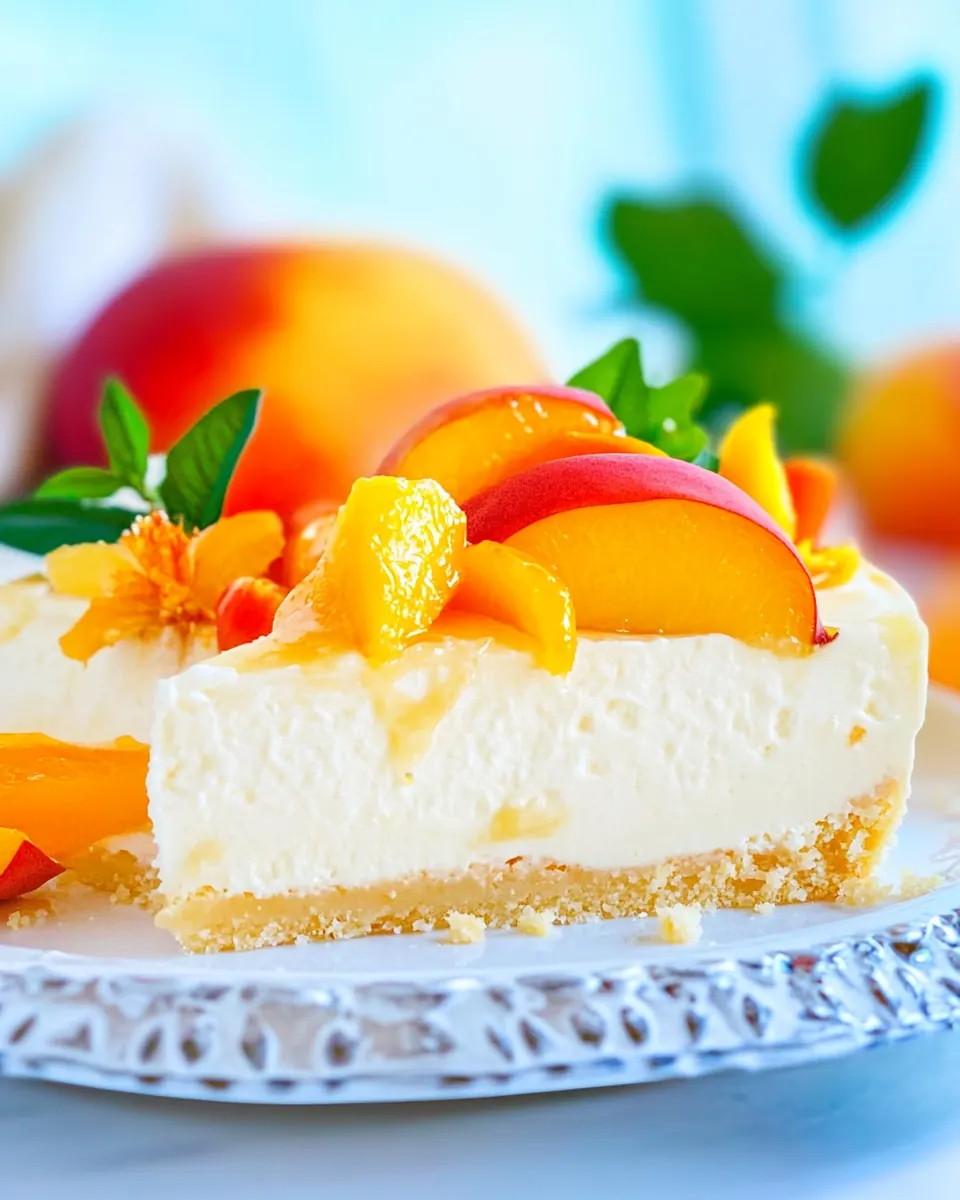
The texture is a major reason I keep making this. The combination of cream cheese and mascarpone cheese makes the filling decadently smooth without being heavy. Because the recipe sets in the fridge, you get a custardy feel that slices neatly, which is ideal for serving guests.
Make Ahead Friendly
I often make this a day ahead. Chilling time lets the flavors meld and the gelatin stabilize the filling. That convenience means less stress on the day of a party, and more time to focus on the people you are feeding.
Textural Contrast
The buttery graham cracker crumbs crust gives a toasty, crisp counterpoint to the soft filling. Pressing the crust firmly ensures clean slices and a satisfying bite, which is one of my favorite small victories when plating dessert.
Customizable Presentation
Finally, the topping options make it fun to personalize. I like piping fresh whipped heavy whipping cream and decorating with peach chunks for a rustic look, but you can also keep it simple and let the fruit shine. That flexibility makes this recipe a great canvas for creativity.
Ingredients for No Bake Peach Cheesecake
These ingredients are chosen to balance creaminess, stability, and bright fruit flavor. The crust provides a crunchy foundation, while the cheeses create a lush, silky body. Gelatin helps the filling set without baking, so the finished cake holds neat slices. The whipped heavy whipping cream folded in and piped on top keeps the texture light, and the peach components add color and freshness.
- 2 cups graham cracker crumbs: Crushed finely to form the base and provide a crunchy texture contrast for the cheesecake, offering a toasty, slightly sweet foundation. Combine with melted butter and sugar to bind into a sturdy crust that holds the filling. Press evenly into the pan to ensure a uniform crust thickness for clean slices.
- 2 tablespoons white granulated sugar: Added to sweeten the crust mixture and enhance caramelized notes when combined with graham crumbs. Dissolves easily into the crumbs so the binder distributes flavor throughout. Adjusts overall sweetness of the base without affecting texture significantly.
- 1 stick unsalted butter melted: Melted and used to bind the graham cracker crumbs into a cohesive crust that sets firmly without baking. Contributes a rich, buttery flavor and helps the crust hold together for slicing. Cool slightly before mixing to avoid making the crumbs soggy.
- 1 package unflavored gelatin 4 envelopes 7 grams each one: Bloomed and dissolved to stabilize the no-bake filling, providing structure so the cheesecake sets without refrigeration alone. Measured as specified to ensure correct gel strength given the recipe's liquid content. Hydrate carefully and fully dissolve to avoid grainy texture in the finished filling.
- 2/3 cup cold water: Used to bloom the gelatin and activate its setting properties for the filling's proper firmness. Kept cold to control gelatin swelling and ensure even dissolution when later heated or combined. Measured precisely to match the gelatin package instructions and recipe volume.
- 4 cups peach chunks canned or fresh; if using fresh peel them first.: Chopped into uniform chunks to provide fresh peach flavor and juicy bursts within the filling or topping. Can be peeled if using fresh to avoid skins disrupting the smooth texture of the cheesecake. If canned, drain well to prevent excess liquid from thinning the filling.
- 24 oz cream cheese room temperature: Softened at room temperature to ensure ultra-smooth, lump-free creaminess when whipped into the filling. Provides the tangy, rich base of the cheesecake and contributes most of the filling's structure and mouthfeel. Beat thoroughly to incorporate air and achieve a silky consistency.
- 8 oz mascarpone cheese room temperature: Brought to room temperature and folded into the cream cheese for extra richness and a smoother, silkier texture. Balances the tang of cream cheese with a subtle sweetness and stabilizes the filling for a luxurious mouthfeel. Mix gently to maintain lightness while achieving homogeneity.
- 1 1/2 cups white granulated sugar: Added to sweeten the creamy filling, balancing the tang of the cheeses and fruit. Dissolves when beaten with the cheeses to create a consistent, sweet profile throughout the cheesecake. Adjust amount slightly to taste but adhere to recipe proportions for proper texture.
- 1/2 cup cold heavy whipping cream: Kept cold and whipped to add volume and lightness to the filling, creating a mousse-like texture. Stabilizes air incorporation so the cheesecake remains airy yet structured once combined with gelatin. Chill before whipping to reach proper stiffness quickly and avoid overbeating.
- 1 teaspoon vanilla extract: Added for a fragrant, warm vanilla note that enhances the overall dessert flavor profile. Small quantity provides aromatic depth without overpowering the peaches or cheeses. Choose pure vanilla extract for best natural flavor.
- 1 cup cold heavy whipping cream: Kept cold and whipped separately as additional stabilized whipped cream to fold into the filling or use as decorative topping. Helps lighten the dense cream cheese–mascarpone mixture and contributes to a fluffy, smooth final texture. Whip to medium-stiff peaks to ensure structure when folded in.
- 3 tablespoons white granulated sugar: Sprinkled into the whipped cream to lightly sweeten and help stabilize peak formation. Dissolves quickly when whipped, allowing controlled sweetness for the topping or filling accents. Use sparingly to avoid overly sweet whipped cream that can mask the peach flavor.
Putting Together No Bake Peach Cheesecake
This recipe is about layering textures and trusting time. As you work through the steps, pay attention to the chill times and the way ingredients come together; that is where the magic happens. Keep bowls and utensils cool when whipping cream, and take moments to scrape the sides, because small details make a neat, balanced final cake.
- Add Graham crumbs and sugar to a medium bowl and mix with melted butter until thoroughly combined.: The aroma at this stage is toasty and buttery, and you should be able to squeeze a small handful of the mixture and have it hold together; this tactile test tells you the crust will bind well. Mixing gently prevents crushing any remaining texture in the crumbs, and avoid letting the melted butter cool and solidify which makes pressing uneven. A common mistake is skimping on mixing time, leaving pockets of dry crumbs that cause crumbling later.
- Press the mixture onto the bottom and sides of a springform pan or a 9×13-inch cake pan. Use a measuring cup to press the mix; it makes the process very easy. Refrigerate for 20-30 minutes.: As you press, listen for a slight compacting sound and watch the surface become smooth and even, which signals good adhesion between crumbs and butter. Pressing firmly creates clean slices and a sturdy base, and chilling helps the butter firm up so the crust does not fall apart. Avoid pressing too hard against the sides which can make the crust overly dense and cause cracking when sliced.
- Add 1 cup of cold water to a small bowl, sprinkle the gelatin on top, and let it bloom for 1-2 minutes. Whisk to combine, then microwave for 30 seconds. Whisk until the mixture is fully combined and a gelatin-like consistency is formed. Set aside.: The gelatin will absorb liquid and swell, smelling faintly neutral; after microwaving it should look glossy and viscous, indicating it is fully dissolved. Whisking until smooth ensures there are no grainy bits, which is essential because undissolved gelatin ruins the filling texture. A pitfall here is heating too long which can scorch or reduce the gelatin effectiveness, so warm briefly and stir well.
- Add 2 cups of peach chunks to a food processor and process until smooth. Set aside.: As you puree the peach , the kitchen will fill with a bright, fruity aroma and the texture should become velvety, with no large fibrous bits. A smooth peach puree blends seamlessly into the filling so you avoid stringy or pulpy sections in slices. If the peaches are excessively watery, pulse and then strain slightly to concentrate flavor; otherwise the filling can become loose.
- In a large bowl, using an electric hand mixer or stand mixer, mix cream cheese, mascarpone cheese, and 1 cup of sugar at medium to low speed until combined. Stop once to scrape the sides and bottom of the bowl. Do not mix on high speed or overmix, as the mascarpone cheese can begin to separate.: The mixture should turn glossy and smooth, and you will notice the grainy texture of the cheeses disappear as air is gently incorporated. Low speed keeps the mixture dense and creamy, which yields a luxurious mouthfeel; high speed introduces too much air, risking a foamy, unstable filling. Overlooking the scrape step often leaves pockets of unmixed cheese, creating lumps in the final cheesecake.
- Add the cold, heavy whipping cream to a chilled mixing bowl, along with the remaining two tablespoons of sugar and vanilla extract. Whip on high speed until stiff peaks form. Manually fold the whipped cream into the mascarpone cream cheese mixture using a spatula.: The whipped heavy whipping cream should be glossy, holding sharp peaks that stand straight; folding it in lightens the dense cheesecake base while keeping structure. Use gentle strokes and a lift and fold technique to retain air, and folding by hand prevents overbeating. A common error is rushing and stirring vigorously which deflates the cream and yields a dense result.
- Add the peach mixture to the gelatin mixture and mix.: When combined, the puree and dissolved gelatin will have a silky sheen and a uniform texture, ready to stabilize the fruit flavor in the filling. Mixing thoroughly prevents streaks of fruit and ensures even distribution of the setting agent, which is crucial for consistent slices. If you see lumps or unevenness, strain and gently rewhisk, as undissolved gelatin will give a gritty mouthfeel.
- Add the peach gelatin mixture to the cheesecake batter and mix to combine.: At this point the batter will take on a pale peach hue and a fragrant, fruity scent; ensure the color is even for a pretty presentation. Gentle mixing preserves air while making sure the fruit flavor is spread throughout; vigorous stirring can cause separation or make the batter too loose. Watch for any watery separation, which means the puree had excess liquid and needs slight adjustment before setting.
- Fold in the remaining 2 cups of peach chunks with a spatula.: Folding in the fruit introduces delightful textural contrast, with little bursts of peach against the creamy base, and the sound of gentle folding should be minimal and quiet. Keep the chunks intact so you maintain those pleasant bites of fruit; overmixing will break them down and make the texture uniform and less interesting. Common mistakes include adding fruit that is too liquid or over-pureed, which can thin the batter.
- Spread the cheesecake filling evenly over the crust.: As you spread, aim for smooth, level strokes that create a flat, even surface; a spatula warmed slightly under hot water helps glide without tearing the crust. Even spreading ensures each slice looks tidy and holds together, and you can smooth the top for piping or leave it rustic. Uneven filling causes slices to slump on one side, so take a moment to level it before chilling.
- Set the cheesecake in the refrigerator to chill and firm for 5-6 hours or better overnight.: During chilling the gelatin finishes its job and the flavors meld, and you will notice the texture firming from glossy and soft to sliceable and set. Overnight chilling yields the best texture, while the minimum recommended time gives acceptable results; avoid rushing this step because insufficient chilling results in messy slices. Removing it too early is a frequent mistake, leading to a soft center and crumbling crust.
- Add the cold, heavy whipping cream and sugar to a large mixing bowl—whip on high speed until stiff peaks form. Transfer the whipped cream to a piping bag fitted with a large star tip and pipe it on top of the cheesecake.: The topping should be pillowy and stable, with peaks that hold their shape when piped, adding both visual appeal and a light counterpoint to the rich filling. Chilled equipment and cream help achieve firm peaks, and the added sugar stabilizes the whipped cream slightly. Overwhipping can turn it grainy and buttery, so watch closely and stop once the peaks hold.
- When ready to serve, carefully remove the cheesecake from the springform pan.: The edges should be clean and the crust intact; easing a thin knife around the pan before unlatching prevents tearing and helps maintain neat slices. Place the cake on a cool surface and slice with a hot, clean knife for the best presentation. A common error is attempting to remove the sides while the cheesecake is still too soft, causing collapse.
- Decorate with peach chunks. Always serve chilled. Slice and serve!: Fresh peach pieces on top add color and a burst of juicy texture, and serving chilled keeps the filling firm and refreshing. Use a gentle touch when arranging fruit so the topping looks natural and inviting. Serving at the wrong temperature is a frequent issue; if it is too cold it dulls flavor, if too warm it will be too soft to slice neatly.
- Store in the fridge for up to 4 days.: Properly wrapped, the cake will hold its texture and flavor for several days, and chilling helps prevent separation or sogginess. Place a cake dome or plastic wrap loosely over the top to protect from absorbing other refrigerator odors. Leaving it uncovered or at room temperature for extended periods leads to spoilage and a degraded texture.
Ways to Adapt This Recipe
This section explores thoughtful ways to tweak texture and presentation while staying true to the heart of the recipe. Small changes can elevate the dessert for different occasions, and each tip below highlights a practical swap or technique you can try.
- Use fresh peaches for peak flavor If ripe, peeled fresh peach gives the brightest, juiciest profile, and you should handle them gently to preserve chunks for folding into the batter rather than pureeing them all the way.
- Adjust sweetness carefully Taste the cheesecake batter before chilling and reduce sugar slightly if your peach is exceptionally sweet to keep balance between fruit and dairy.
- Stabilize whipped cream naturally Chill both the bowl and the heavy whipping cream and add sugar gradually while whipping to help peaks hold without overbeating.
- Make it ahead with confidence The cheesecake benefits from resting overnight, making it ideal for parties; store covered in the fridge and decorate just before serving.
- Pack the crust firmly Use the bottom of a measuring cup to press crumbs into an even layer so slices come out neatly without cracking.
- Use a piping bag substitute If you do not have a piping bag, place whipped heavy whipping cream in a plastic bag, snip a corner, and pipe to create attractive swirls.
What to Pair With No Bake Peach Cheesecake
This cheesecake is versatile and elegant, suitable for casual gatherings and special occasions alike. Consider complementary beverages and light accompaniments that highlight the fruit and cream contrast. Serve chilled slices on pretty plates and add simple finishing touches that echo the dessert’s summery character.
- Light fruit salad A small side of mixed berries or sliced peach adds freshness and color, perfect for brunch or an afternoon gathering.
- Fresh mint garnish A tiny sprig of mint provides aromatic contrast and a pop of green that looks lovely alongside the pale peach tones.
- Tea service Serve with delicate herbal or green teas for a relaxed afternoon, the subtle tannins balancing the creamy richness of the cheesecake.
- Brunch centerpiece This dessert makes a beautiful finish for a summer brunch menu, complementing light egg dishes and fruit forward salads.
- Storage tips Keep the cake refrigerated and covered for up to four days; refrigerate slices on a flat plate and avoid letting it sit at room temperature for long stretches.
- Seasonal occasions This is especially lovely in summer when peaches are at their peak, but canned peaches make it a great choice year round for gatherings and special meals.
- Serving style Slice with a hot, clean knife for tidy pieces and wipe the knife between cuts to keep slices immaculate for presentation.
FAQ
Conclusion
This No Bake Peach Cheesecake stands out for its silky texture, bright fruit flavor, and effortless make ahead charm. It’s the sort of dessert that looks special without demanding last minute work, so it’s ideal for gatherings and warm weather menus. I encourage you to give it a try, taste as you go, and take pride in a dessert that slices neatly and serves beautifully. Share a piece with friends, and enjoy how a little patience in the fridge turns simple ingredients into something memorable.
No Bake Peach Cheesecake
Equipment
- springform pan or 9×13 inch cake pan
- Food Processor
- Electric Hand mixer or Stand mixer
- Measuring Cup
- Mixing Bowls
Ingredients
- 2 cups graham cracker crumbs Crushed finely to form the base and provide a crunchy texture contrast for the cheesecake, offering a toasty, slightly sweet foundation. Combine with melted butter and sugar to bind into a sturdy crust that holds the filling. Press evenly into the pan to ensure a uniform crust thickness for clean slices.
- 2 tablespoons white granulated sugar Added to sweeten the crust mixture and enhance caramelized notes when combined with graham crumbs. Dissolves easily into the crumbs so the binder distributes flavor throughout. Adjusts overall sweetness of the base without affecting texture significantly.
- 1 stick unsalted butter melted Melted and used to bind the graham cracker crumbs into a cohesive crust that sets firmly without baking. Contributes a rich, buttery flavor and helps the crust hold together for slicing. Cool slightly before mixing to avoid making the crumbs soggy.
- 1 package unflavored gelatin 4 envelopes 7 grams each one Bloomed and dissolved to stabilize the no-bake filling, providing structure so the cheesecake sets without refrigeration alone. Measured as specified to ensure correct gel strength given the recipe's liquid content. Hydrate carefully and fully dissolve to avoid grainy texture in the finished filling.
- 2/3 cup cold water Used to bloom the gelatin and activate its setting properties for the filling's proper firmness. Kept cold to control gelatin swelling and ensure even dissolution when later heated or combined. Measured precisely to match the gelatin package instructions and recipe volume.
- 4 cups peach chunks canned or fresh; if using fresh peel them first. Chopped into uniform chunks to provide fresh peach flavor and juicy bursts within the filling or topping. Can be peeled if using fresh to avoid skins disrupting the smooth texture of the cheesecake. If canned, drain well to prevent excess liquid from thinning the filling.
- 24 oz cream cheese room temperature Softened at room temperature to ensure ultra-smooth, lump-free creaminess when whipped into the filling. Provides the tangy, rich base of the cheesecake and contributes most of the filling's structure and mouthfeel. Beat thoroughly to incorporate air and achieve a silky consistency.
- 8 oz mascarpone cheese room temperature Brought to room temperature and folded into the cream cheese for extra richness and a smoother, silkier texture. Balances the tang of cream cheese with a subtle sweetness and stabilizes the filling for a luxurious mouthfeel. Mix gently to maintain lightness while achieving homogeneity.
- 1 1/2 cups white granulated sugar Added to sweeten the creamy filling, balancing the tang of the cheeses and fruit. Dissolves when beaten with the cheeses to create a consistent, sweet profile throughout the cheesecake. Adjust amount slightly to taste but adhere to recipe proportions for proper texture.
- 1/2 cup cold heavy whipping cream Kept cold and whipped to add volume and lightness to the filling, creating a mousse-like texture. Stabilizes air incorporation so the cheesecake remains airy yet structured once combined with gelatin. Chill before whipping to reach proper stiffness quickly and avoid overbeating.
- 1 teaspoon vanilla extract Added for a fragrant, warm vanilla note that enhances the overall dessert flavor profile. Small quantity provides aromatic depth without overpowering the peaches or cheeses. Choose pure vanilla extract for best natural flavor.
- 1 cup cold heavy whipping cream Kept cold and whipped separately as additional stabilized whipped cream to fold into the filling or use as decorative topping. Helps lighten the dense cream cheese-mascarpone mixture and contributes to a fluffy, smooth final texture. Whip to medium-stiff peaks to ensure structure when folded in.
- 3 tablespoons white granulated sugar Sprinkled into the whipped cream to lightly sweeten and help stabilize peak formation. Dissolves quickly when whipped, allowing controlled sweetness for the topping or filling accents. Use sparingly to avoid overly sweet whipped cream that can mask the peach flavor.
Instructions
- Add Graham crumbs and sugar to a medium bowl and mix with melted butter until thoroughly combined.: The aroma at this stage is toasty and buttery, and you should be able to squeeze a small handful of the mixture and have it hold together; this tactile test tells you the crust will bind well. Mixing gently prevents crushing any remaining texture in the crumbs, and avoid letting the melted butter cool and solidify which makes pressing uneven. A common mistake is skimping on mixing time, leaving pockets of dry crumbs that cause crumbling later.
- Press the mixture onto the bottom and sides of a springform pan or a 9×13-inch cake pan. Use a measuring cup to press the mix; it makes the process very easy. Refrigerate for 20-30 minutes.: As you press, listen for a slight compacting sound and watch the surface become smooth and even, which signals good adhesion between crumbs and butter. Pressing firmly creates clean slices and a sturdy base, and chilling helps the butter firm up so the crust does not fall apart. Avoid pressing too hard against the sides which can make the crust overly dense and cause cracking when sliced.
- Add 1 cup of cold water to a small bowl, sprinkle the gelatin on top, and let it bloom for 1-2 minutes. Whisk to combine, then microwave for 30 seconds. Whisk until the mixture is fully combined and a gelatin-like consistency is formed. Set aside.: The gelatin will absorb liquid and swell, smelling faintly neutral; after microwaving it should look glossy and viscous, indicating it is fully dissolved. Whisking until smooth ensures there are no grainy bits, which is essential because undissolved gelatin ruins the filling texture. A pitfall here is heating too long which can scorch or reduce the gelatin effectiveness, so warm briefly and stir well.
- Add 2 cups of peach chunks to a food processor and process until smooth. Set aside.: As you puree the peach , the kitchen will fill with a bright, fruity aroma and the texture should become velvety, with no large fibrous bits. A smooth peach puree blends seamlessly into the filling so you avoid stringy or pulpy sections in slices. If the peaches are excessively watery, pulse and then strain slightly to concentrate flavor; otherwise the filling can become loose.
- In a large bowl, using an electric hand mixer or stand mixer, mix cream cheese, mascarpone cheese, and 1 cup of sugar at medium to low speed until combined. Stop once to scrape the sides and bottom of the bowl. Do not mix on high speed or overmix, as the mascarpone cheese can begin to separate.: The mixture should turn glossy and smooth, and you will notice the grainy texture of the cheeses disappear as air is gently incorporated. Low speed keeps the mixture dense and creamy, which yields a luxurious mouthfeel; high speed introduces too much air, risking a foamy, unstable filling. Overlooking the scrape step often leaves pockets of unmixed cheese, creating lumps in the final cheesecake.
- Add the cold, heavy whipping cream to a chilled mixing bowl, along with the remaining two tablespoons of sugar and vanilla extract. Whip on high speed until stiff peaks form. Manually fold the whipped cream into the mascarpone cream cheese mixture using a spatula.: The whipped heavy whipping cream should be glossy, holding sharp peaks that stand straight; folding it in lightens the dense cheesecake base while keeping structure. Use gentle strokes and a lift and fold technique to retain air, and folding by hand prevents overbeating. A common error is rushing and stirring vigorously which deflates the cream and yields a dense result.
- Add the peach mixture to the gelatin mixture and mix.: When combined, the puree and dissolved gelatin will have a silky sheen and a uniform texture, ready to stabilize the fruit flavor in the filling. Mixing thoroughly prevents streaks of fruit and ensures even distribution of the setting agent, which is crucial for consistent slices. If you see lumps or unevenness, strain and gently rewhisk, as undissolved gelatin will give a gritty mouthfeel.
- Add the peach gelatin mixture to the cheesecake batter and mix to combine.: At this point the batter will take on a pale peach hue and a fragrant, fruity scent; ensure the color is even for a pretty presentation. Gentle mixing preserves air while making sure the fruit flavor is spread throughout; vigorous stirring can cause separation or make the batter too loose. Watch for any watery separation, which means the puree had excess liquid and needs slight adjustment before setting.
- Fold in the remaining 2 cups of peach chunks with a spatula.: Folding in the fruit introduces delightful textural contrast, with little bursts of peach against the creamy base, and the sound of gentle folding should be minimal and quiet. Keep the chunks intact so you maintain those pleasant bites of fruit; overmixing will break them down and make the texture uniform and less interesting. Common mistakes include adding fruit that is too liquid or over-pureed, which can thin the batter.
- Spread the cheesecake filling evenly over the crust.: As you spread, aim for smooth, level strokes that create a flat, even surface; a spatula warmed slightly under hot water helps glide without tearing the crust. Even spreading ensures each slice looks tidy and holds together, and you can smooth the top for piping or leave it rustic. Uneven filling causes slices to slump on one side, so take a moment to level it before chilling.
- Set the cheesecake in the refrigerator to chill and firm for 5-6 hours or better overnight.: During chilling the gelatin finishes its job and the flavors meld, and you will notice the texture firming from glossy and soft to sliceable and set. Overnight chilling yields the best texture, while the minimum recommended time gives acceptable results; avoid rushing this step because insufficient chilling results in messy slices. Removing it too early is a frequent mistake, leading to a soft center and crumbling crust.
- Add the cold, heavy whipping cream and sugar to a large mixing bowl—whip on high speed until stiff peaks form. Transfer the whipped cream to a piping bag fitted with a large star tip and pipe it on top of the cheesecake.: The topping should be pillowy and stable, with peaks that hold their shape when piped, adding both visual appeal and a light counterpoint to the rich filling. Chilled equipment and cream help achieve firm peaks, and the added sugar stabilizes the whipped cream slightly. Overwhipping can turn it grainy and buttery, so watch closely and stop once the peaks hold.
- When ready to serve, carefully remove the cheesecake from the springform pan.: The edges should be clean and the crust intact; easing a thin knife around the pan before unlatching prevents tearing and helps maintain neat slices. Place the cake on a cool surface and slice with a hot, clean knife for the best presentation. A common error is attempting to remove the sides while the cheesecake is still too soft, causing collapse.
- Decorate with peach chunks. Always serve chilled. Slice and serve!: Fresh peach pieces on top add color and a burst of juicy texture, and serving chilled keeps the filling firm and refreshing. Use a gentle touch when arranging fruit so the topping looks natural and inviting. Serving at the wrong temperature is a frequent issue; if it is too cold it dulls flavor, if too warm it will be too soft to slice neatly.
- Store in the fridge for up to 4 days.: Properly wrapped, the cake will hold its texture and flavor for several days, and chilling helps prevent separation or sogginess. Place a cake dome or plastic wrap loosely over the top to protect from absorbing other refrigerator odors. Leaving it uncovered or at room temperature for extended periods leads to spoilage and a degraded texture.
Notes
- Use fresh peaches for peak flavor If ripe, peeled fresh peach gives the brightest, juiciest profile, and you should handle them gently to preserve chunks for folding into the batter rather than pureeing them all the way.
- Adjust sweetness carefully Taste the cheesecake batter before chilling and reduce sugar slightly if your peach is exceptionally sweet to keep balance between fruit and dairy.
- Stabilize whipped cream naturally Chill both the bowl and the heavy whipping cream and add sugar gradually while whipping to help peaks hold without overbeating.
- Make it ahead with confidence The cheesecake benefits from resting overnight, making it ideal for parties; store covered in the fridge and decorate just before serving.
- Pack the crust firmly Use the bottom of a measuring cup to press crumbs into an even layer so slices come out neatly without cracking.
- Use a piping bag substitute If you do not have a piping bag, place whipped heavy whipping cream in a plastic bag, snip a corner, and pipe to create attractive swirls.