No Bake Oreo Pie
No Bake Oreo Pie is one of those recipes I reach for when I want a showstopper that barely asks for my time, yet rewards everyone with rich, creamy, crunchy bliss. I remember bringing this pie to a summer potluck years ago, juggling a baby on my hip and a toddler asking for snacks, and somehow it became the most requested dessert of the night. I loved how the contrast between the silky filling and the crisp cookie crust felt indulgent without any oven drama.
My approach to No Bake Oreo Pie has evolved. I now prepare the crust first, then let the filling cool down in the fridge while I tidy up the kitchen and set the table. That pause gives the flavors time to marry and the texture to firm up perfectly. Guests always comment on the texture, so I take quiet pride in that little win. Over time I learned small tricks like chilling the crust in the freezer and whipping the cream until it sings, they make all the difference.
Recipe Snapshot
31 mins
30 mins
1 mins
Easy
320 kcal
American
Gluten-Free, Low FODMAP
Desserts
Food processor, Electric mixer, 9 inch pie plate, Mixing bowls, Piping bag
What We Adore About This No Bake Oreo Pie
1. Effortless elegance
I love how No Bake Oreo Pie looks like a baker spent hours, when really most of the work is stirring and chilling. I usually get to sip my coffee while it firms up, and that relaxed pace means I can chat with company or prep other dishes without stress.
2. Texture play
The combination of crunchy OREO crumbs and creamy filling makes every bite intriguing. I find that the contrast keeps people coming back to the slice, and it also hides small imperfections in presentation, which every home cook appreciates.
3. Scalable and crowd friendly
I often double the recipe for parties, because it travels well and stores easily. The components hold up in a cooler and still taste fresh the next day. I like recipes that make hosting simpler, and this one reliably does.
4. Minimal equipment, maximal pleasure
There is no oven required, which is a blessing in warm months or in kitchens with limited appliances. I usually pull out only a mixer and a food processor or a sturdy rolling pin, and that keeps cleanup fast. For people who hate long dishes, this is a gift.
5. Kid approved and adaptable
My kids adore decorating the top with cream swirls and whole OREO cookies. I appreciate that the recipe tolerates small changes, like using a different creme filled cookie, while still delivering the nostalgic flavor everyone recognizes.
Everything You Need for No Bake Oreo Pie
I treat the ingredients for No Bake Oreo Pie like a simple team where each player has a clear job. The cookies build texture and chocolate depth, the butter binds the crust, while the cream and cream cheese bring silkiness and structure. The powdered sugar and vanilla round out the sweetness and aroma, and a few extra cookies folded into the filling introduce satisfying crunch.
- 24 whole OREO or other creme-filled chocolate cookies: Crush and combine to form the pie crust base; pulse or smash until fine crumbs form and evenly pack into a pie pan for structure. Provide chocolatey flavor and crunchy texture that complements the creamy filling, helping hold the crust together when mixed with melted butter.
- 5 tablespoons unsalted butter, melted: Melt and mix with crushed cookies to bind the crust components together and create a cohesive, sliceable base. Add a rich, buttery mouthfeel that enhances the cookie flavor while firming the crust once chilled.
- 1 cup heavy whipping cream: Whip to soft peaks and fold into the filling to add lightness and volume, creating a silky, airy texture that balances the dense cream cheese. Contribute richness and a smooth, creamy mouthfeel that elevates the overall dessert.
- 8 ounces cream cheese, at room temperature: Soften and beat until smooth to form the creamy foundation of the filling, providing tangy richness and body. Act as the primary stabilizer that holds the filling together and contrasts the sweet cookie elements with its slight tang.
- 1/4 cup plain Greek yogurt (can substitute sour cream): Add tangy creaminess and slight acidity to balance the sweetness of the filling; can be substituted if needed without significantly changing texture. Help thin the filling slightly for easier blending while contributing a fresh, cultured flavor.
- 1 cup powdered sugar: Sweeten and stabilize the filling by dissolving into the cream cheese mixture, providing smooth sweetness and slight thickening. Assist in balancing tangy and bitter flavors while helping the filling set when chilled.
- 1 teaspoon vanilla extract: Flavor and enhance the filling with warm aromatic notes; stir in for a subtle, familiar vanilla profile. Elevate overall taste complexity and round out the sweetness of the pie filling.
- 9 whole OREO or other creme-filled chocolate cookies: Chop or crush and fold into or sprinkle over the filling to add extra cookie texture and visual appeal. Provide concentrated bursts of chocolate and creme that reinforce the Oreo character throughout the pie.
- 3/4 cup heavy whipping cream: Whip to firm peaks and gently fold into the cream cheese mixture to lighten and stabilize the filling, creating a mousse-like consistency. Offer additional volume and creaminess while helping the pie hold its shape when sliced.
- 5 to 6 whole OREO or other creme-filled chocolate cookies: Reserve and roughly chop to garnish the top of the pie, adding crunchy contrast and decorative appeal. Provide final texture and flavor accents that signal the dessert’s cookie identity to each bite.
Step by Step Guide for No Bake Oreo Pie

This guide walks you through each stage with sensory cues and reasons for the choices I make. I like to keep instructions personable and descriptive so you can tell when things are right, not just follow steps mechanically.
- Add the 24 OREO cookies to the bowl of a food processor. Process into fine crumbs. Then drizzle in the melted butter, and pulse until the crumbs combine with the butter. Press the crumb mixture into the bottom and sides of a deep-dish, 9-inch pie plate. Put it into the freezer while you prepare the filling.: You will notice the kitchen filling with a deep, chocolate aroma as the OREO cookies pulverize, and the texture will change from coarse crumbs to a sandy mass once the butter binds them. Pressing the mixture into the pie plate should feel firm under your fingertips, and a clean sound from the press indicates compacting. This step matters because a well pressed crust holds together when you slice, offering that satisfying snap at the edge. A common mistake is using too little pressure, which leaves the base crumbly, or using warm butter that over saturates the crumbs making the crust greasy. If the crumbs seem too loose, chill briefly and press again.
- Add the heavy cream to a large bowl. Use an electric mixer to beat the cream to stiff peaks (1 or 2 minutes). Set the whipped cream aside.: As you whip the cream , listen for a change from liquid sloshing to a thicker, denser whipping sound; visually, the cream will transform from glossy to matte and form peaks that stand tall without collapsing. This aeration lightens the filling and provides lift, giving the pie a featherlike mouthfeel. Avoid under whipping which yields a loose filling, and over whipping which can make the cream grainy or buttery. If you see small curds forming, stop immediately and fold gently to rescue texture.
- In a separate bowl, use the electric mixer to combine the cream cheese, powdered sugar and vanilla until smooth and well-combined. Transfer the mixture to the bowl with the whipped cream, and use a rubber spatula to fold them together.: The cream cheese mixture should look glossy and velvety when fully incorporated with the powdered sugar and vanilla . When you fold into the whipped cream , do so with a gentle sweeping motion to keep the air you whipped in, creating a light, mousse like texture. You should feel a slight resistance as the spatula moves through the mixture and see a silky ribbon fold over itself. If you mix too vigorously you will deflate the whipped cream , producing a dense filling. A common pitfall is adding cold cream cheese which leaves lumps; ensure it is room temperature for a smooth result.
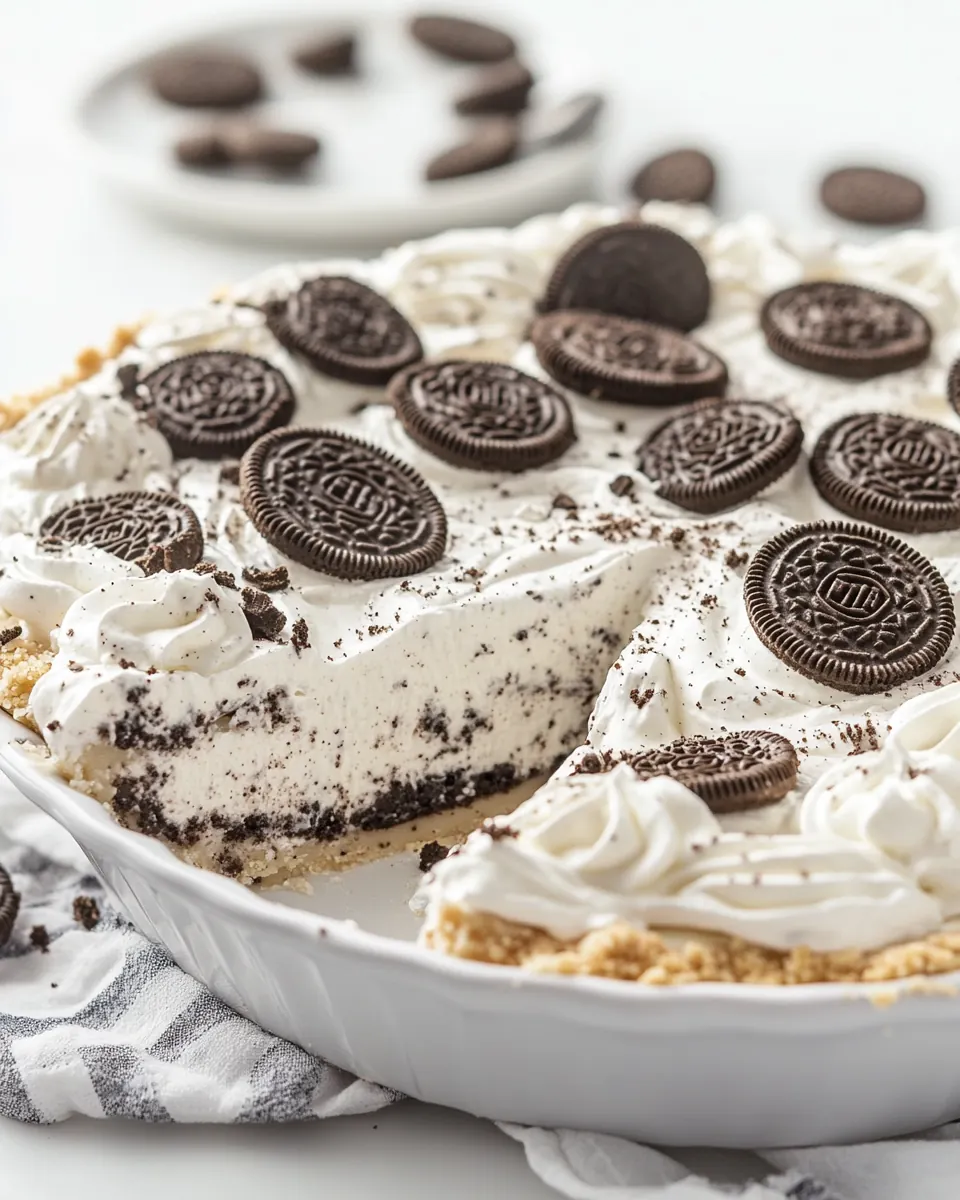
- Add 9 OREO cookies to a zip baggie, and use a rolling pin or meat mallet to smash the cookies into small pieces. Stir the crushed cookies into the filling mixture. Scrape the filling into the frozen crust, and smooth the top. Refrigerate.: When you smash the nine OREO cookies you want a range of small chunks and crumbs so the filling has visible chocolate bits and a pleasant crunch. Stirring them into the filling distributes those pockets of texture; you will see dark specks throughout a pale filling which looks appealing and promises contrast. Spreading the filling into the chilled crust should feel cool to the touch, and the top should become glossy then matte as it settles. Refrigeration is crucial here because it allows the fats and cream to firm up, creating sliceable structure. Avoid adding too many crumbs or very large chunks, otherwise slices will be uneven and messy.
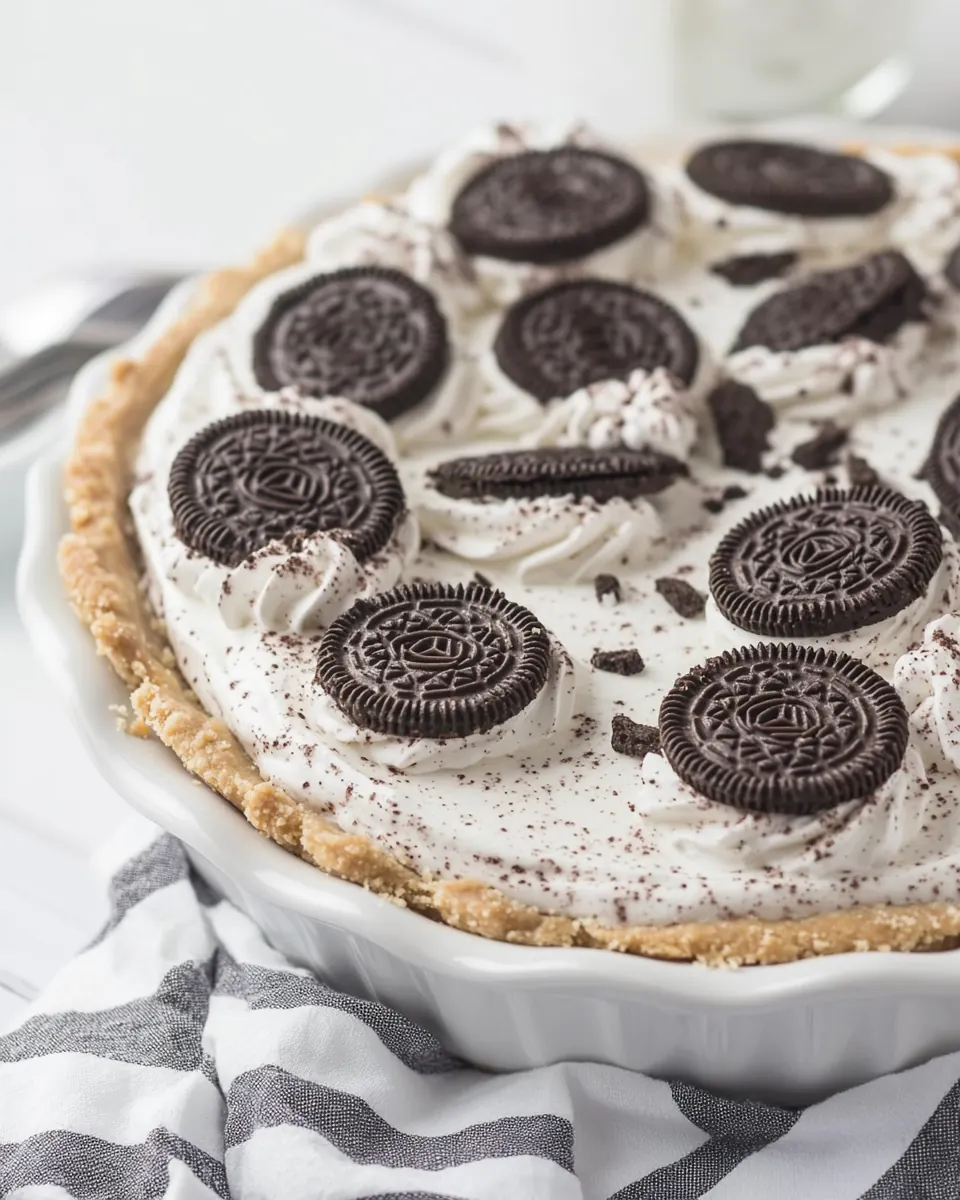
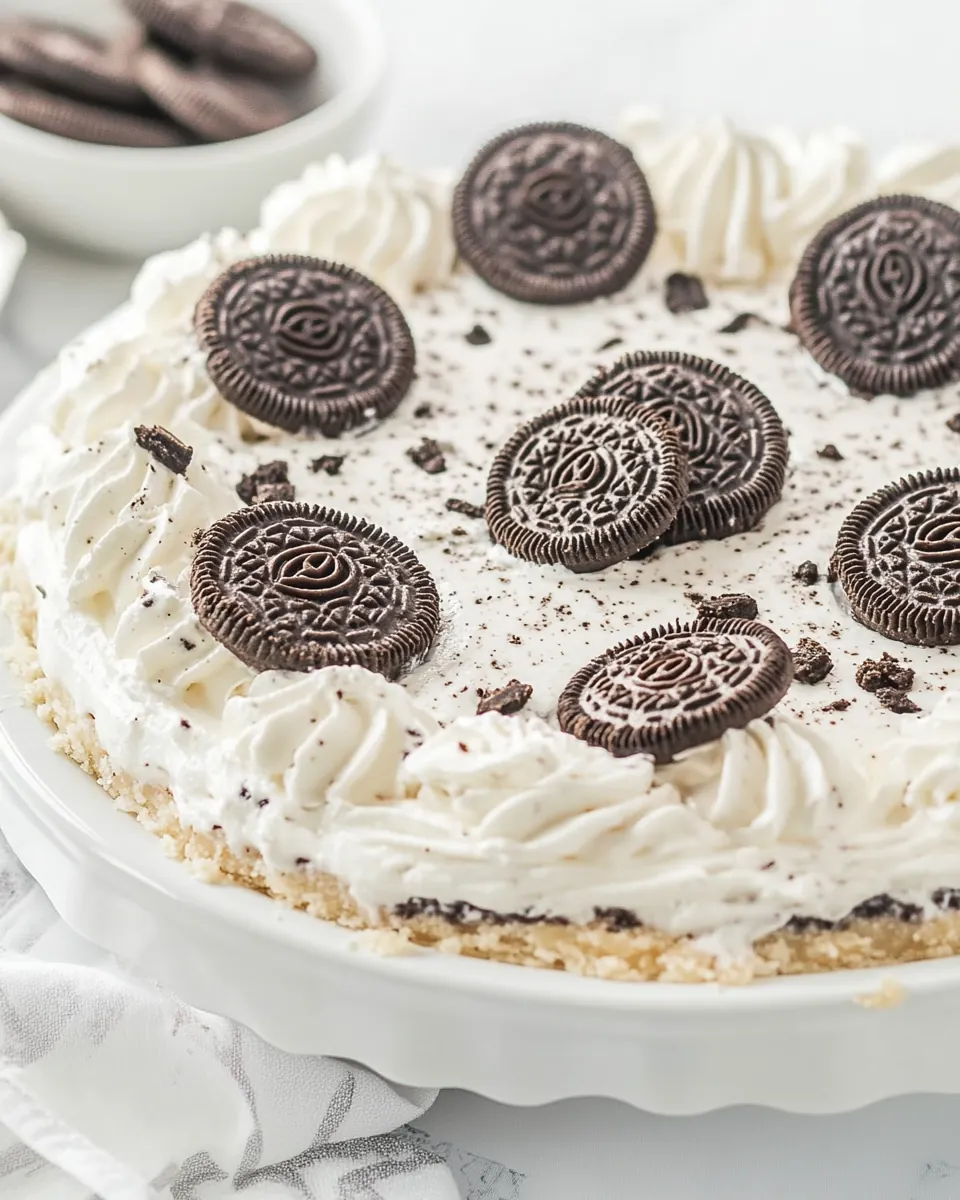
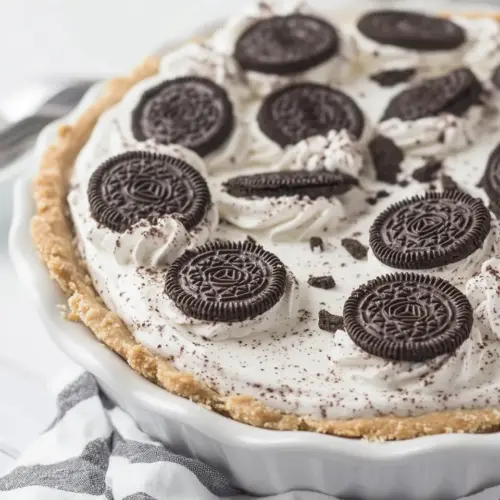
- In a medium bowl, use an electric mixer to whip the heavy cream to stiff peaks. Add the whipped cream to a piping bag with a decorative tip, and pipe swirls along the edge of the pie (alternately, you can just spoon dollops of the whipped cream onto the pie). Place a whole OREO into each swirl of cream. Refrigerate until ready to serve.: The final whipped cream should feel pillowy and cool, and the act of piping creates tall, white ridges that beautifully frame the darker filling. When you press a whole OREO into each swirl you get a delightful junction of textures and a classic look that makes people smile. Keep the pie chilled until serving to maintain the whipped topping shape and the filling firmness. A typical error is piping too early on a warm pie which can cause the cream to slide; always make sure the filling is thoroughly cold before decorating.
Tips and Variations
I like offering a handful of practical tips to make sure your No Bake Oreo Pie turns out exactly as you hope. These suggestions cover small technique details and presentation ideas that elevate the final result.
- Chill everything: Cold bowls and chilled heavy cream whip faster and hold structure longer.
- Crumb size matters: For the filling, aim for a mix of fine crumbs and small chunks to maintain pleasantly varied texture.
- Press firmly: Compact the crust into the pie plate so slices hold together instead of crumbling apart.
- Room temperature cream cheese: This prevents lumps and ensures a silky smooth filling without over mixing.
- Piping tip: Use a large round or star tip for dramatic swirls and to make room for whole OREO garnish.
- Make ahead: Prepare a day ahead and keep refrigerated, the flavors develop and texture improves overnight.
What to Serve Alongside No Bake Oreo Pie
This pie pairs well with coffee or a small scoop of vanilla ice cream, and it easily adapts to casual gatherings or holiday dessert tables. I like to think about contrast and occasion when serving it, matching the richness with lighter accompaniments.
- Fresh berries: A small bowl of berries adds a tart counterpoint to the sweet pie.
- Espresso or strong coffee: The bitter notes of coffee help cut through the creaminess for a balanced finish.
- Vanilla ice cream: A classic scoop pairs wonderfully with each slice, adding chilled creaminess and scoopable texture.
- Serve for celebrations: It makes a fun birthday or potluck dessert that appeals to adults and kids alike.
- Storage tips: Keep the pie covered in the refrigerator for up to three days for best texture; avoid freezing as the whipped components lose structure.
- Seasonal pairing: I like it in spring and summer because it does not require an oven, and it stays bright and refreshing compared to heavier baked desserts.
FAQ
Conclusion
What makes this pie special is its perfect balance of crunchy cookie crust and luxuriously creamy filling, all without turning on the oven. Give No Bake Oreo Pie a try the next time you want a fuss free dessert that still looks and tastes impressive. It is reliable, crowd pleasing, and one of those dishes that becomes a go to for celebrations and quiet nights alike.
No Bake Oreo Pie
Equipment
- Food Processor
- Electric Mixer
- 9-inch pie plate
- Mixing Bowls
- Piping Bag
Ingredients
- 24 whole OREO or other creme-filled chocolate cookies Crush and combine to form the pie crust base; pulse or smash until fine crumbs form and evenly pack into a pie pan for structure. Provide chocolatey flavor and crunchy texture that complements the creamy filling, helping hold the crust together when mixed with melted butter.
- 5 tablespoons unsalted butter, melted Melt and mix with crushed cookies to bind the crust components together and create a cohesive, sliceable base. Add a rich, buttery mouthfeel that enhances the cookie flavor while firming the crust once chilled.
- 1 cup heavy whipping cream Whip to soft peaks and fold into the filling to add lightness and volume, creating a silky, airy texture that balances the dense cream cheese. Contribute richness and a smooth, creamy mouthfeel that elevates the overall dessert.
- 8 ounces cream cheese, at room temperature Soften and beat until smooth to form the creamy foundation of the filling, providing tangy richness and body. Act as the primary stabilizer that holds the filling together and contrasts the sweet cookie elements with its slight tang.
- 1/4 cup plain Greek yogurt (can substitute sour cream) Add tangy creaminess and slight acidity to balance the sweetness of the filling; can be substituted if needed without significantly changing texture. Help thin the filling slightly for easier blending while contributing a fresh, cultured flavor.
- 1 cup powdered sugar Sweeten and stabilize the filling by dissolving into the cream cheese mixture, providing smooth sweetness and slight thickening. Assist in balancing tangy and bitter flavors while helping the filling set when chilled.
- 1 teaspoon vanilla extract Flavor and enhance the filling with warm aromatic notes; stir in for a subtle, familiar vanilla profile. Elevate overall taste complexity and round out the sweetness of the pie filling.
- 9 whole OREO or other creme-filled chocolate cookies Chop or crush and fold into or sprinkle over the filling to add extra cookie texture and visual appeal. Provide concentrated bursts of chocolate and creme that reinforce the Oreo character throughout the pie.
- 3/4 cup heavy whipping cream Whip to firm peaks and gently fold into the cream cheese mixture to lighten and stabilize the filling, creating a mousse-like consistency. Offer additional volume and creaminess while helping the pie hold its shape when sliced.
- 5 to 6 whole OREO or other creme-filled chocolate cookies Reserve and roughly chop to garnish the top of the pie, adding crunchy contrast and decorative appeal. Provide final texture and flavor accents that signal the dessert’s cookie identity to each bite.
Instructions
- Add the 24 OREO cookies to the bowl of a food processor. Process into fine crumbs. Then drizzle in the melted butter, and pulse until the crumbs combine with the butter. Press the crumb mixture into the bottom and sides of a deep-dish, 9-inch pie plate. Put it into the freezer while you prepare the filling.: You will notice the kitchen filling with a deep, chocolate aroma as the OREO cookies pulverize, and the texture will change from coarse crumbs to a sandy mass once the butter binds them. Pressing the mixture into the pie plate should feel firm under your fingertips, and a clean sound from the press indicates compacting. This step matters because a well pressed crust holds together when you slice, offering that satisfying snap at the edge. A common mistake is using too little pressure, which leaves the base crumbly, or using warm butter that over saturates the crumbs making the crust greasy. If the crumbs seem too loose, chill briefly and press again.
- Add the heavy cream to a large bowl. Use an electric mixer to beat the cream to stiff peaks (1 or 2 minutes). Set the whipped cream aside.: As you whip the cream , listen for a change from liquid sloshing to a thicker, denser whipping sound; visually, the cream will transform from glossy to matte and form peaks that stand tall without collapsing. This aeration lightens the filling and provides lift, giving the pie a featherlike mouthfeel. Avoid under whipping which yields a loose filling, and over whipping which can make the cream grainy or buttery. If you see small curds forming, stop immediately and fold gently to rescue texture.
- In a separate bowl, use the electric mixer to combine the cream cheese, powdered sugar and vanilla until smooth and well-combined. Transfer the mixture to the bowl with the whipped cream, and use a rubber spatula to fold them together.: The cream cheese mixture should look glossy and velvety when fully incorporated with the powdered sugar and vanilla . When you fold into the whipped cream , do so with a gentle sweeping motion to keep the air you whipped in, creating a light, mousse like texture. You should feel a slight resistance as the spatula moves through the mixture and see a silky ribbon fold over itself. If you mix too vigorously you will deflate the whipped cream , producing a dense filling. A common pitfall is adding cold cream cheese which leaves lumps; ensure it is room temperature for a smooth result.
- Add 9 OREO cookies to a zip baggie, and use a rolling pin or meat mallet to smash the cookies into small pieces. Stir the crushed cookies into the filling mixture. Scrape the filling into the frozen crust, and smooth the top. Refrigerate.: When you smash the nine OREO cookies you want a range of small chunks and crumbs so the filling has visible chocolate bits and a pleasant crunch. Stirring them into the filling distributes those pockets of texture; you will see dark specks throughout a pale filling which looks appealing and promises contrast. Spreading the filling into the chilled crust should feel cool to the touch, and the top should become glossy then matte as it settles. Refrigeration is crucial here because it allows the fats and cream to firm up, creating sliceable structure. Avoid adding too many crumbs or very large chunks, otherwise slices will be uneven and messy.
- In a medium bowl, use an electric mixer to whip the heavy cream to stiff peaks. Add the whipped cream to a piping bag with a decorative tip, and pipe swirls along the edge of the pie (alternately, you can just spoon dollops of the whipped cream onto the pie). Place a whole OREO into each swirl of cream. Refrigerate until ready to serve.: The final whipped cream should feel pillowy and cool, and the act of piping creates tall, white ridges that beautifully frame the darker filling. When you press a whole OREO into each swirl you get a delightful junction of textures and a classic look that makes people smile. Keep the pie chilled until serving to maintain the whipped topping shape and the filling firmness. A typical error is piping too early on a warm pie which can cause the cream to slide; always make sure the filling is thoroughly cold before decorating.
Notes
- Chill everything: Cold bowls and chilled heavy cream whip faster and hold structure longer.
- Crumb size matters: For the filling, aim for a mix of fine crumbs and small chunks to maintain pleasantly varied texture.
- Press firmly: Compact the crust into the pie plate so slices hold together instead of crumbling apart.
- Room temperature cream cheese: This prevents lumps and ensures a silky smooth filling without over mixing.
- Piping tip: Use a large round or star tip for dramatic swirls and to make room for whole OREO garnish.
- Make ahead: Prepare a day ahead and keep refrigerated, the flavors develop and texture improves overnight.