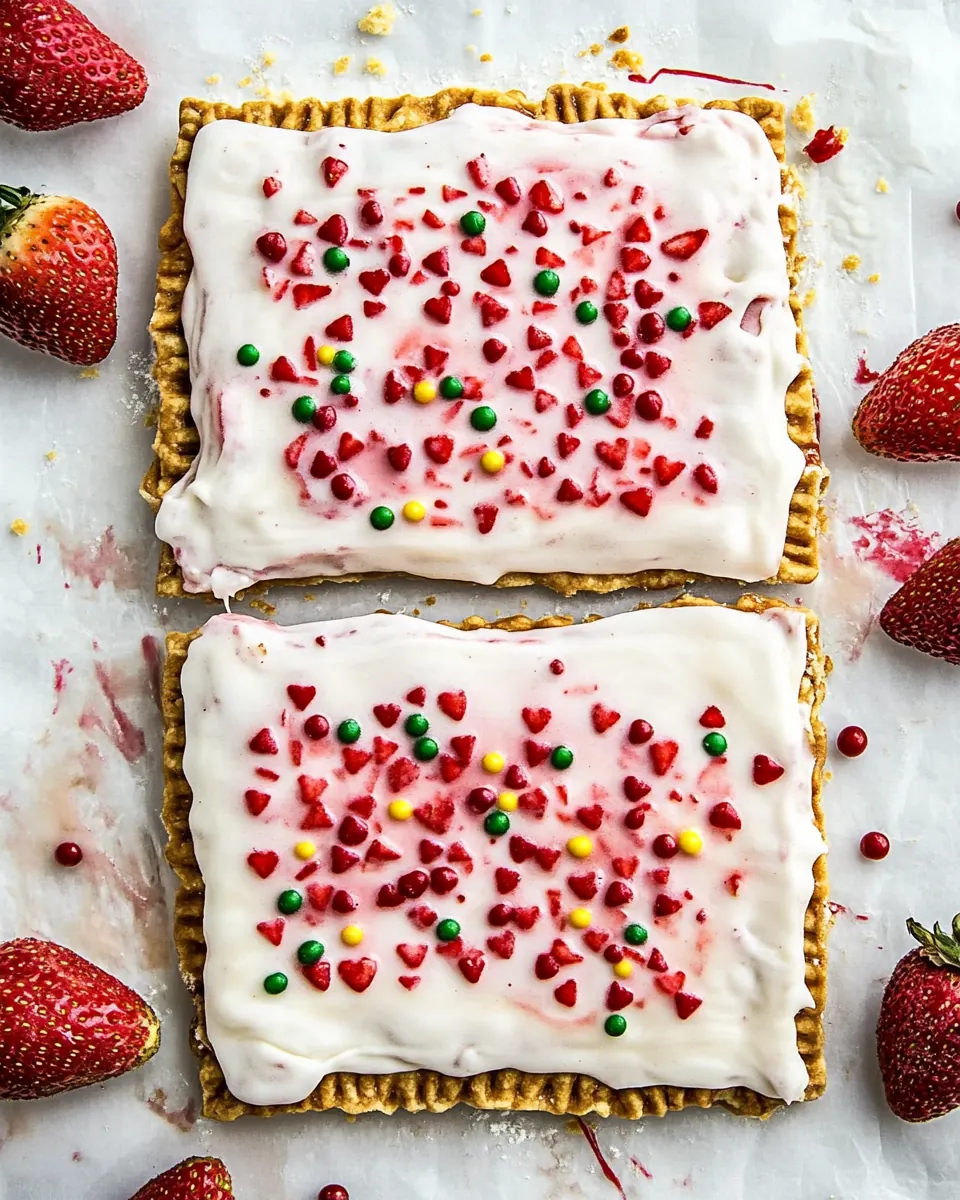
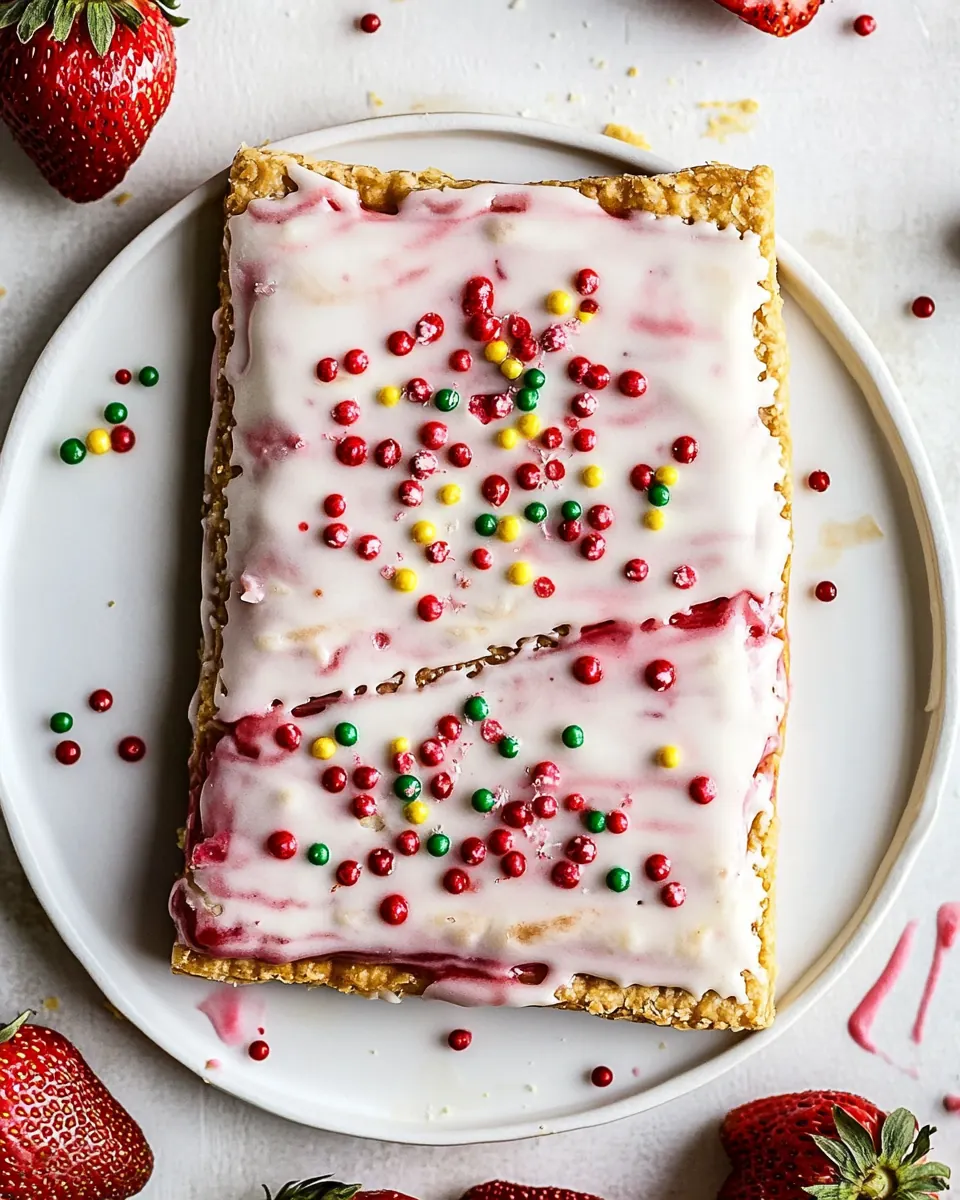
Giant Frosted Strawberry Pop Tart
Giant Frosted Strawberry Pop Tart began as a laughable idea at a summer picnic when I wanted everything nostalgic but larger than life. I remember the sticky sweetness on my fingers as we passed around a massive pastry, the edges crimped imperfectly, and how a simple jam filling turned into a full on conversation starter. That first time, I kept stealing tiny bites while pretending to take notes, and every neighbor wanted the recipe by the end of the afternoon.
Over the years I kept tweaking the dough to be flakier and less fussy, and the filling so it tasted homemade not jarred. There are evenings when I make one to cheer up a friend, and others when I bake one because I need a confident, showy dessert that still feels homey. We serve ours warm when we can, letting the frosting set just enough to hold sprinkles without melting into a sad glaze. You will find this recipe forgiving if you follow a few simple textures and visual cues.
Recipe Snapshot
60 mins
30 mins
30 mins
Medium
250 kcal
American
Gluten-Free, Low FODMAP
Desserts
Mixing bowl, Parchment lined baking sheet, Rolling pin, Whisk, Sharp knife, Bench scraper
What Makes This Giant Frosted Strawberry Pop Tart Special
Big, nostalgic satisfaction
I adore how Giant Frosted Strawberry Pop Tart captures that childhood joy but scaled up so it feels celebratory. The filling is bright and jammy, and when you cut through the flaky crust you get that classic, comforting flavor in every bite.
Simple pantry ingredients
I love that the ingredient list relies on familiar staples like flour, butter, and powdered sugar. It makes this recipe approachable on a weekday afternoon or when you want to impress without a long shopping trip.
Technique driven results
There is a satisfying technique to the dough and assembly that rewards patience. Chilling the dough is worth the wait, and I’ll often pause to admire how the layers look just before baking, because that tells me the texture is on track.
Customizable finishing
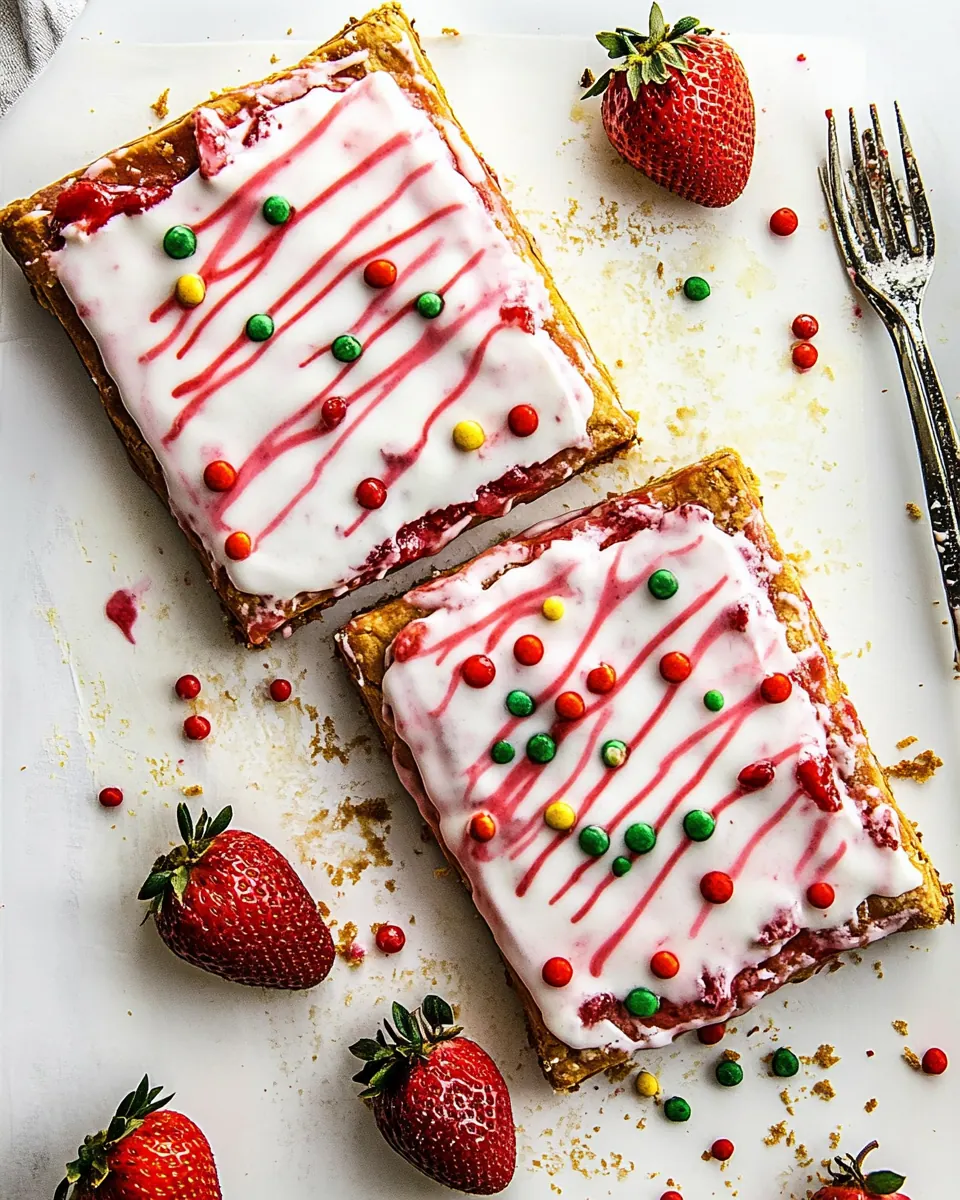
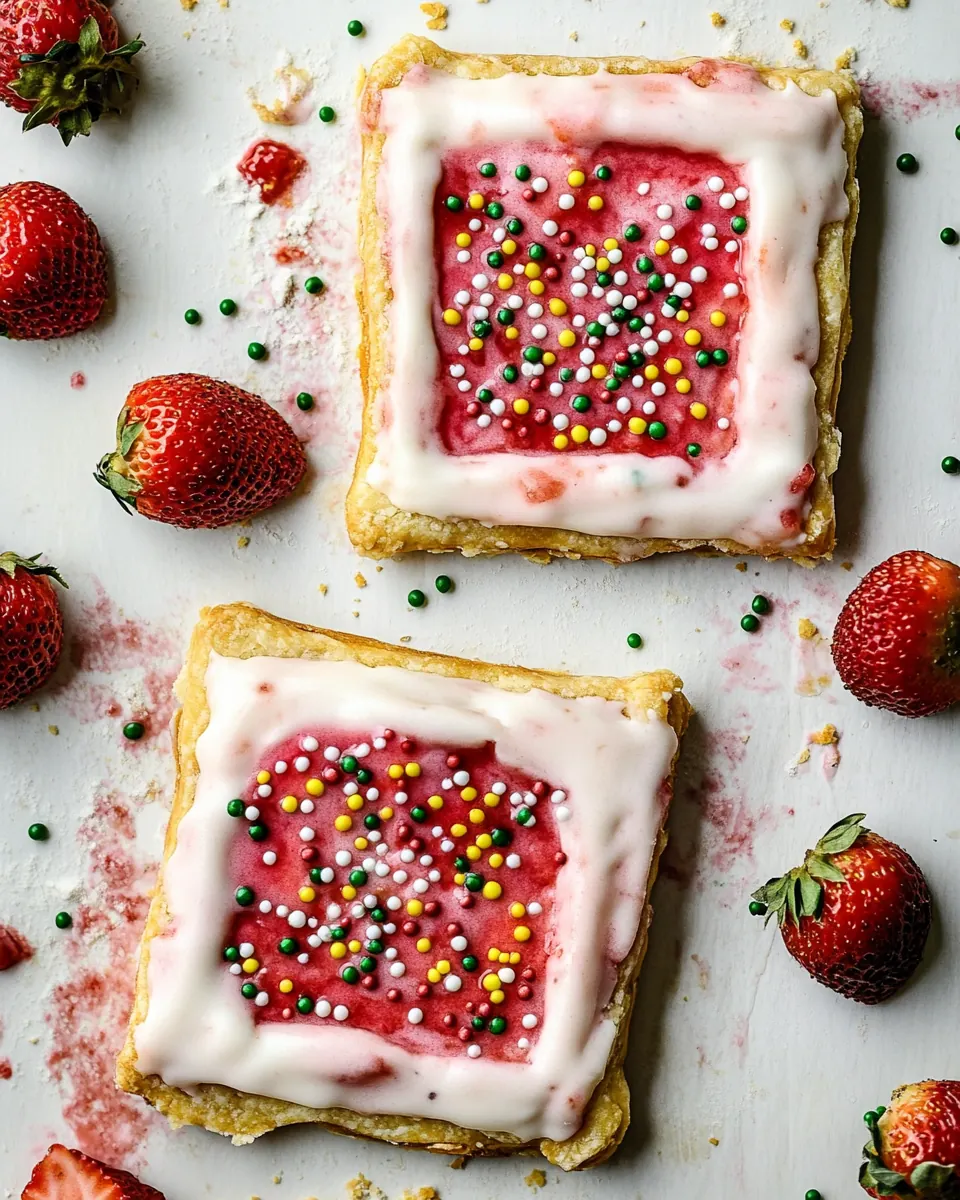
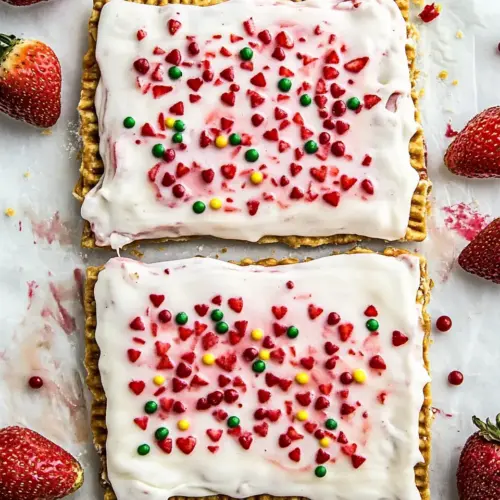
The frosting step is where personality shines. I often adjust the milk to get a thicker or thinner glaze, and the sprinkles make it playful. You can make it glossy or matte, depending on how long you let it set.
Great for gatherings
This recipe scales, and cutting into nine rectangles makes it easy to serve. I find people gather around a large tart the way they gather around a pie, and that communal vibe is one of my favorite outcomes.
Essential Ingredients for Giant Frosted Strawberry Pop Tart
The philosophy behind these ingredients is straightforward: build a flaky, tender crust, a bright jammy center, and a sweet, silky glaze that ties everything together. The key players are the flours for structure, butter for flakiness and flavor, and strawberry jam for that unmistakable filling. The powdered sugar and vanilla extract turn the top into something nostalgic and irresistible.
- 1 cup all-purpose flour: Provide structure and bulk to the dough, contributing to a tender but sturdy crust; sifts easily and balances hydration with the whole wheat flour. Combine with other flours for a consistent texture and to avoid overworking the gluten while rolling the pastry.
- 1 1/2 cup white whole wheat flour: Add nuttiness, fiber, and a heartier texture to the crust, enhancing flavor depth and chewiness; pairs with all-purpose flour to keep the pastry from becoming too dense. Measure carefully to maintain the right flour ratio for a flaky final product.
- 2 sticks (1 cup) cold salted butter, cut into 1/2 inch pieces: Create flakiness and richness in the pastry by shortening gluten strands and adding moisture; chill the butter to ensure distinct layers during baking. Cut into small pieces and work quickly to prevent melting, preserving the desired laminated texture.
- 1/2 teaspoon kosher salt: Enhance overall flavor balance and control sweetness by seasoning the dough slightly; helps relax gluten which aids in rolling out the pastry. Dissolve evenly into dry ingredients so the salt does not create pockets or uneven flavor.
- 1 egg beaten, for brushing: Provide a glossy finish and help seal edges when brushing over the dough; beaten and applied before baking, it promotes browning and adds an appealing sheen. Use sparingly to avoid soggy spots where filling contacts the egg wash.
- 1 jar (13-16 ounces) strawberry jam/preserves: Supply the sweet, fruity filling and primary flavor for the pop tart; choose a spreadable texture to avoid overly runny leaks during baking. Spoon into the pastry center leaving margins for sealing, and ensure even distribution for consistent bites.
- 2 cups powdered sugar: Form the base of the sweet glaze, dissolving into liquid and flavorings to create a smooth topping; adds sweetness and helps the glaze set on cooling. Sift beforehand to avoid lumps and adjust quantity with milk for desired thickness.
- 1 tablespoon vanilla extract: Introduce warm aromatic notes to the glaze, complementing the strawberry filling and enhancing overall flavor complexity; mix thoroughly to distribute evenly through the powdered sugar. Use pure extract for a clean vanilla profile without altering texture.
- 3 6 tablespoons hot milk: Adjust glaze consistency and help dissolve powdered sugar into a spreadable icing by thinning with hot milk; add gradually until achieving a pourable but not runny glaze. Heat helps fully incorporate sugar and creates a glossy finish when applied warm.
- fun sprinkles: Add colorful visual appeal and a playful texture contrast on top of the glaze; sprinkle sparingly to avoid overwhelming the flavor. Choose non-melting decorations suited for baked goods to retain shape and brightness after glazing.
Recipe Directions for Giant Frosted Strawberry Pop Tart
I like to think of these directions as a conversation between you and the dough, where patience pays back in layers and flavor. Below are the steps rewritten with sensory cues, troubleshooting notes, and the reasons behind each technique so you can feel confident as you work.
- To make the dough. In a bowl, combine the whole wheat flour, flour, and salt. Add the butter and toss with the flour until the mix clumps together. Add 1/4-1/3 cup cold water, 1 tablespoon at a time, until the dough forms a ball. Or use a food processor. Turn the dough out onto a floured surface and divide in half. Roll each half out into a 1/4-inch thick rectangle, about 8×16 inches. Transfer 1 sheet to a parchment-lined baking sheet and evenly spread on the jam, leaving a 1-inch border around the edge. Lay the other half of the dough over the filling and seal the edges by crimping with the back of a fork. Cover the baking sheets and place in the fridge for 1 hour or in the freezer for 20 minutes. Preheat the oven to 400° F. Brush the pop-tart with the beaten egg and bake for 30-35 minutes, until the crust is golden brown. Let cool. Meanwhile, in a medium bowl, whisk together the powdered sugar, vanilla, and 2 tablespoons hot milk, adding the milk to thin the frosting as desired. Spread the frosting over the pop-tart. Let the frosting set a few minutes, then decorate with sprinkles. Let sit 1 hour or overnight to allow the frosting to dry. Cut the tart into 9 rectangles. Serve or store in an airtight container for up to 3 days at room temperature.: The first moment you mix dry ingredients you will notice the aroma of flour and the faint salty edge from the salt . This baseline scent is subtle but important, because even distribution of dry ingredients ensures even seasoning and texture. If the dry mix is lumpy, that can lead to pockets of unseasoned dough later on, so sift or whisk briefly. A common mistake is skimping on mixing here which leads to uneven flavor and texture in the final crust.
- Add the butter and toss with the flour until the mix clumps together.: When you work the cold butter into the flour you want pea sized pieces that look like coarse crumbs with some larger clumps. You will hear a faint rubbing sound if you use fingertips, and the mixture will turn slightly paler. Those butter bits create steam pockets while baking, producing flakiness. Avoid overworking, which warms the butter and makes the dough tough.
- Add 1/4 1/3 cup cold water, 1 tablespoon at a time, until the dough forms a ball.: As you add cold water, the dough should come together with a barely cohesive feel, not sticky or wet. The coldness is key for keeping the butter solid. Press a small piece, and if it holds without crumbling it is ready. A common misstep is adding too much water at once, which makes the dough sticky and harder to roll.
- Or use a food processor.: Using a food processor speeds things up and gives very consistent butter distribution. Pulse in short bursts until the mixture looks mealy and then add cold water through the feed tube until it barely clumps. The sound will change from rapid chopping to slower, rhythmic pulses, indicating a cohesive mass. Overprocessing will warm the butter, so pulse only as needed.
- Turn the dough out onto a floured surface and divide in half.: The dough will feel cool and slightly tacky under your hands when ready. Lightly dust the surface with flour so it does not stick, and use a bench scraper to split it evenly. Dividing ensures uniform thickness and baking time. If you skip dividing, one side may bake faster and brown more intensely.
- Roll each half out into a 1/4 inch thick rectangle, about 8×16 inches.: As you roll, press evenly and rotate the dough; you should see a smooth matte surface and even thickness. The edges should remain straight so the final pieces are neat. The pressure you use affects flakiness, so do not overpress. A common error is rolling too thin which yields a fragile crust that can tear when filled.
- Transfer 1 sheet to a parchment lined baking sheet and evenly spread on the jam, leaving a 1 inch border around the edge.: The glossy strawberry jam will contrast with the matte dough, and spreading it evenly prevents soggy spots. Keep the jam away from the edge to allow a clean seal. If your jam is very runny, blot slightly with a spoon to avoid seepage which causes burnt edges or leakage during baking.
- Lay the other half of the dough over the filling and seal the edges by crimping with the back of a fork.: When you place the top layer the dough should sit gently without sliding; crimping compresses the border to trap the jam. You should hear a faint press as the fork makes marks and see a defined ridge. Poor sealing leads to jam oozing during baking, so press firmly and evenly along the entire edge.
- Cover the baking sheets and place in the fridge for 1 hour or in the freezer for 20 minutes.: Chilling firms the butter back up and relaxes gluten, preventing shrinkage and promoting flake. The dough will feel colder and stiffer, which helps it hold structure in the oven. Skipping this step can cause spreading and a denser texture.
- Preheat the oven to 400° F.: A hot oven jump starts steam formation and browning, creating a golden crust. You will notice a warm dry scent in the kitchen as it reaches temperature. An oven that is too cool will produce a pale, heavy crust, so use an oven thermometer if you suspect temperature variance.
- Brush the pop tart with the beaten egg and bake for 30 35 minutes, until the crust is golden brown.: The beaten egg produces a glossy, well colored finish and helps set the surface. As it bakes you will hear quiet crackles and see the edges puff slightly, turning from pale to a deep golden tone. Under baking leaves a pale, doughy texture, while overbaking makes the crust dry, so aim for that warm golden cue.
- Let cool.: Cooling lets the internal steam settle and prevents the frosting from sliding off when applied. The tart will exhale a gentle jam aroma as it cools and the crust firms. Cutting too soon may cause the filling to run, so be patient for a firmer slice.
- Meanwhile, in a medium bowl, whisk together the powdered sugar, vanilla, and 2 tablespoons hot milk, adding the milk to thin the frosting as desired.: The powdered sugar will bloom into a glossy sheen as you whisk it with warm milk and vanilla extract . Start with less milk and add more to reach a spreadable consistency; you want it smooth and not grainy. Too much milk makes the glaze runny and unable to set properly.
- Spread the frosting over the pop tart.: Use a spatula to work from the center outward, creating a smooth finish that catches light. The contrast between the matte crust and the glossy glaze is part of the appeal. If the glaze is too warm it might sink in, so let it cool slightly first for best coverage.
- Let the frosting set a few minutes, then decorate with sprinkles.: As the glaze cools it will dull slightly and become tacky enough for decorations to adhere. The sprinkles add a celebratory crunch and color that makes the tart feel special. If you add heavy or moist toppings too soon they will sink, so wait until tacky but not fully dry.
- Let sit 1 hour or overnight to allow the frosting to dry.: Resting gives the glaze time to form a thin, sliceable skin. Overnight resting deepens the flavors as the crust and filling harmonize. Cutting too early risks smearing the glaze and losing that pretty cross section.
- Cut the tart into 9 rectangles.: Use a sharp knife and a steady hand; you should see clean edges and a defined jam layer. A warm blade may smear, so wipe between cuts for tidy pieces. Uneven cutting can lead to inconsistent portions when serving.
- Serve or store in an airtight container for up to 3 days at room temperature.: At room temperature the crust stays tender and the glaze remains pleasant for a few days. Store in a single layer if possible to avoid crushing the frosting. Refrigeration can dry the crust, so only refrigerate if your room is very warm or humid.
Recipe Tips about Giant Frosted Strawberry Pop Tart
This recipe benefits from a few practical tips that make the process smoother and the results more dependable. Below are my favorite pointers, each starting with a focused phrase you can use as a quick reference while baking.
- Keep ingredients cold When you cut the butter into the flour, work quickly and chill the dough if it becomes warm. Cold butter is what gives the crust its flakiness, and even brief warming can reduce the steam pockets that create layers.
- Measure flour properly Spoon and level the flour into your measuring cup rather than scooping. Too much flour will make the dough dry and tough, changing the texture of the final tart.
- Adjust glaze consistency Add hot milk tablespoon by tablespoon to the powdered sugar until the glaze reaches the desired thickness. Thicker glaze sets faster for cutting, thinner glaze gives a glossy pourable look.
- Seal edges well Press the edges firmly with the back of a fork to prevent jam from leaking during baking. Any gaps will cause the filling to bubble out and brown the edges prematurely.
- Chill assembled tart Refrigerate for an hour or freeze for twenty minutes before baking to firm the butter and relax gluten, which helps the tart hold shape and bake evenly.
- Store at room temperature Keep finished pieces in an airtight container at room temperature for up to three days to preserve the texture of the crust and the gloss of the glaze.
What to Pair With Giant Frosted Strawberry Pop Tart
These serving ideas help you turn the tart into a full experience, whether casual brunch or a festive dessert centerpiece. Choose pairings that complement the sweet, buttery profile and bright strawberry notes.
- Simple beverage pairing Serve with a cup of hot coffee or a creamy tea to balance the sweetness; warm drinks echo the comfort of the pastry.
- Brunch spread Place alongside fresh fruit and yogurt for a playful brunch; the tart becomes the showpiece with lighter sides to balance richness.
- Party dessert For gatherings, cut into nine rectangles and arrange on a platter with small plates and napkins so guests can nibble while mingling.
- Kid friendly The colorful sprinkles make this a fun choice for birthdays or celebrations where a full cake feels like overkill.
- Storage advice Store in an airtight container at room temperature for up to three days; if you need longer storage, freeze wrapped pieces and thaw gently.
- Seasonal serving In spring, pair with lightly macerated berries or a citrus salad to brighten the plate and add fresh contrast.
FAQ
Conclusion
This Giant Frosted Strawberry Pop Tart is special because it turns a simple, nostalgic treat into a showstopper that still feels homey. The balance of a flaky, buttery crust, jammy strawberry center, and a sweet vanilla glaze makes it both comforting and celebratory. Give it a try when you want something playful for brunch or a dessert that sparks conversation. You will find the techniques easy to master, and the result will make people smile.
Giant Frosted Strawberry Pop Tart
Equipment
- Mixing Bowl
- Parchment lined baking sheet
- Rolling Pin
- Whisk
- Sharp Knife
- Bench scraper
Ingredients
- 1 cup all-purpose flour Provide structure and bulk to the dough, contributing to a tender but sturdy crust; sifts easily and balances hydration with the whole wheat flour. Combine with other flours for a consistent texture and to avoid overworking the gluten while rolling the pastry.
- 1 1/2 cup white whole wheat flour Add nuttiness, fiber, and a heartier texture to the crust, enhancing flavor depth and chewiness; pairs with all-purpose flour to keep the pastry from becoming too dense. Measure carefully to maintain the right flour ratio for a flaky final product.
- 2 sticks (1 cup) cold salted butter, cut into 1/2 inch pieces Create flakiness and richness in the pastry by shortening gluten strands and adding moisture; chill the butter to ensure distinct layers during baking. Cut into small pieces and work quickly to prevent melting, preserving the desired laminated texture.
- 1/2 teaspoon kosher salt Enhance overall flavor balance and control sweetness by seasoning the dough slightly; helps relax gluten which aids in rolling out the pastry. Dissolve evenly into dry ingredients so the salt does not create pockets or uneven flavor.
- 1 egg beaten, for brushing Provide a glossy finish and help seal edges when brushing over the dough; beaten and applied before baking, it promotes browning and adds an appealing sheen. Use sparingly to avoid soggy spots where filling contacts the egg wash.
- 1 jar (13-16 ounces) strawberry jam/preserves Supply the sweet, fruity filling and primary flavor for the pop tart; choose a spreadable texture to avoid overly runny leaks during baking. Spoon into the pastry center leaving margins for sealing, and ensure even distribution for consistent bites.
- 2 cups powdered sugar Form the base of the sweet glaze, dissolving into liquid and flavorings to create a smooth topping; adds sweetness and helps the glaze set on cooling. Sift beforehand to avoid lumps and adjust quantity with milk for desired thickness.
- 1 tablespoon vanilla extract Introduce warm aromatic notes to the glaze, complementing the strawberry filling and enhancing overall flavor complexity; mix thoroughly to distribute evenly through the powdered sugar. Use pure extract for a clean vanilla profile without altering texture.
- 3 -6 tablespoons hot milk Adjust glaze consistency and help dissolve powdered sugar into a spreadable icing by thinning with hot milk; add gradually until achieving a pourable but not runny glaze. Heat helps fully incorporate sugar and creates a glossy finish when applied warm.
- fun sprinkles Add colorful visual appeal and a playful texture contrast on top of the glaze; sprinkle sparingly to avoid overwhelming the flavor. Choose non-melting decorations suited for baked goods to retain shape and brightness after glazing.
Instructions
- To make the dough. In a bowl, combine the whole wheat flour, flour, and salt. Add the butter and toss with the flour until the mix clumps together. Add 1/4-1/3 cup cold water, 1 tablespoon at a time, until the dough forms a ball. Or use a food processor. Turn the dough out onto a floured surface and divide in half. Roll each half out into a 1/4-inch thick rectangle, about 8×16 inches. Transfer 1 sheet to a parchment-lined baking sheet and evenly spread on the jam, leaving a 1-inch border around the edge. Lay the other half of the dough over the filling and seal the edges by crimping with the back of a fork. Cover the baking sheets and place in the fridge for 1 hour or in the freezer for 20 minutes. Preheat the oven to 400° F. Brush the pop-tart with the beaten egg and bake for 30-35 minutes, until the crust is golden brown. Let cool. Meanwhile, in a medium bowl, whisk together the powdered sugar, vanilla, and 2 tablespoons hot milk, adding the milk to thin the frosting as desired. Spread the frosting over the pop-tart. Let the frosting set a few minutes, then decorate with sprinkles. Let sit 1 hour or overnight to allow the frosting to dry. Cut the tart into 9 rectangles. Serve or store in an airtight container for up to 3 days at room temperature.: The first moment you mix dry ingredients you will notice the aroma of flour and the faint salty edge from the salt . This baseline scent is subtle but important, because even distribution of dry ingredients ensures even seasoning and texture. If the dry mix is lumpy, that can lead to pockets of unseasoned dough later on, so sift or whisk briefly. A common mistake is skimping on mixing here which leads to uneven flavor and texture in the final crust.
- Add the butter and toss with the flour until the mix clumps together.: When you work the cold butter into the flour you want pea sized pieces that look like coarse crumbs with some larger clumps. You will hear a faint rubbing sound if you use fingertips, and the mixture will turn slightly paler. Those butter bits create steam pockets while baking, producing flakiness. Avoid overworking, which warms the butter and makes the dough tough.
- Add 1/4 1/3 cup cold water, 1 tablespoon at a time, until the dough forms a ball.: As you add cold water, the dough should come together with a barely cohesive feel, not sticky or wet. The coldness is key for keeping the butter solid. Press a small piece, and if it holds without crumbling it is ready. A common misstep is adding too much water at once, which makes the dough sticky and harder to roll.
- Or use a food processor.: Using a food processor speeds things up and gives very consistent butter distribution. Pulse in short bursts until the mixture looks mealy and then add cold water through the feed tube until it barely clumps. The sound will change from rapid chopping to slower, rhythmic pulses, indicating a cohesive mass. Overprocessing will warm the butter, so pulse only as needed.
- Turn the dough out onto a floured surface and divide in half.: The dough will feel cool and slightly tacky under your hands when ready. Lightly dust the surface with flour so it does not stick, and use a bench scraper to split it evenly. Dividing ensures uniform thickness and baking time. If you skip dividing, one side may bake faster and brown more intensely.
- Roll each half out into a 1/4 inch thick rectangle, about 8×16 inches.: As you roll, press evenly and rotate the dough; you should see a smooth matte surface and even thickness. The edges should remain straight so the final pieces are neat. The pressure you use affects flakiness, so do not overpress. A common error is rolling too thin which yields a fragile crust that can tear when filled.
- Transfer 1 sheet to a parchment lined baking sheet and evenly spread on the jam, leaving a 1 inch border around the edge.: The glossy strawberry jam will contrast with the matte dough, and spreading it evenly prevents soggy spots. Keep the jam away from the edge to allow a clean seal. If your jam is very runny, blot slightly with a spoon to avoid seepage which causes burnt edges or leakage during baking.
- Lay the other half of the dough over the filling and seal the edges by crimping with the back of a fork.: When you place the top layer the dough should sit gently without sliding; crimping compresses the border to trap the jam. You should hear a faint press as the fork makes marks and see a defined ridge. Poor sealing leads to jam oozing during baking, so press firmly and evenly along the entire edge.
- Cover the baking sheets and place in the fridge for 1 hour or in the freezer for 20 minutes.: Chilling firms the butter back up and relaxes gluten, preventing shrinkage and promoting flake. The dough will feel colder and stiffer, which helps it hold structure in the oven. Skipping this step can cause spreading and a denser texture.
- Preheat the oven to 400° F.: A hot oven jump starts steam formation and browning, creating a golden crust. You will notice a warm dry scent in the kitchen as it reaches temperature. An oven that is too cool will produce a pale, heavy crust, so use an oven thermometer if you suspect temperature variance.
- Brush the pop tart with the beaten egg and bake for 30 35 minutes, until the crust is golden brown.: The beaten egg produces a glossy, well colored finish and helps set the surface. As it bakes you will hear quiet crackles and see the edges puff slightly, turning from pale to a deep golden tone. Under baking leaves a pale, doughy texture, while overbaking makes the crust dry, so aim for that warm golden cue.
- Let cool.: Cooling lets the internal steam settle and prevents the frosting from sliding off when applied. The tart will exhale a gentle jam aroma as it cools and the crust firms. Cutting too soon may cause the filling to run, so be patient for a firmer slice.
- Meanwhile, in a medium bowl, whisk together the powdered sugar, vanilla, and 2 tablespoons hot milk, adding the milk to thin the frosting as desired.: The powdered sugar will bloom into a glossy sheen as you whisk it with warm milk and vanilla extract . Start with less milk and add more to reach a spreadable consistency; you want it smooth and not grainy. Too much milk makes the glaze runny and unable to set properly.
- Spread the frosting over the pop tart.: Use a spatula to work from the center outward, creating a smooth finish that catches light. The contrast between the matte crust and the glossy glaze is part of the appeal. If the glaze is too warm it might sink in, so let it cool slightly first for best coverage.
- Let the frosting set a few minutes, then decorate with sprinkles.: As the glaze cools it will dull slightly and become tacky enough for decorations to adhere. The sprinkles add a celebratory crunch and color that makes the tart feel special. If you add heavy or moist toppings too soon they will sink, so wait until tacky but not fully dry.
- Let sit 1 hour or overnight to allow the frosting to dry.: Resting gives the glaze time to form a thin, sliceable skin. Overnight resting deepens the flavors as the crust and filling harmonize. Cutting too early risks smearing the glaze and losing that pretty cross section.
- Cut the tart into 9 rectangles.: Use a sharp knife and a steady hand; you should see clean edges and a defined jam layer. A warm blade may smear, so wipe between cuts for tidy pieces. Uneven cutting can lead to inconsistent portions when serving.
- Serve or store in an airtight container for up to 3 days at room temperature.: At room temperature the crust stays tender and the glaze remains pleasant for a few days. Store in a single layer if possible to avoid crushing the frosting. Refrigeration can dry the crust, so only refrigerate if your room is very warm or humid.
Notes
- Keep ingredients cold When you cut the butter into the flour, work quickly and chill the dough if it becomes warm. Cold butter is what gives the crust its flakiness, and even brief warming can reduce the steam pockets that create layers.
- Measure flour properly Spoon and level the flour into your measuring cup rather than scooping. Too much flour will make the dough dry and tough, changing the texture of the final tart.
- Adjust glaze consistency Add hot milk tablespoon by tablespoon to the powdered sugar until the glaze reaches the desired thickness. Thicker glaze sets faster for cutting, thinner glaze gives a glossy pourable look.
- Seal edges well Press the edges firmly with the back of a fork to prevent jam from leaking during baking. Any gaps will cause the filling to bubble out and brown the edges prematurely.
- Chill assembled tart Refrigerate for an hour or freeze for twenty minutes before baking to firm the butter and relax gluten, which helps the tart hold shape and bake evenly.
- Store at room temperature Keep finished pieces in an airtight container at room temperature for up to three days to preserve the texture of the crust and the gloss of the glaze.