Chicken Pot Pie
Chicken Pot Pie has been my trusted answer to chilly nights when I want comfort on the table and nostalgia on the plate. The first time I made it for a houseful of friends, the kitchen smelled like browned butter and warming spices, and everyone kept drifting back to the oven just to peer at the bubbling filling. I still remember pressing the flaky crust into the dish, thinking how simple technique and quality ingredients could make everyone pause and smile.
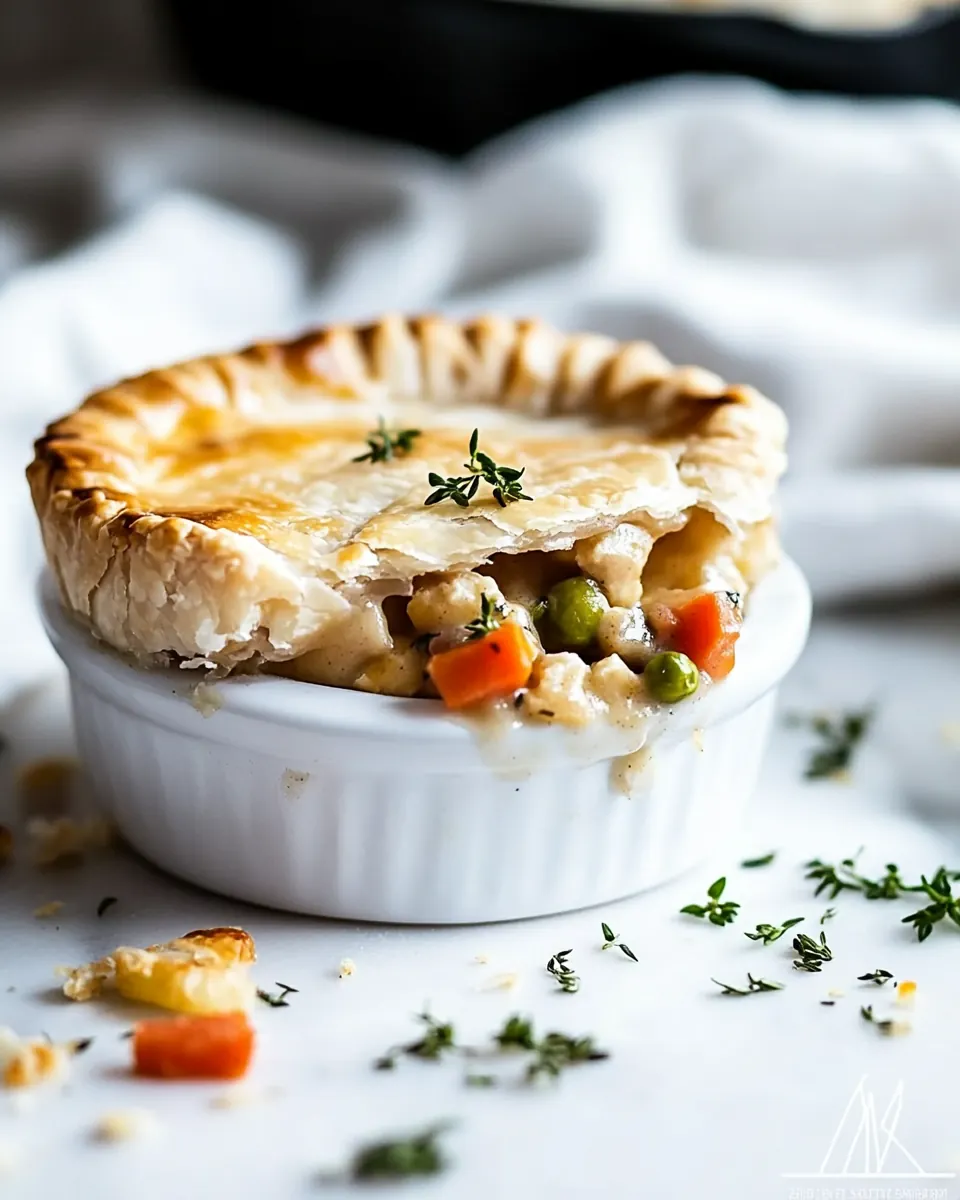
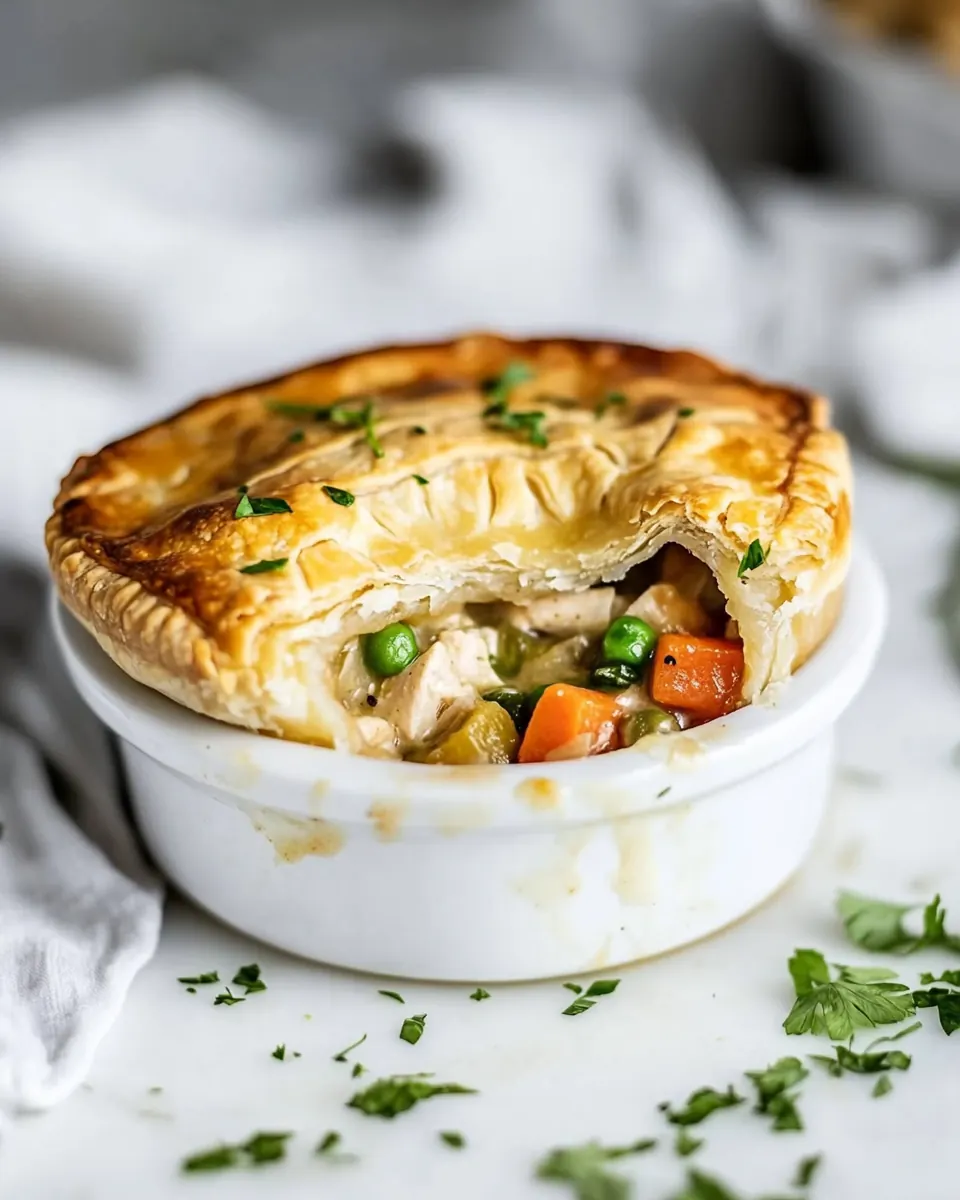
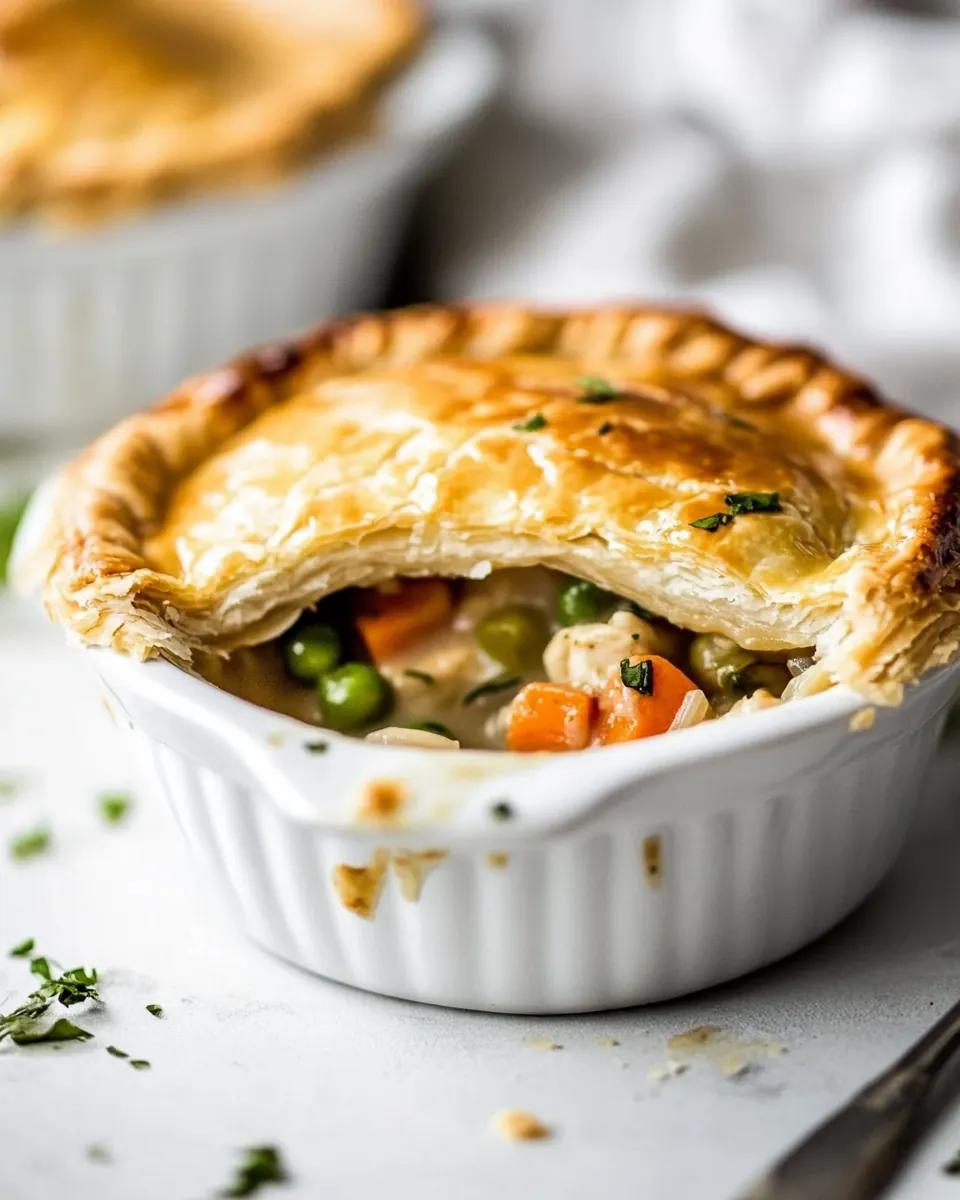
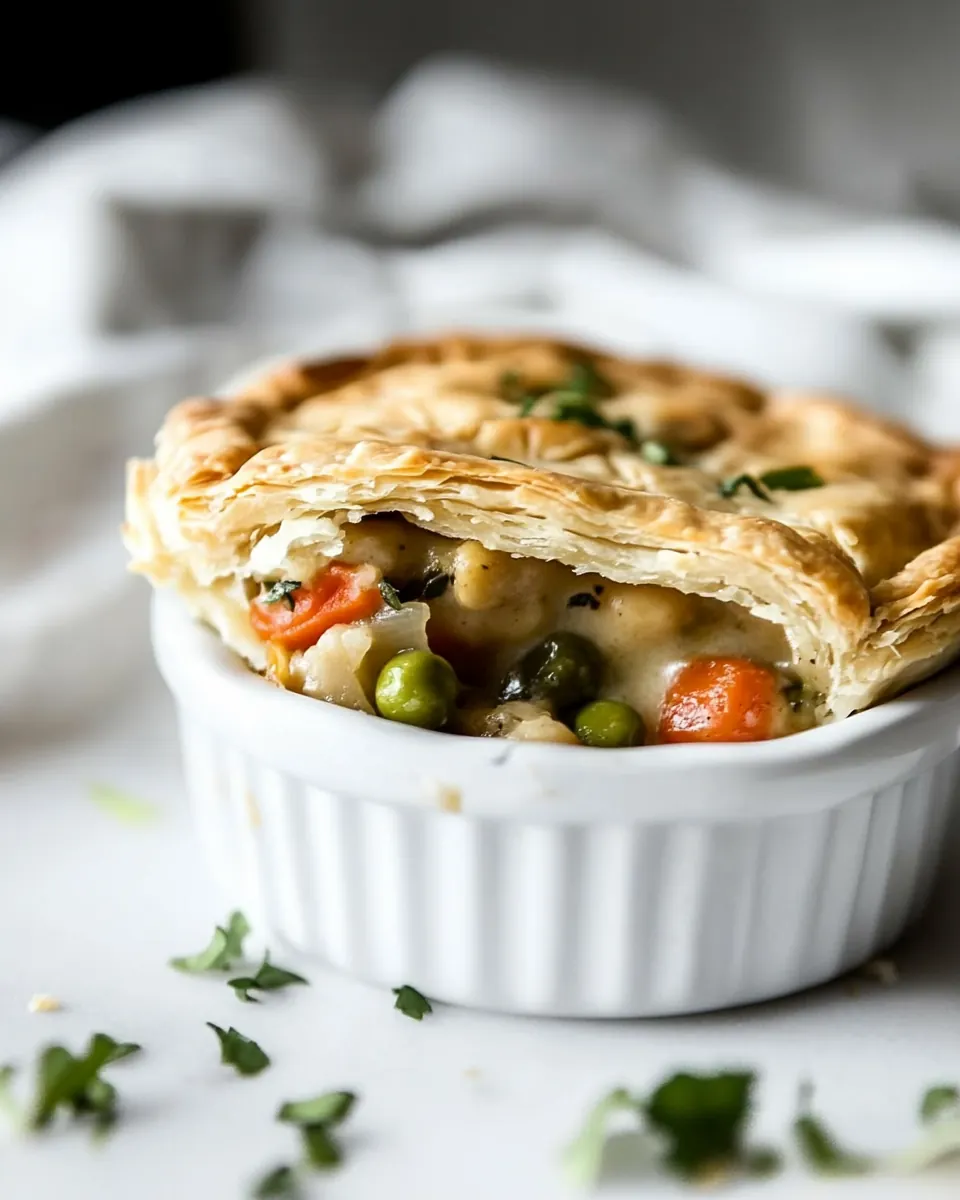
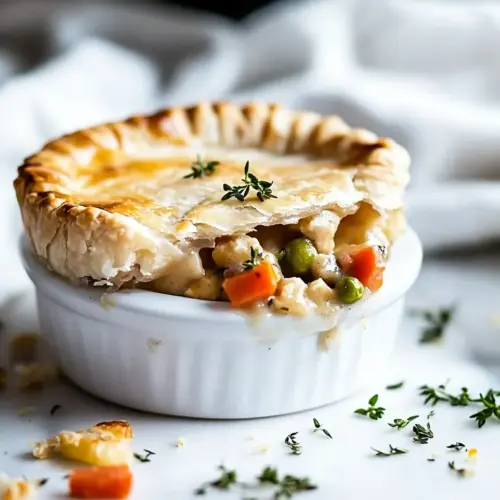
Years later, this version has become the one I reach for when I want to celebrate small victories, or recover from a long week. The texture balance here makes me proud: a crisp, golden crust giving way to a creamy, savory filling with tender chicken and bright flecks of parsley. I love serving it with simple sides and watching people scoop generous portions while trading stories. There is something deeply human about passing a steaming slice across the table, and this Chicken Pot Pie does that effortlessly.
Recipe Snapshot
2 hr
60 mins
60 mins
Medium
450 kcal
American
Gluten-Free, Low FODMAP
Dinner
Large bowl, Rubber spatula, Plastic wrap, Oven, Small saucepan, Large pot or Dutch oven, 9×13 inch casserole dish, Rolling pin, Small bowl
What You’ll Enjoy About This Chicken Pot Pie
Hearty, familiar flavors
I adore how this Chicken Pot Pie tastes like home. The combination of a rich, silky sauce with diced chicken and soft vegetables makes each bite immediately comforting. I often say that this recipe reminds me of hands-on cooking from my childhood, yet it still feels refined when I bring it to a dinner party.
Textural contrast that sings
The contrast between the flaky pastry and the velvety filling is why I come back to this dish. When the crust cracks and you reveal the bubbling filling beneath, you get both crunch and creaminess. That interplay keeps every mouthful interesting, and I pay close attention to chilling the dough so the pastry remains tender and layered.
Make ahead friendly
I value recipes that let me get ahead without losing flavor. The pastry and filling can be prepared separately, refrigerated, or even frozen, which saves so much stress on busy days. I often make both components the day before, then assemble and bake when guests arrive, which makes the whole evening flow much better.
Great for feeding a crowd
This recipe scales beautifully, which is why I use it for family dinners and potlucks. A 9 by 13 casserole yields plenty of generous portions, and the leftovers reheat well for lunches. I love recipes that stretch and still taste fresh the next day, and this one does exactly that.
Flexible and forgiving
While I follow the method closely, I appreciate how forgiving this dish is. You can swap certain vegetables or use pre-cooked chicken and still end up with a stellar pot pie. I’ve learned to trust the process, and the small adjustments never feel risky.
Shopping List for Chicken Pot Pie
These ingredients are chosen to create a classic, comforting balance of flaky crust and rich savory filling. The pastry ingredients build a tender, layered crust, while the filling players bring body, flavor, and texture. Together, they form a hearty dish that is both nostalgic and reliably delicious.
- 3 cups (426 g) all-purpose flour: Provide structure and body to the pastry dough; sift or whisk together with salt and baking powder to ensure an even crust texture. Use measured cups and grams for consistent results, and handle gently to avoid overworking gluten. Combine with cold fats and ice water to create flaky layers in the pie shell.
- 1 1/2 teaspoons kosher salt: Season the dough and filling for balanced flavor; incorporate with the flour when making crust and adjust to taste in the filling. Use kosher salt for a milder, more controllable salinity compared with table salt. Sprinkle or dissolve evenly to avoid concentrated salty spots.
- 1 teaspoon baking powder: Lighten the crust and help achieve a tender crumb; whisk into the flour mixture to add a small amount of leavening without dramatically rising. Ensure even distribution by combining with dry ingredients before adding fats. Reacts with moisture and heat to provide a subtle lift in pastry.
- 1/2 cup (113 g) unsalted butter, cold and diced: Create flakiness and rich flavor in the pastry; keep cubes cold so they form layers as they melt during baking. Use diced unsalted butter to control salt level and achieve a superior buttery taste. Cut into the flour until pea-sized pieces remain for optimal texture.
- 1/2 cup (92 g) vegetable shortening: Enhance flakiness and workability of the dough; use vegetable shortening cold to produce tender, slightly crisper layers. Combine with butter to balance flavor and structural stability in the crust. Cut into the flour mixture until evenly distributed for consistent results.
- 2/3 cup (80 ml) ice water: Bind the dough and allow gluten to develop just enough for cohesion; add ice water gradually until the mixture holds when pressed. Keep water very cold to prevent fats from melting and to preserve flakiness. Measure carefully in milliliters for reproducible pastry consistency.
- 1/2 cup (113 g) unsalted butter: Enrich the filling with creamy mouthfeel and flavor; melt or sauté with vegetables to create a flavorful base for the gravy. Use unsalted butter so seasoning remains controllable and adaptations for dietary sodium are simple. Add at the start of cooking to soften aromatics and carry flavor.
- 1 yellow onion, finely chopped: Build savory depth and aromatic foundation for the filling; finely chop and sauté until translucent to release natural sweetness. Use a yellow onion for balanced flavor that complements other vegetables and chicken. Cook gently in butter to avoid browning too quickly and maintain a mellow taste.
- 4 large carrots, peeled and cut into 1/2-inch dice (about 2 cups): Add natural sweetness, texture, and color while providing body to the filling; dice uniformly to ensure even cooking and tender bites. Peel to remove bitterness and cut into half-inch pieces for consistent mouthfeel. Simmer with stock so carrots become tender but retain slight bite.
- 1/2 cup (71 g) all-purpose flour: Thicken the filling into a glossy gravy; whisk into melted butter to form a roux before adding stock. Use the specified amount to achieve a rich, clingy sauce that coats vegetables and chicken. Cook briefly to remove raw flour taste prior to adding liquid.
- 3 cups (360 ml) chicken stock: Create a savory, chicken-forward sauce and cook the vegetables; bring gradually to thicken with the roux and concentrate flavor. Use a good-quality stock for depth and adjust seasoning after reduction. Measure in milliliters to ensure consistent liquid-to-thickener proportions.
- 1/4 cup (30 ml) heavy cream: Finish the sauce with richness and silkiness; stir in heavy cream at the end of simmering for a smooth consistency and mellow flavor. Add after the stock has reduced slightly so cream integrates without curdling. Use measured milliliters to keep the sauce balanced and not overly thin.
- 2 teaspoons kosher salt: Season the filling for tasteful balance; add at measured amounts and taste toward the end to avoid over-salting. Use kosher salt as specified for consistent texture and flavor control. Distribute evenly to season all components of the pot pie.
- 1/2 teaspoon black pepper: Add warm spice and gentle heat to the filling; freshly ground or measured black pepper enhances savory notes without overpowering. Incorporate with other seasonings during simmering so pepper integrates into the gravy. Adjust quantity slightly to accommodate personal spice tolerance.
- 4 to 5 cups (454 g) cooked chicken, diced small: Provide protein, texture, and substantial body to the pie; dice cooked chicken into small, uniform pieces so it warms through and mixes evenly with the sauce. Use the specified weight range to maintain correct filling ratio for a hearty yet saucy interior. Use leftover roasted or poached chicken for best results.
- 8 ounces red potato, 1/2-inch dice (about 1 1/2 cups): Contribute a tender, creamy starch element and absorb flavors from the sauce; dice red potato into half-inch pieces for even cooking and pleasing bites. Keep skin on or off per preference, but maintain uniform size to match cooking time of carrots and peas. Use measured ounces to ensure correct potato-to-protein balance.
- 10 ounces frozen peas, about 2 cups: Introduce pops of sweetness, color, and textural contrast; add frozen peas near the end of cooking so they remain bright and tender. Use the specified amount to distribute throughout the filling without overwhelming other components. Do not defrost long in advance to avoid mushy texture.
- 1/2 cup (23 g) minced parsley: Bring fresh herbaceous brightness and color to the filling; mince parsley finely and stir in at the end of cooking to preserve freshness and aroma. Use measured weight for consistent herb intensity and avoid overpowering the sauce. Garnish or fold in for balanced herbal notes.
- 1 egg: Create an egg wash to promote golden, shiny crust; beat the egg until smooth and use to brush the pastry before baking. Use a whole large egg for consistent coloring and binding of topping pieces if lattice or vents are used. Apply evenly for uniform browning and sheen.
- 1 tablespoon water: Thin the egg wash for easy brushing and even coverage; mix with water to dilute slightly so it spreads smoothly over the pastry. Use measured tablespoon amounts to avoid making the wash too runny or too thick. Brush lightly to avoid pooling and ensure a glossy finish.
- Flaked sea salt and ground black pepper: Provide final seasoning and presentation contrasts; sprinkle flaked sea salt and a grind of black pepper over the baked crust to enhance flavor and add texture. Apply sparingly after baking to preserve flake structure and prevent excessive saltiness. Use as a finishing touch to elevate appearance and taste.
Making This Chicken Pot Pie
Working through this recipe is a rhythmic, comforting process that rewards patience. I like to ready my mise en place and keep chilled elements cold so the pastry flakes beautifully. Below, each step expands into sensory cues, the reasoning behind the techniques, and one troubleshooting tip to keep you confident at the stove.
- Make the Pastry: In a large bowl, whisk together the flour, salt, and baking powder. Add the butter and shortening and cut into the dry ingredients until the mixture is no larger than the size of peas. Sprinkle the ice water over the mixture and, using a rubber spatula, fold and mix until the dough comes together into a rough ball. Turn the dough out onto a lightly floured surface and knead lightly into a cohesive ball. Wrap in plastic wrap and refrigerate for at least 30 minutes while the filling is prepared.: In a large bowl, whisk together the flour, salt, and baking powder : The scent at this stage is clean and wheaty, and whisking evenly distributes the leavening and salt so the dough develops balanced texture. I pay attention to the visual cue of an even pale mixture, whisking until no streaks remain. Why this matters, the even distribution prevents pockets of salt or rising agent which could cause uneven crust texture. Common mistake to avoid: overworking the dough once wet ingredients are added which makes the crust tough rather than tender.
- Preheat oven to 375 degrees F.: As you work the cold butter and shortening in, you will see coarse, pea sized bits of fat coated in flour. These pieces are essential because they create steam pockets when baked, giving the crust its flaky layers. The sound is a light crunch as the fats are cut in, and the look is a uniformly coarse meal. Why this technique matters, larger pieces yield flakier layers while overly small bits can make the dough mealy. Troubleshooting: if the fats melt during handling because of warm hands, chill the bowl briefly before proceeding.
- Make the Filling: Place the chicken stock in a small saucepan and warm over low heat.: The cold water brings the dough together without melting the fats. You will notice the texture shift from powdery to clumping, and the tactile cue is a shaggy, slightly tacky mass. This gentle folding keeps the dough tender, because vigorous mixing would develop gluten and toughen the crust. One pitfall to avoid is adding too much water; you want just enough for the dough to hold.
- In a large pot or Dutch oven, melt the butter over medium-low heat. Add the onion and carrot and saute until the onion is translucent, 10 to 15 minutes. Add the flour and cook for 2 minutes, stirring constantly. Slowly add the hot chicken stock, stirring constantly, and simmer over low heat until thickened, about 1 minute. Stir in the heavy cream, salt, and pepper. Remove from heat and stir in the chicken, potato, peas, and parsley. Transfer the filling to a 9×13-inch casserole dish.: Kneading briefly aligns the dough so it is cohesive but not elastic. The feel should be smooth rather than sticky, and the surface will appear slightly glossy from the butter. This light knead prevents a dense crust, while over kneading would create chewiness. A common error is overworking here, so stop as soon as it holds together.
- Assemble the Pot Pie: Remove the pastry from the refrigerator and place on a lightly floured surface. Roll into a 12×16-inch rectangle. Brush the outside of the casserole dish with egg wash, then transfer the pastry to cover the filling. Crimp as desired and press the dough onto the outside of the casserole dish.: Chilling firms the fats and relaxes gluten, which helps rollouts that stay flaky. You may notice the dough becoming slightly less tacky and easier to handle after chilling. This rest is important for texture and to prevent shrinkage during baking. If short on time, chill for at least 20 minutes, but avoiding skipping the chill will reduce flakiness.
- In a small bowl, whisk together the egg and water for the egg wash. Brush the entire surface of the dough with the egg wash, then cut five slits into the surface of the dough. Sprinkle with flaked sea salt and cracked black pepper.: Preheating ensures even baking and helps the crust set quickly once it goes in. The oven should be fully up to temperature, and a consistent heat ensures the filling thickens properly while the pastry browns. A common oversight is placing the pie into an oven that is still heating, which can make the bottom soggy and the top under browned.
- Bake until the filling is bubbling and the pastry is golden brown, about 1 hour. Allow the pot pie to sit for at least 20 minutes before serving.: Place the chicken stock in a small saucepan and warm over low heat : Warming the stock means when you add it to the roux it integrates smoothly without causing lumps. The steam rising from the pan smells savory and comforting, and the warm stock helps achieve a silky sauce. This step is important to keep the sauce smooth and cohesive. Mistake to avoid: adding cold stock to the roux which can cause a lumpy texture.
- In a large pot or Dutch oven, melt the butter over medium low heat: As the butter melts, you will notice a nutty aroma beginning to form, which becomes a flavor base for the filling. The gentle sizzle signals even heating. Why this gentle melt matters, it prevents the butter from browning too quickly and changing the sauce flavor. Avoid overheating which would brown or burn the fats.
- Add the onion and carrot and saute until the onion is translucent, 10 to 15 minutes: The vegetables soften and release sweet aromas, the onions becoming glossy while the carrots offer a faint caramel scent. This slow sauté builds depth of flavor and extracts natural sugars that enrich the sauce. Visual cues include softened vegetables and a sweet, savory smell. A typical mistake is cooking at too high a heat, which can brown rather than gently soften, altering the final flavor profile.
- Add the flour and cook for 2 minutes, stirring constantly: The flour briefly toasts and loses its raw taste, and you will see it form a paste that clings to the vegetables and pan. This short cook time prevents a pasty floury flavor in the finished sauce. It also helps the flour bond with the fat to form a roux that will thicken the filling smoothly. Avoid skipping the stirring, or the flour can scorch and impart bitterness.
- Slowly add the hot chicken stock, stirring constantly, and simmer over low heat until thickened, about 1 minute: Adding warm stock slowly prevents lumps and allows you to gauge thickness. You will hear a soft simmer and see the sauce transition from glossy to thickened, coating the back of a spoon. This controlled simmer is what creates a velvety texture. Common error, dumping stock in all at once can lead to uneven thickening and lumps.
- Stir in the heavy cream, salt, and pepper: The heavy cream enriches the sauce, giving it a luxurious mouthfeel, while the seasoning rounds the flavors. You will notice the sauce lighten slightly in color and become silkier. This finishing step balances richness and seasoning so the filling does not taste flat. Mistake to avoid: adding too much salt before tasting, which can overpower the delicate flavors.
- Remove from heat and stir in the chicken, potato, peas, and parsley: Off the heat, folding in the diced chicken and vegetables keeps them from overcooking. The warm filling releases savory steam, and the parsley brightens with herbaceous notes. This final mix ensures even distribution so each spoonful has a balanced mix. A pitfall is letting the filling sit too long before assembling which can thicken excessively and make it hard to transfer.
- Transfer the filling to a 9×13 inch casserole dish: The act of transferring lets you judge filling consistency and spread it evenly. You should see a glossy, spoonable filling that will bubble when baked. Ensuring an even layer helps the pastry bake uniformly. Mistake to avoid is overfilling the dish which can cause boiling over during baking.
- Assemble the Pot Pie: Remove the pastry from the refrigerator and place on a lightly floured surface : The chilled dough will feel firm and easier to roll. A cool surface helps maintain the cold fats as you roll, preserving the flaky structure. This step is crucial because warm dough will be sticky and lose its layering potential. Avoid warming the dough with your hands while handling.
- Roll into a 12×16 inch rectangle: Rolling to size gives you enough coverage to seal the edges and crimp decoratively. You will see the dough expand and thin uniformly, and a light dusting of flour prevents sticking. Proper rolling ensures a consistent crust thickness, which bakes evenly. Common mistake is rolling the dough too thin which can cause tears or a burnt bottom.
- Brush the outside of the casserole dish with egg wash, then transfer the pastry to cover the filling: Brushing the dish helps the dough adhere and creates a neat seal. When the pastry meets the rim, pressing gently will form a secure edge. The egg wash also primes the crust for a glossy finish later. Avoid placing cold filling on warm dough which can cause sogginess.
- Crimp as desired and press the dough onto the outside of the casserole dish: Crimping creates a decorative seal and prevents leakage. As you press, you should see a neat edge that will brown attractively. This also helps the crust stay attached during baking, ensuring even browning. Common misstep is failing to seal well which can let juices escape.
- In a small bowl, whisk together the egg and water for the egg wash: The whisked egg adds sheen and encourages deep browning. The mixture should look smooth and slightly frothy, ready to brush onto the surface evenly. This small step makes a big visual difference after baking. Avoid brushing too heavily which can pool and cause uneven browning.
- Brush the entire surface of the dough with the egg wash, then cut five slits into the surface of the dough: The glossy wash enhances color while the slits let steam escape, preventing soggy pastry. You will see the dough glisten and then reveal slits that will open as the filling bubbles. This venting is important to avoid a soggy top and to give the filling room to breathe. Mistake to avoid is not cutting vents which can cause the crust to bubble unevenly.
- Sprinkle with flaked sea salt and cracked black pepper: These finishing touches add texture and an immediate burst of seasoning as the crust bakes. The sea salt flakes create little highlights, and the cracked black pepper warms the flavor profile. This step elevates the presentation and taste. Avoid over salting, especially if your stock was already salted.
- Bake until the filling is bubbling and the pastry is golden brown, about 1 hour: As the pot pie bakes, you will hear gentle bubbling from the filling and see the crust deepen to a rich golden color. The aroma becomes deeply savory with toasty notes from the pastry. This bake time ensures the filling is hot throughout and the crust is crisp. A common issue is under baking which leaves the center lukewarm, so test for bubbling at the edges.
- Allow the pot pie to sit for at least 20 minutes before serving: Resting lets the filling set and makes slicing neater. During this time, the steam redistributes and the sauce thickens slightly. You will notice the surface tighten and the aroma mellow into a ready to serve dish. Avoid serving immediately as hot filling can be too runny and may burn mouths.
Recipe Notes about Chicken Pot Pie
This section collects practical notes I use when making the recipe repeatedly. Small adjustments make a big difference, and I find these tips help home cooks achieve a reliable, delicious result every time.
- Use cold fats for flakiness. Keep your butter and shortening cold until incorporation, and handle the dough minimally to avoid warming the fats. If your hands are warm, use a bench scraper to cut and fold the dough instead of your palms.
- Weigh your flour when possible. Measuring flour by weight prevents dense dough due to packing. If you must use volume, spoon the flour into the cup and level it rather than scooping directly from the bag.
- Warm stock integrates better. Adding hot chicken stock to the roux prevents lumps and helps you control the sauce thickness more precisely. Keep the stock on the lowest heat while you finish the roux.
- Don’t overcook vegetables. Sauté the onion and carrot until softened but not mushy, since they will continue to cook in the oven. Over softening leads to a filling that lacks textural contrast.
- Make ahead options. Both the filling and the pastry can be made ahead and refrigerated separately for up to two days, or frozen for up to two months. Thaw overnight in the refrigerator before assembling and baking.
- Use a rimmed baking dish. A 9 by 13 casserole works well to contain bubbling filling and allow even browning. If you prefer individual pies, use ramekins and reduce baking time accordingly.
Perfect Pairings for Chicken Pot Pie
A comforting centerpiece like this benefits from simple, complementary sides and thoughtful serving approaches. Below are ideas for sides, occasions, storage, and seasonal pairings that bring out the best in the dish.
- Light green salad with vinaigrette. A crisp salad with a bright vinegar based dressing cuts through the richness of the pie and refreshes the palate between bites.
- Steamed seasonal vegetables. Lightly steamed greens or roasted root vegetables make a balanced plate without competing with the hearty flavors of the pot pie.
- Crusty bread for scooping. Warm, crusty bread is useful for sopping up any leftover sauce and adds a rustic feel to the meal, especially when serving family style.
- Family dinners and holidays. This recipe works well for cozy gatherings in the winter season or as a comforting main for relaxed holiday meals, offering generous portions and easy reheating.
- Make ahead and freezer friendly. Prepare filling and pastry ahead to reduce day of cooking stress; store separately in the refrigerator for up to two days, or freeze both for up to two months for future convenience.
- Leftover strategy. Store cooled leftovers in an airtight container in the refrigerator for up to three days, and reheat in a moderate oven to preserve crust crispness. For longer storage, freeze portions and reheat from mostly thawed to avoid over baking.
- Seasonal serving notes. In winter this dish shines with hearty sides and warm drinks, while in milder months a bright salad and light vegetable sides keep the meal feeling balanced.
FAQ
Conclusion
This Chicken Pot Pie stands out for its balance of flaky pastry and a creamy, flavorful filling that feels both comforting and celebratory. I encourage you to try it when you want a reliable, crowd pleasing main that you can prepare ahead of time. It’s the kind of recipe that rewards patience and basic technique, and once you taste that golden crust with warm, savory filling, it’s easy to see why it becomes a repeat favorite.
Chicken Pot Pie
Equipment
- Large Bowl
- Rubber spatula
- Plastic Wrap
- Oven
- Small Saucepan
- Large Pot or Dutch Oven
- 9x13-inch Casserole Dish
- Rolling Pin
- Small Bowl
Ingredients
- 3 cups (426 g) all-purpose flour Provide structure and body to the pastry dough; sift or whisk together with salt and baking powder to ensure an even crust texture. Use measured cups and grams for consistent results, and handle gently to avoid overworking gluten. Combine with cold fats and ice water to create flaky layers in the pie shell.
- 1 1/2 teaspoons kosher salt Season the dough and filling for balanced flavor; incorporate with the flour when making crust and adjust to taste in the filling. Use kosher salt for a milder, more controllable salinity compared with table salt. Sprinkle or dissolve evenly to avoid concentrated salty spots.
- 1 teaspoon baking powder Lighten the crust and help achieve a tender crumb; whisk into the flour mixture to add a small amount of leavening without dramatically rising. Ensure even distribution by combining with dry ingredients before adding fats. Reacts with moisture and heat to provide a subtle lift in pastry.
- 1/2 cup (113 g) unsalted butter, cold and diced Create flakiness and rich flavor in the pastry; keep cubes cold so they form layers as they melt during baking. Use diced unsalted butter to control salt level and achieve a superior buttery taste. Cut into the flour until pea-sized pieces remain for optimal texture.
- 1/2 cup (92 g) vegetable shortening Enhance flakiness and workability of the dough; use vegetable shortening cold to produce tender, slightly crisper layers. Combine with butter to balance flavor and structural stability in the crust. Cut into the flour mixture until evenly distributed for consistent results.
- 2/3 cup (80 ml) ice water Bind the dough and allow gluten to develop just enough for cohesion; add ice water gradually until the mixture holds when pressed. Keep water very cold to prevent fats from melting and to preserve flakiness. Measure carefully in milliliters for reproducible pastry consistency.
- 1/2 cup (113 g) unsalted butter Enrich the filling with creamy mouthfeel and flavor; melt or sauté with vegetables to create a flavorful base for the gravy. Use unsalted butter so seasoning remains controllable and adaptations for dietary sodium are simple. Add at the start of cooking to soften aromatics and carry flavor.
- 1 yellow onion, finely chopped Build savory depth and aromatic foundation for the filling; finely chop and sauté until translucent to release natural sweetness. Use a yellow onion for balanced flavor that complements other vegetables and chicken. Cook gently in butter to avoid browning too quickly and maintain a mellow taste.
- 4 large carrots, peeled and cut into 1/2-inch dice (about 2 cups) Add natural sweetness, texture, and color while providing body to the filling; dice uniformly to ensure even cooking and tender bites. Peel to remove bitterness and cut into half-inch pieces for consistent mouthfeel. Simmer with stock so carrots become tender but retain slight bite.
- 1/2 cup (71 g) all-purpose flour Thicken the filling into a glossy gravy; whisk into melted butter to form a roux before adding stock. Use the specified amount to achieve a rich, clingy sauce that coats vegetables and chicken. Cook briefly to remove raw flour taste prior to adding liquid.
- 3 cups (360 ml) chicken stock Create a savory, chicken-forward sauce and cook the vegetables; bring gradually to thicken with the roux and concentrate flavor. Use a good-quality stock for depth and adjust seasoning after reduction. Measure in milliliters to ensure consistent liquid-to-thickener proportions.
- 1/4 cup (30 ml) heavy cream Finish the sauce with richness and silkiness; stir in heavy cream at the end of simmering for a smooth consistency and mellow flavor. Add after the stock has reduced slightly so cream integrates without curdling. Use measured milliliters to keep the sauce balanced and not overly thin.
- 2 teaspoons kosher salt Season the filling for tasteful balance; add at measured amounts and taste toward the end to avoid over-salting. Use kosher salt as specified for consistent texture and flavor control. Distribute evenly to season all components of the pot pie.
- 1/2 teaspoon black pepper Add warm spice and gentle heat to the filling; freshly ground or measured black pepper enhances savory notes without overpowering. Incorporate with other seasonings during simmering so pepper integrates into the gravy. Adjust quantity slightly to accommodate personal spice tolerance.
- 4 to 5 cups (454 g) cooked chicken, diced small Provide protein, texture, and substantial body to the pie; dice cooked chicken into small, uniform pieces so it warms through and mixes evenly with the sauce. Use the specified weight range to maintain correct filling ratio for a hearty yet saucy interior. Use leftover roasted or poached chicken for best results.
- 8 ounces red potato, 1/2-inch dice (about 1 1/2 cups) Contribute a tender, creamy starch element and absorb flavors from the sauce; dice red potato into half-inch pieces for even cooking and pleasing bites. Keep skin on or off per preference, but maintain uniform size to match cooking time of carrots and peas. Use measured ounces to ensure correct potato-to-protein balance.
- 10 ounces frozen peas, about 2 cups Introduce pops of sweetness, color, and textural contrast; add frozen peas near the end of cooking so they remain bright and tender. Use the specified amount to distribute throughout the filling without overwhelming other components. Do not defrost long in advance to avoid mushy texture.
- 1/2 cup (23 g) minced parsley Bring fresh herbaceous brightness and color to the filling; mince parsley finely and stir in at the end of cooking to preserve freshness and aroma. Use measured weight for consistent herb intensity and avoid overpowering the sauce. Garnish or fold in for balanced herbal notes.
- 1 egg Create an egg wash to promote golden, shiny crust; beat the egg until smooth and use to brush the pastry before baking. Use a whole large egg for consistent coloring and binding of topping pieces if lattice or vents are used. Apply evenly for uniform browning and sheen.
- 1 tablespoon water Thin the egg wash for easy brushing and even coverage; mix with water to dilute slightly so it spreads smoothly over the pastry. Use measured tablespoon amounts to avoid making the wash too runny or too thick. Brush lightly to avoid pooling and ensure a glossy finish.
- Flaked sea salt and ground black pepper Provide final seasoning and presentation contrasts; sprinkle flaked sea salt and a grind of black pepper over the baked crust to enhance flavor and add texture. Apply sparingly after baking to preserve flake structure and prevent excessive saltiness. Use as a finishing touch to elevate appearance and taste.
Instructions
- Make the Pastry: In a large bowl, whisk together the flour, salt, and baking powder. Add the butter and shortening and cut into the dry ingredients until the mixture is no larger than the size of peas. Sprinkle the ice water over the mixture and, using a rubber spatula, fold and mix until the dough comes together into a rough ball. Turn the dough out onto a lightly floured surface and knead lightly into a cohesive ball. Wrap in plastic wrap and refrigerate for at least 30 minutes while the filling is prepared.: In a large bowl, whisk together the flour, salt, and baking powder : The scent at this stage is clean and wheaty, and whisking evenly distributes the leavening and salt so the dough develops balanced texture. I pay attention to the visual cue of an even pale mixture, whisking until no streaks remain. Why this matters, the even distribution prevents pockets of salt or rising agent which could cause uneven crust texture. Common mistake to avoid: overworking the dough once wet ingredients are added which makes the crust tough rather than tender.
- Preheat oven to 375 degrees F.: As you work the cold butter and shortening in, you will see coarse, pea sized bits of fat coated in flour. These pieces are essential because they create steam pockets when baked, giving the crust its flaky layers. The sound is a light crunch as the fats are cut in, and the look is a uniformly coarse meal. Why this technique matters, larger pieces yield flakier layers while overly small bits can make the dough mealy. Troubleshooting: if the fats melt during handling because of warm hands, chill the bowl briefly before proceeding.
- Make the Filling: Place the chicken stock in a small saucepan and warm over low heat.: The cold water brings the dough together without melting the fats. You will notice the texture shift from powdery to clumping, and the tactile cue is a shaggy, slightly tacky mass. This gentle folding keeps the dough tender, because vigorous mixing would develop gluten and toughen the crust. One pitfall to avoid is adding too much water; you want just enough for the dough to hold.
- In a large pot or Dutch oven, melt the butter over medium-low heat. Add the onion and carrot and saute until the onion is translucent, 10 to 15 minutes. Add the flour and cook for 2 minutes, stirring constantly. Slowly add the hot chicken stock, stirring constantly, and simmer over low heat until thickened, about 1 minute. Stir in the heavy cream, salt, and pepper. Remove from heat and stir in the chicken, potato, peas, and parsley. Transfer the filling to a 9×13-inch casserole dish.: Kneading briefly aligns the dough so it is cohesive but not elastic. The feel should be smooth rather than sticky, and the surface will appear slightly glossy from the butter. This light knead prevents a dense crust, while over kneading would create chewiness. A common error is overworking here, so stop as soon as it holds together.
- Assemble the Pot Pie: Remove the pastry from the refrigerator and place on a lightly floured surface. Roll into a 12×16-inch rectangle. Brush the outside of the casserole dish with egg wash, then transfer the pastry to cover the filling. Crimp as desired and press the dough onto the outside of the casserole dish.: Chilling firms the fats and relaxes gluten, which helps rollouts that stay flaky. You may notice the dough becoming slightly less tacky and easier to handle after chilling. This rest is important for texture and to prevent shrinkage during baking. If short on time, chill for at least 20 minutes, but avoiding skipping the chill will reduce flakiness.
- In a small bowl, whisk together the egg and water for the egg wash. Brush the entire surface of the dough with the egg wash, then cut five slits into the surface of the dough. Sprinkle with flaked sea salt and cracked black pepper.: Preheating ensures even baking and helps the crust set quickly once it goes in. The oven should be fully up to temperature, and a consistent heat ensures the filling thickens properly while the pastry browns. A common oversight is placing the pie into an oven that is still heating, which can make the bottom soggy and the top under browned.
- Bake until the filling is bubbling and the pastry is golden brown, about 1 hour. Allow the pot pie to sit for at least 20 minutes before serving.: Place the chicken stock in a small saucepan and warm over low heat : Warming the stock means when you add it to the roux it integrates smoothly without causing lumps. The steam rising from the pan smells savory and comforting, and the warm stock helps achieve a silky sauce. This step is important to keep the sauce smooth and cohesive. Mistake to avoid: adding cold stock to the roux which can cause a lumpy texture.
- In a large pot or Dutch oven, melt the butter over medium low heat: As the butter melts, you will notice a nutty aroma beginning to form, which becomes a flavor base for the filling. The gentle sizzle signals even heating. Why this gentle melt matters, it prevents the butter from browning too quickly and changing the sauce flavor. Avoid overheating which would brown or burn the fats.
- Add the onion and carrot and saute until the onion is translucent, 10 to 15 minutes: The vegetables soften and release sweet aromas, the onions becoming glossy while the carrots offer a faint caramel scent. This slow sauté builds depth of flavor and extracts natural sugars that enrich the sauce. Visual cues include softened vegetables and a sweet, savory smell. A typical mistake is cooking at too high a heat, which can brown rather than gently soften, altering the final flavor profile.
- Add the flour and cook for 2 minutes, stirring constantly: The flour briefly toasts and loses its raw taste, and you will see it form a paste that clings to the vegetables and pan. This short cook time prevents a pasty floury flavor in the finished sauce. It also helps the flour bond with the fat to form a roux that will thicken the filling smoothly. Avoid skipping the stirring, or the flour can scorch and impart bitterness.
- Slowly add the hot chicken stock, stirring constantly, and simmer over low heat until thickened, about 1 minute: Adding warm stock slowly prevents lumps and allows you to gauge thickness. You will hear a soft simmer and see the sauce transition from glossy to thickened, coating the back of a spoon. This controlled simmer is what creates a velvety texture. Common error, dumping stock in all at once can lead to uneven thickening and lumps.
- Stir in the heavy cream, salt, and pepper: The heavy cream enriches the sauce, giving it a luxurious mouthfeel, while the seasoning rounds the flavors. You will notice the sauce lighten slightly in color and become silkier. This finishing step balances richness and seasoning so the filling does not taste flat. Mistake to avoid: adding too much salt before tasting, which can overpower the delicate flavors.
- Remove from heat and stir in the chicken, potato, peas, and parsley: Off the heat, folding in the diced chicken and vegetables keeps them from overcooking. The warm filling releases savory steam, and the parsley brightens with herbaceous notes. This final mix ensures even distribution so each spoonful has a balanced mix. A pitfall is letting the filling sit too long before assembling which can thicken excessively and make it hard to transfer.
- Transfer the filling to a 9×13 inch casserole dish: The act of transferring lets you judge filling consistency and spread it evenly. You should see a glossy, spoonable filling that will bubble when baked. Ensuring an even layer helps the pastry bake uniformly. Mistake to avoid is overfilling the dish which can cause boiling over during baking.
- Assemble the Pot Pie: Remove the pastry from the refrigerator and place on a lightly floured surface : The chilled dough will feel firm and easier to roll. A cool surface helps maintain the cold fats as you roll, preserving the flaky structure. This step is crucial because warm dough will be sticky and lose its layering potential. Avoid warming the dough with your hands while handling.
- Roll into a 12×16 inch rectangle: Rolling to size gives you enough coverage to seal the edges and crimp decoratively. You will see the dough expand and thin uniformly, and a light dusting of flour prevents sticking. Proper rolling ensures a consistent crust thickness, which bakes evenly. Common mistake is rolling the dough too thin which can cause tears or a burnt bottom.
- Brush the outside of the casserole dish with egg wash, then transfer the pastry to cover the filling: Brushing the dish helps the dough adhere and creates a neat seal. When the pastry meets the rim, pressing gently will form a secure edge. The egg wash also primes the crust for a glossy finish later. Avoid placing cold filling on warm dough which can cause sogginess.
- Crimp as desired and press the dough onto the outside of the casserole dish: Crimping creates a decorative seal and prevents leakage. As you press, you should see a neat edge that will brown attractively. This also helps the crust stay attached during baking, ensuring even browning. Common misstep is failing to seal well which can let juices escape.
- In a small bowl, whisk together the egg and water for the egg wash: The whisked egg adds sheen and encourages deep browning. The mixture should look smooth and slightly frothy, ready to brush onto the surface evenly. This small step makes a big visual difference after baking. Avoid brushing too heavily which can pool and cause uneven browning.
- Brush the entire surface of the dough with the egg wash, then cut five slits into the surface of the dough: The glossy wash enhances color while the slits let steam escape, preventing soggy pastry. You will see the dough glisten and then reveal slits that will open as the filling bubbles. This venting is important to avoid a soggy top and to give the filling room to breathe. Mistake to avoid is not cutting vents which can cause the crust to bubble unevenly.
- Sprinkle with flaked sea salt and cracked black pepper: These finishing touches add texture and an immediate burst of seasoning as the crust bakes. The sea salt flakes create little highlights, and the cracked black pepper warms the flavor profile. This step elevates the presentation and taste. Avoid over salting, especially if your stock was already salted.
- Bake until the filling is bubbling and the pastry is golden brown, about 1 hour: As the pot pie bakes, you will hear gentle bubbling from the filling and see the crust deepen to a rich golden color. The aroma becomes deeply savory with toasty notes from the pastry. This bake time ensures the filling is hot throughout and the crust is crisp. A common issue is under baking which leaves the center lukewarm, so test for bubbling at the edges.
- Allow the pot pie to sit for at least 20 minutes before serving: Resting lets the filling set and makes slicing neater. During this time, the steam redistributes and the sauce thickens slightly. You will notice the surface tighten and the aroma mellow into a ready to serve dish. Avoid serving immediately as hot filling can be too runny and may burn mouths.
Notes
- Use cold fats for flakiness. Keep your butter and shortening cold until incorporation, and handle the dough minimally to avoid warming the fats. If your hands are warm, use a bench scraper to cut and fold the dough instead of your palms.
- Weigh your flour when possible. Measuring flour by weight prevents dense dough due to packing. If you must use volume, spoon the flour into the cup and level it rather than scooping directly from the bag.
- Warm stock integrates better. Adding hot chicken stock to the roux prevents lumps and helps you control the sauce thickness more precisely. Keep the stock on the lowest heat while you finish the roux.
- Don’t overcook vegetables. Sauté the onion and carrot until softened but not mushy, since they will continue to cook in the oven. Over softening leads to a filling that lacks textural contrast.
- Make ahead options. Both the filling and the pastry can be made ahead and refrigerated separately for up to two days, or frozen for up to two months. Thaw overnight in the refrigerator before assembling and baking.
- Use a rimmed baking dish. A 9 by 13 casserole works well to contain bubbling filling and allow even browning. If you prefer individual pies, use ramekins and reduce baking time accordingly.