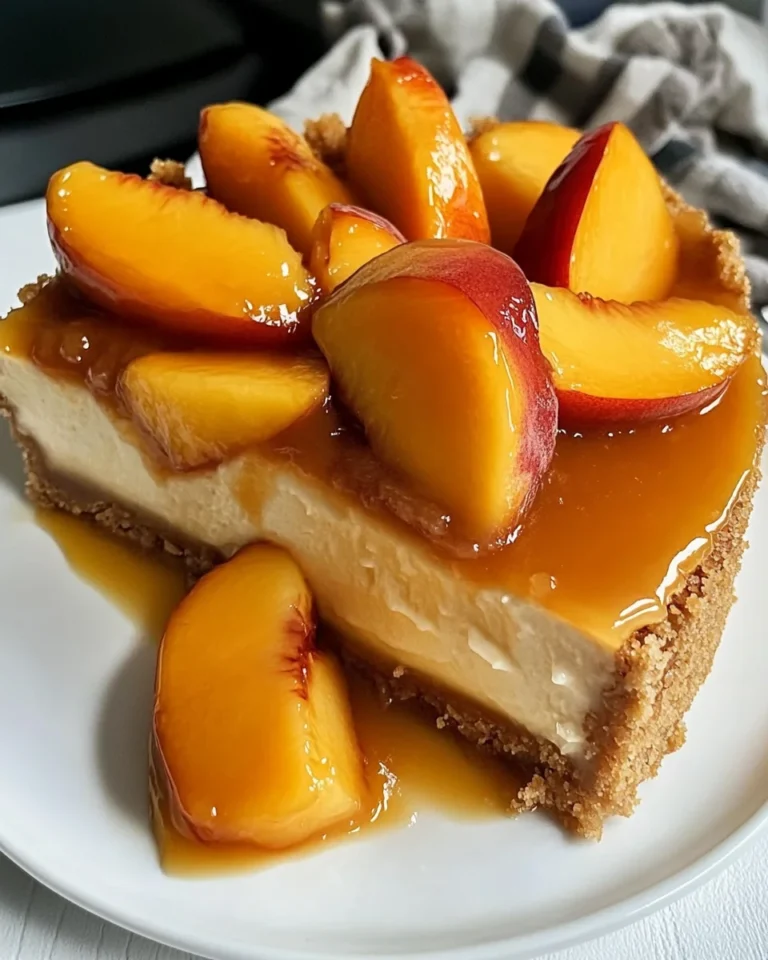
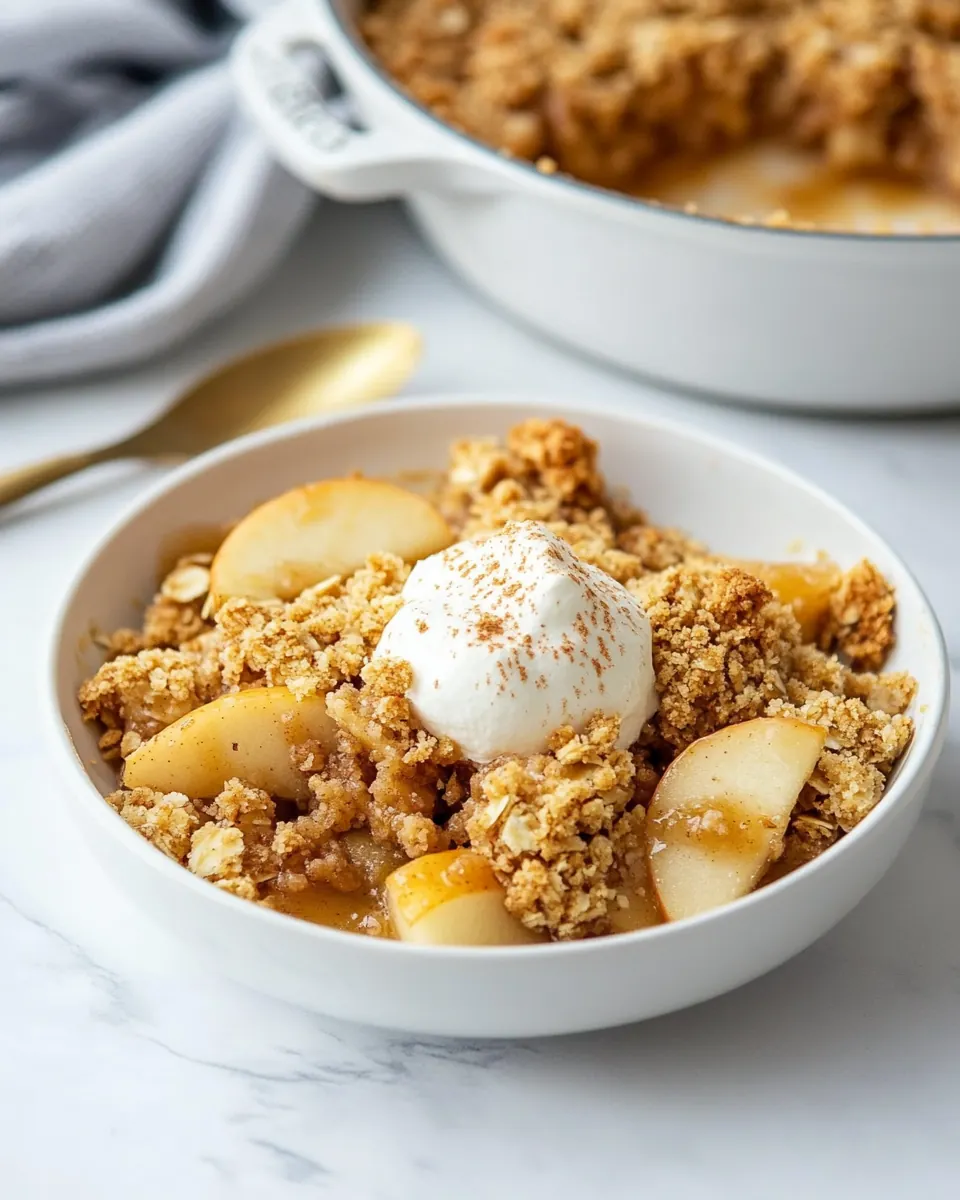
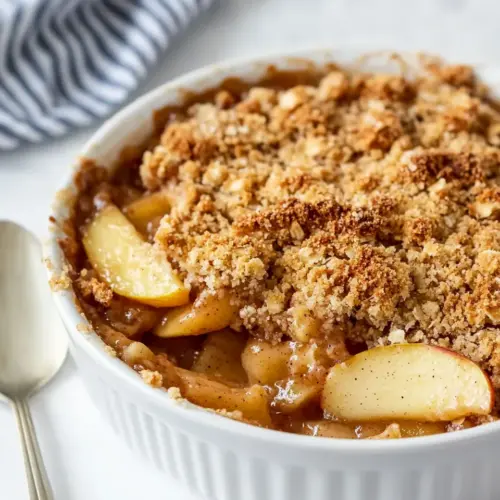
Easy Apple Crisp
Easy Apple Crisp has been my go to for cozy gatherings since I first learned the rhythm of peeling and slicing apples at my grandmother’s kitchen table.
There was a late autumn when a sudden frost threatened our farmers market haul, and I found myself with a trunk full of crisp apples and no plan. I grabbed a simple bowl, mixed a handful of pantry staples, and the warm, buttery aroma that filled the house felt like an instant remedy for the chill outside. That evening, friends showed up with scarves and stories, and the bubbling dish disappeared as quickly as laughter around the table.
I love how Easy Apple Crisp is forgiving yet rewarding. You do not need exact measurements to make it sing, and the texture contrast between tender, juicy apples and crunchy oat streusel always earns compliments. Over the years, I learned small tricks, like keeping the topping cold and mixing the filling just until the apples are evenly coated, so the fruit keeps a pleasant bite rather than turning to mush.
Whenever I want to create a low stress dessert that still feels special, I reach for this recipe. It pairs beautifully with a scoop of vanilla ice cream and a quiet evening, or a bustling holiday table where everyone can serve themselves straight from the pan. Every time I make it, memories come back of that first fall, and a reminder that simple ingredients, handled with care, can produce something truly comforting.
Recipe Snapshot
1 hr 10 mins
25 mins
45 mins
Medium
290 kcal
American
Gluten-Free, Vegan
Desserts
9 x 13 inch baking dish, mixing bowl, pastry blender, peeler
Why You’ll Love This Easy Apple Crisp
Reliable Comfort
I turn to Easy Apple Crisp when I want dessert that arrives warm and familiar. The combination of tender apples and a crunchy topping is consistently crowd pleasing, which makes this recipe a dependable choice for gatherings and weeknight dinners when you want something sweet without fuss.
Fast and Approachable
There are no intimidating techniques here, just straightforward mixing and baking. I appreciate that I can prep most of the work in about half an hour and let the oven do the rest. If you are new to baking, this recipe is a gentle, confidence building project.
Flexible to What You Have
Because the core components are pantry staples like oats, flour, and butter, I often swap between old fashioned oats and quick oats depending on texture preferences. The filling handles a range of apple varieties, so you can use what is available without losing character.
Textural Contrast
The magic here is in the interplay between the crisp topping and the juicy fruit. I always aim for golden brown edges and bubbling juices to know the texture balance is right. That crunchy top keeps the dessert from feeling one note, and it gives people something to savor with each spoonful.
Great for Leftovers and Freezing
I make extra on purpose because Easy Apple Crisp freezes and reheats beautifully. Whether you bake it right away or assemble and freeze for later, this recipe adapts to planning ahead, which I find invaluable during busy holiday seasons.
What You’ll Need for Easy Apple Crisp
The philosophy behind these ingredients is simple and honest. A few pantry staples create structure and sweetness, while the apples provide natural juiciness and tartness. The topping is built from oats, flour, and butter so it crisps and browns beautifully, offering contrast to the soft fruit below. Each player has a clear job, from thickening to flavoring, and together they yield the familiar, homey profile we all expect.
- 1 1/2 cups old fashioned oats or quick oats: Provide a chewy, hearty texture that helps bind the crisp topping together while adding whole-grain flavor; oats toast during baking to offer nutty complexity and a pleasant contrast to the soft filling. Use old fashioned for more chew or quick oats for a finer, more uniform crumble. Can be lightly toasted beforehand to intensify flavor.
- 1 cup all-purpose flour: Create structure and body in the topping by absorbing butter and providing a tender, cake-like crumb when baked. Combine with oats and sugar to balance crispness and softness, ensuring the streusel holds together. Sift briefly to avoid lumps and measure lightly for accurate results.
- 1 cup light brown sugar packed: Add moisture and caramel sweetness to both the topping and filling when combined with butter and flour; packed light brown sugar contributes to chewiness and deeper molasses notes. Use the listed amount to ensure the crisp achieves a buttery, caramelized crust without becoming overly sweet. Pack firmly for consistent measurement.
- 1 cup unsalted butter cut into cubes (2 sticks): Provide richness, fat and flavor that bind dry ingredients into a cohesive, golden topping while promoting browning and a silky mouthfeel. Cut butter into cubes to ease incorporation and encourage pea-sized pockets that create flaky texture as it melts. Use unsalted to control overall salt level in the recipe.
- 1/2 teaspoons salt: Balance sweetness and enhance overall flavor by subtly lifting other components without drawing attention; salt also strengthens gluten slightly in the topping for better texture. Measure carefully—too much will make the crisp taste salty while too little will leave flavors flat. Stir evenly into dry topping ingredients.
- 4 cups firm apples for 8-10 large apples (peel and slice into 1/2 inch wedges): Offer a firm, tart foundation for the dessert with natural pectin and structure that holds slices during baking while releasing juices to form a syrupy filling. Choose firm varieties and slice uniformly into 1/2-inch wedges to ensure even cooking and consistent texture. Peel if desired for a smooth mouthfeel.
- 3/4 cup light brown sugar packed: Provide additional caramelized sweetness and depth to the apple filling, complementing the spices and creating a syrup as it cooks with the fruit. Use packed light brown sugar to introduce subtle molasses notes that balance the apples’ acidity. Adjust slightly only if using very sweet or very tart apples.
- 3 tablespoons all-purpose flour: Thicken fruit juices released during baking to prevent a runny filling and help the syrup cling to the apple slices for a cohesive bite. Mix thoroughly with the sugar and spices so it disperses evenly and avoids lumps. Use the specified amount for a balanced, glossy filling consistency.
- 2 teaspoons apple pie spice or ground cinnamon: Impart warm, aromatic spice that complements apples by adding complexity and classic pie-like flavor to the filling; apple pie spice or cinnamon deepens the overall profile. Sprinkle evenly over the fruit to ensure every bite has balanced spice. Start with listed amount and adjust cautiously to taste.
- 1/4 teaspoons salt: Enhance flavor balance in the filling by moderating sweetness and accentuating fruit flavors without making the mixture taste salty; small amounts help lift other components. Dissolve evenly with the dry filling ingredients to avoid concentrated spots of seasoning. Measure precisely for subtlety.
- Vanilla ice cream for serving: Provide a cold, creamy contrast that complements the warm apple crisp, adding richness and a smooth texture that balances the tart fruit and crunchy topping. Serve immediately with a generous scoop so it melts slightly into the hot dessert. Use quality vanilla ice cream for best flavor pairing.
How to Prepare Easy Apple Crisp
This recipe is straightforward and comforting, and I find the steps unfold like a familiar routine. Below I expand each direction with sensory cues, reasons behind the technique, and a troubleshooting note so you know what to look for at every stage.
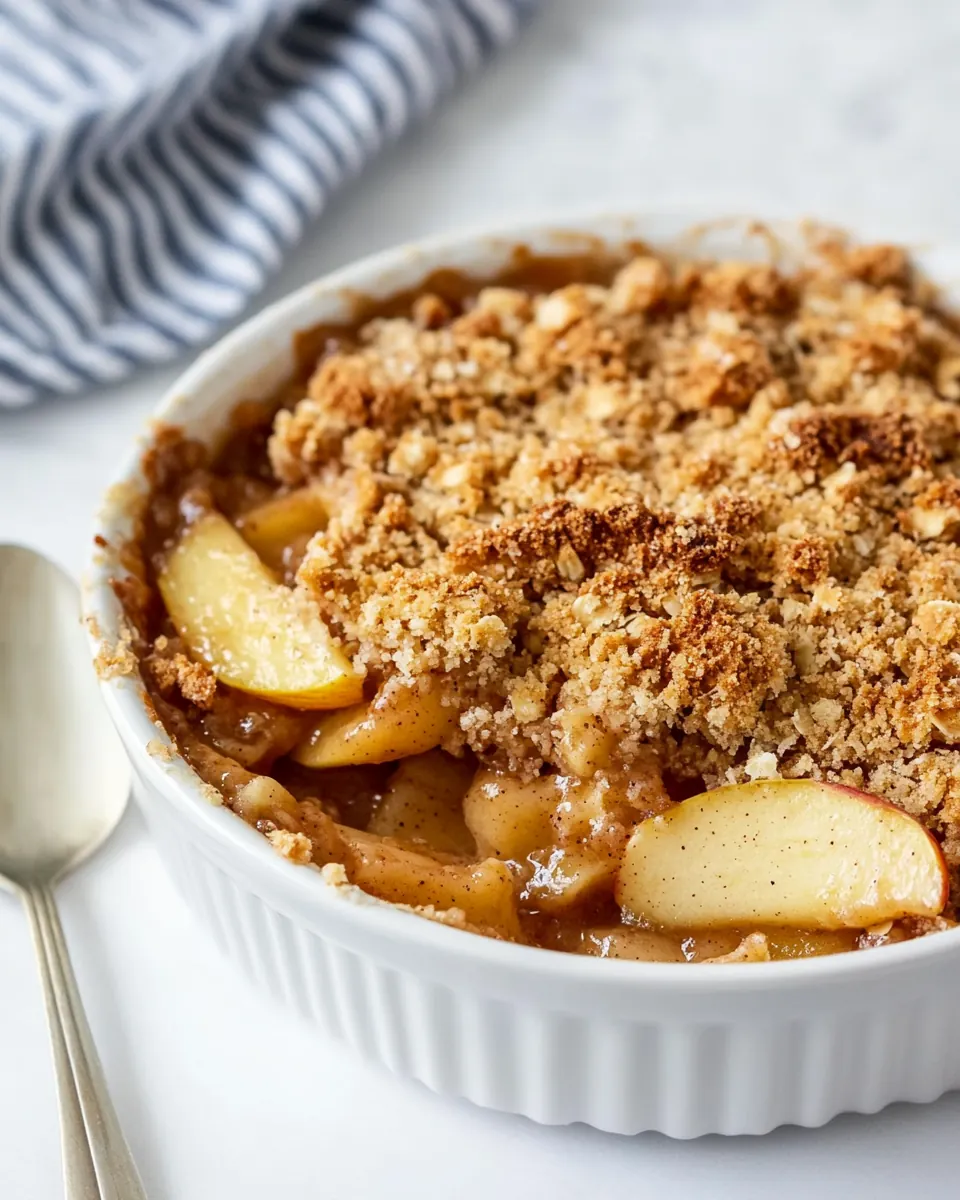
- Preheat the oven to 350°F. Set out a 9 x 13-inch baking dish, or a 3 quart baking dish in any shape.: You will notice the oven warming and a faint electrical hum as it comes to temperature, which ensures even baking. Preheating allows the topping to immediately begin crisping once it goes into a hot oven, helping to form a golden exterior. If you skip preheating, the crisp may take longer to brown and the apples can over soften before the top sets. A common mistake is using a dish that is too deep, which can prevent proper browning around the edges; choose a shallow pan for best results.
- For the Crisp Topping: Set out a medium mixing bowl. Combine the oats, flour, brown sugar, cubes of butter, and salt. Use a pastry blending tool, or your hands, to mix the butter into the dry ingredients, until the butter is in small pea-sized pieces and the mixture looks like dried oatmeal. Set aside. (If working in stages throughout the day, cover and chill the crumpled topping until ready to use.): Set out a medium mixing bowl. : The bowl should feel cool and roomy so you can work comfortably. Start by combining the oats , flour , and brown sugar; the dry mix will smell faintly sweet and wheaty. Add the cubed butter , which should be cold to the touch; as you blend, you will hear soft clinks and see pea sized pieces forming. The butter melting in the oven creates steam that leaves little pockets, producing a flaky crumb. If the butter becomes greasy and the mixture is pasty, chill it briefly and rework gently. Overworking at this stage will ruin the ideal crumbly texture.
- For the Apple Filling: Quickly peel and slice the apples into 1/2-inch wedges. Try to work fast so the apples don't brown. Place the apples in the baking dish and sprinkle the brown sugar, flour, apple pie spice, and salt over the top. Toss to coat and spread the apples out in an even layer. *Some recipes call for lemon juice to be added to the apples so they don't brown. However, lemon juice will break the apples down more as they bake, and this can sometimes cause the apples to turn to mush. If you work fast, you will not need lemon juice.: As you work, pay attention to texture; you want varied crumbs rather than uniform powder. The mixture should smell buttery and slightly sweet, and when pinched it should hold together loosely. This irregularity is why the topping crisps in a pleasing way. If you find large butter chunks remaining, press them gently between your fingers so they distribute evenly. Avoid letting the butter melt from warm hands by refrigerating the bowl for a few minutes if needed.
- Sprinkle the crisp topping over the apples in an even layer. Place the apple crisp in the center of the oven and bake for 40-45 minutes, until the top is golden-brown and the edges are bubbly.: Chilling preserves the shape of the butter pockets. When cold, the topping will produce a flakier, craggier surface after baking, which I find more satisfying. If left at room temperature for too long, the butter can soften and the topping will spread instead of crumbling, resulting in a denser finish.
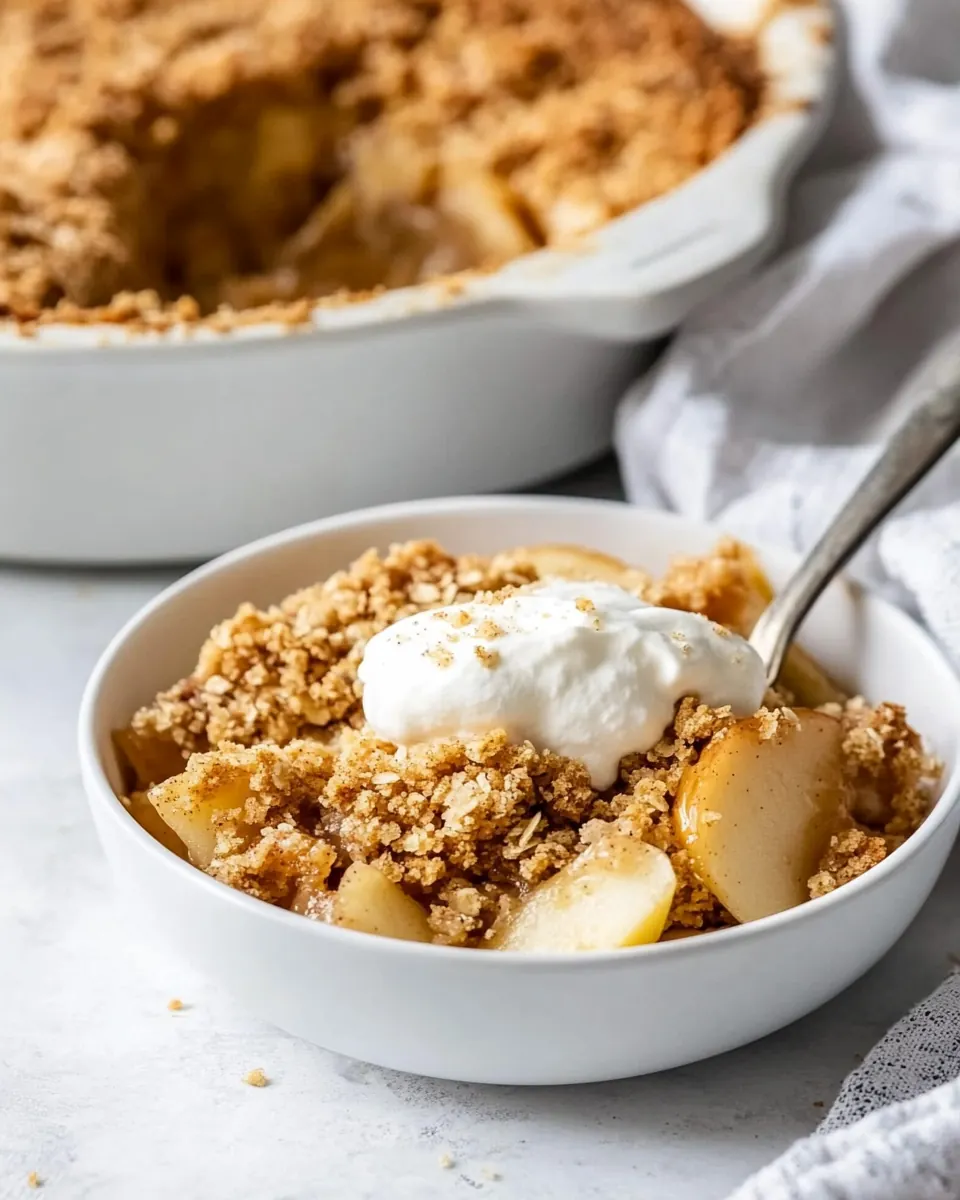
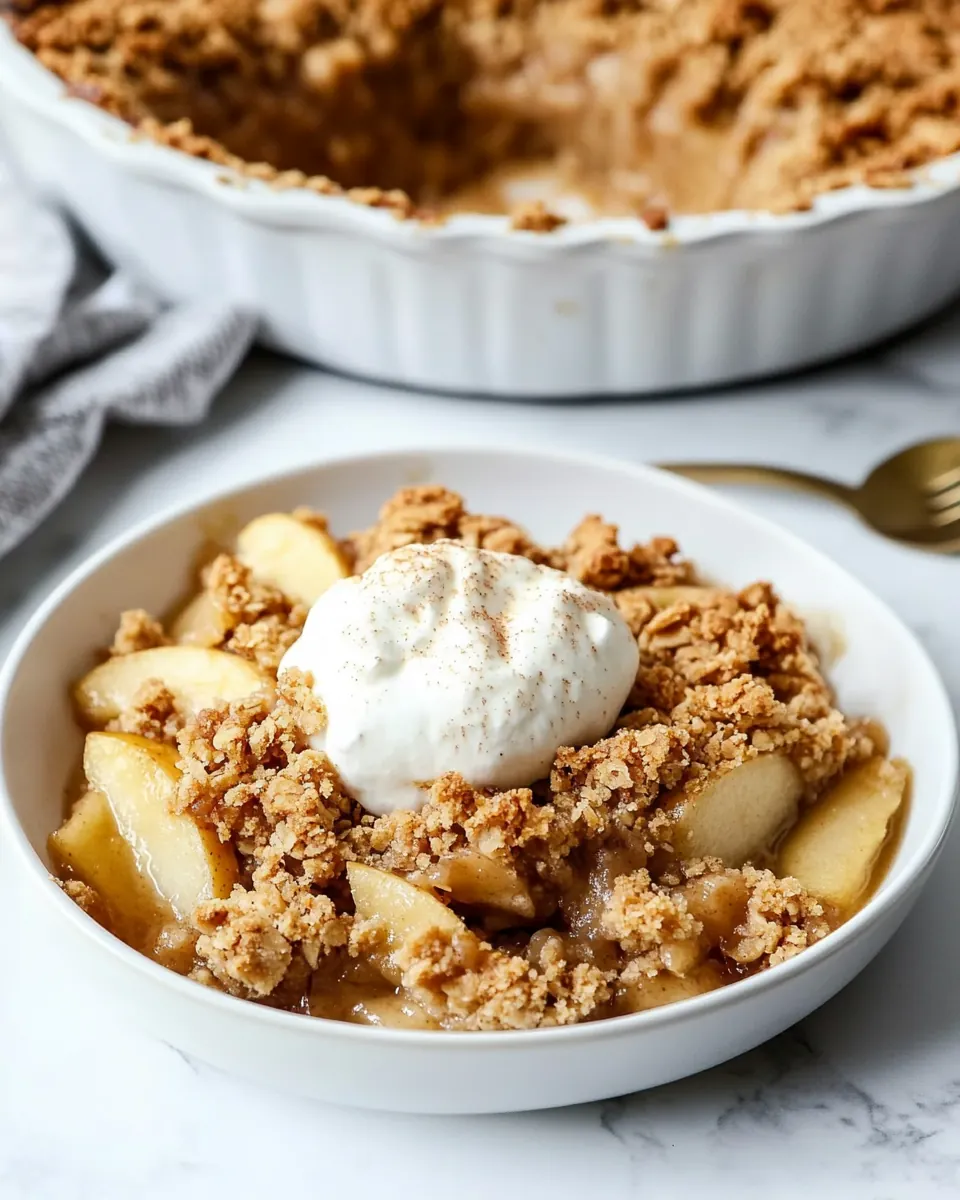
- Cool the apple crisp for 5-10 minutes, then serve warm with vanilla ice cream!: Quickly peel and slice the apples into 1/2-inch wedges. : The brisk sound of the peeler and the clean, crisp scent of fresh apples are the beginning of this step. Slicing evenly ensures uniform cooking; 1/2-inch wedges soften at a steady pace without falling apart. Work quickly to minimize surface browning. A frequent error is slicing unevenly which causes some pieces to overcook while others remain firm, so aim for consistency.
- Try to work fast so the apples don't brown.: Speed preserves bright flesh and a fresher flavor. If some browning occurs, it will not affect safety, but the aesthetic and texture can change. If you are prepping ahead, toss slices in a light coating of sugar or cover tightly to reduce oxidation, but avoid adding acid that could make the fruit break down during baking.
- Place the apples in the baking dish and sprinkle the brown sugar, flour, apple pie spice, and salt over the top.: As you sprinkle, you will see the granules of sugar catch on the fruit and release a faint molasses aroma. The flour absorbs juices as they are released, and the spice brings warm, aromatic notes. Toss gently so the coating is even; this helps the juices thicken into a glossy sauce rather than puddling. Over tossing can bruise the fruit, leading to a mushy texture after baking.
- Toss to coat and spread the apples out in an even layer.: The apples should sit in a single, somewhat loose layer with small gaps so juices can bubble freely. Visually, you want an even distribution so every spoonful has fruit. Pressing the apples down too firmly compacts the filling and can result in uneven cooking and less appealing texture.
- Some recipes call for lemon juice to be added to the apples so they don't brown. However, lemon juice will break the apples down more as they bake, and this can sometimes cause the apples to turn to mush. If you work fast, you will not need lemon juice.: The choice to skip acid preserves a firmer apple texture and a cleaner fruit flavor. The trade off is slight surface browning if prep lingers, but the finished mouthfeel is generally more pleasing. If you prefer a softer, saucier filling, a splash of lemon juice can hasten breakdown, but use sparingly to avoid losing structure.
- Sprinkle the crisp topping over the apples in an even layer.: As the crumbs settle onto the apples, you may feel a satisfying textural contrast between soft fruit and coarse topping. An even layer promotes uniform browning, while clumps may remain doughy in the center. If you spot large chunks of butter, break them up so heat penetrates evenly. Leaving bare spots will mean some apples bake without the desired crunchy cap, so cover thoroughly but loosely.
- Place the apple crisp in the center of the oven and bake for 40 to 45 minutes, until the top is golden-brown and the edges are bubbly.: You will hear a gentle bubbling from the fruit and smell caramelizing sugars as the oven works. The top should turn a deep golden brown and feel crisp to the touch in spots, while juices bubble at the edges indicating the filling is cooked and thickened. Baking longer can deepen flavor, but watch for burning at the very edge. If the topping browns too quickly, tent loosely with foil for the remaining time.
- Cool the apple crisp for 5 to 10 minutes, then serve warm with vanilla ice cream!: During the short rest, juices settle and the filling firms slightly, making the dish easier to portion. Serve warm so the contrast between hot fruit and cold ice cream creates a delightful temperature play. Cutting too soon can cause the filling to run, and serving too long after cooling removes the charm of warm aromas and melting ice cream.
Change It Up
I often tweak small elements depending on what I have on hand or the occasion. Below are detailed tips to vary texture, sweetness, and make the recipe fit your timeline or storage needs.
- Use different oats to change texture: Substitute old fashioned oats for quick oats to achieve a chewier topping, or use quick oats for a finer crumble that bakes more uniformly.
- Adjust sugar levels for ripeness: If your apples are very sweet, reduce the brown sugar in the filling slightly to let natural fruit flavors shine without becoming cloying.
- Make ahead and freeze by assembling in a disposable pan: You can freeze the crisp raw or after baking; increase bake time by 10 to 20 minutes when baking from frozen until bubbling and golden.
- Add nuts sparingly for crunch: Toasted chopped nuts folded into the topping add a savory crunch, but add them sparingly so they do not overpower the oats and butter balance.
- Serve with complementary sides such as a scoop of vanilla ice cream or a drizzle of heavy cream to amplify the creamy contrast with the warm fruit and crunchy topping.
- Store leftovers properly by cooling completely before covering: Refrigerate up to 3 to 4 days, and reheat gently so the topping regains some crispiness without drying out the filling.
Serve This Easy Apple Crisp With
Easy Apple Crisp feels at home on a holiday table yet is casual enough for a weeknight dessert. Below are ideas on pairings, occasions, and storage in list form so you can choose what fits your plans.
- Vanilla ice cream is the classic pairing that adds creamy coolness to contrast the warm, bubbling filling.
- Warm beverage like coffee or spiced tea complements the cinnamon notes and rounds out a relaxed dessert course.
- Holiday gatherings such as Thanksgiving are ideal because the recipe scales easily and can be prepared ahead of time.
- Seasonal serving in fall emphasizes cozy flavors; it also makes a lovely addition to potlucks and neighborhood dinners.
- Storage tips include cooling completely before wrapping, refrigerating for up to 3 to 4 days, or freezing for up to 3 months in an airtight container or disposable pan.
- Day after enjoyment reheating briefly in a 350°F oven revives the topping while keeping the filling warm and comforting.
FAQ
Conclusion
Easy Apple Crisp stands out because it combines simple pantry ingredients into a warm, comforting dessert with a delightful contrast of textures. Give it a try when you want a dessert that is approachable yet impressive, whether you are hosting a holiday gathering or craving something sweet after dinner. This recipe rewards a gentle hand and timing, and it will likely become a favorite you turn to whenever you want the nostalgic flavors of baked apples and buttery crumble.
Easy Apple Crisp
Equipment
- 9 x 13 inch baking dish
- Mixing Bowl
- Pastry blender
- Peeler
Ingredients
- 1 1/2 cups old fashioned oats or quick oats Provide a chewy, hearty texture that helps bind the crisp topping together while adding whole-grain flavor; oats toast during baking to offer nutty complexity and a pleasant contrast to the soft filling. Use old fashioned for more chew or quick oats for a finer, more uniform crumble. Can be lightly toasted beforehand to intensify flavor.
- 1 cup all-purpose flour Create structure and body in the topping by absorbing butter and providing a tender, cake-like crumb when baked. Combine with oats and sugar to balance crispness and softness, ensuring the streusel holds together. Sift briefly to avoid lumps and measure lightly for accurate results.
- 1 cup light brown sugar packed Add moisture and caramel sweetness to both the topping and filling when combined with butter and flour; packed light brown sugar contributes to chewiness and deeper molasses notes. Use the listed amount to ensure the crisp achieves a buttery, caramelized crust without becoming overly sweet. Pack firmly for consistent measurement.
- 1 cup unsalted butter cut into cubes (2 sticks) Provide richness, fat and flavor that bind dry ingredients into a cohesive, golden topping while promoting browning and a silky mouthfeel. Cut butter into cubes to ease incorporation and encourage pea-sized pockets that create flaky texture as it melts. Use unsalted to control overall salt level in the recipe.
- 1/2 teaspoons salt Balance sweetness and enhance overall flavor by subtly lifting other components without drawing attention; salt also strengthens gluten slightly in the topping for better texture. Measure carefully—too much will make the crisp taste salty while too little will leave flavors flat. Stir evenly into dry topping ingredients.
- 4 cups firm apples for 8-10 large apples (peel and slice into 1/2 inch wedges) Offer a firm, tart foundation for the dessert with natural pectin and structure that holds slices during baking while releasing juices to form a syrupy filling. Choose firm varieties and slice uniformly into 1/2-inch wedges to ensure even cooking and consistent texture. Peel if desired for a smooth mouthfeel.
- 3/4 cup light brown sugar packed Provide additional caramelized sweetness and depth to the apple filling, complementing the spices and creating a syrup as it cooks with the fruit. Use packed light brown sugar to introduce subtle molasses notes that balance the apples’ acidity. Adjust slightly only if using very sweet or very tart apples.
- 3 tablespoons all-purpose flour Thicken fruit juices released during baking to prevent a runny filling and help the syrup cling to the apple slices for a cohesive bite. Mix thoroughly with the sugar and spices so it disperses evenly and avoids lumps. Use the specified amount for a balanced, glossy filling consistency.
- 2 teaspoons apple pie spice or ground cinnamon Impart warm, aromatic spice that complements apples by adding complexity and classic pie-like flavor to the filling; apple pie spice or cinnamon deepens the overall profile. Sprinkle evenly over the fruit to ensure every bite has balanced spice. Start with listed amount and adjust cautiously to taste.
- 1/4 teaspoons salt Enhance flavor balance in the filling by moderating sweetness and accentuating fruit flavors without making the mixture taste salty; small amounts help lift other components. Dissolve evenly with the dry filling ingredients to avoid concentrated spots of seasoning. Measure precisely for subtlety.
- Vanilla ice cream for serving Provide a cold, creamy contrast that complements the warm apple crisp, adding richness and a smooth texture that balances the tart fruit and crunchy topping. Serve immediately with a generous scoop so it melts slightly into the hot dessert. Use quality vanilla ice cream for best flavor pairing.
Instructions
- Preheat the oven to 350°F. Set out a 9 x 13-inch baking dish, or a 3 quart baking dish in any shape.: You will notice the oven warming and a faint electrical hum as it comes to temperature, which ensures even baking. Preheating allows the topping to immediately begin crisping once it goes into a hot oven, helping to form a golden exterior. If you skip preheating, the crisp may take longer to brown and the apples can over soften before the top sets. A common mistake is using a dish that is too deep, which can prevent proper browning around the edges; choose a shallow pan for best results.
- For the Crisp Topping: Set out a medium mixing bowl. Combine the oats, flour, brown sugar, cubes of butter, and salt. Use a pastry blending tool, or your hands, to mix the butter into the dry ingredients, until the butter is in small pea-sized pieces and the mixture looks like dried oatmeal. Set aside. (If working in stages throughout the day, cover and chill the crumpled topping until ready to use.): Set out a medium mixing bowl. : The bowl should feel cool and roomy so you can work comfortably. Start by combining the oats , flour , and brown sugar; the dry mix will smell faintly sweet and wheaty. Add the cubed butter , which should be cold to the touch; as you blend, you will hear soft clinks and see pea sized pieces forming. The butter melting in the oven creates steam that leaves little pockets, producing a flaky crumb. If the butter becomes greasy and the mixture is pasty, chill it briefly and rework gently. Overworking at this stage will ruin the ideal crumbly texture.
- For the Apple Filling: Quickly peel and slice the apples into 1/2-inch wedges. Try to work fast so the apples don't brown. Place the apples in the baking dish and sprinkle the brown sugar, flour, apple pie spice, and salt over the top. Toss to coat and spread the apples out in an even layer. *Some recipes call for lemon juice to be added to the apples so they don't brown. However, lemon juice will break the apples down more as they bake, and this can sometimes cause the apples to turn to mush. If you work fast, you will not need lemon juice.: As you work, pay attention to texture; you want varied crumbs rather than uniform powder. The mixture should smell buttery and slightly sweet, and when pinched it should hold together loosely. This irregularity is why the topping crisps in a pleasing way. If you find large butter chunks remaining, press them gently between your fingers so they distribute evenly. Avoid letting the butter melt from warm hands by refrigerating the bowl for a few minutes if needed.
- Sprinkle the crisp topping over the apples in an even layer. Place the apple crisp in the center of the oven and bake for 40-45 minutes, until the top is golden-brown and the edges are bubbly.: Chilling preserves the shape of the butter pockets. When cold, the topping will produce a flakier, craggier surface after baking, which I find more satisfying. If left at room temperature for too long, the butter can soften and the topping will spread instead of crumbling, resulting in a denser finish.
- Cool the apple crisp for 5-10 minutes, then serve warm with vanilla ice cream!: Quickly peel and slice the apples into 1/2-inch wedges. : The brisk sound of the peeler and the clean, crisp scent of fresh apples are the beginning of this step. Slicing evenly ensures uniform cooking; 1/2-inch wedges soften at a steady pace without falling apart. Work quickly to minimize surface browning. A frequent error is slicing unevenly which causes some pieces to overcook while others remain firm, so aim for consistency.
- Try to work fast so the apples don't brown.: Speed preserves bright flesh and a fresher flavor. If some browning occurs, it will not affect safety, but the aesthetic and texture can change. If you are prepping ahead, toss slices in a light coating of sugar or cover tightly to reduce oxidation, but avoid adding acid that could make the fruit break down during baking.
- Place the apples in the baking dish and sprinkle the brown sugar, flour, apple pie spice, and salt over the top.: As you sprinkle, you will see the granules of sugar catch on the fruit and release a faint molasses aroma. The flour absorbs juices as they are released, and the spice brings warm, aromatic notes. Toss gently so the coating is even; this helps the juices thicken into a glossy sauce rather than puddling. Over tossing can bruise the fruit, leading to a mushy texture after baking.
- Toss to coat and spread the apples out in an even layer.: The apples should sit in a single, somewhat loose layer with small gaps so juices can bubble freely. Visually, you want an even distribution so every spoonful has fruit. Pressing the apples down too firmly compacts the filling and can result in uneven cooking and less appealing texture.
- Some recipes call for lemon juice to be added to the apples so they don't brown. However, lemon juice will break the apples down more as they bake, and this can sometimes cause the apples to turn to mush. If you work fast, you will not need lemon juice.: The choice to skip acid preserves a firmer apple texture and a cleaner fruit flavor. The trade off is slight surface browning if prep lingers, but the finished mouthfeel is generally more pleasing. If you prefer a softer, saucier filling, a splash of lemon juice can hasten breakdown, but use sparingly to avoid losing structure.
- Sprinkle the crisp topping over the apples in an even layer.: As the crumbs settle onto the apples, you may feel a satisfying textural contrast between soft fruit and coarse topping. An even layer promotes uniform browning, while clumps may remain doughy in the center. If you spot large chunks of butter, break them up so heat penetrates evenly. Leaving bare spots will mean some apples bake without the desired crunchy cap, so cover thoroughly but loosely.
- Place the apple crisp in the center of the oven and bake for 40 to 45 minutes, until the top is golden-brown and the edges are bubbly.: You will hear a gentle bubbling from the fruit and smell caramelizing sugars as the oven works. The top should turn a deep golden brown and feel crisp to the touch in spots, while juices bubble at the edges indicating the filling is cooked and thickened. Baking longer can deepen flavor, but watch for burning at the very edge. If the topping browns too quickly, tent loosely with foil for the remaining time.
- Cool the apple crisp for 5 to 10 minutes, then serve warm with vanilla ice cream!: During the short rest, juices settle and the filling firms slightly, making the dish easier to portion. Serve warm so the contrast between hot fruit and cold ice cream creates a delightful temperature play. Cutting too soon can cause the filling to run, and serving too long after cooling removes the charm of warm aromas and melting ice cream.
Notes
- Use different oats to change texture: Substitute old fashioned oats for quick oats to achieve a chewier topping, or use quick oats for a finer crumble that bakes more uniformly.
- Adjust sugar levels for ripeness: If your apples are very sweet, reduce the brown sugar in the filling slightly to let natural fruit flavors shine without becoming cloying.
- Make ahead and freeze by assembling in a disposable pan: You can freeze the crisp raw or after baking; increase bake time by 10 to 20 minutes when baking from frozen until bubbling and golden.
- Add nuts sparingly for crunch: Toasted chopped nuts folded into the topping add a savory crunch, but add them sparingly so they do not overpower the oats and butter balance.
- Serve with complementary sides such as a scoop of vanilla ice cream or a drizzle of heavy cream to amplify the creamy contrast with the warm fruit and crunchy topping.
- Store leftovers properly by cooling completely before covering: Refrigerate up to 3 to 4 days, and reheat gently so the topping regains some crispiness without drying out the filling.