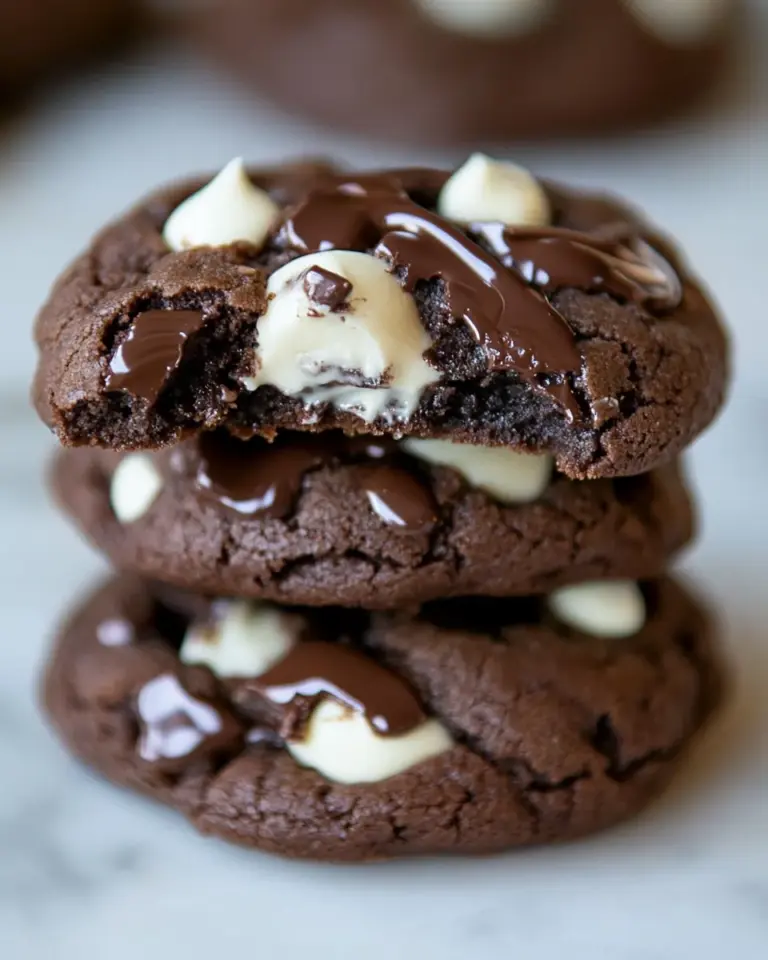
Easter Chocolate Egg Brownies
Easter Chocolate Egg Brownies are the sort of dessert I make when I want to bring a bit of childhood joy into the kitchen, and they always turn an ordinary afternoon into a small celebration. The first time I baked them I remember the house filling with the warm, rich perfume of melting dark chocolate and butter, and my neighbor dropping by because the aroma was impossible to ignore. I loved how the scattered chocolate eggs on top made each square feel like a tiny gift.
Over the years I have tweaked the balance between fudgy and cakey, learned to trust simple techniques, and found that a handful of careful choices creates the best texture. Baking these Easter Chocolate Egg Brownies has become my go to for gatherings because they travel well and slice into pieces that look festive without any fuss. I enjoy the ritual of stirring melted dark chocolate into glossy, warm batter, and I never tire of that first crackle when you pull a fudgy square from the pan.
Recipe Snapshot
35 mins
10 mins
25 mins
Medium
200 kcal
American
Gluten-Free, Low FODMAP
Desserts
Mixing bowl, Whisk, Spatula, Baking pan, Parchment paper, Double boiler or microwave
The Best Thing About This Easter Chocolate Egg Brownies
1. Deep chocolate flavor that still feels light
I love that these Easter Chocolate Egg Brownies use a good percentage dark chocolate paired with cocoa powder. The combination gives depth without weighing the brownies down, so each bite tastes intense yet balanced.
2. Flexible texture from fudgy to cakey
One of the best things about this recipe is how easy it is to adjust the final crumb. By watching the bake time and testing with a toothpick, I can choose gooey, fudgy centers for late night snacks or a slightly firmer, cake like slice if I need neat pieces for a party platter.
3. Fun, festive topping with real impact
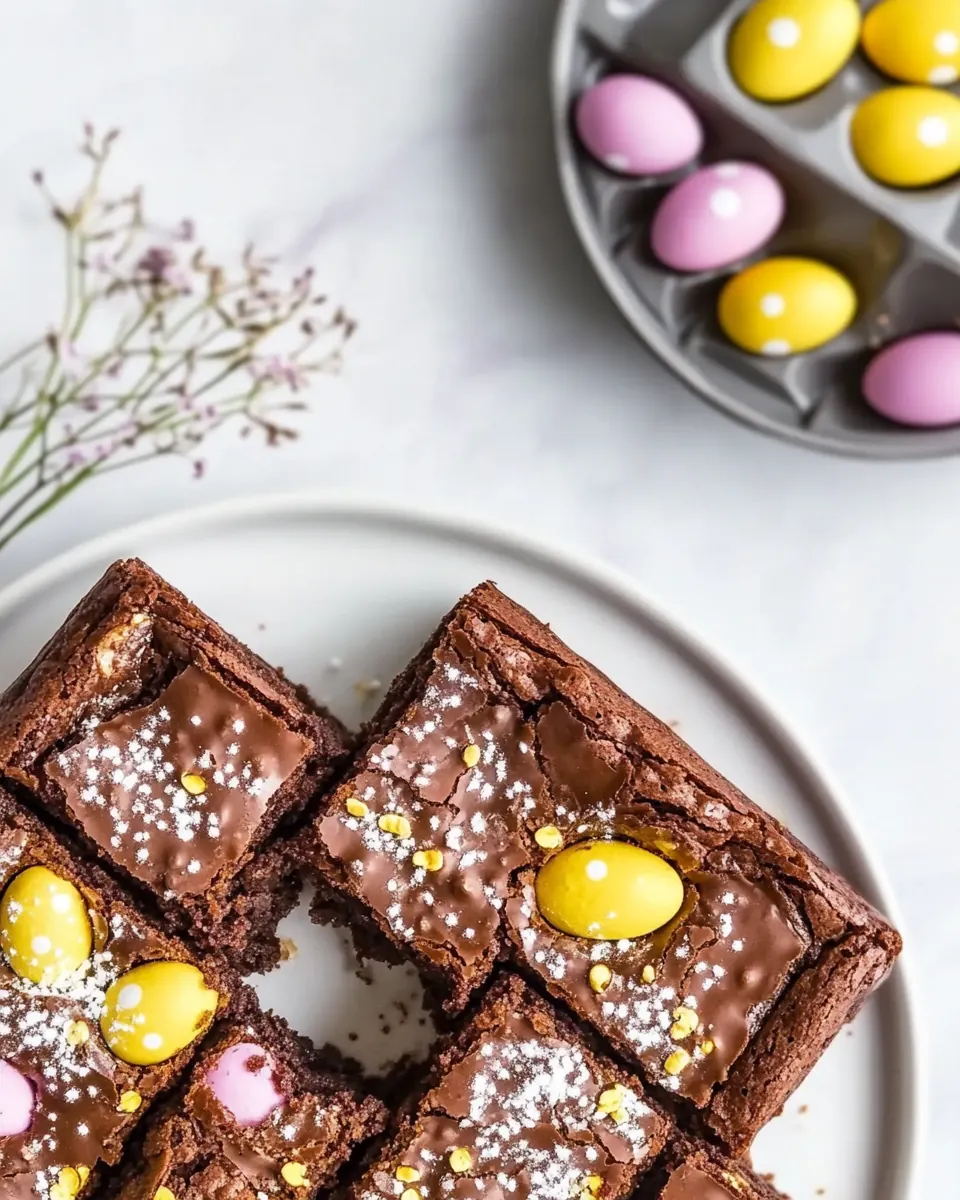
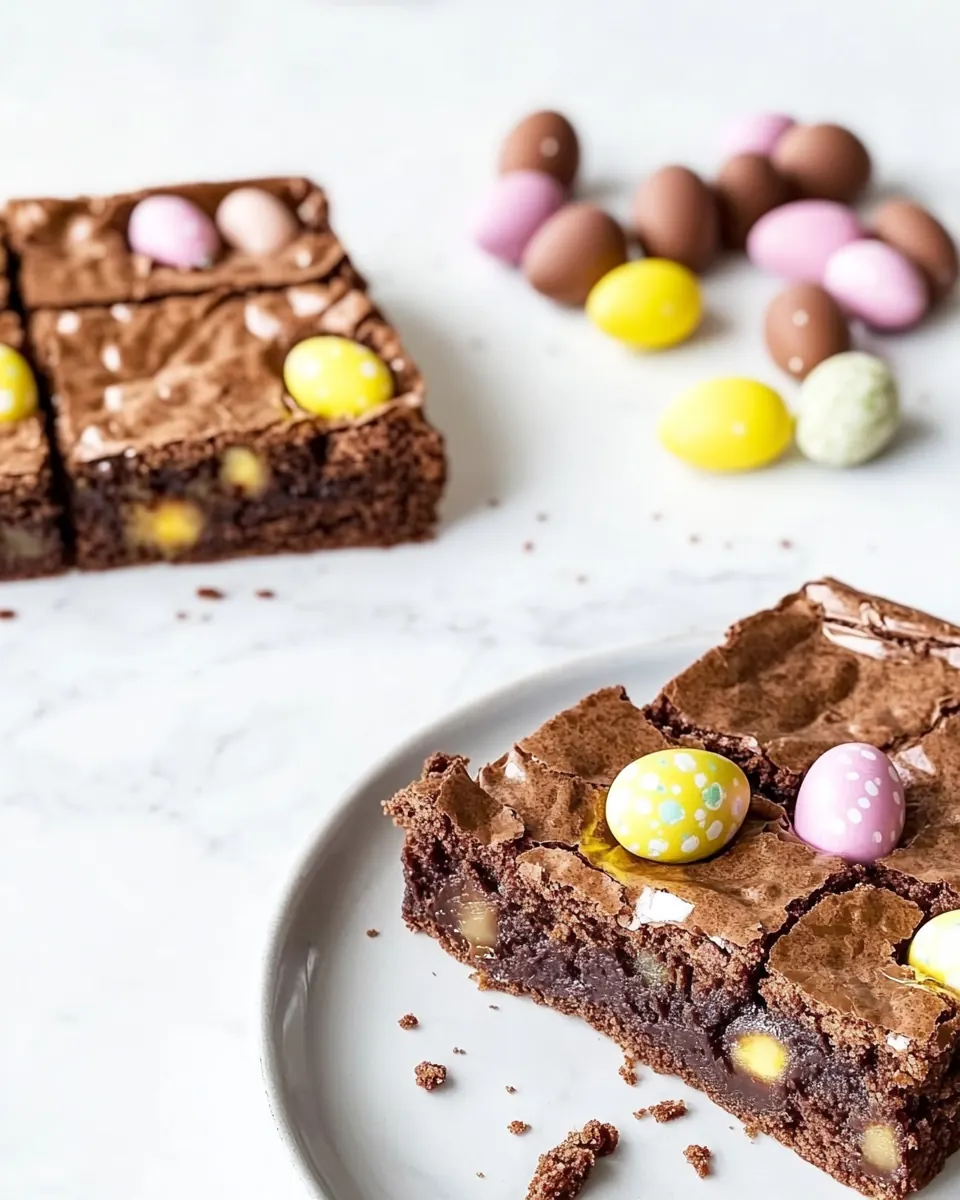
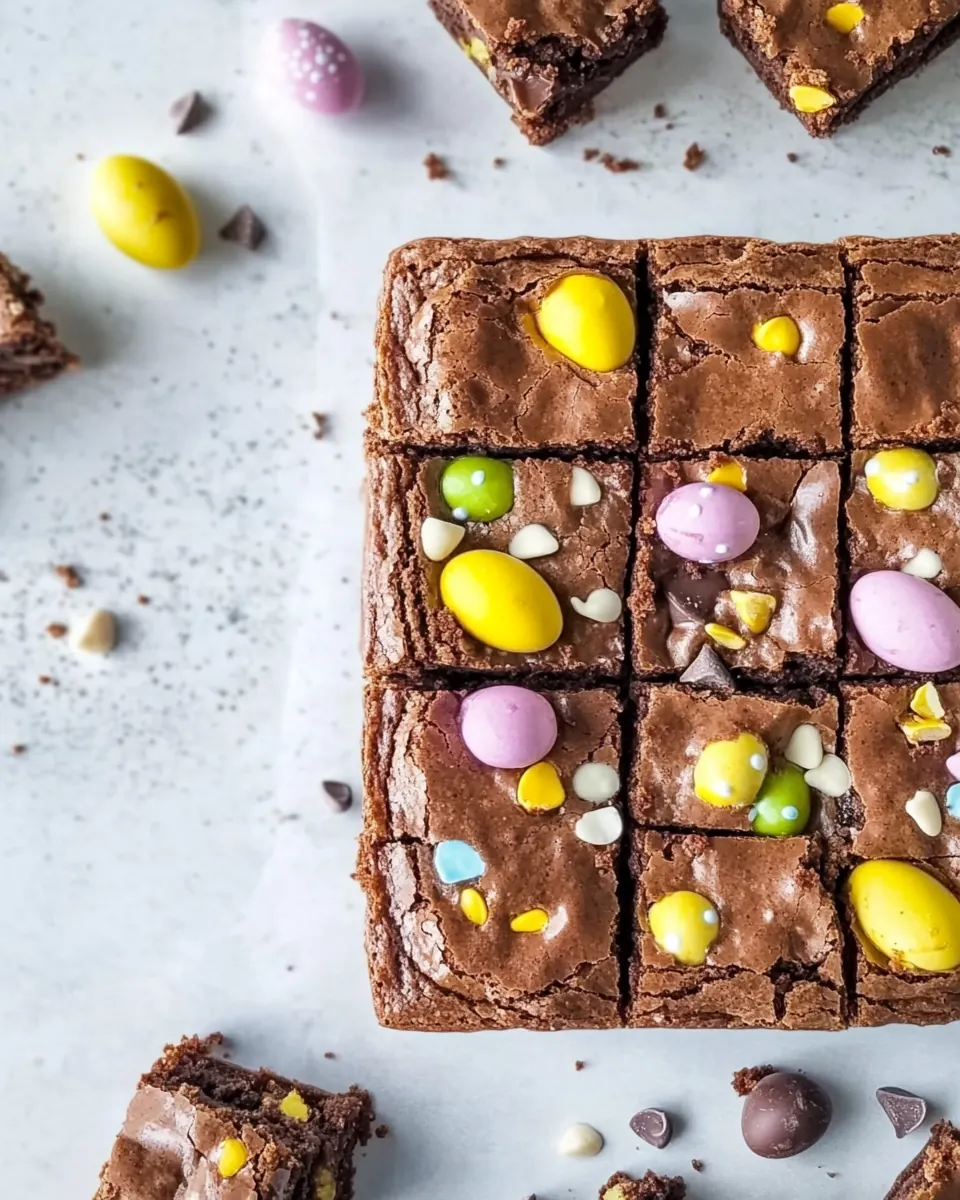
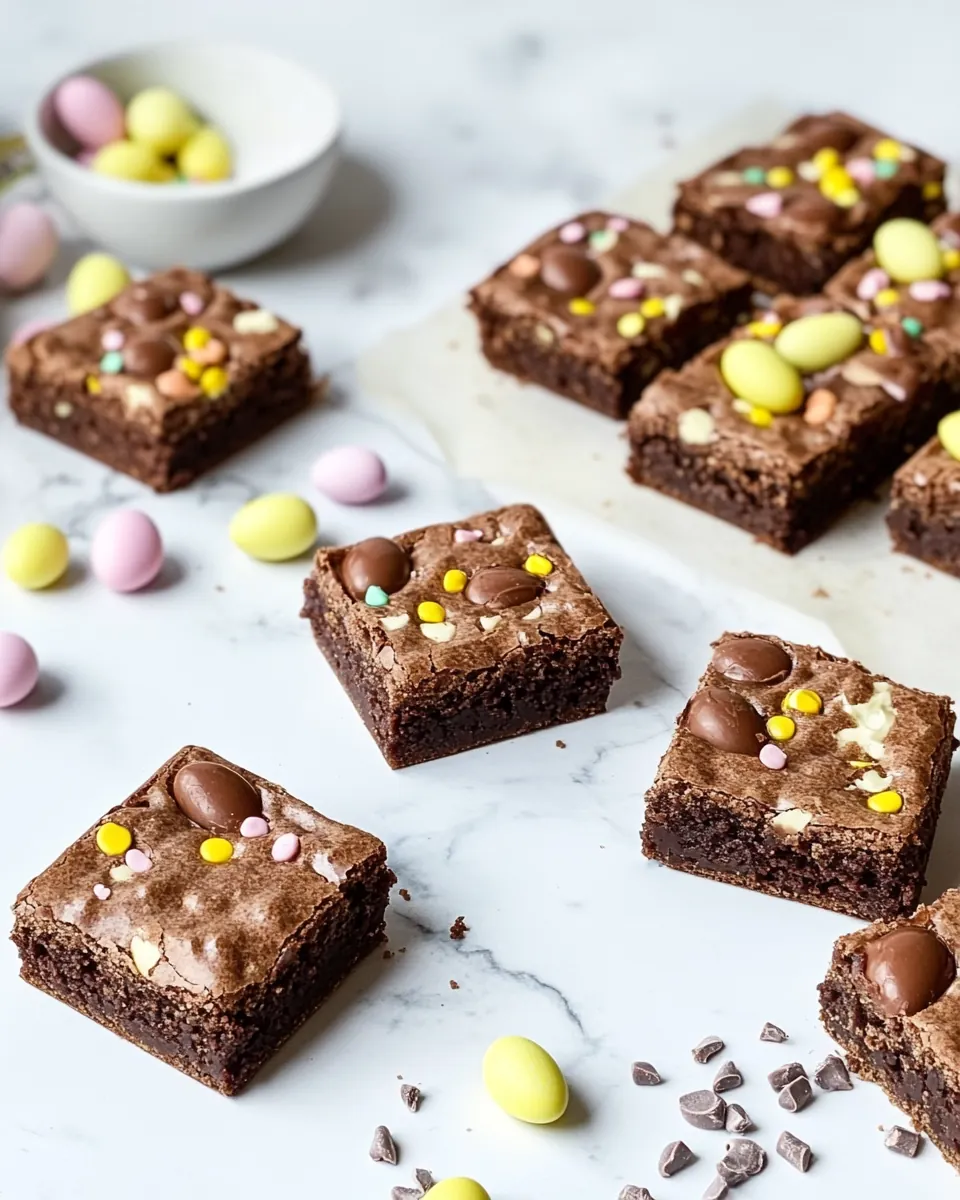
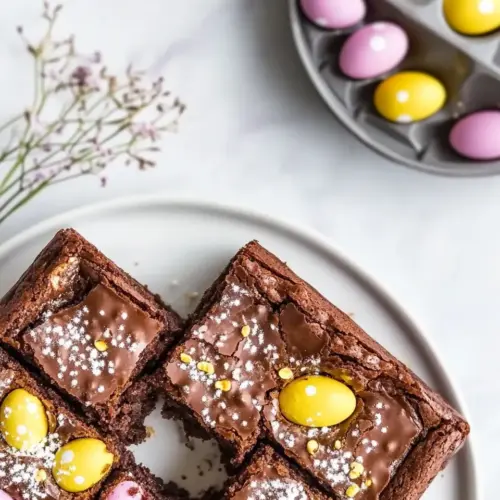
Scattering chocolate eggs on the batter just before baking elevates the brownies without extra work. The eggs melt at the edges and keep their shape at the top, creating playful pockets of color and texture that kids and adults both notice first.
4. Simple pantry friendly ingredients
Most of the list is pantry staples like sugar, flour, and eggs. That makes these brownies a reliable last minute treat when you want something special with minimal fuss, and I often find everything I need already on the shelf.
5. Great for sharing and gifting
These brownies cut into 16 pieces that travel well, and the festive top makes them look gift ready. I like to wrap individual squares in parchment for neighbors, it makes a simple gesture feel thoughtful and homemade.
Key Ingredients for Easter Chocolate Egg Brownies
These ingredients are deliberate partners in creating fudgy, chocolate forward brownies. The butter and dark chocolate form a glossy, rich base, while the eggs and sugar give structure and lift. The dry trio of flour, cocoa powder, and baking powder provides the crumb, and a pinch of salt heightens the chocolate.
- 150 g butter: Melted and rich, provides the primary fat that gives brownies a moist, tender crumb and helps carry chocolate flavor; melt gently to avoid burning and combine with chocolate for a glossy batter.
- 160 g dark chocolate 50-70% cocoa: Melted and intense, supplies deep cocoa flavor and structure while contributing fat and sheen; choose 50-70% cocoa for balanced bitterness and melt with butter for a smooth ganache-like base.
- 1 teaspoon vanilla extract: Aromatic and subtle, adds a warm vanilla note that enhances chocolate flavor and rounds out sweetness; stir into the batter after melting chocolate to preserve its fragrance.
- 150 g sugar: Granulated and sweet, creates sweetness and contributes to texture and slight chewiness; cream briefly with eggs or dissolve into warm chocolate mixture to ensure even distribution.
- 3 eggs: Beaten and binding, provide structure, lift and richness while contributing moisture and a fudgy interior; incorporate one at a time and mix until just combined to avoid overbeating.
- 150 g flour 1 cup (125 g) flour if you prefer fudgy brownies: Dry and forming, supplies the bulk of the batter and creates the framework for brownies; sift or whisk with cocoa and leavening to prevent lumps and measure precisely for desired fudginess.
- 3 tablespoons cocoa powder: Powdered and chocolaty, intensifies chocolate flavor and deepens color while absorbing some moisture for a denser crumb; whisk with flour to ensure even dispersion throughout the batter.
- 1 teaspoon baking powder: Leavening and lightening, gives a gentle rise and prevents overly dense brownies when used sparingly; combine thoroughly with dry ingredients to activate evenly during baking.
- 1/2 teaspoons salt: Salty and balancing, enhances overall flavor and tempers sweetness while strengthening the chocolate notes; dissolve into the dry mix for even seasoning and contrast.
- chocolate eggs (whole and halved, for topping): Decorative and festive, adds crunch, extra chocolate and visual appeal when scattered whole or halved on top; press gently into the surface before baking or immediately after for a glossy finish.
Easter Chocolate Egg Brownies Instructions
I like to walk through these steps slowly when I bake, savoring the smells and watching how the batter changes. Follow the order and pay attention to visual cues, and you will get reliably beautiful brownies. Below are the cleaned steps from the recipe, expanded with sensory notes, why each piece matters, and a common pitfall to watch for.
- Preheat the oven to 180°C/356°F (no fan setting).: You will notice a warm, dry heat build in the oven that helps the top set evenly, producing the classic crackly brownie crust. Accurate temperature matters because a too hot oven causes the edges to overbake while the center stays underdone, and a too cool oven yields a flat, pale top. Use an oven thermometer if yours runs hot or cool. A common mistake is not preheating, which can change bake time drastically and ruin texture.
- Line an 18 x 24 cm (7×10 in) baking pan with parchment paper.: The parchment creates an easy release and prevents the delicate top from sticking, while the pan size ensures an even thickness so the brownies bake uniformly. You should feel the paper smooth against the pan and tuck the sides up slightly for neat removal. If you skip lining, the crust can adhere and tear on unmolding. A frequent slip is using a pan that is too large or too small, which alters bake depth and timing.
- Melt the butter and chocolate together over a double boiler (or microwave in 20-second intervals, stirring in between). Stir in the vanilla extract and let cool slightly.: As the mixture loosens you will see glossy ribbons of chocolate and butter , and the aroma becomes rich and toasty. Stirring encourages a smooth emulsion and prevents scorching, which tastes burnt. If you overheat, the chocolate can seize into grainy clumps; to fix this add a small spoon of warm butter and stir gently. A common oversight is heating too quickly, so be patient and gentle with the heat.
- Whisk the eggs and sugar together in a mixing bowl until slightly pale and frothy. Then, slowly mix in the melted chocolate-butter mixture.: Adding the vanilla extract at this stage lets its floral notes bloom without evaporating. Allowing the mix to cool prevents the hot chocolate from cooking the eggs when combined. You will feel the temperature drop as you stir and the steam will lessen, signaling it is safe to proceed. If the mix is still too hot it will scramble the eggs , so always cool it briefly.
- Sift together the flour, cocoa powder, baking powder, and salt. Gently fold the dry ingredients into the wet mixture, avoiding overmixing.: You should see the mixture lighten and form ribbons when the whisk is lifted, creating air that contributes to tenderness. The sugar helps stabilize the foam and gives that glossy top when baked. Overwhisking can make the batter too aerated, resulting in a cake like texture, while underwhisking may leave the brownies dense. Aim for just pale and frothy.
- Pour the batter into the prepared pan, smoothing the surface with a spatula. Scatter the chocolate eggs on top, some whole and some halved.: As you incorporate the warm chocolate into the whipped egg base, the batter will turn thick and glossy and release a comforting chocolate perfume. Adding it slowly keeps the texture smooth and prevents deflating the aeration you built. If folded in too quickly the batter may seize or split. A typical mistake is pouring all at once, which flattens the mixture.
- Bake for 25-30 minutes, checking at 25 minutes. A toothpick inserted in the center should come out with a few moist crumbs for a fudgy texture or clean for a cakier texture.: Sifting aerates the dry mix and removes lumps, creating a uniform color and consistent crumb. The dry ingredients will taste earthy and fragrant, and blending them first prevents pockets of unsifted cocoa or baking powder. If you skip sifting you can end up with bitter lumps or uneven rising. Avoid vigorous stirring which develops gluten.
- Cool completely before slicing and serving. Enjoy your rich, chocolatey brownies!: The batter will take on a dense, ribbon like appearance, and you should see streaks disappear as it becomes homogeneous. Folding preserves tender air pockets while ensuring even distribution of dry components. Overworking will produce a tough chew, so stop as soon as the last streak vanishes. A common error is mixing until completely fluid which creates a heavy texture.
- Pour the batter into the prepared pan smoothing the surface with a spatula: As you spread, the batter should glisten and hold gentle peaks, filling the pan evenly. Smoothing helps the brownies bake to uniform thickness so centers and edges finish together. Press out any trapped air bubbles by tapping the pan briefly on the counter. If the batter is uneven the thinner parts will overbake; avoid pressing too hard which can cause an uneven top.
- Scatter the chocolate eggs on top some whole and some halved: Placing the chocolate eggs strategically gives a playful look and varied texture, and you will see some sink slightly while others roast at the surface, creating pretty melting patterns. Gently press halved eggs into the batter so they adhere during the bake. Overcrowding leads to uneven baking and pockets of undercooked batter, so space them thoughtfully.
- Bake for 25 to 30 minutes checking at 25 minutes: During baking the aroma deepens and the top will set with a delicate crackle, while the interior remains moist if timed well. The toothpick test is your best gauge: a few moist crumbs means fudgy, a clean pick means cakey. Resist opening the oven too often which lowers the temperature and can affect rise. A typical misstep is relying on time alone rather than visual cues and the toothpick test.
- Cool completely before slicing and serving: Cooling lets the structure set so slices hold their shape, and the chocolate firms slightly, concentrating the flavor. You will notice less steam as the pan cools, and the surface becomes easier to score for neat squares. Cutting while warm often produces messy, gooey pieces, so patience rewards you with clean slices. A common temptation is to taste immediately, which can be disappointing in texture even if the flavor is good.
Recipe Variations about Easter Chocolate Egg Brownies
There are small ways to tune these brownies for texture, presentation, and convenience. Below I outline practical variations I use depending on whether I want extra fudginess, a prettier top, or a quicker method for busy afternoons.
- Extra fudgy version — Reduce the flour slightly to the lower cup measurement and pull the brownies from the oven at the earlier check, this leaves the center lusciously gooey while the edges crisp.
- Cakey slices — If you prefer a lighter crumb, bake toward the longer end of the time window until the toothpick comes out mostly clean for a more cake like texture.
- Neat gift squares — Cool the pan completely, then chill for 30 minutes before slicing; chilled brownies cut with cleaner edges for packaged gifts.
- Chocolate intensity — Use higher percentage dark chocolate for a deeper cocoa flavor, but balance with a touch more sugar if it tastes too bitter.
- Decorative top — Press some halved chocolate eggs slightly into the batter so they sit flush and create a more polished presentation after baking.
Serving Suggestions
These brownies are built for sharing and celebration. They make a bright addition to holiday spreads and casual get togethers, and their portability means they work well for picnics or potlucks. Below are thoughtful serving ideas and pairing notes to help you present them with confidence.
- Casual dessert platter — Arrange squares on a large board with parchment, adding a scattering of extra chocolate eggs for color; the visual contrast invites guests to help themselves.
- Party favor — Wrap individual pieces in parchment and tie with twine for an easy party favor at springtime gatherings or alongside Easter brunch.
- Family snack — Serve warm or cooled with a simple glass of milk for kids, the fudgy texture and colorful toppings make it a hit after school.
- Holiday centerpiece — Place brownies on a cake stand at an Easter table; their festive look works as both dessert and decoration.
- Storage tips — Keep in an airtight container at room temperature for up to three days, or refrigerate for up to one week; bring to room temperature before serving for best texture.
- Occasion fit — These are ideal for spring celebrations, Easter brunches, or anytime you want a cheerful, shareable dessert.
FAQ
Conclusion
These Easter Chocolate Egg Brownies stand out for their rich chocolate flavor, playful topping, and versatile texture that can be adjusted from fudgy to cakey. Take a moment to gather simple pantry staples, follow the temperature and timing cues, and you will end up with a festive dessert that looks special with minimal effort. Try this recipe for your next spring gathering or when you want a comforting chocolate treat that doubles as a cheerful holiday centerpiece.
Easter Chocolate Egg Brownies
Equipment
- Mixing Bowl
- Whisk
- Spatula
- Baking Pan
- Parchment Paper
- Double boiler or microwave
Ingredients
- 150 g butter Melted and rich, provides the primary fat that gives brownies a moist, tender crumb and helps carry chocolate flavor; melt gently to avoid burning and combine with chocolate for a glossy batter.
- 160 g dark chocolate 50-70% cocoa Melted and intense, supplies deep cocoa flavor and structure while contributing fat and sheen; choose 50-70% cocoa for balanced bitterness and melt with butter for a smooth ganache-like base.
- 1 teaspoon vanilla extract Aromatic and subtle, adds a warm vanilla note that enhances chocolate flavor and rounds out sweetness; stir into the batter after melting chocolate to preserve its fragrance.
- 150 g sugar Granulated and sweet, creates sweetness and contributes to texture and slight chewiness; cream briefly with eggs or dissolve into warm chocolate mixture to ensure even distribution.
- 3 eggs Beaten and binding, provide structure, lift and richness while contributing moisture and a fudgy interior; incorporate one at a time and mix until just combined to avoid overbeating.
- 150 g flour 1 cup (125 g) flour if you prefer fudgy brownies Dry and forming, supplies the bulk of the batter and creates the framework for brownies; sift or whisk with cocoa and leavening to prevent lumps and measure precisely for desired fudginess.
- 3 tablespoons cocoa powder Powdered and chocolaty, intensifies chocolate flavor and deepens color while absorbing some moisture for a denser crumb; whisk with flour to ensure even dispersion throughout the batter.
- 1 teaspoon baking powder Leavening and lightening, gives a gentle rise and prevents overly dense brownies when used sparingly; combine thoroughly with dry ingredients to activate evenly during baking.
- 1/2 teaspoons salt Salty and balancing, enhances overall flavor and tempers sweetness while strengthening the chocolate notes; dissolve into the dry mix for even seasoning and contrast.
- chocolate eggs (whole and halved, for topping) Decorative and festive, adds crunch, extra chocolate and visual appeal when scattered whole or halved on top; press gently into the surface before baking or immediately after for a glossy finish.
Instructions
- Preheat the oven to 180°C/356°F (no fan setting).: You will notice a warm, dry heat build in the oven that helps the top set evenly, producing the classic crackly brownie crust. Accurate temperature matters because a too hot oven causes the edges to overbake while the center stays underdone, and a too cool oven yields a flat, pale top. Use an oven thermometer if yours runs hot or cool. A common mistake is not preheating, which can change bake time drastically and ruin texture.
- Line an 18 x 24 cm (7×10 in) baking pan with parchment paper.: The parchment creates an easy release and prevents the delicate top from sticking, while the pan size ensures an even thickness so the brownies bake uniformly. You should feel the paper smooth against the pan and tuck the sides up slightly for neat removal. If you skip lining, the crust can adhere and tear on unmolding. A frequent slip is using a pan that is too large or too small, which alters bake depth and timing.
- Melt the butter and chocolate together over a double boiler (or microwave in 20-second intervals, stirring in between). Stir in the vanilla extract and let cool slightly.: As the mixture loosens you will see glossy ribbons of chocolate and butter , and the aroma becomes rich and toasty. Stirring encourages a smooth emulsion and prevents scorching, which tastes burnt. If you overheat, the chocolate can seize into grainy clumps; to fix this add a small spoon of warm butter and stir gently. A common oversight is heating too quickly, so be patient and gentle with the heat.
- Whisk the eggs and sugar together in a mixing bowl until slightly pale and frothy. Then, slowly mix in the melted chocolate-butter mixture.: Adding the vanilla extract at this stage lets its floral notes bloom without evaporating. Allowing the mix to cool prevents the hot chocolate from cooking the eggs when combined. You will feel the temperature drop as you stir and the steam will lessen, signaling it is safe to proceed. If the mix is still too hot it will scramble the eggs , so always cool it briefly.
- Sift together the flour, cocoa powder, baking powder, and salt. Gently fold the dry ingredients into the wet mixture, avoiding overmixing.: You should see the mixture lighten and form ribbons when the whisk is lifted, creating air that contributes to tenderness. The sugar helps stabilize the foam and gives that glossy top when baked. Overwhisking can make the batter too aerated, resulting in a cake like texture, while underwhisking may leave the brownies dense. Aim for just pale and frothy.
- Pour the batter into the prepared pan, smoothing the surface with a spatula. Scatter the chocolate eggs on top, some whole and some halved.: As you incorporate the warm chocolate into the whipped egg base, the batter will turn thick and glossy and release a comforting chocolate perfume. Adding it slowly keeps the texture smooth and prevents deflating the aeration you built. If folded in too quickly the batter may seize or split. A typical mistake is pouring all at once, which flattens the mixture.
- Bake for 25-30 minutes, checking at 25 minutes. A toothpick inserted in the center should come out with a few moist crumbs for a fudgy texture or clean for a cakier texture.: Sifting aerates the dry mix and removes lumps, creating a uniform color and consistent crumb. The dry ingredients will taste earthy and fragrant, and blending them first prevents pockets of unsifted cocoa or baking powder. If you skip sifting you can end up with bitter lumps or uneven rising. Avoid vigorous stirring which develops gluten.
- Cool completely before slicing and serving. Enjoy your rich, chocolatey brownies!: The batter will take on a dense, ribbon like appearance, and you should see streaks disappear as it becomes homogeneous. Folding preserves tender air pockets while ensuring even distribution of dry components. Overworking will produce a tough chew, so stop as soon as the last streak vanishes. A common error is mixing until completely fluid which creates a heavy texture.
- Pour the batter into the prepared pan smoothing the surface with a spatula: As you spread, the batter should glisten and hold gentle peaks, filling the pan evenly. Smoothing helps the brownies bake to uniform thickness so centers and edges finish together. Press out any trapped air bubbles by tapping the pan briefly on the counter. If the batter is uneven the thinner parts will overbake; avoid pressing too hard which can cause an uneven top.
- Scatter the chocolate eggs on top some whole and some halved: Placing the chocolate eggs strategically gives a playful look and varied texture, and you will see some sink slightly while others roast at the surface, creating pretty melting patterns. Gently press halved eggs into the batter so they adhere during the bake. Overcrowding leads to uneven baking and pockets of undercooked batter, so space them thoughtfully.
- Bake for 25 to 30 minutes checking at 25 minutes: During baking the aroma deepens and the top will set with a delicate crackle, while the interior remains moist if timed well. The toothpick test is your best gauge: a few moist crumbs means fudgy, a clean pick means cakey. Resist opening the oven too often which lowers the temperature and can affect rise. A typical misstep is relying on time alone rather than visual cues and the toothpick test.
- Cool completely before slicing and serving: Cooling lets the structure set so slices hold their shape, and the chocolate firms slightly, concentrating the flavor. You will notice less steam as the pan cools, and the surface becomes easier to score for neat squares. Cutting while warm often produces messy, gooey pieces, so patience rewards you with clean slices. A common temptation is to taste immediately, which can be disappointing in texture even if the flavor is good.
Notes
- Extra fudgy version — Reduce the flour slightly to the lower cup measurement and pull the brownies from the oven at the earlier check, this leaves the center lusciously gooey while the edges crisp.
- Cakey slices — If you prefer a lighter crumb, bake toward the longer end of the time window until the toothpick comes out mostly clean for a more cake like texture.
- Neat gift squares — Cool the pan completely, then chill for 30 minutes before slicing; chilled brownies cut with cleaner edges for packaged gifts.
- Chocolate intensity — Use higher percentage dark chocolate for a deeper cocoa flavor, but balance with a touch more sugar if it tastes too bitter.
- Decorative top — Press some halved chocolate eggs slightly into the batter so they sit flush and create a more polished presentation after baking.