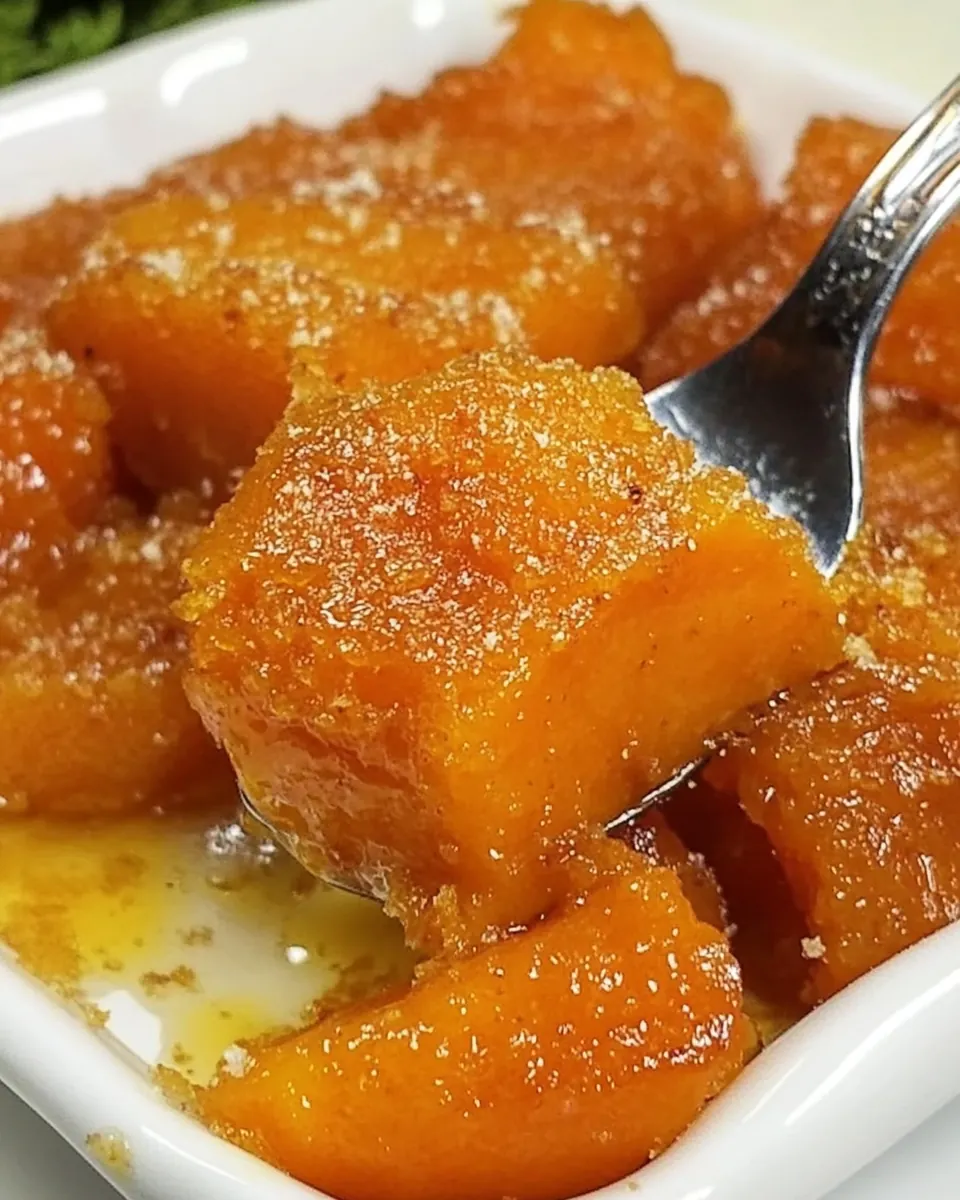
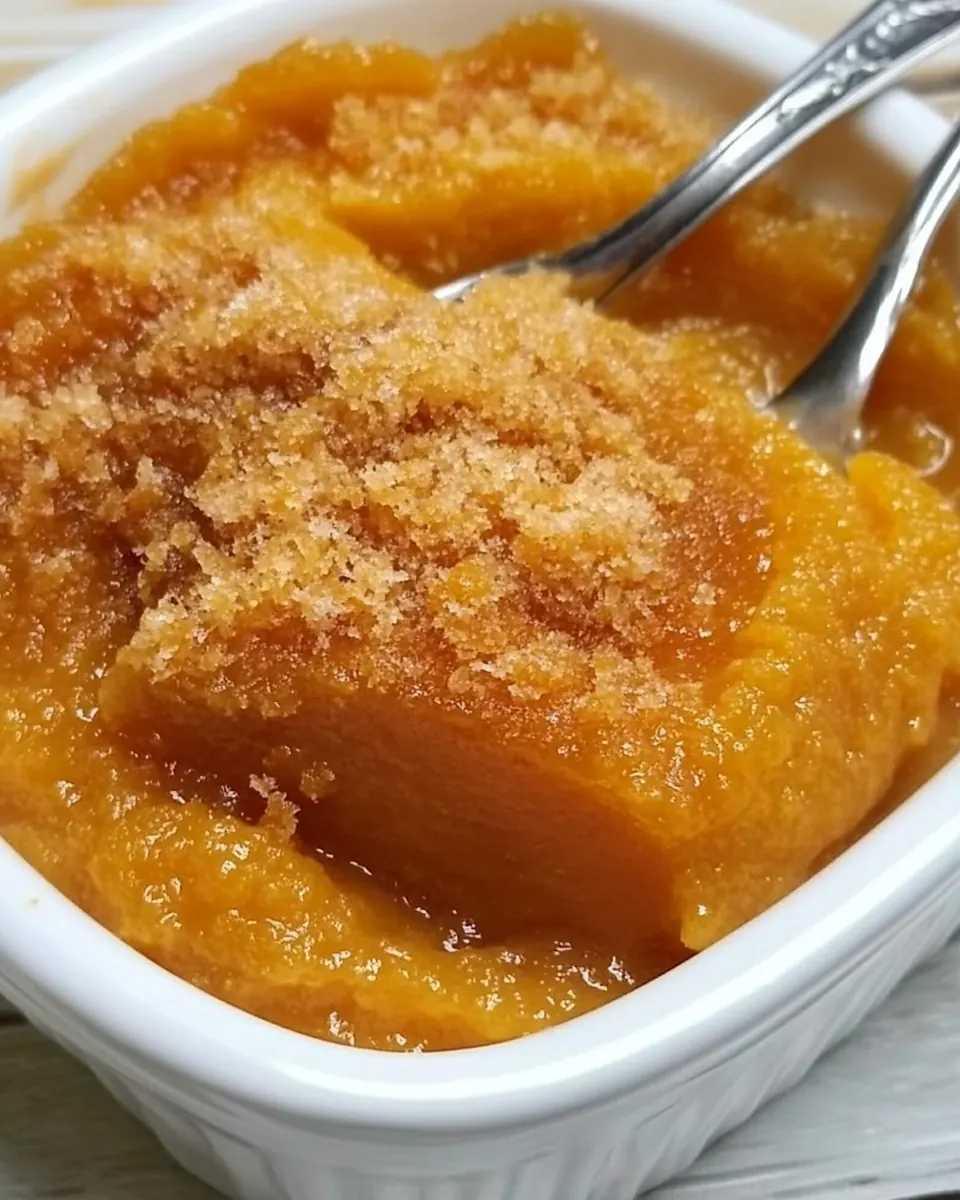
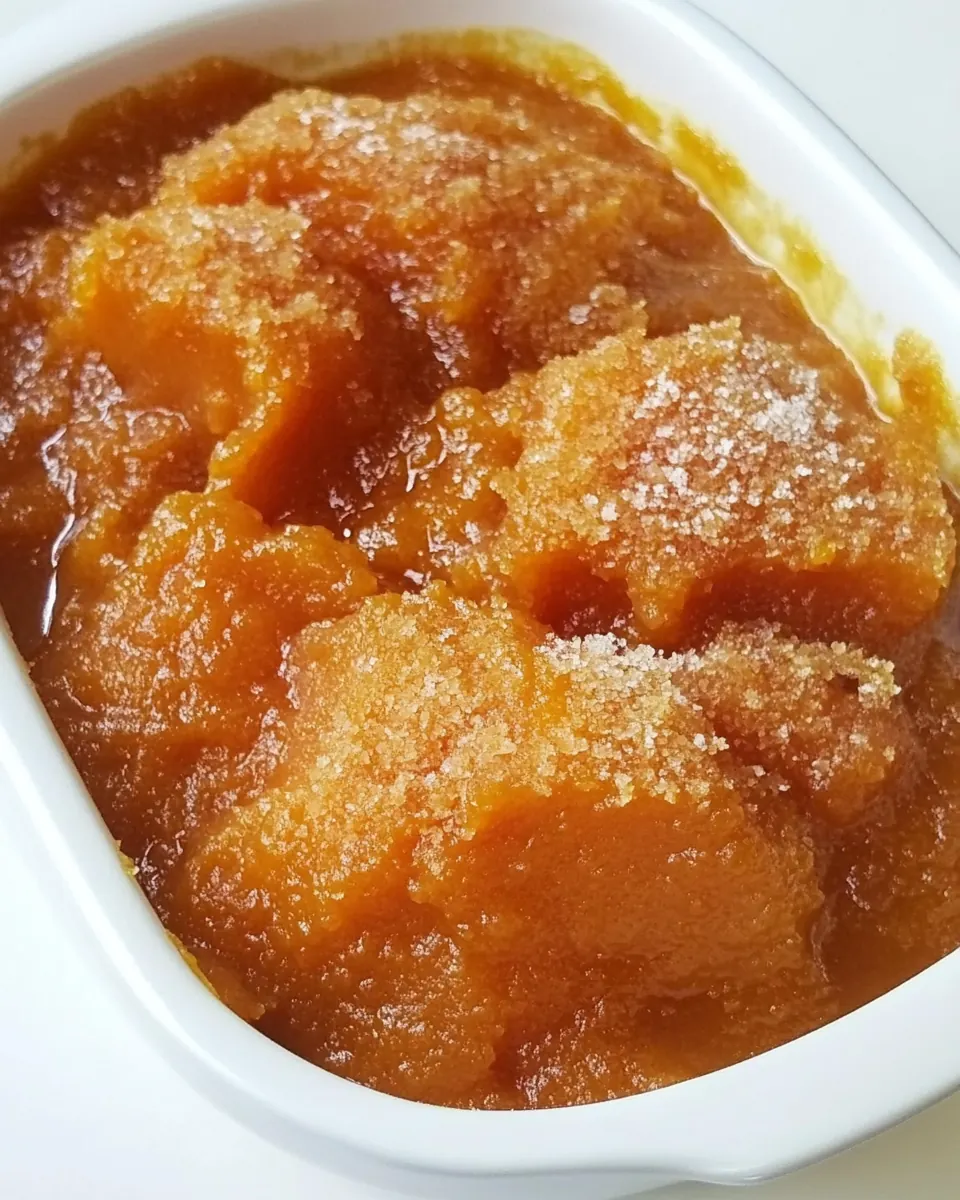
Bruleed Sweet Potatoes
Bruleed Sweet Potatoes hold a cozy place in my fall kitchen, a simple dish that feels both nostalgic and a little bit fancy. The first time I made it was during a chilly afternoon when I wanted comfort without fuss, and the bubbling, caramelized top reminded me of holiday tables and slow conversations. I love how the crisp sugar crust contrasts with the velvety interior, and that balance is why this recipe often pops up when friends come over unexpectedly.
Over the years I have tweaked little things, like how soft to mash the tuber, and whether to use brown sugar in the mash or save it all for the topping. Those tiny choices change the texture and sweetness, and I enjoy the experimentation. When I serve Bruleed Sweet Potatoes, people always ask if I made them from scratch, and I beam because this is one of those recipes that looks elevated but truly comes together in minutes.
There is something grounding about the scent as the sugar melts and browns, a warm reminder of kitchens that feel like home. I like to keep the presentation informal, in individual ramekins or a shallow dish, because everyone gets that satisfying crack of caramel when the torch hits the sugar. Making Bruleed Sweet Potatoes feels like sharing a small, sweet secret, and I return to it every fall when sweet potatoes are abundant and the air turns crisp.
Recipe Snapshot
6 mins
5 mins
1 mins
Easy
180 kcal
American
Vegan, Gluten-Free
Side Dishes
Ramekins, Kitchen torch, Oven broiler
Why This Bruleed Sweet Potatoes Is So Good
Deep, comforting flavor with minimal effort
I find that Bruleed Sweet Potatoes taste far richer than the effort suggests. The mashed sweet potatoes are naturally sweet and creamy, and a touch of brown sugar and vanilla lifts that earthiness into something almost dessert like, while still feeling homey and approachable.
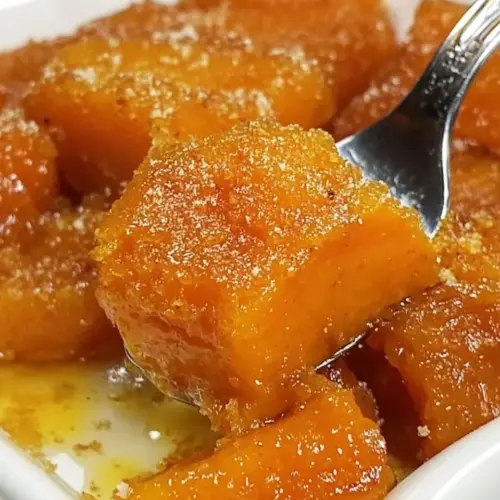
Contrast of textures that delights
What keeps me coming back is the textural play. The soft, pillowy sweet potatoes against the thin, glassy shell of caramelized granulated sugar creates a small moment of drama at the table. When the sugar cracks it releases a warm caramel aroma, and the first bite gives both creaminess and crunchy satisfaction.
Flexible and friendly for hosting
I love that this recipe scales easily. Whether I spoon it into individual ramekins for a dinner party or into a single baking dish for family, the technique remains the same. You can make the mash ahead, chill it, and finish with torching just before serving, which is a huge hosting advantage.
Minimal ingredients, maximum comfort
There are just a handful of pantry staples here, and that simplicity keeps the flavors honest. The kosher salt is a tiny player that matters a lot, balancing the sweetness, while the vanilla extract rounds the profile with a warm note that feels homey and familiar.
Impressive finish without special skills
Even if you are not confident with a torch, you can use the broiler and still achieve a beautiful caramel top. I appreciate recipes that let me look like I know what I am doing, without requiring culinary acrobatics. That confidence boost makes this dish a favorite for casual weeknights and special meals alike.
What Goes Into Bruleed Sweet Potatoes
These ingredients are intentionally few, each chosen to support the creamy base and the glossy, caramelized topping. The sweet potatoes bring natural sweetness and body, while small additions like brown sugar and vanilla extract add depth and warmth. A pinch of kosher salt sharpens the flavors, and the final granulated sugar gives that signature brulee crack. Together they create a comforting, layered experience that reads both rustic and refined.
- 2 sweet potatoes, baked, peeled and mashed: Provide creamy body and natural sweetness to the dish; mash until smooth to create the base texture for bruleed sweet potatoes. Offer moisture and structure so other flavors integrate evenly, and hold heat well when baked or broiled for caramelizing the topping.
- pinch kosher salt: Enhance overall flavor by balancing the sweetness and bringing out the tuber's natural taste; sprinkle sparingly and taste as you go. Help stabilize seasoning so the final dish is well-rounded without being overly salty.
- 1 tablespoon brown sugar: Add a warm, caramel-like sweetness that complements the potato's natural sugars; dissolve into the mash to create a cohesive sweet undertone. Assist with slight browning during broiling of the topping, contributing to depth of flavor.
- 1 teaspoon vanilla extract: Impart a fragrant, floral vanilla aroma that elevates the sweetness and rounds out the flavor profile; stir into the mash for even distribution. Create a subtle complexity that pairs well with both sugar and roasted sweet potato notes.
- granulated sugar, for topping: Create a crisp, caramelized crust when sprinkled on top and torched or broiled; evenly distribute for consistent caramelization. Provide a contrasting crunch to the creamy interior and enhance visual appeal with a glassy, golden finish.
Recipe Steps for Bruleed Sweet Potatoes
These steps are straightforward but benefit from attention to detail. As you go, focus on texture and aroma, and remember that small adjustments in seasoning and caramelization make a big difference. I like to work in a calm rhythm, tasting and observing visual cues.
- Mix together sweet potatoes, salt, brown sugar, and vanilla. Spread into ramekins or serving bowls.: The moment you stir these components, a warm, inviting aroma will rise, signaling how the flavors are marrying. The mash should feel smooth and slightly fluffy, not gluey. I find using a wooden spoon or rubber spatula gives the best control for folding without overworking, which preserves a pleasant, soft texture. If the mixture seems dry, a teaspoon of water or a tiny dab of butter can smooth it, but resist adding too much liquid because the filling should hold shape under the sugar. A common mistake is under seasoning; taste and add a tiny extra pinch of kosher salt if needed.
- Sprinkle sugar on top of the sweet potato mixture until well coated. Melt the sugar until it is lightly brown using a kitchen torch or the broiler of your oven. Watch carefully so that the sugar does not burn.: As you transfer the mash, notice its sheen and how it settles; it should hold a little peak but be soft enough to spread evenly. Using a spoon or offset spatula helps create a smooth surface, which is important so the topping caramelizes uniformly. The contrast between the warm mash and the cool dish can affect setting, so if you are making this ahead, allow chilled servings to come closer to room temperature before topping. Try not to compress the mash too much, as compacting can change the mouthfeel.
- Sprinkle sugar on top of the sweet potato mixture until well coated: When you dust the surface with granulated sugar , pay attention to coverage; an even bed about a quarter to a half centimeter thick gives the best caramel layer. The dry sugar should glint under light, indicating an even spread. If the sugar clumps, break it up with a small spoon to avoid uneven browning. One mistake is adding too little sugar, which yields a thin, brittle crust instead of a satisfying crack.
- Melt the sugar until it is lightly brown using a kitchen torch or the broiler of your oven: As the sugar melts, it will bubble, turn glossy, and then shift to a pale amber, releasing a rich caramel scent. With a torch, move in short sweeps to avoid scorching a spot; you should hear soft sizzling as the sugar liquefies. Under the broiler, position the rack close and watch constantly because browning happens fast. The visual cue to stop is a deep golden color, not dark brown, which means burnt. Overcooking produces a bitter note, so remove the dish at the first indication of evenly distributed color. A frequent pitfall is walking away while broiling, which risks burning the sugar and ruining the flavor.
Expert Tips about Bruleed Sweet Potatoes

I usually keep these tips close when I make Bruleed Sweet Potatoes, because small details change the experience dramatically. Below are practical notes that help with texture, flavor, and presentation.
- Choose baked over boiled for concentrated sweetness and a dryer mash that holds shape under the sugar crust.
- Even sugar layer matters so take time to spread the granulated sugar in a smooth, even coating to avoid spotty browning.
- Watch the broiler if you are using it; the sugar can go from perfect to burnt in seconds, so stay attentive and keep the oven door slightly ajar if possible.
- Make ahead with care by chilling the mash, then bringing it closer to room temperature before finishing with sugar and torching to prevent thermal shock and cracking.
- Adjust seasoning last since the caramel top softens perceived saltiness; taste the mash and tweak with tiny pinches of kosher salt if needed.
Serving Ideas for Bruleed Sweet Potatoes
Bruleed Sweet Potatoes can be served casually or with a touch of ceremony, and the crack of caramel makes them memorable. Below are practical serving suggestions, pairings, and storage notes to make the most of this dish.
- Individual ramekins are perfect for dinner parties because each guest gets their own crunchy top to crack, creating a small interactive moment.
- Family style serve in a shallow baking dish for a cozy dinner, spooning portions onto plates while offering the caramelized topping as the highlight.
- Holiday tables like fall gatherings and Thanksgiving benefit from this recipe because it reads festive yet not overly sweet, complementing roasted mains and green vegetable sides.
- Make ahead by preparing the mash and refrigerating it covered, then finish with sugar and torch just before serving to preserve the crisp texture of the topping.
- Storage tips include keeping leftover unbruleed portions refrigerated up to three days; once caramelized, the crust softens, but you can sprinkle fresh granulated sugar and re-torch to refresh the texture.
- Seasonal pairing works wonderfully with autumnal flavors; serve alongside spiced salads or roasted vegetables to match the warm, sweet notes of the dish.
FAQ
Conclusion
Bruleed Sweet Potatoes stands out for its simple ingredient list and the delightful contrast between a silky, sweet filling and a crisp, caramelized top. It is an approachable recipe that feels special, whether you serve it at a weeknight meal or on a festive table. Give it a try for the satisfying crack of caramel and the warm, comforting flavors that pair well with so many mains and sides. You may find it becomes one of those dishes you return to year after year because it is quick to prepare yet reliably impressive.
Bruleed Sweet Potatoes
Equipment
- Ramekins
- kitchen torch
- Oven Broiler
Ingredients
- 2 sweet potatoes, baked, peeled and mashed Provide creamy body and natural sweetness to the dish; mash until smooth to create the base texture for bruleed sweet potatoes. Offer moisture and structure so other flavors integrate evenly, and hold heat well when baked or broiled for caramelizing the topping.
- pinch kosher salt Enhance overall flavor by balancing the sweetness and bringing out the tuber's natural taste; sprinkle sparingly and taste as you go. Help stabilize seasoning so the final dish is well-rounded without being overly salty.
- 1 tablespoon brown sugar Add a warm, caramel-like sweetness that complements the potato's natural sugars; dissolve into the mash to create a cohesive sweet undertone. Assist with slight browning during broiling of the topping, contributing to depth of flavor.
- 1 teaspoon vanilla extract Impart a fragrant, floral vanilla aroma that elevates the sweetness and rounds out the flavor profile; stir into the mash for even distribution. Create a subtle complexity that pairs well with both sugar and roasted sweet potato notes.
- granulated sugar, for topping Create a crisp, caramelized crust when sprinkled on top and torched or broiled; evenly distribute for consistent caramelization. Provide a contrasting crunch to the creamy interior and enhance visual appeal with a glassy, golden finish.
Instructions
- Mix together sweet potatoes, salt, brown sugar, and vanilla. Spread into ramekins or serving bowls.: The moment you stir these components, a warm, inviting aroma will rise, signaling how the flavors are marrying. The mash should feel smooth and slightly fluffy, not gluey. I find using a wooden spoon or rubber spatula gives the best control for folding without overworking, which preserves a pleasant, soft texture. If the mixture seems dry, a teaspoon of water or a tiny dab of butter can smooth it, but resist adding too much liquid because the filling should hold shape under the sugar. A common mistake is under seasoning; taste and add a tiny extra pinch of kosher salt if needed.
- Sprinkle sugar on top of the sweet potato mixture until well coated. Melt the sugar until it is lightly brown using a kitchen torch or the broiler of your oven. Watch carefully so that the sugar does not burn.: As you transfer the mash, notice its sheen and how it settles; it should hold a little peak but be soft enough to spread evenly. Using a spoon or offset spatula helps create a smooth surface, which is important so the topping caramelizes uniformly. The contrast between the warm mash and the cool dish can affect setting, so if you are making this ahead, allow chilled servings to come closer to room temperature before topping. Try not to compress the mash too much, as compacting can change the mouthfeel.
- Sprinkle sugar on top of the sweet potato mixture until well coated: When you dust the surface with granulated sugar , pay attention to coverage; an even bed about a quarter to a half centimeter thick gives the best caramel layer. The dry sugar should glint under light, indicating an even spread. If the sugar clumps, break it up with a small spoon to avoid uneven browning. One mistake is adding too little sugar, which yields a thin, brittle crust instead of a satisfying crack.
- Melt the sugar until it is lightly brown using a kitchen torch or the broiler of your oven: As the sugar melts, it will bubble, turn glossy, and then shift to a pale amber, releasing a rich caramel scent. With a torch, move in short sweeps to avoid scorching a spot; you should hear soft sizzling as the sugar liquefies. Under the broiler, position the rack close and watch constantly because browning happens fast. The visual cue to stop is a deep golden color, not dark brown, which means burnt. Overcooking produces a bitter note, so remove the dish at the first indication of evenly distributed color. A frequent pitfall is walking away while broiling, which risks burning the sugar and ruining the flavor.
Notes
- Choose baked over boiled for concentrated sweetness and a dryer mash that holds shape under the sugar crust.
- Even sugar layer matters so take time to spread the granulated sugar in a smooth, even coating to avoid spotty browning.
- Watch the broiler if you are using it; the sugar can go from perfect to burnt in seconds, so stay attentive and keep the oven door slightly ajar if possible.
- Make ahead with care by chilling the mash, then bringing it closer to room temperature before finishing with sugar and torching to prevent thermal shock and cracking.
- Adjust seasoning last since the caramel top softens perceived saltiness; taste the mash and tweak with tiny pinches of kosher salt if needed.