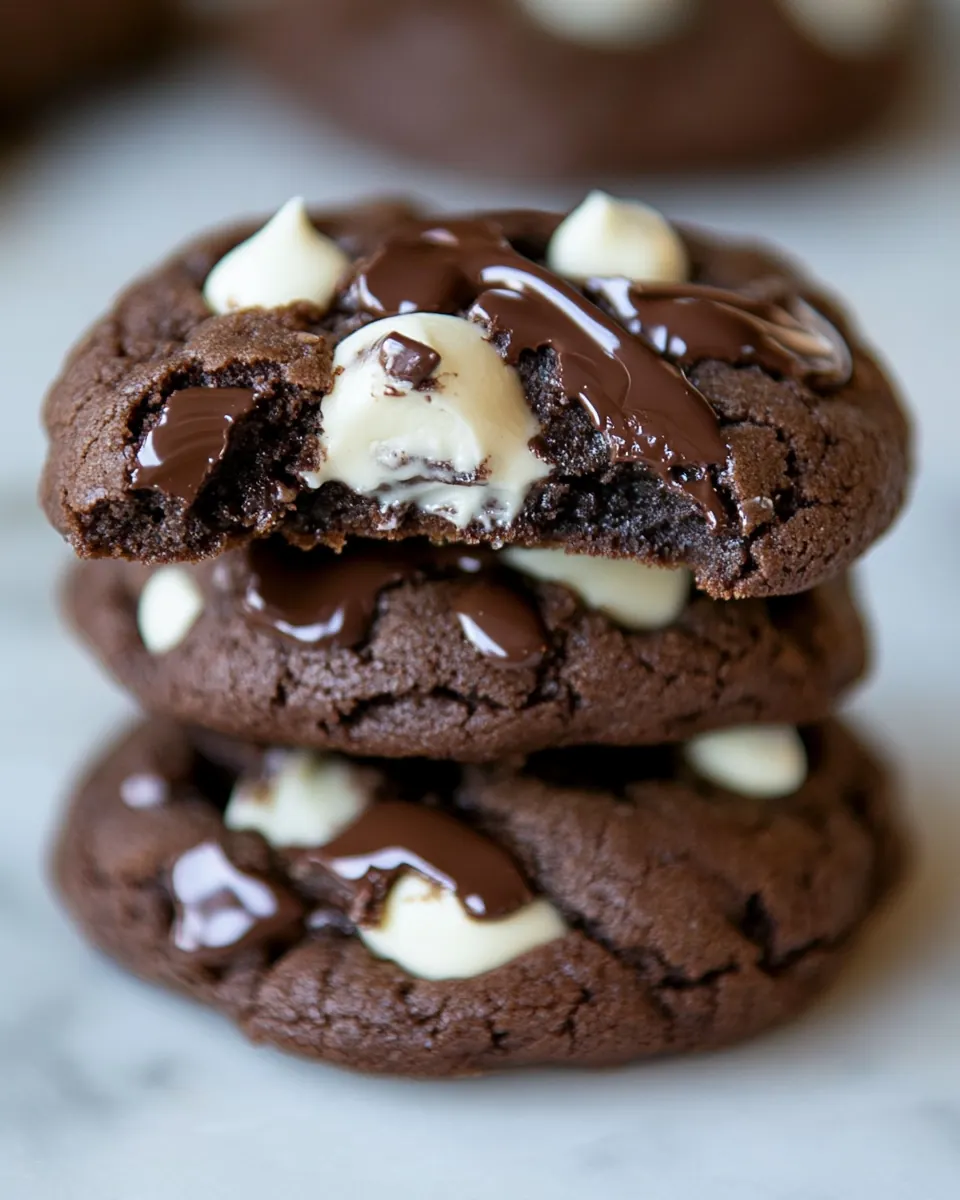
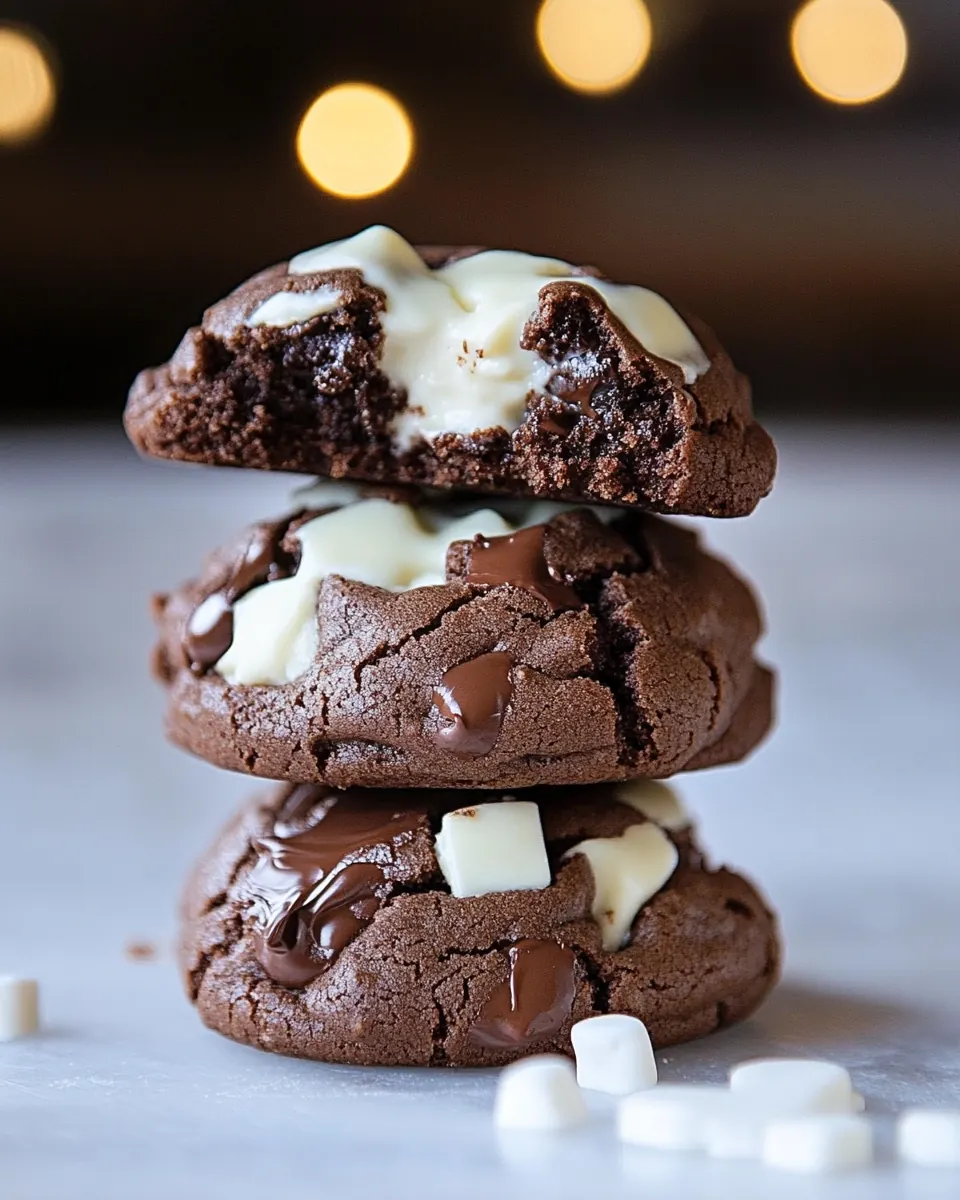
Double Chocolate Cheesecake Cookies
Double Chocolate Cheesecake Cookies started as a late night craving that turned into a weekend ritual in my kitchen. I remember the first time I combined rich chocolate cookie dough with tangy creamy filling, how the scents of cocoa and warm butter filled the room and made everyone wander in. That first batch vanished within an hour, and ever since I’ve been refining the balance between fudgy cookie and silky cheesecake, learning tiny tricks that make each bite sing.
One afternoon I brought a tray of these to a neighborhood potluck, and watching faces light up as people bit into the crisp edged, soft centered cookies felt like a small, delicious victory. Over the years I adjusted the dough to be forgiving, and tuned the cheesecake element so it never overpowers the chocolate. I keep a stash of chilled dough in the freezer for emergencies, and I love how a quick bake makes the house smell like celebration.
Recipe Snapshot
30 mins
15 mins
15 mins
Easy
150 kcal
American
Gluten-Free, Low FODMAP
Desserts
Electric mixer, Mixing bowls, Spatula, Baking sheet, Oven, Whisk, Pastry bag
Why Try This Double Chocolate Cheesecake Cookies
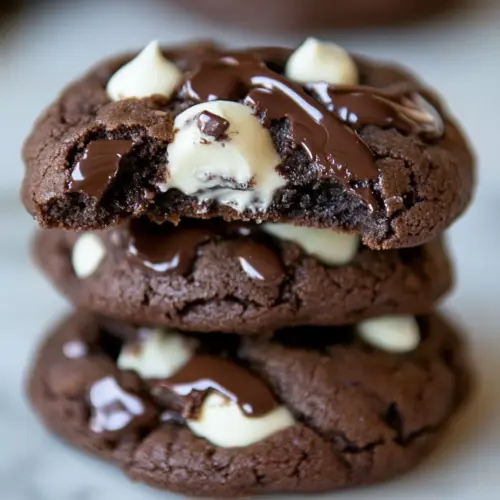
They are reassuringly chocolatey
I adore how every bite highlights deep unsweetened cocoa powder and melting milk chocolate chips, giving a familiar, comforting chocolate hit. The cookie base is cocoa forward, so you get a lush, slightly bitter backbone that makes the sweeter glaze and filling stand out.
Cheesecake adds a silky contrast
The inclusion of both cream cheese and mascarpone cheese lends a cushiony, tangy creaminess that offsets the rich chocolate. I find the texture contrast between dense cookie and airy cream is what keeps people coming back for more.
They are wonderfully adaptable
Whether I need something for a casual tea or a festive cookie swap, these Double Chocolate Cheesecake Cookies fit the bill. You can chill the dough for a quick bake or prep the glaze ahead to streamline assembly. I often tweak the dough chill time for different seasons, and that flexibility is a big reason I love this recipe.
Small batch friendly, but scalable
This recipe yields a moderate number of cookies, which is perfect for testing tweaks. When I want more, the formula scales predictably, and the method stays the same. That reliability makes these cookies a dependable choice when I need to produce a platter quickly.
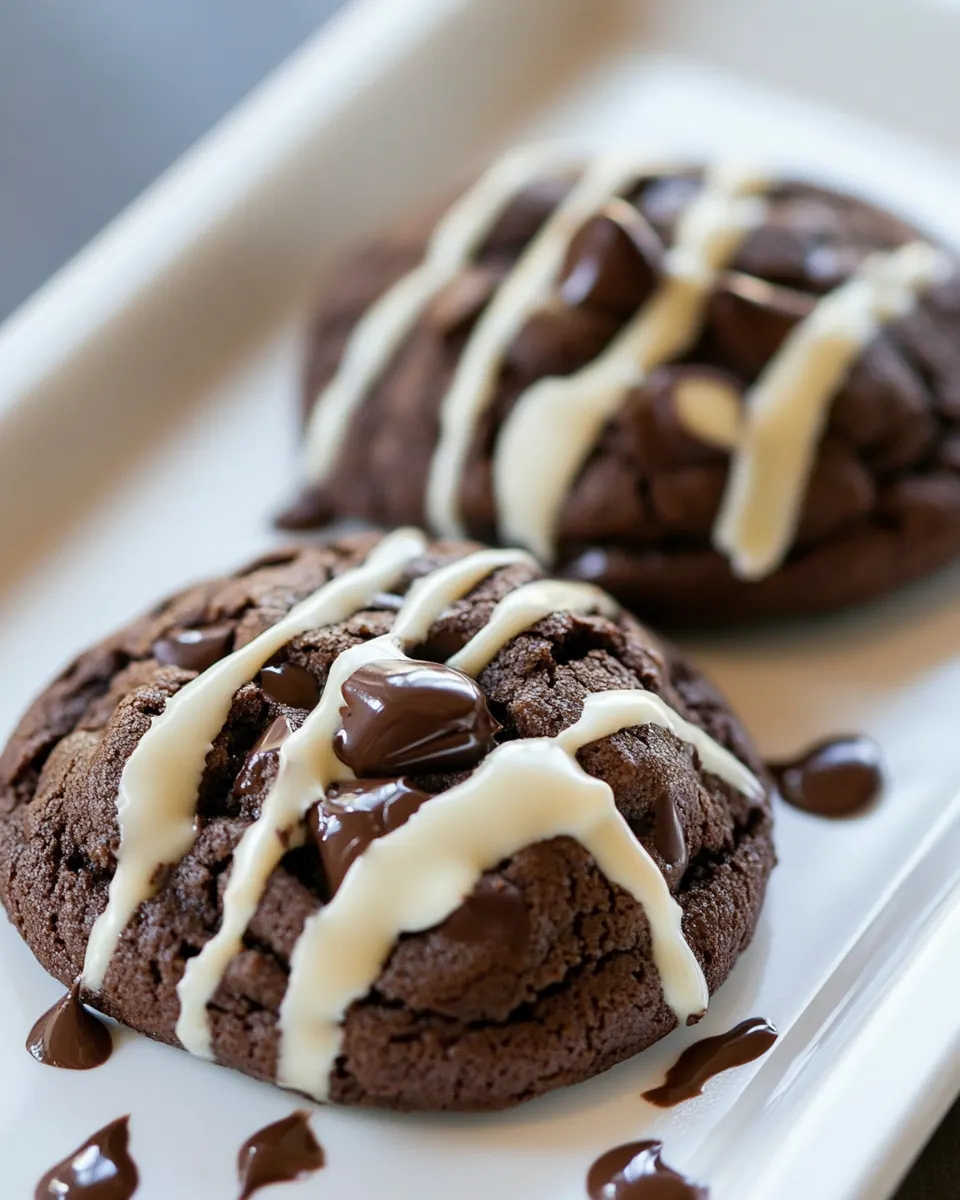
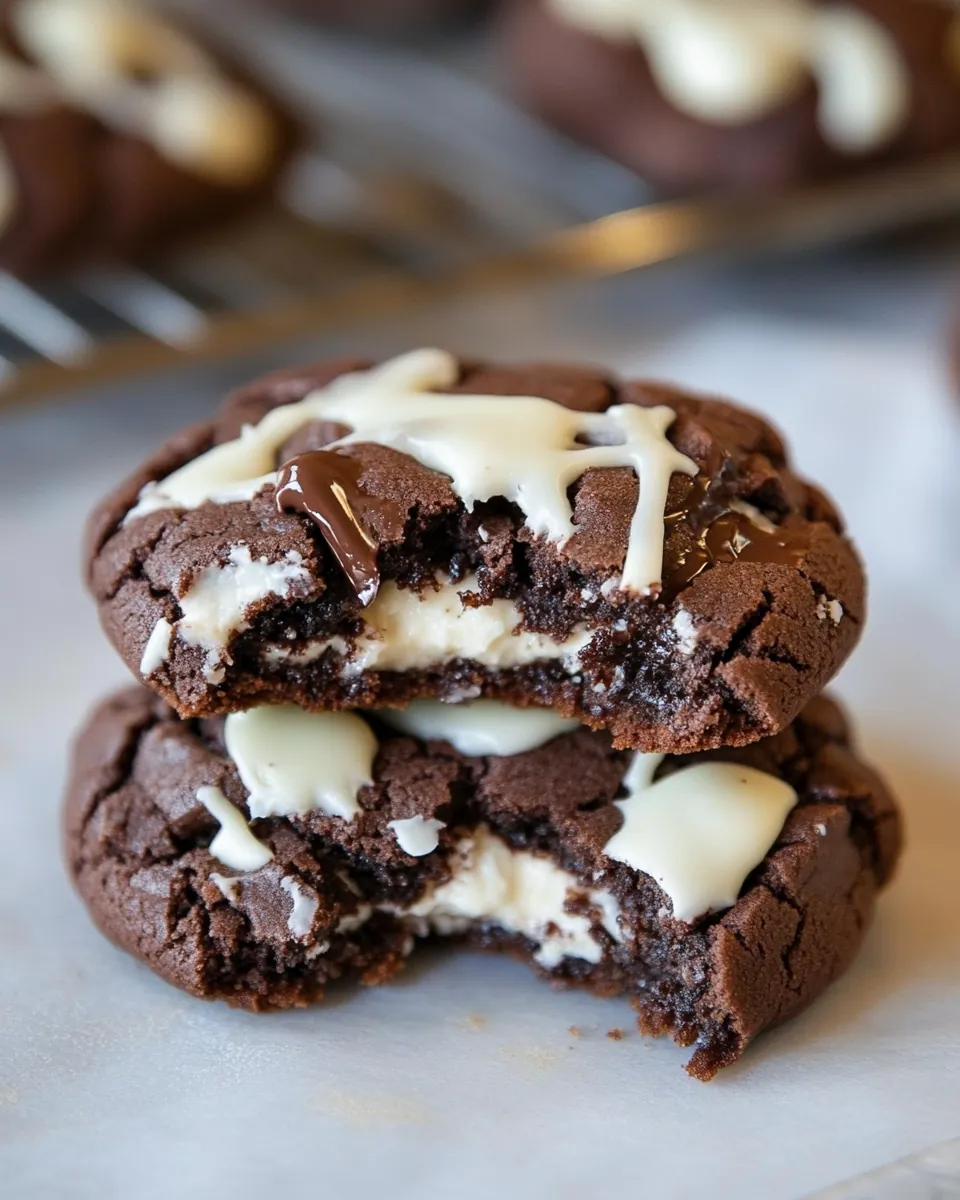
Visually impressive with minimal fuss
The dark cookies contrasted with creamy pale glaze look bakery worthy. A few simple piping strokes or a rustic spread gives a professional polish without a cake level commitment. I always feel proud when these go out on the dessert table because they look elegant but are simple to finish.
Ingredients Overview for Double Chocolate Cheesecake Cookies
These ingredients are chosen to create a balance of deep chocolate flavor, structural cookie crumb, and silky cheesecake brightness. The dry components form a sturdy but tender base, the fats and sugars control texture and spread, while the two cheeses bring richness and a tang that lifts the cocoa. Together they produce cookies with crisp edges, soft centers, and a luscious topping that slices through the chocolate.
- 1 2/3 cup all-purpose flour: Provide structure and bulk to the cookie dough, contributing to chewiness when measured precisely. Combine with leavening and liquids to form the dough matrix and ensure proper texture after baking.
- 1/2 cup unsweetened cocoa powder: Add deep chocolate flavor and a slightly dry, bitter balance that intensifies the cookie's richness. Sift with dry ingredients to prevent lumps and distribute cocoa evenly for uniform color and taste.
- 1/2 teaspoon baking soda: Lighten the cookie by producing carbon dioxide when activated, creating subtle lift and a tender crumb. Blend thoroughly with the dry mixture to ensure even leavening throughout the batter.
- 1/4 teaspoons salt: Enhance overall flavor by balancing sweetness and intensifying the chocolate notes while slightly strengthening gluten development. Dissolve with the dry ingredients to maintain even salt distribution in the dough.
- 8 tablespoons unsalted butter, softened: Contribute fat for tenderness, flavor, and moisture while aiding in creaming with sugars to incorporate air. Soften to room temperature to ensure smooth creaming and proper emulsion with other wet ingredients.
- 1 cup loosely packed brown sugar: Provide moistness, caramel-like depth, and sweetness while assisting in creaming to create a tender crumb. Loosely packed measurement helps control sugar quantity and influences cookie spread.
- 1/4 cup granulated sugar: Impart sweetness and aid in creaming to create lightness and structure in the dough; it also helps with caramelization and surface texture. Measure and cream with butter to ensure even incorporation and desired consistency.
- 8 ounces cream cheese, cold and cut into cubes: Contribute tang, creaminess, and a soft filling texture when cold and cubed, adding a rich dairy element to pockets within the cookies. Keep chilled until used so it holds shape and produces creamy bites after baking.
- 1 large egg yolk: Enrich the filling with fat and help bind ingredients together, adding gloss and richness without the additional moisture of a whole egg. Use at room temperature for easier incorporation and smoother texture.
- 2 teaspoons vanilla extract: Enhance overall sweetness and aromatic depth while rounding out dairy flavors; it also complements other vanilla notes in the recipe. Add with the wet ingredients to distribute flavor evenly and avoid concentrated spots.
- 1 cup milk chocolate chips: Provide pockets of sweet, creamy milk chocolate that melt into soft, gooey bites while baking, adding texture contrast to the cookie. Fold in near the end of mixing to prevent excessive melting and maintain chip integrity.
- 4 ounces mascarpone cheese, softened: Add a silky, milky tang and extra creaminess to the filling for a smoother mouthfeel and richer flavor profile. Soften before using so it blends seamlessly with cream cheese and other filling components.
- 1/3 cup powdered sugar: Sweeten and stabilize the filling while contributing a fine texture that dissolves easily, preventing grittiness. Sift before adding to ensure lump-free incorporation and consistent sweetness throughout.
- 1 tablespoon milk: Adjust the filling's consistency by loosening and smoothing the mixture, aiding in spreadability and creaminess without thinning excessively. Warm slightly if needed to fully integrate and achieve desired texture.
- 1/2 teaspoon vanilla extract: Amplify vanilla flavor in the filling with a concentrated aromatic note that elevates overall taste. Add sparingly and mix thoroughly to ensure uniform flavor distribution without overpowering delicate dairy components.
How to Prepare Double Chocolate Cheesecake Cookies
These directions guide you through building flavor and texture deliberately, from combining dry elements to finishing with a smooth glaze. I like to keep my tools handy and work in a rhythm that respects chilling times and mixing stages because they matter for the final result.
- Preheat oven to 350 degrees F. In a small bowl, whisk together flour, cocoa, baking soda and salt. Set aside.: As you heat the oven, notice the room warming and anticipate the aroma that will develop once the cookies bake. Proper oven temperature ensures the cookies set with crisp edges and tender centers, so always let the oven reach a steady 350 degrees F before sliding in a tray. A common mistake is putting cookies into an oven that is still heating, which gives uneven spread and inconsistent texture. If you have an oven thermometer, use it to confirm accuracy, because many ovens run a bit hot or cool.
- In the bowl of an electric mixer, beat together butter and sugar until fluffy, about 5 minutes. Add in the cream cheese and beat until combined (it’s okay if small clumps form), then beat in the egg yolk and vanilla extract. With the mixer on low speed, beat in the dry ingredients until combined. Use a spatula to stir in the chocolate chips.: When you whisk the dry ingredients, you'll see a uniform, dusty mixture form, and the cocoa will darken the flour into a deep brown. This even distribution prevents pockets of leavening or salt that can create odd bites. The reason this matters is because even tiny clusters of baking soda can leave a soapy metallic note, so thorough whisking is a small but crucial step. Avoid sifting directly into wet ingredients, which can create clumps that are hard to incorporate later.
- Refrigerate the dough for 10 to 15 minutes, just until it’s slightly less sticky and easier to roll into balls. Roll into golf-ball sized balls and place about 2 inches apart on a nonstick baking sheet. Bake for 12 to 15 minutes, or until the cookies are set. Let cool completely before covering in the glaze.: Allow the mixed dry ingredients to rest in the bowl while you prepare the wet components, which keeps the process organized and prevents overmixing at the final stage. Keeping things staged saves time and reduces the chance you'll forget to add an item. A frequent oversight is neglecting to set the bowl aside, which can lead to accidental spills or hurried mixing that damages dough texture.
- Whisk together all the ingredients until smooth and creamy. Use a spoon or spatula to spread the glaze on the cookies or use a pastry bag (I did!) to pipe it across.: As you beat unsalted butter with the combination of brown sugar and granulated sugar , watch it become pale and airy, with tiny air pockets that contribute to lift and tenderness. The creaming step traps air that helps the cookies rise slightly and develop a light interior, so patience here pays dividends. A common mistake is rushing and not reaching the fluffy stage, which yields dense cookies, or overbeating to the point where the butter becomes too soft and the dough spreads excessively.
- Add in the cream cheese and beat until combined: When the cold cubed cream cheese goes in, the mixture may look slightly lumpy at first, and that is okay. The bits will incorporate and provide moisture and tang without making the dough greasy. The cool temperature of the cream cheese is important because if it melts, the dough can become slack and overly loose, causing excess spread while baking. If you see a greasy separation, chill the bowl briefly before continuing to recover the texture.
- Beat in the egg yolk and vanilla extract: Adding the egg yolk enriches the batter and helps emulsify fats for a cohesive dough, while vanilla extract lifts the aromatic profile. The mixture should appear glossy and smooth after these additions, which signals good emulsification. If the batter looks curdled or broken, a brief low speed beat will usually bring it back together; avoid high speed which can overwork it.
- With the mixer on low speed, beat in the dry ingredients until combined: Incorporate the dry mix gradually to avoid a cloud of cocoa and flour over your counter. The dough will thicken and take on a uniform chocolate color, with an overall pliable texture. Overmixing at this stage will develop gluten and yield tougher cookies, so stop as soon as the streaks disappear and the dough looks cohesive.
- Use a spatula to stir in the chocolate chips: Folding in milk chocolate chips by hand preserves pockets of melty chocolate and prevents them from breaking down. You'll see glossy specks of chocolate throughout the dough, and they will provide delightful molten bites after baking. A common pitfall is using the mixer for this step which can chop the chips, so a gentle spatula fold is best.
- Refrigerate the dough for 10 to 15 minutes: Chilling makes the dough firmer, reducing spread and making it easier to roll into balls. The cooled dough feels denser and slightly tacky rather than sticky, which helps maintain shape on the baking sheet. Skipping this short rest can result in flatter cookies with less defined edges, so resist the urge to bake immediately.
- Roll into golf ball sized balls and place about 2 inches apart on a nonstick baking sheet: Rolling by hand ensures consistent portioning, and spacing about 2 inches lets the cookies spread without merging. Visually, the dough balls should be smooth and slightly glossy from the sugar and fat, and they will flatten and crack a bit as they bake, signaling doneness. Crowding the tray is a typical error, which leads to merged cookies and uneven browning.
- Bake for 12 to 15 minutes, or until the cookies are set: As the cookies bake, you will notice the edges firm and darken while centers remain soft and slightly compressed to the touch. The aroma of chocolate will intensify and the surface may show small fissures. Remove when the centers are set but still tender, as they will continue to firm as they cool. Overbaking dries them, while underbaking can leave raw centers, so check at the earlier time and adjust for your oven.
- Let cool completely before covering in the glaze: Cooling solidifies the interior and prevents the glaze from sliding off warm cookies. A completely cool cookie will hold the glaze and display a neat finish, whereas glazing too soon can create a runny, uneven coating. Place them on a rack and be patient, because rushing this step compromises presentation and texture.
- Whisk together all the ingredients until smooth and creamy: Combine mascarpone cheese , powdered sugar , milk , and vanilla extract into a silky glaze. The mixture should be lump free and glossy, with a pipe friendly consistency. If it is too thick, add a drop more milk ; if too thin, add a pinch more powdered sugar . A lumpy glaze is often caused by cold mascarpone straight from the fridge, so soften it gently before whisking.
- Use a spoon or spatula to spread the glaze on the cookies or use a pastry bag to pipe it across: Spreading gives a rustic look while piping offers clean lines and controlled coverage. The glaze should finish with a smooth sheen and hold shape rather than run, creating a delightful contrast to the textured cookie beneath. One mistake is applying the glaze when cookies are warm, which makes it slide off; always ensure cookies are fully cooled.
Make It Your Own
I like to think of small adjustments as personality notes for these cookies. A tweak to sugar ratio or chill time changes their character, so here are ideas to personalize without derailing the core texture and flavor. Use these tips to adapt for occasion or preference.
- Adjust dough chill time to control spread: For thicker cookies chill the dough 20 to 30 minutes, for thinner cookies reduce the chill, which affects edge crispness and center chew.
- Swap chocolate chips quantity for more pockets of melt: Increase to 1 1/4 cups for extra melty bites, keeping dough balance in mind so it does not become too loose.
- Test oven temperature with an oven thermometer: If cookies brown too quickly on edges, lower the oven by 10 degrees F and bake a bit longer for even doneness.
- Smooth glaze consistency by adjusting milk and powdered sugar: Add milk a few drops at a time until pipeable, or more powdered sugar for a thicker spreadable finish.
- Make ahead and freeze for convenience: Scoop and freeze raw dough balls on a tray, then transfer to a bag; bake from frozen adding a couple extra minutes to the bake time.
Accompaniments for Double Chocolate Cheesecake Cookies
These cookies pair well with simple, comforting accompaniments and are versatile for many occasions. Whether you are assembling a dessert platter or packing treats for a gathering, consider textures, temperatures, and seasonal touches to elevate the experience.
- Serve with warm coffee or hot chocolate to balance the richness: The warmth contrasts the cool cheesecake notes and creates a cozy pairing for mornings or afternoon treats.
- Package for cookie swaps in a decorative tin with parchment: The cookies hold up well and look elegant when stacked, making them ideal for gifts and potlucks during holidays or celebrations.
- Present on a dessert board alongside fresh fruit: Bright berries provide acidity that cuts the richness, offering a refreshing contrast on the plate for dinner parties or casual gatherings.
- Store in an airtight container at room temperature for up to three days: If you need longer storage, refrigerate for up to a week, or freeze for up to three months, ensuring the glaze is set before stacking to prevent smudging.
- Serve chilled for a chewier texture by refrigerating before serving: Cooling concentrates flavors and firms the filling, which can be especially pleasant in warm weather or when you want a denser mouthfeel.
FAQ
Conclusion
These Double Chocolate Cheesecake Cookies stand out because they combine intense chocolate flavor with a silky cheesecake finish for a striking contrast in texture and taste. I encourage you to give them a try, whether you bake a small batch for an indulgent treat or scale up for gatherings. They are forgiving, impressive, and reliably delicious, so enjoy the process and share the results with friends and family.
Double Chocolate Cheesecake Cookies
Equipment
- Electric Mixer
- Mixing Bowls
- Spatula
- Baking Sheet
- Oven
- Whisk
- Pastry bag
Ingredients
- 1 2/3 cup all-purpose flour Provide structure and bulk to the cookie dough, contributing to chewiness when measured precisely. Combine with leavening and liquids to form the dough matrix and ensure proper texture after baking.
- 1/2 cup unsweetened cocoa powder Add deep chocolate flavor and a slightly dry, bitter balance that intensifies the cookie's richness. Sift with dry ingredients to prevent lumps and distribute cocoa evenly for uniform color and taste.
- 1/2 teaspoon baking soda Lighten the cookie by producing carbon dioxide when activated, creating subtle lift and a tender crumb. Blend thoroughly with the dry mixture to ensure even leavening throughout the batter.
- 1/4 teaspoons salt Enhance overall flavor by balancing sweetness and intensifying the chocolate notes while slightly strengthening gluten development. Dissolve with the dry ingredients to maintain even salt distribution in the dough.
- 8 tablespoons unsalted butter, softened Contribute fat for tenderness, flavor, and moisture while aiding in creaming with sugars to incorporate air. Soften to room temperature to ensure smooth creaming and proper emulsion with other wet ingredients.
- 1 cup loosely packed brown sugar Provide moistness, caramel-like depth, and sweetness while assisting in creaming to create a tender crumb. Loosely packed measurement helps control sugar quantity and influences cookie spread.
- 1/4 cup granulated sugar Impart sweetness and aid in creaming to create lightness and structure in the dough; it also helps with caramelization and surface texture. Measure and cream with butter to ensure even incorporation and desired consistency.
- 8 ounces cream cheese, cold and cut into cubes Contribute tang, creaminess, and a soft filling texture when cold and cubed, adding a rich dairy element to pockets within the cookies. Keep chilled until used so it holds shape and produces creamy bites after baking.
- 1 large egg yolk Enrich the filling with fat and help bind ingredients together, adding gloss and richness without the additional moisture of a whole egg. Use at room temperature for easier incorporation and smoother texture.
- 2 teaspoons vanilla extract Enhance overall sweetness and aromatic depth while rounding out dairy flavors; it also complements other vanilla notes in the recipe. Add with the wet ingredients to distribute flavor evenly and avoid concentrated spots.
- 1 cup milk chocolate chips Provide pockets of sweet, creamy milk chocolate that melt into soft, gooey bites while baking, adding texture contrast to the cookie. Fold in near the end of mixing to prevent excessive melting and maintain chip integrity.
- 4 ounces mascarpone cheese, softened Add a silky, milky tang and extra creaminess to the filling for a smoother mouthfeel and richer flavor profile. Soften before using so it blends seamlessly with cream cheese and other filling components.
- 1/3 cup powdered sugar Sweeten and stabilize the filling while contributing a fine texture that dissolves easily, preventing grittiness. Sift before adding to ensure lump-free incorporation and consistent sweetness throughout.
- 1 tablespoon milk Adjust the filling's consistency by loosening and smoothing the mixture, aiding in spreadability and creaminess without thinning excessively. Warm slightly if needed to fully integrate and achieve desired texture.
- 1/2 teaspoon vanilla extract Amplify vanilla flavor in the filling with a concentrated aromatic note that elevates overall taste. Add sparingly and mix thoroughly to ensure uniform flavor distribution without overpowering delicate dairy components.
Instructions
- Preheat oven to 350 degrees F. In a small bowl, whisk together flour, cocoa, baking soda and salt. Set aside.: As you heat the oven, notice the room warming and anticipate the aroma that will develop once the cookies bake. Proper oven temperature ensures the cookies set with crisp edges and tender centers, so always let the oven reach a steady 350 degrees F before sliding in a tray. A common mistake is putting cookies into an oven that is still heating, which gives uneven spread and inconsistent texture. If you have an oven thermometer, use it to confirm accuracy, because many ovens run a bit hot or cool.
- In the bowl of an electric mixer, beat together butter and sugar until fluffy, about 5 minutes. Add in the cream cheese and beat until combined (it’s okay if small clumps form), then beat in the egg yolk and vanilla extract. With the mixer on low speed, beat in the dry ingredients until combined. Use a spatula to stir in the chocolate chips.: When you whisk the dry ingredients, you'll see a uniform, dusty mixture form, and the cocoa will darken the flour into a deep brown. This even distribution prevents pockets of leavening or salt that can create odd bites. The reason this matters is because even tiny clusters of baking soda can leave a soapy metallic note, so thorough whisking is a small but crucial step. Avoid sifting directly into wet ingredients, which can create clumps that are hard to incorporate later.
- Refrigerate the dough for 10 to 15 minutes, just until it’s slightly less sticky and easier to roll into balls. Roll into golf-ball sized balls and place about 2 inches apart on a nonstick baking sheet. Bake for 12 to 15 minutes, or until the cookies are set. Let cool completely before covering in the glaze.: Allow the mixed dry ingredients to rest in the bowl while you prepare the wet components, which keeps the process organized and prevents overmixing at the final stage. Keeping things staged saves time and reduces the chance you'll forget to add an item. A frequent oversight is neglecting to set the bowl aside, which can lead to accidental spills or hurried mixing that damages dough texture.
- Whisk together all the ingredients until smooth and creamy. Use a spoon or spatula to spread the glaze on the cookies or use a pastry bag (I did!) to pipe it across.: As you beat unsalted butter with the combination of brown sugar and granulated sugar , watch it become pale and airy, with tiny air pockets that contribute to lift and tenderness. The creaming step traps air that helps the cookies rise slightly and develop a light interior, so patience here pays dividends. A common mistake is rushing and not reaching the fluffy stage, which yields dense cookies, or overbeating to the point where the butter becomes too soft and the dough spreads excessively.
- Add in the cream cheese and beat until combined: When the cold cubed cream cheese goes in, the mixture may look slightly lumpy at first, and that is okay. The bits will incorporate and provide moisture and tang without making the dough greasy. The cool temperature of the cream cheese is important because if it melts, the dough can become slack and overly loose, causing excess spread while baking. If you see a greasy separation, chill the bowl briefly before continuing to recover the texture.
- Beat in the egg yolk and vanilla extract: Adding the egg yolk enriches the batter and helps emulsify fats for a cohesive dough, while vanilla extract lifts the aromatic profile. The mixture should appear glossy and smooth after these additions, which signals good emulsification. If the batter looks curdled or broken, a brief low speed beat will usually bring it back together; avoid high speed which can overwork it.
- With the mixer on low speed, beat in the dry ingredients until combined: Incorporate the dry mix gradually to avoid a cloud of cocoa and flour over your counter. The dough will thicken and take on a uniform chocolate color, with an overall pliable texture. Overmixing at this stage will develop gluten and yield tougher cookies, so stop as soon as the streaks disappear and the dough looks cohesive.
- Use a spatula to stir in the chocolate chips: Folding in milk chocolate chips by hand preserves pockets of melty chocolate and prevents them from breaking down. You'll see glossy specks of chocolate throughout the dough, and they will provide delightful molten bites after baking. A common pitfall is using the mixer for this step which can chop the chips, so a gentle spatula fold is best.
- Refrigerate the dough for 10 to 15 minutes: Chilling makes the dough firmer, reducing spread and making it easier to roll into balls. The cooled dough feels denser and slightly tacky rather than sticky, which helps maintain shape on the baking sheet. Skipping this short rest can result in flatter cookies with less defined edges, so resist the urge to bake immediately.
- Roll into golf ball sized balls and place about 2 inches apart on a nonstick baking sheet: Rolling by hand ensures consistent portioning, and spacing about 2 inches lets the cookies spread without merging. Visually, the dough balls should be smooth and slightly glossy from the sugar and fat, and they will flatten and crack a bit as they bake, signaling doneness. Crowding the tray is a typical error, which leads to merged cookies and uneven browning.
- Bake for 12 to 15 minutes, or until the cookies are set: As the cookies bake, you will notice the edges firm and darken while centers remain soft and slightly compressed to the touch. The aroma of chocolate will intensify and the surface may show small fissures. Remove when the centers are set but still tender, as they will continue to firm as they cool. Overbaking dries them, while underbaking can leave raw centers, so check at the earlier time and adjust for your oven.
- Let cool completely before covering in the glaze: Cooling solidifies the interior and prevents the glaze from sliding off warm cookies. A completely cool cookie will hold the glaze and display a neat finish, whereas glazing too soon can create a runny, uneven coating. Place them on a rack and be patient, because rushing this step compromises presentation and texture.
- Whisk together all the ingredients until smooth and creamy: Combine mascarpone cheese , powdered sugar , milk , and vanilla extract into a silky glaze. The mixture should be lump free and glossy, with a pipe friendly consistency. If it is too thick, add a drop more milk ; if too thin, add a pinch more powdered sugar . A lumpy glaze is often caused by cold mascarpone straight from the fridge, so soften it gently before whisking.
- Use a spoon or spatula to spread the glaze on the cookies or use a pastry bag to pipe it across: Spreading gives a rustic look while piping offers clean lines and controlled coverage. The glaze should finish with a smooth sheen and hold shape rather than run, creating a delightful contrast to the textured cookie beneath. One mistake is applying the glaze when cookies are warm, which makes it slide off; always ensure cookies are fully cooled.
Notes
- Adjust dough chill time to control spread: For thicker cookies chill the dough 20 to 30 minutes, for thinner cookies reduce the chill, which affects edge crispness and center chew.
- Swap chocolate chips quantity for more pockets of melt: Increase to 1 1/4 cups for extra melty bites, keeping dough balance in mind so it does not become too loose.
- Test oven temperature with an oven thermometer: If cookies brown too quickly on edges, lower the oven by 10 degrees F and bake a bit longer for even doneness.
- Smooth glaze consistency by adjusting milk and powdered sugar: Add milk a few drops at a time until pipeable, or more powdered sugar for a thicker spreadable finish.
- Make ahead and freeze for convenience: Scoop and freeze raw dough balls on a tray, then transfer to a bag; bake from frozen adding a couple extra minutes to the bake time.