Favorite Oatmeal Cups
Favorite Oatmeal Cups have been my go to quick breakfast for mornings when the day feels like it needs a little extra kindness. I first started making these when my schedule tightened and I needed something I could assemble fast, pop in the oven, and trust to be wholesome and satisfying. With a loaf of ripe bananas on the counter and a jar of rolled oats in the pantry, these cups became my little ritual, a warm grab and go that still feels homemade.
Over time I learned small tricks that made each batch better than the last. I like the way the edges crisp while the centers stay tender, and how a little maple syrup lifts the flavor without masking the oats. Mornings with these feel calmer, and sharing them with friends always sparks conversation about simple, practical food. I often change the toppings depending on my mood, and that flexibility is why I keep this recipe on constant rotation.
Recipe Snapshot
44 mins
10 mins
34 mins
Easy
200 kcal
American
Gluten-Free, Vegan
Breakfast
Muffin tin, Mixing bowl, Measuring cup, Spoon
The Charm of This Favorite Oatmeal Cups
Comforting and convenient
I love how Favorite Oatmeal Cups deliver a warm, homey texture with almost no fuss. You can make a whole batch in under an hour, and they store well so you have a satisfying breakfast ready for several days. For busy mornings, that convenience is priceless, and I savor the steady, toasted oat aroma that fills the kitchen as they bake.
Versatile and forgiving
These cups are wonderfully adaptable, which is why I reach for them again and again. The base accepts swaps and add ins, so whether you prefer maple syrup or extra mashed banana, the batter still behaves. That forgiving nature means even first timers can succeed, and small ingredient changes rarely derail the final texture.
Nutritious without being preachy
Whole grain rolled oats and ground flaxseed pack fiber and keep you full through the morning. I appreciate recipes that taste like real food and also carry real benefits, and these cups hit that balance. They satisfy sweet cravings while still being a reasonable choice for everyday eating.
Kid friendly and portable
Whenever I bring a tin to gatherings or pack them for school lunches, they disappear fast. Kids love the little muffin shape and the toppings let them personalize their own. The portability makes them great for hectic mornings, and they reheat beautifully in short bursts.
Great for batch baking
I often double the recipe because the cups freeze well and revive quickly in the microwave or oven. That ability to scale up without extra time means I can prep for an entire week in one go, which feels like reclaiming minutes in a busy life. Overall, these cups are a small ritual that pays big returns.
Ingredients Required for Favorite Oatmeal Cups

These ingredients form a simple, wholesome framework. The foundation of rolled oats gives structure and chew, while the wet ingredients like milk and mashed banana create tenderness and moisture. Small additions such as baking powder and cinnamon lift texture and flavor. The optional toppings let you personalize each cup, which keeps the recipe lively and adaptable.
- 3 cups rolled oats: Provide a hearty, chewy base that absorbs liquids and binds the cups; supplies whole-grain fiber and slow-release carbohydrates for sustained energy. Use rolled oats for texture and structure, making the cups substantial and satisfying when baked or chilled.
- 2 tablespoons ground flaxseed (or chia seeds or additional oats): Add a binding and nutrient-dense element that can also provide omega-3s when using flaxseed; can be substituted with chia seeds or extra oats for similar texture. Stir ground flaxseed into the batter to help hold the mixture together and improve moisture retention.
- 1 teaspoon baking powder: Leaven lightly to create a bit of lift and prevent overly dense cups; balances texture without making them cake-like. Incorporate baking powder to ensure the mixture rises slightly and yields softer, more tender centers.
- 1/2 teaspoon cinnamon: Infuse warm, aromatic flavor that complements the oats and banana while enhancing overall taste complexity. Sprinkle cinnamon into the dry mix to add depth and a pleasant spice note.
- 1/4 teaspoon salt: Enhance and balance sweetness while highlighting other flavors; supports proper dough chemistry and prevents blandness. Dissolve salt with the wet ingredients to round out the recipe and intensify flavor.
- 1 1/2 cups milk: Provide necessary moisture to hydrate the oats and create a batter-like consistency; contributes creaminess and affects final texture. Use milk to control density and ensure the oats cook through and bind properly.
- 1/2 cup mashed very ripe banana (about 1 large): Contribute natural sweetness, moisture, and binding properties while also adding banana flavor and soft texture; ripe banana enhances sweetness and reduces need for added sugar. Mash thoroughly to integrate into the mixture and help hold the cups together.
- 1/4 cup maple syrup (or additional mashed banana): Sweeten naturally and add a mild, caramel-like flavor while contributing liquid for texture; can be replaced by extra mashed banana to reduce added sugars. Mix maple syrup into the batter to taste for desired sweetness and moisture.
- 1 teaspoon vanilla extract: Introduce aromatic sweetness and depth to brighten flavors and unify wet and dry ingredients; supports a more complex flavor profile. Stir vanilla extract into the wet mixture to enhance overall aroma and taste.
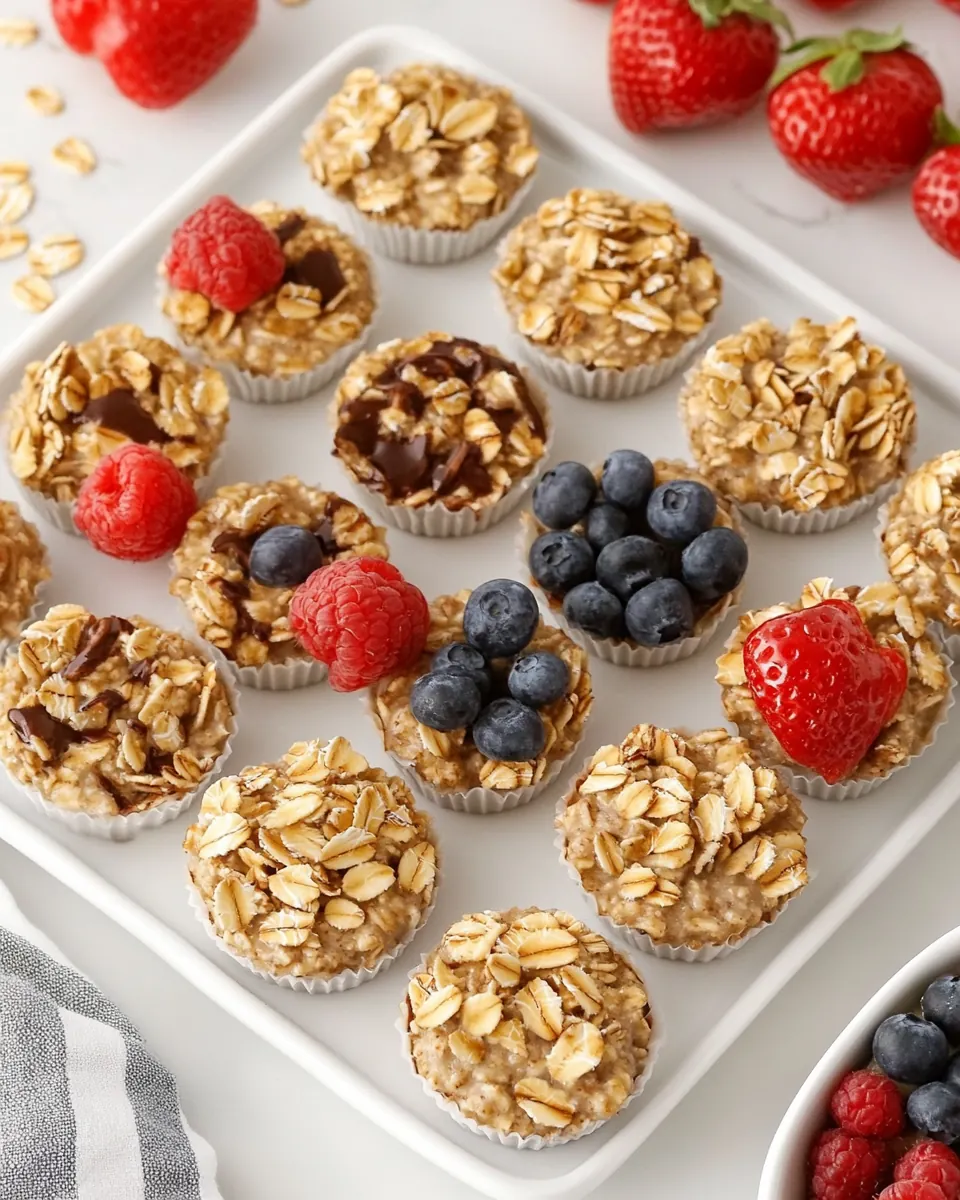
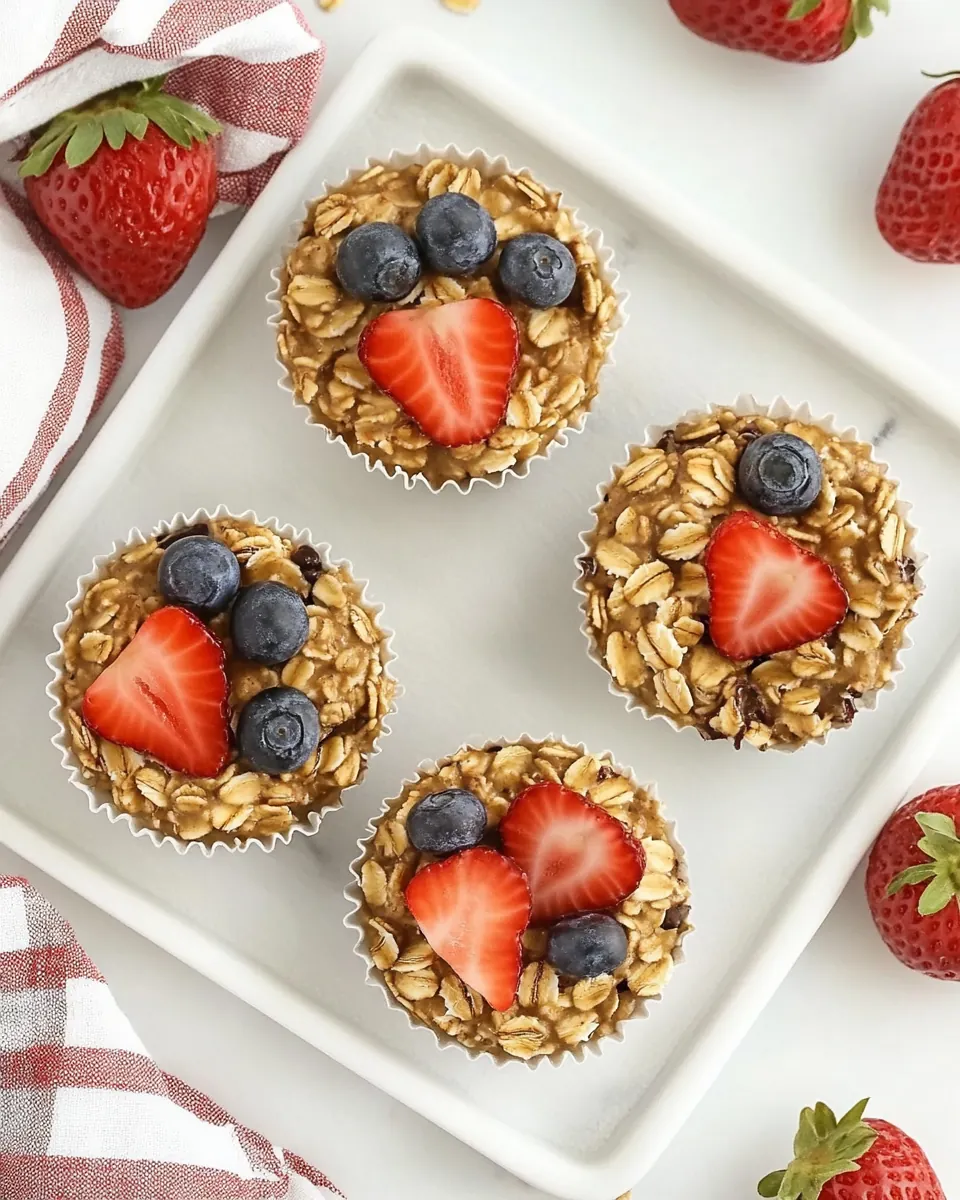
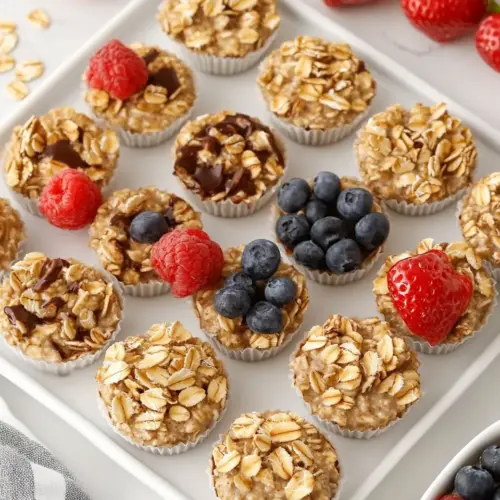
- Chocolate chips, berries, or sliced fruit to top () (optional): Provide optional texture, bursts of sweetness, or fresh tartness as a finishing touch; customize toppings to preference for visual appeal and flavor contrast. Scatter chocolate chips, berries, or sliced fruit on top before baking or after setting for added interest.
Preparation Steps for Favorite Oatmeal Cups

These steps are straightforward and forgiving, but small details make a big difference. I walk you through sensory cues and troubleshooting hints so each batch comes out consistent. Read each step slowly before you begin and have your muffin tin ready.
- Preheat the oven to 350 degrees F and grease a standard muffin tin well.: You should feel the warmth of the kitchen change as the oven reaches 350 degrees F , and that faint dry heat signals the right environment for even baking. Greasing the muffin tin well prevents sticking and encourages crisp edges, which I always enjoy for contrast with a soft center. Use enough grease so you can run a knife around the cups easily after cooling, otherwise you risk tearing the edges when removing them. A common mistake is under greasing the tin, which leads to stubborn cups that fall apart when you try to unmold.
- Add all of the ingredients except the toppings to a big bowl. Stir well.: When you combine the dry and wet ingredients in a big bowl, you’ll notice the batter change visually as the milk hydrates the rolled oats . The batter should look cohesive, with visible flecks of ground flaxseed and thin streaks of mashed banana . The scent at this stage is mild and oat forward, with a hint of cinnamon and vanilla as the mixture comes together. Stir just until combined to avoid overworking; overmixing can make the texture gummy rather than tender. Watch for uneven clumps of dry oats, which indicate you need to fold a bit more gently to fully hydrate them.
- Add batter to the prepared muffin pan, using about 1/4 cup in each cup.: As you portion the batter, aim for roughly uniform amounts so the bake time is consistent across all cups. The batter should be thick but scoopable, and it will settle slightly in the cup as it heats. You’ll feel a satisfying weight in each cup when they are evenly filled, and visual uniformity helps achieve even browning. One mistake people make is overfilling the cups, which causes spillage and uneven cooking. Using a measuring cup or scoop ensures each portion bakes into the same texture.
- Top with fruit or chocolate chips and bake for 30-34 minutes or until lightly golden brown around the edges and firm to the touch.: As the cups bake, the kitchen will fill with a toasty, caramel like aroma as the maple syrup and banana sugars react. Look for lightly golden edges and a set surface that springs back when gently pressed, that is your cue of doneness. The sound is subtle, just a faint quiet from the oven as moisture evaporates. If you rely only on time and not visual cues, you might under or over bake them, so trust the feel and look as much as the timer. Avoid opening the oven too often, which drops temperature and can lengthen bake time.
- Let cool slightly and serve, or store and enjoy later.: After removing the pan, allow the cups to cool so they firm up and release steam, which preserves texture. You’ll notice a more caramelized scent at this stage and edges that have crisped. If you try to unmold them while piping hot, they can fall apart, so patience pays off. For storage, keep them in an airtight container and reheat briefly when ready to eat. A common error is storing them while still warm, which traps condensation and makes them soggy over time.
Recipe Notes about Favorite Oatmeal Cups
I like to treat these notes as a toolkit for better batches. Small details about storage, swaps, and topping ideas can transform the experience. Below are practical, tested notes drawn from repeated bakes and real pantry edits.
- Storage tip Store in an airtight container for up to a week, or freeze for up to 6 months in a freezer bag with as much air removed as possible. When reheating, use short bursts to avoid drying them out.
- Topping variations Try a sliver of butter and a drizzle of maple syrup while warm, or spread a thin layer of nut butter for added richness and protein.
- Banana substitute Use applesauce in place of the banana if you prefer a milder fruit flavor, keeping the texture moist though slightly different.
- Gluten free option Use certified gluten free rolled oats to make these cups safe for gluten sensitive diets while keeping the same method.
- Dairy free option Use nondairy milk to make this recipe dairy free, the bake time and texture remain consistent in my tests.
Serving Options for Favorite Oatmeal Cups
These cups are versatile for many occasions, from a quick office breakfast to a relaxed weekend brunch. They pair well with fresh fruit and can be dressed up or kept simple. Here are thoughtful ways I serve them depending on the moment.
- Breakfast on the go Pack one or two in a small container with a piece of fruit for an easy handheld morning option that travels well.
- Brunch spread Place a variety of toppings like fresh berries and sliced fruit so guests can personalize their cups while enjoying coffee or tea.
- Snack or lunchbox These cups are great for school lunches, offering a more satisfying snack than packaged alternatives and reheating quickly when needed.
- Meal prep Bake a double batch and freeze individual portions for a grab and bake solution that saves time on busy weeks.
- Seasonal pairing In cooler months, I serve them warm with a sprinkle of cinnamon. In warmer months, chilled with fresh berries makes for a refreshing take.
FAQ
Conclusion
These Favorite Oatmeal Cups shine because they combine simplicity with comforting flavor, delivering a warm, portable breakfast that feels indulgent yet wholesome. I encourage you to try them as a batch bake for busy mornings, and to play with toppings and minor swaps to make them your own. They freeze well, reheat beautifully, and fit into many routines, so once you make a batch you will likely find yourself turning to them time and again for an easy, satisfying meal.
Favorite Oatmeal Cups
Equipment
- Muffin Tin
- Mixing Bowl
- Measuring Cup
- Spoon
Ingredients
- 3 cups rolled oats Provide a hearty, chewy base that absorbs liquids and binds the cups; supplies whole-grain fiber and slow-release carbohydrates for sustained energy. Use rolled oats for texture and structure, making the cups substantial and satisfying when baked or chilled.
- 2 tablespoons ground flaxseed (or chia seeds or additional oats) Add a binding and nutrient-dense element that can also provide omega-3s when using flaxseed; can be substituted with chia seeds or extra oats for similar texture. Stir ground flaxseed into the batter to help hold the mixture together and improve moisture retention.
- 1 teaspoon baking powder Leaven lightly to create a bit of lift and prevent overly dense cups; balances texture without making them cake-like. Incorporate baking powder to ensure the mixture rises slightly and yields softer, more tender centers.
- 1/2 teaspoon cinnamon Infuse warm, aromatic flavor that complements the oats and banana while enhancing overall taste complexity. Sprinkle cinnamon into the dry mix to add depth and a pleasant spice note.
- 1/4 teaspoon salt Enhance and balance sweetness while highlighting other flavors; supports proper dough chemistry and prevents blandness. Dissolve salt with the wet ingredients to round out the recipe and intensify flavor.
- 1 1/2 cups milk Provide necessary moisture to hydrate the oats and create a batter-like consistency; contributes creaminess and affects final texture. Use milk to control density and ensure the oats cook through and bind properly.
- 1/2 cup mashed very ripe banana (about 1 large) Contribute natural sweetness, moisture, and binding properties while also adding banana flavor and soft texture; ripe banana enhances sweetness and reduces need for added sugar. Mash thoroughly to integrate into the mixture and help hold the cups together.
- 1/4 cup maple syrup (or additional mashed banana) Sweeten naturally and add a mild, caramel-like flavor while contributing liquid for texture; can be replaced by extra mashed banana to reduce added sugars. Mix maple syrup into the batter to taste for desired sweetness and moisture.
- 1 teaspoon vanilla extract Introduce aromatic sweetness and depth to brighten flavors and unify wet and dry ingredients; supports a more complex flavor profile. Stir vanilla extract into the wet mixture to enhance overall aroma and taste.
- Chocolate chips, berries, or sliced fruit to top (optional) Provide optional texture, bursts of sweetness, or fresh tartness as a finishing touch; customize toppings to preference for visual appeal and flavor contrast. Scatter chocolate chips, berries, or sliced fruit on top before baking or after setting for added interest.
Instructions
- Preheat the oven to 350 degrees F and grease a standard muffin tin well.: You should feel the warmth of the kitchen change as the oven reaches 350 degrees F , and that faint dry heat signals the right environment for even baking. Greasing the muffin tin well prevents sticking and encourages crisp edges, which I always enjoy for contrast with a soft center. Use enough grease so you can run a knife around the cups easily after cooling, otherwise you risk tearing the edges when removing them. A common mistake is under greasing the tin, which leads to stubborn cups that fall apart when you try to unmold.
- Add all of the ingredients except the toppings to a big bowl. Stir well.: When you combine the dry and wet ingredients in a big bowl, you’ll notice the batter change visually as the milk hydrates the rolled oats . The batter should look cohesive, with visible flecks of ground flaxseed and thin streaks of mashed banana . The scent at this stage is mild and oat forward, with a hint of cinnamon and vanilla as the mixture comes together. Stir just until combined to avoid overworking; overmixing can make the texture gummy rather than tender. Watch for uneven clumps of dry oats, which indicate you need to fold a bit more gently to fully hydrate them.
- Add batter to the prepared muffin pan, using about 1/4 cup in each cup.: As you portion the batter, aim for roughly uniform amounts so the bake time is consistent across all cups. The batter should be thick but scoopable, and it will settle slightly in the cup as it heats. You’ll feel a satisfying weight in each cup when they are evenly filled, and visual uniformity helps achieve even browning. One mistake people make is overfilling the cups, which causes spillage and uneven cooking. Using a measuring cup or scoop ensures each portion bakes into the same texture.
- Top with fruit or chocolate chips and bake for 30-34 minutes or until lightly golden brown around the edges and firm to the touch.: As the cups bake, the kitchen will fill with a toasty, caramel like aroma as the maple syrup and banana sugars react. Look for lightly golden edges and a set surface that springs back when gently pressed, that is your cue of doneness. The sound is subtle, just a faint quiet from the oven as moisture evaporates. If you rely only on time and not visual cues, you might under or over bake them, so trust the feel and look as much as the timer. Avoid opening the oven too often, which drops temperature and can lengthen bake time.
- Let cool slightly and serve, or store and enjoy later.: After removing the pan, allow the cups to cool so they firm up and release steam, which preserves texture. You’ll notice a more caramelized scent at this stage and edges that have crisped. If you try to unmold them while piping hot, they can fall apart, so patience pays off. For storage, keep them in an airtight container and reheat briefly when ready to eat. A common error is storing them while still warm, which traps condensation and makes them soggy over time.
Notes
- Storage tip Store in an airtight container for up to a week, or freeze for up to 6 months in a freezer bag with as much air removed as possible. When reheating, use short bursts to avoid drying them out.
- Topping variations Try a sliver of butter and a drizzle of maple syrup while warm, or spread a thin layer of nut butter for added richness and protein.
- Banana substitute Use applesauce in place of the banana if you prefer a milder fruit flavor, keeping the texture moist though slightly different.
- Gluten free option Use certified gluten free rolled oats to make these cups safe for gluten sensitive diets while keeping the same method.
- Dairy free option Use nondairy milk to make this recipe dairy free, the bake time and texture remain consistent in my tests.