
Easy Elote Dip
Easy Elote Dip is the kind of recipe that sneaks into summer cookouts and stays in my rotation all season long. The first time I made this, I was bringing snacks to a block party and wanted something that tasted like street food, but was simple to assemble in a bowl. I remember the warm corn aroma filling my car as I drove, and how everyone hovered around the dish as if it were the main event. That instant made me fall in love with this combination of charred corn, tangy cream, and crumbly cheese.
Over the years I have tweaked little things, swapping in sour cream or plain Greek yogurt, adjusting the chili to suit the crowd, and sometimes serving it warm so the smells keep wafting across the room. I like how forgiving the recipe is, and how it travels well when spooned into a shallow serving bowl with chips on the side. For quiet nights at home, I’ll scoop a warm spoonful onto buttered toast for a quick, savory snack that feels special.
Recipe Snapshot
30 mins
15 mins
15 mins
Easy
180 kcal
Mexican
Gluten-Free, Low FODMAP
Appetizers
Grill, Mixing bowl, Knife, Serving bowl
What Sets This Easy Elote Dip Apart
Bright, simple flavors that pack a punch
I love how Easy Elote Dip balances sweet corn with tangy mayonnaise and sour cream, so you get a lively flavor in every bite. The lime zest and juice lift the whole dip, cutting through the richness and keeping the palate clean. For me, this brightness is what makes people come back for seconds.
Textural contrast makes it addictive
The warm, slightly charred kernels give you a smoky chew while the crumbled queso fresco adds delicate salt and a creamy crumble. I always notice how the creamy base clings to every kernel, creating a luxurious mouthfeel that keeps you reaching for another chip.
Stretchable and crowd friendly
I often bring Easy Elote Dip to casual gatherings because it scales easily, and it plays nicely with chips, veggies, or warmed tortillas. It requires minimal hands on time, so I can mingle while it comes together. That flexibility is a big reason I keep this recipe ready in my mental arsenal.
Versatile for serving temperature and swaps
I enjoy serving it warm right off the grill, but chilling it makes the flavors meld and the texture more spoonable. You can gently cool it, then let it sit at room temperature before serving, which I sometimes do when I want the dip to develop more depth. The recipe handles small ingredient variations without losing its identity, which is reassuring when pantry items are limited.
Simple technique, impressive result
The grilling step is straightforward but transformative. Charring the corn gives it a smoky backbone that store bought corn cannot match. When I teach friends how to make this, they’re surprised how few steps produce such a restaurant quality dip. That combination of ease and wow factor is why I keep making it.
What You’ll Need for Easy Elote Dip
This ingredient list is all about balance. The key players are the charred corn for sweetness and texture, the creamy base for richness, and the bright lime to lift everything. The salty, crumbly queso fresco and a touch of chili powder tie the flavors to classic elote, making each bite intriguing yet familiar.
- 4 ears of corn: Shuck and grill or boil until tender, then cut kernels from the cob to provide the sweet, smoky base of the dip. Adds texture and natural sweetness that contrasts with creamy elements, and can be charred for an authentic elote flavor.
- 1/2 cup mayo: Bind the mixture with a creamy, rich mouthfeel while adding a subtle tang that balances spicy and acidic components. Helps create a smooth, spreadable consistency and carries flavors throughout each bite.
- 1/4 cup sour cream, or plain Greek yogurt: Lighten the dip with a tangy, cultured creaminess that brightens flavors and adds a silky texture; use Greek yogurt for a lighter alternative with similar acidity. Blends well with mayo to prevent greasiness and contributes a pleasant tang that complements the lime and chili.
- 1 lime, zested and juiced: Brighten and lift flavors with fragrant zest and fresh acidity from the juice to cut through richness and add brightness. Zest gives aromatic citrus oils while the juice adds a clean tartness that balances creaminess and spice.
- 1/2 teaspoon kosher salt, or 1/4 tsp salt: Season to taste and enhance overall flavor, using the higher amount for a well-rounded savory profile or the lower amount to control sodium. Dissolves easily into the mixture to heighten other ingredients without overpowering them.
- 1/4 teaspoon chili powder, more to taste: Introduce a mild heat and smoky warmth that complements the corn and cheese, adjustable to personal spice preference. Sprinkled to taste, it reinforces the traditional elote profile and adds depth without overwhelming other flavors.
- 3 5 Tablespoons queso fresco, crumbled: Garnish and enrich the dip with a crumbly, salty cheese that adds tang and creamy pockets of flavor throughout. Crumbled over the top or folded in, it provides a traditional finish and pleasant contrast in texture.
How to Prepare Easy Elote Dip
Getting this dip right is more about attention than effort. I like to pace myself through the grilling, mixing, and final assembly so each element shines. Below are the cleaned steps with detailed guidance to help you sense when each stage is done and how to avoid common pitfalls.
- Heat grill to medium high heat.: When the grill reaches medium high, you should sense a steady radiating heat and a faint metallic sizzle when you test with your hand at a safe distance, that tells you the grates are ready. This temperature allows the corn to char without burning the outer husk too quickly, producing sweet caramelization while softening the kernels. A typical error is starting on too low heat, which results in long cooking and less charring, or too high heat, which chars the exterior while leaving kernels underdone. I like to clean the grates before heating, because a clean surface gives clearer grill marks and a purer smoky aroma.
- Grill corn. Partially shuck 4 ears corn, leaving 1 to 2 layers of husk on during grilling. Place the corn on the hot grill and grill on all sides until husk is corn is tender and has a few dark brown spots (about 15 minutes). Remove from heat and allow to cool slightly.: The husk acts like a natural shield, steaming the kernels while allowing enough exposure for charred spots. As the corn warms, you will hear a soft crackle from the husk and smell a toasty sweetness. Turn the ears every few minutes so all sides catch color, aiming for a few dark brown spots across each ear, which usually takes about 15 minutes. Avoid leaving corn on one side too long because it can develop an acrid burnt flavor. Let the ears cool slightly before handling, because hot kernels can squirt juice.
- In a bowl, mix together 1/2 cup mayonnaise, 1/4 cup sour cream, juice of one lime, lime zest, 1/2 teaspoon salt and 1/4 teaspoon chili powder until incorporated. Add more seasoning to taste.: After grilling, the ears will emit a concentrated sweet corn steam that is fragrant and inviting, and the kernels will be tender to the touch. Allowing a slight cool down makes it safer to remove the husk fully if needed and prevents the cream base from melting excessively when combined. A mistake is rushing this step, which can cause the warm corn to overly loosen the dip texture; patience keeps the texture ideal and the flavors distinct.
- Remove the kernels from each cob. Place the warm corn in the same bowl with the cream mixture and mix to combine.: As you whisk these ingredients, you will notice the mixture thicken and become glossy, the lime juice lending a sharp scent that brightens the creamy base. This emulsion coats each kernel and acts as the flavor carrier, so mix until homogenous to ensure every bite is balanced. Over mixing is rarely an issue here, but adding seasonings in small increments helps you avoid oversalting. If the mixture tastes flat, a touch more lime or a pinch more salt usually rescues it.
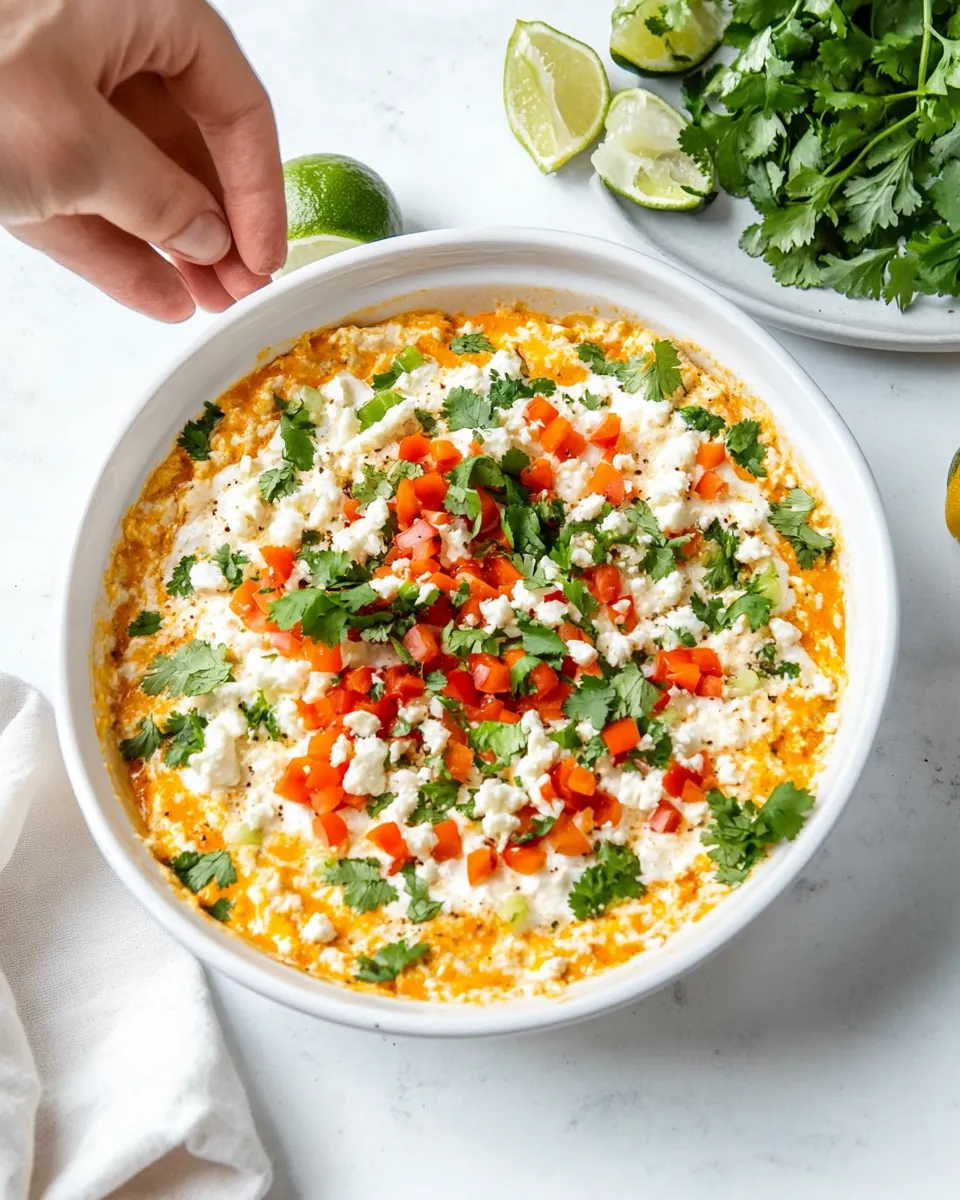
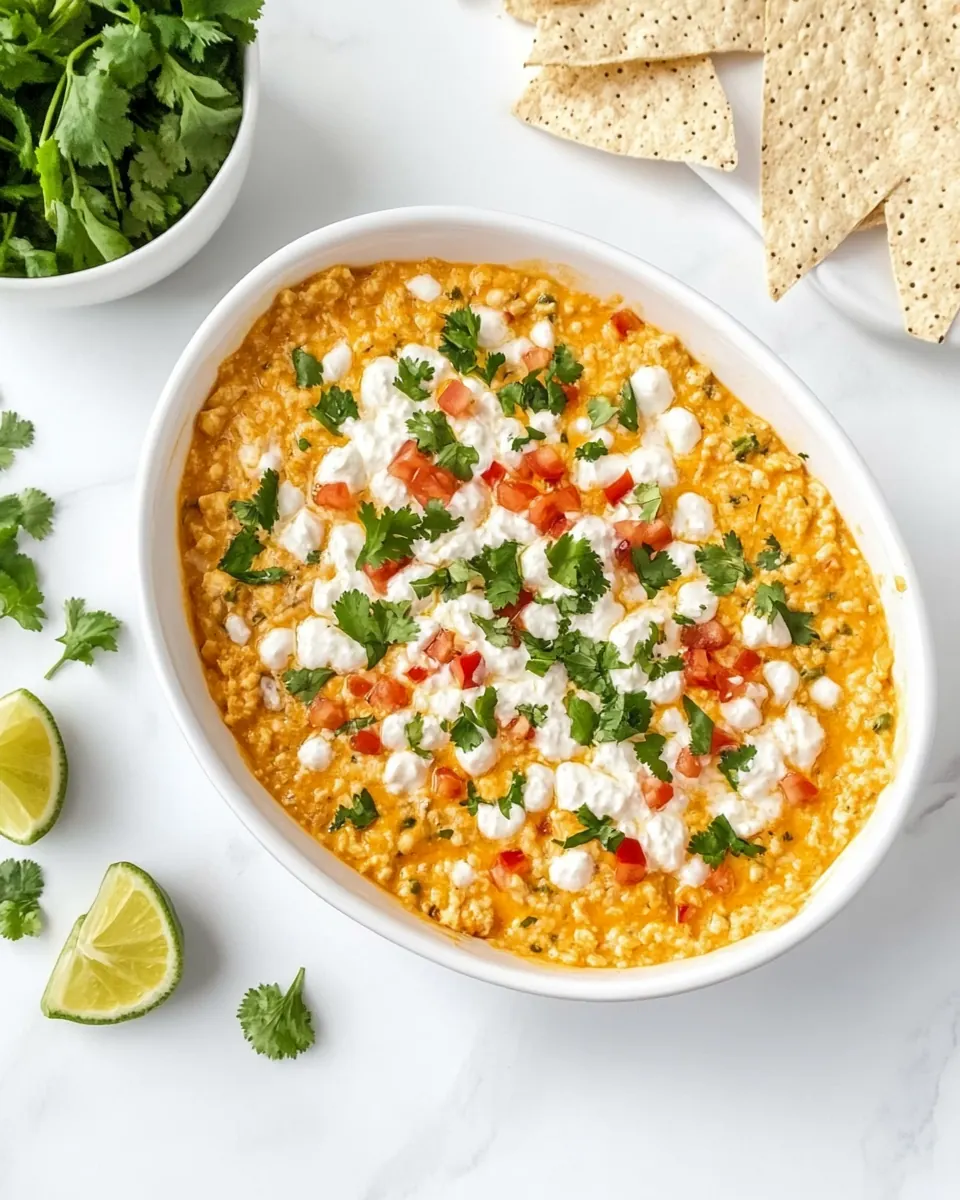
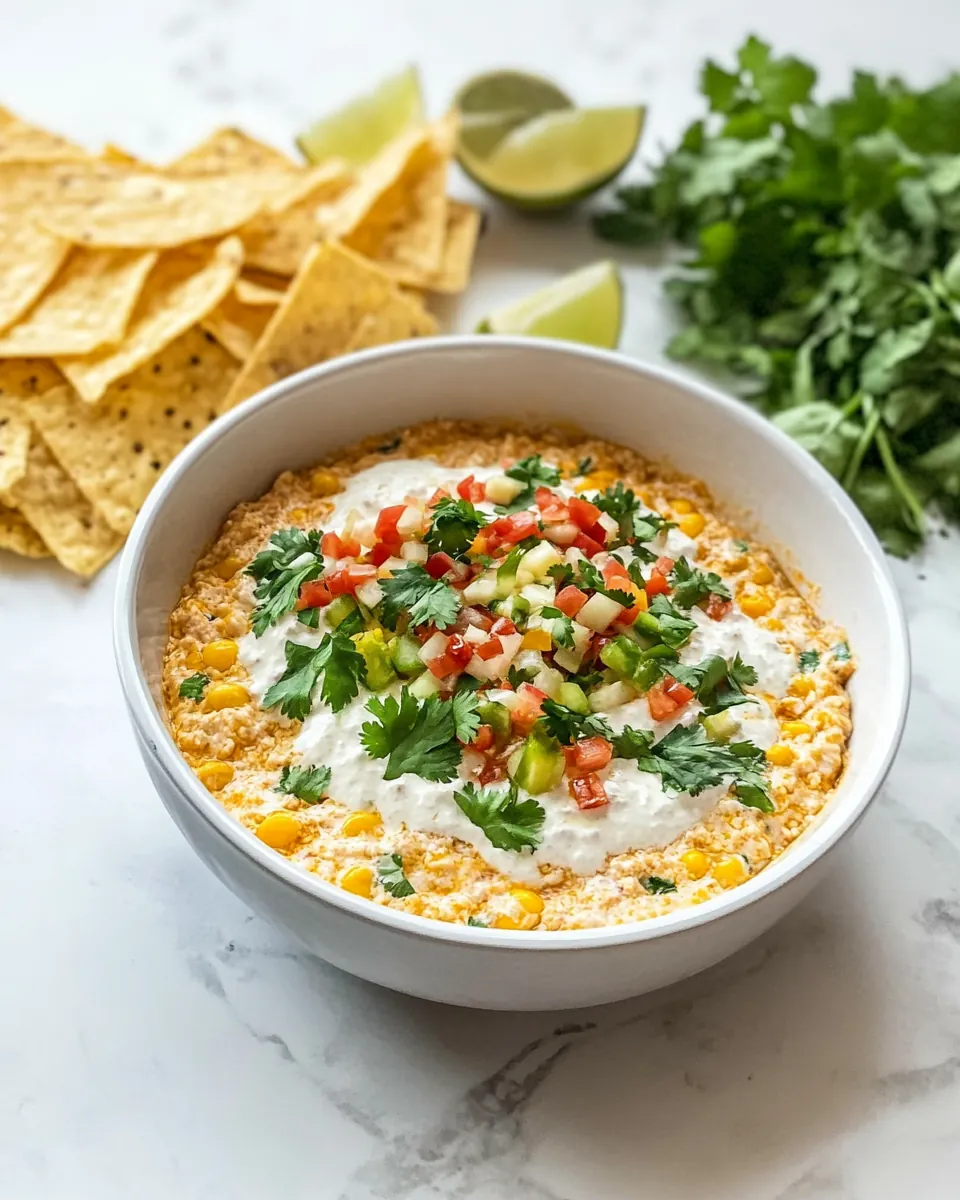
- Place the corn dip in a serving bowl and top with cilantro, 3-5 Tablespoons queso fresco and hot sauce. Place in the fridge to chill if desired or serve warm. Serve with tortilla chips.: Running a knife down the cob releases warm, juicy kernels that will still be slightly caramelized and aromatic. As you work, place the kernels directly into the bowl with the cream mixture so the heat helps the flavors merge. You will feel the kernels yield under the blade, and the bowl will start to look glossy and vibrant. A common slip is cutting too close to the cob, scooping up bits of pith, which can add a dry texture, so take care to leave the core intact.
- Place the warm corn in the same bowl with the cream mixture and mix to combine: When you fold the warm corn into the creamy base, the mixture emits a savory, citrusy scent that signals harmony. Use a gentle folding motion to keep the kernels intact while ensuring everything is evenly coated. This step is crucial because the heat slightly warms the dressing, releasing aromatics and making the dip more cohesive. The typical mistake is over stirring, which can break down the corn and create a mushier texture; gentle folding preserves the pop of each kernel.
- Place the corn dip in a serving bowl and top with cilantro, 3-5 Tablespoons queso fresco and hot sauce: The final flourish of crumbled queso fresco and a drizzle of hot sauce creates contrast and visual appeal. You will hear light clinks as the cheese falls and experience a fragrant top note from any herbs you add. The texture contrast of creamy base and crumbly cheese is inviting and balanced. A mistake is adding too much sauce up front which can dominate the delicate lime brightness; add cautiously and let guests add more if they want.
- Place in the fridge to chill if desired or serve warm: Chilling the dip lets the flavors meld and firms the texture slightly, while serving warm accentuates the grilled scent and makes each bite more aromatic. I alternate depending on setting and transport needs. If refrigerating, cover the bowl to prevent drying, and if serving warm, let it sit at room temperature a few minutes after assembly. A common error is refrigerating uncovered which can lead to a dull top layer, so always cover for storage.
- Serve with tortilla chips: Offering crisp tortilla chips provides the ideal crunchy vehicle for scooping and enjoying the dip, and their neutral corn flavor complements the corn in the dip. Place chips around the bowl or in a separate basket so they remain crisp. Avoid soggy accompaniments, because they will undermine the texture experience; always serve chips at room temperature and replace any that have become stale.
Substitutions and Tips
Small swaps can accommodate what you have on hand without losing the character of Easy Elote Dip. Below are practical tips and substitutions that keep the flavor balanced and the texture pleasing.
- Swap for convenience Use 3 to 4 cups of canned roasted corn or defrosted frozen corn if fresh ears are not available, then quickly char in a hot skillet to recreate that grilled note.
- Choose your cream base If you prefer a tangier finish, use plain Greek yogurt in place of sour cream, it brightens the dip and adds protein while keeping the texture thick.
- Tweak the cheese If you cannot find queso fresco, use a mild crumbly cheese that won’t overpower, but reduce additional salt to keep balance.
- Control the heat Increase or decrease the amount of chili powder to match your audience, and offer hot sauce at the table for guests who like it spicier.
- Make ahead strategy You can assemble the dip a few hours before serving, then bring it to room temperature so the flavors open up, but avoid freezing as texture will change.
- Serving size adjustments To scale the recipe up for a crowd, maintain the same ratios and taste as you go, especially for lime and salt.
What to Pair With Easy Elote Dip
Easy Elote Dip pairs beautifully with crunchy dippers and simple sides that let it shine. For casual gatherings, tortilla chips are classic, but there are plenty of ways to present and extend the dish into a full spread. Consider seasonal touches and serving contexts when planning pairings.
- Classic chips Serve with sturdy tortilla chips for a familiar, crowd pleasing starter that provides satisfying crunch and holds up to scooping.
- Veggie dippers Offer carrot sticks, cucumber rounds, or bell pepper strips for a fresher, lighter contrast that complements the creamy base without overpowering it.
- Grilled mains Pair the dip with grilled chicken or kebabs for summer dinners, it echoes the smoky notes and adds a bright side to richer proteins.
- Outdoor occasions This dip is ideal for picnics, barbecues, and summer parties where casual finger food is preferred, because it travels well in a sealed container.
- Seasonal serving In summer, emphasize fresh grilled corn and bright sides like salsa or a simple salad; in cooler months, serve slightly warmed and pair with roasted vegetables.
- Storage recommendation Store leftovers in an airtight container in the refrigerator for up to three days, and bring to room temperature before serving for best flavor.
FAQ
Conclusion
What makes this recipe special is how simple techniques create a layered, vibrant dip that feels like a street food favorite. The balance of charred corn, creamy mayonnaise and sour cream, zesty lime, and crumbly queso fresco gives you both comfort and brightness in every bite. I encourage you to try it the next time you want a crowd pleasing starter or an elevated snack, because it comes together quickly and always earns compliments. Enjoy the process, and don’t be afraid to tweak the heat and salt to suit your tastes.

Easy Elote Dip
Equipment
- Grill
- Mixing Bowl
- Knife
- Serving bowl
Ingredients
- 4 ears of corn Shuck and grill or boil until tender, then cut kernels from the cob to provide the sweet, smoky base of the dip. Adds texture and natural sweetness that contrasts with creamy elements, and can be charred for an authentic elote flavor.
- 1/2 cup mayo Bind the mixture with a creamy, rich mouthfeel while adding a subtle tang that balances spicy and acidic components. Helps create a smooth, spreadable consistency and carries flavors throughout each bite.
- 1/4 cup sour cream, or plain Greek yogurt Lighten the dip with a tangy, cultured creaminess that brightens flavors and adds a silky texture; use Greek yogurt for a lighter alternative with similar acidity. Blends well with mayo to prevent greasiness and contributes a pleasant tang that complements the lime and chili.
- 1 lime, zested and juiced Brighten and lift flavors with fragrant zest and fresh acidity from the juice to cut through richness and add brightness. Zest gives aromatic citrus oils while the juice adds a clean tartness that balances creaminess and spice.
- 1/2 teaspoon kosher salt, or 1/4 tsp salt Season to taste and enhance overall flavor, using the higher amount for a well-rounded savory profile or the lower amount to control sodium. Dissolves easily into the mixture to heighten other ingredients without overpowering them.
- 1/4 teaspoon chili powder, more to taste Introduce a mild heat and smoky warmth that complements the corn and cheese, adjustable to personal spice preference. Sprinkled to taste, it reinforces the traditional elote profile and adds depth without overwhelming other flavors.
- 3 -5 Tablespoons queso fresco, crumbled Garnish and enrich the dip with a crumbly, salty cheese that adds tang and creamy pockets of flavor throughout. Crumbled over the top or folded in, it provides a traditional finish and pleasant contrast in texture.
Instructions
- Heat grill to medium high heat.: When the grill reaches medium high, you should sense a steady radiating heat and a faint metallic sizzle when you test with your hand at a safe distance, that tells you the grates are ready. This temperature allows the corn to char without burning the outer husk too quickly, producing sweet caramelization while softening the kernels. A typical error is starting on too low heat, which results in long cooking and less charring, or too high heat, which chars the exterior while leaving kernels underdone. I like to clean the grates before heating, because a clean surface gives clearer grill marks and a purer smoky aroma.
- Grill corn. Partially shuck 4 ears corn, leaving 1 to 2 layers of husk on during grilling. Place the corn on the hot grill and grill on all sides until husk is corn is tender and has a few dark brown spots (about 15 minutes). Remove from heat and allow to cool slightly.: The husk acts like a natural shield, steaming the kernels while allowing enough exposure for charred spots. As the corn warms, you will hear a soft crackle from the husk and smell a toasty sweetness. Turn the ears every few minutes so all sides catch color, aiming for a few dark brown spots across each ear, which usually takes about 15 minutes. Avoid leaving corn on one side too long because it can develop an acrid burnt flavor. Let the ears cool slightly before handling, because hot kernels can squirt juice.
- In a bowl, mix together 1/2 cup mayonnaise, 1/4 cup sour cream, juice of one lime, lime zest, 1/2 teaspoon salt and 1/4 teaspoon chili powder until incorporated. Add more seasoning to taste.: After grilling, the ears will emit a concentrated sweet corn steam that is fragrant and inviting, and the kernels will be tender to the touch. Allowing a slight cool down makes it safer to remove the husk fully if needed and prevents the cream base from melting excessively when combined. A mistake is rushing this step, which can cause the warm corn to overly loosen the dip texture; patience keeps the texture ideal and the flavors distinct.
- Remove the kernels from each cob. Place the warm corn in the same bowl with the cream mixture and mix to combine.: As you whisk these ingredients, you will notice the mixture thicken and become glossy, the lime juice lending a sharp scent that brightens the creamy base. This emulsion coats each kernel and acts as the flavor carrier, so mix until homogenous to ensure every bite is balanced. Over mixing is rarely an issue here, but adding seasonings in small increments helps you avoid oversalting. If the mixture tastes flat, a touch more lime or a pinch more salt usually rescues it.
- Place the corn dip in a serving bowl and top with cilantro, 3-5 Tablespoons queso fresco and hot sauce. Place in the fridge to chill if desired or serve warm. Serve with tortilla chips.: Running a knife down the cob releases warm, juicy kernels that will still be slightly caramelized and aromatic. As you work, place the kernels directly into the bowl with the cream mixture so the heat helps the flavors merge. You will feel the kernels yield under the blade, and the bowl will start to look glossy and vibrant. A common slip is cutting too close to the cob, scooping up bits of pith, which can add a dry texture, so take care to leave the core intact.
- Place the warm corn in the same bowl with the cream mixture and mix to combine: When you fold the warm corn into the creamy base, the mixture emits a savory, citrusy scent that signals harmony. Use a gentle folding motion to keep the kernels intact while ensuring everything is evenly coated. This step is crucial because the heat slightly warms the dressing, releasing aromatics and making the dip more cohesive. The typical mistake is over stirring, which can break down the corn and create a mushier texture; gentle folding preserves the pop of each kernel.
- Place the corn dip in a serving bowl and top with cilantro, 3-5 Tablespoons queso fresco and hot sauce: The final flourish of crumbled queso fresco and a drizzle of hot sauce creates contrast and visual appeal. You will hear light clinks as the cheese falls and experience a fragrant top note from any herbs you add. The texture contrast of creamy base and crumbly cheese is inviting and balanced. A mistake is adding too much sauce up front which can dominate the delicate lime brightness; add cautiously and let guests add more if they want.
- Place in the fridge to chill if desired or serve warm: Chilling the dip lets the flavors meld and firms the texture slightly, while serving warm accentuates the grilled scent and makes each bite more aromatic. I alternate depending on setting and transport needs. If refrigerating, cover the bowl to prevent drying, and if serving warm, let it sit at room temperature a few minutes after assembly. A common error is refrigerating uncovered which can lead to a dull top layer, so always cover for storage.
- Serve with tortilla chips: Offering crisp tortilla chips provides the ideal crunchy vehicle for scooping and enjoying the dip, and their neutral corn flavor complements the corn in the dip. Place chips around the bowl or in a separate basket so they remain crisp. Avoid soggy accompaniments, because they will undermine the texture experience; always serve chips at room temperature and replace any that have become stale.
Notes
- Swap for convenience Use 3 to 4 cups of canned roasted corn or defrosted frozen corn if fresh ears are not available, then quickly char in a hot skillet to recreate that grilled note.
- Choose your cream base If you prefer a tangier finish, use plain Greek yogurt in place of sour cream, it brightens the dip and adds protein while keeping the texture thick.
- Tweak the cheese If you cannot find queso fresco, use a mild crumbly cheese that won’t overpower, but reduce additional salt to keep balance.
- Control the heat Increase or decrease the amount of chili powder to match your audience, and offer hot sauce at the table for guests who like it spicier.
- Make ahead strategy You can assemble the dip a few hours before serving, then bring it to room temperature so the flavors open up, but avoid freezing as texture will change.
- Serving size adjustments To scale the recipe up for a crowd, maintain the same ratios and taste as you go, especially for lime and salt.