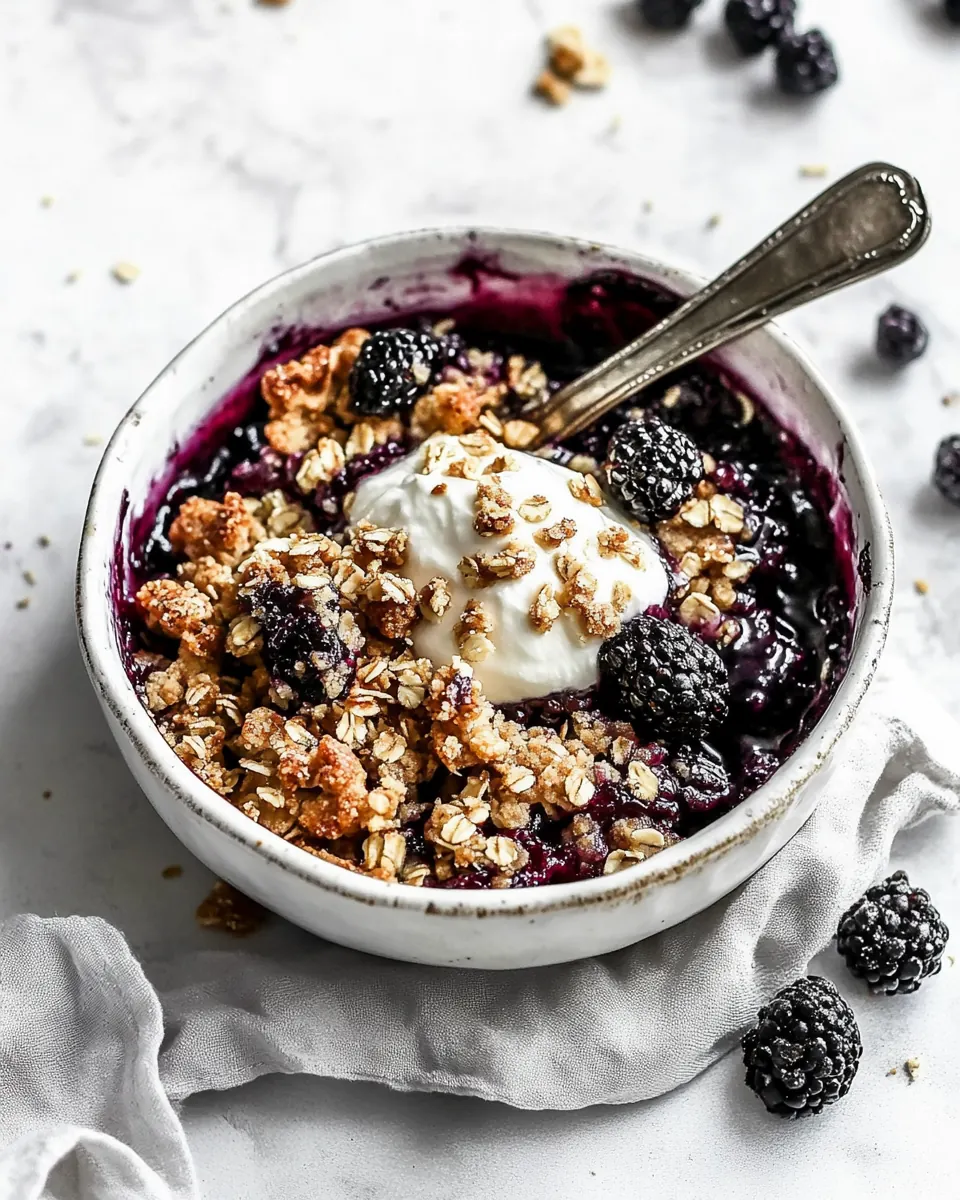
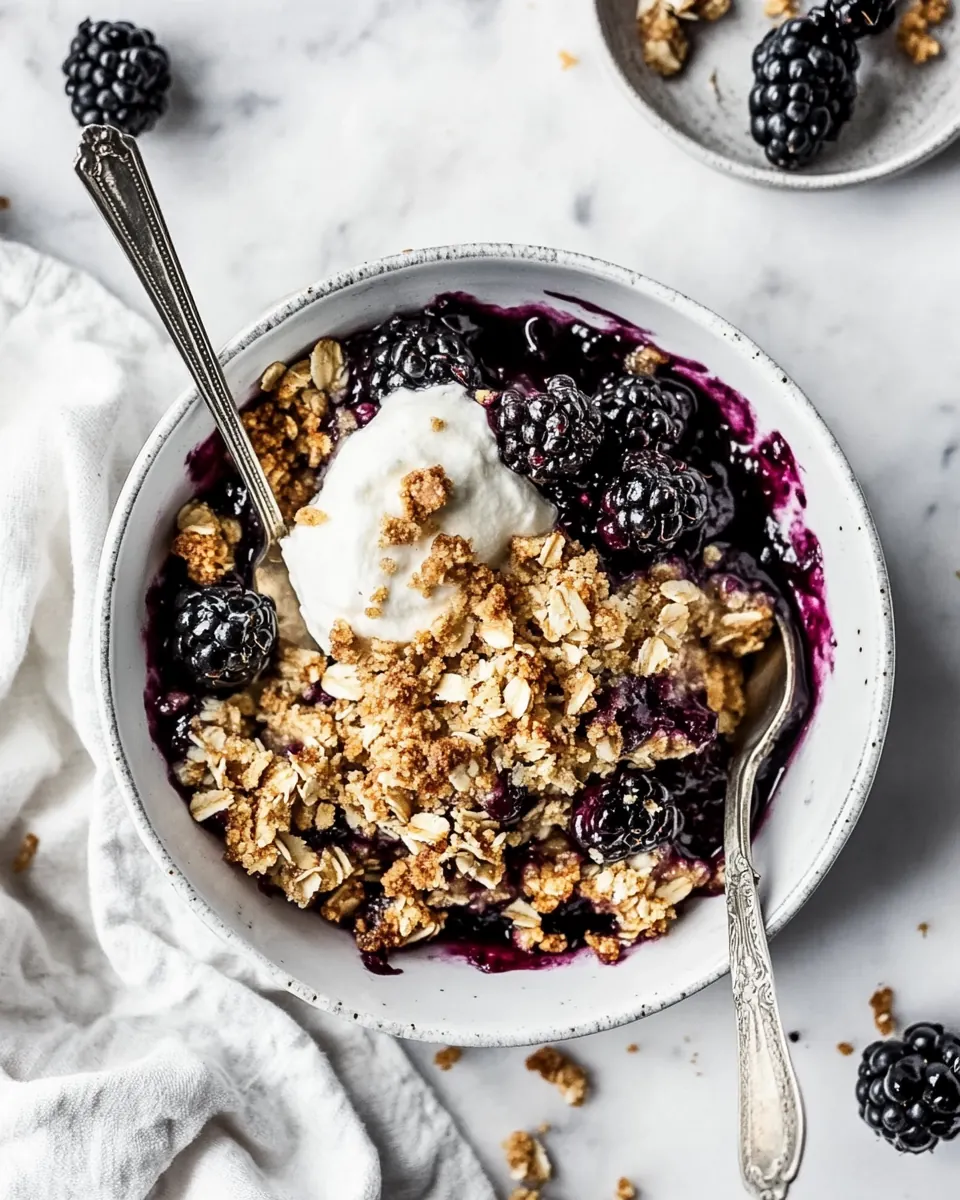
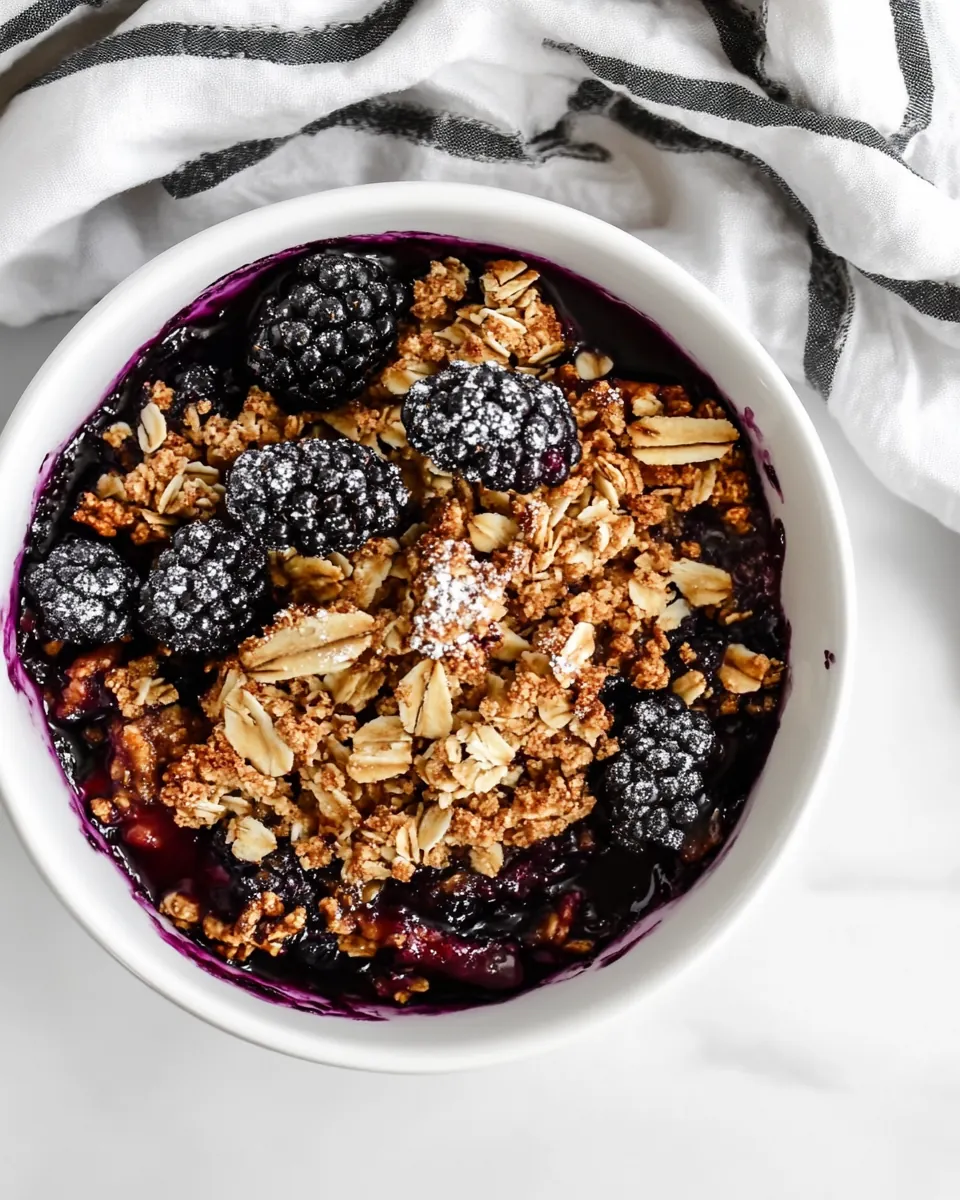
Blackberry Crisp
Blackberry Crisp is the kind of dessert that takes me right back to summer afternoons at my grandmother’s kitchen, when the windows were open and the scent of fruit and toasted nuts filled the air. I remember watching her spoon glossy, jewel toned blackberries into a dish, humming to herself while she mixed oats and nuts by hand. There was a calm, slow rhythm to those moments that made the whole house feel like a safe place to linger.
I learned to make my own version over years of tweaking, tasting, and stealing techniques from those early memories. What started as an attempt to recreate that exact warmth became a family favorite for gatherings and quiet breakfasts alike. I love how Blackberry Crisp can be dressed up for guests, or served simply with yogurt for a cozy morning. Playing with textures, I swapped in almond flour and a touch of flaked coconut to add a fragrant, toasty note that complements the tart blackberries without stealing the spotlight. Every time I bake it, I find myself smiling at the first crackle when the oven door opens.
There’s a rhythm to making fruit crisps that I adore, from the gentle fold of berries with a glossy ribbon of honey, to the satisfying scatter of the oat topping that becomes golden and crackling as it bakes. I like to pause and breathe in that warm aroma, and I always tell friends that the best part is the ten minute rest after baking, when the juices settle and the topping firms up just enough to scoop. Whether you’re serving it warm with a scoop of frozen custard or trying it cold with plain Greek yogurt for breakfast, Blackberry Crisp rewards patience and simple ingredients.
Recipe Snapshot
1 hr 10 mins
20 mins
50 mins
Medium
250 kcal
American
Gluten-Free, Vegan
Desserts
Oven, 8×8 inch baking dish, Mixing bowls, Spatula
The Beauty of This Blackberry Crisp
Simple seasonal fruit at its best
I love how Blackberry Crisp lets the blackberries shine. In summer the fruit is at its peak, vibrant and slightly tart, and the crisp simply honors that flavor instead of masking it. That straightforwardness makes it a go to when fresh blackberries are abundant and you want to celebrate the season.
Textural contrast that sings
The interplay between a bubbling, juicy filling and a crunchy, nut studded topping is why I keep coming back to this recipe. The blackberries soften and release juices that become syrupy, while the oat and nut topping toasts and becomes deeply aromatic, offering satisfying crunch against the tender fruit.
Flexible and forgiving
I find this recipe forgiving for bakers of all levels. You can use frozen blackberries straight from the freezer, and the topping handles a range of adjustments, whether you need a gluten free swap with almond flour or a different nut because that is what you have on hand. That adaptability makes it welcome at potlucks and last minute dinners.
Natural sweetness and lovely aromatics
By using honey or pure maple syrup and a touch of vanilla, you get a warm, rounded sweetness that lifts the fruit without overpowering it. The hint of cinnamon and toasted coconut in the topping adds dimension and a cozy scent as it bakes, which always brings people into the kitchen.
Wonderful for many occasions
This crisp scales easily and transitions from casual breakfasts to dinner party desserts. It stores and reheats well, and the leftovers often taste even better after a day when the flavors have married, making it a practical choice for busy cooks and hosts.
What You’ll Need for Blackberry Crisp
These ingredients are a study in balance, pairing juicy fruit with a crunchy, nutty topping. The filling relies on minimal components to let the blackberries speak, while the topping uses oats, nuts, and a touch of coconut to create texture and toasty flavor. Together, they form a dessert that is both comforting and bright.
- 6 cups blackberries, fresh or frozen—do not thaw if frozen: Provide juicy, tart-sweet fruit that forms the base of the crisp, releasing juices as it bakes and creating the filling’s texture and flavor; fresh or frozen both work, though frozen should remain unthawed to prevent excess sogginess.
- 2 tablespoons cornstarch: Thicken the fruit juices by absorbing excess liquid during baking, helping the filling set and preventing a runny texture while allowing the berries to remain vibrant and intact.
- 1/3 cup honey or pure maple syrup: Sweeten the fruit naturally while adding moisture and a glossy finish to the filling; honey or maple syrup also contributes subtle floral or caramel notes that complement the blackberries.
- 1 1/2 teaspoons pure vanilla extract: Enhance and deepen the overall flavor profile with warm, aromatic notes that round out the sweetness and brighten the fruit, contributing a familiar baked-dessert aroma.
- 1 cup old fashioned rolled oats: Add hearty texture and chew to the topping, providing structure and a wholesome mouthfeel that crisps up in the oven to contrast the tender fruit.
- 3/4 cup chopped walnuts, almonds, or pecans (untoasted): Contribute crunch and a toasty, nutty richness to the topping while providing healthy fats and a satisfying contrast to the soft filling; leave untoasted to control final roast level.
- 1/2 cup almond flour or almond meal: Provide tender, buttery crumb structure and bind the topping ingredients together while contributing a mild nutty flavor and some additional fat for tenderness.
- 1/2 cup flaked coconut (I prefer unsweetened; sweetened works too): Introduce a light, tropical chew and subtle sweetness to the topping, balancing the nuts and oats while crisping up to add more textural contrast.
- 1/2 teaspoon ground cinnamon: Warm and aromatic spice that complements the fruit and nuts, enhancing the overall flavor without overpowering the natural blackberry brightness.
- 1/4 teaspoon kosher salt: Balance sweetness and amplify flavors by providing a small savory backbone that elevates the fruit and topping components without tasting salty.
- 1/3 cup extra virgin olive oil or melted coconut oil: Replace butter with a neutral oil to moisten and help bind the topping while adding richness and ensuring the topping crisps rather than remains greasy; choose oil for desired flavor notes.
- 1/3 cup honey or pure maple syrup: Add additional sweetening and help caramelize the topping during baking, creating a glossy, cohesive crumble that holds together and provides pleasant chew and crisp edges.
- Vanilla ice cream, frozen yogurt, or Greek yogurt or nonfat plain greek yogurt for breakfast: Serve as a cool, creamy accompaniment that contrasts the warm crisp; choose vanilla ice cream, frozen yogurt, or Greek yogurt to add creaminess, acidity, or protein depending on desired indulgence or breakfast suitability.
Making Blackberry Crisp
I like to move steadily and savor each part of the process when I make Blackberry Crisp. The oven preheats while I assemble the filling, and the rhythmic mixing of the topping helps me relax as the kitchen fills with a toasty, sweet scent. Below I’ve expanded each direction into detailed steps so you know what to look, smell, and listen for as you bake.
- Place a rack in the center of your oven and preheat to 350 degrees F. Lightly coat a deep 8×8-inch or similar baking dish with nonstick spray. Set aside.: As the oven warms to a steady 350 degrees F, you will notice the room gain a faint warmth and the oven indicator reach its set point. Preparing the dish ahead means you can work confidently when the fruit and topping are ready to assemble. Use a deep 8×8 inch baking dish so the filling has room to bubble without overflowing, and a light coat of nonstick spray prevents the sugars from sticking to the sides. A common mistake is waiting to preheat until after assembly, which can lengthen bake time and affect texture; always preheat first. If you hear any popping from the oven when it first heats, that is normal metal expansion. Visually, the interior should be evenly heated before you slide the dish in, and having the rack centered promotes even browning on the topping.
- Place the blackberries in a large mixing bowl, then scatter the cornstarch over the top. Add the honey and vanilla, then fold gently to combine.: When you scatter the cornstarch over cold or room temperature blackberries , you will see a powdery dusting that helps absorb juices as they release heat during baking. Drizzling the honey and adding the vanilla brings a glossy sheen and aromatic warmth to the berries. Fold gently so the berries remain intact and you do not crush them into puree; this keeps the texture interesting. You should notice a light, sticky coating on the fruit, and the mixture will smell floral and sweet from the honey and vanilla . A pitfall is overmixing, which breaks berries and makes the filling too thin; fold just until combined. If using frozen berries, do not thaw them first so they hold shape better and release juices gradually.
- Transfer to the prepared baking dish.: As you scrape the bowl into the dish the berries will settle into a glossy bed, and you may hear a soft sliding sound as the fruit shifts. Spreading them evenly helps the topping sit uniformly and bake consistently. Visually, aim for a level layer with berries reaching near the dish edges, leaving a little space so bubbling juices can rise without spilling heavily. Avoid piling fruit too high in the center, which can delay even cooking. If you notice too much excess syrup pooling, gently redistribute some berries to absorb it; the goal is an even, not soupy, layer.
- In a medium bowl, combine the oats, walnuts, almond meal, coconut, cinnamon, and salt.: When you mix these dry components, the aroma of cinnamon and toasted nuts will start to come forward, even before the oven is on. The texture will be coarse and crumbly, with visible flakes of coconut and pieces of chopped walnuts or chosen nuts. Combining them dry ensures even distribution so each bite gets oats, nuts, and coconut. A common error is adding wet ingredients too soon, which can clump the mixture; keep them separate until you are ready to moisten. Use a spoon or your fingers to check for uniformity; the mixture should look cohesive but not wet at this point.
- Drizzle the olive oil and honey over the top, then use a spatula to combine until the dry ingredients are evenly moistened. It will be thick and sticky.: As you add the oil and honey , watch the dry mix transform; the flakes and crumbs will take on a sheen and begin to cling together. The scent will deepen, with the oil lending roundness and the honey creating caramel notes during baking. Mixing until evenly moistened ensures the topping toasts uniformly and binds into crisp clusters, which is what gives that wonderful crackly texture. Avoid over wetting, which can make the topping soggy; it should be thick and sticky but not runny. If you see large pools of oil, fold a bit more to absorb them. A troubleshooting note: if your topping seems too dry once combined, add a teaspoon of oil at a time until the right consistency is reached.
- Spread the filling over the top.: Spoon and gently press the topping over the berry layer so it covers completely, creating pockets and peaks that will brown beautifully. The contrast between the ruby filling below and the pale oat topping above is delightful to see, and spreading by hand or spatula helps you control thickness for even baking. Expect a tactile feedback as the topping compresses slightly; that is normal. Do not press so hard that you compact the berries beneath, which can steam rather than bubble. If any fruit is exposed at the edges, tuck a few topping bits over to prevent excessive bubbling over the rim.
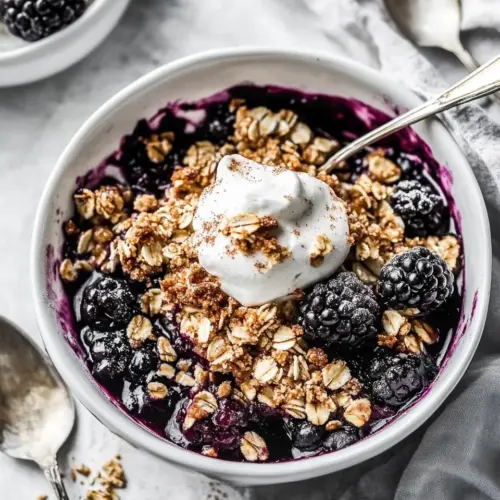
- Bake the crisp until the filling is hot and bubbly, about 45-55 minutes. Check the crisp at the 30-minute mark. If the topping becomes too brown, tent with foil, then continue baking until ready. Let rest for 10 minutes, then serve warm, smothered with vanilla ice cream, homemade whipped cream, or Greek yogurt.: During baking, you will notice the kitchen fill with a warm, fruity perfume and the topping slowly deepen to a golden brown. The telltale sign the crisp is done is vigorous bubbling from the center and edges, with the topping evenly browned. At 30 minutes check for over browning; if the peaks are getting too dark, gently tent foil to protect them while the interior finishes. Letting the dish rest for 10 minutes is crucial, because the filling will thicken as it cools slightly, making it easier to serve neat portions. A common mistake is slicing immediately, which yields loose, runny servings. Serve warm with a scoop of cold frozen treat or a dollop of Greek yogurt for contrast, and listen for the crunch as you serve: that sound is pure joy.
Ways to Customize
This section highlights thoughtful ways to make Blackberry Crisp your own while keeping the recipe reliable. Each tip begins with a bold phrase to help you scan quickly and decide which tweak fits your mood or pantry.
- Swap nuts freely Use walnuts, almonds, or pecans interchangeably to change the topping’s flavor profile without altering texture, choosing what’s freshest or most affordable.
- Choose your sweetener Opt for honey for floral notes or pure maple syrup for a deeper caramel nuance, both will brown nicely in the topping and pair beautifully with the fruit.
- Make it gluten friendly The recipe already leans gluten friendly when using almond flour and oats labeled gluten free, offering a hearty crisp without wheat.
- Adjust sweetness for tart berries If your blackberries are very tart, add a tablespoon more honey to the filling, tasting as you go to hit your preferred balance.
- Toasting adds depth Lightly toast the chopped nuts and coconut before mixing into the topping for intensified nutty notes and extra crunch.
- Make ahead option Assemble the topping and store it separately in an airtight container, then sprinkle over the berries and bake right before serving for fresh texture.
How to Serve Blackberry Crisp
I enjoy serving Blackberry Crisp both as a relaxed weekend breakfast and as a warm after dinner treat. The combination of warm fruit and crunchy topping invites a variety of accompaniments and occasions.
- Classic dessert service Serve warm with a generous scoop of vanilla ice cream to create a hot and cold contrast and showcase the crisp’s toasty topping.
- Breakfast bowl Spoon a portion over plain or nonfat Greek yogurt for a tangy, protein rich start to the day, adding freshness and balance.
- Casual gatherings Present the crisp family style in the baking dish with serving spoons, letting guests help themselves for relaxed entertaining.
- Storing leftovers Keep cooled leftovers in an airtight container in the refrigerator for up to four days, then reheat gently for a revived texture.
- Occasions This dish is ideal for summer brunches, casual dinners, and holiday breakfasts where fruit forward desserts are welcome.
- Seasonal pairing Pair with other seasonal fruits or a simple green salad for a light summer meal, or serve alongside coffee for a cozy afternoon treat.
FAQ
Conclusion
Blackberry Crisp shines because it balances juicy seasonal fruit with a toasty, nut filled topping that is both comforting and elegant. It is forgiving to make, flexible with ingredients, and rewarding every time you scoop a warm portion. I encourage you to try this version the next time blackberries are at their peak, or when you want an easy, shareable dessert that feels homemade and thoughtful. Enjoy the aromas that fill your kitchen, and savor the crispy contrast against the tender fruit.
Blackberry Crisp
Equipment
- Oven
- 8×8 inch baking dish
- Mixing Bowls
- Spatula
Ingredients
- 6 cups blackberries, fresh or frozen—do not thaw if frozen Provide juicy, tart-sweet fruit that forms the base of the crisp, releasing juices as it bakes and creating the filling’s texture and flavor; fresh or frozen both work, though frozen should remain unthawed to prevent excess sogginess.
- 2 tablespoons cornstarch Thicken the fruit juices by absorbing excess liquid during baking, helping the filling set and preventing a runny texture while allowing the berries to remain vibrant and intact.
- 1/3 cup honey or pure maple syrup Sweeten the fruit naturally while adding moisture and a glossy finish to the filling; honey or maple syrup also contributes subtle floral or caramel notes that complement the blackberries.
- 1 1/2 teaspoons pure vanilla extract Enhance and deepen the overall flavor profile with warm, aromatic notes that round out the sweetness and brighten the fruit, contributing a familiar baked-dessert aroma.
- 1 cup old fashioned rolled oats Add hearty texture and chew to the topping, providing structure and a wholesome mouthfeel that crisps up in the oven to contrast the tender fruit.
- 3/4 cup chopped walnuts, almonds, or pecans (untoasted) Contribute crunch and a toasty, nutty richness to the topping while providing healthy fats and a satisfying contrast to the soft filling; leave untoasted to control final roast level.
- 1/2 cup almond flour or almond meal Provide tender, buttery crumb structure and bind the topping ingredients together while contributing a mild nutty flavor and some additional fat for tenderness.
- 1/2 cup flaked coconut (I prefer unsweetened; sweetened works too) Introduce a light, tropical chew and subtle sweetness to the topping, balancing the nuts and oats while crisping up to add more textural contrast.
- 1/2 teaspoon ground cinnamon Warm and aromatic spice that complements the fruit and nuts, enhancing the overall flavor without overpowering the natural blackberry brightness.
- 1/4 teaspoon kosher salt Balance sweetness and amplify flavors by providing a small savory backbone that elevates the fruit and topping components without tasting salty.
- 1/3 cup extra virgin olive oil or melted coconut oil Replace butter with a neutral oil to moisten and help bind the topping while adding richness and ensuring the topping crisps rather than remains greasy; choose oil for desired flavor notes.
- 1/3 cup honey or pure maple syrup Add additional sweetening and help caramelize the topping during baking, creating a glossy, cohesive crumble that holds together and provides pleasant chew and crisp edges.
- Vanilla ice cream, frozen yogurt, or Greek yogurt or nonfat plain greek yogurt for breakfast Serve as a cool, creamy accompaniment that contrasts the warm crisp; choose vanilla ice cream, frozen yogurt, or Greek yogurt to add creaminess, acidity, or protein depending on desired indulgence or breakfast suitability.
Instructions
- Place a rack in the center of your oven and preheat to 350 degrees F. Lightly coat a deep 8×8-inch or similar baking dish with nonstick spray. Set aside.: As the oven warms to a steady 350 degrees F, you will notice the room gain a faint warmth and the oven indicator reach its set point. Preparing the dish ahead means you can work confidently when the fruit and topping are ready to assemble. Use a deep 8×8 inch baking dish so the filling has room to bubble without overflowing, and a light coat of nonstick spray prevents the sugars from sticking to the sides. A common mistake is waiting to preheat until after assembly, which can lengthen bake time and affect texture; always preheat first. If you hear any popping from the oven when it first heats, that is normal metal expansion. Visually, the interior should be evenly heated before you slide the dish in, and having the rack centered promotes even browning on the topping.
- Place the blackberries in a large mixing bowl, then scatter the cornstarch over the top. Add the honey and vanilla, then fold gently to combine.: When you scatter the cornstarch over cold or room temperature blackberries , you will see a powdery dusting that helps absorb juices as they release heat during baking. Drizzling the honey and adding the vanilla brings a glossy sheen and aromatic warmth to the berries. Fold gently so the berries remain intact and you do not crush them into puree; this keeps the texture interesting. You should notice a light, sticky coating on the fruit, and the mixture will smell floral and sweet from the honey and vanilla . A pitfall is overmixing, which breaks berries and makes the filling too thin; fold just until combined. If using frozen berries, do not thaw them first so they hold shape better and release juices gradually.
- Transfer to the prepared baking dish.: As you scrape the bowl into the dish the berries will settle into a glossy bed, and you may hear a soft sliding sound as the fruit shifts. Spreading them evenly helps the topping sit uniformly and bake consistently. Visually, aim for a level layer with berries reaching near the dish edges, leaving a little space so bubbling juices can rise without spilling heavily. Avoid piling fruit too high in the center, which can delay even cooking. If you notice too much excess syrup pooling, gently redistribute some berries to absorb it; the goal is an even, not soupy, layer.
- In a medium bowl, combine the oats, walnuts, almond meal, coconut, cinnamon, and salt.: When you mix these dry components, the aroma of cinnamon and toasted nuts will start to come forward, even before the oven is on. The texture will be coarse and crumbly, with visible flakes of coconut and pieces of chopped walnuts or chosen nuts. Combining them dry ensures even distribution so each bite gets oats, nuts, and coconut. A common error is adding wet ingredients too soon, which can clump the mixture; keep them separate until you are ready to moisten. Use a spoon or your fingers to check for uniformity; the mixture should look cohesive but not wet at this point.
- Drizzle the olive oil and honey over the top, then use a spatula to combine until the dry ingredients are evenly moistened. It will be thick and sticky.: As you add the oil and honey , watch the dry mix transform; the flakes and crumbs will take on a sheen and begin to cling together. The scent will deepen, with the oil lending roundness and the honey creating caramel notes during baking. Mixing until evenly moistened ensures the topping toasts uniformly and binds into crisp clusters, which is what gives that wonderful crackly texture. Avoid over wetting, which can make the topping soggy; it should be thick and sticky but not runny. If you see large pools of oil, fold a bit more to absorb them. A troubleshooting note: if your topping seems too dry once combined, add a teaspoon of oil at a time until the right consistency is reached.
- Spread the filling over the top.: Spoon and gently press the topping over the berry layer so it covers completely, creating pockets and peaks that will brown beautifully. The contrast between the ruby filling below and the pale oat topping above is delightful to see, and spreading by hand or spatula helps you control thickness for even baking. Expect a tactile feedback as the topping compresses slightly; that is normal. Do not press so hard that you compact the berries beneath, which can steam rather than bubble. If any fruit is exposed at the edges, tuck a few topping bits over to prevent excessive bubbling over the rim.
- Bake the crisp until the filling is hot and bubbly, about 45-55 minutes. Check the crisp at the 30-minute mark. If the topping becomes too brown, tent with foil, then continue baking until ready. Let rest for 10 minutes, then serve warm, smothered with vanilla ice cream, homemade whipped cream, or Greek yogurt.: During baking, you will notice the kitchen fill with a warm, fruity perfume and the topping slowly deepen to a golden brown. The telltale sign the crisp is done is vigorous bubbling from the center and edges, with the topping evenly browned. At 30 minutes check for over browning; if the peaks are getting too dark, gently tent foil to protect them while the interior finishes. Letting the dish rest for 10 minutes is crucial, because the filling will thicken as it cools slightly, making it easier to serve neat portions. A common mistake is slicing immediately, which yields loose, runny servings. Serve warm with a scoop of cold frozen treat or a dollop of Greek yogurt for contrast, and listen for the crunch as you serve: that sound is pure joy.
Notes
- Swap nuts freely Use walnuts, almonds, or pecans interchangeably to change the topping's flavor profile without altering texture, choosing what's freshest or most affordable.
- Choose your sweetener Opt for honey for floral notes or pure maple syrup for a deeper caramel nuance, both will brown nicely in the topping and pair beautifully with the fruit.
- Make it gluten friendly The recipe already leans gluten friendly when using almond flour and oats labeled gluten free, offering a hearty crisp without wheat.
- Adjust sweetness for tart berries If your blackberries are very tart, add a tablespoon more honey to the filling, tasting as you go to hit your preferred balance.
- Toasting adds depth Lightly toast the chopped nuts and coconut before mixing into the topping for intensified nutty notes and extra crunch.
- Make ahead option Assemble the topping and store it separately in an airtight container, then sprinkle over the berries and bake right before serving for fresh texture.