Better Than Anything Pumpkin Cake
Better Than Anything Pumpkin Cake landed on my kitchen counter one chilly October afternoon, and I can still remember the soft, spicy scent that filled the air as it baked. I was juggling a stack of mail and a toddler who insisted on sampling every fallen breadcrumb, yet that single tray of cake pulled me into a calmer rhythm. The blend of pumpkin and warm spices felt like a small ritual, something that anchored the day and invited everyone to pause.
Over the years I’ve made this cake for casual potlucks, a rushed school bake sale, and quiet Sunday tea, and each time it has a way of turning ordinary moments into something sticky sweet and memorable. I love the contrast between the tender crumb and the creamy layers that follow, and how a drizzle of caramel sauce makes the whole thing sing. Friends ask for the recipe constantly, and I always tell them it is the sort of dessert that travels well in both taste and affection.
Recipe Snapshot
35 mins
10 mins
25 mins
Medium
350 kcal
American
Gluten-Free, Low FODMAP
Desserts
9 X 13 inch baking dish, Wire rack, Large bowl, Hand mixer
The Appeal of This Better Than Anything Pumpkin Cake
1. Comforting autumn flavors everyone recognizes
I grew up with pumpkin desserts in the cooler months, and this cake captures that cozy, spiced warmth without being fussy. The pumpkin puree brings moistness and a mellow sweetness that pairs beautifully with the brown sugar and pumpkin pie spice. When I serve it, people always comment on how it tastes like fall in one bite.
2. Incredible texture contrast
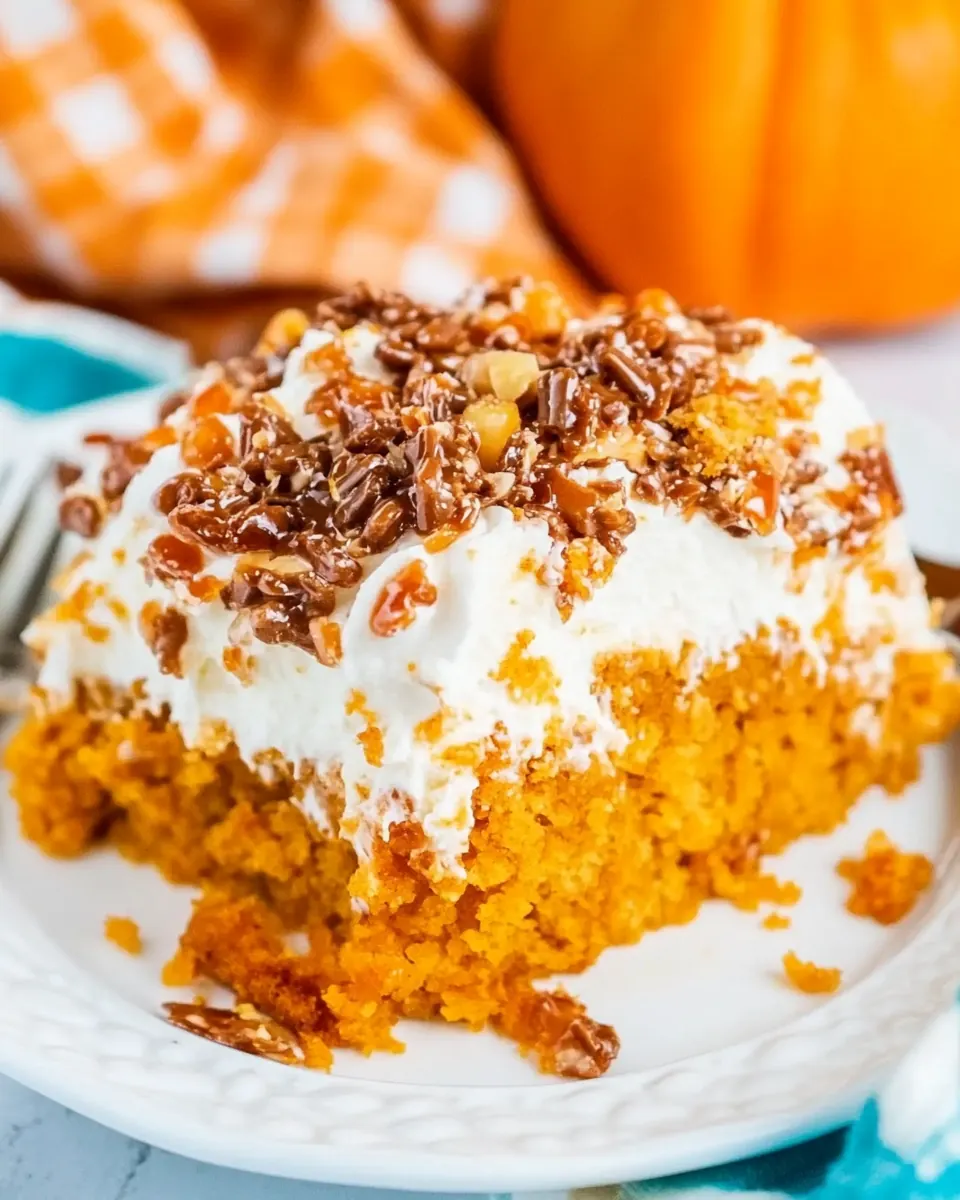
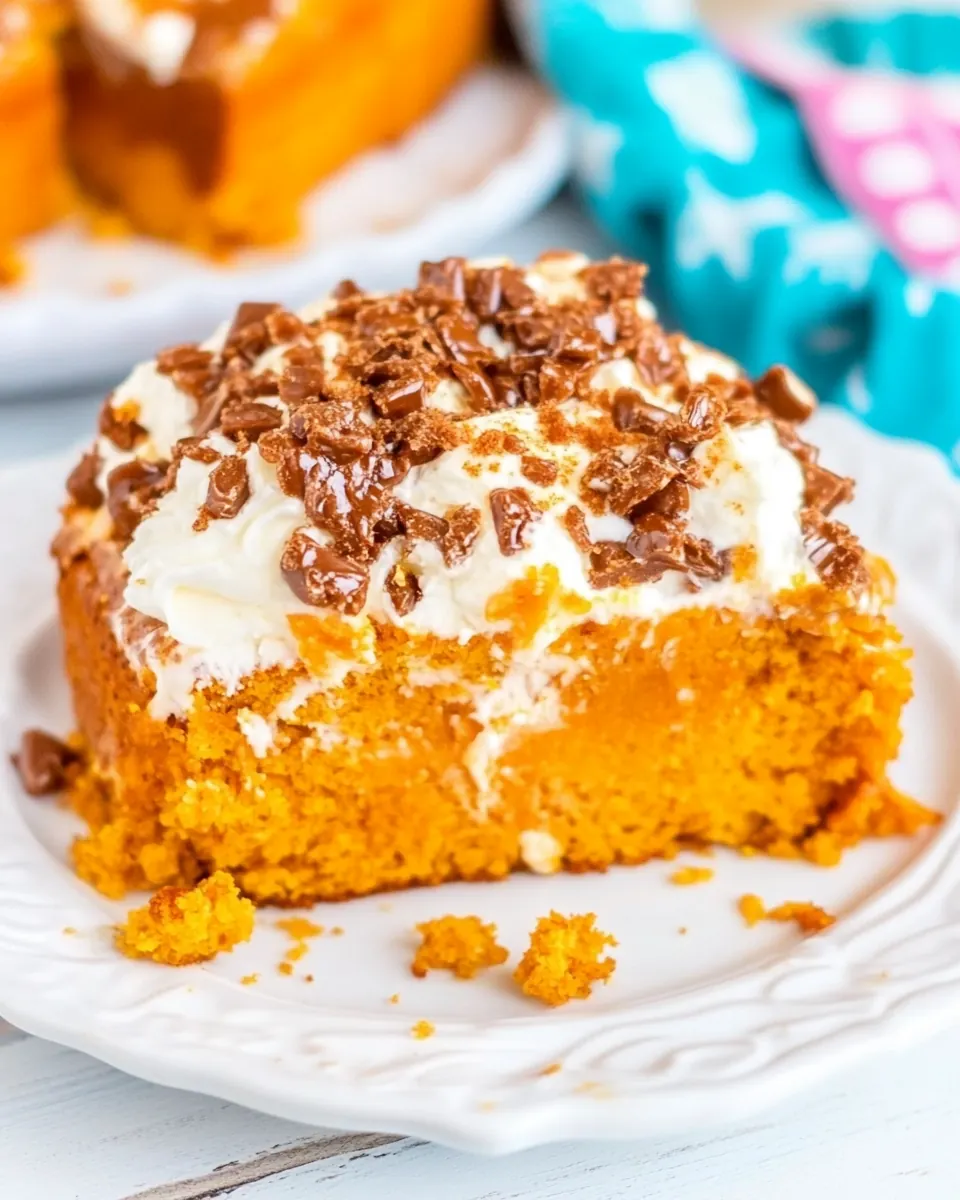
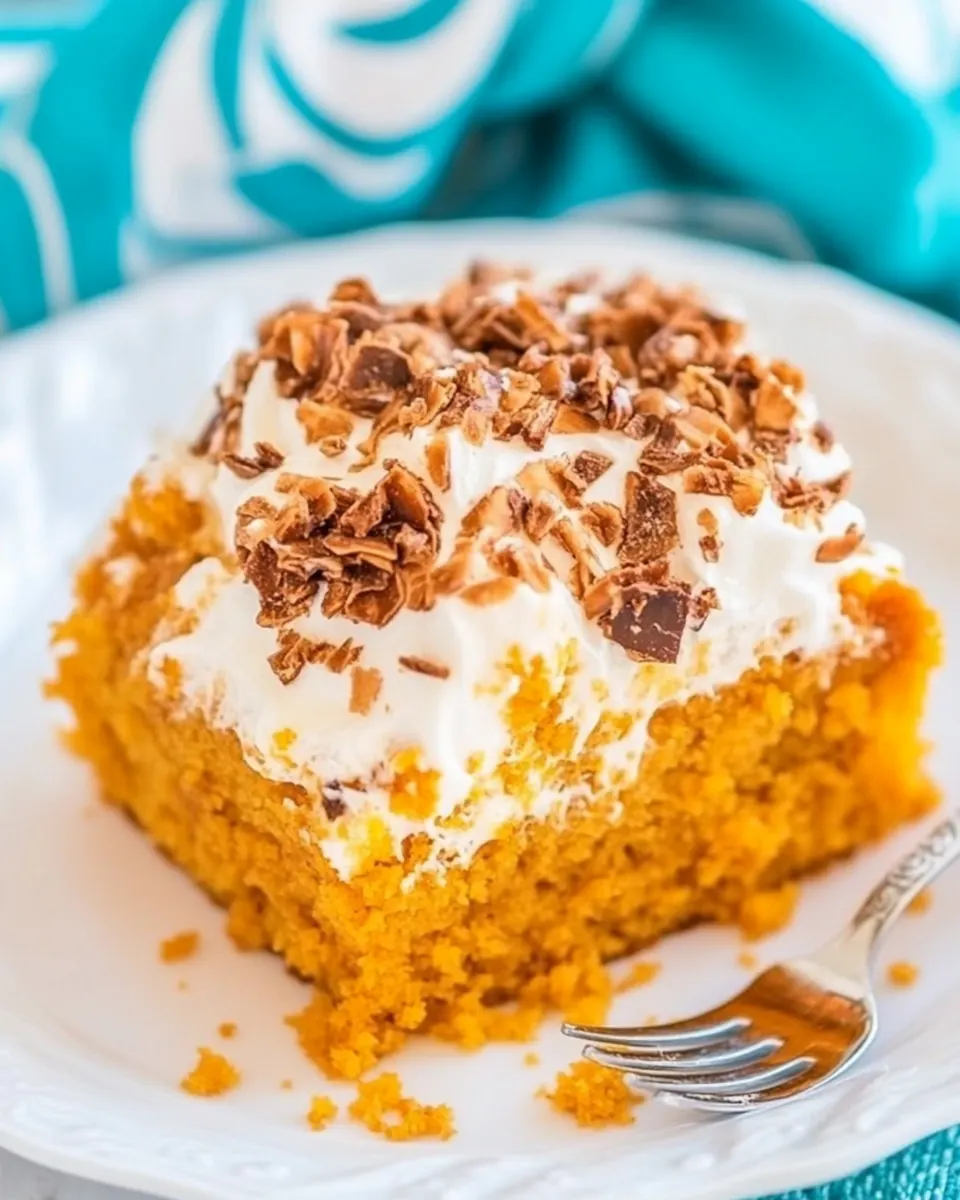
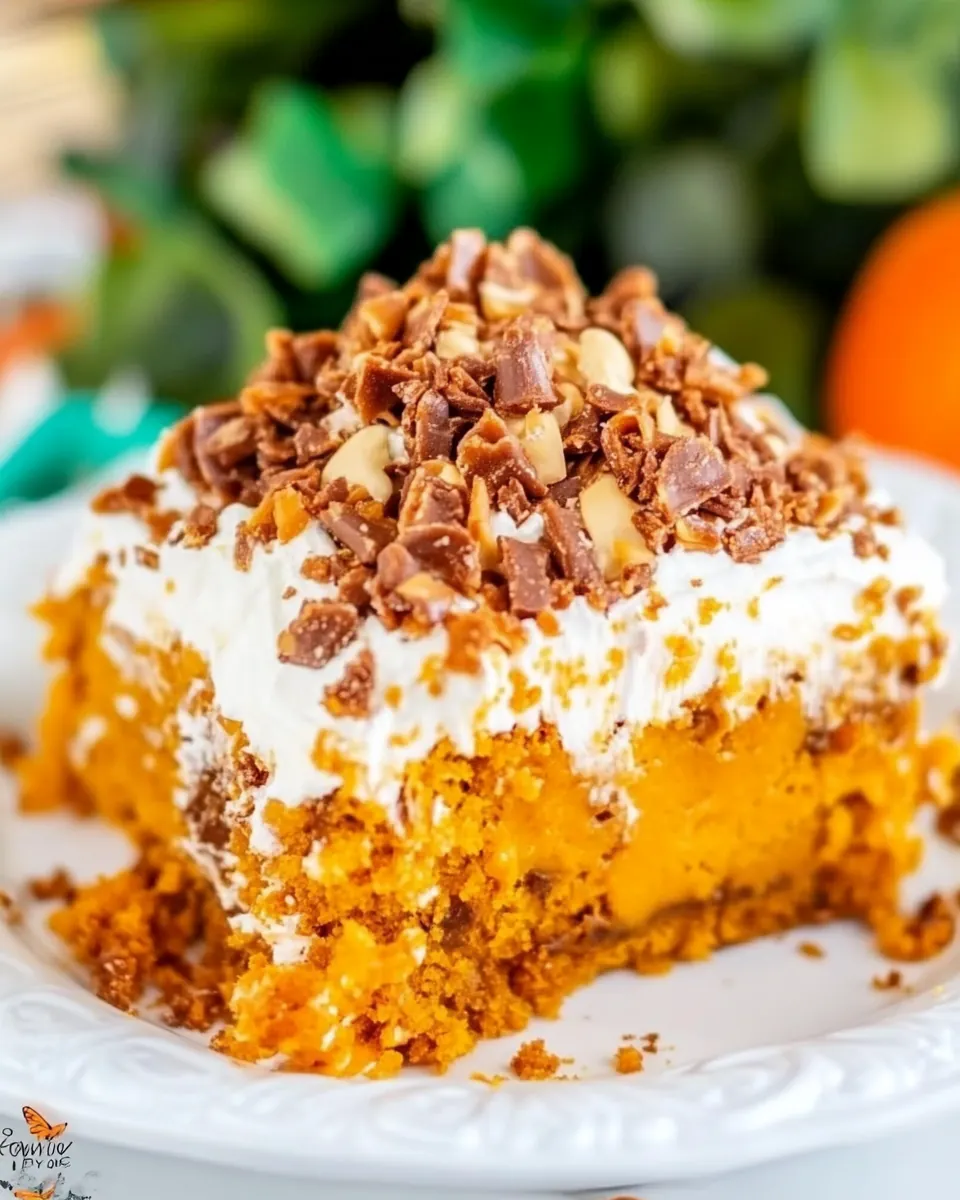
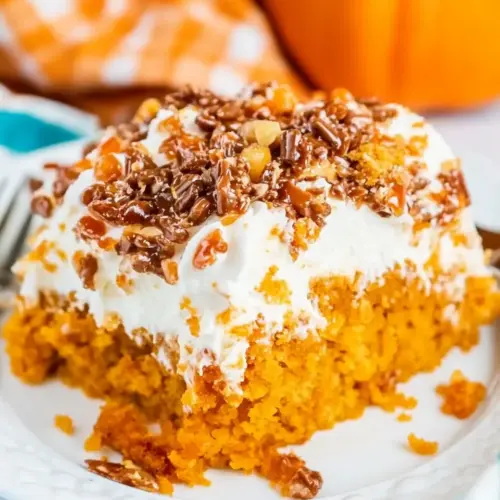
The way this recipe uses a boxed yellow cake mix for structure, then follows with a creamy soak and whipped layer, gives each forkful complexity. You get a tender cake base, pockets of sweetened condensed milk that have seeped in, and a pillowy top of whipped topping. I love how each bite alternates between cakey, creamy, and crunchy when the toffee bits arrive.
3. Fast to assemble, great to make ahead
From testing this in my busy kitchen, I found you can put the cake together quickly and rely on chill time to do the heavy lifting. That makes it perfect for busy hosts who want to prepare a dessert the day before. I often make it the night before so the flavors meld and the texture settles into something sliceable yet silky.
4. Crowd pleasing and adaptable
Whether I bring it to a Thanksgiving table or bring a pan to a neighbor, people respond to its nostalgic profile. The recipe plays well with simple swaps for toffee or caramel, so you can pick what your crowd loves. I usually keep a jar of caramel sauce nearby so guests can add more if they want an extra hit of sweetness.
5. Simple techniques, big payoff
You do not need advanced baking skills to succeed here. The directions rely on basic mixing, poking, and chilling, but when you follow those small techniques the result is reliably impressive. I appreciate recipes that let the ingredients do the heavy lifting, and this one does just that.
Ingredients to Make Better Than Anything Pumpkin Cake
These ingredients are deliberately straightforward, which is what makes the cake so approachable. The boxed yellow cake mix forms the reliable structure while the pumpkin puree adds moisture and autumnal flavor. Sticky elements like sweetened condensed milk and caramel sauce seep into the crumb to create creamy pockets, and the crunchy toffee bits introduce contrast. Together, the list balances texture and flavor so every slice is layered and satisfying.
- 15.25 ounces yellow cake mix 1 box, your favorite brand: Provides structure and sweetness for the cake batter; use a standard yellow cake mix to supply flour, leavening agents, and sugar that create a light crumb when baked. Enhance the mix by following package directions while incorporating wet ingredients evenly to avoid lumps and ensure uniform rise.
- 15 ounces pumpkin puree: Adds moistness and rich pumpkin flavor while contributing dense texture and natural moisture; use pure pumpkin puree rather than pumpkin pie filling for correct sweetness and consistency. Fold into the batter thoroughly to distribute flavor and prevent pockets of dry mix.
- 2 tablespoons brown sugar: Adds a touch of caramelized sweetness and depth to the batter; brown sugar contains molasses that complements pumpkin spice and enhances overall richness. Sprinkle or stir in evenly so the sugary flavor melds with the pumpkin without creating overly sweet spots.
- 1 teaspoon pumpkin pie spice: Provides warm, autumnal spice notes that amplify pumpkin flavor; pumpkin pie spice blends cinnamon, nutmeg, ginger, and cloves for balanced seasoning. Measure carefully to avoid overpowering the batter and sift or mix in to prevent clumping.
- 14 ounces sweetened condensed milk 1 can: Contributes creaminess and concentrated sweetness to produce a dense, custard-like topping or filling; sweetened condensed milk caramelizes slightly when baked and helps set textures. Pour evenly over the baked layer or incorporate as directed to achieve a glossy, sweet finish.
- 8 ounces frozen whipped topping thawed: Delivers light, airy creaminess and cooling contrast to the dense pumpkin cake; thawed frozen whipped topping offers a quick whipped cream substitute with stable volume. Fold gently or dollop on top to maintain fluffiness and add visual appeal.
- 1 cup toffee bits or Skor bits or chop up w Heath bars: Provides crunchy, buttery toffee flavor and textural contrast; toffee or Skor bits bring sweet, brittle shards that complement the soft cake and creamy toppings. Scatter evenly to ensure each bite includes crunchy morsels without sinking into the batter.
- 1 cup caramel sauce plus additional for serving: Adds sticky, buttery-sweet sauce for drizzling and richness; caramel sauce enhances the dessert with glossy sweetness and pairs well with pumpkin and toffee. Warm slightly for easier pouring and offer extra for serving so guests can add more to their slices.
Making Better Than Anything Pumpkin Cake
I like the straightforward flow of this recipe because it lets you focus on texture and timing rather than complicated technique. You will move from mixing to baking, then into a hands on assembly where the cake gets its signature soaked, chilled, and layered finish. Take your time with the cooling and poking steps because that is where the magic happens.
- Preheat the oven to 350°F. Spray a 9 X 13 inch baking dish with non-stick cooking spray and set aside.: As the oven warms you will notice a dry heat that primes the pan to promote even baking. The right oven temperature ensures the edges brown gently while the center cooks through, creating a uniformly tender crumb. Use an oven thermometer if yours runs hot or cold to avoid an overly dark crust or an underbaked middle. A common mistake is skipping the spray which can make removal messy; coat the dish well so slices lift cleanly.
- In a large bowl, mix together the yellow cake mix, pumpkin puree, brown sugar and pumpkin pie spice until combined and smooth but do not over mix. You can use a hand mixer here to make things easier.: The batter will smell warmly spiced as the pumpkin pie spice blooms and the pumpkin gives off a faint, earthy scent. Mixing until smooth distributes the moisture and flavor without developing gluten, which keeps the cake tender. If you overmix, the crumb can become gummy, so stop when streaks disappear and texture is uniform. A typical error is vigorous mixing; use short pulses with a hand mixer to maintain lightness.
- Transfer the cake batter to the prepared baking dish and spread evenly. Bake the cake for 20 to 25 minutes. An inserted toothpick should come out clean.: As the batter bakes you will see it rise slightly and the surface take on a pale golden color, releasing a sweet, spiced aroma. The toothpick test is your best cue for doneness; look for golden edges that pull away from the pan and a springy center. If the top is browning too quickly, tent with foil to prevent overcoloring. People sometimes underbake the center, so trust the toothpick rather than just time.
- Allow the cake to cool for 15 minutes on a wire rack.: During this rest the cake firms up and the internal steam redistributes, which makes it easier to poke and to hold the sweetened condensed milk. The surface will stop steaming and feel slightly springy to the touch. Removing it too soon from the pan can cause it to crumble, so let it settle on the rack. Avoid rushing to the next step while it is hot, because the holes will not hold properly.
- Poke holes all over the top of the cake about 1 inch apart and about halfway through the cake. You don't want to poke the holes through to the bottom of the cake. You can use the end of a wooden spoon or spatula to poke the holes.: The act of poking lets the sweetened condensed milk sink into the crumb, creating pockets of concentrated sweetness. Aim for even spacing so the soak distributes uniformly and each slice benefits. If you poke too deep you may create channels to the pan, which will make the milk pool on the bottom instead of soaking. Be deliberate and use a tool with a rounded end to control depth.
- Evenly pour the sweetened condensed milk over the top of the cake making sure it fills all of the holes you just created. Chill the cake in the fridge for 30 minutes to allow the sweetened condensed milk to soak into the cake.: As the milk settles it will sink with a glossy sheen into the tiny tunnels you created, and the surface will look moist but not drowned. Cooling the cake helps the milk stay where it should, soaking gradually into the crumb for a creamy interior. A common blunder is pouring too fast which leaves uneven saturation; take your time and tilt the pan slightly if needed for balance.
- Remove the cake from the fridge and carefully spread the whipped topping evenly over the top of the cake.: The whipped topping should be cool and airy, providing a cloudlike contrast to the dense, soaked cake below. Spread gently to keep its volume and create a smooth, even layer that will hold the toffee bits without sinking. If the topping is still too soft, chill briefly before spreading, because a runny layer will mix into the milk soaked top and lose its texture.
- Sprinkle the Heath bits over the top. Next, drizzle the caramel sauce over the top of the cake.: The toffee bits add a crisp, crunchy counterpoint and the caramel introduces a sticky, buttery gloss that binds the elements. Sprinkle evenly to avoid clumps of candy in one slice, and drizzle the caramel sauce in ribbons for visual appeal. Beware of overdoing the caramel, which can overwhelm the gentler pumpkin notes; a light hand creates balance.
- Finally, place the cake back in the fridge and allow it to chill for a minimum of 3 hours. If you have the time, this cake is truly at its best when it is made the day before and chilled overnight. Serve and enjoy!: As it chills the flavors meld and the textures unify into a sliceable, cohesive dessert with creamy pockets and crunchy accents. Overnight chilling encourages full absorption and a cleaner slice when serving. Cutting too soon will yield loose slices, so be patient and chill for the recommended time to get neat pieces. A final tip is to warm the caramel sauce slightly if it firms, for easy drizzling when serving.
Tips and Variations
This section offers ways to refine and adapt the cake while preserving its signature layers of flavor and texture. Whether you want bolder crunch, a lighter finish, or easier assembly, these tips help you make it your own without straying from the original spirit.
- Stabilized whipped topping: Use the gelatin method from the notes to stabilize the whipped topping for firmer slices when serving later in the day.
- Even drizzle: Warm the caramel sauce slightly so it flows into elegant ribbons rather than clumping in one spot, which also helps with presentation.
- Toffee distribution: Toss toffee bits with a tiny sprinkle of flour before adding to the top to prevent sinking into the whipped layer during chilling.
- Make ahead: Fully assemble the day before and chill overnight for best texture and flavor melding; this also frees up time on your serving day.
- Serving temperature: Serve chilled, but take the cake out 10 to 15 minutes before slicing to make cutting easier and to let the caramel sauce soften slightly.
Serving Suggestions
How you present this cake can turn a simple dessert into a focal point for gatherings. Think about complementary textures and occasions when planning service, and use chilled preparation to your advantage for neat slices. Below are ideas for pairings, occasions, and storage that suit the cake‘s profile.
- Holiday centerpiece: Serve the cake at a Thanksgiving dessert table alongside simple spiced coffee to echo the seasonal notes and give guests a familiar favorite.
- Casual potluck: Bring the cake in the baking dish with extra caramel sauce on the side so guests can drizzle more, making it a crowd pleasing, shareable treat.
- Family dessert: For a cozy dinner, slice and serve with warm mugs of tea or coffee to balance the chilled creaminess with a warm beverage.
- Storage: Keep the cake covered in the fridge for up to four days; the chilled environment preserves texture and keeps the whipped topping stable.
- Make ahead tip: Assemble the night before for best slices and flavor melding, which is perfect for busy hosts preparing for a big meal.
- Serving size guidance: With a yield of about 12 servings, cut moderately sized pieces so each guest enjoys the layered textures without feeling overwhelmed.
- Seasonal pairing: This cake feels appropriate for fall gatherings and special occasions when warm, spiced desserts are welcome.
FAQ
Conclusion
This cake stands out because it pairs simple assembly with deeply comforting autumn flavors. It is ideal for busy hosts who want an impressive, make ahead dessert that still feels homemade and rich. Try making it the night before so the layers fully meld and guests can enjoy clean, creamy slices that combine tender cake, sweet pockets, and crunchy toffee. Serve chilled with an extra drizzle of caramel for the final flourish, and watch how quickly it becomes a requested classic.
Better Than Anything Pumpkin Cake
Equipment
- 9 x 13 inch baking dish
- Wire Rack
- Large Bowl
- Hand Mixer
Ingredients
- 15.25 ounces yellow cake mix 1 box, your favorite brand Provides structure and sweetness for the cake batter; use a standard yellow cake mix to supply flour, leavening agents, and sugar that create a light crumb when baked. Enhance the mix by following package directions while incorporating wet ingredients evenly to avoid lumps and ensure uniform rise.
- 15 ounces pumpkin puree Adds moistness and rich pumpkin flavor while contributing dense texture and natural moisture; use pure pumpkin puree rather than pumpkin pie filling for correct sweetness and consistency. Fold into the batter thoroughly to distribute flavor and prevent pockets of dry mix.
- 2 tablespoons brown sugar Adds a touch of caramelized sweetness and depth to the batter; brown sugar contains molasses that complements pumpkin spice and enhances overall richness. Sprinkle or stir in evenly so the sugary flavor melds with the pumpkin without creating overly sweet spots.
- 1 teaspoon pumpkin pie spice Provides warm, autumnal spice notes that amplify pumpkin flavor; pumpkin pie spice blends cinnamon, nutmeg, ginger, and cloves for balanced seasoning. Measure carefully to avoid overpowering the batter and sift or mix in to prevent clumping.
- 14 ounces sweetened condensed milk 1 can Contributes creaminess and concentrated sweetness to produce a dense, custard-like topping or filling; sweetened condensed milk caramelizes slightly when baked and helps set textures. Pour evenly over the baked layer or incorporate as directed to achieve a glossy, sweet finish.
- 8 ounces frozen whipped topping thawed Delivers light, airy creaminess and cooling contrast to the dense pumpkin cake; thawed frozen whipped topping offers a quick whipped cream substitute with stable volume. Fold gently or dollop on top to maintain fluffiness and add visual appeal.
- 1 cup toffee bits or Skor bits or chop up w Heath bars Provides crunchy, buttery toffee flavor and textural contrast; toffee or Skor bits bring sweet, brittle shards that complement the soft cake and creamy toppings. Scatter evenly to ensure each bite includes crunchy morsels without sinking into the batter.
- 1 cup caramel sauce plus additional for serving Adds sticky, buttery-sweet sauce for drizzling and richness; caramel sauce enhances the dessert with glossy sweetness and pairs well with pumpkin and toffee. Warm slightly for easier pouring and offer extra for serving so guests can add more to their slices.
Instructions
- Preheat the oven to 350°F. Spray a 9 X 13 inch baking dish with non-stick cooking spray and set aside.: As the oven warms you will notice a dry heat that primes the pan to promote even baking. The right oven temperature ensures the edges brown gently while the center cooks through, creating a uniformly tender crumb. Use an oven thermometer if yours runs hot or cold to avoid an overly dark crust or an underbaked middle. A common mistake is skipping the spray which can make removal messy; coat the dish well so slices lift cleanly.
- In a large bowl, mix together the yellow cake mix, pumpkin puree, brown sugar and pumpkin pie spice until combined and smooth but do not over mix. You can use a hand mixer here to make things easier.: The batter will smell warmly spiced as the pumpkin pie spice blooms and the pumpkin gives off a faint, earthy scent. Mixing until smooth distributes the moisture and flavor without developing gluten, which keeps the cake tender. If you overmix, the crumb can become gummy, so stop when streaks disappear and texture is uniform. A typical error is vigorous mixing; use short pulses with a hand mixer to maintain lightness.
- Transfer the cake batter to the prepared baking dish and spread evenly. Bake the cake for 20 to 25 minutes. An inserted toothpick should come out clean.: As the batter bakes you will see it rise slightly and the surface take on a pale golden color, releasing a sweet, spiced aroma. The toothpick test is your best cue for doneness; look for golden edges that pull away from the pan and a springy center. If the top is browning too quickly, tent with foil to prevent overcoloring. People sometimes underbake the center, so trust the toothpick rather than just time.
- Allow the cake to cool for 15 minutes on a wire rack.: During this rest the cake firms up and the internal steam redistributes, which makes it easier to poke and to hold the sweetened condensed milk. The surface will stop steaming and feel slightly springy to the touch. Removing it too soon from the pan can cause it to crumble, so let it settle on the rack. Avoid rushing to the next step while it is hot, because the holes will not hold properly.
- Poke holes all over the top of the cake about 1 inch apart and about halfway through the cake. You don't want to poke the holes through to the bottom of the cake. You can use the end of a wooden spoon or spatula to poke the holes.: The act of poking lets the sweetened condensed milk sink into the crumb, creating pockets of concentrated sweetness. Aim for even spacing so the soak distributes uniformly and each slice benefits. If you poke too deep you may create channels to the pan, which will make the milk pool on the bottom instead of soaking. Be deliberate and use a tool with a rounded end to control depth.
- Evenly pour the sweetened condensed milk over the top of the cake making sure it fills all of the holes you just created. Chill the cake in the fridge for 30 minutes to allow the sweetened condensed milk to soak into the cake.: As the milk settles it will sink with a glossy sheen into the tiny tunnels you created, and the surface will look moist but not drowned. Cooling the cake helps the milk stay where it should, soaking gradually into the crumb for a creamy interior. A common blunder is pouring too fast which leaves uneven saturation; take your time and tilt the pan slightly if needed for balance.
- Remove the cake from the fridge and carefully spread the whipped topping evenly over the top of the cake.: The whipped topping should be cool and airy, providing a cloudlike contrast to the dense, soaked cake below. Spread gently to keep its volume and create a smooth, even layer that will hold the toffee bits without sinking. If the topping is still too soft, chill briefly before spreading, because a runny layer will mix into the milk soaked top and lose its texture.
- Sprinkle the Heath bits over the top. Next, drizzle the caramel sauce over the top of the cake.: The toffee bits add a crisp, crunchy counterpoint and the caramel introduces a sticky, buttery gloss that binds the elements. Sprinkle evenly to avoid clumps of candy in one slice, and drizzle the caramel sauce in ribbons for visual appeal. Beware of overdoing the caramel, which can overwhelm the gentler pumpkin notes; a light hand creates balance.
- Finally, place the cake back in the fridge and allow it to chill for a minimum of 3 hours. If you have the time, this cake is truly at its best when it is made the day before and chilled overnight. Serve and enjoy!: As it chills the flavors meld and the textures unify into a sliceable, cohesive dessert with creamy pockets and crunchy accents. Overnight chilling encourages full absorption and a cleaner slice when serving. Cutting too soon will yield loose slices, so be patient and chill for the recommended time to get neat pieces. A final tip is to warm the caramel sauce slightly if it firms, for easy drizzling when serving.
Notes
- Stabilized whipped topping: Use the gelatin method from the notes to stabilize the whipped topping for firmer slices when serving later in the day.
- Even drizzle: Warm the caramel sauce slightly so it flows into elegant ribbons rather than clumping in one spot, which also helps with presentation.
- Toffee distribution: Toss toffee bits with a tiny sprinkle of flour before adding to the top to prevent sinking into the whipped layer during chilling.
- Make ahead: Fully assemble the day before and chill overnight for best texture and flavor melding; this also frees up time on your serving day.
- Serving temperature: Serve chilled, but take the cake out 10 to 15 minutes before slicing to make cutting easier and to let the caramel sauce soften slightly.