Banana Bread Cinnamon Rolls
Banana Bread Cinnamon Rolls started as my sleepy weekend experiment when I had ripe bananas and a stubborn sweet tooth, and it quickly became the recipe I reach for when I want something comforting and a little adventurous. The first time I baked these I remember the kitchen filling with a warm, bakery like aroma, the promise of soft, pillowy dough wrapped around a sweet banana filling. My family gathered at the counter, and we traded stories while I sliced the rolls, testing the icing on each finger. That immediate, messy joy sealed this as one of my favorite make ahead treats.
There is something about combining the familiar texture of banana bread with the oozy spiral of a classic cinnamon roll that feels like a clever shortcut to happiness. I like to think of these as portable memories, bites that travel from morning coffee to dessert plates. Over time I tweaked the dough so it stays tender yet strong enough to hold a generous filling, and I always toast the nuts a touch longer for a whisper of crunch. If you are juggling guests or a busy morning, these rolls can be mixed and set to rise overnight, so you wake up to a practically finished bake.
Recipe Snapshot
60 mins
30 mins
30 mins
Hard
200 kcal
American
Vegan, Gluten-Free
Breakfast
9×13 inch baking dish, Stand mixer with dough hook, Rolling pin, Mixing bowls, Oven
The Charm of This Banana Bread Cinnamon Rolls
Comfort That Feels Homemade
I love how Banana Bread Cinnamon Rolls bring the nostalgia of slow mornings into a quick, repeatable bake. The blend of soft banana in the filling with the tender dough creates a texture that hugs the palate, and every bite feels like a homemade hug.
Practical Make Ahead Magic
We often need desserts that can be prepared in advance, and these rolls fit that need perfectly. You can shape them, refrigerate overnight, and bake fresh in the morning. I find that the flavors deepen with a cold rise, so the next day the cinnamon and banana tastes feel more integrated.
Flexible and Inclusive
The recipe is vegan friendly while still delivering rich, lush results. Replacing dairy with vegan alternatives does not sacrifice creaminess, and the frosting made with plant based ingredients becomes irresistibly smooth and spreadable, so I can share these with a wide range of friends.
Textural Contrast
These rolls are more than soft dough and sweet filling. I add chopped nuts for a toasty crunch, and that difference in texture keeps each mouthful interesting. I personally prefer walnuts toasted lightly, because they bring out an almost caramel like note that pairs beautifully with the banana.
Great for Entertaining
I often turn to Banana Bread Cinnamon Rolls when hosting brunch because they are showy yet straightforward. They deliver an impressive spread with minimal stress, and the scent alone announces something special is on the table.
Everything You Need for Banana Bread Cinnamon Rolls
The ingredients here balance structure, flavor, and moisture to create rolls that are tender yet resilient. The dry elements give the dough its backbone, the liquids and mashed banana add richness and tenderness, and the fats create a soft crumb and glossy filling. Each ingredient plays a clear role, from the yeast that lends lift to the brown sugar that caramelizes into pockets of sweet, sticky goodness.
- 3/4 cups oy milk warmed to 115 degrees F: Warm to 115 degrees F to activate yeast and help dissolve sugars; provides the liquid base and slight richness for the dough.
- 1 teaspoon vanilla extract: Add for sweet floral notes and depth in aroma; enhances the overall flavor profile of the bread and filling.
- 4 cups all purpose flour plus more for rolling.: Sift or measure into the dough to build structure and gluten formation; reserve extra for dusting when rolling to prevent sticking.
- 1/4 cup granulated sugar: Sprinkle into the dough and some into the filling to provide sweetness and tenderize the crumb.
- 3 1/2 teaspoons active yeast: Bloom into the warm milk to leaven the dough; ensures a light, airy roll texture when properly proofed.
- 1 teaspoon cinnamon: Incorporate into the dough for warm spice undertones that complement banana and cinnamon filling flavors.
- 1/2 teaspoon kosher salt: Dissolve into the dough mixture to control yeast activity and strengthen flavor; balances sweetness and enhances texture.
- 3/4 cup mashed ripe banana (about 2 medium bananas): Mash and fold into the dough to add moisture, natural sweetness, and banana flavor while contributing to a tender crumb.
- 4 tablespoons vegan butter softened, cut in tablespoons: Cut into the dough or use in the filling to add buttery richness and help create a soft, flaky texture.
- 1/4 cup vegan butter softened: Soften and spread into the filling or on top for extra buttery flavor and moisture in the swirl and crumb.
- 1/2 packed cup dark brown sugar: Pack into the filling to create a deep, molasses-like sweetness that pairs well with cinnamon and banana.
- 1 tablespoon ground cinnamon: Sprinkle into the filling to reinforce warm spice flavors and create a classic cinnamon roll profile.
- 1 2 bananas thinly sliced: Layer sliced into the rolls for pockets of fresh banana texture and mild sweetness throughout the pastry.
- 1/2 cup walnuts or pecans chopped: Fold into the filling or sprinkle between layers to add crunch, earthy flavor, and contrast to the soft rolls.
- 1/4 cup vegan butter softened: Soften and use in the glaze or to dot on rolls for additional buttery richness and flavor depth.
- 4 ounces cream cheese at room temperature: Bring to room temperature and beat into the frosting to create a tangy, creamy base for the glaze.
- 1 cup powdered sugar: Sift or beat into the cream cheese frosting to achieve the desired sweetness and smooth texture.
- 1 teaspoon vanilla extract or vanilla paste: Stir in for sweet vanilla aroma and to round out the frosting’s flavor; can also enhance perceived sweetness.
- 2 tablespoons chopped walnuts for garnish () (optional): Chop and sprinkle as an optional finishing touch to add texture, visual appeal, and a nutty crunch on top.
Cooking Method for Banana Bread Cinnamon Rolls
I find the technique matters as much as the ingredients when making Banana Bread Cinnamon Rolls. The method below walks you through each phase, from activating the yeast to frosting the warm rolls. Take your time at the staging points, and use sensory cues to know when to move to the next step.
- Prep: Grease or spray a 9×13” baking dish with butter or oil and set aside. Make sure the butter is softened for both the dough and filling before starting the recipe.: Grease or spray a 9×13” baking dish with butter or oil and set aside : The kitchen will smell faintly of oil or butter when the dish is ready, and using a well greased pan prevents the bottoms from sticking while helping the rolls brown evenly. This step matters because stuck rolls tear and lose their neat spiral shape, so be generous with the grease. A common mistake here is skimping on the greasing which leads to roll tearing during serving, so coat the pan well and set it nearby so it's ready when you transfer the cut rolls.
- Mash the Banana: Peel the bananas and break them into chunks in a medium bowl. Use a fork to mash the bananas, then give the mixture a vigorous stir to break up the fibers even more; the finished mash should look glossy. Measure out 3/4 cup of mashed banana and save the remainder for smoothies or compost.: Peel the bananas and break them into chunks in a medium bowl : The mashed banana should be glossy and slightly lumpy, with a sweet, fruity aroma that signals ripeness. When you vigorously stir to break fibers, you release natural sugars that contribute to browning and flavor depth. This step matters because uneven mash can create pockets of raw fruit; avoid overdoing the mashing which can make the dough too wet and sticky.
- Warm the Milk: Warm the milk and vanilla in a small pot on the stovetop until they reach between 110-115 F (just when the milk starts to steam). Alternatively, combine the milk and vanilla in a small bowl and microwave for 45 seconds. Set aside.: Warm the milk and vanilla in a small pot on the stovetop until they reach between 110-115 F : You will notice a faint steam and a hand warm temperature when the milk is perfect, and the vanilla lifts the scent into a gentle floral note. The warmth wakes the yeast, ensuring active fermentation; if the milk is hotter than 120 F you risk killing the yeast. A typical error is overheating, so test with a thermometer or the back of your wrist.
- Dry Ingredients: Whisk the flour, sugar, cinnamon, and yeast together in the bowl of a standing mixer with a dough hook attachment. Sprinkle the salt on top.: Whisk the flour, sugar, cinnamon, and yeast together in the bowl of a standing mixer with a dough hook attachment : The dry mixture will smell of cinnamon and sugar, and whisking ensures even distribution so the yeast and salt do not clump. This evenness is crucial because it influences how uniformly the dough rises. A common pitfall is adding salt directly on the yeast, which can inhibit it, so sprinkle the salt on top as instructed.
- Wet Ingredients: Add the mashed banana and warmed milk to the bowl.: Add the mashed banana and warmed milk to the bowl : When the wet elements hit the flour, you will see the mix begin to coalesce into shaggy dough with a sweet, yeasty scent. This combination is important for hydration and flavor fusion; too much added liquid can make the dough slack, so aim for a cohesive, slightly tacky texture. One mistake I often see is rushing to add all butter at once, which prevents proper incorporation.
- Knead: Knead the dough on medium-low speed for 8 to 10 minutes in total. Once all of the flour has been incorporated with the wet ingredients, begin to add the butter 1 tablespoon at a time. Wait until the butter has been fully incorporated into the dough (about 1 minute) before adding the next tablespoon. (Note: I like to prep all of the filling ingredients and slice my bananas while the dough is kneading): Knead the dough on medium-low speed for 8 to 10 minutes in total : As you knead, the dough will change from sticky to smooth and elastic, and you may hear a faint, rubbery tear as gluten develops. Adding the softened vegan butter tablespoon by tablespoon lets it emulsify into the dough, creating a tender, layered crumb. This matters because even incorporation prevents greasy pockets; a common error is adding butter too quickly which leaves streaks in the dough.
- Roll: The dough should look and feel smooth when ready (if not, knead for an additional 2 to 4 minutes). Dust your work surface and a rolling pin with flour, then transfer the dough to the work surface. Sprinkle the dough with a little flour and roll it out until it forms a 12×20” (30×50 cm) rectangle.: Dust your work surface and a rolling pin with flour, then transfer the dough to the work surface : The rolled dough should feel supple and stretch without snapping back immediately, and you will see a uniform 12×20” rectangle form. Proper rolling creates an even thickness so filling spreads predictably, which is why flouring the surface is important to avoid tearing. If the dough fights back, rest it for a few minutes to relax the gluten instead of forcing it.
- Fill: Mix the brown sugar and cinnamon together in a small bowl, then set aside. Use a spatula or offset spatula to spread the butter over the dough, leaving a 1/2" border on one long side of the dough. Sprinkle the sugar mix evenly over the butter, gently pressing into the butter so it sticks. Top the sugar mixture with the sliced banana and walnuts (if using).: Mix the brown sugar and cinnamon together in a small bowl, then set aside : The sugar mixture will smell rich and molasses forward, and spreading softened vegan butter over the dough creates a lacquer that helps the sugar adhere. Tucking sliced banana and nuts into the filling adds texture and bursts of flavor as the rolls bake. A mistake to avoid is overloading the filling which can make the center too wet and cause leaking during baking.
- Roll: Starting with the long edge that has no free border, roll the dough toward the long edge with the bare border. Pinch the dough ends together to seal the cinnamon roll better.: Starting with the long edge that has no free border, roll the dough toward the long edge with the bare border : As you roll, you should feel the layers compress slightly and hear a soft sigh of air escaping from between layers. Pinching the seam is critical to keep the roll from unraveling while baking, this secures the spiral for neat slices. A common slip is not sealing the seam well, leading to unrolled or loose slices after cutting.
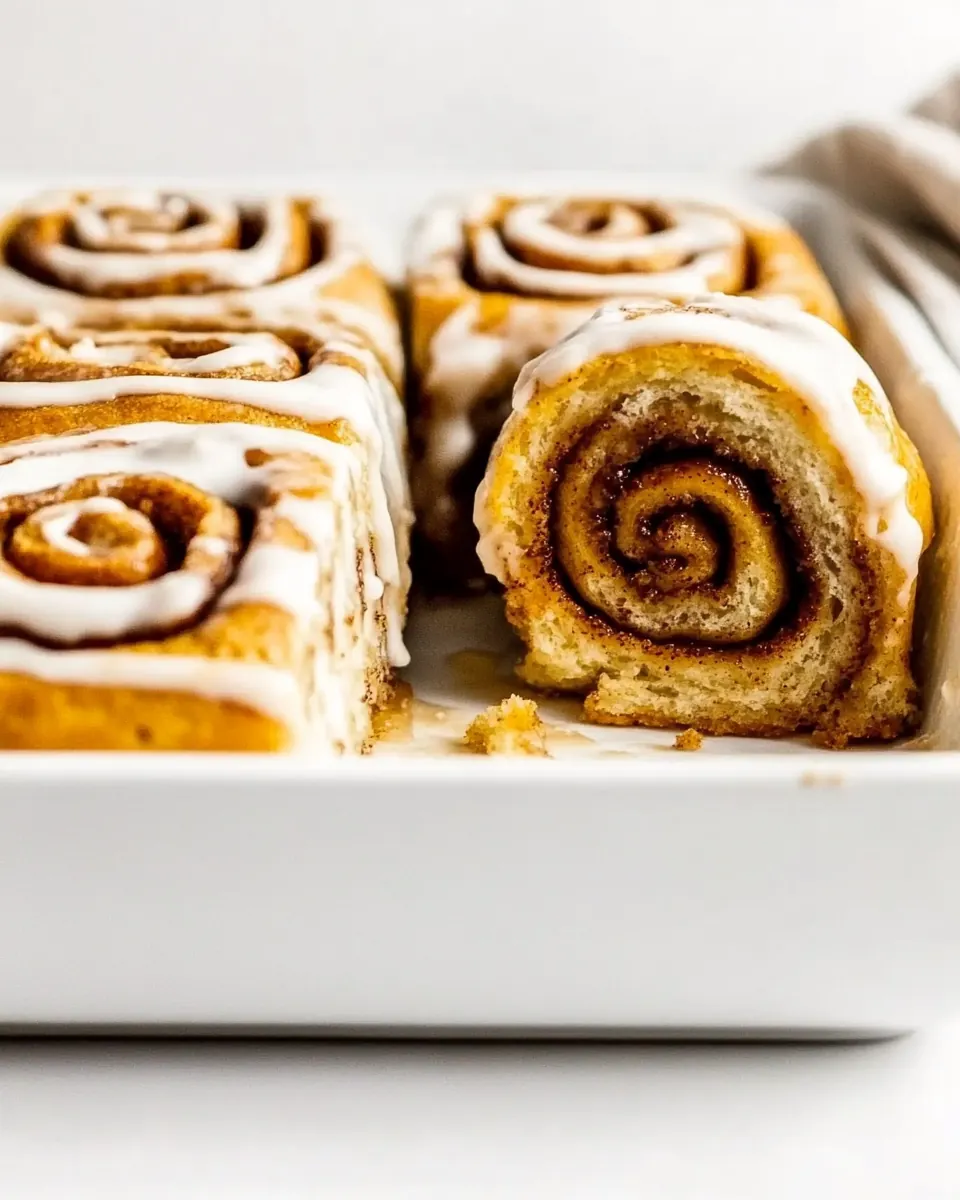
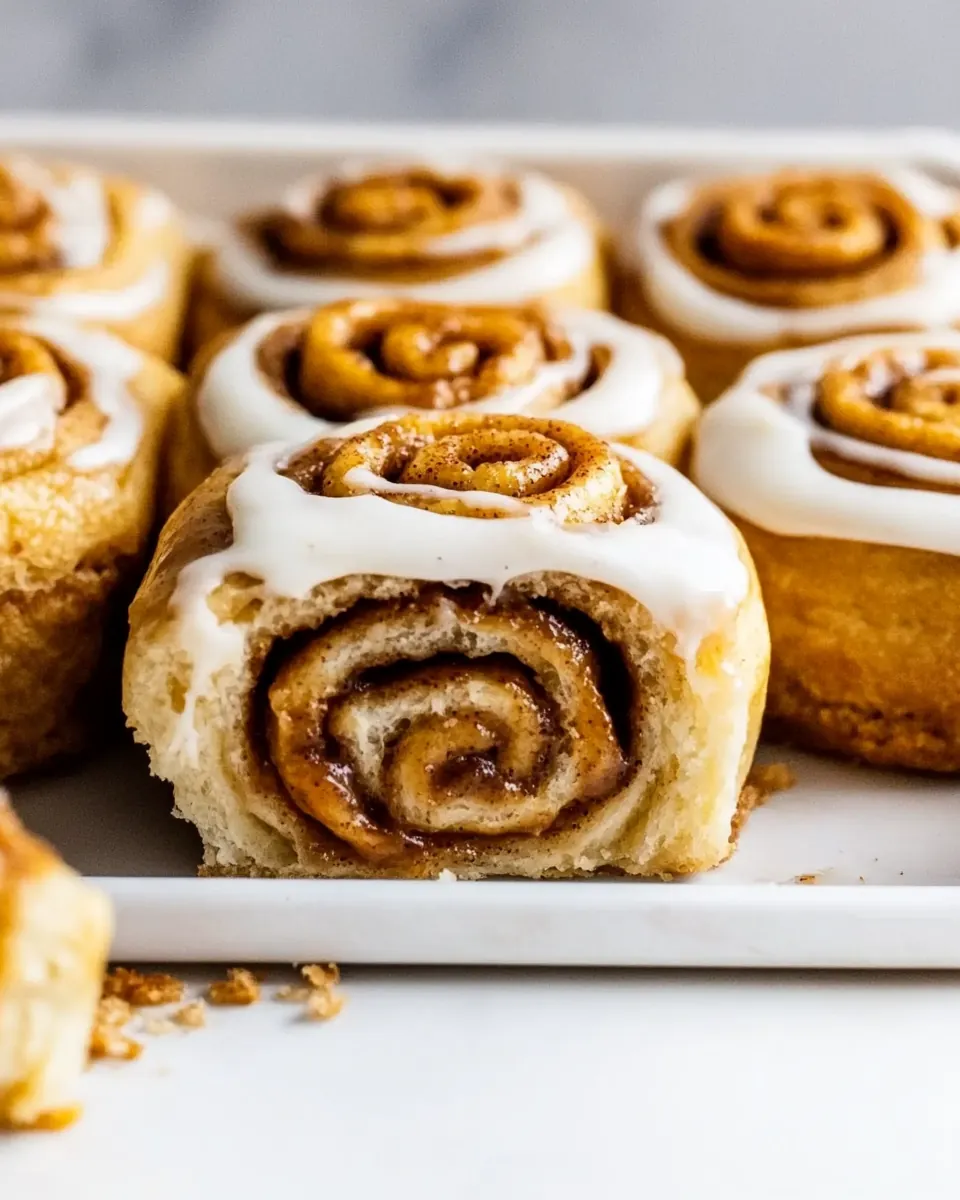
- Slice: Slice the rolls into 12 even pieces by using a long string of dental floss; slide the floss under the roll, then “cross” the two free ends over the top and pull down to create a clean slice. You can also use a sharp knife to slice the rolls, but they won’t look as neat. I find the easiest way to make slices is to cut the roll in half first, then each of those rolls in half again. You should now have 4 even rolls; cut each of these rolls into thirds to create 12 even slices.: Slice the rolls into 12 even pieces by using a long string of dental floss : Using floss yields clean, smooth edges without squashing the roll, and you should see tight spirals reveal themselves with minimal drag. Clean slices bake more evenly and look professional. If slices get misshapen, try cutting the larger roll in halves first, as described, instead of forcing a single long cut.
- Rise: Transfer the rolls into the prepared baking sheet. Cover with plastic wrap and let rise in a warm place for 1 hour, until the rolls have almost doubled in size.: Transfer the rolls into the prepared baking sheet : As the rolls rise covered, they will puff and the seams will relax, and you should notice a soft, pillowy texture when gently pressed. This final rise determines lightness, so allow the rolls to nearly double; under proofed rolls will be dense and overly compact. Avoid drafts and cold spots, which cause uneven rising.
- Overnight Option: Immediately transfer the covered rolls to the fridge and store chilled for 10 to 12 hours. Let the rolls come to room temperature on the counter for 30 minutes before baking.: Immediately transfer the covered rolls to the fridge and store chilled for 10 to 12 hours : Chilling transforms the flavors as fermentation continues slowly, producing deeper notes; the dough will be firm and cool to the touch in the morning. This is handy for prepping the night before, but make sure you return them to room temperature for about 30 minutes before baking to ensure even oven spring. A frequent mistake is baking straight from cold which yields uneven rise.
- Preheat: While the rolls rise, preheat the oven to 350 F. I also recommend removing the frosting ingredients from the fridge at this time, so they have time to soften.: While the rolls rise, preheat the oven to 350 F : The oven should feel reliably hot and stable before you put the rolls in, which ensures immediate oven spring and even baking. I also remove frosting ingredients to soften so they blend smoothly later. Preheating matters because an underheated oven delays rising and ruins texture; check your oven thermometer if uncertain.
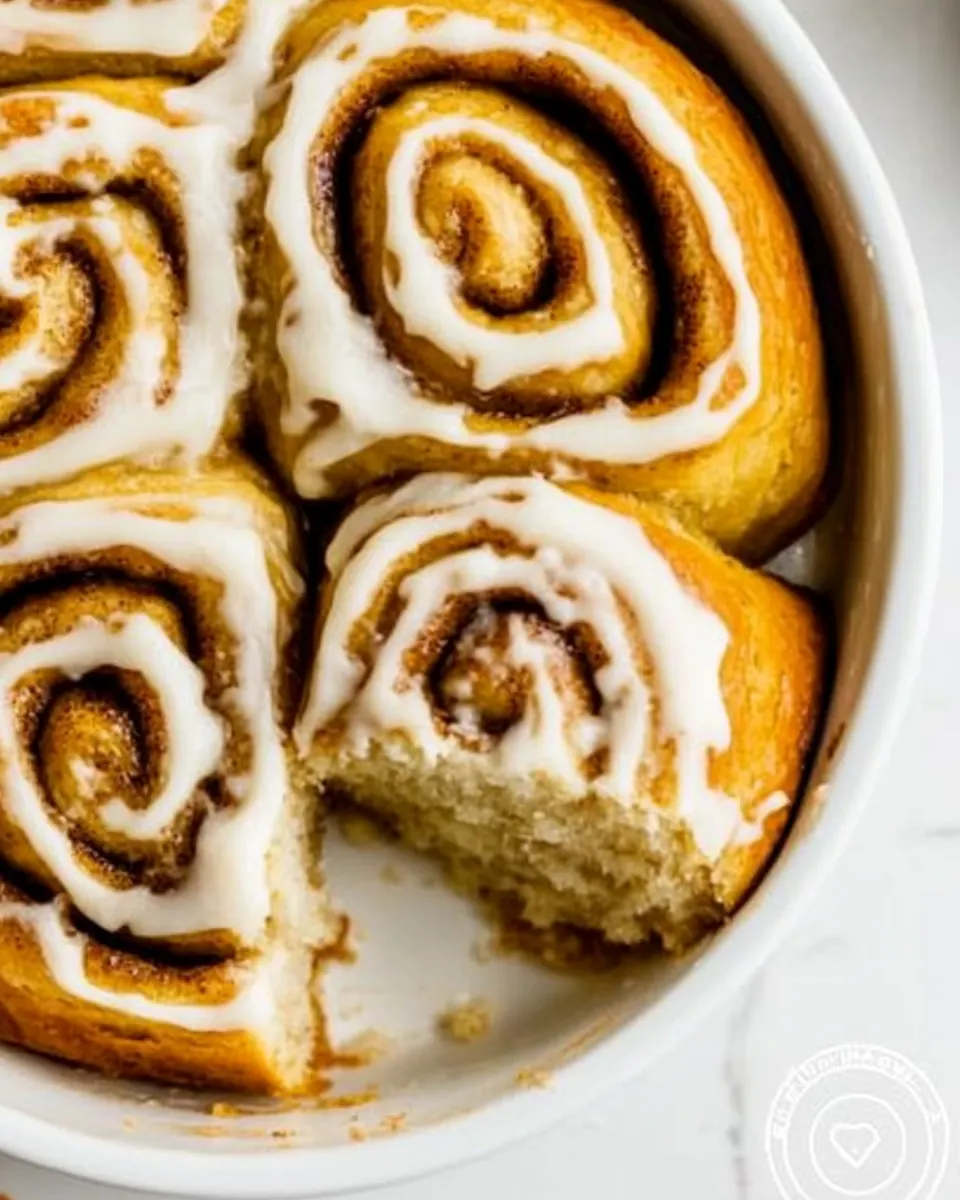
- Bake: Bake in the oven for 25 to 30 minutes, until the rolls have risen and are lightly golden brown. For crispier rolls, bake for 30 to 35 minutes. Set the baking dish on a cooling rack to let the rolls cool while you prepare the icing.: Bake in the oven for 25 to 30 minutes, until the rolls have risen and are lightly golden brown : The aroma will deepen to caramelized sugar and warm banana , and the tops should look evenly golden without dark spots. For crisper tops, add a few minutes, but watch closely to avoid drying out the crumb. A typical mishap is overbaking which makes the rolls drier than intended.
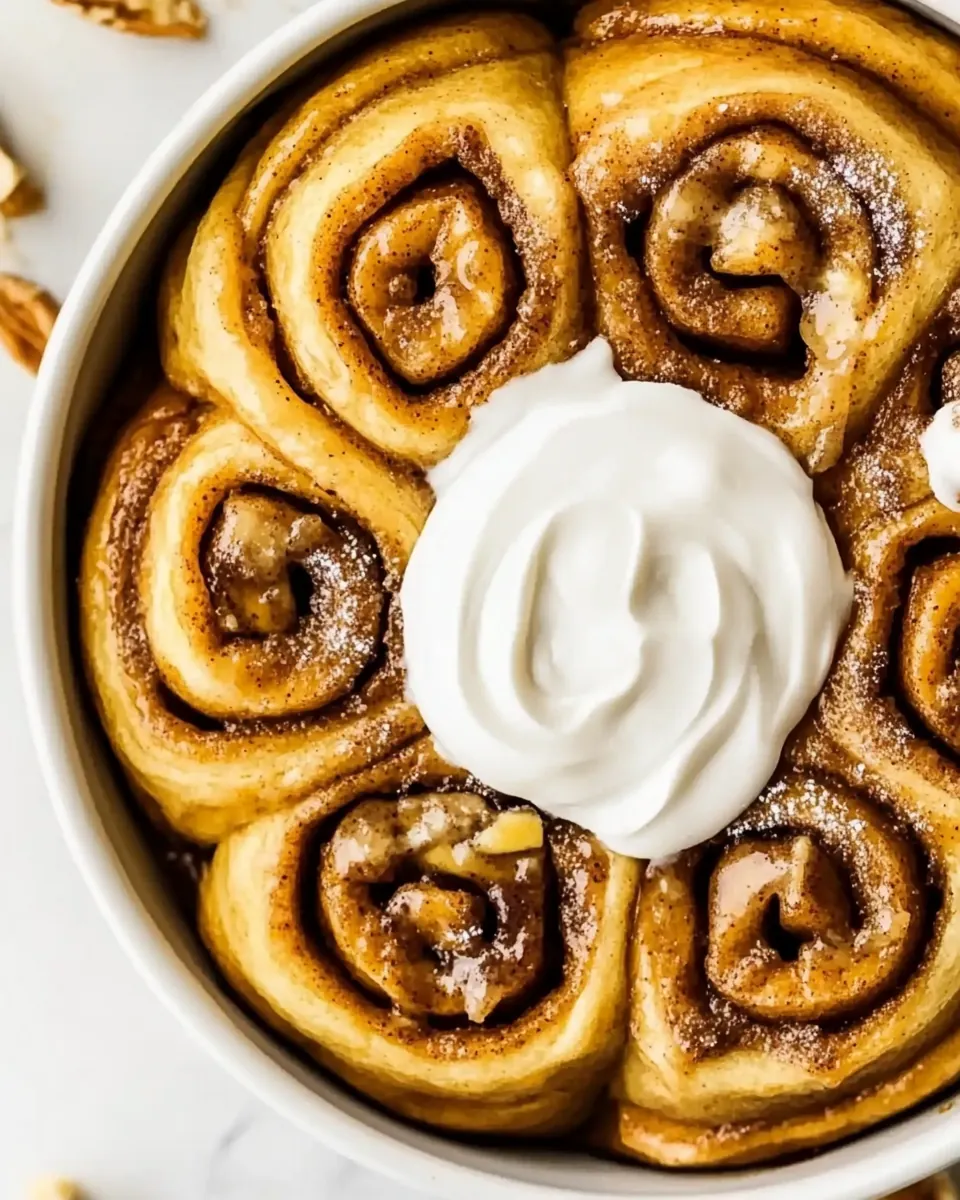
- Icing: Add the softened butter, cream cheese, powdered sugar, and vanilla to a medium bowl. Use a stand mixer or hand mixer to beat the icing until it is smooth and fluffy, scraping the sides of the bowl as necessary.: Add the softened butter, cream cheese, powdered sugar, and vanilla to a medium bowl : Beating these ingredients yields a glossy, fluffy frosting that smells sweet and tangy, and you should stop beating once it is smooth and airy to prevent it from getting runny. This frosting balances the roll sweetness and adds a creamy texture that melts into the warm swirls. Over mixing can make the frosting too loose, so keep an eye on the consistency.
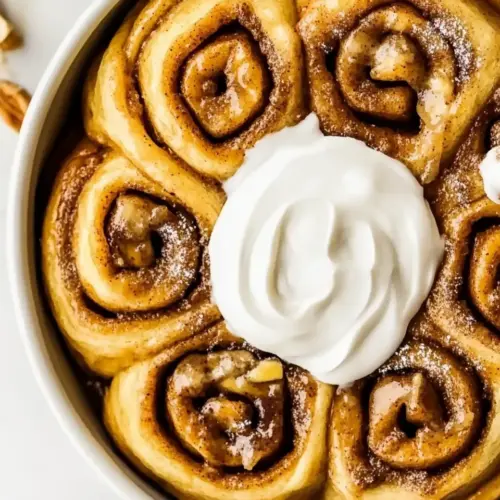
- Serve: Use a spoon to dollop frosting on top of each cinnamon roll while they are still warm, then use a spatula to spread the frosting into each nook and cranny of the rolls. Serve warm.: Use a spoon to dollop frosting on top of each cinnamon roll while they are still warm : The warmth helps the frosting soften and sink into crevices, making each bite oozy and decadent. Serve warm for the fullest sensory experience, as cooled rolls firm up and the frosting sets. A common error is frosting too early when rolls are piping hot which can make frosting too runny, so wait a few minutes after baking.
- Storage: Let the cinnamon rolls cool completely before storing in the refrigerator, where they will keep in an airtight container for up to 3 days. You can also freeze leftover cinnamon rolls for up to 2 months.: Let the cinnamon rolls cool completely before storing in the refrigerator : Cooling prevents condensation which can make rolls soggy, and refrigerated rolls keep for up to three days in an airtight container. For longer storage, freeze individually wrapped rolls for up to two months; thaw gently before reheating. Avoid sealing warm rolls, as trapped steam ruins texture.
Recipe Notes about Banana Bread Cinnamon Rolls
These notes help you adapt and troubleshoot while maintaining the core personality of Banana Bread Cinnamon Rolls. I expanded each tip from the original note so you can choose a hands on or equipment assisted path confidently.
- No Mixer: If you do not have a stand mixer, combine the dry ingredients in a large bowl, add the wet ingredients, and mix with a sturdy spatula until a shaggy dough forms. Transfer to a lightly floured surface and knead by hand for about eight to ten minutes, gradually incorporating the vegan butter tablespoon by tablespoon. Kneading by hand develops the gluten more slowly, so expect a slightly longer working time but equally satisfying texture.
- Room Temperature Ingredients: Let your vegan butter and plant based cream cheese come to room temperature before mixing. This ensures they blend smoothly into the dough and frosting, preventing lumps and giving the icing a silky consistency. Cold fat will not incorporate well and may lead to pockets of butter in the final roll.
- Overnight Chill: For an overnight schedule, shape the rolls, cover them tightly, and place them in the fridge for ten to twelve hours. In the morning, bring them to room temperature for thirty minutes before baking. This slow fermentation heightens flavor and creates an effortless morning bake with minimal hands on time.
- Testing Yeast: If you are unsure whether your yeast is active, proof it in the warmed soy milk with a pinch of sugar and watch for a foamy cap within ten to fifteen minutes. No foam means the yeast is inactive and should be replaced to avoid dense, under risen rolls.
- Freezing and Reheating: Freeze baked rolls individually wrapped for up to two months. To reheat, thaw in the fridge overnight, then warm in a low oven for ten to fifteen minutes until heated through, refreshing the frosting as needed. This method preserves texture and flavor best.
What Complements This Banana Bread Cinnamon Rolls
These rolls pair wonderfully with bright beverages and simple sides to balance richness. Consider fresh fruit, a savory element for contrast, or seasonal touches depending on the occasion. I like serving them warm with a pot of coffee for brunch and packing them in boxes for holiday breakfasts.
- Breakfast Pairing: Serve warm with a cup of coffee or tea, and add a small bowl of fresh berries to cut through the sweetness.
- Brunch Occasion: These are excellent on a brunch spread alongside savory quiches and salads, offering a sweet, indulgent counterpoint.
- Make Ahead for Guests: Prepare the rolls the night before and bake the morning of your event, so guests enjoy them fresh and warm. Chill overnight then let them come to room temperature for thirty minutes before baking.
- Storage Tip: Store in an airtight container in the fridge for up to three days, or freeze for up to two months. Reheat gently to revive the texture before serving.
- Seasonal Serving: In colder months I add an extra sprinkle of toasted nuts and a dusting of cinnamon on top of the frosting to enhance the cozy feel of the rolls.
FAQ
Conclusion
Banana Bread Cinnamon Rolls are special because they combine the tender, fruity comfort of banana bread with the swirled, gooey nature of a cinnamon roll, resulting in a treat that feels both nostalgic and fresh. Give them a try when you have ripe bananas and a little time to savor the process, and you will be rewarded with warm, aromatic rolls that please a crowd or transform a weekday morning. I hope you enjoy the rituals of mixing, rolling, and sharing these rolls as much as I do, and that they become one of your go to recipes for gatherings and relaxed breakfasts.
Banana Bread Cinnamon Rolls
Equipment
- 9x13-inch Baking Dish
- Stand mixer with dough hook
- Rolling Pin
- Mixing Bowls
- Oven
Ingredients
- 3/4 cups oy milk warmed to 115 degrees F Warm to 115 degrees F to activate yeast and help dissolve sugars; provides the liquid base and slight richness for the dough.
- 1 teaspoon vanilla extract Add for sweet floral notes and depth in aroma; enhances the overall flavor profile of the bread and filling.
- 4 cups all purpose flour plus more for rolling. Sift or measure into the dough to build structure and gluten formation; reserve extra for dusting when rolling to prevent sticking.
- 1/4 cup granulated sugar Sprinkle into the dough and some into the filling to provide sweetness and tenderize the crumb.
- 3 1/2 teaspoons active yeast Bloom into the warm milk to leaven the dough; ensures a light, airy roll texture when properly proofed.
- 1 teaspoon cinnamon Incorporate into the dough for warm spice undertones that complement banana and cinnamon filling flavors.
- 1/2 teaspoon kosher salt Dissolve into the dough mixture to control yeast activity and strengthen flavor; balances sweetness and enhances texture.
- 3/4 cup mashed ripe banana (about 2 medium bananas) Mash and fold into the dough to add moisture, natural sweetness, and banana flavor while contributing to a tender crumb.
- 4 tablespoons vegan butter softened, cut in tablespoons Cut into the dough or use in the filling to add buttery richness and help create a soft, flaky texture.
- 1/4 cup vegan butter softened Soften and spread into the filling or on top for extra buttery flavor and moisture in the swirl and crumb.
- 1/2 packed cup dark brown sugar Pack into the filling to create a deep, molasses-like sweetness that pairs well with cinnamon and banana.
- 1 tablespoon ground cinnamon Sprinkle into the filling to reinforce warm spice flavors and create a classic cinnamon roll profile.
- 1 -2 bananas thinly sliced Layer sliced into the rolls for pockets of fresh banana texture and mild sweetness throughout the pastry.
- 1/2 cup walnuts or pecans chopped Fold into the filling or sprinkle between layers to add crunch, earthy flavor, and contrast to the soft rolls.
- 1/4 cup vegan butter softened Soften and use in the glaze or to dot on rolls for additional buttery richness and flavor depth.
- 4 ounces cream cheese at room temperature Bring to room temperature and beat into the frosting to create a tangy, creamy base for the glaze.
- 1 cup powdered sugar Sift or beat into the cream cheese frosting to achieve the desired sweetness and smooth texture.
- 1 teaspoon vanilla extract or vanilla paste Stir in for sweet vanilla aroma and to round out the frosting’s flavor; can also enhance perceived sweetness.
- 2 tablespoons chopped walnuts for garnish (optional) Chop and sprinkle as an optional finishing touch to add texture, visual appeal, and a nutty crunch on top.
Instructions
- Prep: Grease or spray a 9×13” baking dish with butter or oil and set aside. Make sure the butter is softened for both the dough and filling before starting the recipe.: Grease or spray a 9×13” baking dish with butter or oil and set aside : The kitchen will smell faintly of oil or butter when the dish is ready, and using a well greased pan prevents the bottoms from sticking while helping the rolls brown evenly. This step matters because stuck rolls tear and lose their neat spiral shape, so be generous with the grease. A common mistake here is skimping on the greasing which leads to roll tearing during serving, so coat the pan well and set it nearby so it's ready when you transfer the cut rolls.
- Mash the Banana: Peel the bananas and break them into chunks in a medium bowl. Use a fork to mash the bananas, then give the mixture a vigorous stir to break up the fibers even more; the finished mash should look glossy. Measure out 3/4 cup of mashed banana and save the remainder for smoothies or compost.: Peel the bananas and break them into chunks in a medium bowl : The mashed banana should be glossy and slightly lumpy, with a sweet, fruity aroma that signals ripeness. When you vigorously stir to break fibers, you release natural sugars that contribute to browning and flavor depth. This step matters because uneven mash can create pockets of raw fruit; avoid overdoing the mashing which can make the dough too wet and sticky.
- Warm the Milk: Warm the milk and vanilla in a small pot on the stovetop until they reach between 110-115 F (just when the milk starts to steam). Alternatively, combine the milk and vanilla in a small bowl and microwave for 45 seconds. Set aside.: Warm the milk and vanilla in a small pot on the stovetop until they reach between 110-115 F : You will notice a faint steam and a hand warm temperature when the milk is perfect, and the vanilla lifts the scent into a gentle floral note. The warmth wakes the yeast, ensuring active fermentation; if the milk is hotter than 120 F you risk killing the yeast. A typical error is overheating, so test with a thermometer or the back of your wrist.
- Dry Ingredients: Whisk the flour, sugar, cinnamon, and yeast together in the bowl of a standing mixer with a dough hook attachment. Sprinkle the salt on top.: Whisk the flour, sugar, cinnamon, and yeast together in the bowl of a standing mixer with a dough hook attachment : The dry mixture will smell of cinnamon and sugar, and whisking ensures even distribution so the yeast and salt do not clump. This evenness is crucial because it influences how uniformly the dough rises. A common pitfall is adding salt directly on the yeast, which can inhibit it, so sprinkle the salt on top as instructed.
- Wet Ingredients: Add the mashed banana and warmed milk to the bowl.: Add the mashed banana and warmed milk to the bowl : When the wet elements hit the flour, you will see the mix begin to coalesce into shaggy dough with a sweet, yeasty scent. This combination is important for hydration and flavor fusion; too much added liquid can make the dough slack, so aim for a cohesive, slightly tacky texture. One mistake I often see is rushing to add all butter at once, which prevents proper incorporation.
- Knead: Knead the dough on medium-low speed for 8 to 10 minutes in total. Once all of the flour has been incorporated with the wet ingredients, begin to add the butter 1 tablespoon at a time. Wait until the butter has been fully incorporated into the dough (about 1 minute) before adding the next tablespoon. (Note: I like to prep all of the filling ingredients and slice my bananas while the dough is kneading): Knead the dough on medium-low speed for 8 to 10 minutes in total : As you knead, the dough will change from sticky to smooth and elastic, and you may hear a faint, rubbery tear as gluten develops. Adding the softened vegan butter tablespoon by tablespoon lets it emulsify into the dough, creating a tender, layered crumb. This matters because even incorporation prevents greasy pockets; a common error is adding butter too quickly which leaves streaks in the dough.
- Roll: The dough should look and feel smooth when ready (if not, knead for an additional 2 to 4 minutes). Dust your work surface and a rolling pin with flour, then transfer the dough to the work surface. Sprinkle the dough with a little flour and roll it out until it forms a 12×20” (30×50 cm) rectangle.: Dust your work surface and a rolling pin with flour, then transfer the dough to the work surface : The rolled dough should feel supple and stretch without snapping back immediately, and you will see a uniform 12×20” rectangle form. Proper rolling creates an even thickness so filling spreads predictably, which is why flouring the surface is important to avoid tearing. If the dough fights back, rest it for a few minutes to relax the gluten instead of forcing it.
- Fill: Mix the brown sugar and cinnamon together in a small bowl, then set aside. Use a spatula or offset spatula to spread the butter over the dough, leaving a 1/2" border on one long side of the dough. Sprinkle the sugar mix evenly over the butter, gently pressing into the butter so it sticks. Top the sugar mixture with the sliced banana and walnuts (if using).: Mix the brown sugar and cinnamon together in a small bowl, then set aside : The sugar mixture will smell rich and molasses forward, and spreading softened vegan butter over the dough creates a lacquer that helps the sugar adhere. Tucking sliced banana and nuts into the filling adds texture and bursts of flavor as the rolls bake. A mistake to avoid is overloading the filling which can make the center too wet and cause leaking during baking.
- Roll: Starting with the long edge that has no free border, roll the dough toward the long edge with the bare border. Pinch the dough ends together to seal the cinnamon roll better.: Starting with the long edge that has no free border, roll the dough toward the long edge with the bare border : As you roll, you should feel the layers compress slightly and hear a soft sigh of air escaping from between layers. Pinching the seam is critical to keep the roll from unraveling while baking, this secures the spiral for neat slices. A common slip is not sealing the seam well, leading to unrolled or loose slices after cutting.
- Slice: Slice the rolls into 12 even pieces by using a long string of dental floss; slide the floss under the roll, then “cross” the two free ends over the top and pull down to create a clean slice. You can also use a sharp knife to slice the rolls, but they won’t look as neat. I find the easiest way to make slices is to cut the roll in half first, then each of those rolls in half again. You should now have 4 even rolls; cut each of these rolls into thirds to create 12 even slices.: Slice the rolls into 12 even pieces by using a long string of dental floss : Using floss yields clean, smooth edges without squashing the roll, and you should see tight spirals reveal themselves with minimal drag. Clean slices bake more evenly and look professional. If slices get misshapen, try cutting the larger roll in halves first, as described, instead of forcing a single long cut.
- Rise: Transfer the rolls into the prepared baking sheet. Cover with plastic wrap and let rise in a warm place for 1 hour, until the rolls have almost doubled in size.: Transfer the rolls into the prepared baking sheet : As the rolls rise covered, they will puff and the seams will relax, and you should notice a soft, pillowy texture when gently pressed. This final rise determines lightness, so allow the rolls to nearly double; under proofed rolls will be dense and overly compact. Avoid drafts and cold spots, which cause uneven rising.
- Overnight Option: Immediately transfer the covered rolls to the fridge and store chilled for 10 to 12 hours. Let the rolls come to room temperature on the counter for 30 minutes before baking.: Immediately transfer the covered rolls to the fridge and store chilled for 10 to 12 hours : Chilling transforms the flavors as fermentation continues slowly, producing deeper notes; the dough will be firm and cool to the touch in the morning. This is handy for prepping the night before, but make sure you return them to room temperature for about 30 minutes before baking to ensure even oven spring. A frequent mistake is baking straight from cold which yields uneven rise.
- Preheat: While the rolls rise, preheat the oven to 350 F. I also recommend removing the frosting ingredients from the fridge at this time, so they have time to soften.: While the rolls rise, preheat the oven to 350 F : The oven should feel reliably hot and stable before you put the rolls in, which ensures immediate oven spring and even baking. I also remove frosting ingredients to soften so they blend smoothly later. Preheating matters because an underheated oven delays rising and ruins texture; check your oven thermometer if uncertain.
- Bake: Bake in the oven for 25 to 30 minutes, until the rolls have risen and are lightly golden brown. For crispier rolls, bake for 30 to 35 minutes. Set the baking dish on a cooling rack to let the rolls cool while you prepare the icing.: Bake in the oven for 25 to 30 minutes, until the rolls have risen and are lightly golden brown : The aroma will deepen to caramelized sugar and warm banana , and the tops should look evenly golden without dark spots. For crisper tops, add a few minutes, but watch closely to avoid drying out the crumb. A typical mishap is overbaking which makes the rolls drier than intended.
- Icing: Add the softened butter, cream cheese, powdered sugar, and vanilla to a medium bowl. Use a stand mixer or hand mixer to beat the icing until it is smooth and fluffy, scraping the sides of the bowl as necessary.: Add the softened butter, cream cheese, powdered sugar, and vanilla to a medium bowl : Beating these ingredients yields a glossy, fluffy frosting that smells sweet and tangy, and you should stop beating once it is smooth and airy to prevent it from getting runny. This frosting balances the roll sweetness and adds a creamy texture that melts into the warm swirls. Over mixing can make the frosting too loose, so keep an eye on the consistency.
- Serve: Use a spoon to dollop frosting on top of each cinnamon roll while they are still warm, then use a spatula to spread the frosting into each nook and cranny of the rolls. Serve warm.: Use a spoon to dollop frosting on top of each cinnamon roll while they are still warm : The warmth helps the frosting soften and sink into crevices, making each bite oozy and decadent. Serve warm for the fullest sensory experience, as cooled rolls firm up and the frosting sets. A common error is frosting too early when rolls are piping hot which can make frosting too runny, so wait a few minutes after baking.
- Storage: Let the cinnamon rolls cool completely before storing in the refrigerator, where they will keep in an airtight container for up to 3 days. You can also freeze leftover cinnamon rolls for up to 2 months.: Let the cinnamon rolls cool completely before storing in the refrigerator : Cooling prevents condensation which can make rolls soggy, and refrigerated rolls keep for up to three days in an airtight container. For longer storage, freeze individually wrapped rolls for up to two months; thaw gently before reheating. Avoid sealing warm rolls, as trapped steam ruins texture.
Notes
- No Mixer: If you do not have a stand mixer, combine the dry ingredients in a large bowl, add the wet ingredients, and mix with a sturdy spatula until a shaggy dough forms. Transfer to a lightly floured surface and knead by hand for about eight to ten minutes, gradually incorporating the vegan butter tablespoon by tablespoon. Kneading by hand develops the gluten more slowly, so expect a slightly longer working time but equally satisfying texture.
- Room Temperature Ingredients: Let your vegan butter and plant based cream cheese come to room temperature before mixing. This ensures they blend smoothly into the dough and frosting, preventing lumps and giving the icing a silky consistency. Cold fat will not incorporate well and may lead to pockets of butter in the final roll.
- Overnight Chill: For an overnight schedule, shape the rolls, cover them tightly, and place them in the fridge for ten to twelve hours. In the morning, bring them to room temperature for thirty minutes before baking. This slow fermentation heightens flavor and creates an effortless morning bake with minimal hands on time.
- Testing Yeast: If you are unsure whether your yeast is active, proof it in the warmed soy milk with a pinch of sugar and watch for a foamy cap within ten to fifteen minutes. No foam means the yeast is inactive and should be replaced to avoid dense, under risen rolls.
- Freezing and Reheating: Freeze baked rolls individually wrapped for up to two months. To reheat, thaw in the fridge overnight, then warm in a low oven for ten to fifteen minutes until heated through, refreshing the frosting as needed. This method preserves texture and flavor best.