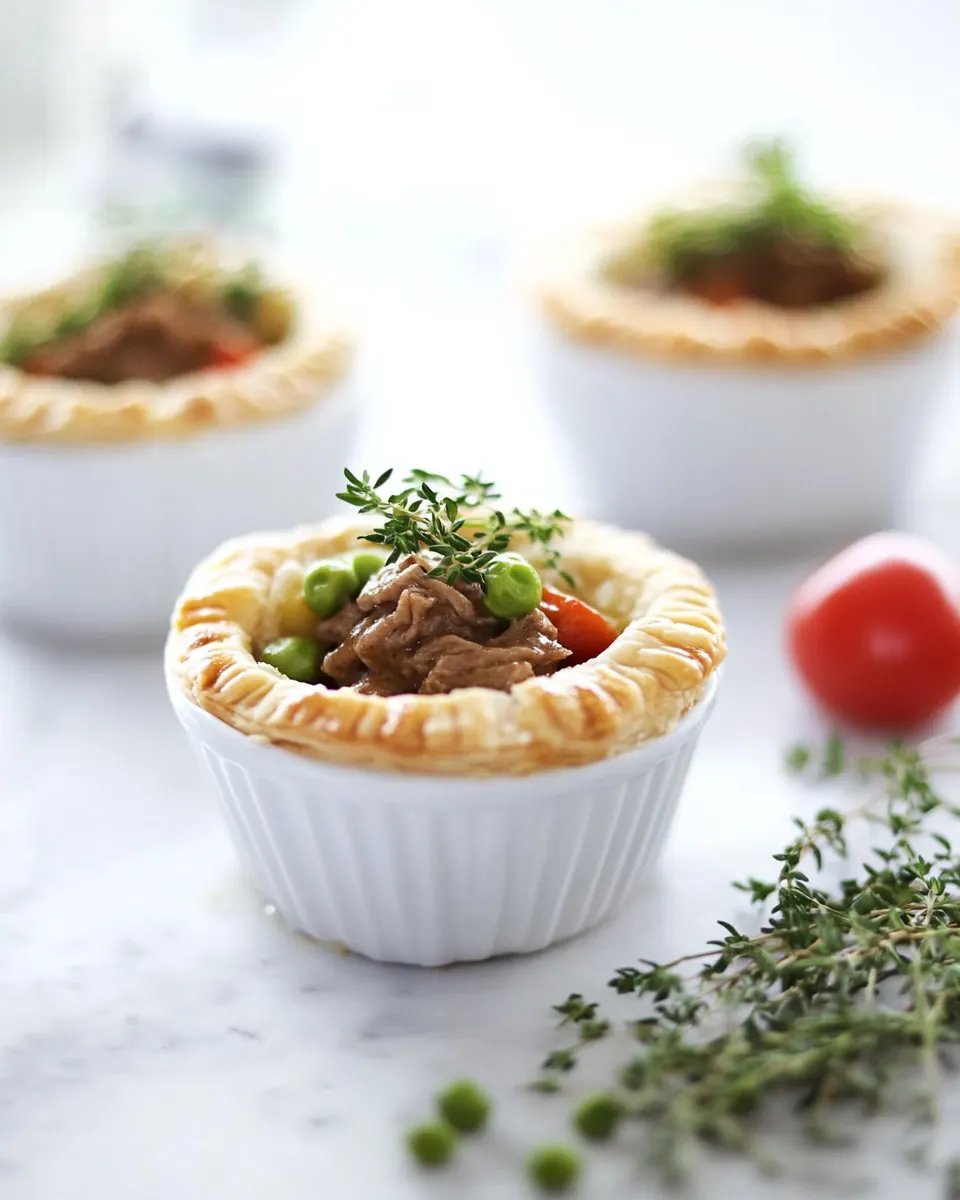
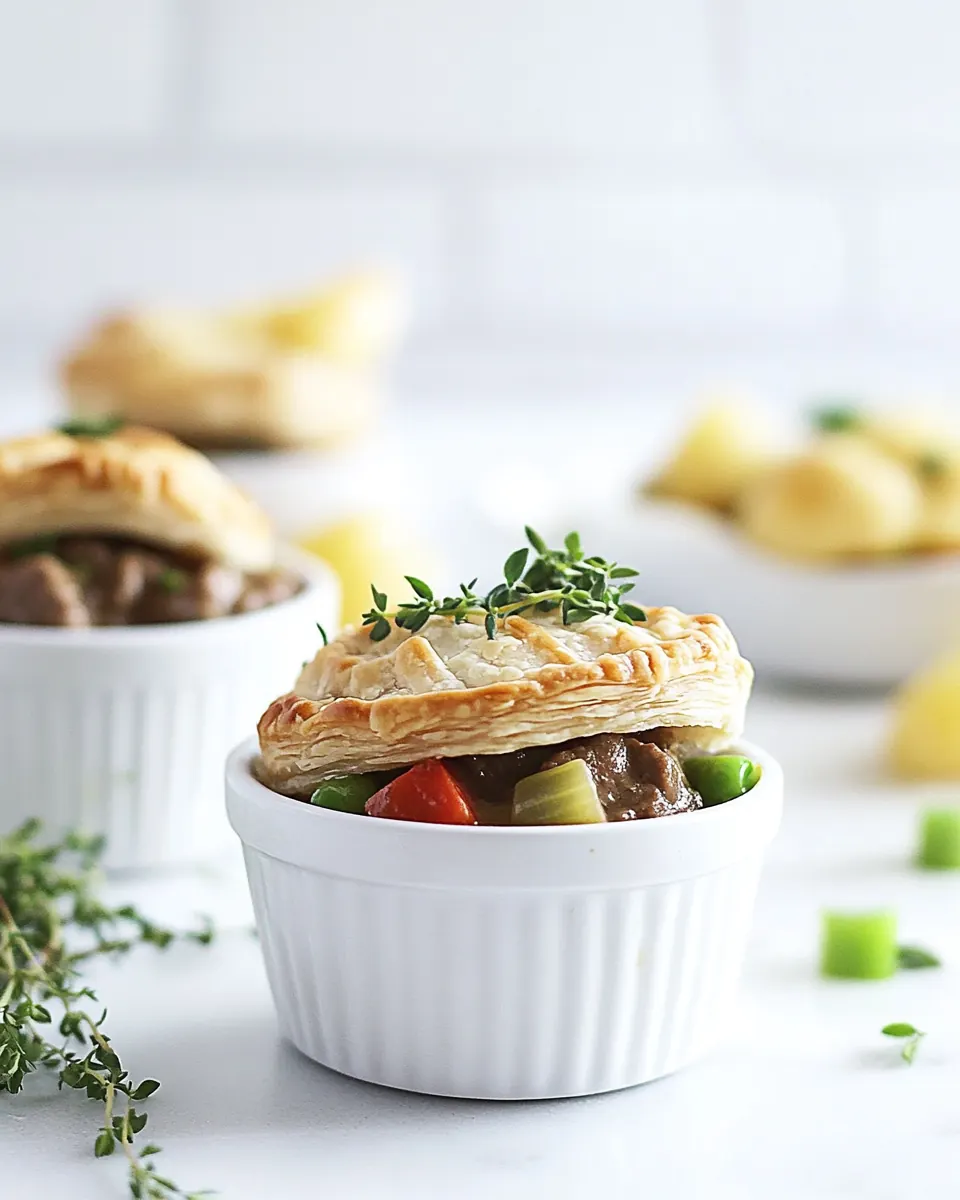
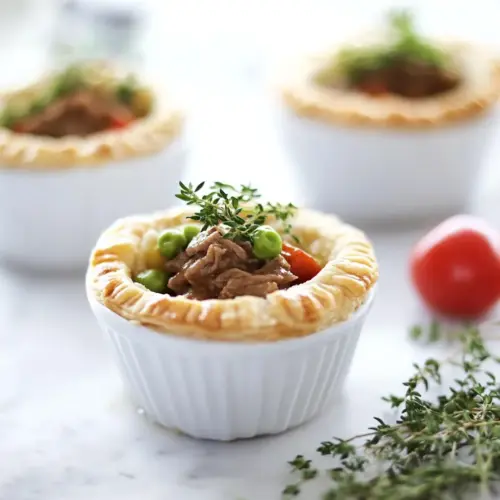
Beef Pot Pies
Beef Pot Pies are the kind of cozy, hands on food I turn to when the air turns crisp and I want something that tastes like a warm kitchen and a hug. I remember the first time I made these, my countertop littered with flour and a triumphant puff pastry sheet that rose into a tiny golden dome, steam escaping as I lifted the lid. That first bite was comforting, the way the beef and carrots folded into a creamy, savory center, while the pastry gave a crisp contrast. I kept thinking about how simple pantry items turned into something so memorable.
Over the years I’ve adjusted little things, like letting the vegetables sweat gently before adding the beef, or stirring the parmesan cheese in at the end so it melts silky rather than clumping. These tweaks made the filling more cohesive and the texture just right. Guests often ask for the recipe after a bite, and I always tell them it is the friendly combination of rich filling and flaky pastry that does the trick.
Recipe Snapshot
50 mins
20 mins
30 mins
Medium
500 kcal
American
Gluten-Free, Low FODMAP
Dinner
Skillet, Muffin pan, Oven
Why This Beef Pot Pies Is So Good
Reliable comfort food
I love that Beef Pot Pies deliver a bowl of warmth in a handheld package. When life is busy, this recipe gives you a concentrated dose of comfort, with a crisp top and a tender, saucy interior. The contrast between the flaky pastry and the rich filling keeps every bite interesting.
Smart use of simple ingredients
What stands out to me is how everyday items like milk, flour, and parmesan cheese team up with pantry staples like tomato paste and beef broth to create deep savory flavor. You do not need fancy shopping to impress at the table.
Great for make ahead and assembly
I appreciate that you can prepare the filling ahead, chill it, and then assemble right before baking. That flexibility makes these ideal for gatherings, or a quick weeknight dinner when you want something elevated without last minute panic.
Textural delight
Between the buttery puff pastry and the creamy filling studded with tender carrots and soft potatoes, each mouthful is balanced. The sage adds an aromatic lift while the parmesan cheese gives a savory edge that ties everything together.
Kid friendly and approachable
Families tend to love these because they are familiar yet fun. The pockets are easy to hold, and you can control the filling texture so picky eaters find them approachable. I like that it makes dinner feel a bit festive, even on an ordinary night.
What to Gather for Beef Pot Pies
These ingredients are deliberately chosen to build layers of flavor and texture. The puff pastry gives a golden, flaky shell, while the combination of butter and canola oil creates a flavorful cooking medium for the vegetables and beef. Starch from the flour and liquid from the milk and beef broth form a silky sauce that clings to the filling. Small additions like parmesan cheese and tomato paste deepen the savory profile, and herbs like thyme and sage provide aromatic warmth.
- 2 sheets of puff pastry: Flaky and buttery, provides a crisp, golden crust that seals in fillings and adds rich texture to each pot pie; chill before using to ensure proper puffing during baking.
- 3/4 stick unsalted butter: Creamy and rich, contributes silkiness and depth to the filling while aiding in browning edges; melt gently and combine with vegetables to create a cohesive base.
- 1 tablespoon canola oil: Neutral and high-heat stable, helps sauté vegetables and brown meat without overpowering flavors; use to prevent sticking and develop savory fond on the pan.
- 6 large sage leaves: Aromatic and slightly peppery, imparts warm herbal notes when finely chopped or fried with butter; pair with other herbs to enhance the dish's savory profile.
- 1 1/2 cups diced carrots: Sweet and tender when cooked, adds color, natural sweetness, and a pleasant bite to balance savory beef; dice uniformly so they cook evenly in the filling.
- 1 cup country potatoes: Starchy and hearty, provides body and bite to the filling while absorbing and thickening flavorful juices; cut into small cubes to ensure even cooking.
- 1/3 cup sliced leeks: Mild and onion-like, contributes subtle sweet-onion flavor and moisture without overpowering; slice thinly so pieces soften into the filling during simmering.
- 1 lb extra lean ground beef: Lean and savory, provides the primary protein and meaty flavor base for the pot pies; brown thoroughly to develop caramelized flavor before combining with other components.
- 1/3 cup frozen sweet peas: Sweet and tender, offers pops of sweetness, color, and textural contrast; add near the end of cooking to retain bright color and avoid over-softening.
- salt and pepper to taste: Essential for seasoning, balances and enhances all flavors in the filling and crust; add gradually and taste as you cook to avoid over-salting.
- 2 tablespoons of thyme: Earthy and fragrant, delivers floral, woodsy notes that complement beef and vegetables; add fresh or dried, adjusting quantity to taste for aromatic depth.
- 1/4 cup flour: Absorbent and thickening, helps create a silky, gravy-like consistency for the filling when cooked with fat and liquid; sprinkle evenly and cook briefly to remove raw taste.
- 1 cup milk: Smooth and creamy, contributes to the sauce's richness and helps create a velvety texture when combined with roux and broth; warm slightly before adding to avoid curdling.
- 1/2 cup parmesan cheese: Nutty and salty, adds umami and a savory finish to the filling or topping, enhancing overall flavor complexity; grate finely and stir in toward the end for best melting.
- 1/2 cup beef broth: Savory and concentrated, enhances beefy depth and enriches the sauce with meaty flavor; stir into liquids to boost the broth's body and taste.
- 2 tablespoons tomato paste: Tomato-rich and concentrated, provides acidity, umami, and a slightly sweet tang to lift the filling; dissolve into liquids to distribute its flavor evenly.
How to Prepare Beef Pot Pies
These instructions walk you from stovetop to golden pastry. I like to move deliberately through each stage so the filling develops flavor and the pastry bakes crisp. Keep your mise en place handy and your oven preheated so assembly is smooth.
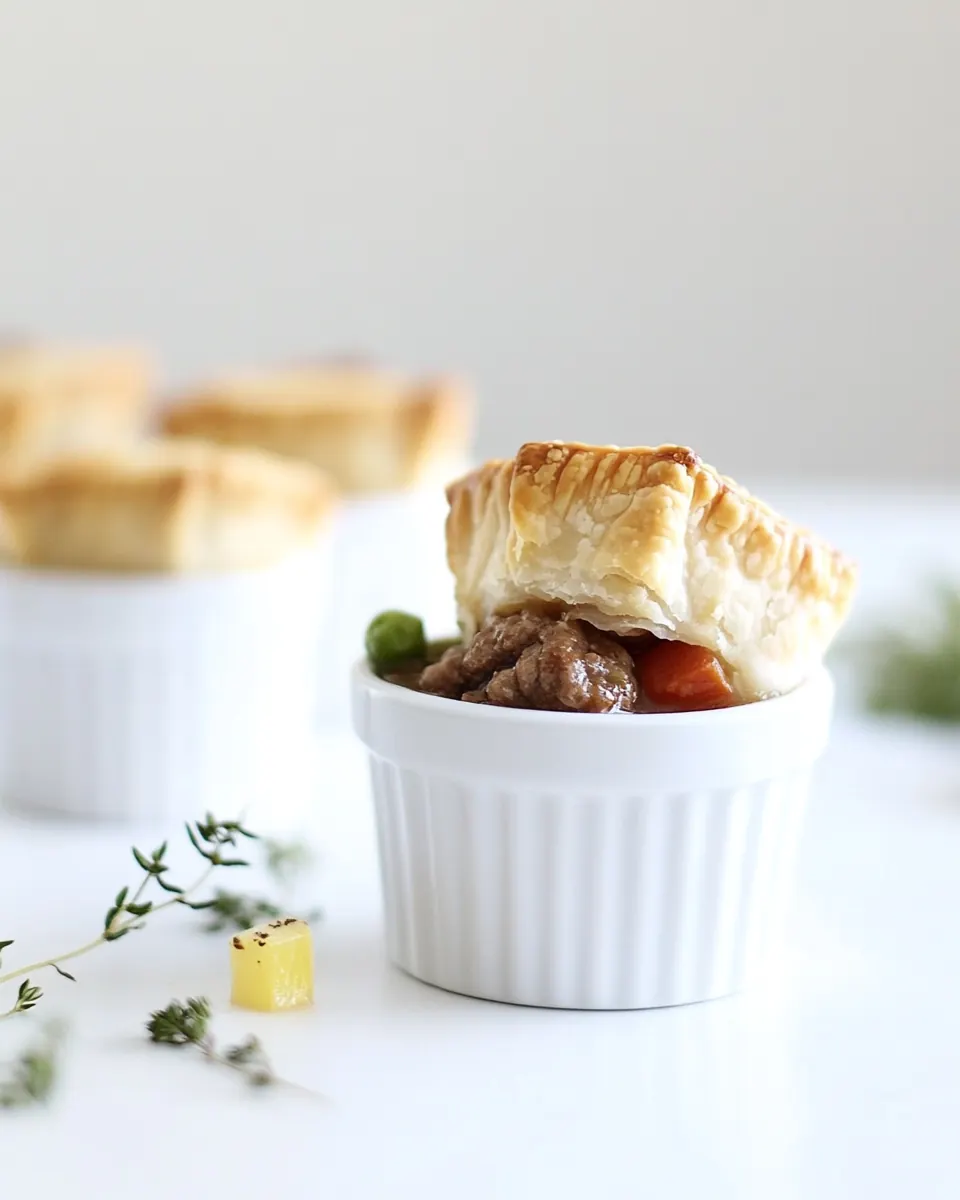
- Preparation: Heat oven to 400 degrees F. Butter muffin pan wells with butter.: The air warms with buttery aroma as you preheat the oven to 400 degrees F , and the sound of butter sizzling in the pan becomes the first cue that things are underway. As the muffin pan wells are buttered, you will notice a glossy sheen that prevents sticking and helps the pastry brown evenly. This step sets the stage so the pastry bottom gets a little crisp contact with butter, which promotes color and richness. A common mistake is skipping this and ending up with pastry that clings to the pan, tearing when you remove it, so take the minute to butter each well.
- Thaw puff pastry according to package.: As the sheets come to temperature, they lose some rigidity and become pliable while still cold enough to puff properly. Thawing according to package directions ensures the layered dough keeps steam pockets that cause rise in the oven. You will feel the texture change from glassy to slightly soft, and the sheets should still be cool to the touch. If the pastry becomes too warm, pop it briefly in the fridge, because warm dough will not puff well and can produce a denser crust.
- Place butter and oil in a large skillet over medium high heat and stir to blend and until butter is foamy. Add in sage leaves and cook until crispy. Remove from pan and discard. Add in carrots, potatoes and leeks, stir to coat. Place lid on top for about 8 minutes or until carrots and potatoes are softened. Add in beef and stir until cooked through and meat is no longer pink. Salt and pepper to taste, add in thyme and flour and stir until dissolved. Add in milk and cook until liquid is almost all evaporated. Stir in parmesan cheese. Pour in beef broth and add tomato paste in and stir until combined. Remove from heat.: When the butter and canola oil hit the skillet over medium high heat, the butter will foam and the fragrant smell will herald the start of browning. This fat blend gives you flavor and a higher smoke point, which helps with even cooking of the vegetables. You should hear a gentle sizzle as you add aromatics; if the fat smokes aggressively, lower the heat to avoid a burnt taste.
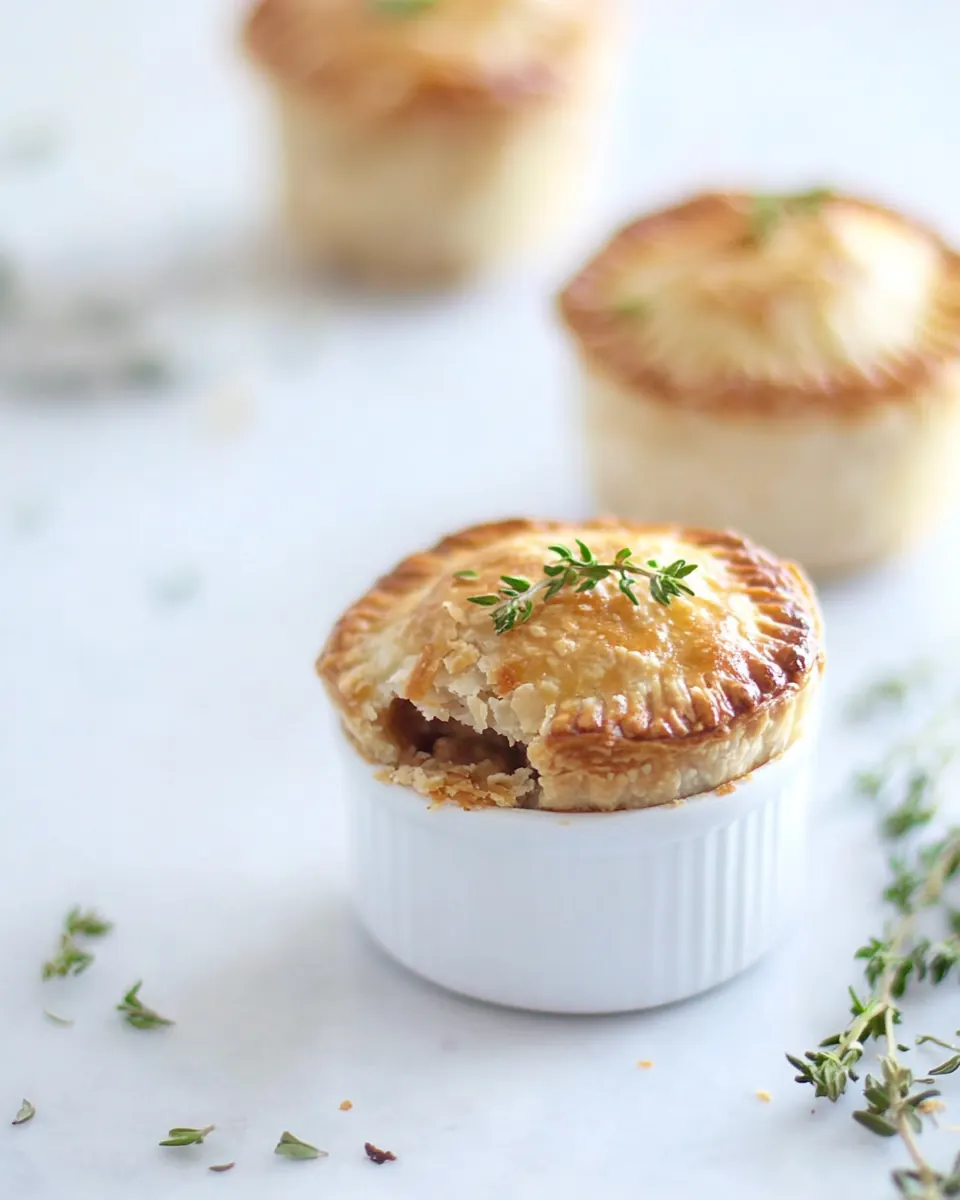
- Cut each puff pastry sheet into four even squares. Stretch each square to approximately 6 inches wide. Place puff pastry in buttered muffin well and fill with pot pie filling. Cover top by bringing the four corners to the center and pinching them together. Brush tops with egg wash (one beaten egg). Sprinkle kosher salt on top. Bake 400 degrees F for about 10-12 minutes or until tops are golden brown. Serve immediately.: The sage will crisp within seconds, releasing an herbal perfume and snapping as it fries. Remove and discard the sage once crisp to infuse the fat without making the leaves leathery. The brief frying concentrates the oils, offering a savory note to the filling. If the leaves char quickly, your pan is too hot, and that will add bitterness, so reduce the flame.
- Add carrots potatoes and leeks: The vegetables sizzle and soften as you stir, their edges becoming glossy from the fat. Covering the pan traps steam, speeding tenderness in about eight minutes, and the smell becomes sweet and earthy as the sugars release. Uniform dice ensures even cooking; if pieces vary in size, some will remain hard while others overcook.
- Add beef and cook through: When you add the beef , it will start to brown and release juices that mingle with the vegetables, creating savory caramelized bits. Stirring as it cooks breaks it into crumbles and ensures even color. Cook until no pink remains, which gives a full meaty flavor while preventing raw texture. Avoid overcrowding the pan which can steam the meat rather than brown it, reducing flavor development.
- Season add thyme and flour: Sprinkling in thyme brightens the mixture, while the flour absorbs fat and forms the base for the sauce. Stirring until the flour dissolves helps prevent raw flour taste and creates a roux like texture that will thicken the filling. You should see the mixture take on a slightly pasty look, signaling the flour has hydrated. If you do not cook the flour briefly, the sauce can taste chalky.
- Add milk and reduce: Pouring in the milk loosens the mixture and transforms it into a silky coating that clings to the vegetables and meat as it simmers. Cook until the liquid is almost all evaporated, concentrating flavor and ensuring the filling is thick enough to hold its shape in the pastry. The scent becomes rich and dairy forward as proteins meld. If you rush and keep too much liquid, the filling will be soupy and may make the pastry soggy.
- Stir in parmesan: When the parmesan cheese melts into the warm filling, it adds a nutty umami quality and a silkier mouthfeel. Stirring off the direct heat helps it incorporate without clumping. You will notice the sauce take on a glossy sheen as the cheese dissolves. If you overheat, the cheese can seize and become grainy, so moderate temperature is key.
- Pour in beef broth and tomato paste: Adding the beef broth and tomato paste deepens both color and savory complexity, rounding out the taste profile with a touch of acidity. Stir until combined and allow the mixture to come together into a cohesive filling. The aroma becomes richer and more layered. If the tomato paste is not cooked in, it can retain a raw, sharp note, so ensure it melds into the mixture.
- Remove from heat: Letting the filling rest off the heat allows flavors to settle and the sauce to thicken slightly as it cools, which makes filling the pastry easier. The residual warmth keeps the mixture pliable while preventing steam from sogging the pastry during assembly. If you try to fill while it is piping hot, steam can create a soggy bottom and make handling tricky.
- Cut puff pastry sheet into squares: As you slice each sheet into four even squares and gently stretch to about six inches, you will see the layers loosen and the dough becomes easier to form into wells. Cold, neat cuts preserve the lamination that yields flaky layers in the oven. If the pastry is uneven, some pieces may rise more than others, so aim for consistent sizing.
- Place pastry in muffin wells and fill: When you press each square into the buttered muffin well, the pastry will take the shape of the well, creating a cup ready for filling. Spoon in the filling until nearly full, noticing the contrast between the soft interior and the crisp pastry edge. Overfilling can cause spillage and uneven baking, so leave a little room for the top to close.
- Cover and brush with egg wash: Bringing the four corners to the center and pinching them creates a rustic closure, and brushing with an egg wash imparts glossy, golden color. The sprinkle of kosher salt on top gives a final savory pop against the buttery crust. Make sure the seams are sealed; if not, filling can leak during baking.
- Bake at 400 degrees F for 10 to 12 minutes: In the oven the pastry will puff and brown, with steam escaping in little bursts and the tops turning a deep golden hue. The sound of light crackle and the aroma of baked butter and toasted pastry signal readiness. If the tops brown too quickly, lower the oven rack or reduce temperature slightly to allow the interior to heat through without burning the crust.
- Serve immediately: These are best enjoyed hot, when the pastry is crisp and the filling is steaming and aromatic. Letting them rest slightly helps avoid burns, but serve while the contrast between flaky shell and creamy interior is at its peak. Waiting too long causes the pastry to lose crispness and the filling to firm up.
Pro Tips and Tweaks
I like to think of these tips as small investments that pay off in flavor and texture. Below are practical tweaks and reminders I use every time to ensure consistent results and a memorable final bite.
- Keep pastry cold before baking to maximize puff and flakiness, chilling between handling sessions if necessary.
- Even dice your carrots and potatoes so they cook uniformly, which ensures consistent texture in every bite.
- Don’t rush the roux, cook the flour a minute or two in the fat to avoid a raw flour taste and to build a silkier sauce.
- Adjust seasoning last after adding the beef broth and milk, since liquids concentrate differently as they reduce.
- Watch oven color during the final minutes of baking, rotating the pan if one side browns faster than the other.
Best Served With
These handheld pies pair beautifully with simple sides and fit many occasions from a cozy winter dinner to a casual lunch. Here I outline ideas for pairings, occasions, and practical storage notes so you can serve them with confidence.
- Light green salad A crisp mixed green salad dressed simply offsets the richness of the pies, adding a refreshing counterpoint.
- Roasted vegetables Seasonal roasted root vegetables echo the filling flavors and make for a heartier plate for dinner occasions.
- Weeknight family dinner These are ideal for a quick family meal because they can be prepped ahead and baked when you are ready to eat.
- Winter comfort Serve them during cold months as a warming main, perfect for evenings when you want something filling and soothing.
- Storage tips Cool completely before refrigerating, store in an airtight container for up to three days, and reheat in a moderate oven to restore crispness.
- Make ahead Prepare the filling and keep it chilled, then assemble and bake when you need a hot, fresh serving.
FAQ
Conclusion
These Beef Pot Pies shine because they pair a silky, savory filling with a crisp, buttery pastry for a comforting, handheld meal. Try them when you want something that feels both homey and a little special, perfect for a cold evening or a casual gathering. The recipe is forgiving, adaptable, and rewards a bit of attentive cooking, so give it a go and enjoy the warm, savory results with people you love.
Beef Pot Pies
Equipment
- Skillet
- Muffin Pan
- Oven
Ingredients
- 2 sheets of puff pastry Flaky and buttery, provides a crisp, golden crust that seals in fillings and adds rich texture to each pot pie; chill before using to ensure proper puffing during baking.
- 3/4 stick unsalted butter Creamy and rich, contributes silkiness and depth to the filling while aiding in browning edges; melt gently and combine with vegetables to create a cohesive base.
- 1 tablespoon canola oil Neutral and high-heat stable, helps sauté vegetables and brown meat without overpowering flavors; use to prevent sticking and develop savory fond on the pan.
- 6 large sage leaves Aromatic and slightly peppery, imparts warm herbal notes when finely chopped or fried with butter; pair with other herbs to enhance the dish's savory profile.
- 1 1/2 cups diced carrots Sweet and tender when cooked, adds color, natural sweetness, and a pleasant bite to balance savory beef; dice uniformly so they cook evenly in the filling.
- 1 cup country potatoes Starchy and hearty, provides body and bite to the filling while absorbing and thickening flavorful juices; cut into small cubes to ensure even cooking.
- 1/3 cup sliced leeks Mild and onion-like, contributes subtle sweet-onion flavor and moisture without overpowering; slice thinly so pieces soften into the filling during simmering.
- 1 lb extra lean ground beef Lean and savory, provides the primary protein and meaty flavor base for the pot pies; brown thoroughly to develop caramelized flavor before combining with other components.
- 1/3 cup frozen sweet peas Sweet and tender, offers pops of sweetness, color, and textural contrast; add near the end of cooking to retain bright color and avoid over-softening.
- salt and pepper to taste Essential for seasoning, balances and enhances all flavors in the filling and crust; add gradually and taste as you cook to avoid over-salting.
- 2 tablespoons of thyme Earthy and fragrant, delivers floral, woodsy notes that complement beef and vegetables; add fresh or dried, adjusting quantity to taste for aromatic depth.
- 1/4 cup flour Absorbent and thickening, helps create a silky, gravy-like consistency for the filling when cooked with fat and liquid; sprinkle evenly and cook briefly to remove raw taste.
- 1 cup milk Smooth and creamy, contributes to the sauce's richness and helps create a velvety texture when combined with roux and broth; warm slightly before adding to avoid curdling.
- 1/2 cup parmesan cheese Nutty and salty, adds umami and a savory finish to the filling or topping, enhancing overall flavor complexity; grate finely and stir in toward the end for best melting.
- 1/2 cup beef broth Savory and concentrated, enhances beefy depth and enriches the sauce with meaty flavor; stir into liquids to boost the broth's body and taste.
- 2 tablespoons tomato paste Tomato-rich and concentrated, provides acidity, umami, and a slightly sweet tang to lift the filling; dissolve into liquids to distribute its flavor evenly.
Instructions
- Preparation: Heat oven to 400 degrees F. Butter muffin pan wells with butter.: The air warms with buttery aroma as you preheat the oven to 400 degrees F , and the sound of butter sizzling in the pan becomes the first cue that things are underway. As the muffin pan wells are buttered, you will notice a glossy sheen that prevents sticking and helps the pastry brown evenly. This step sets the stage so the pastry bottom gets a little crisp contact with butter, which promotes color and richness. A common mistake is skipping this and ending up with pastry that clings to the pan, tearing when you remove it, so take the minute to butter each well.
- Thaw puff pastry according to package.: As the sheets come to temperature, they lose some rigidity and become pliable while still cold enough to puff properly. Thawing according to package directions ensures the layered dough keeps steam pockets that cause rise in the oven. You will feel the texture change from glassy to slightly soft, and the sheets should still be cool to the touch. If the pastry becomes too warm, pop it briefly in the fridge, because warm dough will not puff well and can produce a denser crust.
- Place butter and oil in a large skillet over medium high heat and stir to blend and until butter is foamy. Add in sage leaves and cook until crispy. Remove from pan and discard. Add in carrots, potatoes and leeks, stir to coat. Place lid on top for about 8 minutes or until carrots and potatoes are softened. Add in beef and stir until cooked through and meat is no longer pink. Salt and pepper to taste, add in thyme and flour and stir until dissolved. Add in milk and cook until liquid is almost all evaporated. Stir in parmesan cheese. Pour in beef broth and add tomato paste in and stir until combined. Remove from heat.: When the butter and canola oil hit the skillet over medium high heat, the butter will foam and the fragrant smell will herald the start of browning. This fat blend gives you flavor and a higher smoke point, which helps with even cooking of the vegetables. You should hear a gentle sizzle as you add aromatics; if the fat smokes aggressively, lower the heat to avoid a burnt taste.
- Cut each puff pastry sheet into four even squares. Stretch each square to approximately 6 inches wide. Place puff pastry in buttered muffin well and fill with pot pie filling. Cover top by bringing the four corners to the center and pinching them together. Brush tops with egg wash (one beaten egg). Sprinkle kosher salt on top. Bake 400 degrees F for about 10-12 minutes or until tops are golden brown. Serve immediately.: The sage will crisp within seconds, releasing an herbal perfume and snapping as it fries. Remove and discard the sage once crisp to infuse the fat without making the leaves leathery. The brief frying concentrates the oils, offering a savory note to the filling. If the leaves char quickly, your pan is too hot, and that will add bitterness, so reduce the flame.
- Add carrots potatoes and leeks: The vegetables sizzle and soften as you stir, their edges becoming glossy from the fat. Covering the pan traps steam, speeding tenderness in about eight minutes, and the smell becomes sweet and earthy as the sugars release. Uniform dice ensures even cooking; if pieces vary in size, some will remain hard while others overcook.
- Add beef and cook through: When you add the beef , it will start to brown and release juices that mingle with the vegetables, creating savory caramelized bits. Stirring as it cooks breaks it into crumbles and ensures even color. Cook until no pink remains, which gives a full meaty flavor while preventing raw texture. Avoid overcrowding the pan which can steam the meat rather than brown it, reducing flavor development.
- Season add thyme and flour: Sprinkling in thyme brightens the mixture, while the flour absorbs fat and forms the base for the sauce. Stirring until the flour dissolves helps prevent raw flour taste and creates a roux like texture that will thicken the filling. You should see the mixture take on a slightly pasty look, signaling the flour has hydrated. If you do not cook the flour briefly, the sauce can taste chalky.
- Add milk and reduce: Pouring in the milk loosens the mixture and transforms it into a silky coating that clings to the vegetables and meat as it simmers. Cook until the liquid is almost all evaporated, concentrating flavor and ensuring the filling is thick enough to hold its shape in the pastry. The scent becomes rich and dairy forward as proteins meld. If you rush and keep too much liquid, the filling will be soupy and may make the pastry soggy.
- Stir in parmesan: When the parmesan cheese melts into the warm filling, it adds a nutty umami quality and a silkier mouthfeel. Stirring off the direct heat helps it incorporate without clumping. You will notice the sauce take on a glossy sheen as the cheese dissolves. If you overheat, the cheese can seize and become grainy, so moderate temperature is key.
- Pour in beef broth and tomato paste: Adding the beef broth and tomato paste deepens both color and savory complexity, rounding out the taste profile with a touch of acidity. Stir until combined and allow the mixture to come together into a cohesive filling. The aroma becomes richer and more layered. If the tomato paste is not cooked in, it can retain a raw, sharp note, so ensure it melds into the mixture.
- Remove from heat: Letting the filling rest off the heat allows flavors to settle and the sauce to thicken slightly as it cools, which makes filling the pastry easier. The residual warmth keeps the mixture pliable while preventing steam from sogging the pastry during assembly. If you try to fill while it is piping hot, steam can create a soggy bottom and make handling tricky.
- Cut puff pastry sheet into squares: As you slice each sheet into four even squares and gently stretch to about six inches, you will see the layers loosen and the dough becomes easier to form into wells. Cold, neat cuts preserve the lamination that yields flaky layers in the oven. If the pastry is uneven, some pieces may rise more than others, so aim for consistent sizing.
- Place pastry in muffin wells and fill: When you press each square into the buttered muffin well, the pastry will take the shape of the well, creating a cup ready for filling. Spoon in the filling until nearly full, noticing the contrast between the soft interior and the crisp pastry edge. Overfilling can cause spillage and uneven baking, so leave a little room for the top to close.
- Cover and brush with egg wash: Bringing the four corners to the center and pinching them creates a rustic closure, and brushing with an egg wash imparts glossy, golden color. The sprinkle of kosher salt on top gives a final savory pop against the buttery crust. Make sure the seams are sealed; if not, filling can leak during baking.
- Bake at 400 degrees F for 10 to 12 minutes: In the oven the pastry will puff and brown, with steam escaping in little bursts and the tops turning a deep golden hue. The sound of light crackle and the aroma of baked butter and toasted pastry signal readiness. If the tops brown too quickly, lower the oven rack or reduce temperature slightly to allow the interior to heat through without burning the crust.
- Serve immediately: These are best enjoyed hot, when the pastry is crisp and the filling is steaming and aromatic. Letting them rest slightly helps avoid burns, but serve while the contrast between flaky shell and creamy interior is at its peak. Waiting too long causes the pastry to lose crispness and the filling to firm up.
Notes
- Keep pastry cold before baking to maximize puff and flakiness, chilling between handling sessions if necessary.
- Even dice your carrots and potatoes so they cook uniformly, which ensures consistent texture in every bite.
- Don’t rush the roux, cook the flour a minute or two in the fat to avoid a raw flour taste and to build a silkier sauce.
- Adjust seasoning last after adding the beef broth and milk, since liquids concentrate differently as they reduce.
- Watch oven color during the final minutes of baking, rotating the pan if one side browns faster than the other.