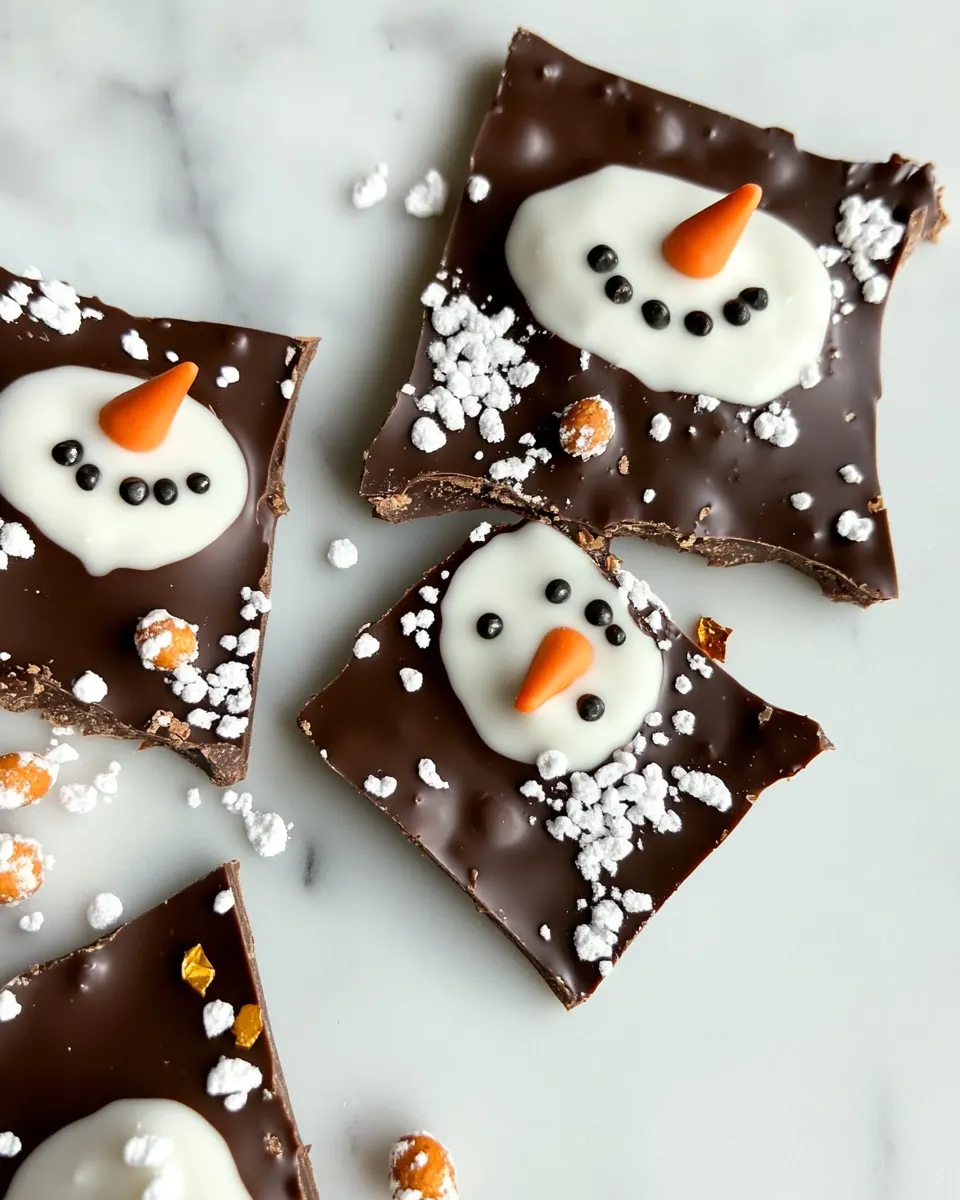
Snowman Chocolate Bark
Snowman Chocolate Bark is the kind of festive treat I reach for when I want a playful, no fuss dessert that still feels handcrafted. The first time I made this, my kitchen looked like a candy workshop, with little marshmallow faces lined up like tiny winter villagers. I loved how the project invited help, and how each imperfect snowman felt like a miniature ornament you could nibble. That first batch disappeared in a single afternoon at a holiday cookie swap, partly because the look was irresistible, and partly because the chocolate was so satisfying and crisp.
I remember deciding to simplify the decorations so kids could join in. We used Edible ink markers to draw faces, and pretzel pieces made perfect stick arms. There is something joyful about assembling these on a sheet of melted chocolate and seeing them set into a glossy, crackling bark. The combination of the smooth chocolate, chewy minimarshmallows, and the salty snap of the pretzel sticks creates contrast that keeps you coming back for one more piece. I like to set up an assembly line, everyone choosing their marshmallow character and placing it in a careful row, which also makes portioning into nine pieces simple.
Over the years I’ve adjusted small details to make the process less fussy. Using preportioned chips makes melting predictable, and chilling the bark ensures clean breaks so each piece holds its little snowman proudly. If you want something quick to whip up for a classroom party or a holiday platter, this recipe reliably delivers joyful results with minimal stress. It’s a sweet project that doubles as a conversation starter, and I keep the ingredients simple so the star, glossy chocolate, really shines.
Recipe Snapshot
16 mins
15 mins
1 mins
Medium
150 kcal
American
Vegan, Gluten-Free
Desserts
Microwave safe bowl, 9 x 13 inch sheet pan, Parchment paper, Rubber spatula
What You’ll Enjoy About This Snowman Chocolate Bark
Playful Presentation
I love how Snowman Chocolate Bark instantly elevates a simple dessert into something whimsical. The tiny marshmallow faces give each piece personality, and that visual charm makes it a hit with kids and adults. Presentation matters to me, and this bark doesn’t need fancy tools to look special.
Quick and Accessible
What draws me to this recipe is how approachable it is. With just a microwave and a sheet pan, you can have a holiday-ready treat in under an hour. I often pull this together when I need a last minute contribution, and it never fails to impress without demanding chef-level skills.
Great Textural Contrast
The interplay between the silky chocolate, pillowy minimarshmallows, and crunchy pretzel sticks makes every bite interesting. I find the salt from the pretzels balances the sweetness, and the nonpareils add a delicate crunch, resulting in a multi layered treat that keeps people reaching back for more.
Kid Friendly and Customizable
This recipe is a perfect family activity. I enjoy giving children simple tasks like drawing faces with Edible ink markers and placing the marshmallows. You can also swap in different sprinkles or shapes, but I often stick to the original combo because it works so well.
Make Ahead Friendly
I value recipes that travel and store well. Once set, this bark keeps firmly when refrigerated and can be portioned for gifting. I usually make an extra batch for neighbors because it keeps its charm and texture for several days when stored properly.
What’s In This Snowman Chocolate Bark
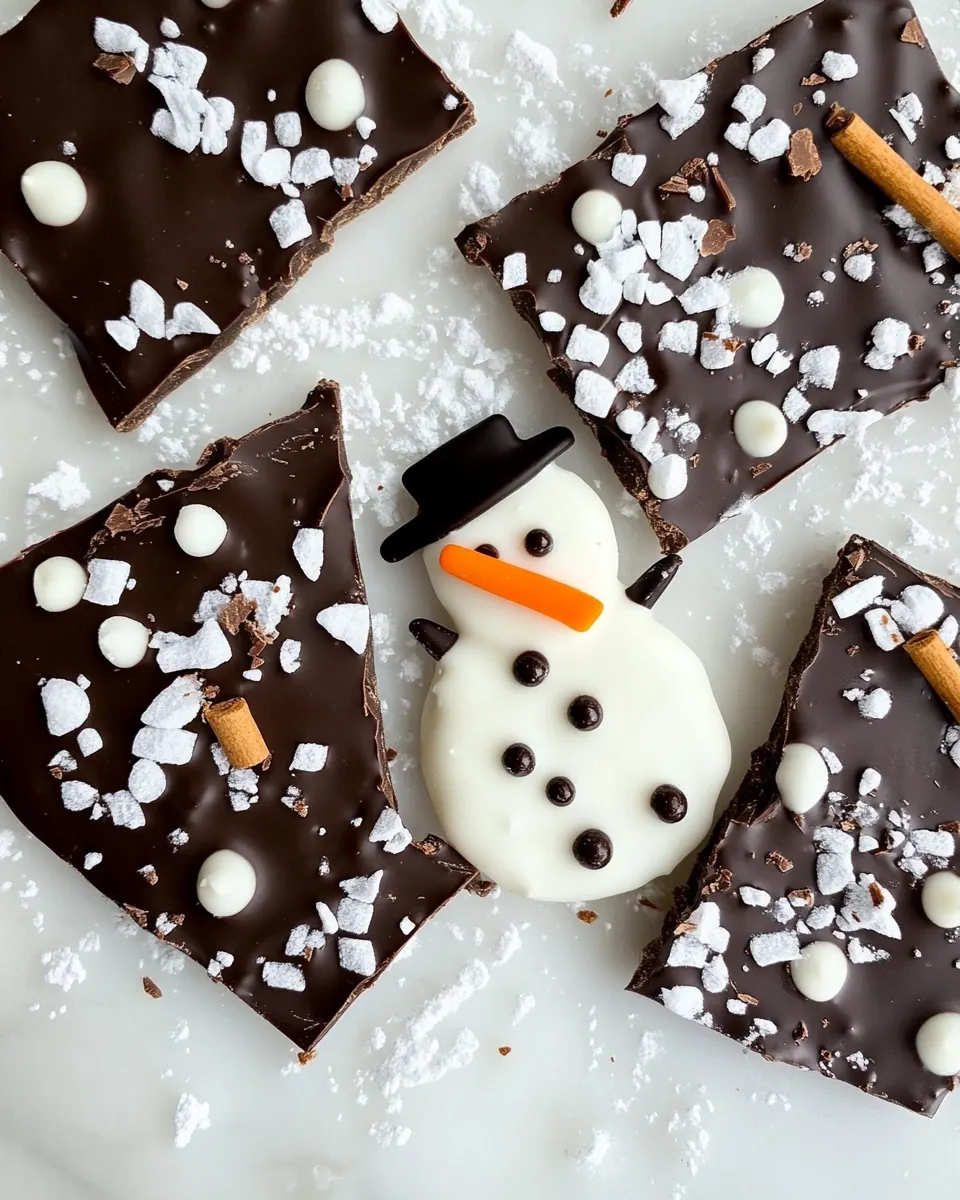
These ingredients are intentionally simple, focused on texture and visual appeal. The chocolate provides the silky base that holds everything together, while the marshmallows form the snowman shapes and the pretzel pieces add a salty crunch. Sprinkles bring a little sparkle, and the edible markers let you personalize each face. Together, they create a balance of sweet, salty, and playful textures that make the bark more than the sum of its parts.
- 9 ounces sugar free chocolate chips, I used Lily’s: Melting smoothly to form the bark base, provides sweetness and a rich chocolate flavor while remaining sugar–free for a lighter treat; melts easily when tempered and sets into a firm, glossy sheet that holds decorations. Helps bind marshmallows and sprinkles, offering a creamy mouthfeel and familiar chocolate aroma that complements the snowman theme.
- 27 minimarshmallows: Adding pillowy texture and visual charm, creates the snowman bodies and provides soft contrast against the crisp chocolate; miniature size makes placement easy and allows melting slightly into the chocolate for adhesion. Offers a sweet, chewy bite that enhances the playful appearance and keeps the bark light and festive.
- 1 teaspoon White Nonpareils Sprinkles: Providing tiny crunchy decoration that mimics snow and adds sparkle, supplies a decorative white pop and subtle sugary crunch; nonpareils adhere well to the melted chocolate and hold their round shape when set. Enhances the wintery aesthetic and adds small bursts of texture without overwhelming the bark.
- pretzel sticks cut into 1/2 inch pieces, for the arms (about 1 oz total): Contributing structural detail for arms, supplies a salty, crunchy component and allows for realistic snowman limbs when inserted into the set chocolate; cutting into 1/2 inch pieces creates easy-to-place, proportionate sticks. Balances sweetness with a savory note and adds a pleasing snap to each piece of bark.
- Edible ink markers, orange and black: Enabling fine decorative detailing, allows drawing facial features and carrot noses directly onto marshmallows for expressive snowmen; edible ink markers are food-safe and create precise lines that withstand handling. Adds personality and whimsical finishing touches that transform simple shapes into recognizable snowman faces.
How to Assemble Snowman Chocolate Bark
Assembling this bark is a relaxed, hands on process that rewards attention to timing. I like to lay everything out in an assembly line so the decorations can be added quickly once the chocolate is spread. Work fluidly, and keep an eye on the chocolate as you place marshmallows and pretzels so everything adheres before the surface starts to set.
- Line a small 9 x 13-inch sheet pan with parchment paper. Set aside.: The cool, crinkly feel of parchment against the pan helps prevent sticking and makes removal effortless after the chocolate sets. I press the parchment into the corners so the chocolate spreads evenly, and I smooth any creases to avoid bumps in the bark. If you skip this, the bark can adhere to the pan and break unevenly, so this preparation step saves cleanup and ensures clean edges.
- Using the edible markers, make a snowman face on 9 small marshmallows. Plan where you will be placing the snowman so they will be easy to cut equally later.: Drawing faces is a delicate task, and beginning on a clean, dry surface keeps the ink from smearing. When I draw, I start with small dots for eyes in black, then a tiny orange dash for the nose, and a curved black line for a smile. The marshmallow surface accepts the ink easily, but pressing too hard can dent them, so use a light touch. A common mistake is drawing after the marshmallows are warmed or sticky, which can cause smudging.
- Have your pretzels cut and ready because once the chocolate hardens they won’t stick.: Visualizing the final cuts lets you space the marshmallows uniformly so each piece contains one snowman. I mentally divide the pan into three columns by three rows, and place marshmallows accordingly. This foresight avoids uneven pieces and ensures every guest gets a complete snowman. If you crowd them too close, breaking the bark can split your decorations.
- Pour the chocolate into a medium microwave-safe bowl. Melt the chocolate in the microwave, stirring the chocolate every 30 seconds to help avoid seizing.: Preparing the pretzel sticks ahead of time is crucial because the window for adhesion is short. I cut them into half inch pieces and lay them on a plate for quick access. When the chocolate begins to set, the surface becomes matte and tacky rather than glossy, which means pretzels will not adhere properly if you wait. Avoid cutting pretzels at the last moment and fumbling, as missed timing can lead to decorations falling off.
- Once melted and smooth, set aside. This took me about 1 1/2 to 2 minutes, but will vary with every microwave. When you’re ready, pour chocolate onto the prepared baking sheet, spreading with a rubber spatula into a smooth layer almost to the edge.: When you scoop the chocolate chips into a bowl, they should clink softly as you stir, indicating a dry, even pile ready to melt. I use a microwave safe bowl because even heat helps with smooth melting, and I stir every 30 seconds to distribute warmth and prevent seizing. Overheating will make the chocolate grainy, so be cautious when approaching a fully melted state.
- Quickly add the marshmallows to create your snowmen, then add the pretzel arms and lastly add the sprinkles, for snow.: You will notice the chips soften, then pool into a glossy mass as you stir. The aroma becomes rich and cocoa forward, and the sound of the spoon against the bowl is a small, satisfying rhythm. Stirring frequently ensures consistent temperature and prevents hot spots that can seize. If your chocolate thickens suddenly, that is a sign of moisture contamination or overheating, so stop heating and keep stirring to distribute residual heat.
- Allow the bark to set completely in the refrigerator, about 30 minutes. Once hardened, break into 9 pieces about 1 ounce each.: Smooth melted chocolate will flow like velvet when you tilt the bowl, and it should be lump free. I let it rest briefly to allow the heat to equalize, which reduces the risk of melting your marshmallows on contact. This step also lets you check the viscosity before spreading, ensuring the chocolate will level nicely across the pan. A common pitfall is pouring while the chocolate is too hot, which can cause marshmallows to melt or sink.
- When you are ready pour chocolate onto the prepared baking sheet spreading with a rubber spatula into a smooth layer almost to the edge: As you spread, the surface should become glossy and reflective, with the spatula leaving faint trails that level out. I aim for a thickness that is sturdy enough to hold the decorations, roughly the thickness of a coin, which helps when breaking into nine 1 ounce pieces. Work quickly but deliberately so the surface stays workable. If you drag the spatula too slowly, the chocolate can start forming a skin that prevents proper settling of decorations.
- Quickly add the marshmallows to create your snowmen then add the pretzel arms and lastly add the sprinkles for snow: This is the most tactile part, and you will feel a brief tack as the decorations adhere. Place each decorated minimarshmallow gently so the inked faces remain visible, then slide in pretzel arms at a slight angle for a natural pose. Finish with a light scatter of White Nonpareils Sprinkles to mimic falling snow. Working fast is essential because once the surface loses gloss the decorations will not stick. A frequent error is overloading one section which can cause uneven setting and make the bark hard to break.
- Allow the bark to set completely in the refrigerator about 30 minutes: Cooling transforms the glossy surface into a firm, crisp bark with a satisfying snap. You will notice the chocolate change from tacky to solid and the edges will lift cleanly from the parchment. Chilling speeds crystallization for a clean break and preserves the marshmallow shape. Avoid leaving it at room temperature for too long, as warmth can make the pieces soft and difficult to portion neatly.
- Once hardened break into 9 pieces about 1 ounce each: When the bark is fully set, lift the parchment and gently tap to loosen if needed. Break along natural weak points or score lightly with a knife beforehand for uniform pieces. Each piece should display a complete snowman with intact features, and you will hear a crisp snap as you separate them. The most common mistake is forcing uneven breaks which can fragment marshmallows, so take a moment to find clean seams before splitting.
Ways to Adapt This Recipe
This bark is flexible and forgiving, so small swaps can personalize it without changing the joyful result. Below I share adaptation ideas that keep the technique intact while offering new flavor or textural accents. Each tip begins with a bolded quick idea so you can scan fast, then I expand on how I use that approach.
- Swap chocolate type: If you prefer a sweeter profile try milk chocolate chips instead of sugar free, but be mindful that melting times may vary and the set will be slightly softer.
- Adjust sweetness: Use sugar free chips like I do to control sugar, or mix dark and semi sweet to find the perfect balance for your crowd while keeping texture consistent.
- Change the sprinkles: Swap in colored nonpareils or small shaped sprinkles to match a holiday theme, ensuring they are light enough to sit on the surface without sinking.
- Make mini gifts: Break into smaller pieces for bite size treats and package in small cellophane bags for neighbor gifts, keeping them chilled until handed out.
- Involve kids: Let children draw faces and place decorations for a family activity; supervise marker use and show them how to space the pieces for equal cutting.
- Vary the pretzel style: Use thin pretzel sticks for delicate arms or broken pretzel twists for a rustic look, cutting them uniformly so placement is predictable.
What to Serve Alongside Snowman Chocolate Bark
This playful bark pairs well with simple hot beverages and seasonal platters, and it works for multiple occasions from classroom parties to holiday gift boxes. Below I outline serving ideas, pairing suggestions, and storage pointers so your presentation and logistics are covered. Use the bolded phrases to quickly see practical options.
- Serve with hot cocoa: A warm mug of hot cocoa complements the crisp chocolate and offers a cozy contrast, especially during winter gatherings.
- Include on a dessert board: Arrange alongside cookies, nuts, and dried fruit to provide variety in texture and flavor for guests to graze.
- Perfect for holiday parties: Place on a platter with festive napkins for holiday cookie swaps and seasonal celebrations like Christmas where the theme matches perfectly.
- Pack for gifting: Layer pieces in a small box with parchment and a ribbon for neighbor or teacher gifts, keeping the package chilled until delivery.
- Storage tips: Keep the bark refrigerated in an airtight container to prevent melting and moisture, and consume within one week for best texture.
- Occasion pairings: Use it as a fun dessert for family movie nights, winter school events, or as a sweet stocking stuffer during the holidays.
FAQ
Conclusion
Snowman Chocolate Bark stands out because it is visually charming, texturally satisfying, and simple to make. I love that it brings people together, whether it’s a family decorating session or a quick last minute dessert for guests. Try it when you want a festive, shareable treat that looks special without demanding hours in the kitchen. Have fun with the faces, keep the process relaxed, and enjoy handing out pieces that are as joyful to give as they are to eat.
Snowman Chocolate Bark
Equipment
- Microwave-safe Bowl
- 9 x 13 inch sheet pan
- Parchment Paper
- Rubber spatula
Ingredients
- 9 ounces sugar free chocolate chips, I used Lily’s Melting smoothly to form the bark base, provides sweetness and a rich chocolate flavor while remaining sugar-free for a lighter treat; melts easily when tempered and sets into a firm, glossy sheet that holds decorations. Helps bind marshmallows and sprinkles, offering a creamy mouthfeel and familiar chocolate aroma that complements the snowman theme.
- 27 minimarshmallows Adding pillowy texture and visual charm, creates the snowman bodies and provides soft contrast against the crisp chocolate; miniature size makes placement easy and allows melting slightly into the chocolate for adhesion. Offers a sweet, chewy bite that enhances the playful appearance and keeps the bark light and festive.
- 1 teaspoon White Nonpareils Sprinkles Providing tiny crunchy decoration that mimics snow and adds sparkle, supplies a decorative white pop and subtle sugary crunch; nonpareils adhere well to the melted chocolate and hold their round shape when set. Enhances the wintery aesthetic and adds small bursts of texture without overwhelming the bark.
- pretzel sticks cut into 1/2 inch pieces, for the arms (about 1 oz total) Contributing structural detail for arms, supplies a salty, crunchy component and allows for realistic snowman limbs when inserted into the set chocolate; cutting into 1/2 inch pieces creates easy-to-place, proportionate sticks. Balances sweetness with a savory note and adds a pleasing snap to each piece of bark.
- Edible ink markers, orange and black Enabling fine decorative detailing, allows drawing facial features and carrot noses directly onto marshmallows for expressive snowmen; edible ink markers are food-safe and create precise lines that withstand handling. Adds personality and whimsical finishing touches that transform simple shapes into recognizable snowman faces.
Instructions
- Line a small 9 x 13-inch sheet pan with parchment paper. Set aside.: The cool, crinkly feel of parchment against the pan helps prevent sticking and makes removal effortless after the chocolate sets. I press the parchment into the corners so the chocolate spreads evenly, and I smooth any creases to avoid bumps in the bark. If you skip this, the bark can adhere to the pan and break unevenly, so this preparation step saves cleanup and ensures clean edges.
- Using the edible markers, make a snowman face on 9 small marshmallows. Plan where you will be placing the snowman so they will be easy to cut equally later.: Drawing faces is a delicate task, and beginning on a clean, dry surface keeps the ink from smearing. When I draw, I start with small dots for eyes in black, then a tiny orange dash for the nose, and a curved black line for a smile. The marshmallow surface accepts the ink easily, but pressing too hard can dent them, so use a light touch. A common mistake is drawing after the marshmallows are warmed or sticky, which can cause smudging.
- Have your pretzels cut and ready because once the chocolate hardens they won’t stick.: Visualizing the final cuts lets you space the marshmallows uniformly so each piece contains one snowman. I mentally divide the pan into three columns by three rows, and place marshmallows accordingly. This foresight avoids uneven pieces and ensures every guest gets a complete snowman. If you crowd them too close, breaking the bark can split your decorations.
- Pour the chocolate into a medium microwave-safe bowl. Melt the chocolate in the microwave, stirring the chocolate every 30 seconds to help avoid seizing.: Preparing the pretzel sticks ahead of time is crucial because the window for adhesion is short. I cut them into half inch pieces and lay them on a plate for quick access. When the chocolate begins to set, the surface becomes matte and tacky rather than glossy, which means pretzels will not adhere properly if you wait. Avoid cutting pretzels at the last moment and fumbling, as missed timing can lead to decorations falling off.
- Once melted and smooth, set aside. This took me about 1 1/2 to 2 minutes, but will vary with every microwave. When you’re ready, pour chocolate onto the prepared baking sheet, spreading with a rubber spatula into a smooth layer almost to the edge.: When you scoop the chocolate chips into a bowl, they should clink softly as you stir, indicating a dry, even pile ready to melt. I use a microwave safe bowl because even heat helps with smooth melting, and I stir every 30 seconds to distribute warmth and prevent seizing. Overheating will make the chocolate grainy, so be cautious when approaching a fully melted state.
- Quickly add the marshmallows to create your snowmen, then add the pretzel arms and lastly add the sprinkles, for snow.: You will notice the chips soften, then pool into a glossy mass as you stir. The aroma becomes rich and cocoa forward, and the sound of the spoon against the bowl is a small, satisfying rhythm. Stirring frequently ensures consistent temperature and prevents hot spots that can seize. If your chocolate thickens suddenly, that is a sign of moisture contamination or overheating, so stop heating and keep stirring to distribute residual heat.
- Allow the bark to set completely in the refrigerator, about 30 minutes. Once hardened, break into 9 pieces about 1 ounce each.: Smooth melted chocolate will flow like velvet when you tilt the bowl, and it should be lump free. I let it rest briefly to allow the heat to equalize, which reduces the risk of melting your marshmallows on contact. This step also lets you check the viscosity before spreading, ensuring the chocolate will level nicely across the pan. A common pitfall is pouring while the chocolate is too hot, which can cause marshmallows to melt or sink.
- When you are ready pour chocolate onto the prepared baking sheet spreading with a rubber spatula into a smooth layer almost to the edge: As you spread, the surface should become glossy and reflective, with the spatula leaving faint trails that level out. I aim for a thickness that is sturdy enough to hold the decorations, roughly the thickness of a coin, which helps when breaking into nine 1 ounce pieces. Work quickly but deliberately so the surface stays workable. If you drag the spatula too slowly, the chocolate can start forming a skin that prevents proper settling of decorations.
- Quickly add the marshmallows to create your snowmen then add the pretzel arms and lastly add the sprinkles for snow: This is the most tactile part, and you will feel a brief tack as the decorations adhere. Place each decorated minimarshmallow gently so the inked faces remain visible, then slide in pretzel arms at a slight angle for a natural pose. Finish with a light scatter of White Nonpareils Sprinkles to mimic falling snow. Working fast is essential because once the surface loses gloss the decorations will not stick. A frequent error is overloading one section which can cause uneven setting and make the bark hard to break.
- Allow the bark to set completely in the refrigerator about 30 minutes: Cooling transforms the glossy surface into a firm, crisp bark with a satisfying snap. You will notice the chocolate change from tacky to solid and the edges will lift cleanly from the parchment. Chilling speeds crystallization for a clean break and preserves the marshmallow shape. Avoid leaving it at room temperature for too long, as warmth can make the pieces soft and difficult to portion neatly.
- Once hardened break into 9 pieces about 1 ounce each: When the bark is fully set, lift the parchment and gently tap to loosen if needed. Break along natural weak points or score lightly with a knife beforehand for uniform pieces. Each piece should display a complete snowman with intact features, and you will hear a crisp snap as you separate them. The most common mistake is forcing uneven breaks which can fragment marshmallows, so take a moment to find clean seams before splitting.
Notes
- Swap chocolate type: If you prefer a sweeter profile try milk chocolate chips instead of sugar free, but be mindful that melting times may vary and the set will be slightly softer.
- Adjust sweetness: Use sugar free chips like I do to control sugar, or mix dark and semi sweet to find the perfect balance for your crowd while keeping texture consistent.
- Change the sprinkles: Swap in colored nonpareils or small shaped sprinkles to match a holiday theme, ensuring they are light enough to sit on the surface without sinking.
- Make mini gifts: Break into smaller pieces for bite size treats and package in small cellophane bags for neighbor gifts, keeping them chilled until handed out.
- Involve kids: Let children draw faces and place decorations for a family activity; supervise marker use and show them how to space the pieces for equal cutting.
- Vary the pretzel style: Use thin pretzel sticks for delicate arms or broken pretzel twists for a rustic look, cutting them uniformly so placement is predictable.