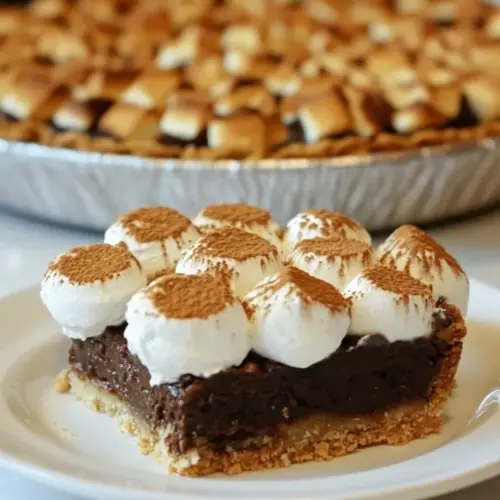
Smores Pie
Smores Pie is one of those desserts that immediately transports me back to backyard nights when I was a kid, scraping sticky marshmallow from my fingers and trading graham crackers like currency. I remember the first time I turned that campfire ritual into a proper pie, curious whether the creamy chocolate filling could stand up to the toasted marshmallow crown. It did, and it became my go to when friends asked for something nostalgic but a little grown up.
Over the years I have made Smores Pie for potlucks, quiet dinners, and summer gatherings where someone inevitably mentions how much they love anything with toasted marshmallow. I love that the recipe is playful yet elegant, quick enough to make on a weeknight if you plan ahead, and shows up beautifully on a dessert table. Each bite combines a buttery crumb, silken chocolate, and that smoky sweetness only a torch or broiler can create.
Recipe Snapshot
37 mins
20 mins
17 mins
Easy
350 kcal
American
Gluten-Free, Low FODMAP
Desserts
Double boiler or heat proof bowl, Tart pans, Kitchen torch or broiler, Mixing bowls
Why This Smores Pie Is So Good
I grew up on campfire sweets, so this is comfort food
There is a deep nostalgia baked into Smores Pie. For me, the smell of toasted marshmallow triggers memories of summer nights and easy laughter. Recreating that experience in a pie taps into emotion as much as flavor, which is why I bring this dish to gatherings where I want people to relax and smile.
Textural contrast keeps every bite interesting
The buttery graham crust, smooth chocolate custard, and pillowy toasted marshmallow create layers that play off each other. That contrast is why I keep the crust finely ground and press it into individual tart pans, so each mouthful has crispness and cream in equal measure.
It feels fancy but is approachable
Even though the presentation reads elevated, the steps are straightforward. I often cook this when I want a dessert that looks like I spent hours on it but actually didn’t. The techniques are forgiving, and small shortcuts like using a heat proof bowl over simmering water simplify the process without sacrificing taste.
Flexible for gatherings and solo treats
I love that Smores Pie suits many occasions. Make individual tarts for a party, or scale to a single larger pie for a dinner with friends. The refrigerated filling holds up well, so you can make it ahead and toast the marshmallows right before serving for best texture and aroma.
The flavors are universally appealing
Chocolate, marshmallow, and graham are a classic trio that almost everyone recognizes and enjoys. They work together because the butter and sugar in the crust frame the chocolate filling, while the marshmallow topping adds an airy sweetness and toasted aroma that punctuates the whole experience.
Ingredients to Make Smores Pie
These ingredients are deliberately simple, designed to recreate campfire nostalgia with kitchen friendly steps. The star players are the crust, which provides a crunchy, buttery base, the chocolate custard that brings richness and silkiness, and the marshmallow topping for the classic toasted finish. Together they balance texture and sweetness so each bite feels complete.
- 1 sleeve graham crackers finely ground: Finely ground to form a cohesive crust, providing structure and a toasty graham flavor that complements the filling. Combine with butter and sugar to press into the pie pan and bake briefly for stability.
- 4 tablespoons butter: Melted to bind the graham cracker crumbs and sugar, adding richness and helping the crust set firmly. Use softened or melted butter to ensure an even, buttery texture throughout the base.
- 2 tablespoons granulated sugar: Added to the crust mixture to enhance sweetness and promote browning, balancing the savory notes of the graham crackers. Sprinkle evenly into the crumbs before combining with butter for consistent flavor.
- 1 1/2 tablespoons sugar: Sprinkled into the filling to subtly sweeten and balance the richness of the cream and chocolate without overpowering the dessert. Dissolve into warm cream or mix with yolks to ensure smooth integration.
- 3/4 cup heavy cream: Heated to create a silky, custard-like filling when combined with egg yolks and sugar, contributing richness and a creamy mouthfeel. Warm gently to melt chocolate and help emulsify the filling for a smooth texture.
- pinch of salt: Pinched in to enhance and balance the sweetness of the dessert, elevating the overall flavor profile without being detectable. Add sparingly to the cream or custard to accentuate chocolate and marshmallow notes.
- 2 egg yolks: Whisked into the warm cream mixture to thicken and enrich the filling, providing a velvety custard texture and stability when cooked gently. Temper yolks carefully to avoid curdling and create a smooth, set filling.
- 2/3 cups semi sweet chocolate chips: Melted into the hot cream to form the chocolate component of the filling, offering deep cocoa flavor and glossy texture. Use good-quality semi–sweet chips for balanced sweetness and a silky ganache-like consistency.
- 1/4 teaspoon vanilla extract: Stirred in for a subtle aromatic lift, rounding out the chocolate and cream with warm vanilla notes and enhancing perceived sweetness. Add at the end of cooking to preserve its fragrance and avoid evaporation.
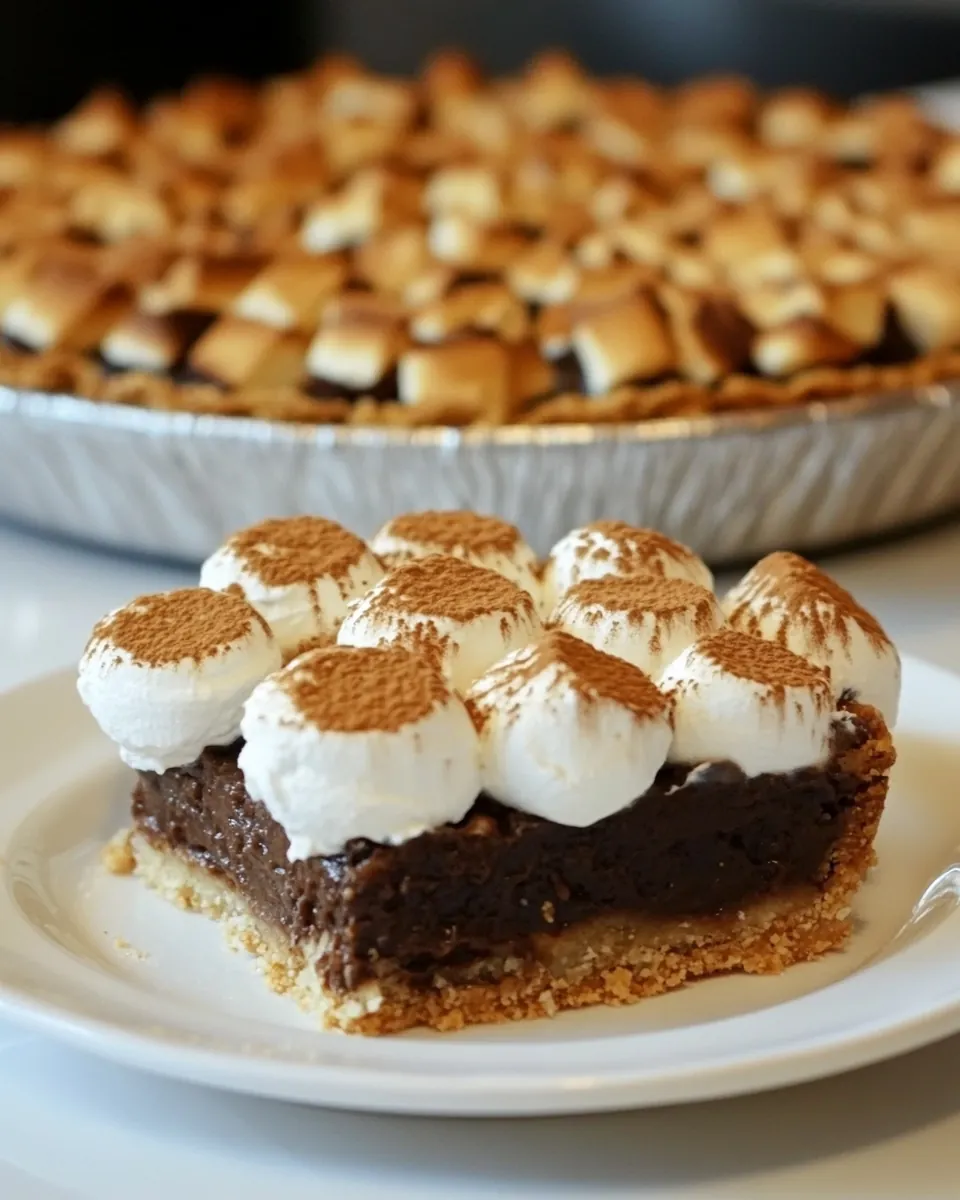
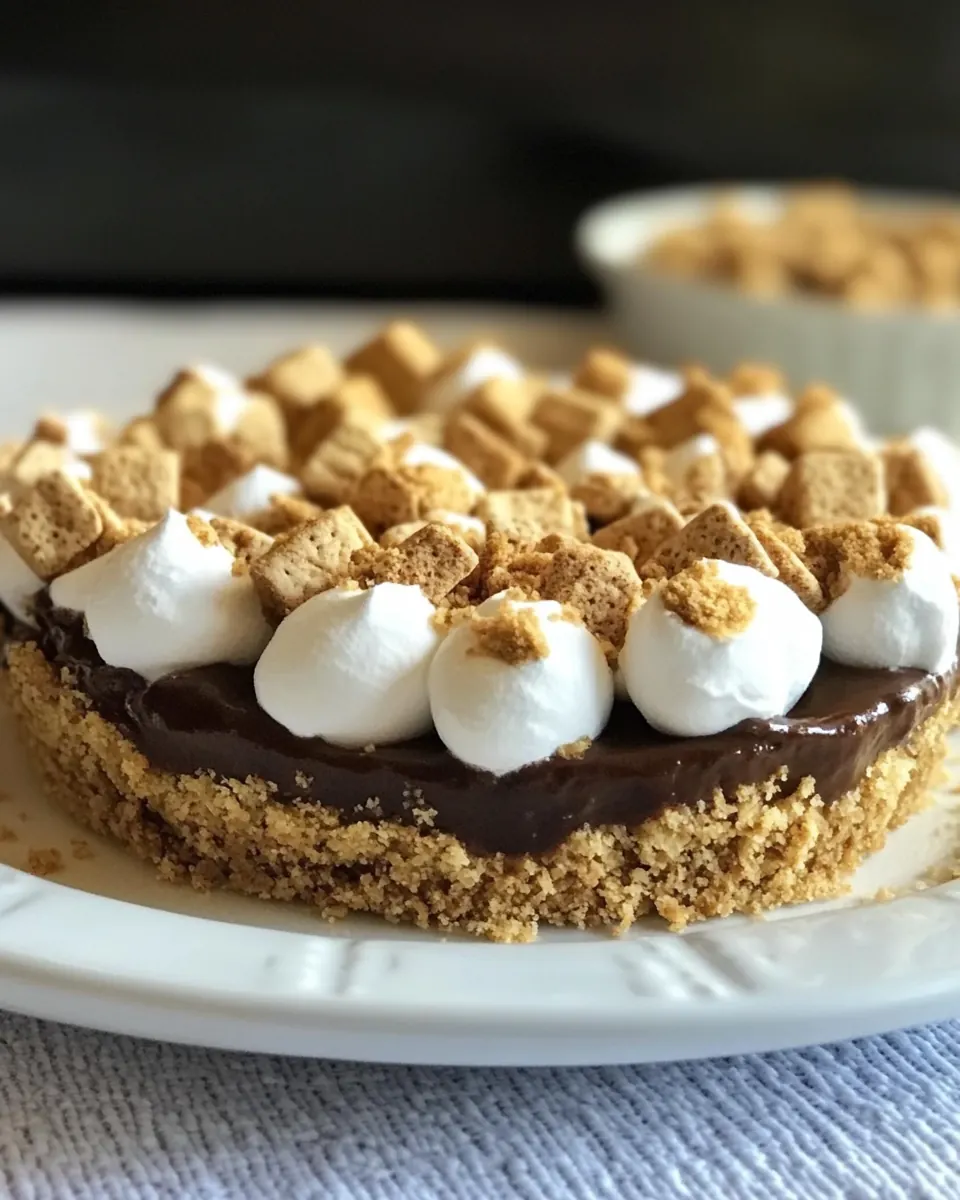
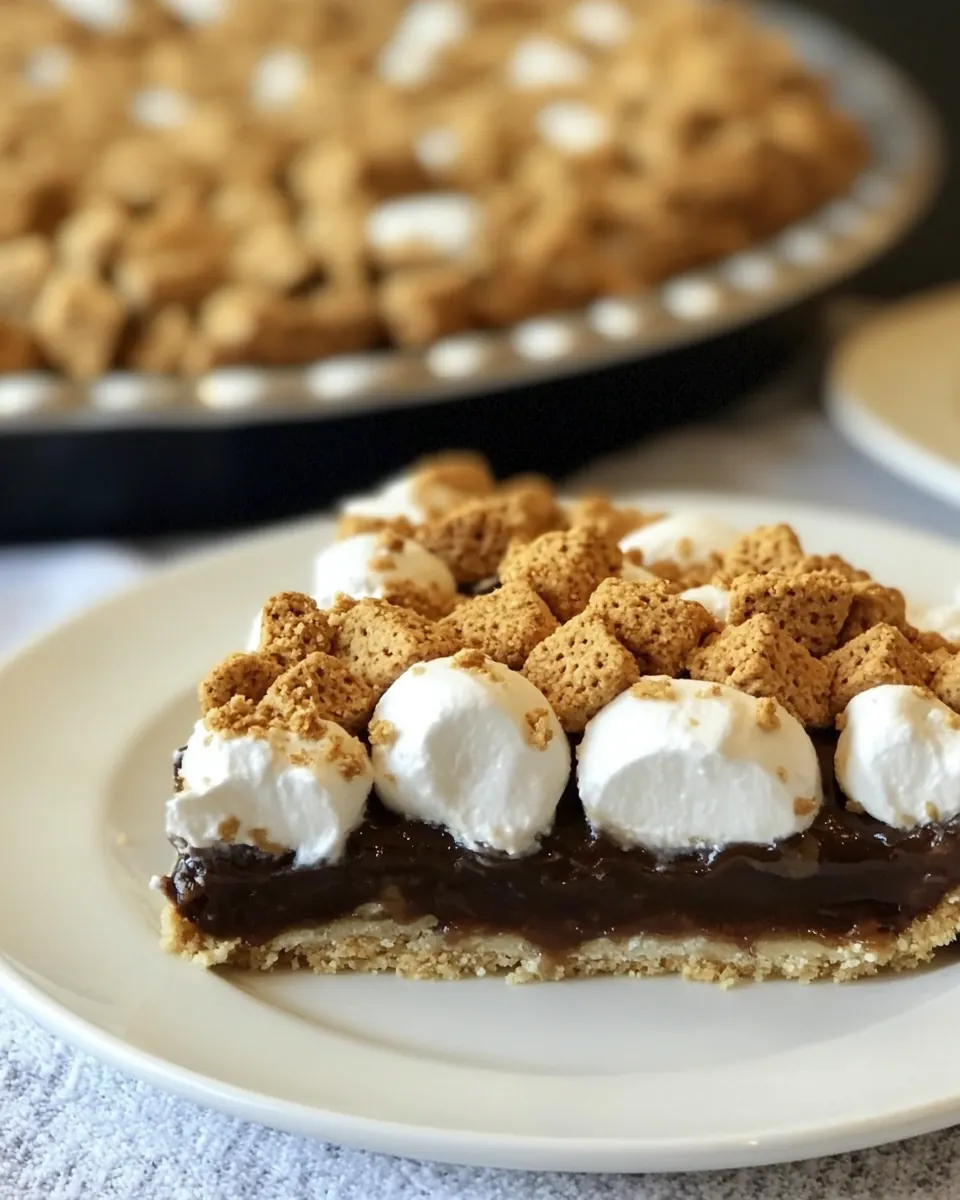
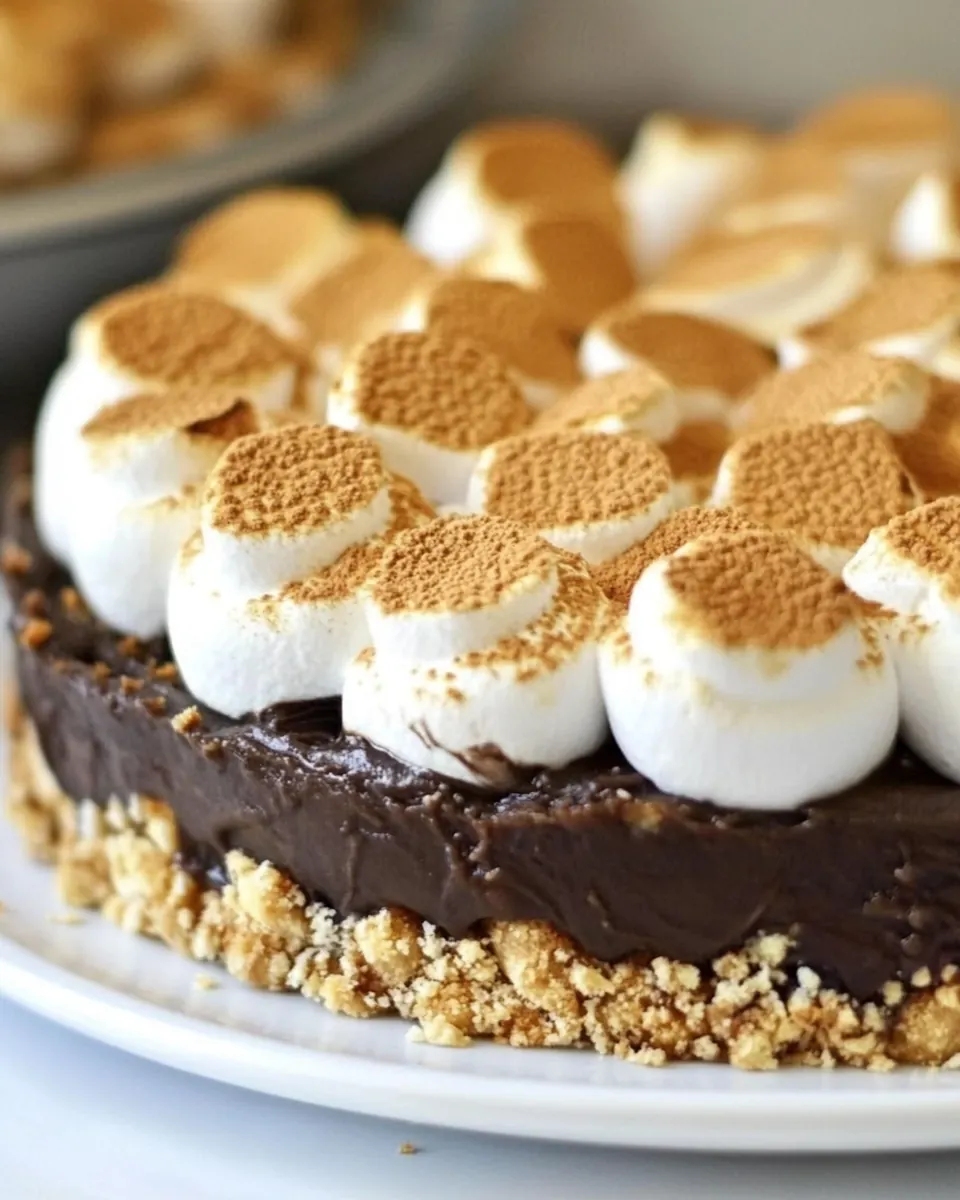
- 2 cups mini marshmallows: Layered on top and toasted to create the iconic s'mores topping, providing chewy, gooey sweetness and a toasty finish. Scatter evenly and broil briefly or torch to achieve browned peaks that contrast the creamy filling.
Cooking Instructions for Smores Pie
I like to walk into the steps with a calm kitchen and one bowl at a time. These directions are written to help you sense when each stage is right, and to avoid the little pitfalls that can derail a custard based filling. Read through first, then gather your ingredients and tools.
- In a small bowl, mix all ingredients for the crust until completely moistened. Divide evenly between 4 individual tart pans and press in. Place into the freezer while you make the filling.: You will feel the mixture change from dry crumbs to a texture that holds together when pressed, a tactile cue that the ratio is right. The aroma will be buttery and mildly sweet. If it seems dusty or falls apart, add a touch more melted butter , a teaspoon at a time, until it clumps when pinched between fingers. Avoid overworking the crumbs, which can make the crust dense rather than tender.
- For the filling, stir sugar and salt into cream in the top of a double boiler. A heat-proof bowl over lightly simmering water works just fine! Stir occasionally to heat cream thoroughly and dissolve sugar, about 7 minutes or so.: Pressing creates uniform thickness so the crust bakes or chills evenly and supports the filling without breaking. Use the flat bottom of a measuring cup to press and smooth the surface. If you press too thin in places, the filling may leak or create fragile edges, so aim for an even layer about the thickness of a nickel.
- Temper egg yolks with hot cream and mix. Pour that mixture into the double boiler and stir frequently for 10-12 minutes so the mixture can thicken.: Chilling firms the crust and prevents it from absorbing too much moisture from the filling, preserving a crisp base. You will notice the crust become cool and set. Skip this step and the crust can become soggy when filled, so resist the urge to skip freezing.
- Remove from heat and stir in chocolate chips and vanilla extract. Stir until chocolate has melted and filling is a smooth and uniform consistency.: As the heavy cream warms, the sugar dissolves and the mixture becomes glossy, releasing a gentle steam and a sweet dairy aroma. Keep the water at a light simmer to avoid boiling, which can scorch the cream. Stir occasionally to distribute heat and dissolve the sugar completely; undissolved sugar can create a grainy texture.
- Pour into tart shells evenly and sit out at room temperature. Because the shells were in the freezer, this should take 30 minutes or so. Place plastic wrap directly onto the filling of the tarts and refrigerate at least 2 hours or until the filling has set. You should be able to remove the plastic wrap cleanly–with no filling on it. Store in refrigerator until ready to serve.: The gentle, indirect heat prevents scorching and gives you control over temperature. You will see small bubbles around the edge of the water and a thin steam rising. Avoid vigorous boiling underneath, which can cause the bowl to rattle and unevenly heat the custard.
- When ready to serve, remove tarts from fridge. Top with 1/2 cup mini marshmallows each and torch the top to toast. Or stick them under a hot broiler for a few seconds. Serve immediately.: The cream will thicken slightly and smell sweeter as the sugar dissolves. Keep stirring to prevent a skin from forming on the surface. If the cream starts to boil, reduce heat immediately, because boiling causes separation and ruins the smooth texture you want.
- Temper egg yolks with hot cream and mix: Pouring a small stream of the hot cream into the beaten egg yolks while whisking prevents the yolks from scrambling. You should see the yolks loosen and become warm and glossy, not curdled. If you add the cream too quickly, you risk scrambled bits in the custard, which is hard to fix at this point.
- Pour that mixture into the double boiler and stir frequently for 10 to 12 minutes so the mixture can thicken: The custard will slowly thicken and coat the back of a spoon, a key visual cue. Stirring constantly helps maintain an even temperature and prevents hot spots that can cause curdling. If the mixture looks lumpy, remove from heat and whisk vigorously to smooth, but avoid high heat which solidifies the proteins.
- Remove from heat and stir in chocolate chips and vanilla extract: Adding the semi sweet chocolate chips off heat lets them melt gently into the warm custard, forming a silky glossy filling. Stir until the chocolate is fully incorporated and the mixture is uniformly smooth. If chocolate does not melt, return briefly to warm water bath, stirring constantly, rather than direct heat which could separate the mixture.
- Stir until chocolate has melted and filling is a smooth and uniform consistency: The filling should be shiny and thick, with no visible streaks of chocolate or yolk. The aroma becomes richly chocolatey and inviting. If the filling seems too thin, let it cool slightly to thicken before pouring; if it seizes, whisk in a tablespoon of warm cream to reincorporate.
- Pour into tart shells evenly and sit out at room temperature: Because the shells were chilled, the filling will start to set at the edges first, creating a clean top. You will notice the surface lose some gloss as it cools. Allow about 30 minutes for initial set; this reduces condensation under the plastic wrap and improves texture.
- Place plastic wrap directly onto the filling of the tarts and refrigerate at least 2 hours or until the filling has set: Pressing the plastic gently onto the filling prevents a skin and protects the surface from fridge smells. The filling will firm to a sliceable custard texture. If refrigerated for less time the center may be soft and not hold shape when sliced.
- You should be able to remove the plastic wrap cleanly with no filling on it: This is the test for properly set custard. If the plastic comes away with filling, return to fridge and chill longer. Proper setting ensures clean presentation and prevents an overly soft center when serving.
- Store in refrigerator until ready to serve: Keep the tarts chilled to maintain the custard texture and prevent the marshmallows from melting prematurely. They will hold for a day or two, but the crust begins to soften over time, so serve within 48 hours for best contrast.
- When ready to serve, remove tarts from fridge: Cold tarts provide the best contrast under warm toasted marshmallows. You should feel a cool firmness when touching the shell. If they have warmed, return briefly to chill; warm filling can collapse under the marshmallow heat.
- Top with 1/2 cup mini marshmallows each and torch the top to toast: Toasting with a kitchen torch gives you control and produces a caramelized surface that crackles softly. Move the flame in gentle sweeps until you reach a golden to deep brown shade according to preference. Avoid holding the torch too close which can scorch the marshmallows and create bitter notes.
- Or stick them under a hot broiler for a few seconds: If using a broiler, watch constantly as marshmallows can go from golden to burnt in moments. Place tarts on a high rack and broil on low to medium for a few seconds, removing as soon as the tops puff and color. A common mistake is stepping away, which results in blackened tops.
- Serve immediately: The contrast of warm toasted marshmallow and cool chocolate custard is the highlight. You will hear small crackles as the marshmallow cools and a soft sigh as your guests take their first bite. If left too long, the marshmallow surface will become sticky rather than crisp.
Helpful Hints
I like to keep a short list of practical pointers near the stove when making Smores Pie. Below are detailed tips that expand on little tricks I use to keep the process calm and the results consistent. Each tip begins with a bolded phrase so you can scan quickly while cooking.
- Measure ingredients accurately, especially the heavy cream and egg yolks, because custards rely on precise ratios for texture. Too much liquid leads to a runny filling, and too little leads to an overly firm set. Use a kitchen scale for best results, and level cups when measuring dry items.
- Keep heat gentle while heating cream to avoid scalding which can produce an off aroma. A double boiler or a heat proof bowl over simmering water provides even, controllable heat. Stir occasionally and watch for steam rather than a rolling boil.
- Work with cold tart shells when pouring warm filling to minimize crust sogginess. The chilled shell firms the edges and allows the filling to set from the outside in, maintaining structure and contrast between textures.
- Use a kitchen torch for best toasting control to achieve even caramelization and avoid burnt spots. Move the flame in wide sweeps and keep it in motion. If you only have a broiler, preheat it and position tarts on the top rack, watching continuously for the briefest of seconds.
- Plan chilling time into your schedule as the filling needs a minimum of two hours to set firmly. Make the filling earlier in the day or the night before, then finish the topping just before serving to maintain texture and presentation.
Great Combinations for Smores Pie
This dessert pairs well with simple accompaniments and occasions that honor its nostalgic character. Below I outline serving ideas, storage tips, and pairing suggestions so you can present Smores Pie beautifully, whether for an intimate gathering or a summer party.
- Serve with fresh fruit, such as sliced strawberries or raspberries, to cut through the richness and add a bright, acidic counterpoint that refreshes the palate.
- Pair with coffee or decaf after dinner, the roast notes in coffee complement the chocolate and toasted marshmallow without overpowering them.
- Perfect for summer gatherings, bring individual tarts to a backyard get together where the toasted marshmallow theme resonates with outdoor memories and relaxed conversation.
- Store refrigerated, keep tarts covered with plastic wrap pressed to the filling and consume within 48 hours for optimal texture and crust crispness.
- Make ahead strategy, prepare crusts and filling a day in advance, refrigerate, and add marshmallows and torch right before serving for freshest presentation.
- Occasion suggestions, serve at casual dinners, holiday dessert spreads, or anytime you want a dessert that is playful yet refined.
FAQ
Conclusion
Smores Pie brings campfire memories to the table with a creamy chocolate filling, crisp graham crust, and toasted marshmallow top. The recipe shines because it balances simple techniques with nostalgic flavors, making it a favorite for gatherings and quiet nights alike. Give it a try, following the steps for tempering the yolks and chilling the crust, and finish by toasting the marshmallows at the last minute for the best contrast between warm topping and cool custard.
Smores Pie
Equipment
- Double boiler or heat proof bowl
- Tart pans
- Kitchen Torch or Broiler
- Mixing Bowls
Ingredients
- 1 sleeve graham crackers finely ground Finely ground to form a cohesive crust, providing structure and a toasty graham flavor that complements the filling. Combine with butter and sugar to press into the pie pan and bake briefly for stability.
- 4 tablespoons butter Melted to bind the graham cracker crumbs and sugar, adding richness and helping the crust set firmly. Use softened or melted butter to ensure an even, buttery texture throughout the base.
- 2 tablespoons granulated sugar Added to the crust mixture to enhance sweetness and promote browning, balancing the savory notes of the graham crackers. Sprinkle evenly into the crumbs before combining with butter for consistent flavor.
- 1 1/2 tablespoons sugar Sprinkled into the filling to subtly sweeten and balance the richness of the cream and chocolate without overpowering the dessert. Dissolve into warm cream or mix with yolks to ensure smooth integration.
- 3/4 cup heavy cream Heated to create a silky, custard-like filling when combined with egg yolks and sugar, contributing richness and a creamy mouthfeel. Warm gently to melt chocolate and help emulsify the filling for a smooth texture.
- pinch of salt Pinched in to enhance and balance the sweetness of the dessert, elevating the overall flavor profile without being detectable. Add sparingly to the cream or custard to accentuate chocolate and marshmallow notes.
- 2 egg yolks Whisked into the warm cream mixture to thicken and enrich the filling, providing a velvety custard texture and stability when cooked gently. Temper yolks carefully to avoid curdling and create a smooth, set filling.
- 2/3 cups semi sweet chocolate chips Melted into the hot cream to form the chocolate component of the filling, offering deep cocoa flavor and glossy texture. Use good-quality semi-sweet chips for balanced sweetness and a silky ganache-like consistency.
- 1/4 teaspoon vanilla extract Stirred in for a subtle aromatic lift, rounding out the chocolate and cream with warm vanilla notes and enhancing perceived sweetness. Add at the end of cooking to preserve its fragrance and avoid evaporation.
- 2 cups mini marshmallows Layered on top and toasted to create the iconic s'mores topping, providing chewy, gooey sweetness and a toasty finish. Scatter evenly and broil briefly or torch to achieve browned peaks that contrast the creamy filling.
Instructions
- In a small bowl, mix all ingredients for the crust until completely moistened. Divide evenly between 4 individual tart pans and press in. Place into the freezer while you make the filling.: You will feel the mixture change from dry crumbs to a texture that holds together when pressed, a tactile cue that the ratio is right. The aroma will be buttery and mildly sweet. If it seems dusty or falls apart, add a touch more melted butter , a teaspoon at a time, until it clumps when pinched between fingers. Avoid overworking the crumbs, which can make the crust dense rather than tender.
- For the filling, stir sugar and salt into cream in the top of a double boiler. A heat-proof bowl over lightly simmering water works just fine! Stir occasionally to heat cream thoroughly and dissolve sugar, about 7 minutes or so.: Pressing creates uniform thickness so the crust bakes or chills evenly and supports the filling without breaking. Use the flat bottom of a measuring cup to press and smooth the surface. If you press too thin in places, the filling may leak or create fragile edges, so aim for an even layer about the thickness of a nickel.
- Temper egg yolks with hot cream and mix. Pour that mixture into the double boiler and stir frequently for 10-12 minutes so the mixture can thicken.: Chilling firms the crust and prevents it from absorbing too much moisture from the filling, preserving a crisp base. You will notice the crust become cool and set. Skip this step and the crust can become soggy when filled, so resist the urge to skip freezing.
- Remove from heat and stir in chocolate chips and vanilla extract. Stir until chocolate has melted and filling is a smooth and uniform consistency.: As the heavy cream warms, the sugar dissolves and the mixture becomes glossy, releasing a gentle steam and a sweet dairy aroma. Keep the water at a light simmer to avoid boiling, which can scorch the cream. Stir occasionally to distribute heat and dissolve the sugar completely; undissolved sugar can create a grainy texture.
- Pour into tart shells evenly and sit out at room temperature. Because the shells were in the freezer, this should take 30 minutes or so. Place plastic wrap directly onto the filling of the tarts and refrigerate at least 2 hours or until the filling has set. You should be able to remove the plastic wrap cleanly–with no filling on it. Store in refrigerator until ready to serve.: The gentle, indirect heat prevents scorching and gives you control over temperature. You will see small bubbles around the edge of the water and a thin steam rising. Avoid vigorous boiling underneath, which can cause the bowl to rattle and unevenly heat the custard.
- When ready to serve, remove tarts from fridge. Top with 1/2 cup mini marshmallows each and torch the top to toast. Or stick them under a hot broiler for a few seconds. Serve immediately.: The cream will thicken slightly and smell sweeter as the sugar dissolves. Keep stirring to prevent a skin from forming on the surface. If the cream starts to boil, reduce heat immediately, because boiling causes separation and ruins the smooth texture you want.
- Temper egg yolks with hot cream and mix: Pouring a small stream of the hot cream into the beaten egg yolks while whisking prevents the yolks from scrambling. You should see the yolks loosen and become warm and glossy, not curdled. If you add the cream too quickly, you risk scrambled bits in the custard, which is hard to fix at this point.
- Pour that mixture into the double boiler and stir frequently for 10 to 12 minutes so the mixture can thicken: The custard will slowly thicken and coat the back of a spoon, a key visual cue. Stirring constantly helps maintain an even temperature and prevents hot spots that can cause curdling. If the mixture looks lumpy, remove from heat and whisk vigorously to smooth, but avoid high heat which solidifies the proteins.
- Remove from heat and stir in chocolate chips and vanilla extract: Adding the semi sweet chocolate chips off heat lets them melt gently into the warm custard, forming a silky glossy filling. Stir until the chocolate is fully incorporated and the mixture is uniformly smooth. If chocolate does not melt, return briefly to warm water bath, stirring constantly, rather than direct heat which could separate the mixture.
- Stir until chocolate has melted and filling is a smooth and uniform consistency: The filling should be shiny and thick, with no visible streaks of chocolate or yolk. The aroma becomes richly chocolatey and inviting. If the filling seems too thin, let it cool slightly to thicken before pouring; if it seizes, whisk in a tablespoon of warm cream to reincorporate.
- Pour into tart shells evenly and sit out at room temperature: Because the shells were chilled, the filling will start to set at the edges first, creating a clean top. You will notice the surface lose some gloss as it cools. Allow about 30 minutes for initial set; this reduces condensation under the plastic wrap and improves texture.
- Place plastic wrap directly onto the filling of the tarts and refrigerate at least 2 hours or until the filling has set: Pressing the plastic gently onto the filling prevents a skin and protects the surface from fridge smells. The filling will firm to a sliceable custard texture. If refrigerated for less time the center may be soft and not hold shape when sliced.
- You should be able to remove the plastic wrap cleanly with no filling on it: This is the test for properly set custard. If the plastic comes away with filling, return to fridge and chill longer. Proper setting ensures clean presentation and prevents an overly soft center when serving.
- Store in refrigerator until ready to serve: Keep the tarts chilled to maintain the custard texture and prevent the marshmallows from melting prematurely. They will hold for a day or two, but the crust begins to soften over time, so serve within 48 hours for best contrast.
- When ready to serve, remove tarts from fridge: Cold tarts provide the best contrast under warm toasted marshmallows. You should feel a cool firmness when touching the shell. If they have warmed, return briefly to chill; warm filling can collapse under the marshmallow heat.
- Top with 1/2 cup mini marshmallows each and torch the top to toast: Toasting with a kitchen torch gives you control and produces a caramelized surface that crackles softly. Move the flame in gentle sweeps until you reach a golden to deep brown shade according to preference. Avoid holding the torch too close which can scorch the marshmallows and create bitter notes.
- Or stick them under a hot broiler for a few seconds: If using a broiler, watch constantly as marshmallows can go from golden to burnt in moments. Place tarts on a high rack and broil on low to medium for a few seconds, removing as soon as the tops puff and color. A common mistake is stepping away, which results in blackened tops.
- Serve immediately: The contrast of warm toasted marshmallow and cool chocolate custard is the highlight. You will hear small crackles as the marshmallow cools and a soft sigh as your guests take their first bite. If left too long, the marshmallow surface will become sticky rather than crisp.
Notes
- Measure ingredients accurately, especially the heavy cream and egg yolks, because custards rely on precise ratios for texture. Too much liquid leads to a runny filling, and too little leads to an overly firm set. Use a kitchen scale for best results, and level cups when measuring dry items.
- Keep heat gentle while heating cream to avoid scalding which can produce an off aroma. A double boiler or a heat proof bowl over simmering water provides even, controllable heat. Stir occasionally and watch for steam rather than a rolling boil.
- Work with cold tart shells when pouring warm filling to minimize crust sogginess. The chilled shell firms the edges and allows the filling to set from the outside in, maintaining structure and contrast between textures.
- Use a kitchen torch for best toasting control to achieve even caramelization and avoid burnt spots. Move the flame in wide sweeps and keep it in motion. If you only have a broiler, preheat it and position tarts on the top rack, watching continuously for the briefest of seconds.
- Plan chilling time into your schedule as the filling needs a minimum of two hours to set firmly. Make the filling earlier in the day or the night before, then finish the topping just before serving to maintain texture and presentation.