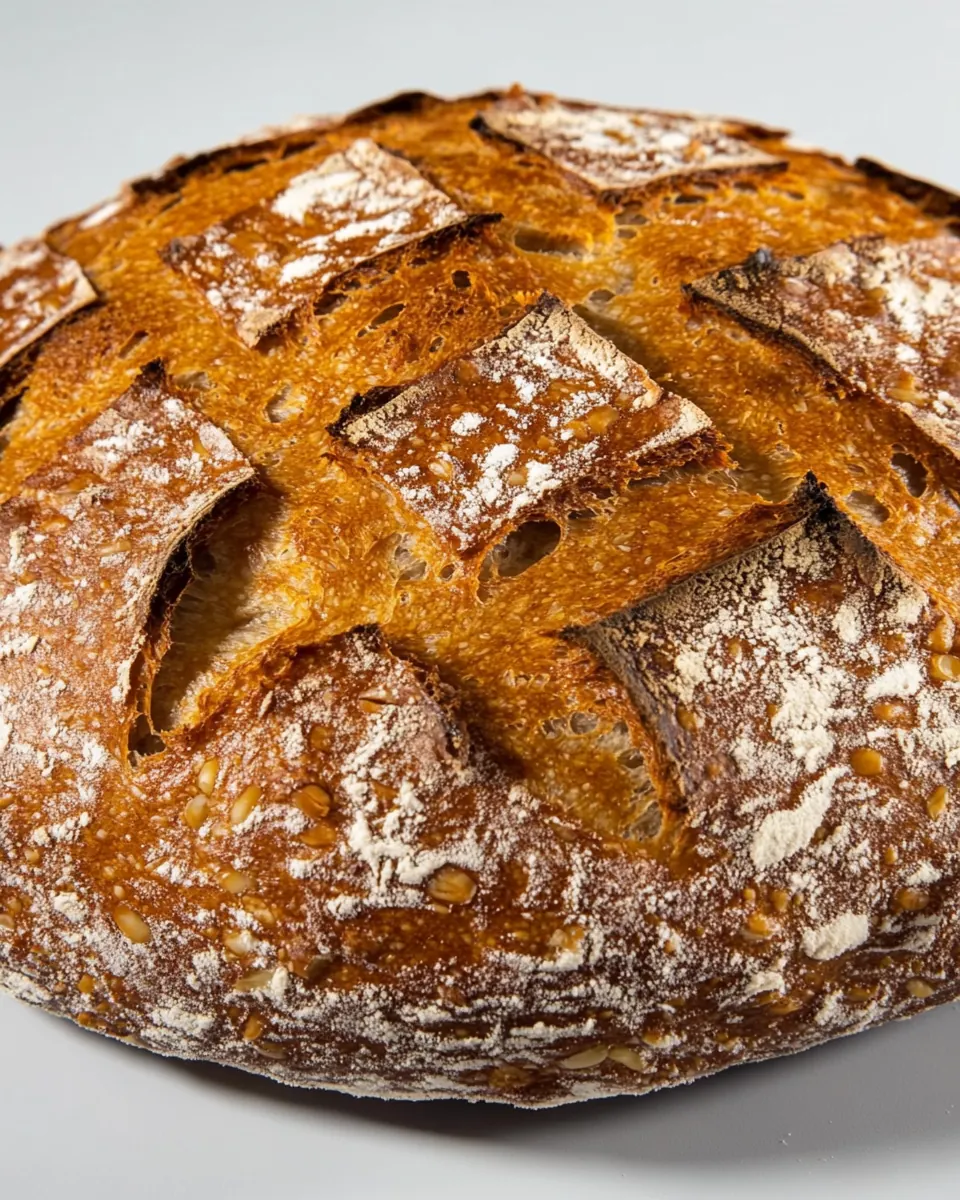
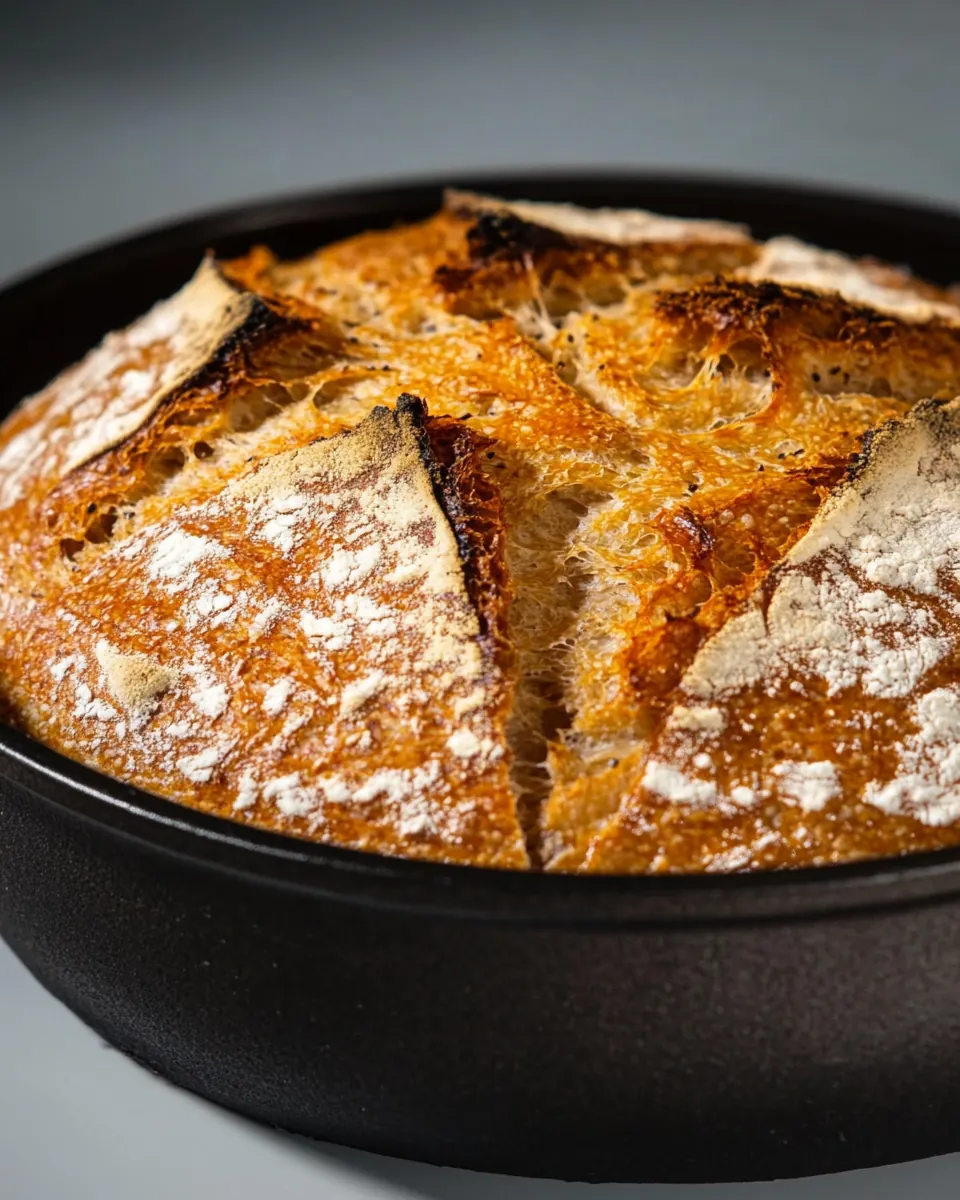
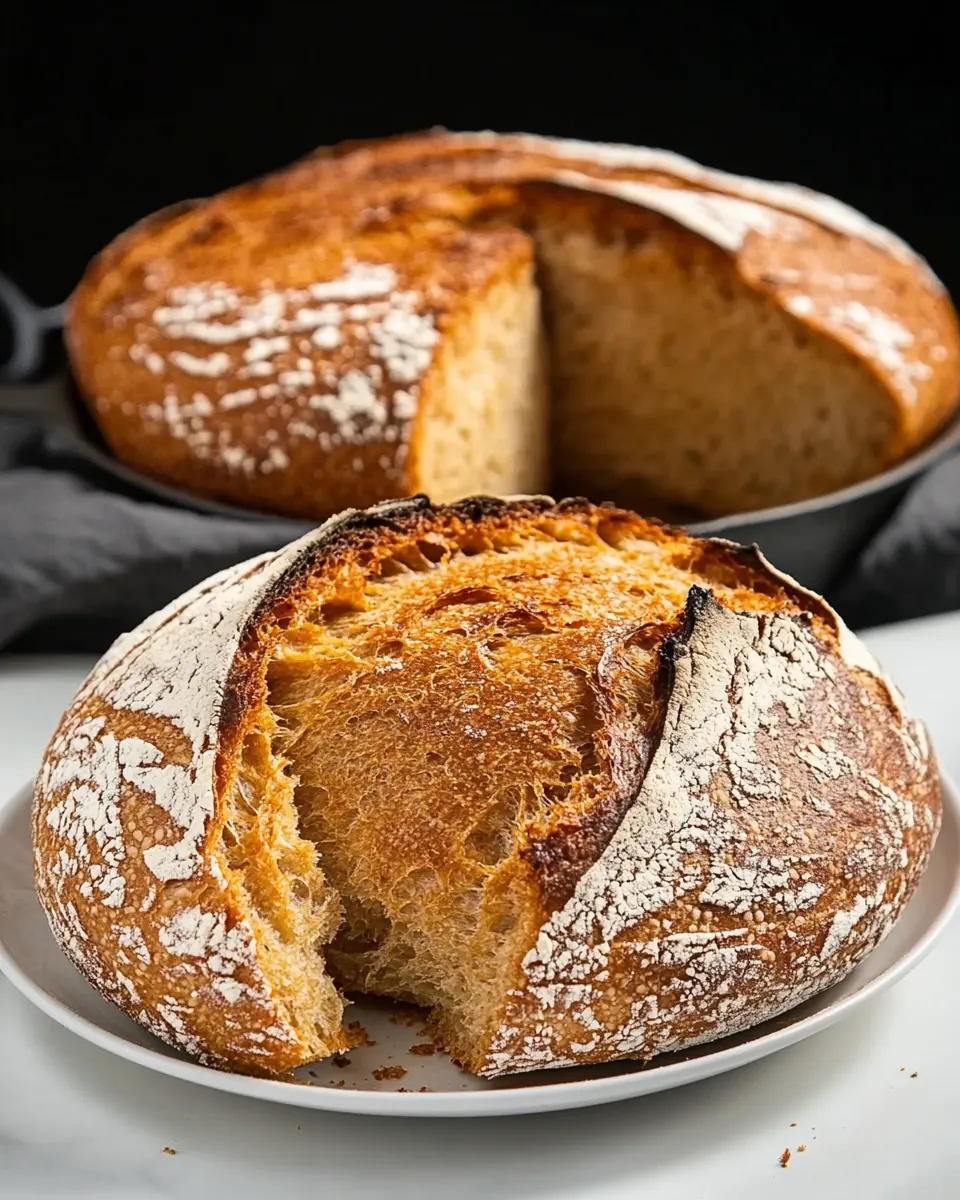
Smoky Pepper Dutch Oven Bread
Smoky Pepper Dutch Oven Bread has been a weekday savior for me on more than one chilly evening, the kind of loaf that fills the kitchen with warm, smoky notes and a gentle, toasty sweetness from melted cheese.
I remember the first time I tried this recipe, standing over a cold oven as it warmed, feeling strangely proud to be coaxing rustic bread from such simple ingredients. The smell of bread flour and smoked paprika mingled with the tang of the Monterey Jack cheese with peppers, and I found myself slicing a hot wedge even before dinner was ready. That first crackle as the crust cooled on the rack felt like a small domestic triumph.
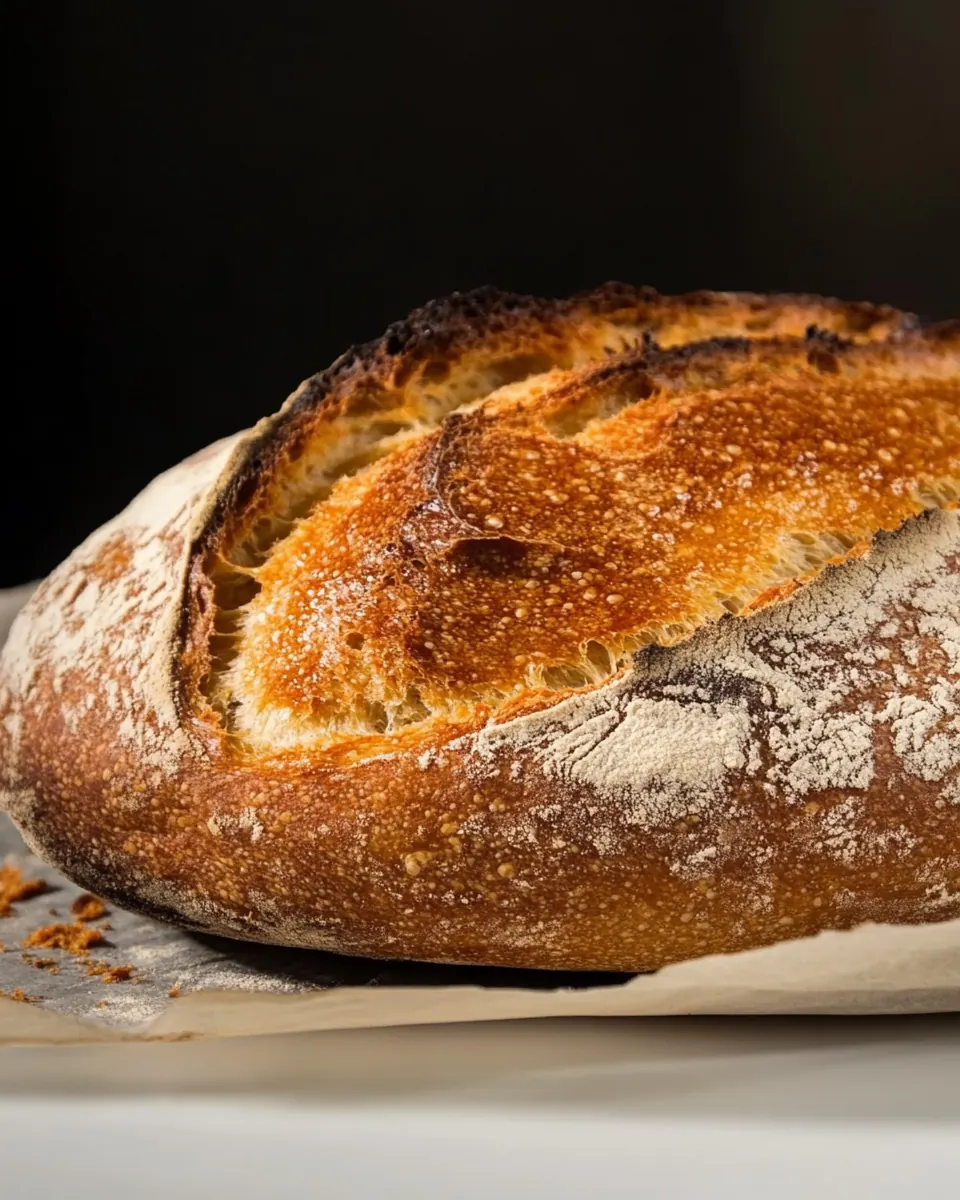
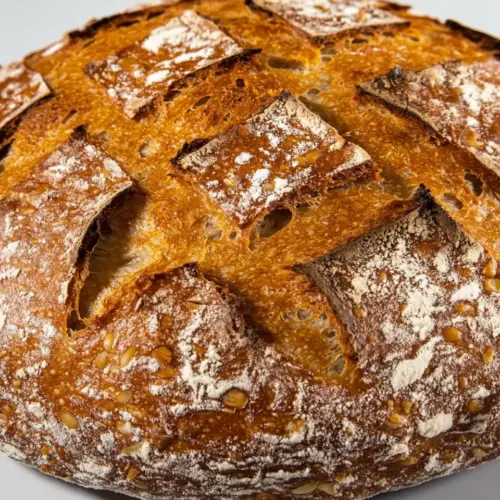
Since then, this loaf has shown up at casual dinners, cozy breakfasts, and impromptu gatherings. It travels well, slices cleanly for sandwiches, and toasts up beautifully. I love how the crumb keeps a little chew while the crust gets that dramatic, almost lottery-winning split when scored right. Every time I pull it from the Dutch oven, I make a note of the little things I did differently that day, because small adjustments change texture in surprisingly satisfying ways.
Recipe Snapshot
2 hr 40 mins
120 mins
40 mins
Hard
180 kcal
American
Gluten-Free, Vegan
Dinner
Dutch oven, Parchment paper, Instant-read thermometer, Mixing bowl, Lame or sharp knife
The Best Thing About This Smoky Pepper Dutch Oven Bread
Bold, Balanced Flavor
I love how Smoky Pepper Dutch Oven Bread marries smoked paprika and black pepper without overpowering the loaf. The smoked spice gives a warm, savory backbone while the pepper adds a lively, aromatic lift. When I bite into a slice, I taste a rounded savory note, the kind that makes simple butter feel like a revelation.
Cheesy pockets that surprise
The inclusion of Monterey Jack cheese with peppers means every loaf has pockets of molten, slightly spicy cheese. I love finding those little molten wells, they add richness and a touch of heat, and they keep the crumb moist. You get creamy stretches of cheese against a chewy interior, and that contrast is one reason I keep coming back to this bread.
Reliable crust from the Dutch oven
I rely on the Dutch oven method because it creates steam and locks heat, producing a crisp, shiny crust and a tender interior. I’ve learned that the high initial heat and the covered bake are non negotiable for that signature oven spring. When you do it right, the crust sings as it cools, and you get that bakery style ear you see in professional loaves.
Flexible timing and make ahead options
This recipe is forgiving. I often refrigerate the dough overnight, which deepens flavor and fits into a busy schedule. That slow, cool fermentation gives the loaf a nuanced, slightly tangy note, and lets you break up the work across two days, which is perfect if you want fresh bread for morning coffee.
Simple pantry ingredients, big payoff
I appreciate how few ingredient priorities there are here: quality flour, the right yeast, and warm water. The rest is seasoning and texture. This loaf proves that straightforward components handled with care result in something impressively complex and comforting.
Ingredients to Make Smoky Pepper Dutch Oven Bread
These ingredients are chosen to build structure, flavor, and texture. The flours provide the framework for a good crumb, the yeast gives lift and fermentation flavor, and the smoked spices and cheese deliver layered savory character. Each item plays a clear role in the chemistry of bread, from hydration to gluten development to oven spring.
- 3 cups (381 grams) bread flour, plus more for dusting: Provide structure and gluten development to the dough; bread flour's higher protein content creates a chewy, airy crumb and supports oven spring, while additional flour is useful for dusting surfaces to prevent sticking during shaping.
- 1 cup (130 grams) whole wheat flour 1 tablespoon (9 grams) kosher salt: Add whole-grain flavor and tenderizing elements; whole wheat flour contributes nuttiness and fiber while the kosher salt enhances overall flavor, strengthens gluten slightly, and regulates yeast activity for controlled fermentation.
- 1 tablespoon (6 grams) smoked paprika: Impart a smoky, savory warmth; smoked paprika adds depth and a gentle heat that complements cheese and peppers while contributing color and an aromatic complexity to the loaf.
- 1 (0.25-ounce) package (7 grams) instant yeast: Leaven the dough quickly and reliably; instant yeast activates easily in warm water to produce carbon dioxide for rise, enabling predictable proof times and good volume in a no-knead or enriched bread.
- 1 teaspoon (2 grams) garlic powder 1/2 teaspoon (1 gram) ground black pepper: Enhance savory notes and spiciness; garlic powder provides umami and aromatic depth while ground black pepper delivers pungent heat and brightness that balance the cheese and smoky elements.
- 1 1/4 cups (171 grams) 1/4-inch-cubed Monterey Jack cheese with peppers: Introduce creamy, spicy pockets of flavor and melty texture; cubed Monterey Jack with peppers distributes savory, gooey cheese and bursts of pepper throughout the crumb, enriching mouthfeel and taste.
- 1 3/4 cups plus 2 tablespoons (450 grams) warm water (105°F/41°C to 110°F/43°C): Hydrate and activate ingredients while controlling temperature; warm water dissolves yeast and hydrates flours to form the dough, with the specified temperature range optimizing yeast activity for consistent fermentation.
Cooking Instructions for Smoky Pepper Dutch Oven Bread
This recipe unfolds in a few clear phases: mixing the dough, a first rise, shaping, a second rise, and a high heat bake in a covered Dutch oven. Below I expand each direction into sensory rich, hands on steps so you know what to expect at every turn.
- In a large bowl, whisk together bread flour, whole wheat flour, salt, paprika, yeast, garlic powder, and black pepper; stir in cheese until coated in flour mixture. Add 1 3/4 cups plus 2 tablespoons (450 grams) warm water, and stir until water is fully incorporated and a sticky dough forms. Cover and let rise in a warm, draft-free place (75°F/24°C) for 2 hours.: The dry mix should smell faintly of smoke and spice, with the visible specks of smoked paprika and the cubes of Monterey Jack cheese dusted in flour. As you combine, the flours will shift into a sandy, slightly coarse texture, and the cheese will look less glossy as it picks up flour. This coating helps the cubes disperse and prevents excessive melting into one blob during fermentation. A common mistake here is uneven distribution, which results in pockets without cheese or uneven seasoning; take the extra minute to whisk thoroughly so each bite will have balanced flavor and texture.
- Refrigerate dough for at least 2 hours or up to overnight.: When the warm water hits the dry mix you will see the dough come together into a shaggy, adhesive mass. Stir slowly at first so the hydration soaks into the flour, then use a firm, folding motion to bring everything together. The dough will feel tacky but not batter like; it should cling slightly to your spoon and the bowl. This is a tactile checkpoint telling you that hydration is correct. If it feels too dry, add a teaspoon of water at a time; if it is soupy, you likely added too much, which will flatten the final loaf. The sensory cue to watch for is the dough pulling away from the sides of the bowl but still sticking to itself in a cohesive mass.
- Lightly dust a work surface with bread flour; turn out dough onto prepared surface, and gently press dough just to level and even it out. Starting on left side of dough and working clockwise, fold edges of dough toward center, pressing lightly. Turn dough ball over, and using both hands, cup dough and pull it toward you. Rotate dough 90 degrees, and repeat until you have a smooth, tight, sealed round.: During the first rise the dough will gradually puff, forming tiny gas bubbles that you can sometimes see beneath the surface. The room will take on a gentle yeasty aroma and the dough will feel airy when poked. I set mine on the counter away from open windows to avoid drafts which can chill the dough and slow fermentation. A common error is impatience, removing the dough too early; you want noticeable volume increase, not just a surface change. Temperature matters, so aim for a steady, warm spot to encourage even activity.
- Heavily dust a sheet of parchment paper with bread flour; place dough, seam side down, on prepared parchment. Cover and let rise in a warm, draft-free place (75°F/24°C) until puffed and dough holds an indentation when gently pressed, 1 to 1 1/2 hours.: Cooling the dough in the refrigerator slows fermentation and deepens flavor, producing subtle tang and complexity. You will notice the dough become denser to the touch while developing slightly more pronounced aroma. This is a flexible pause step I often use to fit baking into a busy schedule. The trap here is leaving it too long without checking; if refrigerated for multiple days the yeast can overproof and weaken structure, so adhere to the recommended window.
- When dough has about 30 minutes left to rise, place a 6- to 7-quart Dutch oven with lid in a cold oven. Preheat oven to 500°F (260°C).: The dough should feel cool and supple when you transfer it. The dusted bread flour prevents sticking while keeping the exterior dry enough to shape. Press gently so you do not deflate all the gas pockets; you want to even the surface, not flatten the dough. Overworking at this stage will tighten the gluten and reduce the loaf’s ability to rise during baking, so keep motions light and confident.
- Using a lame or sharp knife, score top of dough as desired. Trim parchment so it extends 2 to 3 inches around sides of dough.: As you fold, you will feel the dough begin to take on tension and surface sheen. These folds build structure, creating layers that trap gas and contribute to oven spring. Press with a gentle, fingertip pressure to seal seams. A common mistake is folding too aggressively which can tear the surface and release too much gas; delicate, repeated folds are the way to build strength without deflating.
- Carefully remove hot Dutch oven from oven, and remove lid; using parchment as handles, quickly place dough in Dutch oven. Cover with lid, and place in oven.: This motion creates surface tension and a tight outer skin, which helps the loaf hold shape. As you rotate and repeat, the dough becomes smoother and glossier. You'll notice a firmer exterior and a rounded profile. If your hands stick excessively, dust them lightly with flour, but avoid incorporating too much additional flour into the dough as that will dry the surface and hinder oven spring.
- Immediately reduce oven temperature to 450°F (230°C). Bake for 30 minutes. Remove lid, and bake until an instant-read thermometer inserted in center registers 190°F (88°C), about 10 minutes more. Immediately but carefully remove loaf from Dutch oven, and let cool completely on a wire rack. Store in an airtight container for up to 3 days.: With each rotation the boule will become taut and compact, the surface nearly seamless. The smoothing helps the loaf rise evenly and gives a clean canvas for scoring. If you see jagged seams or loose patches, take another gentle round of cupping and pulling to improve the seal. An uneven surface can lead to lopsided expansion in the oven, so patience here pays off visually and texturally.
- Heavily dust a sheet of parchment paper with bread flour; place dough, seam side down, on prepared parchment: The floured parchment prevents the bottom from sticking to the Dutch oven and keeps the exterior from becoming gummy. Place the boule seam side down to preserve the smooth top for an attractive score. The heavy dusting also makes the final transfer easier. If you underflour the parchment, the loaf can stick and tear when you try to lift it into the pot.
- Cover and let rise in a warm, draft-free place (75°F/24°C) until puffed and dough holds an indentation when gently pressed, 1 to 1 1/2 hours: In this second rise you should see a gentle puff and the dough should slowly bounce back when poked, leaving a slight indentation. This is the visual cue that the loaf is ready to bake. Overproofing here will cause a weak structure that collapses in the oven, so check regularly. The aroma becomes more pronounced, and the surface looks slightly domed and airy.
- When dough has about 30 minutes left to rise, place a 6 to 7 quart Dutch oven with lid in a cold oven Preheat oven to 500°F (260°C): The cold pot warms gradually and then becomes a steam chamber when the loaf enters, promoting a blistered crust and strong oven spring. Preheating the pot along with the oven ensures instant, high heat contact. Use heavy oven mitts and plan your timing because a hot cast iron pot is dangerous; rushing this step can lead to burns or a botched transfer.
- Using a lame or sharp knife, score top of dough as desired Trim parchment so it extends 2 to 3 inches around sides of dough: Scoring controls where the loaf will open, and a quick, confident cut made at a 45 degree angle yields an impressive ear. The exposed interior will bloom and darken in that scored area. Trim the parchment so it fits comfortably inside the pot without bunching, which helps with even baking. A common error is slow or dragging cuts, which tear the surface and prevent a clean rise.
- Carefully remove hot Dutch oven from oven, and remove lid using parchment as handles, quickly place dough in Dutch oven: The first hiss of steam when you set the dough in the pot is encouraging and tells you the environment is right. Use the floured parchment as a sling to lower the loaf in without touching the hot metal. Replace the lid immediately to trap steam. If you fumble at this moment and leave the pot open too long, you will lose steam and reduce oven spring.
- Cover with lid, and place in oven Immediately reduce oven temperature to 450°F (230°C) Bake for 30 minutes: The covered bake keeps moisture around the crust, allowing it to stay supple and expand before hardening. After 30 minutes the crust will darken and become firm. This timing establishes a good balance between oven spring and crust formation. A common misstep is removing the lid too early or skipping the temperature reduction, both of which can burn the crust or yield an undercooked interior.
- Remove lid, and bake until an instant-read thermometer inserted in center registers 190°F (88°C), about 10 minutes more: With the lid off the crust will brown and crisp intensely, producing nutty aromas and a satisfying crackle as it cools. Aim for the internal temperature for doneness; visual cues help, but the thermometer is definitive. Doneness errors often come from underbaking; a pale crust may look done but have a gummy crumb inside.
- Immediately but carefully remove loaf from Dutch oven, and let cool completely on a wire rack: Cooling fully allows steam inside to redistribute and the crumb to set, which improves slicing and texture. The crust will crisp further as it cools, and the loaf will stop cooking from carryover heat. Cutting too soon invites a gummy interior and lost structure, so patience here rewards you with clean slices and the best mouthfeel.
- Store in an airtight container for up to 3 days: Once cooled, keeping the loaf sealed preserves moisture and prevents a stale crust. I prefer to slice as needed and refresh slices in a toaster for that just baked texture. Storing for longer than recommended can dry the crumb, and refrigeration tends to accelerate staling, so room temperature in an airtight container is ideal.
Substitutions and Tips
This loaf is forgiving and adaptable, and these tips help you get consistent results whether you are baking on a weeknight or prepping for a weekend brunch. Below I expand practical notes into actionable tips to guide you at each stage.
- Adjust hydration carefully: If your dough feels too sticky after mixing, add flour a teaspoon at a time during shaping so you do not over dry the dough and compromise crumb elasticity.
- Maintain consistent temperature: Aim for a warm, draft free spot around 75°F during rises; inconsistent temperatures create uneven fermentation and can cause irregular crumb and oven spring.
- Protect your hands: Use a bench scraper to handle sticky dough if you prefer not to add extra flour, it helps move and fold the dough without excessive touching which can cool it down.
- Use a sharp lame or razor: A clean, decisive cut at a 45 degree angle produces a better ear; dull blades drag and tear the surface, which undermines the aesthetic and expansion.
- Trim parchment for safety: Leave 2 to 3 inches of parchment around the dough so it fits into the pot without bunching, which helps ensure an even bake and easy removal.
What to Pair With Smoky Pepper Dutch Oven Bread
This loaf is versatile, pairing beautifully with bright, creamy, and savory accompaniments. Below I outline serving ideas, occasions, and storage notes to help you make the most of your bake.
- For breakfast: Serve slices toasted with a smear of softened butter or a mild spread, the cheese pockets add richness that pairs well with a cup of coffee.
- For lunch: Use for hearty sandwiches, the chewy crumb and smoky notes stand up to robust fillings without falling apart.
- For dinner: Present alongside soups and stews as a rustic soak up option, its crust and interior texture are perfect for mopping up broths.
- For gatherings: Slice into thick wedges for a bread board, include olives or pickles on the side, and let guests help themselves; it holds up well for sharing.
- Storage tips: Keep at room temperature in an airtight container for up to three days, slice as needed and refresh slices in a toaster to restore crispness.
FAQ
Conclusion
This loaf stands out for its smoky depth and melted cheese pockets, delivering bakery quality from a simple ingredient list. Try it when you want a statement loaf for guests or a comforting, hands on baking session for yourself. With predictable technique and a little patience, youll get a loaf that slices beautifully and fills your kitchen with irresistible aroma, making it worth the time and attention.
Smoky Pepper Dutch Oven Bread
Equipment
- Dutch Oven
- Parchment Paper
- Instant read thermometer
- Mixing Bowl
- Lame or sharp knife
Ingredients
- 3 cups (381 grams) bread flour, plus more for dusting Provide structure and gluten development to the dough; bread flour's higher protein content creates a chewy, airy crumb and supports oven spring, while additional flour is useful for dusting surfaces to prevent sticking during shaping.
- 1 cup (130 grams) whole wheat flour 1 tablespoon (9 grams) kosher salt Add whole-grain flavor and tenderizing elements; whole wheat flour contributes nuttiness and fiber while the kosher salt enhances overall flavor, strengthens gluten slightly, and regulates yeast activity for controlled fermentation.
- 1 tablespoon (6 grams) smoked paprika Impart a smoky, savory warmth; smoked paprika adds depth and a gentle heat that complements cheese and peppers while contributing color and an aromatic complexity to the loaf.
- 1 (0.25-ounce) package (7 grams) instant yeast Leaven the dough quickly and reliably; instant yeast activates easily in warm water to produce carbon dioxide for rise, enabling predictable proof times and good volume in a no-knead or enriched bread.
- 1 teaspoon (2 grams) garlic powder 1/2 teaspoon (1 gram) ground black pepper Enhance savory notes and spiciness; garlic powder provides umami and aromatic depth while ground black pepper delivers pungent heat and brightness that balance the cheese and smoky elements.
- 1 1/4 cups (171 grams) 1/4-inch-cubed Monterey Jack cheese with peppers Introduce creamy, spicy pockets of flavor and melty texture; cubed Monterey Jack with peppers distributes savory, gooey cheese and bursts of pepper throughout the crumb, enriching mouthfeel and taste.
- 1 3/4 cups plus 2 tablespoons (450 grams) warm water (105°F/41°C to 110°F/43°C) Hydrate and activate ingredients while controlling temperature; warm water dissolves yeast and hydrates flours to form the dough, with the specified temperature range optimizing yeast activity for consistent fermentation.
Instructions
- In a large bowl, whisk together bread flour, whole wheat flour, salt, paprika, yeast, garlic powder, and black pepper; stir in cheese until coated in flour mixture. Add 1 3/4 cups plus 2 tablespoons (450 grams) warm water, and stir until water is fully incorporated and a sticky dough forms. Cover and let rise in a warm, draft-free place (75°F/24°C) for 2 hours.: The dry mix should smell faintly of smoke and spice, with the visible specks of smoked paprika and the cubes of Monterey Jack cheese dusted in flour. As you combine, the flours will shift into a sandy, slightly coarse texture, and the cheese will look less glossy as it picks up flour. This coating helps the cubes disperse and prevents excessive melting into one blob during fermentation. A common mistake here is uneven distribution, which results in pockets without cheese or uneven seasoning; take the extra minute to whisk thoroughly so each bite will have balanced flavor and texture.
- Refrigerate dough for at least 2 hours or up to overnight.: When the warm water hits the dry mix you will see the dough come together into a shaggy, adhesive mass. Stir slowly at first so the hydration soaks into the flour, then use a firm, folding motion to bring everything together. The dough will feel tacky but not batter like; it should cling slightly to your spoon and the bowl. This is a tactile checkpoint telling you that hydration is correct. If it feels too dry, add a teaspoon of water at a time; if it is soupy, you likely added too much, which will flatten the final loaf. The sensory cue to watch for is the dough pulling away from the sides of the bowl but still sticking to itself in a cohesive mass.
- Lightly dust a work surface with bread flour; turn out dough onto prepared surface, and gently press dough just to level and even it out. Starting on left side of dough and working clockwise, fold edges of dough toward center, pressing lightly. Turn dough ball over, and using both hands, cup dough and pull it toward you. Rotate dough 90 degrees, and repeat until you have a smooth, tight, sealed round.: During the first rise the dough will gradually puff, forming tiny gas bubbles that you can sometimes see beneath the surface. The room will take on a gentle yeasty aroma and the dough will feel airy when poked. I set mine on the counter away from open windows to avoid drafts which can chill the dough and slow fermentation. A common error is impatience, removing the dough too early; you want noticeable volume increase, not just a surface change. Temperature matters, so aim for a steady, warm spot to encourage even activity.
- Heavily dust a sheet of parchment paper with bread flour; place dough, seam side down, on prepared parchment. Cover and let rise in a warm, draft-free place (75°F/24°C) until puffed and dough holds an indentation when gently pressed, 1 to 1 1/2 hours.: Cooling the dough in the refrigerator slows fermentation and deepens flavor, producing subtle tang and complexity. You will notice the dough become denser to the touch while developing slightly more pronounced aroma. This is a flexible pause step I often use to fit baking into a busy schedule. The trap here is leaving it too long without checking; if refrigerated for multiple days the yeast can overproof and weaken structure, so adhere to the recommended window.
- When dough has about 30 minutes left to rise, place a 6- to 7-quart Dutch oven with lid in a cold oven. Preheat oven to 500°F (260°C).: The dough should feel cool and supple when you transfer it. The dusted bread flour prevents sticking while keeping the exterior dry enough to shape. Press gently so you do not deflate all the gas pockets; you want to even the surface, not flatten the dough. Overworking at this stage will tighten the gluten and reduce the loaf’s ability to rise during baking, so keep motions light and confident.
- Using a lame or sharp knife, score top of dough as desired. Trim parchment so it extends 2 to 3 inches around sides of dough.: As you fold, you will feel the dough begin to take on tension and surface sheen. These folds build structure, creating layers that trap gas and contribute to oven spring. Press with a gentle, fingertip pressure to seal seams. A common mistake is folding too aggressively which can tear the surface and release too much gas; delicate, repeated folds are the way to build strength without deflating.
- Carefully remove hot Dutch oven from oven, and remove lid; using parchment as handles, quickly place dough in Dutch oven. Cover with lid, and place in oven.: This motion creates surface tension and a tight outer skin, which helps the loaf hold shape. As you rotate and repeat, the dough becomes smoother and glossier. You'll notice a firmer exterior and a rounded profile. If your hands stick excessively, dust them lightly with flour, but avoid incorporating too much additional flour into the dough as that will dry the surface and hinder oven spring.
- Immediately reduce oven temperature to 450°F (230°C). Bake for 30 minutes. Remove lid, and bake until an instant-read thermometer inserted in center registers 190°F (88°C), about 10 minutes more. Immediately but carefully remove loaf from Dutch oven, and let cool completely on a wire rack. Store in an airtight container for up to 3 days.: With each rotation the boule will become taut and compact, the surface nearly seamless. The smoothing helps the loaf rise evenly and gives a clean canvas for scoring. If you see jagged seams or loose patches, take another gentle round of cupping and pulling to improve the seal. An uneven surface can lead to lopsided expansion in the oven, so patience here pays off visually and texturally.
- Heavily dust a sheet of parchment paper with bread flour; place dough, seam side down, on prepared parchment: The floured parchment prevents the bottom from sticking to the Dutch oven and keeps the exterior from becoming gummy. Place the boule seam side down to preserve the smooth top for an attractive score. The heavy dusting also makes the final transfer easier. If you underflour the parchment, the loaf can stick and tear when you try to lift it into the pot.
- Cover and let rise in a warm, draft-free place (75°F/24°C) until puffed and dough holds an indentation when gently pressed, 1 to 1 1/2 hours: In this second rise you should see a gentle puff and the dough should slowly bounce back when poked, leaving a slight indentation. This is the visual cue that the loaf is ready to bake. Overproofing here will cause a weak structure that collapses in the oven, so check regularly. The aroma becomes more pronounced, and the surface looks slightly domed and airy.
- When dough has about 30 minutes left to rise, place a 6 to 7 quart Dutch oven with lid in a cold oven Preheat oven to 500°F (260°C): The cold pot warms gradually and then becomes a steam chamber when the loaf enters, promoting a blistered crust and strong oven spring. Preheating the pot along with the oven ensures instant, high heat contact. Use heavy oven mitts and plan your timing because a hot cast iron pot is dangerous; rushing this step can lead to burns or a botched transfer.
- Using a lame or sharp knife, score top of dough as desired Trim parchment so it extends 2 to 3 inches around sides of dough: Scoring controls where the loaf will open, and a quick, confident cut made at a 45 degree angle yields an impressive ear. The exposed interior will bloom and darken in that scored area. Trim the parchment so it fits comfortably inside the pot without bunching, which helps with even baking. A common error is slow or dragging cuts, which tear the surface and prevent a clean rise.
- Carefully remove hot Dutch oven from oven, and remove lid using parchment as handles, quickly place dough in Dutch oven: The first hiss of steam when you set the dough in the pot is encouraging and tells you the environment is right. Use the floured parchment as a sling to lower the loaf in without touching the hot metal. Replace the lid immediately to trap steam. If you fumble at this moment and leave the pot open too long, you will lose steam and reduce oven spring.
- Cover with lid, and place in oven Immediately reduce oven temperature to 450°F (230°C) Bake for 30 minutes: The covered bake keeps moisture around the crust, allowing it to stay supple and expand before hardening. After 30 minutes the crust will darken and become firm. This timing establishes a good balance between oven spring and crust formation. A common misstep is removing the lid too early or skipping the temperature reduction, both of which can burn the crust or yield an undercooked interior.
- Remove lid, and bake until an instant-read thermometer inserted in center registers 190°F (88°C), about 10 minutes more: With the lid off the crust will brown and crisp intensely, producing nutty aromas and a satisfying crackle as it cools. Aim for the internal temperature for doneness; visual cues help, but the thermometer is definitive. Doneness errors often come from underbaking; a pale crust may look done but have a gummy crumb inside.
- Immediately but carefully remove loaf from Dutch oven, and let cool completely on a wire rack: Cooling fully allows steam inside to redistribute and the crumb to set, which improves slicing and texture. The crust will crisp further as it cools, and the loaf will stop cooking from carryover heat. Cutting too soon invites a gummy interior and lost structure, so patience here rewards you with clean slices and the best mouthfeel.
- Store in an airtight container for up to 3 days: Once cooled, keeping the loaf sealed preserves moisture and prevents a stale crust. I prefer to slice as needed and refresh slices in a toaster for that just baked texture. Storing for longer than recommended can dry the crumb, and refrigeration tends to accelerate staling, so room temperature in an airtight container is ideal.
Notes
- Adjust hydration carefully: If your dough feels too sticky after mixing, add flour a teaspoon at a time during shaping so you do not over dry the dough and compromise crumb elasticity.
- Maintain consistent temperature: Aim for a warm, draft free spot around 75°F during rises; inconsistent temperatures create uneven fermentation and can cause irregular crumb and oven spring.
- Protect your hands: Use a bench scraper to handle sticky dough if you prefer not to add extra flour, it helps move and fold the dough without excessive touching which can cool it down.
- Use a sharp lame or razor: A clean, decisive cut at a 45 degree angle produces a better ear; dull blades drag and tear the surface, which undermines the aesthetic and expansion.
- Trim parchment for safety: Leave 2 to 3 inches of parchment around the dough so it fits into the pot without bunching, which helps ensure an even bake and easy removal.