Skinny Strawberry Jell O Cream Pie Cannolis
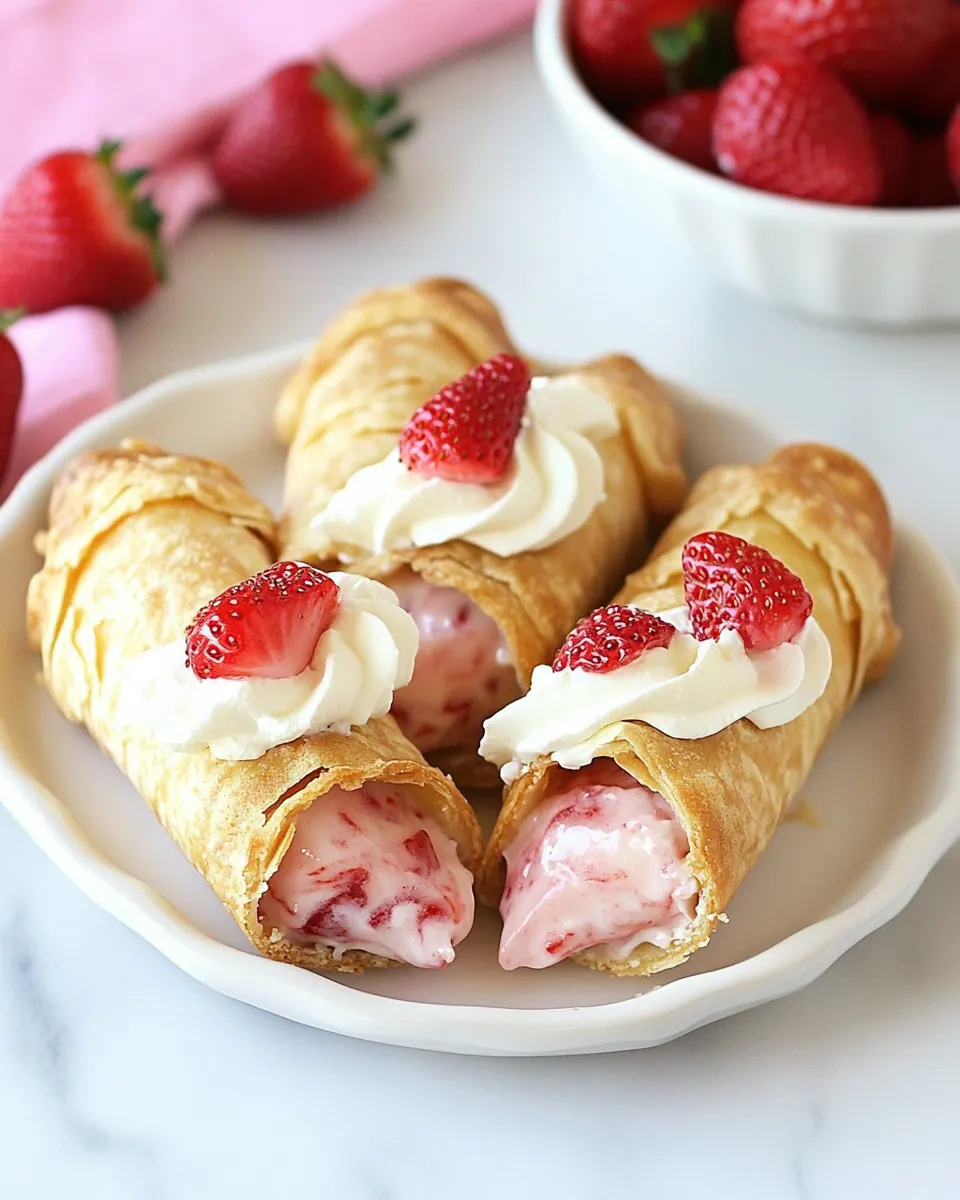
Skinny Strawberry Jell O Cream Pie Cannolis arrived in my life on a sunny afternoon when I wanted something playful, nostalgic, and just a touch lighter than the usual pastry parade. I remember unpacking a bag of store bought pie crusts and a small box of Strawberry Jell O, feeling hopeful that a simple swap could turn into a conversation starter at a spring potluck. The result was unexpectedly charming, a mashup of childhood flavors and grown up presentation that earned polite applause and second helpings.
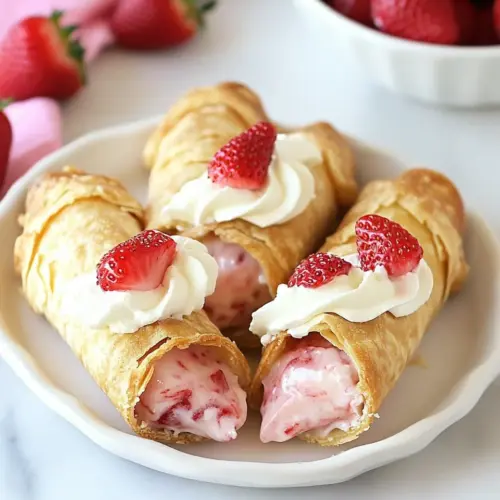
That day I experimented with texture, carefully piping a creamy filling into crisp, shell shaped cannolis. The contrast between the flaky pie crust doughs and the pillowy Cool Whip filling was the real win. I kept the sugar option flexible by using a single serving size of the gelatin, which makes these feel lighter, and the whole process was fast enough to pull off between errands. I’ll never forget the bright pink filling and how the scent of baked crust warmed the kitchen as guests gathered.
Recipe Snapshot
32 mins
20 mins
12 mins
Medium
150 kcal
American
Gluten-Free, Low FODMAP
Desserts
Mixing bowl, Whisk, 1 cup measuring cup, Cannoli forms, Rolling pin, Cookie cutter, Baking sheet, Wire rack
The Beauty of This Skinny Strawberry Jell O Cream Pie Cannolis
They are fun and playful
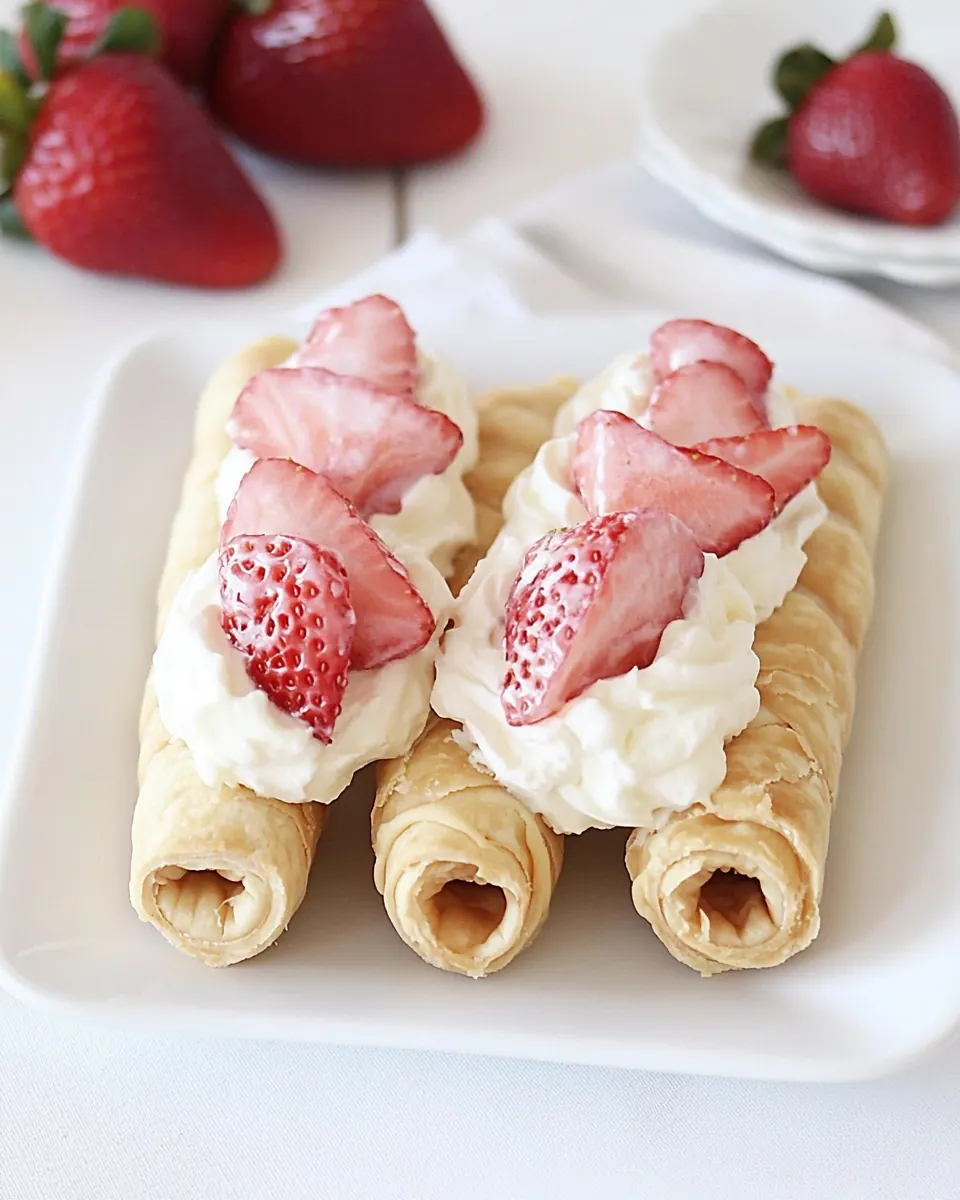
I love how Skinny Strawberry Jell O Cream Pie Cannolis bring a smile to people of all ages. The visual pop of the pink filling inside crisp shells makes them conversation friendly, and I often find that even picky eaters take a bite just to see what they are. The format is playful, which is why I reach for this recipe when I want an easy wow factor.
Simple ingredients, big impact
These cannolis rely on pantry friendly items like pie crust doughs and a small box of Strawberry Jell O, so you can pull them together quickly. I appreciate recipes that do not demand obscure items, and this one rewards small effort with bright flavor. The combination of gelled fruit and whipped topping gives you creamy texture without heavy mixing or chilling for hours.
Great for gatherings
I often make a batch for spring celebrations and casual get togethers because they travel well when chilled. The individual size means portion control is easy, and they look curated on a platter. If I need to scale up, the math is forgiving, and guests seem delighted by the novelty of pie crust shaped into cannoli shells.
Customizable and forgiving
There is room to personalize these without breaking the recipe. I sometimes pick sugar free Strawberry Jell O or light Cool Whip depending on my audience. The technique is forgiving too, since small variations in chilling or baking time only change the crispness slightly, not the overall enjoyment.
Quick assembly and cleanup
The prep is compact and efficient, which I value on busy days. Using a zip close bag for piping reduces utensils and speeds up filling. I always keep extra napkins on hand though, because the bright filling can be tempting for little hands. Overall this recipe hits a sweet spot between adorable presentation and low stress preparation.
Ingredients Required for Skinny Strawberry Jell O Cream Pie Cannolis

These ingredients are intentionally simple, and they work because each plays a clear role. The pie crust doughs form a buttery, flaky shell that crisps when baked. The Strawberry Jell O builds concentrated fruit flavor and structure when mixed with hot and cold water. The Cool Whip provides light, airy creaminess that mellows the gelatin. Small additions like milk help the crust brown, while ice and water control the gel setting speed.
- 2 pie crust doughs, for a 9" pie: Use to form the pie shells and provide a flaky base for the filling; press into two 9-inch pie pans and crimp edges before baking or blind-baking as recipe directs. Provide structure and a buttery contrast to the sweet, creamy strawberry filling, and can be brushed or egg-washed for a golden finish.
- 1 small box, 4 servings size Strawberry Jell-O (you can use sugar free): Provide the primary strawberry flavor and gelatin structure that sets the filling; dissolve according to package directions with specified water amounts to achieve proper consistency. Offer sweetness and fruitiness while allowing for sugar–free substitution to reduce calories without changing setting properties.
- 8 oz Cool Whip, you can use Fat Free: Add light, airy creaminess to the filling and lighten the texture when folded into the set strawberry gelatin; contribute volume and a smooth mouthfeel. Offer a low-fat option if desired and help balance the gelatin’s firmness with a creamy, cool element.
- 2/3 cup water: Dissolve the strawberry gelatin powder and act as the hot liquid needed to activate the gelatin; combine with the powder to fully dissolve before mixing with cool ingredients. Control the concentration of the gelatin solution and influence final firmness of the filling based on volume used.
- 1/2 cup water: Cool or dilute the gelatin mixture as required in the recipe and help bring the mixture to a temperature suitable for folding in the Cool Whip without melting it. Allow for an intermediate dilution step that adjusts sweetness and texture prior to chilling or setting.
- ice cubes: Chill ingredients quickly and help set the gelatin by creating an ice bath for rapid cooling; use around the mixing bowl to lower temperature without over-diluting the mixture. Assist in controlling temperature during preparation to preserve the airy texture of the whipped topping.
- 1 tbsp milk, – for brushing pie crust: Brush onto the pie crust prior to baking to promote browning and help toppings adhere; apply a thin layer for a glossy finish and slight color enhancement. Provide moisture for surface adhesion and improve crust appearance when baked.
Instructions for Skinny Strawberry Jell O Cream Pie Cannolis

This recipe balances a quick chilled filling and a hot bake for crisp shells. I like to work in stages so the filling can rest in the fridge while I shape and bake the shells. Below I expand each original direction into detailed steps so you can follow the sensory cues and avoid common mistakes.
- In a medium bowl whisk together the Jell-O powder with the boiling water, stir for 2 minutes so the powder is all dissolved.: As you pour the freshly boiled water over the Strawberry Jell O powder, the aroma becomes instantly fruity and bright. Vigorous whisking for the full two minutes ensures the granules dissolve into a smooth, glossy syrup that clings to the whisk rather than leaving powdery streaks. You will notice the color become more uniformly pink and the mixture thin and shiny. This step matters because undissolved powder will leave gritty texture and prevent the gel from setting evenly. A common mistake is to under stir, which leaves tiny lumps; if you see any specks, keep whisking and scrape the sides until the mixture is homogeneous. Stirring also helps release the strawberry scent, which builds anticipation. Use a heatproof bowl so the residual heat does not crack it. When done, the surface should be smooth and free of crystals.
- In a 1-cup measuring cup fill to 1/2 cup with cold water, add enough ice to cold water to make 1 cup. Pour into the gelatin mixture, stir until slightly thickened; remove any unmelted ice cubes.: The instant you add the icy cold water, the steam subsides and you can feel the temperature drop in the bowl. Stirring now causes the mixture to thicken noticeably into a syrupy consistency, signaling it is beginning to set. Watch the texture; it should become syrup like and slightly more viscous, not fully gelled. Remove any unmelted ice cubes so they do not dilute the balance of liquid and weaken the final gel. This cooling technique is important because it prevents the gelatin from being too hot when you fold in the whipped topping, which would collapse air. A frequent error is adding too much ice so the mixture becomes watery, so measure carefully and discard leftover unmelted ice. The mixture should hold a slow ribbon when you lift the whisk.
- Whisk in the Cool Whip. Pour into a zip-close bag and store in refrigerator for at least 1 hour.: As you fold in the cold Cool Whip , notice how the filling softens into a cloud like texture and the color becomes paler pink. Gentle folding preserves the aeration; over vigorous mixing will deflate it and make the filling dense. I find a few patient folds until no streaks remain is ideal. Transferring into a zip close bag minimizes tools and makes piping neat. Refrigerating for at least one hour stabilizes the structure so it holds shape when piped; the chill also sharpens the strawberry flavor. A common slip up is skipping chilling, which yields runny filling that leaks from shells. Label the bag and press out excess air to keep the texture uniform.
- Pre-heat oven to 425 degrees F.: When the oven gets hot, you will feel a wave of warm, dry air when you open it, and the aroma of baked pastry will become more pronounced once the shells go in. Preheating to the full temperature ensures the crusts begin crisping immediately, locking layers and preventing excessive spreading. This is essential for achieving a flaky, hollow shell. A mistake is to under preheat, which can make the pastry greasy and soft. Use an oven thermometer if your oven runs cool to ensure accuracy. Place racks in the middle to promote even browning.
- Cut out pie crust into 3" circles. Cut out stars (if desired). Wrap the circles around the cannoli forms, brush lightly with the milk, add the stars on top, and brush with milk. Repeat with remaining pie crusts. Note- use a rolling pin to re-roll out the scraps of dough to cut out 3 more circles per pie crust.: The moment you press the cutter into the chilled pie crust doughs , you should feel a clean snap at the edge and see neat, uniform discs. If you are making decorative stars, they should adhere with a light brush of milk . Wrapping the circles around cannoli forms creates that classic tubular shell shape; press seams gently so they stay closed. Re rolling scraps with a rolling pin yields additional circles, but avoid over working the dough because it will tighten gluten and make shells tough. A common issue is creating too thin discs which can burn; aim for even thickness. The shells should feel cool to the touch before baking.
- Bake for 10-12 minutes, or until golden brown. Cool on a wire rack for 5 minutes before carefully removing the cannoli form. Use caution as the forms will be very hot.: As the shells bake, the kitchen fills with a warm, buttery scent and you can see the edges begin to color. Look for an even golden brown hue across the surface, not just at the tips. The sound will be quiet but the visual cue of firm, set pastry tells you they are done. Cooling on a wire rack for about 5 minutes lets steam escape so the shells retain crispness, and this step prevents sogginess. A major pitfall is leaving the shells on a hot tray which can overcook them; transfer immediately to a rack. Use caution when removing the cannoli forms as they will be very hot to the touch.
- Snip a corner of the zip-close bag and pipe the strawberry Jell-O cream pie mixture into the cannolis. Keep refrigerated until ready to serve.: During this rest the shell firms and becomes less pliable, which helps it slide off the form without tearing. If you try to remove the form too soon, the shell can collapse. The shell will feel crisp and slightly warm, and you may hear a faint papery crack when you handle it. Use tongs or an oven mitt to steady the form and gently wiggle it free. A common error is forcing the form out quickly, which can break the shell; patience is key. If a shell sticks, let it cool a minute longer and try again.
- Enjoy!: When you snip the bag corner, the filling should pipe out in a smooth ribbon that holds its shape briefly before settling. As you fill, the contrast of pale pink cream against the golden shell is visually appealing. Work methodically to avoid overfilling, which can cause the filling to spill and make the shell soggy. If the filling seems too fluid, chill it longer until it firms; if too stiff, let it sit a few minutes at room temperature. Keep the filled cannolis refrigerated until serving to maintain structure and flavor.
- Keep refrigerated until ready to serve: Chilling preserves the crispness and prevents the filling from weeping. The cool temperature also enhances the strawberry note and keeps the cream stable. I store them in a single layer if possible, because stacking can damage the delicate shells. A common oversight is leaving them out too long which softens the shell; serve within a few hours for best texture. When transporting, use a rigid container to maintain their shape.
- Enjoy!: The first bite should offer a crisp crack followed by airy, fruity cream, and that contrast is what makes the recipe memorable. Savor the interplay of buttery crust and cool filling, and watch guests smile. If you find any shells less crisp than you like after refrigeration, a quick 3 minute re crisp in a warm oven can help, though be careful not to melt the filling.
Change It Up
If you want to experiment, small tweaks can change texture or sweetness without altering the core technique. Below are practical ideas to customize presentation, manage sweetness, and speed assembly.
- Swap Strawberry Jell O variant Use sugar free Strawberry Jell O to reduce sugar content, but taste the filling and adjust expectations since it will be less sweet.
- Lighten the topping Choose Fat Free Cool Whip to shave calories, noting that it may incorporate slightly less air, so fold gently to maintain loft.
- Make ahead strategy Prepare the filling a day ahead and keep it chilled, then pipe into shells the day of service for fresher crunch.
- Re roll scrap dough Save and re roll scraps to maximize yield, but rest the dough briefly if it gets too warm to keep edges clean when cutting circles.
- Use decorative cutters Add small star cutouts to the shells and brush with milk for an elegant finish that adheres during baking.
- Transport tips Place filled cannolis in a rigid container with single layer packing to prevent shifting and cracking during travel.
What to Serve With Skinny Strawberry Jell O Cream Pie Cannolis
These petite treats shine as a light dessert or sweet course. I often pair them with complementary textures and simple beverages so the strawberry notes pop. Below I list serving ideas, occasions, and storage tips to help you plan presentation.
- Serve at spring gatherings These feel seasonal and bright, ideal for garden parties and sunny potlucks where their color stands out on a dessert table.
- Pair with fresh fruit A small bowl of sliced berries complements the Strawberry Jell O flavor and adds freshness to each bite.
- Occasions They work well for baby showers, casual brunches, and holiday buffets where individual portions are helpful for guests.
- Storage tip Keep in a single layer in the refrigerator and consume within two days for optimal shell crispness.
- Serving style Arrange on a platter with a dusting of powdered sugar around the edges for an elegant touch, avoiding contact with the shells.
- Transport Use a rigid container to prevent the shells from shifting and cracking during travel to events.
- Seasonal pairing Highlight in spring and early summer when berries are abundant, as the bright fruit flavors feel most appropriate.
- Portion guidance With yield around fourteen pieces, they are great for sharing plates or as a light ending to a larger meal.
- Serving temperature Keep chilled until just before serving so the filling holds and the shells remain crisp on the first bite.
- Plating idea Stand a few unfilled shells upright and pipe in front of guests for a live assembly moment that feels interactive.
FAQ
Conclusion
What makes this recipe special is the playful contrast of crisp, buttery shells and a light, strawberry flavored cream that feels both nostalgic and fresh. The simplicity of pantry friendly ingredients paired with a charming presentation makes it an ideal choice for spring gatherings or casual get togethers. Give it a try and you may find this easy technique becomes a go to when you want a small, shareable dessert that looks impressive without a big time commitment. I hope it becomes a favorite in your rotation, bringing bright color and simple joy to your next celebration.
Skinny Strawberry Jell O Cream Pie Cannolis
Equipment
- Mixing Bowl
- Whisk
- 1 cup measuring cup
- Cannoli Forms
- Rolling Pin
- Cookie Cutter
- Baking Sheet
- Wire Rack
Ingredients
- 2 pie crust doughs, for a 9" pie Use to form the pie shells and provide a flaky base for the filling; press into two 9-inch pie pans and crimp edges before baking or blind-baking as recipe directs. Provide structure and a buttery contrast to the sweet, creamy strawberry filling, and can be brushed or egg-washed for a golden finish.
- 1 small box, 4 servings size Strawberry Jell-O (you can use sugar free) Provide the primary strawberry flavor and gelatin structure that sets the filling; dissolve according to package directions with specified water amounts to achieve proper consistency. Offer sweetness and fruitiness while allowing for sugar-free substitution to reduce calories without changing setting properties.
- 8 oz Cool Whip, you can use Fat Free Add light, airy creaminess to the filling and lighten the texture when folded into the set strawberry gelatin; contribute volume and a smooth mouthfeel. Offer a low-fat option if desired and help balance the gelatin’s firmness with a creamy, cool element.
- 2/3 cup water Dissolve the strawberry gelatin powder and act as the hot liquid needed to activate the gelatin; combine with the powder to fully dissolve before mixing with cool ingredients. Control the concentration of the gelatin solution and influence final firmness of the filling based on volume used.
- 1/2 cup water Cool or dilute the gelatin mixture as required in the recipe and help bring the mixture to a temperature suitable for folding in the Cool Whip without melting it. Allow for an intermediate dilution step that adjusts sweetness and texture prior to chilling or setting.
- ice cubes Chill ingredients quickly and help set the gelatin by creating an ice bath for rapid cooling; use around the mixing bowl to lower temperature without over-diluting the mixture. Assist in controlling temperature during preparation to preserve the airy texture of the whipped topping.
- 1 tbsp milk, - for brushing pie crust Brush onto the pie crust prior to baking to promote browning and help toppings adhere; apply a thin layer for a glossy finish and slight color enhancement. Provide moisture for surface adhesion and improve crust appearance when baked.
Instructions
- In a medium bowl whisk together the Jell-O powder with the boiling water, stir for 2 minutes so the powder is all dissolved.: As you pour the freshly boiled water over the Strawberry Jell O powder, the aroma becomes instantly fruity and bright. Vigorous whisking for the full two minutes ensures the granules dissolve into a smooth, glossy syrup that clings to the whisk rather than leaving powdery streaks. You will notice the color become more uniformly pink and the mixture thin and shiny. This step matters because undissolved powder will leave gritty texture and prevent the gel from setting evenly. A common mistake is to under stir, which leaves tiny lumps; if you see any specks, keep whisking and scrape the sides until the mixture is homogeneous. Stirring also helps release the strawberry scent, which builds anticipation. Use a heatproof bowl so the residual heat does not crack it. When done, the surface should be smooth and free of crystals.
- In a 1-cup measuring cup fill to 1/2 cup with cold water, add enough ice to cold water to make 1 cup. Pour into the gelatin mixture, stir until slightly thickened; remove any unmelted ice cubes.: The instant you add the icy cold water, the steam subsides and you can feel the temperature drop in the bowl. Stirring now causes the mixture to thicken noticeably into a syrupy consistency, signaling it is beginning to set. Watch the texture; it should become syrup like and slightly more viscous, not fully gelled. Remove any unmelted ice cubes so they do not dilute the balance of liquid and weaken the final gel. This cooling technique is important because it prevents the gelatin from being too hot when you fold in the whipped topping, which would collapse air. A frequent error is adding too much ice so the mixture becomes watery, so measure carefully and discard leftover unmelted ice. The mixture should hold a slow ribbon when you lift the whisk.
- Whisk in the Cool Whip. Pour into a zip-close bag and store in refrigerator for at least 1 hour.: As you fold in the cold Cool Whip , notice how the filling softens into a cloud like texture and the color becomes paler pink. Gentle folding preserves the aeration; over vigorous mixing will deflate it and make the filling dense. I find a few patient folds until no streaks remain is ideal. Transferring into a zip close bag minimizes tools and makes piping neat. Refrigerating for at least one hour stabilizes the structure so it holds shape when piped; the chill also sharpens the strawberry flavor. A common slip up is skipping chilling, which yields runny filling that leaks from shells. Label the bag and press out excess air to keep the texture uniform.
- Pre-heat oven to 425 degrees F.: When the oven gets hot, you will feel a wave of warm, dry air when you open it, and the aroma of baked pastry will become more pronounced once the shells go in. Preheating to the full temperature ensures the crusts begin crisping immediately, locking layers and preventing excessive spreading. This is essential for achieving a flaky, hollow shell. A mistake is to under preheat, which can make the pastry greasy and soft. Use an oven thermometer if your oven runs cool to ensure accuracy. Place racks in the middle to promote even browning.
- Cut out pie crust into 3" circles. Cut out stars (if desired). Wrap the circles around the cannoli forms, brush lightly with the milk, add the stars on top, and brush with milk. Repeat with remaining pie crusts. Note- use a rolling pin to re-roll out the scraps of dough to cut out 3 more circles per pie crust.: The moment you press the cutter into the chilled pie crust doughs , you should feel a clean snap at the edge and see neat, uniform discs. If you are making decorative stars, they should adhere with a light brush of milk . Wrapping the circles around cannoli forms creates that classic tubular shell shape; press seams gently so they stay closed. Re rolling scraps with a rolling pin yields additional circles, but avoid over working the dough because it will tighten gluten and make shells tough. A common issue is creating too thin discs which can burn; aim for even thickness. The shells should feel cool to the touch before baking.
- Bake for 10-12 minutes, or until golden brown. Cool on a wire rack for 5 minutes before carefully removing the cannoli form. Use caution as the forms will be very hot.: As the shells bake, the kitchen fills with a warm, buttery scent and you can see the edges begin to color. Look for an even golden brown hue across the surface, not just at the tips. The sound will be quiet but the visual cue of firm, set pastry tells you they are done. Cooling on a wire rack for about 5 minutes lets steam escape so the shells retain crispness, and this step prevents sogginess. A major pitfall is leaving the shells on a hot tray which can overcook them; transfer immediately to a rack. Use caution when removing the cannoli forms as they will be very hot to the touch.
- Snip a corner of the zip-close bag and pipe the strawberry Jell-O cream pie mixture into the cannolis. Keep refrigerated until ready to serve.: During this rest the shell firms and becomes less pliable, which helps it slide off the form without tearing. If you try to remove the form too soon, the shell can collapse. The shell will feel crisp and slightly warm, and you may hear a faint papery crack when you handle it. Use tongs or an oven mitt to steady the form and gently wiggle it free. A common error is forcing the form out quickly, which can break the shell; patience is key. If a shell sticks, let it cool a minute longer and try again.
- Enjoy!: When you snip the bag corner, the filling should pipe out in a smooth ribbon that holds its shape briefly before settling. As you fill, the contrast of pale pink cream against the golden shell is visually appealing. Work methodically to avoid overfilling, which can cause the filling to spill and make the shell soggy. If the filling seems too fluid, chill it longer until it firms; if too stiff, let it sit a few minutes at room temperature. Keep the filled cannolis refrigerated until serving to maintain structure and flavor.
- Keep refrigerated until ready to serve: Chilling preserves the crispness and prevents the filling from weeping. The cool temperature also enhances the strawberry note and keeps the cream stable. I store them in a single layer if possible, because stacking can damage the delicate shells. A common oversight is leaving them out too long which softens the shell; serve within a few hours for best texture. When transporting, use a rigid container to maintain their shape.
- Enjoy!: The first bite should offer a crisp crack followed by airy, fruity cream, and that contrast is what makes the recipe memorable. Savor the interplay of buttery crust and cool filling, and watch guests smile. If you find any shells less crisp than you like after refrigeration, a quick 3 minute re crisp in a warm oven can help, though be careful not to melt the filling.
Notes
- Swap Strawberry Jell O variant Use sugar free Strawberry Jell O to reduce sugar content, but taste the filling and adjust expectations since it will be less sweet.
- Lighten the topping Choose Fat Free Cool Whip to shave calories, noting that it may incorporate slightly less air, so fold gently to maintain loft.
- Make ahead strategy Prepare the filling a day ahead and keep it chilled, then pipe into shells the day of service for fresher crunch.
- Re roll scrap dough Save and re roll scraps to maximize yield, but rest the dough briefly if it gets too warm to keep edges clean when cutting circles.
- Use decorative cutters Add small star cutouts to the shells and brush with milk for an elegant finish that adheres during baking.
- Transport tips Place filled cannolis in a rigid container with single layer packing to prevent shifting and cracking during travel.