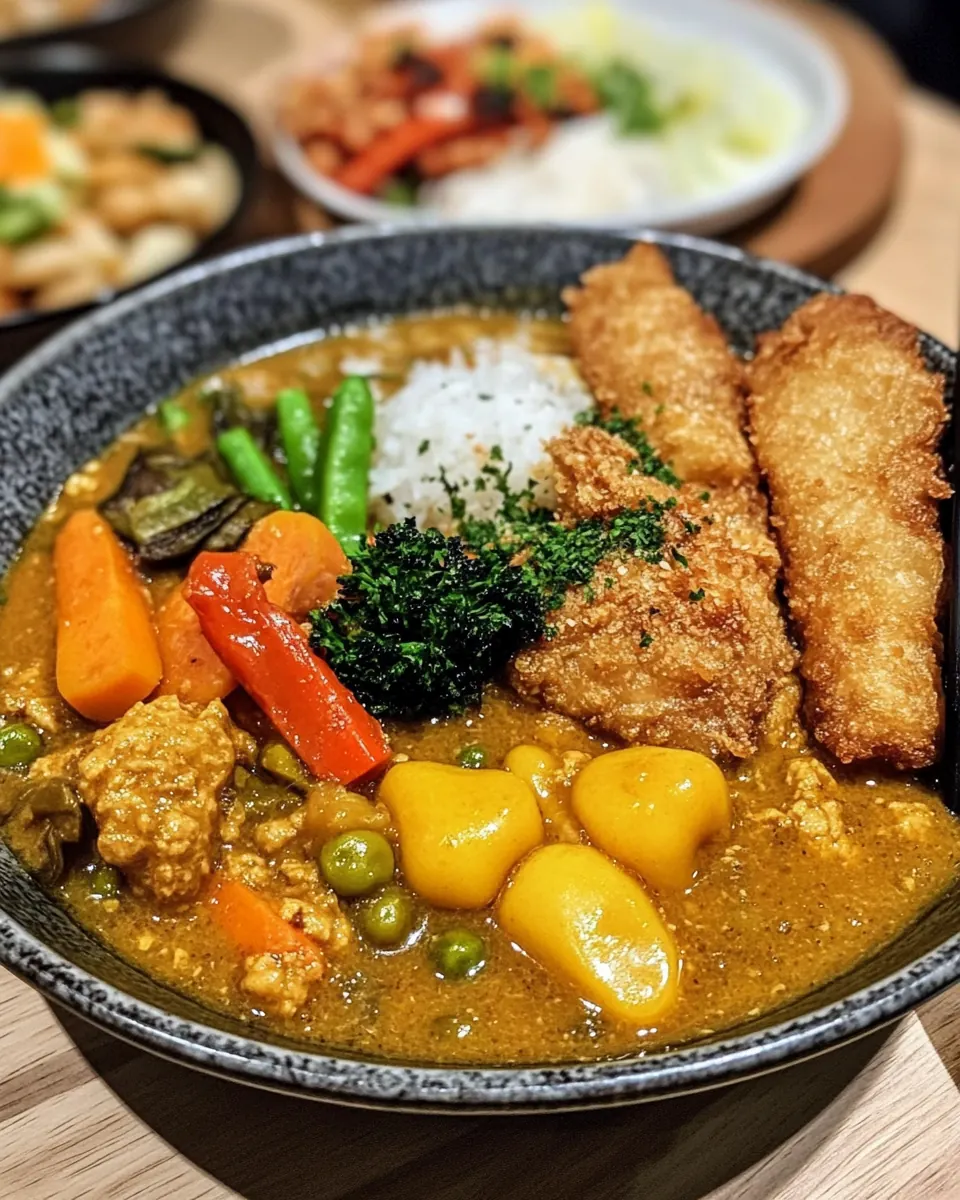
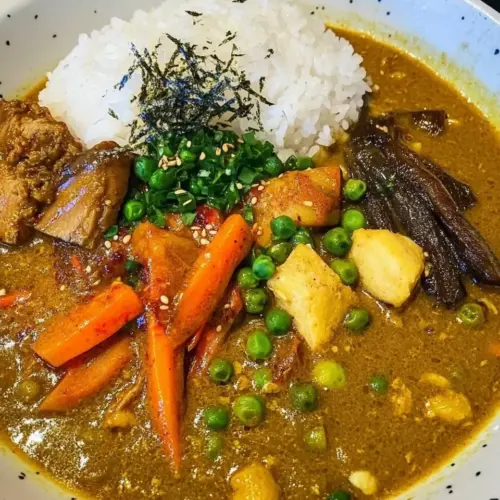
Sapporo Soup Curry
Sapporo Soup Curry has a special place in my weeknight rotation, a bowl that somehow feels both like a cozy hug and a lively adventure. The first time I tasted it in a tiny Sapporo eatery I was struck by the way the broth carried layers of spice, the chicken lending body, and the fried vegetables offering crunchy contrast. Ever since, I’ve been chasing that balance at home, tweaking the seasoning until it felt like mine.
Some evenings I crave something restorative, other nights I want a meal that wakes up the senses. That flexibility is why Sapporo Soup Curry became a favorite. I love how the broth is both aromatic and light, and how the toppings let you get playful. I’ll often change the veggies depending on what’s in the fridge, and each variation tells its own little story.
Recipe Snapshot
1 hr 15 mins
20 mins
55 mins
Hard
450 kcal
Japanese
Gluten-Free, Low FODMAP
Dinner
Deep sauce pan, Saucepan, Wire rack, Thermometer
Why This Sapporo Soup Curry Is a Winner
Complex but approachable flavors
I adore that Sapporo Soup Curry layers spices in a way that feels sophisticated yet totally approachable. The combination of curry powder, garam masala, and tomato paste gives a rounded warmth without overwhelming the palate. I find this mix creates depth, letting the chicken and vegetables shine through, not get buried.
Texture play that excites
The contrast between the silky broth and the crisp fried vegetables is a joy to eat. I often fry the eggplant and bell pepper until they develop golden edges, then rest them on a rack so they stay crisp. That textural variety turns every spoonful into a little celebration.
Comfort with a light touch
This recipe delivers comfort without heaviness. The use of a clear chicken stock base keeps the soup broth-forward and satisfying, rather than thick and creamy. I like that it warms me up on cold nights, yet never leaves you feeling weighed down afterwards.
Customizable and forgiving
I love how flexible Sapporo Soup Curry is. If you want more heat, you can nudge the curry powder up a touch. If you want more umami, a splash of soy sauce does wonders. It’s forgiving for cooks of all levels, so I often invite friends to help assemble toppings and enjoy the ritual together.
Great for leftovers
Leftovers actually improve in many cases, as the flavors continue to meld. I’ll store the broth separately from the fried vegetables and rice, then reheat gently. That little bit of separation preserves texture, so reheated portions still taste vibrant the next day.
What You’ll Need for Sapporo Soup Curry
The ingredient list for Sapporo Soup Curry is a purposeful ensemble. The broth ingredients build a savory, spiced foundation while the toppings provide texture and color. Key players like chicken stock and Japanese curry roux form the backbone, while items such as eggplant and shimeji mushrooms add earthy, meaty notes without heaviness.
- 1/2 onion: Sauté until translucent to build a sweet and savory base for the soup curry, releasing natural sugars that deepen the broth’s flavor. Chop finely to ensure even cooking and integration with other aromatics. Use gently to avoid burning and to provide subtle sweetness that balances spices.
- 1/4 carrot: Simmer until tender to add earthy sweetness and body to the curry broth, contributing texture and natural sugars. Slice or dice uniformly so it cooks at the same rate as other vegetables. Use as a supporting vegetable that soaks up the savory, spiced stock.
- 2 cloves of garlic: Crush and mince to provide pungent, aromatic depth that complements ginger and curry spices. Add early in the cooking process to mellow its sharpness and integrate into the soup base. Use sparingly to avoid overpowering the balance of flavors.
- 1 knob of ginger (2 cm / about 1 inch): Grate or finely chop to contribute warm, zesty heat that brightens the curry and pairs with garlic. Add with garlic early to infuse the oil and stock with fresh spiciness and aromatics. Use a small amount to lift the overall flavor profile without making it overly hot.
- 3 cup chicken stock: Simmer as the primary liquid component to create a rich, savory foundation for the soup curry, supporting vegetables and spices. Use preferably homemade or low-sodium chicken stock to control salt and richness. Keep at a gentle simmer to meld flavors without reducing excessively.
- 1 bay leaf: Steep whole to impart a subtle, herbal background note that enhances the broth’s complexity while remaining mild. Add during simmering and remove before serving to avoid an overpowering bay intensity. Use one leaf to accentuate the savory profile without dominating it.
- 1 tsp soy sauce: Splash to add a touch of salty umami and depth that complements both the stock and curry roux. Add near the end of cooking to adjust seasoning and reinforce savory notes. Use sparingly and taste as you go to prevent over-salting.
- 1 piece Japanese curry roux: Melt into the simmering broth to thicken and lend a familiar rounded curry flavor commonly used in Japanese-style curries. Break into pieces to dissolve evenly and stir until fully incorporated for a smooth texture. Use to achieve a comforting, slightly sweet curry body.
- 1 tbsp curry powder: Sprinkle to enhance warm, aromatic curry character and reinforce spice layers in the soup base. Add during cooking to toast gently and release essential oils, adjusting to taste. Use to deepen the overall curry flavor without adding heat alone.
- 1 tsp garam masala: Dust to introduce complex, toasted spice notes that bring warmth and aromatic finish to the curry. Stir in towards the end to preserve its fragrance and avoid bitterness from overcooking. Use modestly to complement curry powder and enrich the spice profile.
- 1 tbsp tomato paste: Stir in to add concentrated tomato umami and acidity that brightens the broth and balances richness. Dissolve into the stock to integrate fully and avoid isolated pockets of intense flavor. Use to lift the curry and provide subtle tartness.
- 1 tbsp sugar: Add to balance acidity and round out savory flavors with a touch of sweetness that harmonizes spices. Dissolve into the simmering broth to integrate evenly and adjust according to taste preference. Use to mellow sharp edges and create a smoother finish.
- 1/2 pack shimeji mushrooms: Separate clusters and briefly sauté to contribute a delicate, nutty mushroom flavor that soaks up the curry broth. Add later in cooking to preserve texture and avoid becoming overly soft. Use as an umami-rich vegetable element that enhances the overall depth.
- 1 eggplant: Slice and roast or sauté to bring a smoky, tender element that absorbs spices and broth, adding meaty texture for vegetarians or alongside meat. Add mid-to-late in cooking so it becomes tender without disintegrating. Use to contribute substantial, silky bites in each spoonful.
- 1/2 red bell pepper: Chop into strips and lightly roast or sauté to maintain slight crunch and sweet pepper flavor that brightens the dish. Add near the end of cooking to preserve color and texture while still absorbing some curry flavor. Use to provide fresh, crisp contrast in the bowl.
- 1 chicken thigh, bone in: Brown with skin on to develop deep savory richness and render fat that flavors the broth while keeping the meat juicy. Simmer bone-in in the stock to extract collagen and add body to the soup curry. Use as the main protein component that also enriches the stock.
- (plus any extra vegetables you like): Include optionally to increase variety and bulk, allowing personalization with seasonal vegetables or preferred textures. Add compatible vegetables that will cook within the soup’s simmer time and complement the curry spices. Use extras to customize heat, sweetness, or earthiness.
- Japanese short grain rice: Serve hot alongside the curry to provide a neutral, slightly sticky base that soaks up the flavorful broth and balances spice. Cook to desired doneness so grains remain separate yet cling slightly when scooped with soup. Use as the traditional accompaniment for Japanese soup curry meals.
How to Prepare Sapporo Soup Curry
This recipe unfolds in a sequence that builds flavor, from seasoning the soup to browning the chicken and finally frying the vegetables for contrast. Below are the cleaned steps from the original directions, expanded with sensory cues, technique reasons, and troubleshooting tips to help you get each stage right.
- Mix all the soup seasonings in a bowl.: The aroma of blended spices is immediate, a prelude to the broth to come. When you combine items like curry powder , garam masala , and tomato paste off heat, their scents mingle and you can adjust ratios before they enter the pan. This step prevents uneven pockets of spice later. A common mistake is skimping on tasting the mix, which can leave the broth underseasoned, so take a moment to balance salt and spice now.
- Mince the garlic and ginger.: Minced garlic and ginger release fragrant oils that bloom once they hit hot oil, offering bright, pungent layers. The texture should be fine enough to disperse but not so fine it turns mushy. If garlic browns too quickly it becomes bitter, so add it after the onions have softened and keep the heat moderate.
- Dice the onions into 2 cm / 1 inch pieces. Cut the carrots to a similar size using the Japanese ‘rangiri’ cutting method.: This size creates even cooking and pleasant bites. The rough, angled surfaces from rangiri help the carrot pick up more broth flavor. If pieces vary too much you will have some that fall apart during simmering, so aim for consistency for reliable texture.
- Pat the chicken thigh dry and season with salt and pepper on both sides.: Dryness on the surface encourages a golden sear, and simple seasoning enhances the meat and the resulting fond. When you press the chicken gently it should be tacky not wet; excess moisture will steam the meat and prevent browning. If your pan is crowded the sear will be weak, so give pieces room.
- Heat 1 tbsp of oil in a deep sauce pan, then sear the chicken thigh on both sides until golden brown. Take out and rest on a tray or plate.: The sizzle when the chicken meets the hot oil is the reassuring sound of caramelization. You are forming a browned crust that adds flavor to both the meat and the broth. Resting preserves juices and prevents the meat from drying during the simmer. A common slip is turning too soon, which tears the crust, so wait until a golden edge forms before flipping.
- In the same sauce pan, on a medium heat, sauté the onions for around 5 minutes till translucent.: The pan will carry browned bits from searing, and as the onions sweat they release sugars that mingle with those fond bits, building depth. Stir occasionally until translucency appears. If you rush with too high heat the onions will char, creating bitter notes, so keep it steady.
- Add the minced ginger, garlic and the carrots. Fry for 3 minutes.: At this point the skillet becomes aromatic, bright with ginger and garlicky warmth while the carrot begins to soften. A light sizzle and lifted aroma are the cues to look for. Overcooking will flatten the brightness of ginger and garlic, so keep this short and attentive.
- Add the soup seasonings in and mix all together. Fry for 1-2 minutes to combine the flavors.: Toasting the seasoning briefly in the pan releases essential oils and deepens the spice profile. You should sense an amplified fragrance, not a burnt smell. Stir constantly to prevent sticking, and if clumping occurs, add a splash of chicken stock to loosen the mixture.
- Add the chicken stock and the chicken thigh. Make sure to scrape the sides and bottom to remove all the golden bits, which will add more umami to the curry.: Deglazing with chicken stock lifts the fond, dissolving caramelized flavors into the broth. The liquid should come to a gentle shimmer, and you will notice savory richness deepen. If you skip scraping, you lose those concentrated notes, so use a wooden spoon to scrape thoroughly.
- Add the bay leaf and simmer for 45 minutes.: A long simmer allows the chicken to give up collagen and flavor, producing a flavorful, slightly gelatinous broth. Simmer at a low bubble so the surface barely moves, which preserves clarity. A common error is boiling too hard, which toughens meat and clouds the broth, so keep the heat low and steady.
- After simmering, adjust the seasoning with salt, pepper, and sugar if needed.: Taste the broth when it is hot and aromatic, then balance with salt or a small amount of sugar to harmonize acidity and spice. Adjusting at the end ensures flavors are vivid. Over-salting is easy, so add gradually and taste between additions.
- Add a neutral flavored oil to a saucepan and heat to 170 ºC / 340° F.: Heating oil to the proper temperature readies it for quick frying of the vegetables, producing a crisp exterior and tender interior. A thermometer helps, but tiny test pieces can confirm readiness by turning golden in seconds. Oil that is too cool will cause soggy vegetables, while oil too hot may burn them, so monitor carefully.
- Cut all the vegetables into bite-size pieces.: Uniform, bite-size cuts ensure even frying and pleasing bites in the finished bowl. You want pieces that get crisp edges without becoming mushy. If some pieces are much larger they will remain undercooked, so aim for consistent sizing.
- Lightly fry each vegetable till tender.: Frying should produce blistered, golden edges and a soft, flavorful interior. Listen for a steady, lively sizzle and watch for color change. Work in small batches to avoid crowding which causes steaming rather than frying; this is the most common pitfall.
- Place on a wire rack to drain excess oil.: Resting on a rack keeps vegetables crisp by allowing oil to drip away, instead of pooling beneath them. The texture remains vivid and contrasts nicely with the broth. If you skip the rack and use paper directly, the steam traps and the vegetables can become limp.
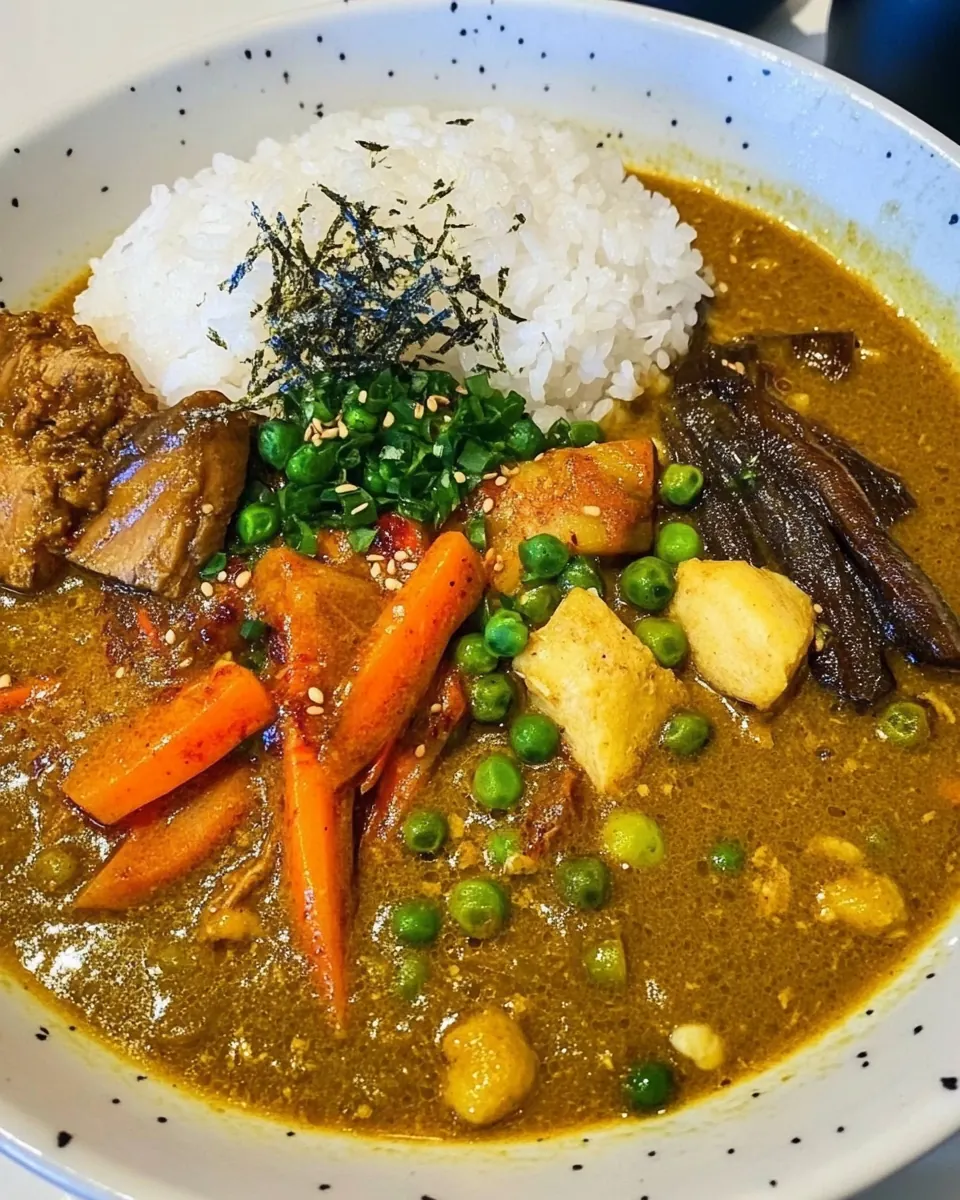
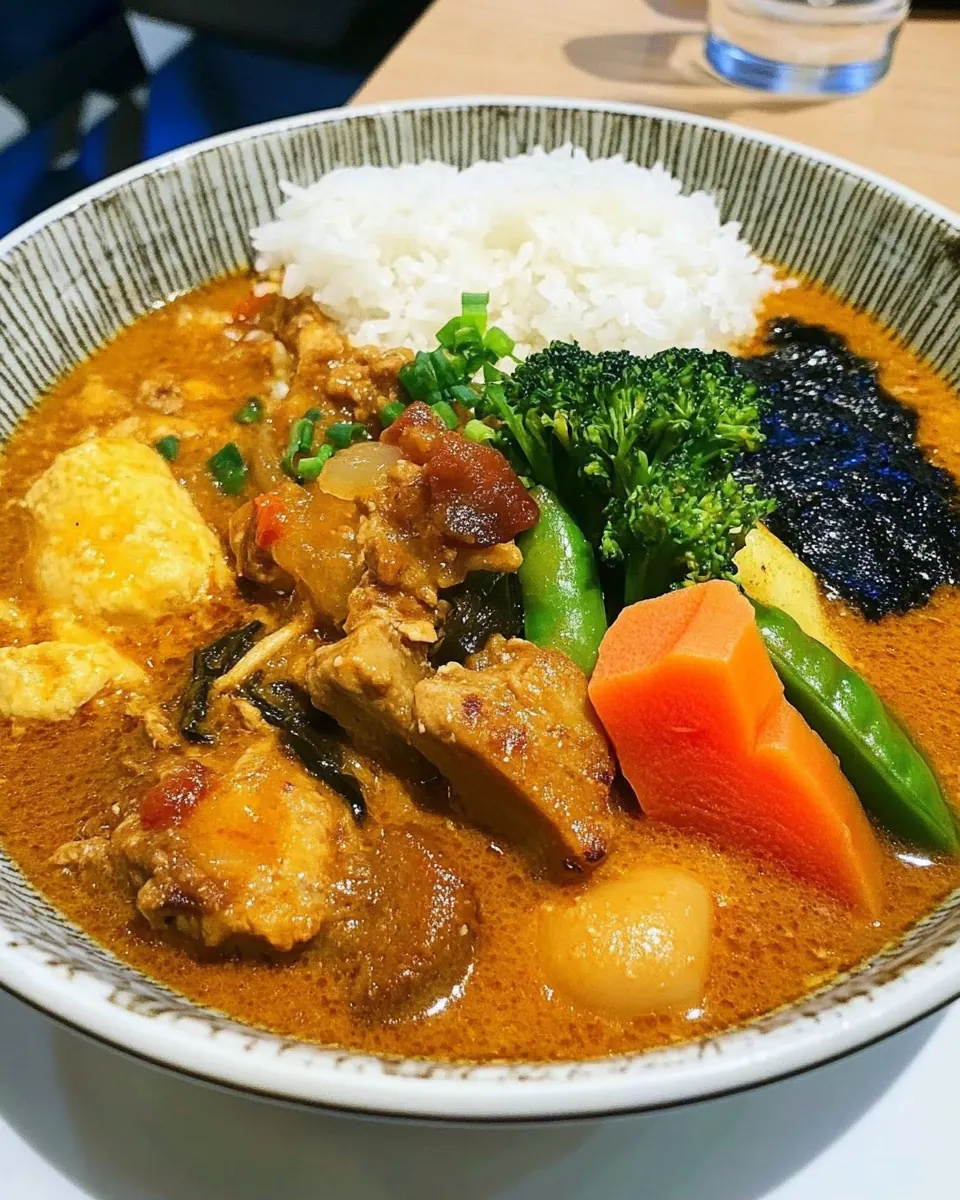
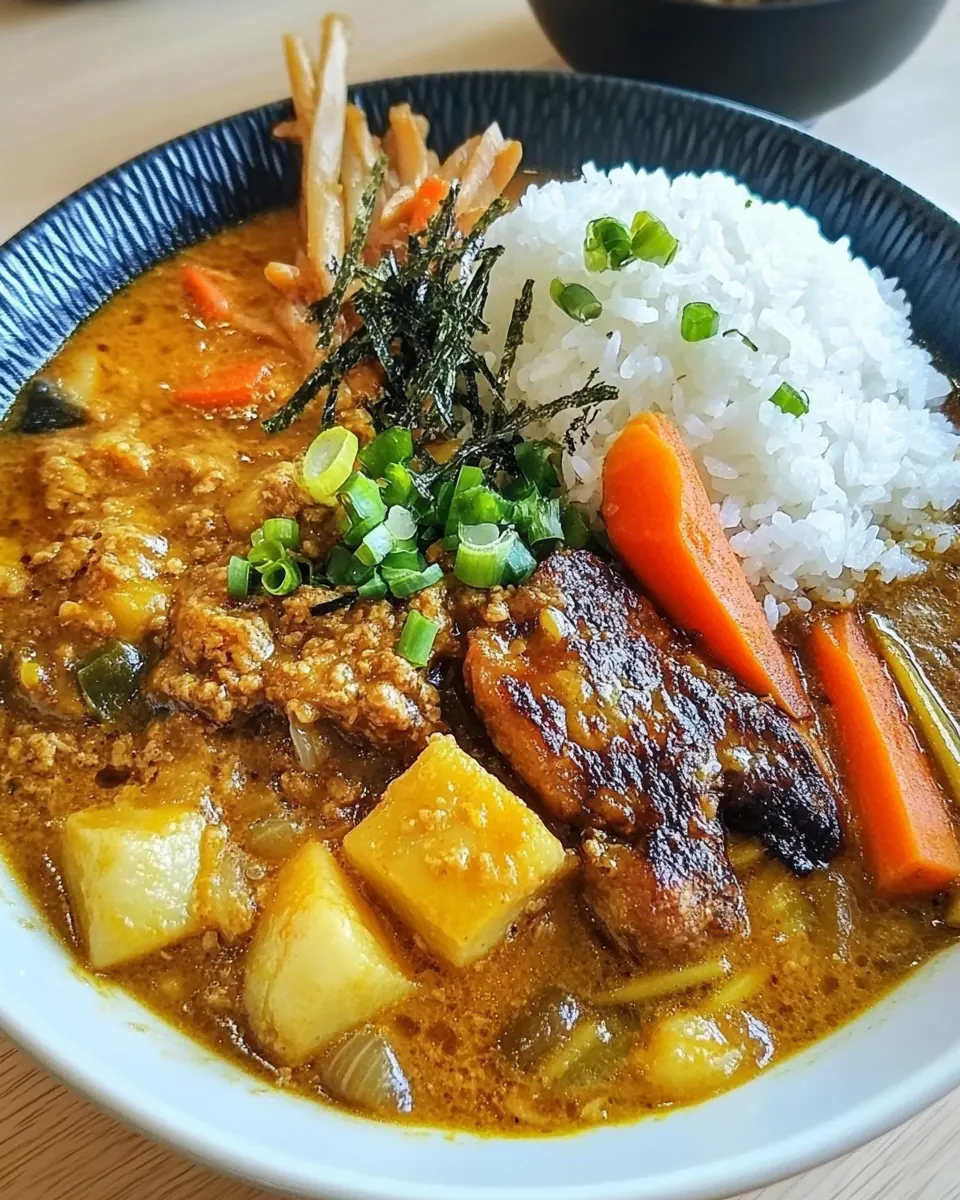
- Serve the soup with the chicken leg and top with the fried vegetables. Serve your rice on a separate plate and enjoy!: The final presentation is aromatic, colorful, and layered. Ladle hot broth and chicken into bowls, then crown with crisp vegetables so they stay crunchy for each bite. Serving rice separately keeps textures distinct. A misstep is combining everything too early, which softens the fried toppings, so assemble just before eating.
Tips and Tricks about Sapporo Soup Curry
I like to think of tips as shortcuts to better results. Below are focused ideas that will elevate your Sapporo Soup Curry from good to memorable, with practical details to help you at the stove.
- Brown the chicken well — A deep golden sear creates fond that dissolves into the broth, producing a richer, more savory soup. Be patient and avoid moving the meat too soon.
- Bloom spices in fat briefly — Frying the curry powder and tomato paste in oil for a short moment unlocks aromatic oils, intensifying flavor without adding heat.
- Use a thermometer for oil — Heating to around 170 ºC / 340° F gives a reliable crisp when frying vegetables; test with a small piece first to confirm.
- Keep toppings separate until serving — Arrange fried vegetables and rice separately so textures stay distinct, and assemble just before eating for the best contrast.
- Adjust seasoning at the end — Taste after simmering and tweak with salt or sugar to balance acidity and spice, making nuanced adjustments rather than large ones.
Serving This Sapporo Soup Curry
Serving well ensures the contrasts shine. I usually keep everything separated until the table is set so each diner can compose their bowl. The broth goes hot, the fried vegetables go on top, and the rice remains on its own plate for scooping.
- Classic plating — Ladle hot soup and place the chicken into bowls, then arrange the fried vegetables on top so they remain crisp.
- Rice on the side — Serve Japanese short grain rice separately so diners can spoon broth over rice or dip, preserving textural contrasts.
- Occasions — This works beautifully for cozy winter dinners or casual gatherings, it’s warming and interactive for sharing.
- Storage tips — Keep broth and fried vegetables separate in airtight containers. Reheat broth gently and refresh vegetables in a hot oven for a few minutes to restore crispness.
- Seasonal pairings — In winter I use heartier vegetables and root vegetables, while spring invites brighter peppers and mushrooms for fresh notes.
FAQ
Conclusion
Sapporo Soup Curry is special because it marries a spiced, savory broth with crisp, vibrant toppings for a bowl that is both comforting and lively. I encourage you to give it a try, experimenting with vegetables and seasoning to make it your own. The process is rewarding, and the result is a flexible, warming meal that works for cozy weeknights or relaxed gatherings, delivering layers of flavor and texture with each spoonful.
Sapporo Soup Curry
Equipment
- Deep sauce pan
- Saucepan
- Wire Rack
- Thermometer
Ingredients
- 1/2 onion Sauté until translucent to build a sweet and savory base for the soup curry, releasing natural sugars that deepen the broth’s flavor. Chop finely to ensure even cooking and integration with other aromatics. Use gently to avoid burning and to provide subtle sweetness that balances spices.
- 1/4 carrot Simmer until tender to add earthy sweetness and body to the curry broth, contributing texture and natural sugars. Slice or dice uniformly so it cooks at the same rate as other vegetables. Use as a supporting vegetable that soaks up the savory, spiced stock.
- 2 cloves of garlic Crush and mince to provide pungent, aromatic depth that complements ginger and curry spices. Add early in the cooking process to mellow its sharpness and integrate into the soup base. Use sparingly to avoid overpowering the balance of flavors.
- 1 knob of ginger (2 cm / about 1 inch) Grate or finely chop to contribute warm, zesty heat that brightens the curry and pairs with garlic. Add with garlic early to infuse the oil and stock with fresh spiciness and aromatics. Use a small amount to lift the overall flavor profile without making it overly hot.
- 3 cup chicken stock Simmer as the primary liquid component to create a rich, savory foundation for the soup curry, supporting vegetables and spices. Use preferably homemade or low-sodium chicken stock to control salt and richness. Keep at a gentle simmer to meld flavors without reducing excessively.
- 1 bay leaf Steep whole to impart a subtle, herbal background note that enhances the broth’s complexity while remaining mild. Add during simmering and remove before serving to avoid an overpowering bay intensity. Use one leaf to accentuate the savory profile without dominating it.
- 1 tsp soy sauce Splash to add a touch of salty umami and depth that complements both the stock and curry roux. Add near the end of cooking to adjust seasoning and reinforce savory notes. Use sparingly and taste as you go to prevent over-salting.
- 1 piece Japanese curry roux Melt into the simmering broth to thicken and lend a familiar rounded curry flavor commonly used in Japanese-style curries. Break into pieces to dissolve evenly and stir until fully incorporated for a smooth texture. Use to achieve a comforting, slightly sweet curry body.
- 1 tbsp curry powder Sprinkle to enhance warm, aromatic curry character and reinforce spice layers in the soup base. Add during cooking to toast gently and release essential oils, adjusting to taste. Use to deepen the overall curry flavor without adding heat alone.
- 1 tsp garam masala Dust to introduce complex, toasted spice notes that bring warmth and aromatic finish to the curry. Stir in towards the end to preserve its fragrance and avoid bitterness from overcooking. Use modestly to complement curry powder and enrich the spice profile.
- 1 tbsp tomato paste Stir in to add concentrated tomato umami and acidity that brightens the broth and balances richness. Dissolve into the stock to integrate fully and avoid isolated pockets of intense flavor. Use to lift the curry and provide subtle tartness.
- 1 tbsp sugar Add to balance acidity and round out savory flavors with a touch of sweetness that harmonizes spices. Dissolve into the simmering broth to integrate evenly and adjust according to taste preference. Use to mellow sharp edges and create a smoother finish.
- 1/2 pack shimeji mushrooms Separate clusters and briefly sauté to contribute a delicate, nutty mushroom flavor that soaks up the curry broth. Add later in cooking to preserve texture and avoid becoming overly soft. Use as an umami-rich vegetable element that enhances the overall depth.
- 1 eggplant Slice and roast or sauté to bring a smoky, tender element that absorbs spices and broth, adding meaty texture for vegetarians or alongside meat. Add mid-to-late in cooking so it becomes tender without disintegrating. Use to contribute substantial, silky bites in each spoonful.
- 1/2 red bell pepper Chop into strips and lightly roast or sauté to maintain slight crunch and sweet pepper flavor that brightens the dish. Add near the end of cooking to preserve color and texture while still absorbing some curry flavor. Use to provide fresh, crisp contrast in the bowl.
- 1 chicken thigh, bone in Brown with skin on to develop deep savory richness and render fat that flavors the broth while keeping the meat juicy. Simmer bone-in in the stock to extract collagen and add body to the soup curry. Use as the main protein component that also enriches the stock.
- (plus any extra vegetables you like) Include optionally to increase variety and bulk, allowing personalization with seasonal vegetables or preferred textures. Add compatible vegetables that will cook within the soup’s simmer time and complement the curry spices. Use extras to customize heat, sweetness, or earthiness.
- Japanese short grain rice Serve hot alongside the curry to provide a neutral, slightly sticky base that soaks up the flavorful broth and balances spice. Cook to desired doneness so grains remain separate yet cling slightly when scooped with soup. Use as the traditional accompaniment for Japanese soup curry meals.
Instructions
- Mix all the soup seasonings in a bowl.: The aroma of blended spices is immediate, a prelude to the broth to come. When you combine items like curry powder , garam masala , and tomato paste off heat, their scents mingle and you can adjust ratios before they enter the pan. This step prevents uneven pockets of spice later. A common mistake is skimping on tasting the mix, which can leave the broth underseasoned, so take a moment to balance salt and spice now.
- Mince the garlic and ginger.: Minced garlic and ginger release fragrant oils that bloom once they hit hot oil, offering bright, pungent layers. The texture should be fine enough to disperse but not so fine it turns mushy. If garlic browns too quickly it becomes bitter, so add it after the onions have softened and keep the heat moderate.
- Dice the onions into 2 cm / 1 inch pieces. Cut the carrots to a similar size using the Japanese ‘rangiri’ cutting method.: This size creates even cooking and pleasant bites. The rough, angled surfaces from rangiri help the carrot pick up more broth flavor. If pieces vary too much you will have some that fall apart during simmering, so aim for consistency for reliable texture.
- Pat the chicken thigh dry and season with salt and pepper on both sides.: Dryness on the surface encourages a golden sear, and simple seasoning enhances the meat and the resulting fond. When you press the chicken gently it should be tacky not wet; excess moisture will steam the meat and prevent browning. If your pan is crowded the sear will be weak, so give pieces room.
- Heat 1 tbsp of oil in a deep sauce pan, then sear the chicken thigh on both sides until golden brown. Take out and rest on a tray or plate.: The sizzle when the chicken meets the hot oil is the reassuring sound of caramelization. You are forming a browned crust that adds flavor to both the meat and the broth. Resting preserves juices and prevents the meat from drying during the simmer. A common slip is turning too soon, which tears the crust, so wait until a golden edge forms before flipping.
- In the same sauce pan, on a medium heat, sauté the onions for around 5 minutes till translucent.: The pan will carry browned bits from searing, and as the onions sweat they release sugars that mingle with those fond bits, building depth. Stir occasionally until translucency appears. If you rush with too high heat the onions will char, creating bitter notes, so keep it steady.
- Add the minced ginger, garlic and the carrots. Fry for 3 minutes.: At this point the skillet becomes aromatic, bright with ginger and garlicky warmth while the carrot begins to soften. A light sizzle and lifted aroma are the cues to look for. Overcooking will flatten the brightness of ginger and garlic, so keep this short and attentive.
- Add the soup seasonings in and mix all together. Fry for 1-2 minutes to combine the flavors.: Toasting the seasoning briefly in the pan releases essential oils and deepens the spice profile. You should sense an amplified fragrance, not a burnt smell. Stir constantly to prevent sticking, and if clumping occurs, add a splash of chicken stock to loosen the mixture.
- Add the chicken stock and the chicken thigh. Make sure to scrape the sides and bottom to remove all the golden bits, which will add more umami to the curry.: Deglazing with chicken stock lifts the fond, dissolving caramelized flavors into the broth. The liquid should come to a gentle shimmer, and you will notice savory richness deepen. If you skip scraping, you lose those concentrated notes, so use a wooden spoon to scrape thoroughly.
- Add the bay leaf and simmer for 45 minutes.: A long simmer allows the chicken to give up collagen and flavor, producing a flavorful, slightly gelatinous broth. Simmer at a low bubble so the surface barely moves, which preserves clarity. A common error is boiling too hard, which toughens meat and clouds the broth, so keep the heat low and steady.
- After simmering, adjust the seasoning with salt, pepper, and sugar if needed.: Taste the broth when it is hot and aromatic, then balance with salt or a small amount of sugar to harmonize acidity and spice. Adjusting at the end ensures flavors are vivid. Over-salting is easy, so add gradually and taste between additions.
- Add a neutral flavored oil to a saucepan and heat to 170 ºC / 340° F.: Heating oil to the proper temperature readies it for quick frying of the vegetables, producing a crisp exterior and tender interior. A thermometer helps, but tiny test pieces can confirm readiness by turning golden in seconds. Oil that is too cool will cause soggy vegetables, while oil too hot may burn them, so monitor carefully.
- Cut all the vegetables into bite-size pieces.: Uniform, bite-size cuts ensure even frying and pleasing bites in the finished bowl. You want pieces that get crisp edges without becoming mushy. If some pieces are much larger they will remain undercooked, so aim for consistent sizing.
- Lightly fry each vegetable till tender.: Frying should produce blistered, golden edges and a soft, flavorful interior. Listen for a steady, lively sizzle and watch for color change. Work in small batches to avoid crowding which causes steaming rather than frying; this is the most common pitfall.
- Place on a wire rack to drain excess oil.: Resting on a rack keeps vegetables crisp by allowing oil to drip away, instead of pooling beneath them. The texture remains vivid and contrasts nicely with the broth. If you skip the rack and use paper directly, the steam traps and the vegetables can become limp.
- Serve the soup with the chicken leg and top with the fried vegetables. Serve your rice on a separate plate and enjoy!: The final presentation is aromatic, colorful, and layered. Ladle hot broth and chicken into bowls, then crown with crisp vegetables so they stay crunchy for each bite. Serving rice separately keeps textures distinct. A misstep is combining everything too early, which softens the fried toppings, so assemble just before eating.
Notes
- Brown the chicken well — A deep golden sear creates fond that dissolves into the broth, producing a richer, more savory soup. Be patient and avoid moving the meat too soon.
- Bloom spices in fat briefly — Frying the curry powder and tomato paste in oil for a short moment unlocks aromatic oils, intensifying flavor without adding heat.
- Use a thermometer for oil — Heating to around 170 ºC / 340° F gives a reliable crisp when frying vegetables; test with a small piece first to confirm.
- Keep toppings separate until serving — Arrange fried vegetables and rice separately so textures stay distinct, and assemble just before eating for the best contrast.
- Adjust seasoning at the end — Taste after simmering and tweak with salt or sugar to balance acidity and spice, making nuanced adjustments rather than large ones.