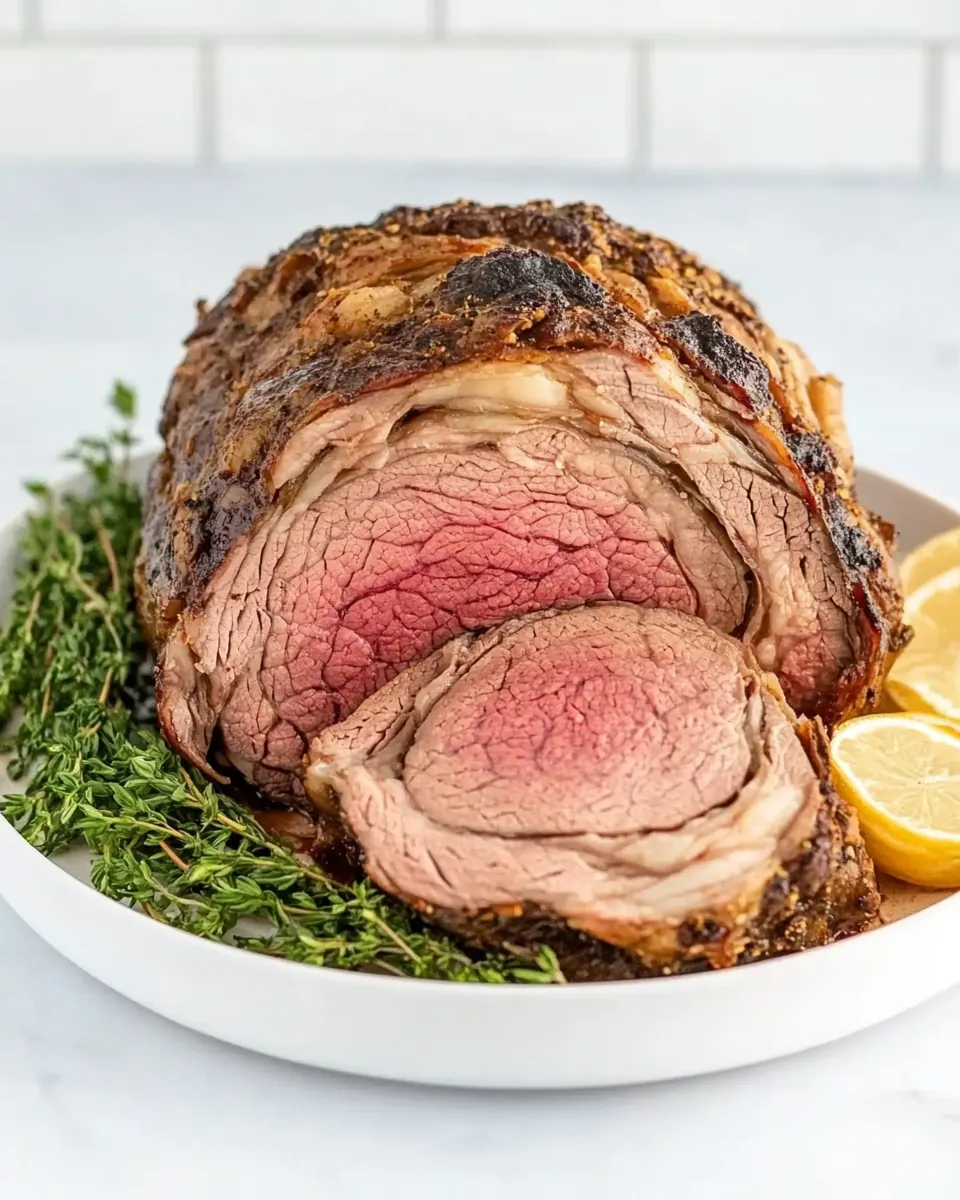
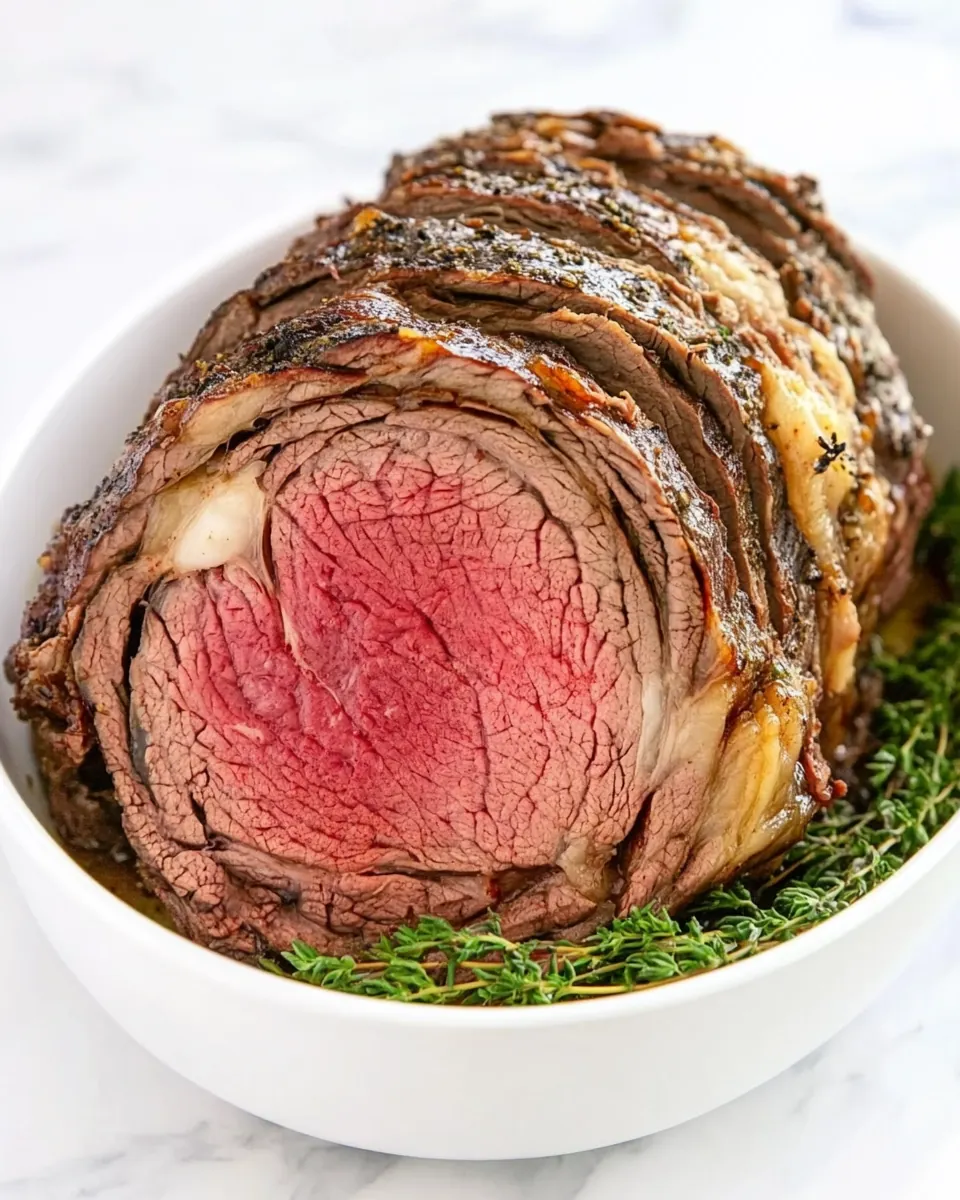
Rib Eye Roast
Rib Eye Roast has been my go to showstopper for cold evenings when friends gather and conversation runs long, because a well roasted standing rib is an experience, not just a meal.
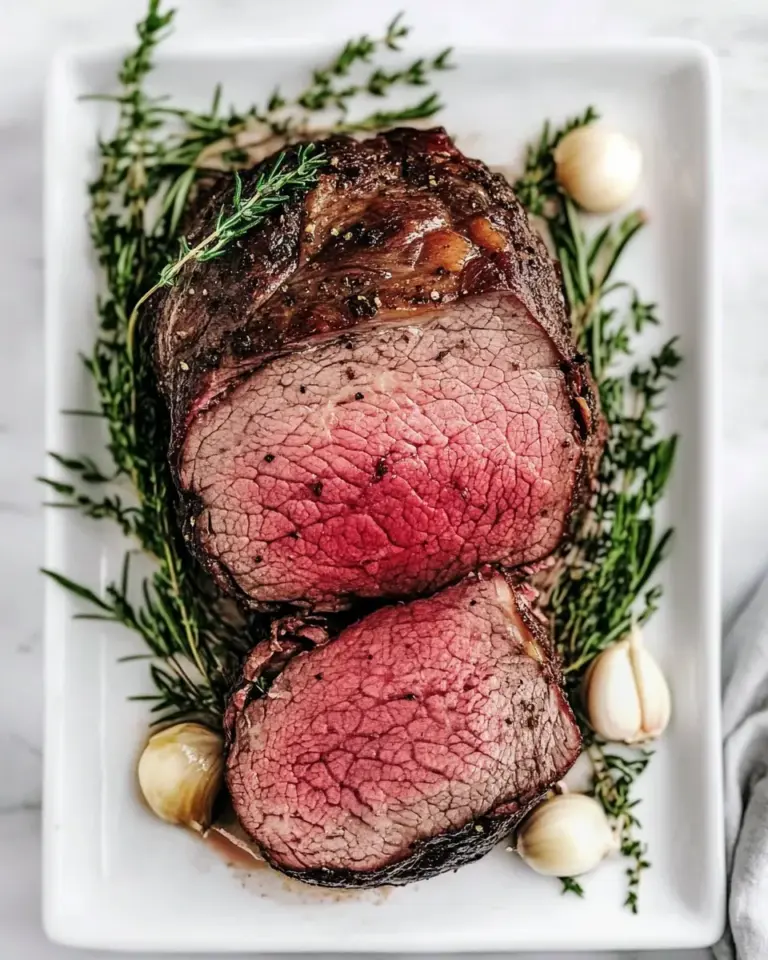
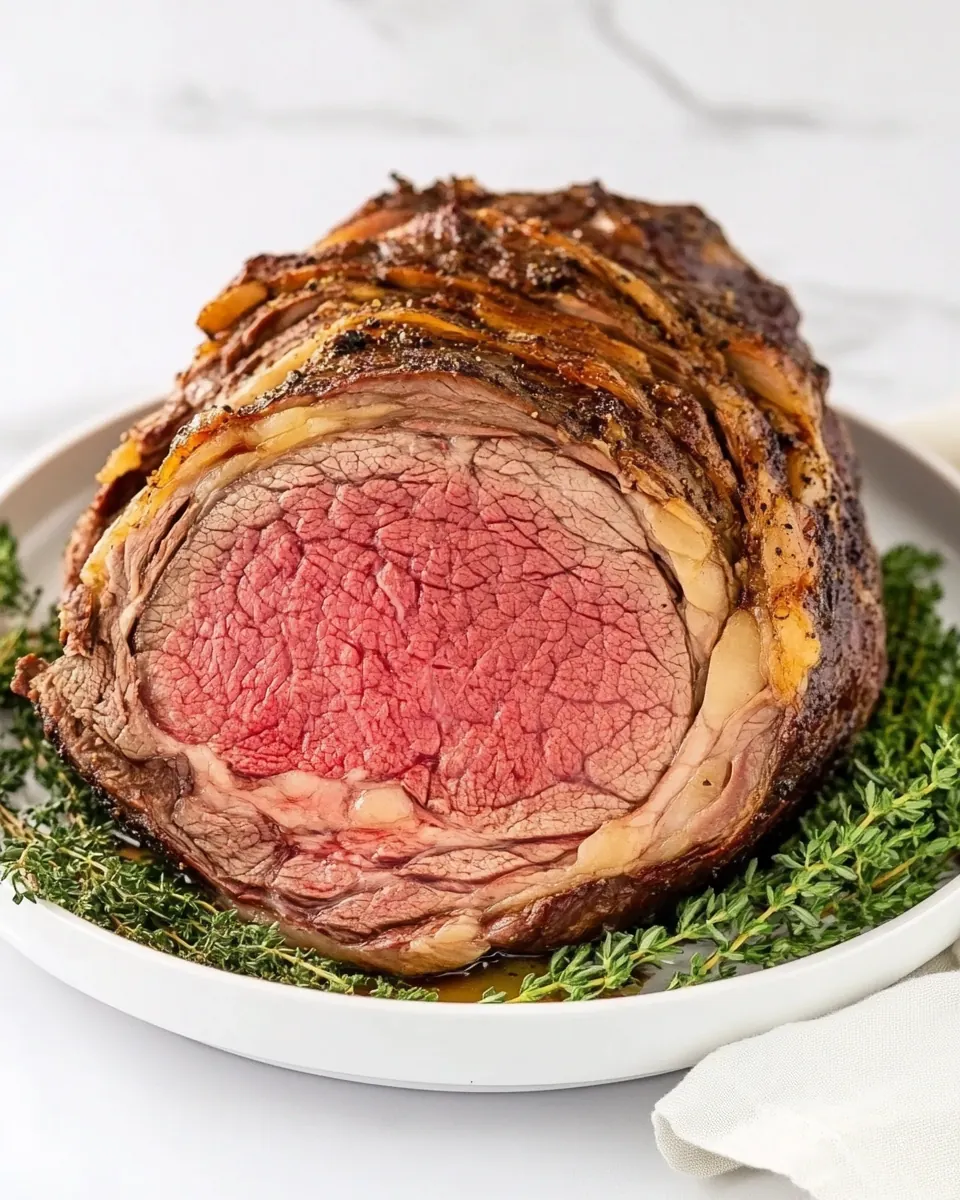
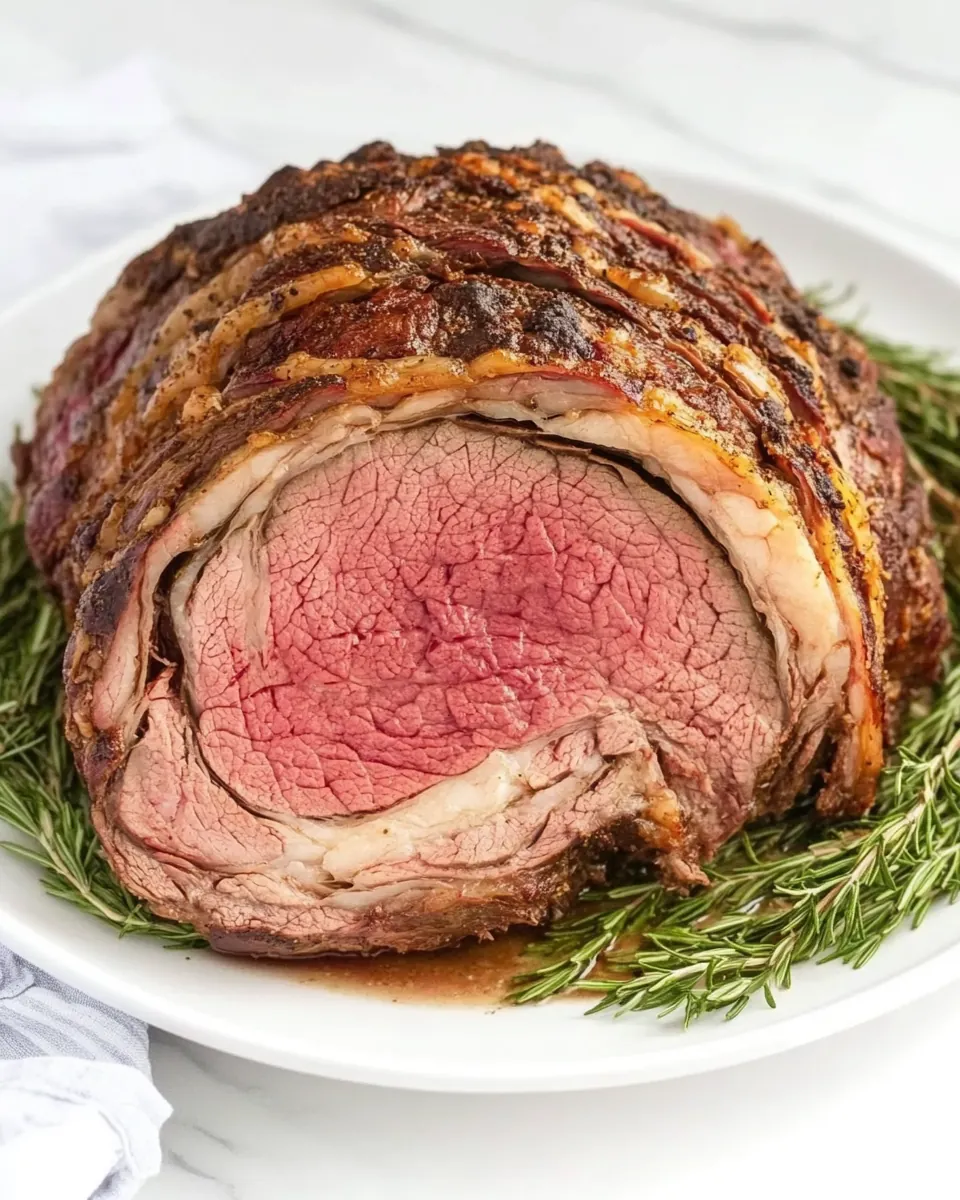
There was one night I remember clearly, a December dinner when I nervously slid a large roast into the oven while the house filled with the scent of butter and garlic. I kept checking the window, listening for the faint pop as fat rendered, and the living room chatter slowed the moment I carried the platter in. The crust was deeply browned, the interior carried that perfect rosy glow, and everyone paused before taking the first bite. That memory is why I return to this recipe whenever I want to make an impression while keeping things straightforward.
Over the years I learned small rituals that change everything, like letting the roast come to room temperature and resting it well before slicing, which keeps the juices where they belong. I also love how simple pantry ingredients like butter, garlic, garlic salt and black pepper transform a prime cut into something soulful. The technique feels timeless, and each time I serve Rib Eye Roast there is a mix of ritual and reward that never gets old.
Recipe Snapshot
1 hr 55 mins
10 mins
105 mins
Medium
500 kcal
American
Keto, Gluten-Free
Dinner
Oven, Roasting rack, Meat thermometer, Mixing bowl, Knife
What Sets This Rib Eye Roast Apart
Why the simplicity sings
I adore that the Rib Eye Roast relies on a few powerful ingredients, which means each element has to do its job. When you let butter and garlic meet the beef, you get a fragrant crust and a concentrated roasty aroma that rules the plate. You can taste the quality of the meat instead of being overwhelmed by complex sauces.
Perfectly even cooking
Using a consistent oven temperature and a rack to lift the roast lets heat circulate evenly, which is why I always pay attention to placement. The bone in a standing rib roast acts like a natural heat sink, moderating the interior so the outer crust develops while the center stays tender. That control makes for dependable results whether you are serving a crowd or just a few people.
Hands on, yet forgiving
There is a satisfying hands on element during preparation, from rubbing the aromatic butter into the meat to poking tiny holes for flavor penetration. Still, the method is forgiving because the roast tolerates slow, steady heat and a final rest, which corrects slight timing differences. I love recipes that let me be present without needing constant babysitting.
Memorable texture contrasts
The interplay between the deeply seared exterior and the succulent interior is what keeps folks coming back. The crust delivers a savory snap while the center offers tender, juicy slices that are easy to carve and share. For holiday dinners or winter gatherings, that textural dialogue is a crowd pleaser.
Low fuss, high reward
Finally, this roast is about maximizing return on attention. With a little prep and reliable timing, you get a dramatic centerpiece with bold flavor. I love serving something that feels luxurious without being overly complicated, and that is exactly what the Rib Eye Roast delivers.
Essential Ingredients for Rib Eye Roast
These ingredients form a classic, no fuss partnership that showcases the beef. The philosophy here is restraint, letting a prime cut shine while a few aromatics and fat build a flavorful crust. The key players are the roast itself, butter to promote browning and richness, garlic for savory lift, and simple seasonings to coax out the meat’s natural character.
- 1 cups salted butter, softened: Soften thoroughly to allow easy spreading and to incorporate air for a richer crust; helps carry flavors and promotes browning during roasting. Used to create a compound butter when mixed with garlic and seasonings, which bastes the roast and adds moistness and a silky mouthfeel. Can be applied before and after cooking to enhance juiciness and develop a glossy, flavorful exterior.
- 6 cloves garlic, minced: Mince finely to release aromatic oils that infuse the butter and meat with pungent, savory depth; provides sharp, garlicky flavor that penetrates the roast surface. Mix into softened butter to form a paste that adheres to the meat, helping the seasonings adhere and building layers of taste. Also contributes subtle caramelization when exposed to oven heat, enhancing the overall aroma.
- 1 (4-pound) bone-in rib-eye roast, at room temperature: Bring to room temperature to ensure even cooking and to avoid temperature shock that can lead to uneven doneness; a bone-in cut provides extra flavor and helps regulate roasting. Position centrally in the oven for consistent heat circulation and allow resting after roasting to redistribute juices and achieve the desired medium-rare to medium interior. Use the bone as a natural flavor enhancer and for carving guidance once rested.
- garlic salt with parsley flakes: Season lightly to add savory, herbed saltiness and a hint of parsley freshness that complements the beef and garlic butter; balances the overall flavor profile. Sprinkle evenly over the butter-coated roast to marry salt and herb notes with the meat’s natural richness, enhancing both taste and appearance. Can be adjusted to taste but applied with restraint to avoid overpowering the beef.
- cracked black pepper, to taste: Crack liberally to add bold, freshly ground heat and aromatic complexity that accentuates the roast’s richness; adjusts seasoning to personal preference. Grind over the surface just before roasting and again after resting to preserve volatile oils and deliver crisp peppery bites. Works in tandem with butter and garlic to lift flavors and provide pleasant contrast on the palate.
Making Rib Eye Roast
This roast is straightforward to execute, but the success lies in attention to small details and trusting the process. Below I unpack each direction into vivid, practical guidance so you can confidently manage timing, temperatures, and sensory cues through every stage.
- Gather all ingredients and preheat the oven to 325°F. (Most bone-in ribeye roasts will be tied with butcher's twine which helps hold the roast together during cooking, ensuring more even cooking and preventing it from falling apart. Remove after baking.): When you open the oven and feel the gentle, steady warmth filling the cavity, it signals that the environment is ready to coax even cooking. The aroma at this point is faint, mostly clean heated air, but once the roast goes in you will notice the smell deepen. Doing this early ensures consistent temperature from the first minute of roasting. A common mistake is inserting the roast into an oven that is still warming, which can lengthen cooking time and yield uneven doneness.
- Beat butter and garlic together in a bowl. Poke rib eye with a sharp knife all over. Rub the butter mixture all over and season with garlic salt and pepper.: As the roast browns, the twine keeps the shape compact, encouraging a uniform crust and interior gradient. You can feel the tautness before cooking and after resting, and removing the twine after cooking reveals clean slices. If you forget to tie or to remove the twine, the roast may splay or be harder to carve neatly, so check placement before slicing.
- Place fat side up on rack and bake for 1 hour 45 minutes – 2 hours 15 minutes or until at the desired doneness. Use a meat thermometer to make sure the meat is 145 degrees for medium temperature. NOTE: Allow the roast to rest for 15 minutes so it can continue to cook the final 5 degrees as well as redistribute the juices throughout the standing rib roast, then cut and serve.: The sound of a wooden spoon against a bowl and the increasing glossy sheen of the mixture tell you when the butter and garlic are harmonized. The aromatic punch of raw garlic mellows slightly as it mixes into the fat, creating a paste that will brown beautifully. If the butter is too cold, the mixture will be lumpy, so work at room temperature or short bursts of gentle mixing to avoid melting it completely.
- Poke rib eye with a sharp knife all over.: Light, shallow punctures allow the seasoned butter to nestle against the interior muscle fibers, improving flavor penetration. When you poke, you might hear a slight tearing sound and see small pockets where the butter will settle, which helps the crust take on richer flavor. Be careful not to overdo it, as deep cuts will let juices escape during roasting, causing dryness.
- Rub the butter mixture all over and season with garlic salt and pepper.: As you spread the glossy compound across the surface, you will notice the meat darken slightly and take on a sheen that promises a crisp, savory crust. The salt begins to draw moisture to the surface where it helps the crust develop, while the cracked black pepper will toast and release sharp aromatics. A common slip is applying too much salt because the butter is salted, so taste caution and adjust sparingly.
- Place fat side up on rack and bake for 1 hour 45 minutes to 2 hours 15 minutes or until at the desired doneness.: Baking fat side up allows the melting fat to baste the meat, keeping it moist and helping the surface crisp. You will see the exterior darken slowly, and occasional bubbling of rendered fat at the edges. The oven will produce a steady low murmur as it cycles, and the roast will gradually firm as proteins set. Relying on time alone is risky because roast sizes and ovens vary, so plan to monitor internal temperature. A frequent error is opening the oven often, which drops heat and extends cooking time, so use a probe thermometer if you can.
- Use a meat thermometer to make sure the meat is 145 degrees for medium temperature.: This is the reliable signal that the roast has reached medium doneness. When pierced, the thermometer slip should be smooth, and the internal color will be rosy. The thermometer prevents guesswork and avoids under or overcooking. Don't trust surface color only, as browning can occur well before the center reaches the target. One pitfall is inserting the probe too close to the bone, which reads hotter, so aim for the thickest part away from bone.
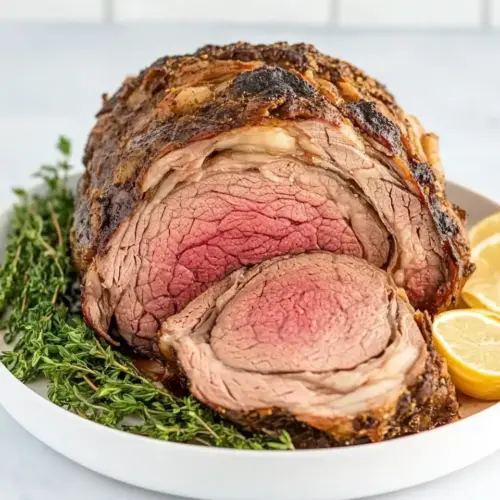
- NOTE: Allow the roast to rest for 15 minutes so it can continue to cook the final 5 degrees as well as redistribute the juices throughout the standing rib roast, then cut and serve. : Resting is when the magic happens, the sizzling subsides to a quiet, savory steam and juices travel back into the muscle, making slices glossy and tender. You will feel the temperature settle and the texture relax when you press lightly, and the aroma will mellow into an inviting roast scent. Carving too soon causes juices to spill out onto the cutting board, leaving the slices drier. Be patient, tent with foil if you like, and slice with a sharp knife for clean presentation.
Tips and Tricks about Rib Eye Roast
These tips are culled from many roasts and will help you avoid common pitfalls while dialing in flavor and texture. Each tip is practical, focused on technique, and aimed at consistent, delicious results.
- Trim and dry: Before you apply the butter and garlic, pat the surface of the roast thoroughly with paper towels to remove surface moisture, which promotes better browning and a crisper crust.
- Room temperature matters: Allowing the rib eye roast to sit at room temperature for about 30 to 60 minutes reduces thermal shock and improves even cooking throughout the center without overcooking the exterior.
- Even butter distribution: Beat the softened butter and minced garlic until smooth so the compound spreads easily, which ensures the flavors toast uniformly during roasting rather than concentrating in a few spots.
- Season wisely: Because the recipe calls for salted butter and garlic salt with parsley flakes, season gradually and taste sparingly to avoid over salting the exterior before roasting.
- Use a rack: Cooking the roast on a rack allows hot air to circulate under and around the meat, rendering fat away from the surface and supporting an even crust and color.
- Rest time is essential: After removing from the oven, tent the roast loosely with foil and wait at least 15 minutes so juices redistribute, which keeps slices succulent and reduces pooling on the plate.
Serving Ideas for Rib Eye Roast
When serving this roast, think about balance, texture, and the warmth of a shared meal. Below are ideas for side pairings, occasions, and storage guidance presented as practical, easy to follow options for different settings.
- Classic dinner plate: Slice the rib eye roast and serve with spooned pan juices or a light drizzle of the melted butter from the roasting pan for a rich, traditional presentation.
- Holiday centerpiece: For winter gatherings or special occasions, present the roast on a warmed carving board, surrounded by simple roasted vegetables so the centerpiece remains the star of the table.
- Family style feast: Carve thick slabs into a platter for passing around at a communal meal, pairing with warm bread and small bowls of seasoned salt and black pepper for guests to finish their portions.
- Occasion ideas: This roast suits dinner parties, festive winter meals, and gatherings where a dramatic main course is desired; it pairs especially well with slow conversations and relaxed pacing.
- Storage tips: Refrigerate leftover slices tightly wrapped or in an airtight container within two hours of cooking, and use within three to four days for best quality. Reheat gently to avoid drying the meat.
- Seasonal pairings: In winter, pair the roast with root vegetables and hearty sides; use brighter, quick cooked greens if you prefer a lighter contrast in other months.
FAQ
Conclusion
This Rib Eye Roast stands out because it transforms a handful of straightforward ingredients into a deeply flavorful, succulent centerpiece. Its appeal lies in simplicity and technique, where gentle heat, aromatic butter and patient resting create an impressive result without fuss. I encourage you to make it for a winter gathering or any time you want to serve something special, and pay attention to the thermometer and resting time for the best outcome. Enjoy the ritual of carving and savoring each tender, juicy slice with people you love.
Rib Eye Roast
Equipment
- Oven
- Roasting rack
- Meat Thermometer
- Mixing Bowl
- Knife
Ingredients
- 1 cups salted butter, softened Soften thoroughly to allow easy spreading and to incorporate air for a richer crust; helps carry flavors and promotes browning during roasting. Used to create a compound butter when mixed with garlic and seasonings, which bastes the roast and adds moistness and a silky mouthfeel. Can be applied before and after cooking to enhance juiciness and develop a glossy, flavorful exterior.
- 6 cloves garlic, minced Mince finely to release aromatic oils that infuse the butter and meat with pungent, savory depth; provides sharp, garlicky flavor that penetrates the roast surface. Mix into softened butter to form a paste that adheres to the meat, helping the seasonings adhere and building layers of taste. Also contributes subtle caramelization when exposed to oven heat, enhancing the overall aroma.
- 1 (4-pound) bone-in rib-eye roast, at room temperature Bring to room temperature to ensure even cooking and to avoid temperature shock that can lead to uneven doneness; a bone-in cut provides extra flavor and helps regulate roasting. Position centrally in the oven for consistent heat circulation and allow resting after roasting to redistribute juices and achieve the desired medium-rare to medium interior. Use the bone as a natural flavor enhancer and for carving guidance once rested.
- garlic salt with parsley flakes Season lightly to add savory, herbed saltiness and a hint of parsley freshness that complements the beef and garlic butter; balances the overall flavor profile. Sprinkle evenly over the butter-coated roast to marry salt and herb notes with the meat’s natural richness, enhancing both taste and appearance. Can be adjusted to taste but applied with restraint to avoid overpowering the beef.
- cracked black pepper, to taste Crack liberally to add bold, freshly ground heat and aromatic complexity that accentuates the roast’s richness; adjusts seasoning to personal preference. Grind over the surface just before roasting and again after resting to preserve volatile oils and deliver crisp peppery bites. Works in tandem with butter and garlic to lift flavors and provide pleasant contrast on the palate.
Instructions
- Gather all ingredients and preheat the oven to 325°F. (Most bone-in ribeye roasts will be tied with butcher's twine which helps hold the roast together during cooking, ensuring more even cooking and preventing it from falling apart. Remove after baking.): When you open the oven and feel the gentle, steady warmth filling the cavity, it signals that the environment is ready to coax even cooking. The aroma at this point is faint, mostly clean heated air, but once the roast goes in you will notice the smell deepen. Doing this early ensures consistent temperature from the first minute of roasting. A common mistake is inserting the roast into an oven that is still warming, which can lengthen cooking time and yield uneven doneness.
- Beat butter and garlic together in a bowl. Poke rib eye with a sharp knife all over. Rub the butter mixture all over and season with garlic salt and pepper.: As the roast browns, the twine keeps the shape compact, encouraging a uniform crust and interior gradient. You can feel the tautness before cooking and after resting, and removing the twine after cooking reveals clean slices. If you forget to tie or to remove the twine, the roast may splay or be harder to carve neatly, so check placement before slicing.
- Place fat side up on rack and bake for 1 hour 45 minutes – 2 hours 15 minutes or until at the desired doneness. Use a meat thermometer to make sure the meat is 145 degrees for medium temperature. NOTE: Allow the roast to rest for 15 minutes so it can continue to cook the final 5 degrees as well as redistribute the juices throughout the standing rib roast, then cut and serve.: The sound of a wooden spoon against a bowl and the increasing glossy sheen of the mixture tell you when the butter and garlic are harmonized. The aromatic punch of raw garlic mellows slightly as it mixes into the fat, creating a paste that will brown beautifully. If the butter is too cold, the mixture will be lumpy, so work at room temperature or short bursts of gentle mixing to avoid melting it completely.
- Poke rib eye with a sharp knife all over.: Light, shallow punctures allow the seasoned butter to nestle against the interior muscle fibers, improving flavor penetration. When you poke, you might hear a slight tearing sound and see small pockets where the butter will settle, which helps the crust take on richer flavor. Be careful not to overdo it, as deep cuts will let juices escape during roasting, causing dryness.
- Rub the butter mixture all over and season with garlic salt and pepper.: As you spread the glossy compound across the surface, you will notice the meat darken slightly and take on a sheen that promises a crisp, savory crust. The salt begins to draw moisture to the surface where it helps the crust develop, while the cracked black pepper will toast and release sharp aromatics. A common slip is applying too much salt because the butter is salted, so taste caution and adjust sparingly.
- Place fat side up on rack and bake for 1 hour 45 minutes to 2 hours 15 minutes or until at the desired doneness.: Baking fat side up allows the melting fat to baste the meat, keeping it moist and helping the surface crisp. You will see the exterior darken slowly, and occasional bubbling of rendered fat at the edges. The oven will produce a steady low murmur as it cycles, and the roast will gradually firm as proteins set. Relying on time alone is risky because roast sizes and ovens vary, so plan to monitor internal temperature. A frequent error is opening the oven often, which drops heat and extends cooking time, so use a probe thermometer if you can.
- Use a meat thermometer to make sure the meat is 145 degrees for medium temperature.: This is the reliable signal that the roast has reached medium doneness. When pierced, the thermometer slip should be smooth, and the internal color will be rosy. The thermometer prevents guesswork and avoids under or overcooking. Don't trust surface color only, as browning can occur well before the center reaches the target. One pitfall is inserting the probe too close to the bone, which reads hotter, so aim for the thickest part away from bone.
- NOTE: Allow the roast to rest for 15 minutes so it can continue to cook the final 5 degrees as well as redistribute the juices throughout the standing rib roast, then cut and serve. : Resting is when the magic happens, the sizzling subsides to a quiet, savory steam and juices travel back into the muscle, making slices glossy and tender. You will feel the temperature settle and the texture relax when you press lightly, and the aroma will mellow into an inviting roast scent. Carving too soon causes juices to spill out onto the cutting board, leaving the slices drier. Be patient, tent with foil if you like, and slice with a sharp knife for clean presentation.
Notes
- Trim and dry: Before you apply the butter and garlic, pat the surface of the roast thoroughly with paper towels to remove surface moisture, which promotes better browning and a crisper crust.
- Room temperature matters: Allowing the rib eye roast to sit at room temperature for about 30 to 60 minutes reduces thermal shock and improves even cooking throughout the center without overcooking the exterior.
- Even butter distribution: Beat the softened butter and minced garlic until smooth so the compound spreads easily, which ensures the flavors toast uniformly during roasting rather than concentrating in a few spots.
- Season wisely: Because the recipe calls for salted butter and garlic salt with parsley flakes, season gradually and taste sparingly to avoid over salting the exterior before roasting.
- Use a rack: Cooking the roast on a rack allows hot air to circulate under and around the meat, rendering fat away from the surface and supporting an even crust and color.
- Rest time is essential: After removing from the oven, tent the roast loosely with foil and wait at least 15 minutes so juices redistribute, which keeps slices succulent and reduces pooling on the plate.