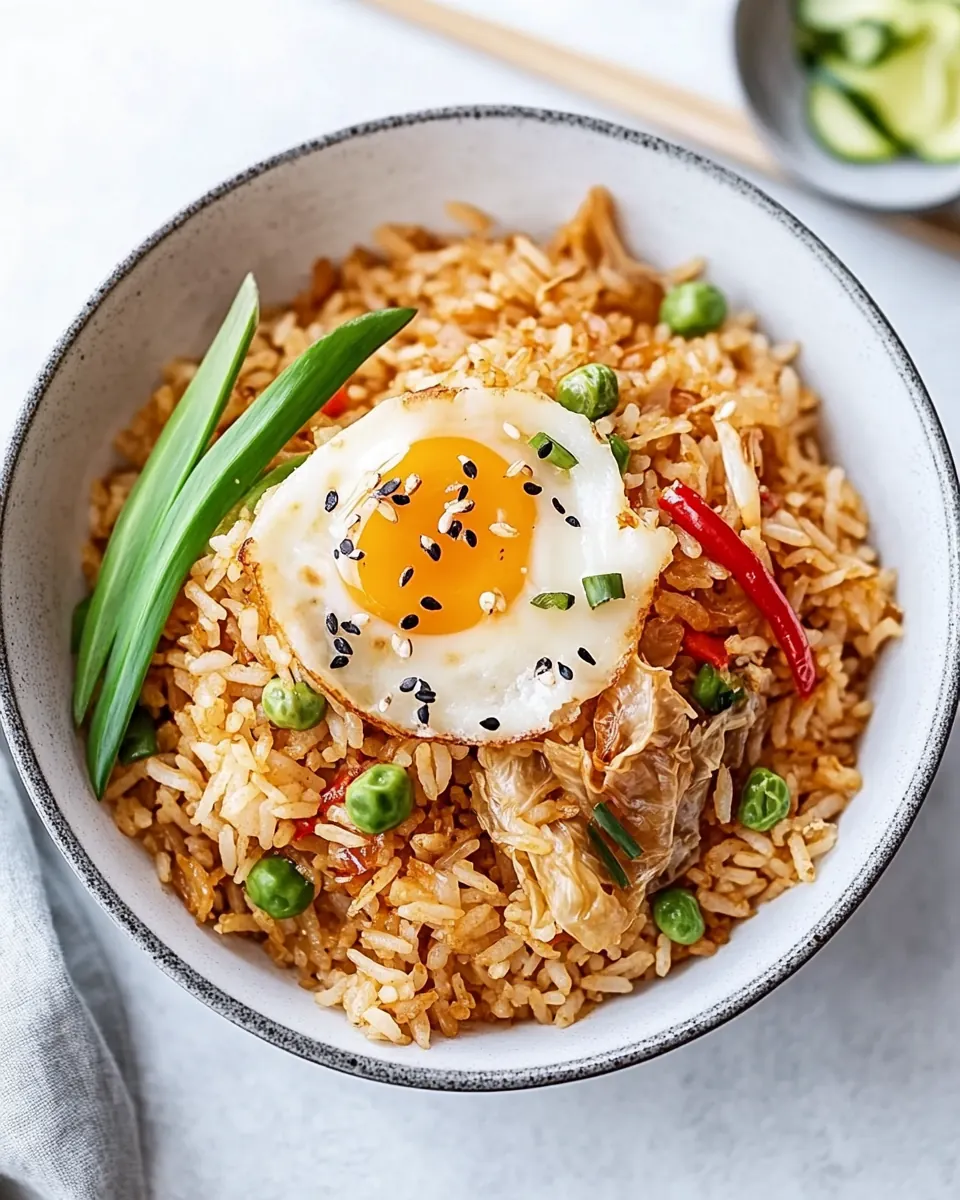
Kimchi Fried Rice
Kimchi Fried Rice has been my go to when I need fast comfort with bold flavors. I first fell in love with this dish on a rainy evening when I had nothing but leftover rice, a jar of tangy kimchi, and a stubborn craving for something savory and warming. The first bite cracked open with bright, fermented notes, and the little pops of texture from the vegetables made every forkful interesting.
That night I tweaked the balance until it felt like home. I learned to rely on the interplay between nutty sesame oil and savory soy sauce, and to treat day old rice like a secret weapon for crisp edges. Over the years I began to make simple swaps and add tiny finishes that change the experience without complicating the dish.
Recipe Snapshot
20 mins
5 mins
15 mins
Easy
450 kcal
Korean
Gluten-Free, Vegan
Dinner
Large heavy bottomed skillet, Wok, Spatula
Why This Kimchi Fried Rice Hits Different
1. Big flavor from humble ingredients
I love that Kimchi Fried Rice turns a few pantry staples into something memorable. The fermented tang of kimchi brings complexity that feels like it took longer to prepare than it did, so you get elevated taste without fuss. I can assemble everything in minutes, and the result tastes layered and deeply seasoned.
2. Speed and simplicity
We often crave big results on busy nights, and this recipe delivers. Because you use cooked, chilled rice, the starches separate, letting each grain toast rather than clump. That means faster cooking time and a more satisfying texture, which is why I reach for this dish when time is tight but I still want something special.
3. Texture play
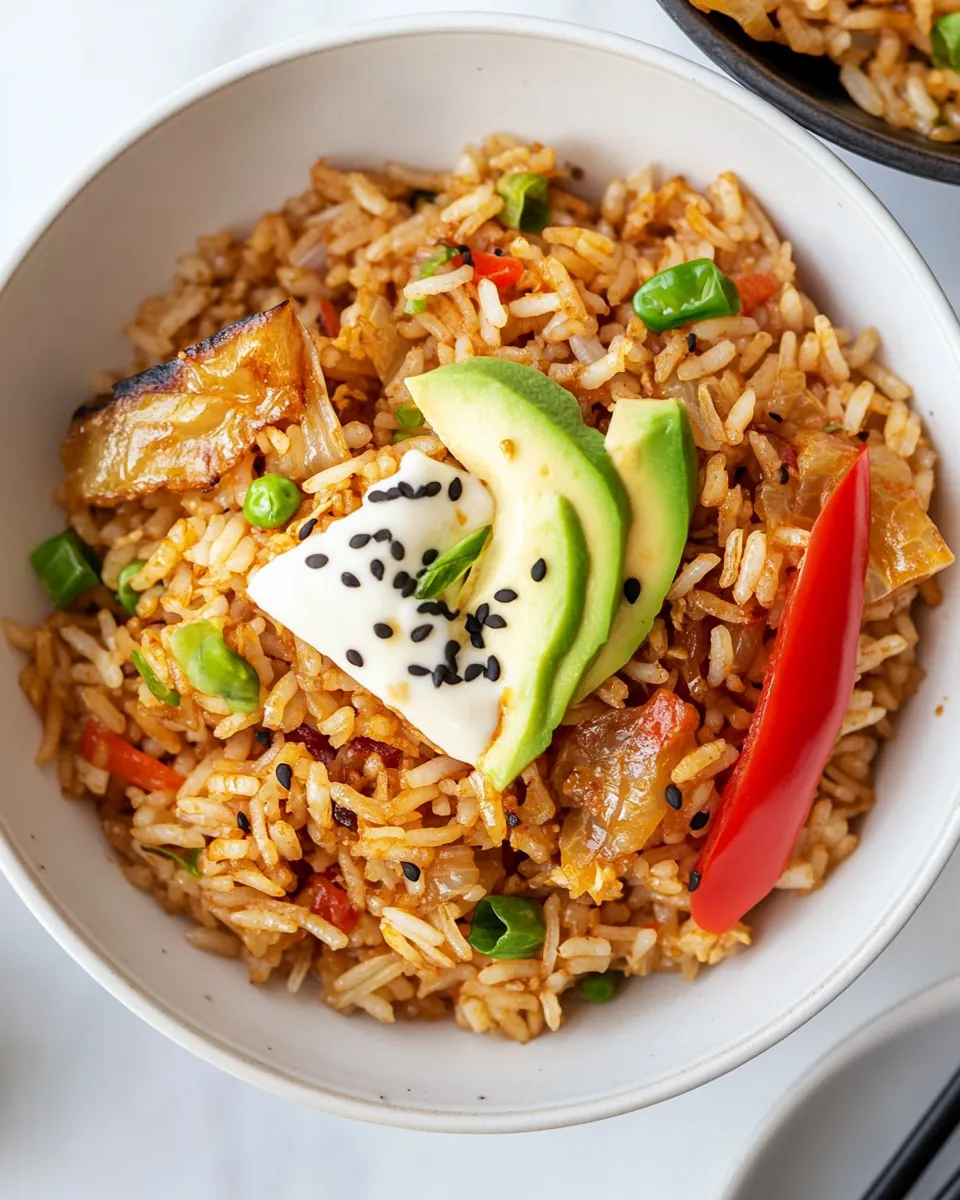
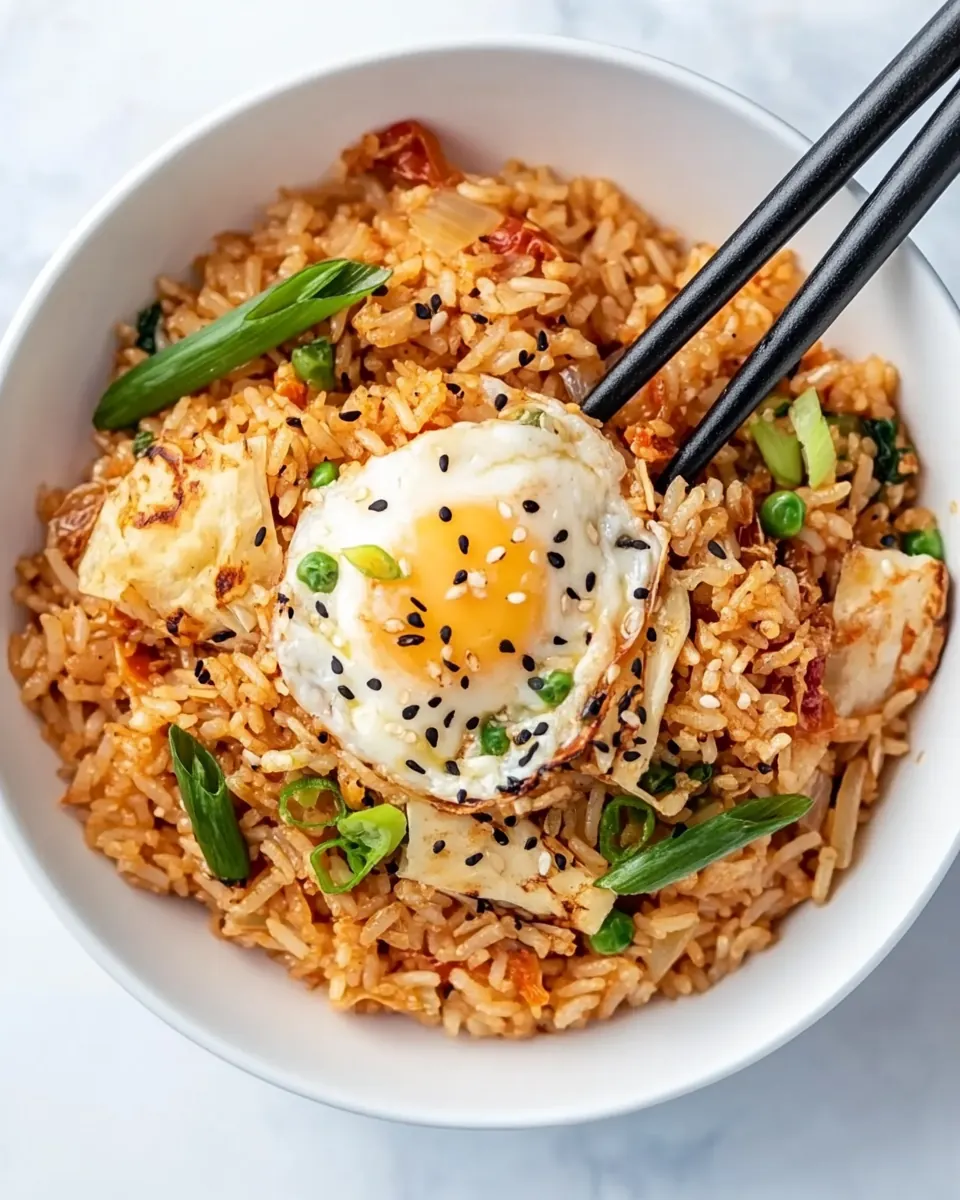
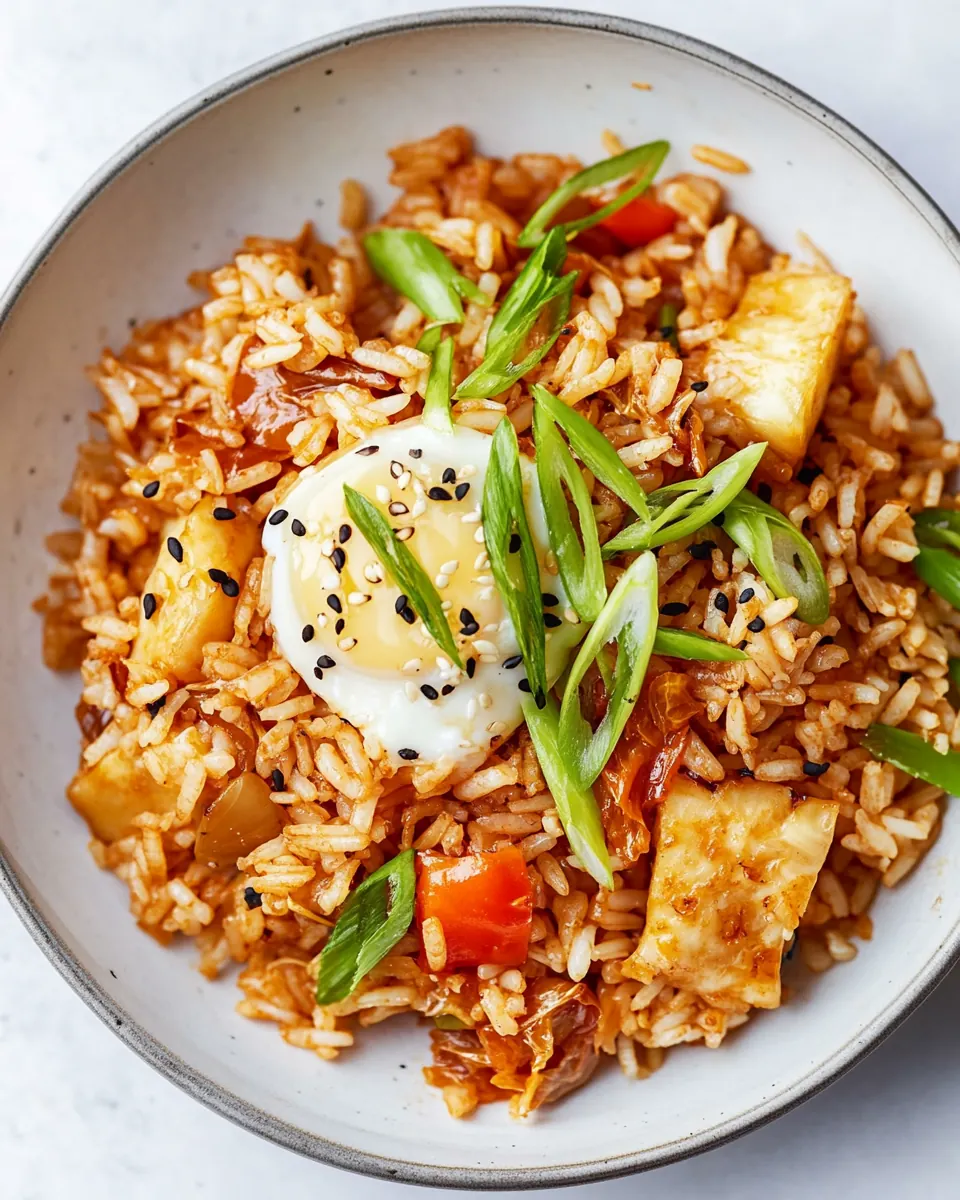
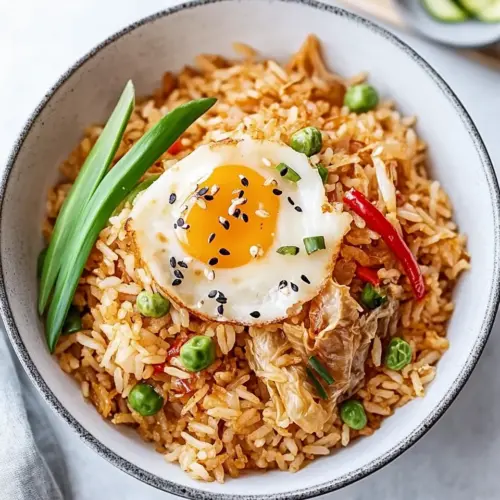
The mix of soft, warm kimchi, slightly crisped rice, tender frozen peas, and chewy bits of diced carrots makes each bite interesting. I enjoy how the contrast keeps you coming back for another forkful, and how a runny or fried egg on top adds silkiness that ties everything together.
4. Customizable heat and garnish
I like that you can dial this from mild to fiery. You can sprinkle in Korean chili flakes or stir in a touch of chili garlic sauce if you want more punch. Finishing with sliced green onions or a sprinkle of sesame seeds brightens the plate and gives a crisp, fresh finish, which I always appreciate when serving guests.
5. Leftover friendly and practical
This is a top choice for turning leftovers into a star meal. Cold, day old rice works best, and the dish uses a short list of ingredients that many people already have. I find I can scale it up easily for company, or keep it modest for a solo dinner that still feels celebratory.
Ingredients Required for Kimchi Fried Rice
I believe great fried rice is about harmony, not complexity. The ingredient list here focuses on players that each do heavy lifting. The oils carry flavor and aid browning, the aromatics build a savory backbone, and the kimchi provides the tangy, fermented lift that makes this recipe sing. Together, these elements create contrast between crisp grains and soft, saucy bits.
- 2 tablespoons olive oil: Provide a neutral cooking fat to sauté vegetables and prevent sticking while adding mild flavor; ideal for medium-high heat browning of carrots and onions and for finishing rice with a glossy sheen.
- 1 tablespoon sesame oil: Add a nutty, aromatic layer and deepen flavor complexity when tossed with rice; use sparingly to impart sesame fragrance without overwhelming other savory components.
- 1/2 cup diced carrots: Add sweet, crunchy texture and subtle sweetness when sautéed; dice evenly so they cook quickly and contribute color contrast throughout the fried rice.
- 1/2 cup diced sweet yellow onion: Supply soft, savory sweetness and body to the dish when caramelized; dice consistently to ensure even cooking and to meld with other aromatics.
- 2 large cloves garlic minced: Deliver pungent depth and aromatic sharpness once minced; stir into hot oil early to bloom flavor and complement ginger and kimchi.
- 1 teaspoon grated ginger: Provide bright, slightly spicy citrusy warmth when grated; cook briefly to release oils and balance the fermented tang of kimchi.
- 4 cups cooked cold day-old white rice: Offer bulk and the characteristic fried rice texture when cold and day-old; separate grains before frying to avoid clumping and to achieve a crisp exterior.
- 1/4 cup soy sauce: Contribute savory umami and salt to season the rice; add gradually and taste to avoid over-salting given kimchi and other salty components.
- 1/2 cup frozen peas: Introduce pops of sweetness and tender texture when thawed; add near the end to retain color and prevent overcooking.
- 1 cup kimchi roughly chopped: Bring a tangy, spicy, fermented backbone and moisture to the dish; chop roughly to distribute pockets of flavor and juice throughout the rice.
- 2 green onions thinly sliced: Deliver fresh, sharp oniony brightness and a crisp green finish; slice thin and sprinkle on top or stir in briefly to preserve color and crunch.
- 2 fried or soft-boiled eggs (optional): Provide rich creaminess and a silky yolk to top the fried rice optionally; fry or soft-boil to preference and serve immediately to add protein and sauce-like richness.
Step by Step Instructions for Kimchi Fried Rice
This is a hands on, quick fry that benefits from attention and rhythm. Move quickly, taste as you go, and watch the pan for visual cues that tell you when to add the next ingredient. Keep your tools ready so you can work without pausing.
- Heat a large heavy bottomed skillet (or wok) over medium-high heat. Add the olive oil and sesame oil. When the oil is hot, add the carrots and onion. Cook for 2-3 minutes, or until the onions are beginning to brown.: You should notice the pan warming and a faint shimmer on its surface before you add oil, which signals it is hot enough to sear foods. A heavy bottomed skillet or wok distributes heat consistently so the rice can crisp without burning. If the pan is too cool, ingredients will steam instead of brown, leaving a soft, soggy texture. A common error is overcrowding the pan, which reduces contact with the hot surface and prevents that golden sear, so keep space for movement.
- Next add the garlic and ginger. Stir and cook for an additional minute.: The oils will thin and ripple when they reach temperature, releasing a gentle nutty scent from the sesame oil . This combination carries flavor and helps the carrots and onion brown evenly. If you see wisps of smoke quickly, reduce heat to avoid bitterness. Avoid pouring too much oil, as the rice will become heavy instead of crisp.
- Add the rice and soy sauce. Stir and saute for another 3-4 minutes or until the rice is lightly browned and beginning to crisp.: You will hear a lively sizzle on contact, and within a minute the onions will begin to wilt and caramelize, giving off a sweet, toasted aroma. These vegetables need a few minutes to soften and build flavor, so resist stirring constantly; let them sit briefly to color. A mistake here is leaving them raw by moving them too often, which prevents proper browning and flavor development.
- Add the frozen peas and chopped kimchi. Cook, stirring occasionally, for another 3-4 minutes or until the kimchi is warmed through.: Watch for edges turning translucent and golden, releasing a rich fragrance that hints at the dish's depth. Slight caramelization adds sweetness that balances the tang of the kimchi . If you see pieces blackening, reduce heat because burnt bits taste acrid and will dominate the dish.
- Lastly, add the green onions and stir to combine. Serve the fried rice topped with an egg and garnished with sesame seeds, additional green onion, and/or gochugaru.: The moment you add these aromatics you will smell an immediate lift, a bright, warm note that infuses the pan. Stir them with the softened vegetables for about a minute so they bloom without scorching. Burnt garlic becomes bitter quickly, so keep the heat moderated and stir continuously to prevent sticking.
- Stir and cook for an additional minute: During this minute the mixture should smell fragrant and slightly sweet from the softened vegetables, with warm spice from the ginger . This is the foundation for the dish, so take this time to adjust heat and scrape any flavorful browned bits from the pan. Rushing this stage often leaves the aromatics underdeveloped, so pause and let the scents deepen.
- Add the rice and soy sauce: The rice will hiss as it meets the hot pan, and the soy sauce will immediately begin to color and season the grains, creating savory pockets of flavor. Break up clumps with your spatula so each grain sees heat and sauce. If you dump too much rice at once it can lower pan temperature and cause steaming instead of toasting, so add in manageable amounts.
- Stir and saute for another 3 to 4 minutes or until the rice is lightly browned and beginning to crisp: You should notice some edges of the rice turning golden and hearing occasional crackles as grains crisp, signaling proper texture development. This toasting deepens flavor and reduces mushiness. A frequent misstep is cooking too briefly, resulting in a limp, gluey texture rather than the sought after bite of good fried rice.
- Add the frozen peas and chopped kimchi: When they hit the pan the peas will release a bright, vegetal aroma and the kimchi will steam and warm, sending tangy, fermented scents through the kitchen. Stir gently so the kimchi mixes without releasing too much liquid, which could make the rice soggy. If the kimchi is especially wet, drain a bit first to protect the crispness of the rice .
- Cook, stirring occasionally, for another 3 to 4 minutes or until the kimchi is warmed through: At this stage you should see the kimchi soften and integrate, and the whole pan will smell savory with a bright acidic note from the fermented vegetables. Allow occasional pauses between stirs so the rice can brown further; constant stirring reduces browning and can yield a uniformly colored but less textured dish. Overheating will dry out the kimchi and mute its flavor, so monitor heat closely.
- Lastly, add the green onions and stir to combine: The thinly sliced green onions will add a fresh, peppery finish and a pop of bright color. Stir them in just long enough to wilt slightly so their crunch remains. Leaving them out earlier would cause them to become limp and lose their vibrant bite, so add them at the end for contrast.
- Serve the fried rice topped with an egg and garnished with sesame seeds, additional green onion, and/or gochugaru: The final plating releases steam carrying all the dish's aromas, and a runny egg yolk, when broken, will create a luscious sauce that binds the components. Garnishes add both texture and visual appeal. A common serving mistake is over-salting before tasting; the soy sauce and kimchi already contribute a good amount of salt, so always taste first.
Pro Tips and Tweaks
These tips will help you get consistent results and let you adapt the dish to your preferences. I gathered them from repeated practice, and they reflect small changes that make a big difference.
- Toast the rice properly by letting it sit a few moments between stirs so certain grains get crispy, this contrast is what elevates the texture and keeps the dish interesting.
- Balance the salt by adding soy sauce gradually and tasting, the goal is savory depth without overpowering the fermented notes from the kimchi.
- Protect aromatics by adding minced garlic and grated ginger after the onions have softened, this prevents burning and preserves bright flavors.
- Garnish last with sliced green onions and sesame seeds to preserve color and provide a fresh contrast to the warm, savory rice.
- Adjust spice thoughtfully by incorporating gochugaru or gochujang in small amounts, tasting as you go to reach your desired heat level without masking the kimchi‘s character.
- Make it ahead by prepping the vegetables and chopping the kimchi in advance; when you cook, the process is fast and stress free.
How to Enjoy Kimchi Fried Rice
This dish is flexible and suits many occasions, from a quick solo dinner to a casual family meal. You can serve it as the main course or alongside simple sides to round out the plate.
- Weeknight dinner idea Serve a generous scoop as a main with a fried or soft boiled egg on top for richness and extra protein.
- Lazy lunch Plate with a side of quick cucumber salad to add a cooling, crisp contrast to the warm, savory rice.
- Ramadan iftar Break the fast with a warm bowl that is both satisfying and quick to prepare, the tang of kimchi pairs well with simple broths or steamed greens.
- Meal prep Store cooled leftovers in an airtight container in the refrigerator for up to three days, reheat gently in a skillet to revive crispiness rather than using the microwave which can make it soggy.
- Seasonal pairing In cooler months I enjoy it with steamed winter greens for contrast, while in spring a bright side salad with citrus complements the fermented notes.
- Serving style Offer condiments like extra soy sauce, gochujang, or chili garlic sauce on the side so diners can customize heat and savoriness.
FAQ
Conclusion
Kimchi Fried Rice stands out for transforming a few simple ingredients into a boldly flavored, comforting meal that is both quick and deeply satisfying. Give it a try tonight, especially when you have leftover rice and want something with personality but no fuss. Trust the balance of tangy kimchi, savory soy sauce, and toasted grains to deliver a meal that feels special, even on a busy weeknight. Share it with friends or keep it all to yourself, either way it warms the kitchen and the soul.
Kimchi Fried Rice
Equipment
- Large heavy bottomed skillet
- Wok
- Spatula
Ingredients
- 2 tablespoons olive oil Provide a neutral cooking fat to sauté vegetables and prevent sticking while adding mild flavor; ideal for medium-high heat browning of carrots and onions and for finishing rice with a glossy sheen.
- 1 tablespoon sesame oil Add a nutty, aromatic layer and deepen flavor complexity when tossed with rice; use sparingly to impart sesame fragrance without overwhelming other savory components.
- 1/2 cup diced carrots Add sweet, crunchy texture and subtle sweetness when sautéed; dice evenly so they cook quickly and contribute color contrast throughout the fried rice.
- 1/2 cup diced sweet yellow onion Supply soft, savory sweetness and body to the dish when caramelized; dice consistently to ensure even cooking and to meld with other aromatics.
- 2 large cloves garlic minced Deliver pungent depth and aromatic sharpness once minced; stir into hot oil early to bloom flavor and complement ginger and kimchi.
- 1 teaspoon grated ginger Provide bright, slightly spicy citrusy warmth when grated; cook briefly to release oils and balance the fermented tang of kimchi.
- 4 cups cooked cold day-old white rice Offer bulk and the characteristic fried rice texture when cold and day-old; separate grains before frying to avoid clumping and to achieve a crisp exterior.
- 1/4 cup soy sauce Contribute savory umami and salt to season the rice; add gradually and taste to avoid over-salting given kimchi and other salty components.
- 1/2 cup frozen peas Introduce pops of sweetness and tender texture when thawed; add near the end to retain color and prevent overcooking.
- 1 cup kimchi roughly chopped Bring a tangy, spicy, fermented backbone and moisture to the dish; chop roughly to distribute pockets of flavor and juice throughout the rice.
- 2 green onions thinly sliced Deliver fresh, sharp oniony brightness and a crisp green finish; slice thin and sprinkle on top or stir in briefly to preserve color and crunch.
- 2 fried or soft-boiled eggs optional Provide rich creaminess and a silky yolk to top the fried rice optionally; fry or soft-boil to preference and serve immediately to add protein and sauce-like richness.
Instructions
- Heat a large heavy bottomed skillet (or wok) over medium-high heat. Add the olive oil and sesame oil. When the oil is hot, add the carrots and onion. Cook for 2-3 minutes, or until the onions are beginning to brown.: You should notice the pan warming and a faint shimmer on its surface before you add oil, which signals it is hot enough to sear foods. A heavy bottomed skillet or wok distributes heat consistently so the rice can crisp without burning. If the pan is too cool, ingredients will steam instead of brown, leaving a soft, soggy texture. A common error is overcrowding the pan, which reduces contact with the hot surface and prevents that golden sear, so keep space for movement.
- Next add the garlic and ginger. Stir and cook for an additional minute.: The oils will thin and ripple when they reach temperature, releasing a gentle nutty scent from the sesame oil . This combination carries flavor and helps the carrots and onion brown evenly. If you see wisps of smoke quickly, reduce heat to avoid bitterness. Avoid pouring too much oil, as the rice will become heavy instead of crisp.
- Add the rice and soy sauce. Stir and saute for another 3-4 minutes or until the rice is lightly browned and beginning to crisp.: You will hear a lively sizzle on contact, and within a minute the onions will begin to wilt and caramelize, giving off a sweet, toasted aroma. These vegetables need a few minutes to soften and build flavor, so resist stirring constantly; let them sit briefly to color. A mistake here is leaving them raw by moving them too often, which prevents proper browning and flavor development.
- Add the frozen peas and chopped kimchi. Cook, stirring occasionally, for another 3-4 minutes or until the kimchi is warmed through.: Watch for edges turning translucent and golden, releasing a rich fragrance that hints at the dish's depth. Slight caramelization adds sweetness that balances the tang of the kimchi . If you see pieces blackening, reduce heat because burnt bits taste acrid and will dominate the dish.
- Lastly, add the green onions and stir to combine. Serve the fried rice topped with an egg and garnished with sesame seeds, additional green onion, and/or gochugaru.: The moment you add these aromatics you will smell an immediate lift, a bright, warm note that infuses the pan. Stir them with the softened vegetables for about a minute so they bloom without scorching. Burnt garlic becomes bitter quickly, so keep the heat moderated and stir continuously to prevent sticking.
- Stir and cook for an additional minute: During this minute the mixture should smell fragrant and slightly sweet from the softened vegetables, with warm spice from the ginger . This is the foundation for the dish, so take this time to adjust heat and scrape any flavorful browned bits from the pan. Rushing this stage often leaves the aromatics underdeveloped, so pause and let the scents deepen.
- Add the rice and soy sauce: The rice will hiss as it meets the hot pan, and the soy sauce will immediately begin to color and season the grains, creating savory pockets of flavor. Break up clumps with your spatula so each grain sees heat and sauce. If you dump too much rice at once it can lower pan temperature and cause steaming instead of toasting, so add in manageable amounts.
- Stir and saute for another 3 to 4 minutes or until the rice is lightly browned and beginning to crisp: You should notice some edges of the rice turning golden and hearing occasional crackles as grains crisp, signaling proper texture development. This toasting deepens flavor and reduces mushiness. A frequent misstep is cooking too briefly, resulting in a limp, gluey texture rather than the sought after bite of good fried rice.
- Add the frozen peas and chopped kimchi: When they hit the pan the peas will release a bright, vegetal aroma and the kimchi will steam and warm, sending tangy, fermented scents through the kitchen. Stir gently so the kimchi mixes without releasing too much liquid, which could make the rice soggy. If the kimchi is especially wet, drain a bit first to protect the crispness of the rice .
- Cook, stirring occasionally, for another 3 to 4 minutes or until the kimchi is warmed through: At this stage you should see the kimchi soften and integrate, and the whole pan will smell savory with a bright acidic note from the fermented vegetables. Allow occasional pauses between stirs so the rice can brown further; constant stirring reduces browning and can yield a uniformly colored but less textured dish. Overheating will dry out the kimchi and mute its flavor, so monitor heat closely.
- Lastly, add the green onions and stir to combine: The thinly sliced green onions will add a fresh, peppery finish and a pop of bright color. Stir them in just long enough to wilt slightly so their crunch remains. Leaving them out earlier would cause them to become limp and lose their vibrant bite, so add them at the end for contrast.
- Serve the fried rice topped with an egg and garnished with sesame seeds, additional green onion, and/or gochugaru: The final plating releases steam carrying all the dish's aromas, and a runny egg yolk, when broken, will create a luscious sauce that binds the components. Garnishes add both texture and visual appeal. A common serving mistake is over-salting before tasting; the soy sauce and kimchi already contribute a good amount of salt, so always taste first.
Notes
- Toast the rice properly by letting it sit a few moments between stirs so certain grains get crispy, this contrast is what elevates the texture and keeps the dish interesting.
- Balance the salt by adding soy sauce gradually and tasting, the goal is savory depth without overpowering the fermented notes from the kimchi.
- Protect aromatics by adding minced garlic and grated ginger after the onions have softened, this prevents burning and preserves bright flavors.
- Garnish last with sliced green onions and sesame seeds to preserve color and provide a fresh contrast to the warm, savory rice.
- Adjust spice thoughtfully by incorporating gochugaru or gochujang in small amounts, tasting as you go to reach your desired heat level without masking the kimchi's character.
- Make it ahead by prepping the vegetables and chopping the kimchi in advance; when you cook, the process is fast and stress free.