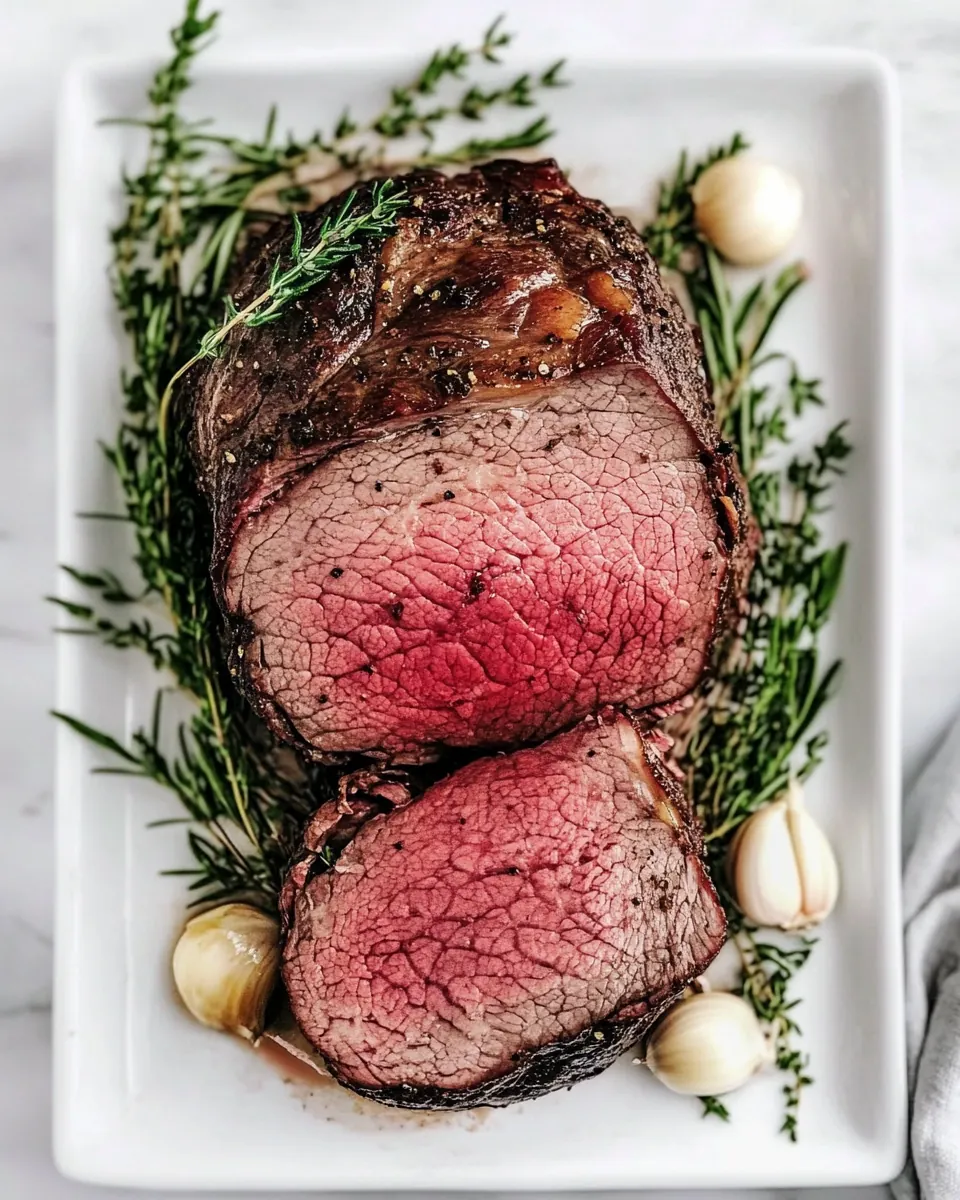
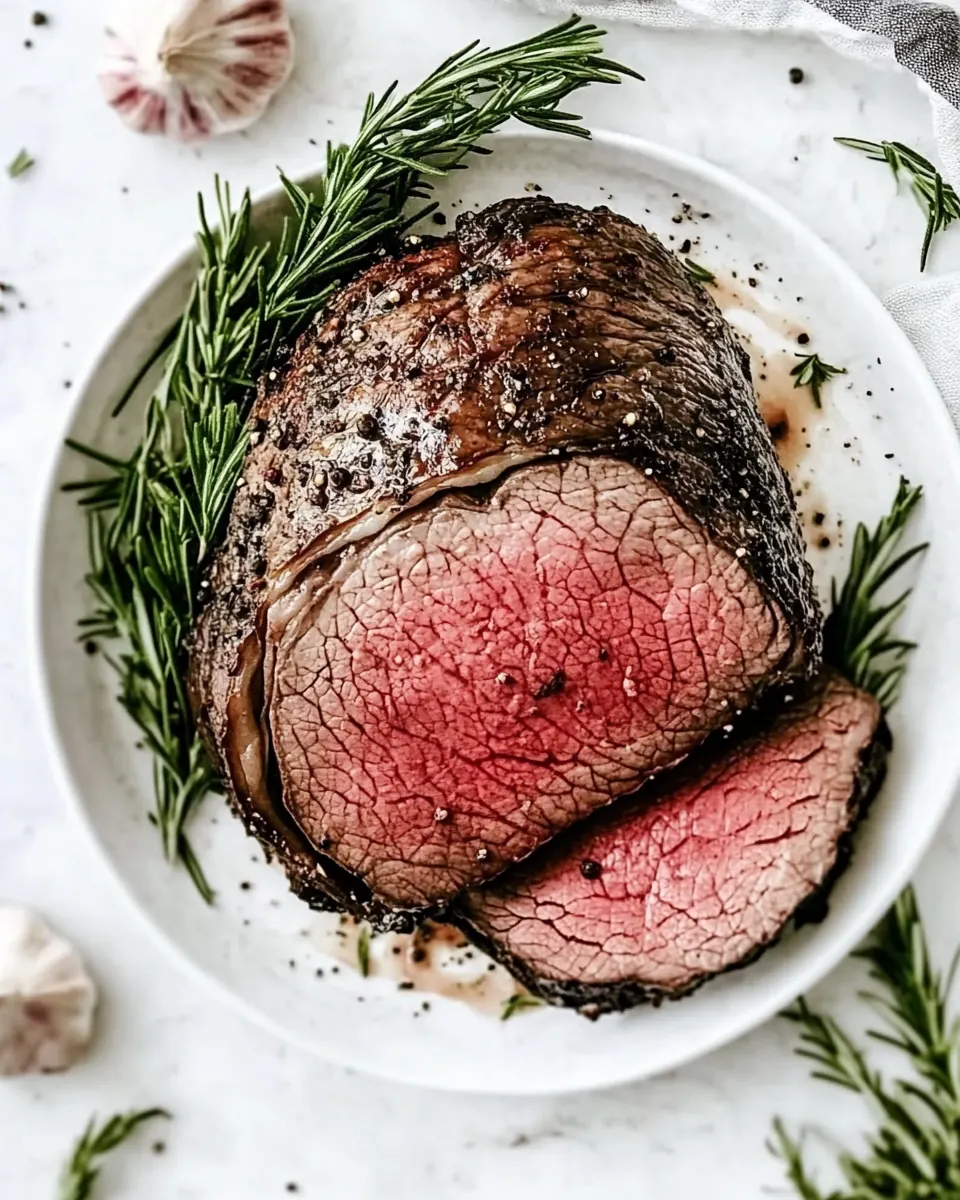
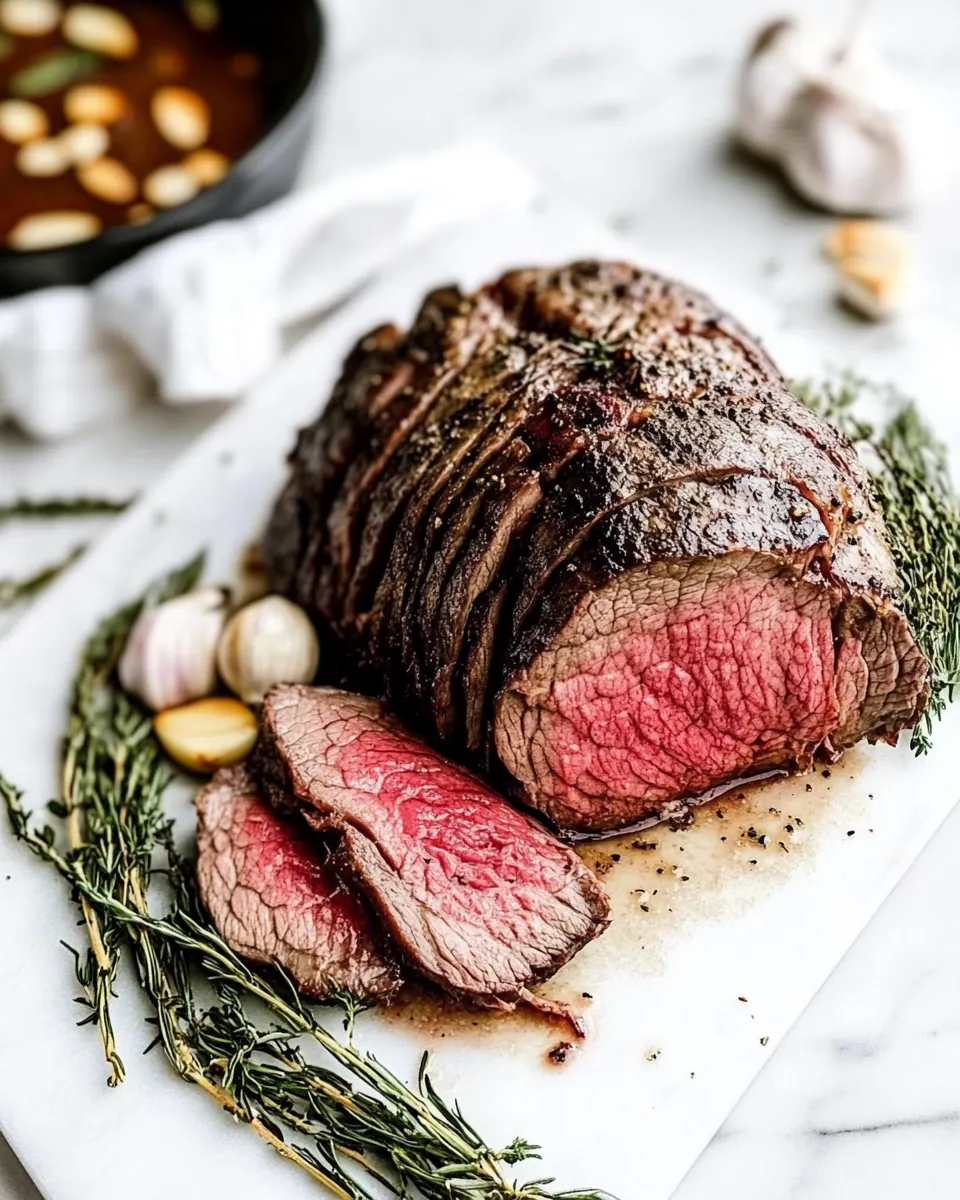
Garlic Lovers Roast Beef
Garlic Lovers Roast Beef is the kind of roast I make when I want my kitchen to smell like a warm, savory hug for hours.
Years ago I cooked a roast for a friend who had just moved into a new apartment, and the housewarming gift turned into an impromptu neighborhood gathering because the aroma pulled people from the hallway. I still remember the soft pop when the garlic met the hot meat, the way the crust developed into a browned, fragrant shell while the interior stayed tender. That night taught me that a few simple techniques and a little patience can transform a plain roast into something people ask about for months.
When I prepare Garlic Lovers Roast Beef I treat it like a conversation with the oven. I give the meat time to settle to room temperature so it cooks evenly, and I take care inserting the garlic slivers so each bite carries a burst of roasted garlic without overpowering the beef. I enjoy the ritual of rubbing on rosemary and feeling the grain of the meat under my fingers as I season. Those small, intentional moments are what make a roast memorable, and they are why I keep coming back to this simple method whenever I want true comfort food.
Recipe Snapshot
1 hr 20 mins
5 mins
75 mins
Medium
300 kcal
American
Keto, Paleo
Dinner
Roasting pan, Meat thermometer, Sharp knife
Why You’ll Love This Garlic Lovers Roast Beef
Flavor that penetrates
I love how the technique of inserting garlic slivers into the roast forces the garlic flavor deep into the meat, not just on the surface. You get aromatic pockets of sweet roasted garlic in every slice, which makes each bite layered and interesting. This is not about a single hit of seasoning, it’s about a steady, balanced flavor experience.
Simple ingredients, big payoff
We only need a handful of pantry items like kosher salt, fresh cracked pepper, and dried chopped rosemary, yet the result tastes sophisticated. I appreciate recipes that respect the ingredient, letting the natural beef flavor carry the dish while complementary aromatics enhance it. This is a technique-driven recipe that rewards care more than technique complexity.
Reliable roasting method
The oven roast approach is predictable and forgiving. When you monitor the internal temperature with a meat thermometer, you gain precise control over doneness. I value recipes that remove guesswork, and this one allows you to aim for rare, medium rare, or well done with confidence.
Great for gatherings
Because you roast a whole roast sized for a group, the recipe scales naturally for small celebrations or weeknight family dinners. I like that you can prepare it with minimal hands on time, then slice and serve when guests are arriving. It feels special without being stressful.
Versatile serving options
You can lean into classic plating, or slice paper thin for sandwiches, salads, or hearty bowls. I often stretch leftovers across several meals, and the concentrated garlic pockets keep the cooked slices lively even the next day. This versatility is a major reason I return to this roast again and again.
Ingredients You’ll Need for Garlic Lovers Roast Beef

These ingredients are intentionally straightforward. The key idea is to honor the main player, the roast, while using concentrated aromatics like garlic and dried chopped rosemary to build flavor from the inside out. Salt and pepper sharpen the meat‘s natural savory notes, and a light coating of olive oil spray encourages browning without excess fat. The meat thermometer is a small tool with a big payoff, giving you control over final doneness.
- 2 3 lb roast or eye round, all fat trimmed off: Select a well-marbled roast or eye round trimmed of all fat to ensure even cooking and prevent excess grease. Provide a solid centerpiece that will soak up garlic and seasonings, yielding tender slices when cooked properly. Allow the roast to rest after cooking for juices to redistribute so slices stay moist.
- 3 4 cloves garlic, cut into thin slivers: Slice garlic into thin slivers to maximize surface area for flavor infusion and to create small pockets that melt into the meat during roasting. Press slivers into shallow cuts across the roast so garlic oils permeate the interior, contributing pungent, aromatic notes. Monitor for browning to avoid burnt garlic that can impart bitterness.
- olive oil spray, I used my misto: Lightly mist the roast with olive oil spray to help seasonings adhere and to promote even browning on the surface without adding excess oil. Use a fine spray to coat the exterior evenly, which enhances crust development during roasting. Choose a neutral or extra virgin olive oil depending on desired flavor intensity.
- kosher salt, to taste: Season with kosher salt to taste to enhance natural meat flavors and to aid in forming a flavorful crust during roasting. Apply salt evenly over the surface and into any slits to help draw out moisture for better seasoning penetration. Adjust amount based on meat weight and personal preference to avoid over-salting.
- fresh cracked pepper, to taste: Apply fresh cracked pepper to taste to introduce sharp, aromatic heat and complement the garlic and rosemary. Grind coarse for textural contrast and to release volatile oils at the time of seasoning for maximum flavor impact. Re-season lightly after resting if needed to balance flavors.
- 2 tsp dried chopped rosemary: Sprinkle dried chopped rosemary evenly to impart earthy, piney notes that pair well with roast beef and garlic. Use measured teaspoons to avoid overpowering the meat; rubbing the herb into the surface helps release oils and aromas. Consider combining with salt and pepper for a cohesive herb crust.
- meat thermometer: Use a meat thermometer to monitor internal temperature and ensure the roast reaches the desired doneness without overcooking. Insert into the thickest part of the roast away from bone or fat for an accurate reading, and remove from heat when target temperature is reached. Allow carryover cooking and resting time to achieve perfect tenderness.
How to Assemble Garlic Lovers Roast Beef
These directions are straightforward but precise, and I walk you through sensory cues so you can tell when the roast is progressing correctly. Allow yourself a calm kitchen rhythm, and use the thermometer as your guide while paying attention to aroma and crust development.
- Remove the roast from refrigerator 1 hour before cooking to reach room temperature. Trim all the fat off the meat. Using a sharp knife, pierce meat about 1/2-inch deep and insert slivers of garlic in each hole, pushing all the way in. Lightly spray the meat with olive oil and season generously with salt, pepper and rosemary. Place the thermometer all the way into the center of the meat.: When you leave the roast at room temperature for an hour the surface warms so it cooks more evenly, which reduces the gradient between crust and center. You will notice the meat losing its chill, and the fibers relax which allows seasonings and the inserted garlic to mingle more naturally with the flesh. As you poke the holes and slide in the slivers, listen for a soft tearing of the muscle, and feel the garlic settle in snug pockets. Press the garlic all the way so it does not fall out during roasting. A common mistake is inserting too large a sliver which can create a raw garlic center, or inserting them too shallow so they burn on the surface. The gentle spray of olive oil creates an even film that helps the dried chopped rosemary and cracked pepper adhere, promoting an even browned crust while preventing the seasonings from sliding off during transfer to the pan. Finally, ensure the meat thermometer reaches the thickest part, avoiding bone or fat pockets, so you get an accurate readout during roasting.
- Preheat oven to 350 F. When the oven reaches 350 F, place the roast in a roasting pan and put in the oven.: You will sense the oven hit the set temperature when preheat indicators turn off or the light goes out. Placing the roast into a fully preheated oven ensures predictable searing and browning from the moment it goes in. As the roast slides into the pan you may hear a faint hiss as residual moisture meets the hot air, and the initial scent will be subtle, building into something much more savory as time goes on. Position the pan so air can circulate; avoid overcrowding. A typical misstep is putting the roast into a cold oven, which leads to longer cooking and a paler exterior. Aim to transfer confidently and close the oven quickly to retain heat.
- Roast until the thermometer reads 130° for rare, 140° for medium rare, 150° for medium, and 155-160° for well done. Remove the roast from the oven and let it rest 10-20 minutes before you cut it so that the juices distributed evenly. I personally remove my roast beef from the oven when it is 135° for medium rare. The temperature will rise an additional 5 degrees as it sits.: As the roast cooks you will notice the exterior deepen in color and the kitchen fill with the sweet scent of roasted garlic and warm herbs. The thermometer is the most honest signal of progress, and pulling the roast a few degrees earlier accounts for residual carryover cooking. When you remove the roast and tent it loosely with foil, you will hear a gentle settling silence as internal juices redistribute, and after resting those juices will yield clean, slightly glossy slices rather than a flood on the cutting board. Avoid skipping rest time, as slicing too soon squeezes juices out and leaves the meat dry. Also, resist the urge to slice immediately to check doneness; patience pays off for texture and succulence.
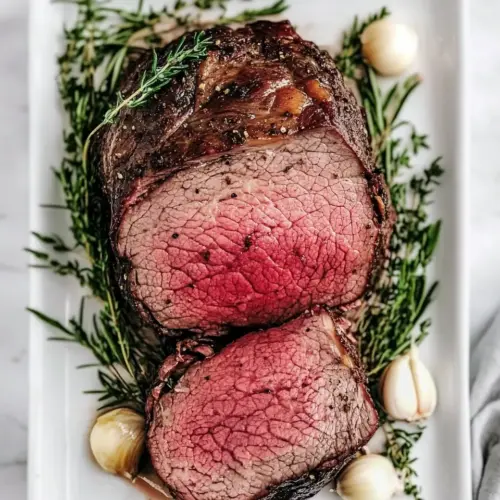
- Slice thin and serve.: After resting, you'll find the crust slightly firmer and the interior tender and rosy when cooked to medium rare. Use a sharp slicing knife and cut against the grain for the most tender mouthfeel. As you slice, you may notice pockets of softened, roasted garlic distributed through each piece, delivering concentrated flavor bursts. Arrange slices on a warm platter so they retain heat, and serve promptly. A common error is slicing too thickly, which masks the delicate interplay of crust and inner tenderness; aim for thin, confident strokes for the best experience.
Ways to Adapt This Recipe
This roast is intentionally simple, making it easy to adapt based on equipment, occasion, or flavor preference. Below are practical adjustments and variations that keep the core method intact while offering flexibility for different cooks and kitchens.
- Oven temperature tweak Change the oven to a slightly lower temperature and extend cook time for a more evenly pink interior, which can help with thicker roasts and give a gentler finish.
- Garlic intensity Adjust the amount of garlic slivers if you prefer subtler or bolder garlic notes, inserting fewer slivers for a milder profile or more for a pronounced garlic character.
- Herb swap Substitute the dried chopped rosemary with a similarly aromatic dried herb if you want a different herbal edge, keeping in mind that rosemary has a sturdy piney aroma that pairs especially well with beef.
- Slicing approach For very lean cuts like eye round, slice extra thin against the grain to maximize tenderness and avoid a chewier texture.
- Make ahead strategy Roast and cool fully, then refrigerate. Slice chilled for sandwiches or rewarm gently in a low oven to preserve moisture when serving later in the day.
What to Serve Alongside Garlic Lovers Roast Beef
The right accompaniments can turn this roast into a full, balanced meal or a special event centerpiece. Think about textures and temperatures that complement the savory, garlicky meat. Below are detailed serving suggestions in list form so you can mix and match based on the occasion and season.
- Classic roasted vegetables Roast carrots, parsnips, and potatoes with olive oil and a touch of salt to echo the roast‘s caramelized exterior, adding a sweet, earthy contrast to the savory beef.
- Creamy mashed potatoes Serve warm, buttery mashed potatoes to soak up juices from slices, offering a soft, silky counterpoint to the roast‘s firm crust.
- Simple green salad A crisp salad with a bright vinaigrette helps lighten the plate, cutting through the richness while adding refreshing texture and acidity.
- Hearty grain side Consider warm farro or couscous dressed with olive oil and lemon to provide a chewy base that complements thinly sliced roast beef.
- Warm bread Offer a rustic loaf or rolls so guests can make open faced sandwiches, using leftover slices the next day for quick, satisfying meals.
- Occasion pairing For a winter family dinner the roast stands out as a centerpiece, while for a casual lunch slices work well in sandwiches; the recipe adapts to intimate gatherings and festive meals alike.
- Storage tips Cool sliced roast quickly, then refrigerate in an airtight container for up to four days, or freeze for longer storage. Reheat gently to maintain tenderness.
- Seasonal pairing In colder months pair with root vegetables and bold sides, while in milder weather offer lighter salads and chilled accompaniments for balance.
FAQ
Conclusion
This roast stands out because it delivers concentrated pockets of roasted garlic inside tender, precisely cooked slices, creating a harmonious blend of aroma and texture. Give it a try the next time you want a simple yet memorable centerpiece that requires minimal hands on time but yields maximum flavor. I hope you enjoy the warm, savory results and find it becomes a go to recipe for gatherings and cozy dinners alike.
Garlic Lovers Roast Beef
Equipment
- Roasting Pan
- Meat Thermometer
- Sharp Knife
Ingredients
- 2 -3 lb roast or eye round, all fat trimmed off Select a well-marbled roast or eye round trimmed of all fat to ensure even cooking and prevent excess grease. Provide a solid centerpiece that will soak up garlic and seasonings, yielding tender slices when cooked properly. Allow the roast to rest after cooking for juices to redistribute so slices stay moist.
- 3 -4 cloves garlic, cut into thin slivers Slice garlic into thin slivers to maximize surface area for flavor infusion and to create small pockets that melt into the meat during roasting. Press slivers into shallow cuts across the roast so garlic oils permeate the interior, contributing pungent, aromatic notes. Monitor for browning to avoid burnt garlic that can impart bitterness.
- olive oil spray, I used my misto Lightly mist the roast with olive oil spray to help seasonings adhere and to promote even browning on the surface without adding excess oil. Use a fine spray to coat the exterior evenly, which enhances crust development during roasting. Choose a neutral or extra virgin olive oil depending on desired flavor intensity.
- kosher salt, to taste Season with kosher salt to taste to enhance natural meat flavors and to aid in forming a flavorful crust during roasting. Apply salt evenly over the surface and into any slits to help draw out moisture for better seasoning penetration. Adjust amount based on meat weight and personal preference to avoid over-salting.
- fresh cracked pepper, to taste Apply fresh cracked pepper to taste to introduce sharp, aromatic heat and complement the garlic and rosemary. Grind coarse for textural contrast and to release volatile oils at the time of seasoning for maximum flavor impact. Re-season lightly after resting if needed to balance flavors.
- 2 tsp dried chopped rosemary Sprinkle dried chopped rosemary evenly to impart earthy, piney notes that pair well with roast beef and garlic. Use measured teaspoons to avoid overpowering the meat; rubbing the herb into the surface helps release oils and aromas. Consider combining with salt and pepper for a cohesive herb crust.
- meat thermometer Use a meat thermometer to monitor internal temperature and ensure the roast reaches the desired doneness without overcooking. Insert into the thickest part of the roast away from bone or fat for an accurate reading, and remove from heat when target temperature is reached. Allow carryover cooking and resting time to achieve perfect tenderness.
Instructions
- Remove the roast from refrigerator 1 hour before cooking to reach room temperature. Trim all the fat off the meat. Using a sharp knife, pierce meat about 1/2-inch deep and insert slivers of garlic in each hole, pushing all the way in. Lightly spray the meat with olive oil and season generously with salt, pepper and rosemary. Place the thermometer all the way into the center of the meat.: When you leave the roast at room temperature for an hour the surface warms so it cooks more evenly, which reduces the gradient between crust and center. You will notice the meat losing its chill, and the fibers relax which allows seasonings and the inserted garlic to mingle more naturally with the flesh. As you poke the holes and slide in the slivers, listen for a soft tearing of the muscle, and feel the garlic settle in snug pockets. Press the garlic all the way so it does not fall out during roasting. A common mistake is inserting too large a sliver which can create a raw garlic center, or inserting them too shallow so they burn on the surface. The gentle spray of olive oil creates an even film that helps the dried chopped rosemary and cracked pepper adhere, promoting an even browned crust while preventing the seasonings from sliding off during transfer to the pan. Finally, ensure the meat thermometer reaches the thickest part, avoiding bone or fat pockets, so you get an accurate readout during roasting.
- Preheat oven to 350 F. When the oven reaches 350 F, place the roast in a roasting pan and put in the oven.: You will sense the oven hit the set temperature when preheat indicators turn off or the light goes out. Placing the roast into a fully preheated oven ensures predictable searing and browning from the moment it goes in. As the roast slides into the pan you may hear a faint hiss as residual moisture meets the hot air, and the initial scent will be subtle, building into something much more savory as time goes on. Position the pan so air can circulate; avoid overcrowding. A typical misstep is putting the roast into a cold oven, which leads to longer cooking and a paler exterior. Aim to transfer confidently and close the oven quickly to retain heat.
- Roast until the thermometer reads 130° for rare, 140° for medium rare, 150° for medium, and 155-160° for well done. Remove the roast from the oven and let it rest 10-20 minutes before you cut it so that the juices distributed evenly. I personally remove my roast beef from the oven when it is 135° for medium rare. The temperature will rise an additional 5 degrees as it sits.: As the roast cooks you will notice the exterior deepen in color and the kitchen fill with the sweet scent of roasted garlic and warm herbs. The thermometer is the most honest signal of progress, and pulling the roast a few degrees earlier accounts for residual carryover cooking. When you remove the roast and tent it loosely with foil, you will hear a gentle settling silence as internal juices redistribute, and after resting those juices will yield clean, slightly glossy slices rather than a flood on the cutting board. Avoid skipping rest time, as slicing too soon squeezes juices out and leaves the meat dry. Also, resist the urge to slice immediately to check doneness; patience pays off for texture and succulence.
- Slice thin and serve.: After resting, you'll find the crust slightly firmer and the interior tender and rosy when cooked to medium rare. Use a sharp slicing knife and cut against the grain for the most tender mouthfeel. As you slice, you may notice pockets of softened, roasted garlic distributed through each piece, delivering concentrated flavor bursts. Arrange slices on a warm platter so they retain heat, and serve promptly. A common error is slicing too thickly, which masks the delicate interplay of crust and inner tenderness; aim for thin, confident strokes for the best experience.
Notes
- Oven temperature tweak Change the oven to a slightly lower temperature and extend cook time for a more evenly pink interior, which can help with thicker roasts and give a gentler finish.
- Garlic intensity Adjust the amount of garlic slivers if you prefer subtler or bolder garlic notes, inserting fewer slivers for a milder profile or more for a pronounced garlic character.
- Herb swap Substitute the dried chopped rosemary with a similarly aromatic dried herb if you want a different herbal edge, keeping in mind that rosemary has a sturdy piney aroma that pairs especially well with beef.
- Slicing approach For very lean cuts like eye round, slice extra thin against the grain to maximize tenderness and avoid a chewier texture.
- Make ahead strategy Roast and cool fully, then refrigerate. Slice chilled for sandwiches or rewarm gently in a low oven to preserve moisture when serving later in the day.