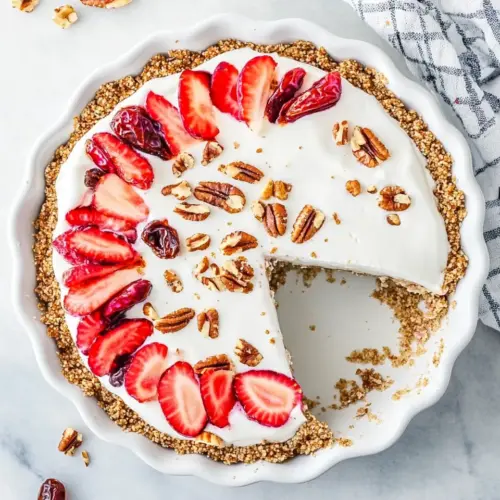
No Bake Yogurt Pie with Date Nut Crust
No Bake Yogurt Pie with Date Nut Crust came into my kitchen on a sticky summer afternoon when I wanted something cool, creamy, and a little unexpected. I remember juggling a basket of berries while the kids raced through the yard, and I needed a dessert that felt special but did not demand an oven. That first version, made with a simple crust of dates and nuts and a thick layer of greek yogurt, quickly became my answer to busy weekend entertaining.
Over the years I have tweaked the balance between sweet and tangy, learning which brands of yogurt give the best texture, and how a fragrant whisper of orange zest lifts the whole pie. Friends always comment on the crust, which tastes indulgent yet wholesome, thanks to the combination of medjool dates, walnuts, and unsalted roasted almonds. I love that it requires no baking, so you can assemble it while chatting with guests and pop it into the fridge until it is time to slice.
When I serve No Bake Yogurt Pie with Date Nut Crust, I often tell the story of the confused neighbor who thought it was a cheesecake until they tasted the bright dairy tang and the chewy, nutty base. The pie travels well, and it feels right for brunch, potlucks, or a relaxed holiday spread. I also appreciate how forgiving the recipe is, and how it gives you room to play with fruit patterns on top.
Recipe Snapshot
26 mins
25 mins
1 mins
Medium
230 kcal
American
Gluten-Free, Low FODMAP
Desserts
Food processor, 8 inch pie plate, Small offset spatula, Mixing bowl, Fine mesh sieve
Why You Need This No Bake Yogurt Pie with Date Nut Crust
Simple, smart ingredients that shine
I love how No Bake Yogurt Pie with Date Nut Crust relies on clean, pantry friendly ingredients. The crust uses only medjool dates, walnuts, unsalted roasted almonds, and a pinch of kosher salt. That minimalism makes each component sing, and it keeps the pie naturally sweet without refined sugar. The result feels honest, and I find that guests ask for the recipe because it tastes much more complex than the few ingredients suggest.
Texture contrast that keeps you reaching for another bite
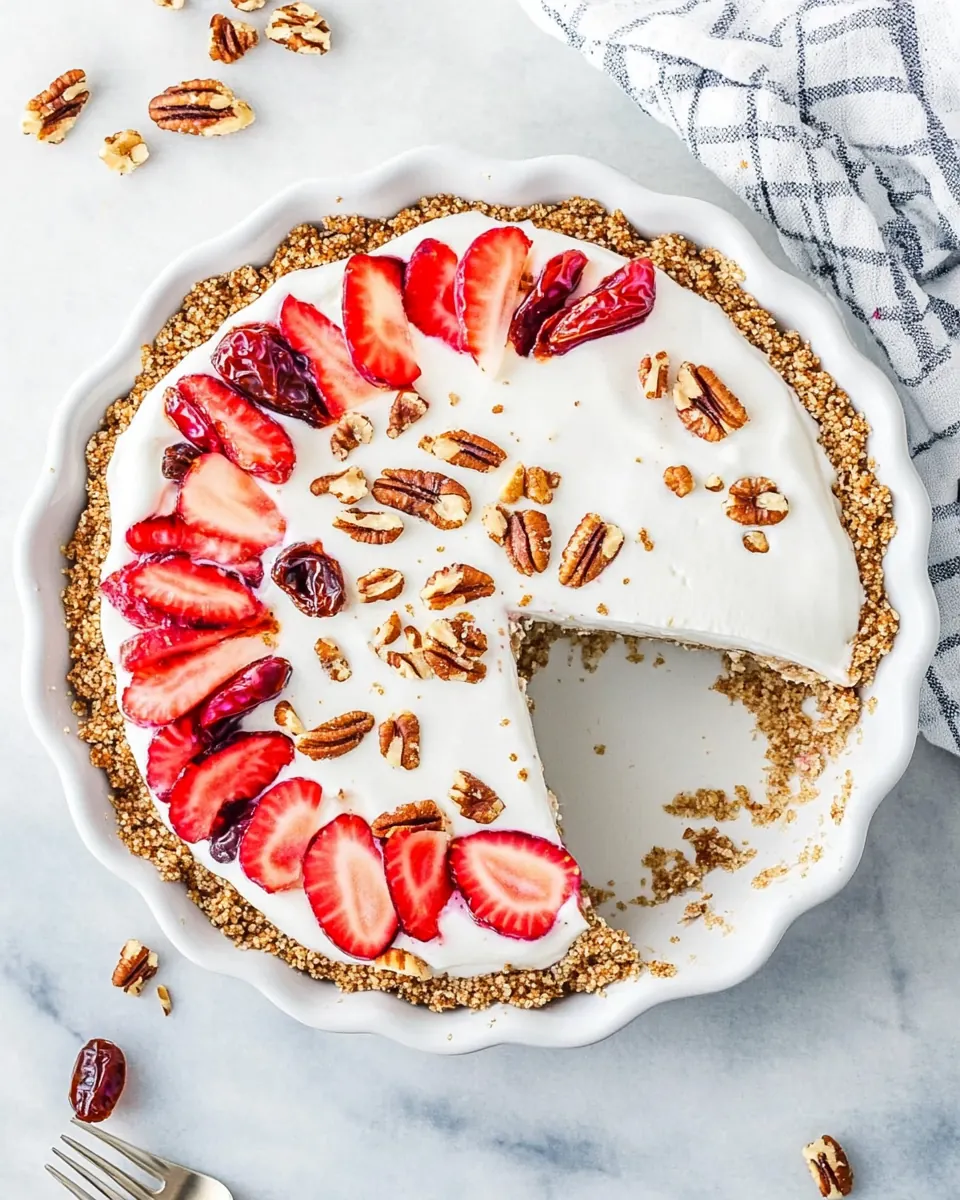
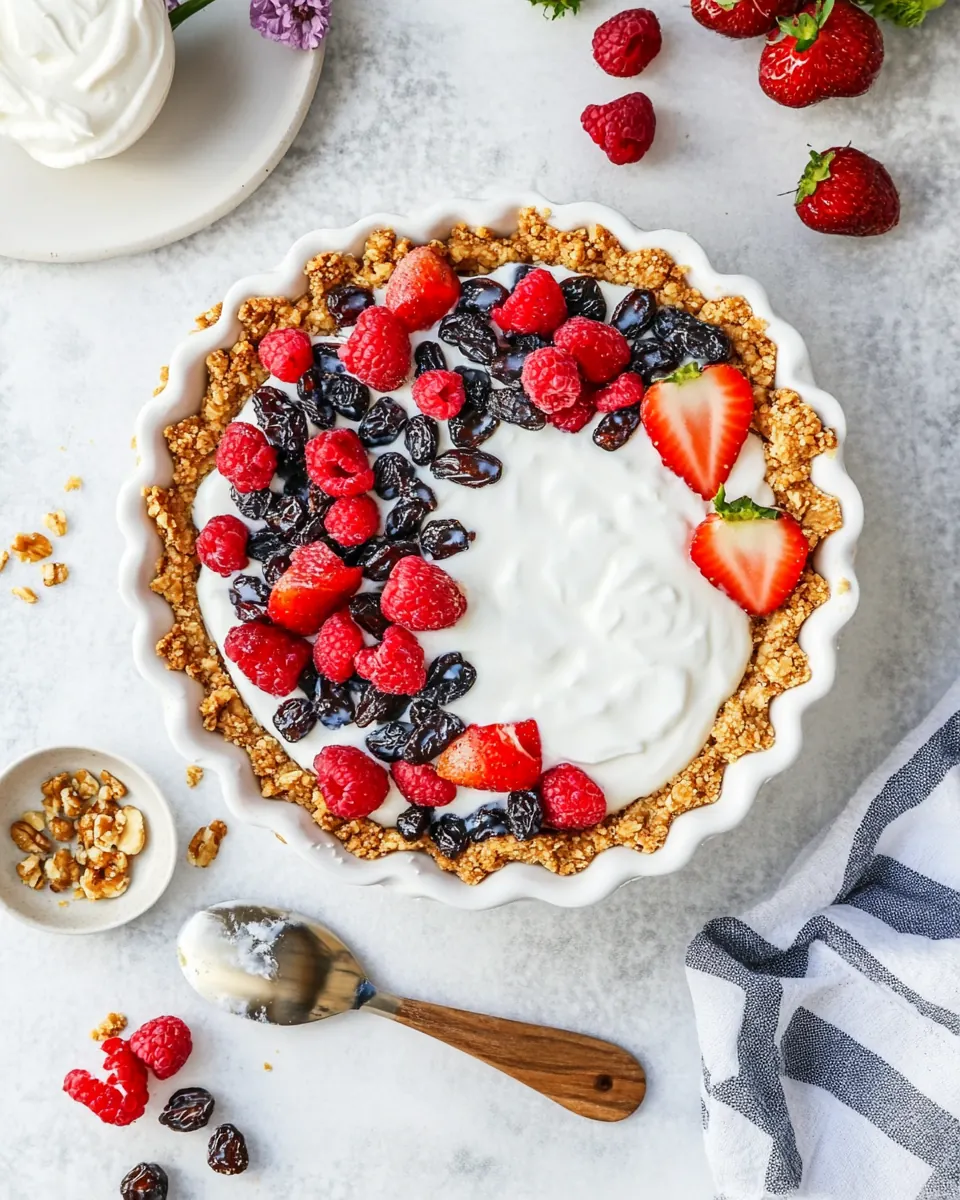
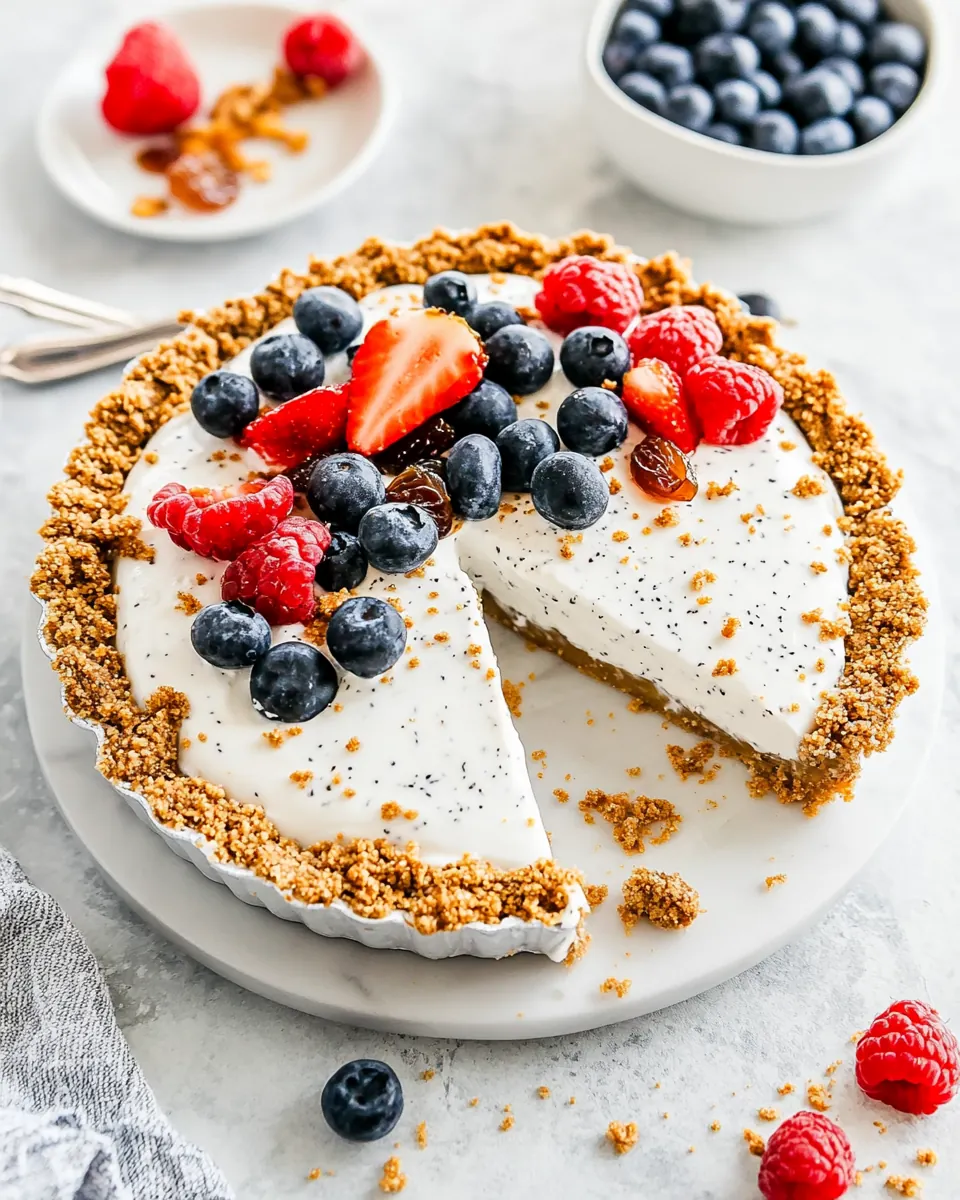
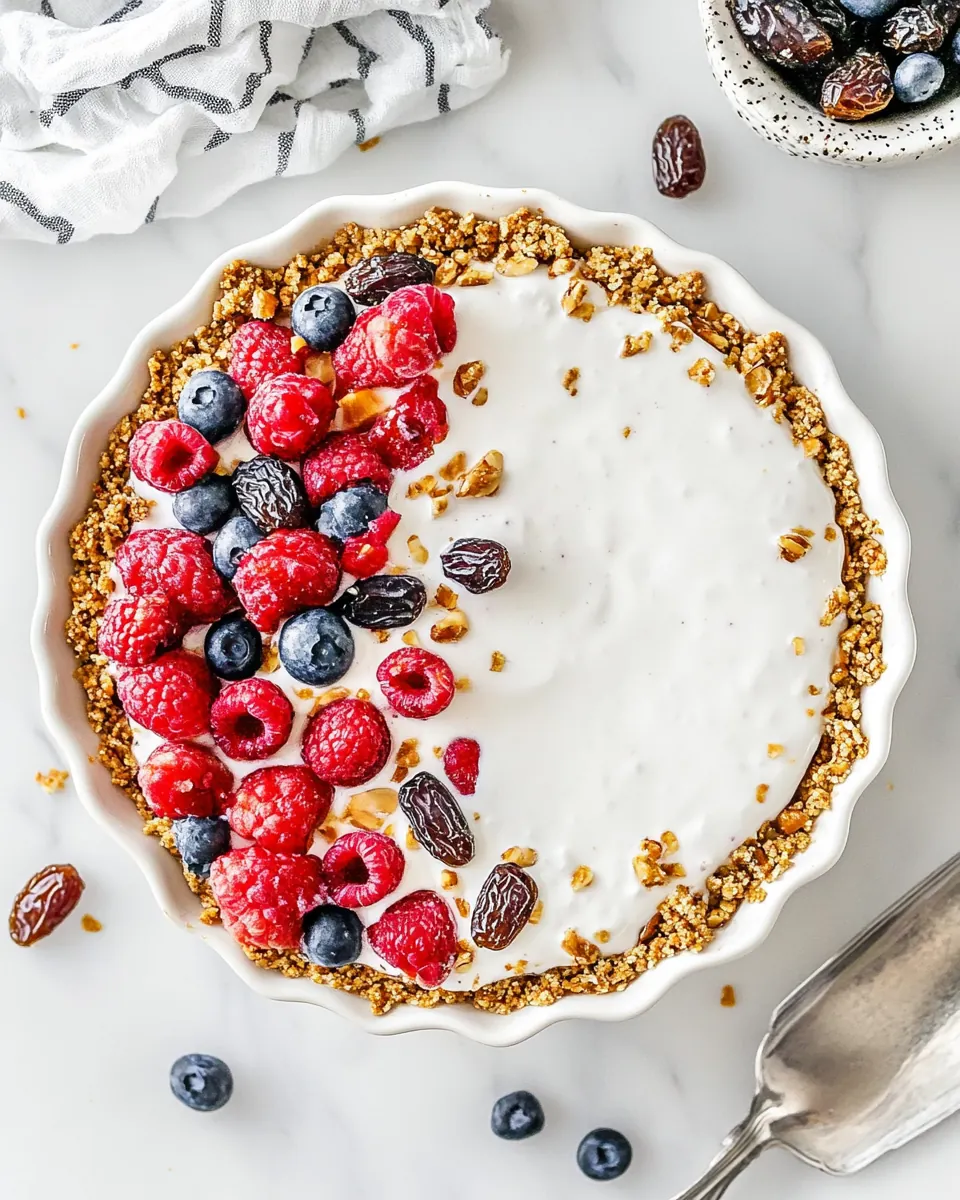
The interplay between the creamy whole milk greek yogurt filling and the chewy date crust is the best part. The crust should pack together and hold a slice, while the filling remains luxuriously smooth. I enjoy how the mixed berries on top add a pop of freshness and slight acidity, which balances the gentle sweetness of the dates. That contrast makes each forkful lively.
No oven, no stress
I keep coming back to the convenience factor. Because this is a No Bake Yogurt Pie with Date Nut Crust, you skip heating your kitchen and you can prepare most of it ahead of time. For summer dinners or last minute gatherings, being able to assemble and chill this pie is a real lifesaver. I often make it a day ahead, and it tastes even better after the flavors have had time to settle.
Customizable and forgiving
One of the reasons I recommend this pie so often is how forgiving it is. If your yogurt is a touch thinner, a quick strain fixes the texture. If you prefer a firmer slice, a bit of setting agent helps. The topping also invites creativity. You can arrange the mixed berries into a simple scatter or a decorative pattern. I enjoy switching things up for holidays or seasonal produce.
A dessert that feels both wholesome and indulgent
There is something satisfying about serving a dessert that tastes indulgent but is built from recognizable, wholesome items. Guests often tell me they appreciate that it does not feel overly sweet or heavy, and that it has a homey, handcrafted quality. That balance is exactly why this pie remains a favorite in my repertoire.
Recipe Ingredients for No Bake Yogurt Pie with Date Nut Crust
These ingredients are chosen to create a harmony of texture and flavor. The crust is the structural hero, built from sticky medjool dates and crunchy walnuts and unsalted roasted almonds, while the filling is all about creamy, tangy comfort from whole milk greek yogurt. The small additions of vanilla bean paste or vanilla extract, orange zest, and honey lift the dairy without overpowering it, and the mixed berries finish the pie with bright color and fresh acidity.
- 15 medjool dates, with the pits: Soak and sweeten the filling by softening pits inside the dates and blending them into a sticky base for the crust; pitting before processing creates a smooth texture and natural sweetness that binds the nuts together.
- 3/4 cup walnuts: Toast or pulse to coarse crumbs to provide rich, buttery flavor and crunchy structure to the crust; walnuts add depth and a slightly bitter counterpoint to the dates.
- 3/4 cup unsalted roasted almonds: Chop or pulse until coarse to contribute firm, nutty texture and structure to the crust; roasted almonds enhance the overall crunch and buttery flavor profile.
- 1/4 teaspoon kosher salt: Season the nut-date crust by balancing sweetness and intensifying flavors; a small amount of kosher salt highlights the nuts and dates without making the crust salty.
- 1 1/4 cups whole milk greek yogurt: Thicken and tang the filling by providing creamy body and a rich dairy backbone; whole milk Greek yogurt creates a stable, smooth no-bake custard with pleasant acidity.
- 1 teaspoon vanilla bean paste or vanilla extract: Flavor the filling with warm aromatic notes by incorporating vanilla bean paste or extract; it rounds out the yogurt’s tang and complements the fruit topping.
- 1/2 teaspoon orange zest: Brighten the filling and complement the berries by adding concentrated citrus aroma; orange zest lifts the flavor and adds freshness without extra liquid.
- 2 teaspoons honey: Sweeten and lightly glaze the fruit topping with natural sweetness; honey enhances berry flavor and helps hold sliced fruit together with a glossy finish.
- 1 1/2 cups mixed berries, sliced strawberries, raspberries, blackberries, blueberries: Top and decorate the finished pie using a mix of sliced strawberries, raspberries, blackberries, and blueberries; mixed berries provide tartness, color contrast, and juicy texture.
- Nonstick cooking spray: Prepare the pan by preventing sticking and allowing easy release of the pie; nonstick cooking spray makes removing the finished no-bake pie simple and clean.
Cooking Method for No Bake Yogurt Pie with Date Nut Crust
This is a relaxed no bake process that rewards patience and attention to texture. The steps below expand on the original directions to help you measure cues by feel, sight, and aroma so your pie sets perfectly and slices cleanly.
- Add the dates to a bowl and cover with very hot water. Cover and let sit for 15 minutes. Drain, pat dry, and cut in half, removing the pit.: The softened and warmed water will plump the medjool dates and release some of their sticky sugars, creating a smoother texture when blended. You should notice the dates becoming glossy and tender after sitting, and the aroma will become more caramel like. A common mistake is under soaking, which leaves the dates dry and prevents the crust from binding; if any dates feel firm after the recommended time, let them sit a little longer. Drain and pat the dates dry so excess water does not make the crust too wet.
- Spray a 8-inch pie plate with nonstick cooking spray and set aside.: Preparing the pan first ensures the crust will release easily later, and a light coating on the plate also prevents the bottom from clinging. When you press the crust in, you want the surface to glide under the crust edges, not tear them. Over spraying can create slippery patches where the crust will not adhere well, so use a light, even mist.
- Add the soaked dates, nuts, and salt to the bowl of a food processor fitted with the blade attachment. Pulse together until the mixture is finely chopped. The mixture should hold together when pressed between your fingers.: Pulse these ingredients until finely chopped so the texture becomes uniformly small and able to stick together. As the mixture comes together you will see a cohesive, slightly tacky mass that holds when pinched. If you over process, the nuts will release too much oil and the mixture will become pasty, so pulse in short bursts and check frequently. Make sure the kosher salt is evenly distributed for balanced flavor.
- Transfer the mixture to the prepared pie plate. Lightly spray your hands or the bottom of a flat dry measuring cup with nonstick spray and gently press the crust out to cover the base and the sides of the pie plate.: Pressing the crust into the pan defines the structure of the pie, so focus on evenness and thickness across the base and sides. Lightly spray your hands or the bottom of a flat dry measuring cup with nonstick cooking spray and gently press the crust out to cover the base and the sides of the pie plate. You want a compact, level surface without holes. A common error is packing too loosely which causes crumbs to fall away when slicing; press firmly but not so hard that the crust becomes overly dense.
- In a medium bowl, mix together the yogurt, vanilla bean paste, orange zest, and honey. Spoon the mixture into the pie plate and smooth into an even layer.: The filling blends quickly, and you should notice a fragrant lift from the orange zest and vanilla bean paste as you stir. The texture should be creamy and thick; if the whole milk greek yogurt seems thin, let it drain briefly in a strainer for a firmer finish. Over mixing introduces air which can make the filling settle oddly, so combine until smooth and uniform.
- Arrange the fruit in your desired pattern. Loosely cover with plastic wrap and refrigerate for 1 hour before serving.: Use an offset spatula or the back of a spoon to level the filling so it meets the crust edges cleanly. You want a flat, even surface for the berries to sit on. Work quickly but gently so the filling does not become grainy from over handling. If the filling is too loose, chill the pie briefly before arranging fruit to prevent sliding.
- Slice into wedges and use a small offset spatula to remove the slices.: Place the mixed berries on top in a pattern that pleases you, whether casual or precise. The bright colors will create contrast against the creamy white filling. Pat the berries lightly so they sit snugly, and avoid stacking too high which can cause them to slip off when slicing. If using very juicy berries, consider patting them dry first to prevent extra moisture pooling on the surface.
- Loosely cover with plastic wrap and refrigerate for 1 hour before serving: Chilling firms the filling and helps the crust set so slices hold their shape. You will feel the pie go from squishy to pleasantly set, and the flavors will meld in the cold environment. A mistake some people make is refrigerating for too long without protection, which can pick up other fridge odors; keep it loosely covered to allow a slight exchange while preventing a film from forming.
- Slice into wedges and use a small offset spatula to remove the slices: For clean slices, run a clean, warm knife between cuts and wipe it dry after each pass. The contrast you want is a neat edge where the creamy filling meets the compact crust and the berries sit on top. If the pie is too cold, let it sit five minutes to soften slightly for easier cutting. Avoid tearing the crust by using a steady lift with an offset spatula under each wedge.
Recipe Tips about No Bake Yogurt Pie with Date Nut Crust
This section expands on small technique points that make the pie easier to assemble and more reliable to serve. The tips focus on texture control, ingredient selection, and presentation so you get consistent, beautiful results.
- Choose thick whole milk greek yogurt — The richness of whole milk greek yogurt gives the filling a silky mouthfeel and helps it set without heavy cream, producing a satisfying, creamy slice.
- Soak dates properly — Soaking medjool dates in very hot water for the suggested time softens them and releases natural sugars which blend smoothly into the crust, preventing dry pockets.
- Pulse, do not puree — When processing the walnuts and unsalted roasted almonds with dates, use short pulses to maintain a slightly textured crumb that binds without becoming oily.
- Lightly oil your pressing tool — Spraying the bottom of a measuring cup or your hands with nonstick cooking spray ensures an even, neat crust surface and reduces sticking while pressing into the pan.
- Balance sweetness with bright fruit — The mixed berries add tartness that contrasts the date sweetness and the creamy filling, creating a lively, balanced dessert.
Best Served With
This pie is versatile across occasions, and the following suggestions help you pair it well for casual or special moments. The ideas focus on complementary textures and seasonal appeal so your serving choices enhance the dessert.
- Serve chilled on warm afternoons — The cool, creamy No Bake Yogurt Pie with Date Nut Crust is perfect for summer brunches or backyard gatherings, offering a refreshing finish that does not weigh guests down.
- Pair with light tea or coffee — Offer a bright herbal tea or a mild coffee to accompany slices, letting the beverage gently contrast the tart mixed berries and creamy filling.
- Bring to potlucks and picnics — Because it does not require reheating, this pie travels well. Keep it chilled in a cooler until serving for best texture and appearance.
- Present for Ramadan iftar or family dinners — The nourishing combination of fruit and dairy makes it a pleasant way to break a fast or conclude a communal meal, especially when served modestly portioned.
- Store leftovers properly — Keep covered in the refrigerator for up to two days to preserve the crust structure and the fresh fruit. If fruit releases moisture, drain gently before serving additional slices.
- Highlight seasonal berries — When berries are in peak season, use them liberally for a vibrant appearance and peak flavor, making each slice feel festive and fresh.
FAQ
Conclusion
This pie stands out for its creamy, tangy filling paired with a naturally sweet, chewy date and nut crust. It is a no bake dessert that manages to feel both indulgent and wholesome, making it ideal for warm weather gatherings or when you want a simple but striking finish to a meal. Give it a try the next time you want a dessert that is easy to assemble, travels well, and earns compliments without fuss. I hope it becomes one of your dependable go to recipes for casual entertaining and relaxed weekend treats.
No Bake Yogurt Pie with Date Nut Crust
Equipment
- Food Processor
- 8 inch pie plate
- Small offset spatula
- Mixing Bowl
- Fine mesh sieve
Ingredients
- 15 medjool dates, with the pits Soak and sweeten the filling by softening pits inside the dates and blending them into a sticky base for the crust; pitting before processing creates a smooth texture and natural sweetness that binds the nuts together.
- 3/4 cup walnuts Toast or pulse to coarse crumbs to provide rich, buttery flavor and crunchy structure to the crust; walnuts add depth and a slightly bitter counterpoint to the dates.
- 3/4 cup unsalted roasted almonds Chop or pulse until coarse to contribute firm, nutty texture and structure to the crust; roasted almonds enhance the overall crunch and buttery flavor profile.
- 1/4 teaspoon kosher salt Season the nut-date crust by balancing sweetness and intensifying flavors; a small amount of kosher salt highlights the nuts and dates without making the crust salty.
- 1 1/4 cups whole milk greek yogurt Thicken and tang the filling by providing creamy body and a rich dairy backbone; whole milk Greek yogurt creates a stable, smooth no-bake custard with pleasant acidity.
- 1 teaspoon vanilla bean paste or vanilla extract Flavor the filling with warm aromatic notes by incorporating vanilla bean paste or extract; it rounds out the yogurt’s tang and complements the fruit topping.
- 1/2 teaspoon orange zest Brighten the filling and complement the berries by adding concentrated citrus aroma; orange zest lifts the flavor and adds freshness without extra liquid.
- 2 teaspoons honey Sweeten and lightly glaze the fruit topping with natural sweetness; honey enhances berry flavor and helps hold sliced fruit together with a glossy finish.
- 1 1/2 cups mixed berries, sliced strawberries, raspberries, blackberries, blueberries Top and decorate the finished pie using a mix of sliced strawberries, raspberries, blackberries, and blueberries; mixed berries provide tartness, color contrast, and juicy texture.
- Nonstick cooking spray Prepare the pan by preventing sticking and allowing easy release of the pie; nonstick cooking spray makes removing the finished no-bake pie simple and clean.
Instructions
- Add the dates to a bowl and cover with very hot water. Cover and let sit for 15 minutes. Drain, pat dry, and cut in half, removing the pit.: The softened and warmed water will plump the medjool dates and release some of their sticky sugars, creating a smoother texture when blended. You should notice the dates becoming glossy and tender after sitting, and the aroma will become more caramel like. A common mistake is under soaking, which leaves the dates dry and prevents the crust from binding; if any dates feel firm after the recommended time, let them sit a little longer. Drain and pat the dates dry so excess water does not make the crust too wet.
- Spray a 8-inch pie plate with nonstick cooking spray and set aside.: Preparing the pan first ensures the crust will release easily later, and a light coating on the plate also prevents the bottom from clinging. When you press the crust in, you want the surface to glide under the crust edges, not tear them. Over spraying can create slippery patches where the crust will not adhere well, so use a light, even mist.
- Add the soaked dates, nuts, and salt to the bowl of a food processor fitted with the blade attachment. Pulse together until the mixture is finely chopped. The mixture should hold together when pressed between your fingers.: Pulse these ingredients until finely chopped so the texture becomes uniformly small and able to stick together. As the mixture comes together you will see a cohesive, slightly tacky mass that holds when pinched. If you over process, the nuts will release too much oil and the mixture will become pasty, so pulse in short bursts and check frequently. Make sure the kosher salt is evenly distributed for balanced flavor.
- Transfer the mixture to the prepared pie plate. Lightly spray your hands or the bottom of a flat dry measuring cup with nonstick spray and gently press the crust out to cover the base and the sides of the pie plate.: Pressing the crust into the pan defines the structure of the pie, so focus on evenness and thickness across the base and sides. Lightly spray your hands or the bottom of a flat dry measuring cup with nonstick cooking spray and gently press the crust out to cover the base and the sides of the pie plate. You want a compact, level surface without holes. A common error is packing too loosely which causes crumbs to fall away when slicing; press firmly but not so hard that the crust becomes overly dense.
- In a medium bowl, mix together the yogurt, vanilla bean paste, orange zest, and honey. Spoon the mixture into the pie plate and smooth into an even layer.: The filling blends quickly, and you should notice a fragrant lift from the orange zest and vanilla bean paste as you stir. The texture should be creamy and thick; if the whole milk greek yogurt seems thin, let it drain briefly in a strainer for a firmer finish. Over mixing introduces air which can make the filling settle oddly, so combine until smooth and uniform.
- Arrange the fruit in your desired pattern. Loosely cover with plastic wrap and refrigerate for 1 hour before serving.: Use an offset spatula or the back of a spoon to level the filling so it meets the crust edges cleanly. You want a flat, even surface for the berries to sit on. Work quickly but gently so the filling does not become grainy from over handling. If the filling is too loose, chill the pie briefly before arranging fruit to prevent sliding.
- Slice into wedges and use a small offset spatula to remove the slices.: Place the mixed berries on top in a pattern that pleases you, whether casual or precise. The bright colors will create contrast against the creamy white filling. Pat the berries lightly so they sit snugly, and avoid stacking too high which can cause them to slip off when slicing. If using very juicy berries, consider patting them dry first to prevent extra moisture pooling on the surface.
- Loosely cover with plastic wrap and refrigerate for 1 hour before serving: Chilling firms the filling and helps the crust set so slices hold their shape. You will feel the pie go from squishy to pleasantly set, and the flavors will meld in the cold environment. A mistake some people make is refrigerating for too long without protection, which can pick up other fridge odors; keep it loosely covered to allow a slight exchange while preventing a film from forming.
- Slice into wedges and use a small offset spatula to remove the slices: For clean slices, run a clean, warm knife between cuts and wipe it dry after each pass. The contrast you want is a neat edge where the creamy filling meets the compact crust and the berries sit on top. If the pie is too cold, let it sit five minutes to soften slightly for easier cutting. Avoid tearing the crust by using a steady lift with an offset spatula under each wedge.
Notes
- Choose thick whole milk greek yogurt — The richness of whole milk greek yogurt gives the filling a silky mouthfeel and helps it set without heavy cream, producing a satisfying, creamy slice.
- Soak dates properly — Soaking medjool dates in very hot water for the suggested time softens them and releases natural sugars which blend smoothly into the crust, preventing dry pockets.
- Pulse, do not puree — When processing the walnuts and unsalted roasted almonds with dates, use short pulses to maintain a slightly textured crumb that binds without becoming oily.
- Lightly oil your pressing tool — Spraying the bottom of a measuring cup or your hands with nonstick cooking spray ensures an even, neat crust surface and reduces sticking while pressing into the pan.
- Balance sweetness with bright fruit — The mixed berries add tartness that contrasts the date sweetness and the creamy filling, creating a lively, balanced dessert.