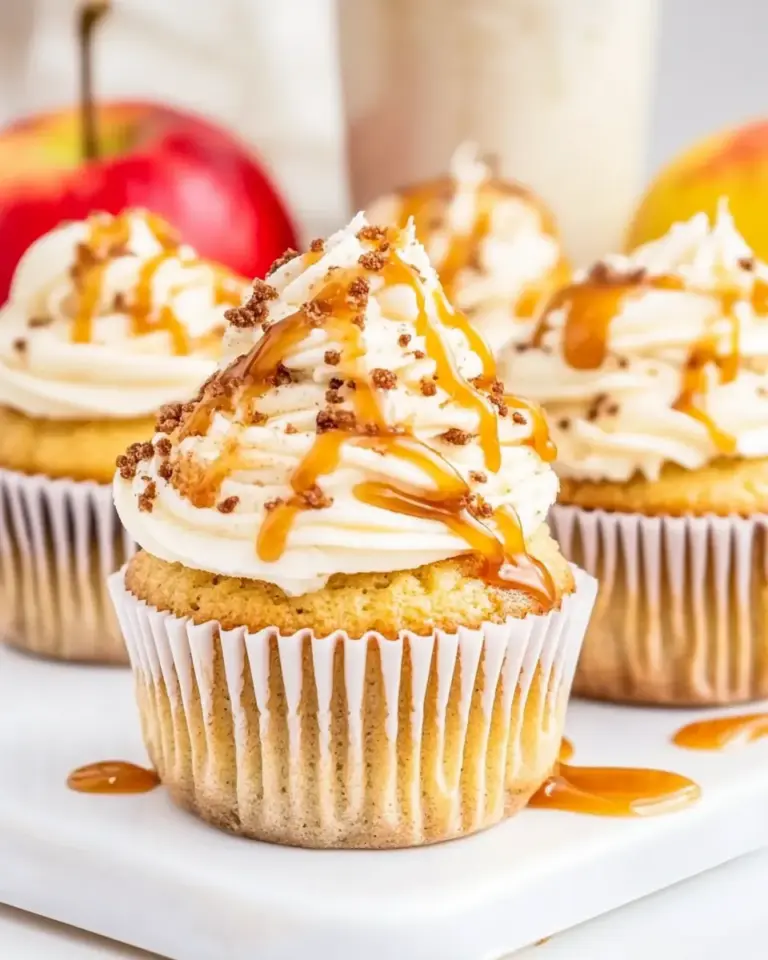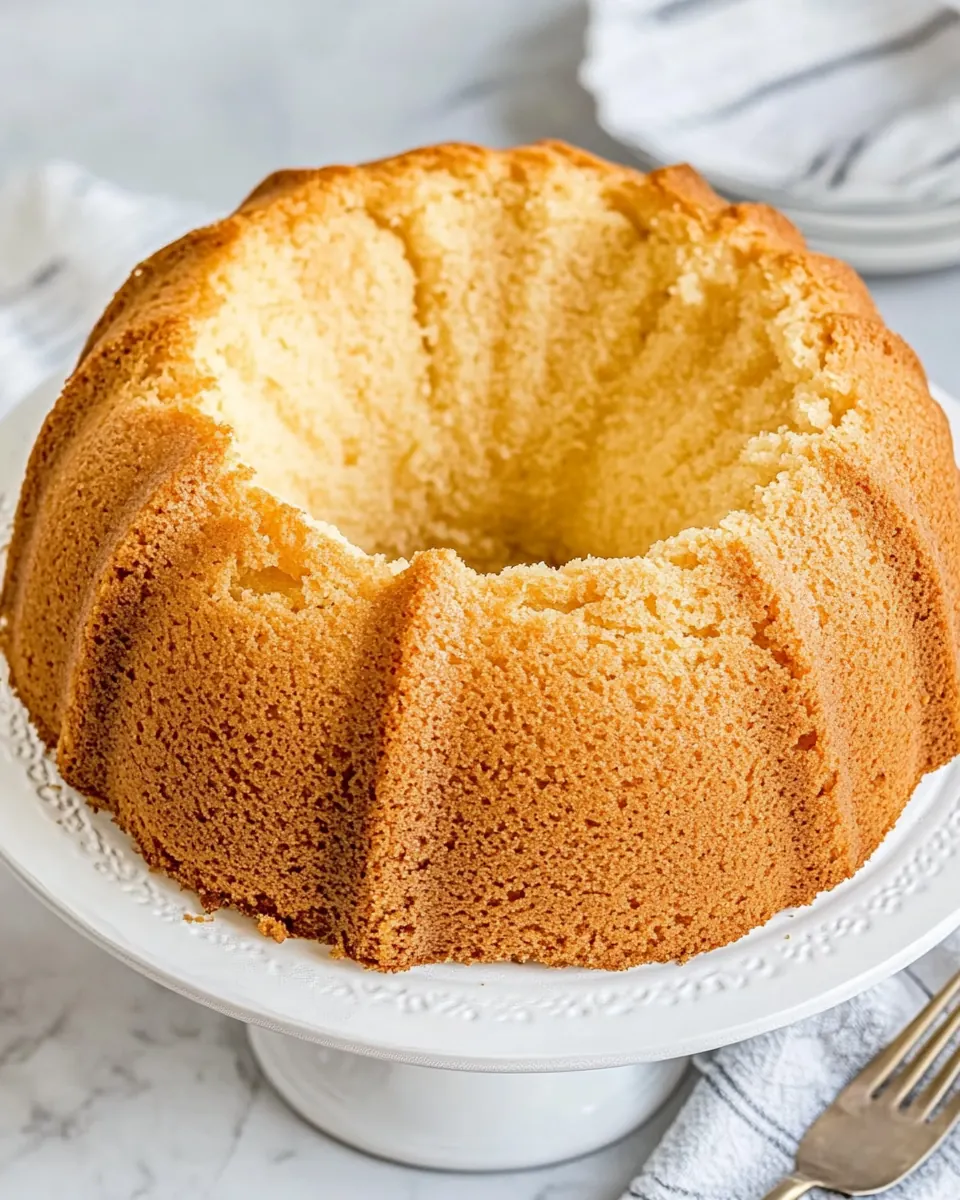
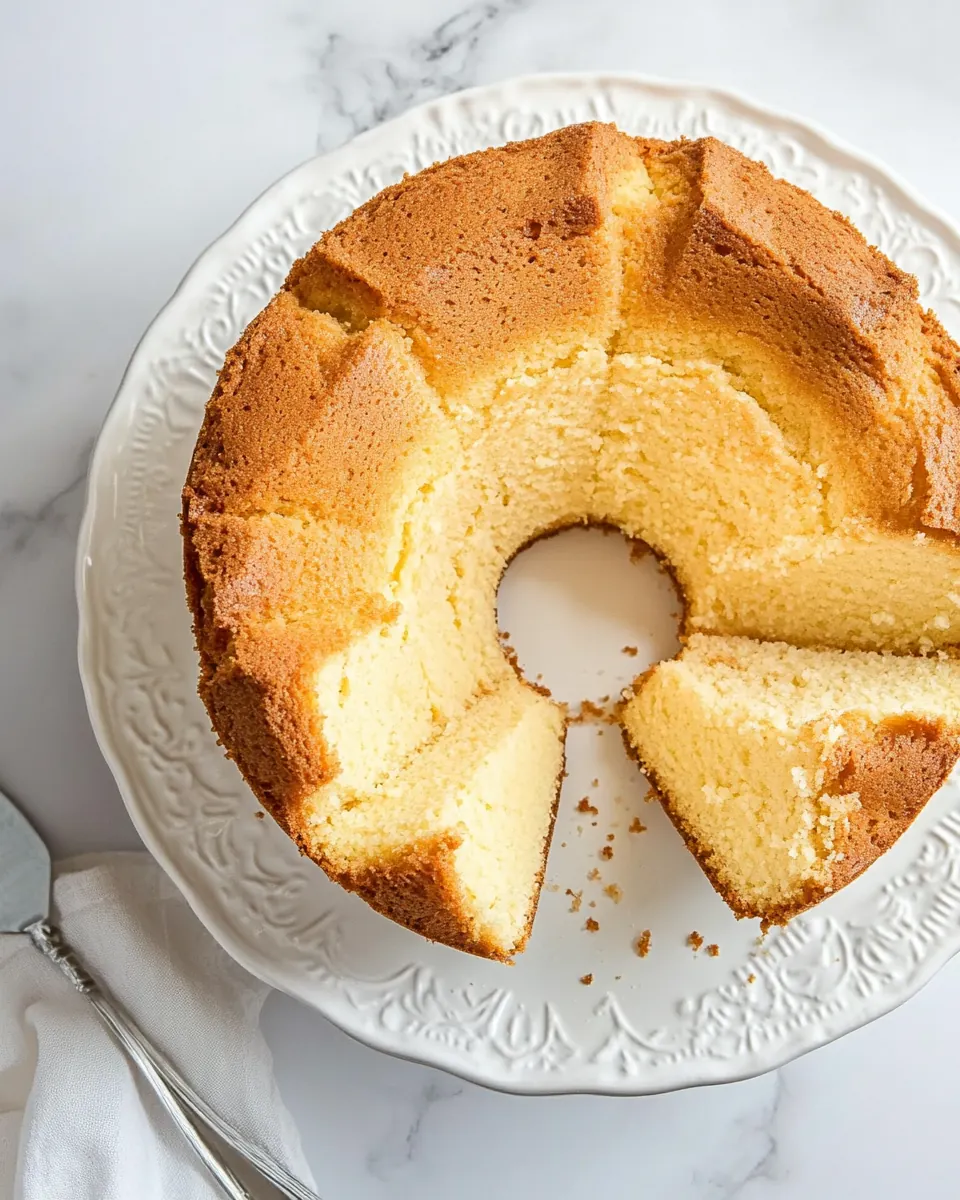
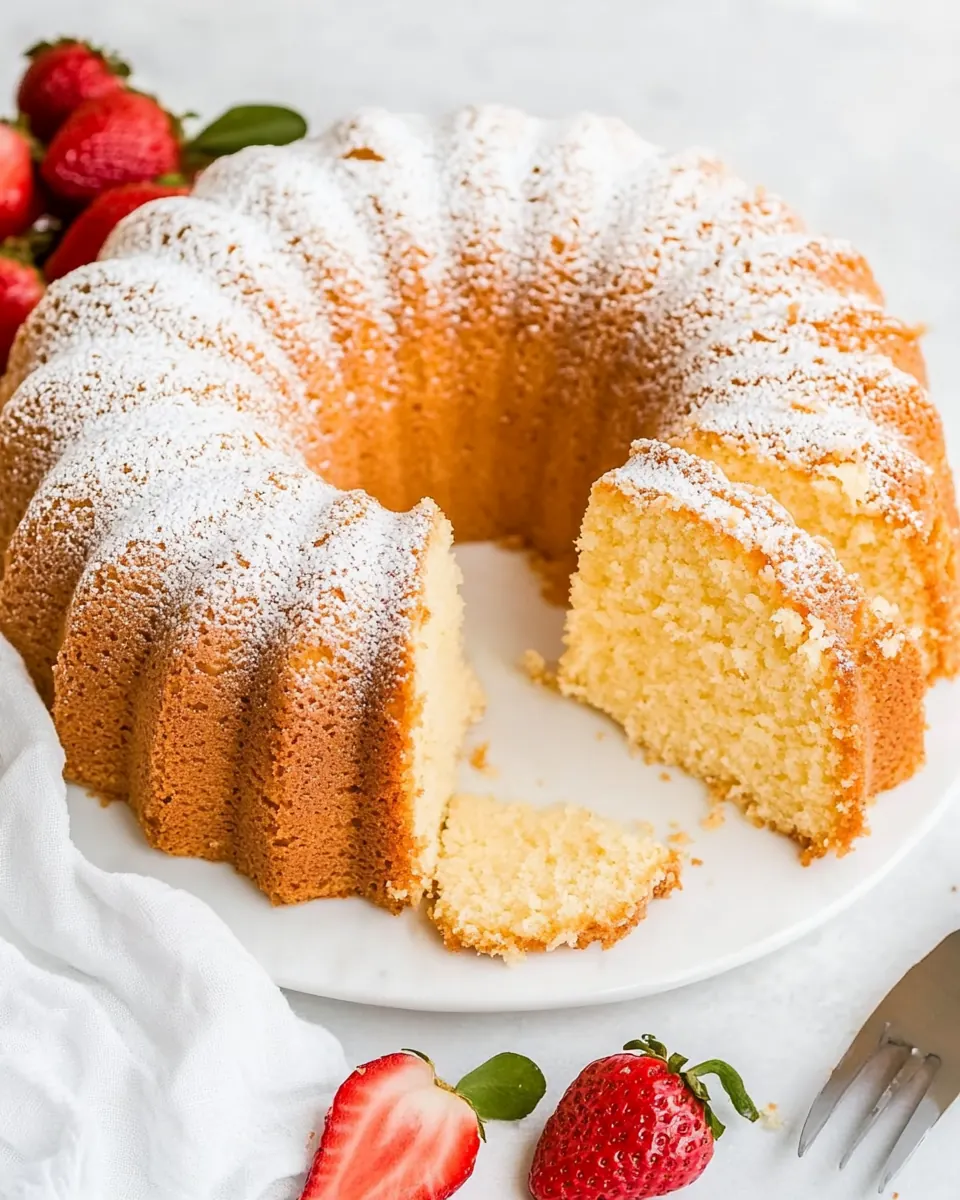
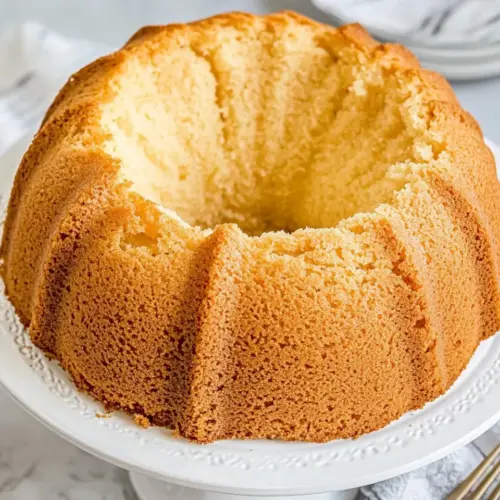
Homemade Pound Cake
Homemade Pound Cake is the kind of dessert that follows me through family gatherings and quiet afternoons alike. I remember the first time I baked this cake with my mother, the kitchen warm and the radio playing softly; the air filled with a buttery, sweet aroma that felt like comfort wrapped in a loaf. From that first bite, the texture spoke to me: dense yet tender, with a crunchy sugared edge that made each slice sing. Over the years, I learned the little adjustments that lift a good pound cake into something you want to share with neighbors and keep for yourself.
There is a ritual to making Homemade Pound Cake that I’ve grown to love. I get a quiet half hour to measure and whisk, to feel the dough change as the eggs and sugar fold into the softened fat. It becomes meditative, especially when the kitchen smells of vanilla and almond. My family has a running debate about whether the cake is best the day it is baked or the next morning. I find both moments irresistible, but the day-after slice, with its settled crumb and deeper flavor, always wins my heart.
When friends ask me for a crowd pleaser, I hand them this recipe. It travels well, it slices beautifully, and it responds kindly to small tweaks, so you can make it your own. While I’ll share techniques and sensory cues so you feel confident in the oven, the joy of this cake is how personal it becomes with each baker. Try it once, and you might find yourself baking it again for a birthday, a casual coffee, or just because the loaf pan is calling.
Recipe Snapshot
1 hr 25 mins
15 mins
70 mins
Medium
350 kcal
American
Gluten-Free, Low FODMAP
Desserts
Kitchen Scale (optional), 10 Cup Bundt Pan, Tube Pan, Hand Mixer
Why This Homemade Pound Cake Is a Winner
Classic, dependable texture
I love how Homemade Pound Cake delivers a reliably dense yet tender crumb. When I slice into it, the interior gives a slight, satisfying resistance, not gummy, not dry. That texture is the result of balancing all purpose flour, buttermilk, and fats, so I always pay attention to mixing times and ingredient temperatures.
Buttery, nostalgic flavor
The flavor profile is simple and honest. With generous amounts of unsalted butter and a touch of vanilla plus almond extract, this cake tastes like memory. I find that the almond note brightens the butter and makes each slice feel slightly special without overpowering it.
Elegant presentation with minimal fuss
Because this recipe bakes in a bundt or tube pan, the finished loaf looks elegant with almost zero decorating skill required. Sprinkling coarse raw sugar inside the pan gives a sparkly, crunchy crust that feels intentional when you serve it at a gathering, and I always get compliments on that sugared edge.
Flexible and forgiving
One of the biggest reasons I return to this Homemade Pound Cake is how forgiving it is. It tolerates small timing differences and still rewards you with a beautiful bake. If your buttermilk is a touch colder, or you beat a little more cautiously, you still end up with a cake that sings. That reliability makes it great for bakers of all levels.
Multi occasion winner
From casual weekend coffee to potluck dessert tables, this pound cake fits. It stores well, and flavors deepen overnight, so you can bake it a day ahead and still impress guests. I often find myself slicing a thin piece for breakfast and not regretting it.
Ingredients Overview for Homemade Pound Cake

These ingredients combine to make a classic, buttery loaf that is both sturdy and tender. The key players are the fats for richness, the sugar for sweetness and crust, the eggs for structure and lift, and the flour and leavening to create that signature crumb. Small amounts of salt and extracts bring balance and aroma so each slice feels complete.
- Coarse raw sugar for lining the pan: Sprinkle coarse raw sugar across the pan to create a crunchy, decorative crust that helps release the cake cleanly after baking. Provide gentle texture contrast to the tender crumb and add visual sparkle to slices.
- 1 cup unsalted butter 226 grams (2 sticks), a little colder than room temperature (65°F): Cream unsalted butter until just softened to incorporate air and richness into the batter; its fat content tenderizes the cake and carries flavors. Maintain a slightly cooler-than–room temperature to ensure proper creaming with sugar for stable volume.
- 1/2 cup vegetable shortening 92 grams: Blend vegetable shortening with butter to stabilize the fat blend, yielding a moist, tender crumb and slightly higher rise. Contribute neutral flavor and prevent excessive spreading, improving the cake's fine texture.
- 3 cups granulated sugar 600 grams: Beat granulated sugar with fats to dissolve into the batter, aiding aeration and sweetness while promoting a tender, fine crumb. Also helps create a golden crust through caramelization during baking.
- 5 large eggs 250 grams, room temperature: Whisk large eggs into the batter to provide structure, moisture, and emulsification that binds ingredients and traps air for lift. Bring to room temperature so they blend smoothly and contribute maximum volume.
- 3 cups all-purpose flour 360 grams: Sift or measure all-purpose flour to supply the primary structure through gluten formation while keeping the crumb tender when mixed appropriately. Balance against liquids and fats to achieve the classic dense-but-soft pound cake texture.
- 1/2 teaspoon fine sea salt: Measure fine sea salt to enhance and balance the cake's sweetness, deepen flavor complexity, and strengthen gluten slightly for better structure. Dissolve into the batter so savory notes are evenly distributed.
- 1/2 teaspoon baking powder 2 grams: Add baking powder to introduce a controlled leavening lift that lightens the traditionally dense pound cake without altering flavor. Ensure even distribution by mixing with dry ingredients to prevent uneven rising.
- 1 cup buttermilk 227 grams, room temperature: Pour buttermilk into the batter to provide acidity that tenderizes the crumb, activates baking powder, and adds tangy richness for depth. Use room–temperature buttermilk to help maintain emulsion and even batter consistency.
- 2 teaspoons vanilla extract 8 grams (or vanilla bean paste): Stir vanilla extract into the batter to deliver warm, sweet aromatic notes that round out the flavor profile and complement butter and sugar. Use vanilla bean paste interchangeably for flecks of visual interest and concentrated taste.
- 1 teaspoon almond extract 4 grams: Include almond extract sparingly to contribute a concentrated nutty aroma that enhances and elevates the cake's flavor without overpowering other extracts. Add at the end of mixing to preserve its delicate fragrance.
Putting Together Homemade Pound Cake
Working through these steps is comforting and rhythmic. I like to set everything out so the process flows, and then I follow each step while paying attention to sensory cues. You will notice changes in aroma, texture, and even sound that signal progress at each stage.
- Adjust oven rack to middle positions, preheat oven to 350°F, and spray a 10-inch tube or Bundt pan with nonstick cooking spray. Sprinkle the inside of the pan with coarse raw sugar; set aside.: When the oven warms to 350°F , there is an immediate, cozy warmth that fills the kitchen and signals baking is imminent. You should hear the click and steady hum of the oven once it reaches temperature. Spraying the pan and sprinkling it with coarse raw sugar helps the cake release and gives a crunchy sugared exterior, so be sure to coat evenly. A common mistake is skipping the sugar lining which can lead to sticking or a dull crust. I recommend placing the rack in the center so heat circulates evenly, and I test the oven with an oven thermometer if it runs hot or cool.
- Cream the butter and shortening together using a hand mixer set on medium speed for 1 minute.: As you cream the softened unsalted butter and vegetable shortening , you’ll notice they lighten in color and become smoother. The sound will change to a softer, paddling hum as fats incorporate air. This step builds the structure so the batter can trap air and rise properly. Avoid overcreaming which can cause the batter to become too soft and collapse; one minute at medium is usually perfect. If the fats feel greasy or too warm, chill briefly before continuing.
- Slowly add the granulated sugar while the mixer is set at medium-low speed. Set the mixer to medium-high and beat the sugar/butter mixture for 3 minutes.: Adding granulated sugar slowly lets the crystals interact with the fat, creating tiny pockets of air. You may hear a faint, whispering scraping as the sugar blends. After the sugar is incorporated, increasing to medium-high and beating for three minutes will produce a pale, fluffy mixture. The sensory cue is a noticeably lighter texture and a sweet, buttery scent. A common pitfall is rushing this step, which yields a denser crumb; patience here pays off.
- Add the eggs, one at a time, beating until incorporated after each addition.: During this three minute beat, you should watch the mixture become visibly paler and somewhat fluffy. The batter will cling differently to the beaters, and the room will smell richly of butter and sugar. This aeration is crucial for creating lift without excessive leavening. If your kitchen is very warm, the fats may start to soften too much; pause and chill the bowl for a few minutes if the batter looks oily.
- In a separate large bowl, whisk the flour, salt, and baking powder together.: As you add each egg , the batter becomes silkier and more cohesive. The emulsification that occurs is tactile, the mixture moving from grainy to smooth. Pause between eggs if the batter looks separated, scraping the bowl to ensure even integration. A common mistake is adding eggs too quickly which prevents proper emulsification and can lead to curdling. If this happens, add a spoonful of flour to stabilize before continuing.
- Alternately add the flour mixture and the buttermilk in 3 additions, starting and ending with the dry ingredients. Beat just until incorporated after each addition.: Whisking all purpose flour , fine sea salt , and baking powder aerates the dry mix and distributes the leavening. You will see a uniform pale mixture without clumps, which helps avoid pockets of baking powder in the cake. The dry ingredients should smell neutral, and the texture should be light. Sifting is optional but can improve uniformity. Avoid adding wet ingredients to unmixed flour to prevent uneven rise.
- Add the vanilla and almond extracts, beating just until incorporated.: Alternating flour and buttermilk builds a tender crumb by balancing hydration without overworking gluten. Start with dry, then wet, repeating until incorporated. The batter should look smooth and flow slowly from the spatula, not runny. Mixing just until combined is key; overmixing develops gluten and makes the cake tough. A telltale mistake is rushing and beating vigorously; instead, fold gently and stop when streaks disappear.
- Pour into the prepared pan and smooth the top.: When you add vanilla and almond extract , the aroma shifts to a warm, fragrant note that makes it hard to resist licking the spoon. Only a few beats are needed to distribute flavor evenly. Overbeating here can cause the batter to deflate, so incorporate gently. If the flavor seems weak, check that extracts are fresh, as older extracts can fade.
- Bake 70-90 minutes, or until a toothpick inserted in the middle comes out clean. The internal temperature should register 205°F in the middle of the cake on an instant-read thermometer.: Pouring the batter into the prepared pan should feel satisfying as the dense batter settles and levels. Use a spatula to smooth the surface so the cake bakes evenly. The batter will be thick and glossy, and any peaks should be smoothed for even browning. A common error is underfilling or overfilling; aim for the pan to be roughly three quarters full for proper rise. Give the pan a light tap on the counter to remove large air bubbles.
- Transfer the cake to a metal cooling rack for 15 minutes. Invert and flip the cake over to its original position to cool completely on the cooling rack.: As it bakes, the kitchen will fill with a deep, buttery aroma and the top will color to a rich golden brown. You may hear a faint crackle as the crust sets. Use the toothpick test for doneness and aim for an internal temperature around 205°F , which ensures the center is fully set. Avoid opening the oven too early which can cause the cake to sink. If the top is browning too quickly, tent lightly with foil.
- The cake is delicious as is or serve with your favorite toppings.: After baking, moving the pan to a cooling rack lets steam escape evenly, preventing soggy sides. The cake will relax and slightly pull from the pan edges. Wait fifteen minutes before inverting so the crumb firms up, reducing the chance of tearing. A common mistake is inverting too soon, which can cause breakage; patience yields clean release.
- Once cooled, keep covered. The cake tastes even better the next day.: Inverting reveals the sugared crust and allows the cake to finish cooling upright, preserving its shape. The surface should feel warm but set. Cooling completely before slicing ensures neat slices that hold together. Cutting too early can make the crumb gummy, so resist the temptation to sample immediately.
- The cake is delicious as is or serve with your favorite toppings: Sensory notes here include a tender crumb and a subtly crunchy sugared edge. I like a thin slice to appreciate texture, and if serving to guests, present it simply so the buttery flavor shines. Be mindful not to overload with wet toppings that could make slices soggy.
- Once cooled, keep covered: Storing the cake covered preserves moisture and allows flavors to marry overnight, often improving taste. The cake will keep well at room temperature for several days if wrapped or in an airtight container. A common error is leaving it uncovered which dries the crumb; cover as soon as it reaches room temperature.
Make It Your Own
This cake is wonderfully adaptable, and small changes can personalize it without breaking the recipe. Below are tips that expand on the recipe notes and help you tailor texture, aroma, and presentation to your taste.
- Honor ingredient temperatures: Bring eggs, buttermilk, and fats close to room temperature before mixing so they emulsify easily and produce a smooth batter.
- Measure carefully: For consistent outcomes, weigh the flour, butter, and sugar. This avoids a dense cake caused by too much flour or a flat cake from too little sugar.
- Watch mixing times: Beat fats and sugar until pale, but stop as soon as dry and wet ingredients are combined. Overmixing after adding flour develops gluten and can make the crumb chewy.
- Use an oven thermometer: Ovens vary, so check that 350°F is accurate. This prevents under or over baking and helps hit that ideal internal 205°F target.
- Consider vanilla bean paste: If you want flecks of bean and deeper aroma, use paste instead of extract. The visual appeal is subtle but adds charm to each slice.
- Allow proper cooling: Let the cake rest in the pan briefly, then invert and cool completely. This preserves structure and prevents crumb tear when slicing.
- Store it covered: Keep the cooled cake wrapped or in an airtight container to retain moisture, and know that flavors often improve the next day.
- Keep the topping simple: If serving with additions, choose light, dry accompaniments like a dusting of sugar or a thin glaze so the cake’s texture remains the star.
- Adapt pan size cautiously: If you change pan types, adjust bake time and monitor doneness closely to avoid underbaked centers.
- Make ahead: Bake a day before serving; the cake firms and flavors meld, making it easier to slice and present.
What Goes Well With This Homemade Pound Cake
This cake pairs beautifully with simple, gentle accompaniments that enhance its buttery profile without overwhelming it. Below are serving ideas, occasions, and storage tips to make the most of your loaf.
- Breakfast or brunch: Serve thin slices with a mug of coffee or tea for a comforting morning treat. The cake’s sturdy crumb stands up well to spreads if desired.
- Casual dessert: Bring this to potlucks or family dinners; it slices neatly and transports well. Offer small plates and a light dusting of sugar for a tidy presentation.
- Special occasions: For birthdays or gatherings, present the cake on a platter with a few berries on the side, allowing the simplicity of the loaf to shine.
- Storage tips: Keep the cake covered on the counter for up to three days, or slice and freeze for longer storage. Thaw slices at room temperature wrapped to maintain moisture.
- Seasonal pairings: In warm months, pair with fresh stone fruit; in cooler months, serve alongside spiced tea or coffee to accentuate the buttery notes.
- Serving style: Slice moderately thin to showcase the crunchy sugared edge and tender crumb, and provide a small fork so guests can appreciate the texture.
- Occasion flexibility: Whether for Ramadan iftar, casual afternoon tea, or an after dinner sweet, its understated elegance makes it appropriate for many settings.
- Make ahead for events: Bake the day before and keep covered so the flavor deepens, making hosting less stressful and the cake more delicious.
FAQ
Conclusion
This Homemade Pound Cake stands out for its buttery richness, tender crumb, and delightful crunchy sugared edge. It’s a recipe that rewards careful technique without demanding perfection, making it perfect for both special occasions and quiet moments at home. I encourage you to give it a try, follow the sensory cues in the steps, and notice how the flavors deepen after resting; sharing a slice with friends or keeping a few pieces for yourself is one of life’s simple pleasures.
Homemade Pound Cake
Equipment
- Kitchen Scale (optional)
- 10 cup Bundt pan
- Tube Pan
- Hand Mixer
Ingredients
- Coarse raw sugar for lining the pan Sprinkle coarse raw sugar across the pan to create a crunchy, decorative crust that helps release the cake cleanly after baking. Provide gentle texture contrast to the tender crumb and add visual sparkle to slices.
- 1 cup unsalted butter 226 grams (2 sticks), a little colder than room temperature (65°F) Cream unsalted butter until just softened to incorporate air and richness into the batter; its fat content tenderizes the cake and carries flavors. Maintain a slightly cooler-than-room temperature to ensure proper creaming with sugar for stable volume.
- 1/2 cup vegetable shortening 92 grams Blend vegetable shortening with butter to stabilize the fat blend, yielding a moist, tender crumb and slightly higher rise. Contribute neutral flavor and prevent excessive spreading, improving the cake's fine texture.
- 3 cups granulated sugar 600 grams Beat granulated sugar with fats to dissolve into the batter, aiding aeration and sweetness while promoting a tender, fine crumb. Also helps create a golden crust through caramelization during baking.
- 5 large eggs 250 grams, room temperature Whisk large eggs into the batter to provide structure, moisture, and emulsification that binds ingredients and traps air for lift. Bring to room temperature so they blend smoothly and contribute maximum volume.
- 3 cups all-purpose flour 360 grams Sift or measure all-purpose flour to supply the primary structure through gluten formation while keeping the crumb tender when mixed appropriately. Balance against liquids and fats to achieve the classic dense-but-soft pound cake texture.
- 1/2 teaspoon fine sea salt Measure fine sea salt to enhance and balance the cake's sweetness, deepen flavor complexity, and strengthen gluten slightly for better structure. Dissolve into the batter so savory notes are evenly distributed.
- 1/2 teaspoon baking powder 2 grams Add baking powder to introduce a controlled leavening lift that lightens the traditionally dense pound cake without altering flavor. Ensure even distribution by mixing with dry ingredients to prevent uneven rising.
- 1 cup buttermilk 227 grams, room temperature Pour buttermilk into the batter to provide acidity that tenderizes the crumb, activates baking powder, and adds tangy richness for depth. Use room-temperature buttermilk to help maintain emulsion and even batter consistency.
- 2 teaspoons vanilla extract 8 grams (or vanilla bean paste) Stir vanilla extract into the batter to deliver warm, sweet aromatic notes that round out the flavor profile and complement butter and sugar. Use vanilla bean paste interchangeably for flecks of visual interest and concentrated taste.
- 1 teaspoon almond extract 4 grams Include almond extract sparingly to contribute a concentrated nutty aroma that enhances and elevates the cake's flavor without overpowering other extracts. Add at the end of mixing to preserve its delicate fragrance.
Instructions
- Adjust oven rack to middle positions, preheat oven to 350°F, and spray a 10-inch tube or Bundt pan with nonstick cooking spray. Sprinkle the inside of the pan with coarse raw sugar; set aside.: When the oven warms to 350°F , there is an immediate, cozy warmth that fills the kitchen and signals baking is imminent. You should hear the click and steady hum of the oven once it reaches temperature. Spraying the pan and sprinkling it with coarse raw sugar helps the cake release and gives a crunchy sugared exterior, so be sure to coat evenly. A common mistake is skipping the sugar lining which can lead to sticking or a dull crust. I recommend placing the rack in the center so heat circulates evenly, and I test the oven with an oven thermometer if it runs hot or cool.
- Cream the butter and shortening together using a hand mixer set on medium speed for 1 minute.: As you cream the softened unsalted butter and vegetable shortening , you’ll notice they lighten in color and become smoother. The sound will change to a softer, paddling hum as fats incorporate air. This step builds the structure so the batter can trap air and rise properly. Avoid overcreaming which can cause the batter to become too soft and collapse; one minute at medium is usually perfect. If the fats feel greasy or too warm, chill briefly before continuing.
- Slowly add the granulated sugar while the mixer is set at medium-low speed. Set the mixer to medium-high and beat the sugar/butter mixture for 3 minutes.: Adding granulated sugar slowly lets the crystals interact with the fat, creating tiny pockets of air. You may hear a faint, whispering scraping as the sugar blends. After the sugar is incorporated, increasing to medium-high and beating for three minutes will produce a pale, fluffy mixture. The sensory cue is a noticeably lighter texture and a sweet, buttery scent. A common pitfall is rushing this step, which yields a denser crumb; patience here pays off.
- Add the eggs, one at a time, beating until incorporated after each addition.: During this three minute beat, you should watch the mixture become visibly paler and somewhat fluffy. The batter will cling differently to the beaters, and the room will smell richly of butter and sugar. This aeration is crucial for creating lift without excessive leavening. If your kitchen is very warm, the fats may start to soften too much; pause and chill the bowl for a few minutes if the batter looks oily.
- In a separate large bowl, whisk the flour, salt, and baking powder together.: As you add each egg , the batter becomes silkier and more cohesive. The emulsification that occurs is tactile, the mixture moving from grainy to smooth. Pause between eggs if the batter looks separated, scraping the bowl to ensure even integration. A common mistake is adding eggs too quickly which prevents proper emulsification and can lead to curdling. If this happens, add a spoonful of flour to stabilize before continuing.
- Alternately add the flour mixture and the buttermilk in 3 additions, starting and ending with the dry ingredients. Beat just until incorporated after each addition.: Whisking all purpose flour , fine sea salt , and baking powder aerates the dry mix and distributes the leavening. You will see a uniform pale mixture without clumps, which helps avoid pockets of baking powder in the cake. The dry ingredients should smell neutral, and the texture should be light. Sifting is optional but can improve uniformity. Avoid adding wet ingredients to unmixed flour to prevent uneven rise.
- Add the vanilla and almond extracts, beating just until incorporated.: Alternating flour and buttermilk builds a tender crumb by balancing hydration without overworking gluten. Start with dry, then wet, repeating until incorporated. The batter should look smooth and flow slowly from the spatula, not runny. Mixing just until combined is key; overmixing develops gluten and makes the cake tough. A telltale mistake is rushing and beating vigorously; instead, fold gently and stop when streaks disappear.
- Pour into the prepared pan and smooth the top.: When you add vanilla and almond extract , the aroma shifts to a warm, fragrant note that makes it hard to resist licking the spoon. Only a few beats are needed to distribute flavor evenly. Overbeating here can cause the batter to deflate, so incorporate gently. If the flavor seems weak, check that extracts are fresh, as older extracts can fade.
- Bake 70-90 minutes, or until a toothpick inserted in the middle comes out clean. The internal temperature should register 205°F in the middle of the cake on an instant-read thermometer.: Pouring the batter into the prepared pan should feel satisfying as the dense batter settles and levels. Use a spatula to smooth the surface so the cake bakes evenly. The batter will be thick and glossy, and any peaks should be smoothed for even browning. A common error is underfilling or overfilling; aim for the pan to be roughly three quarters full for proper rise. Give the pan a light tap on the counter to remove large air bubbles.
- Transfer the cake to a metal cooling rack for 15 minutes. Invert and flip the cake over to its original position to cool completely on the cooling rack.: As it bakes, the kitchen will fill with a deep, buttery aroma and the top will color to a rich golden brown. You may hear a faint crackle as the crust sets. Use the toothpick test for doneness and aim for an internal temperature around 205°F , which ensures the center is fully set. Avoid opening the oven too early which can cause the cake to sink. If the top is browning too quickly, tent lightly with foil.
- The cake is delicious as is or serve with your favorite toppings.: After baking, moving the pan to a cooling rack lets steam escape evenly, preventing soggy sides. The cake will relax and slightly pull from the pan edges. Wait fifteen minutes before inverting so the crumb firms up, reducing the chance of tearing. A common mistake is inverting too soon, which can cause breakage; patience yields clean release.
- Once cooled, keep covered. The cake tastes even better the next day.: Inverting reveals the sugared crust and allows the cake to finish cooling upright, preserving its shape. The surface should feel warm but set. Cooling completely before slicing ensures neat slices that hold together. Cutting too early can make the crumb gummy, so resist the temptation to sample immediately.
- The cake is delicious as is or serve with your favorite toppings: Sensory notes here include a tender crumb and a subtly crunchy sugared edge. I like a thin slice to appreciate texture, and if serving to guests, present it simply so the buttery flavor shines. Be mindful not to overload with wet toppings that could make slices soggy.
- Once cooled, keep covered: Storing the cake covered preserves moisture and allows flavors to marry overnight, often improving taste. The cake will keep well at room temperature for several days if wrapped or in an airtight container. A common error is leaving it uncovered which dries the crumb; cover as soon as it reaches room temperature.
Notes
- Honor ingredient temperatures: Bring eggs, buttermilk, and fats close to room temperature before mixing so they emulsify easily and produce a smooth batter.
- Measure carefully: For consistent outcomes, weigh the flour, butter, and sugar. This avoids a dense cake caused by too much flour or a flat cake from too little sugar.
- Watch mixing times: Beat fats and sugar until pale, but stop as soon as dry and wet ingredients are combined. Overmixing after adding flour develops gluten and can make the crumb chewy.
- Use an oven thermometer: Ovens vary, so check that 350°F is accurate. This prevents under or over baking and helps hit that ideal internal 205°F target.
- Consider vanilla bean paste: If you want flecks of bean and deeper aroma, use paste instead of extract. The visual appeal is subtle but adds charm to each slice.
- Allow proper cooling: Let the cake rest in the pan briefly, then invert and cool completely. This preserves structure and prevents crumb tear when slicing.
- Store it covered: Keep the cooled cake wrapped or in an airtight container to retain moisture, and know that flavors often improve the next day.
- Keep the topping simple: If serving with additions, choose light, dry accompaniments like a dusting of sugar or a thin glaze so the cake’s texture remains the star.
- Adapt pan size cautiously: If you change pan types, adjust bake time and monitor doneness closely to avoid underbaked centers.
- Make ahead: Bake a day before serving; the cake firms and flavors meld, making it easier to slice and present.