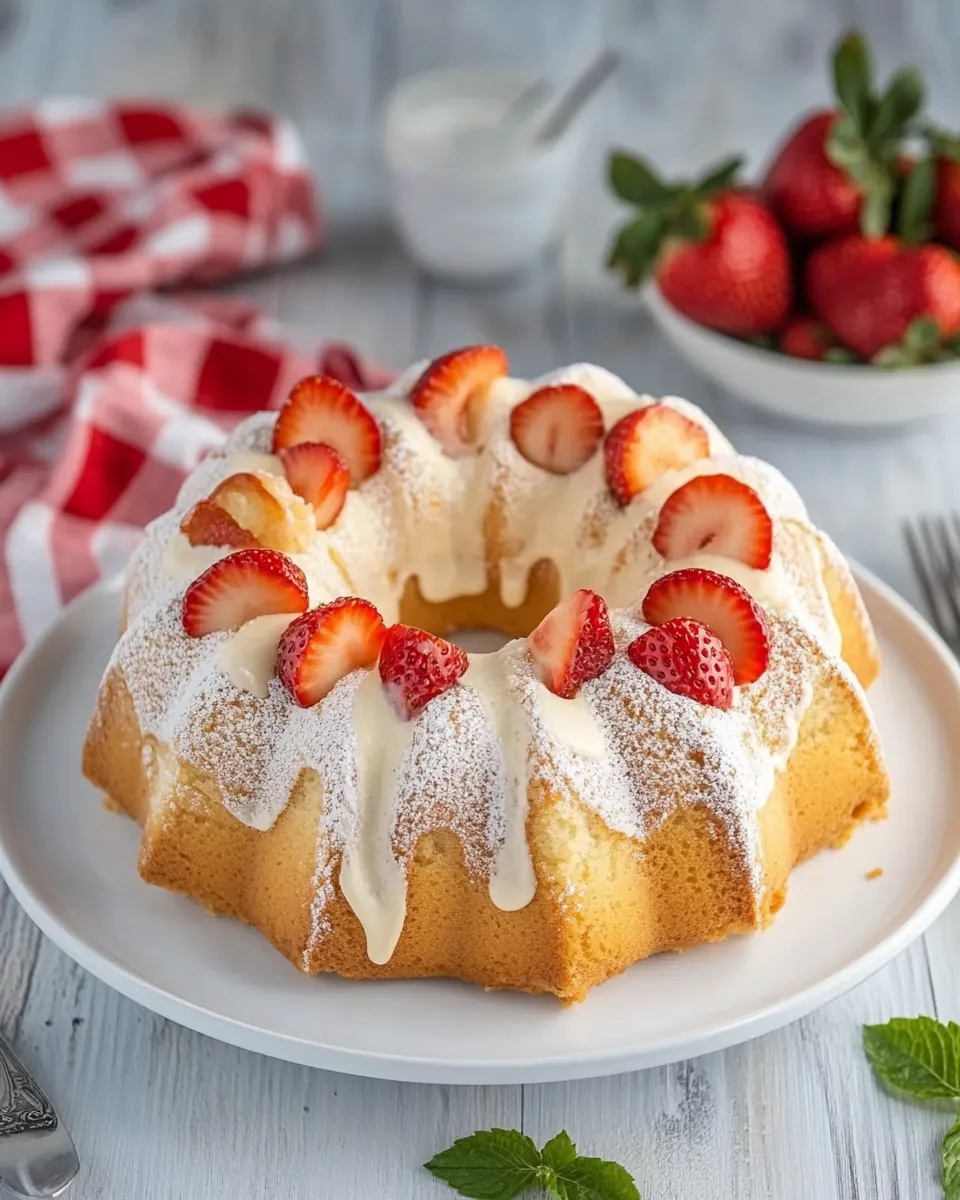
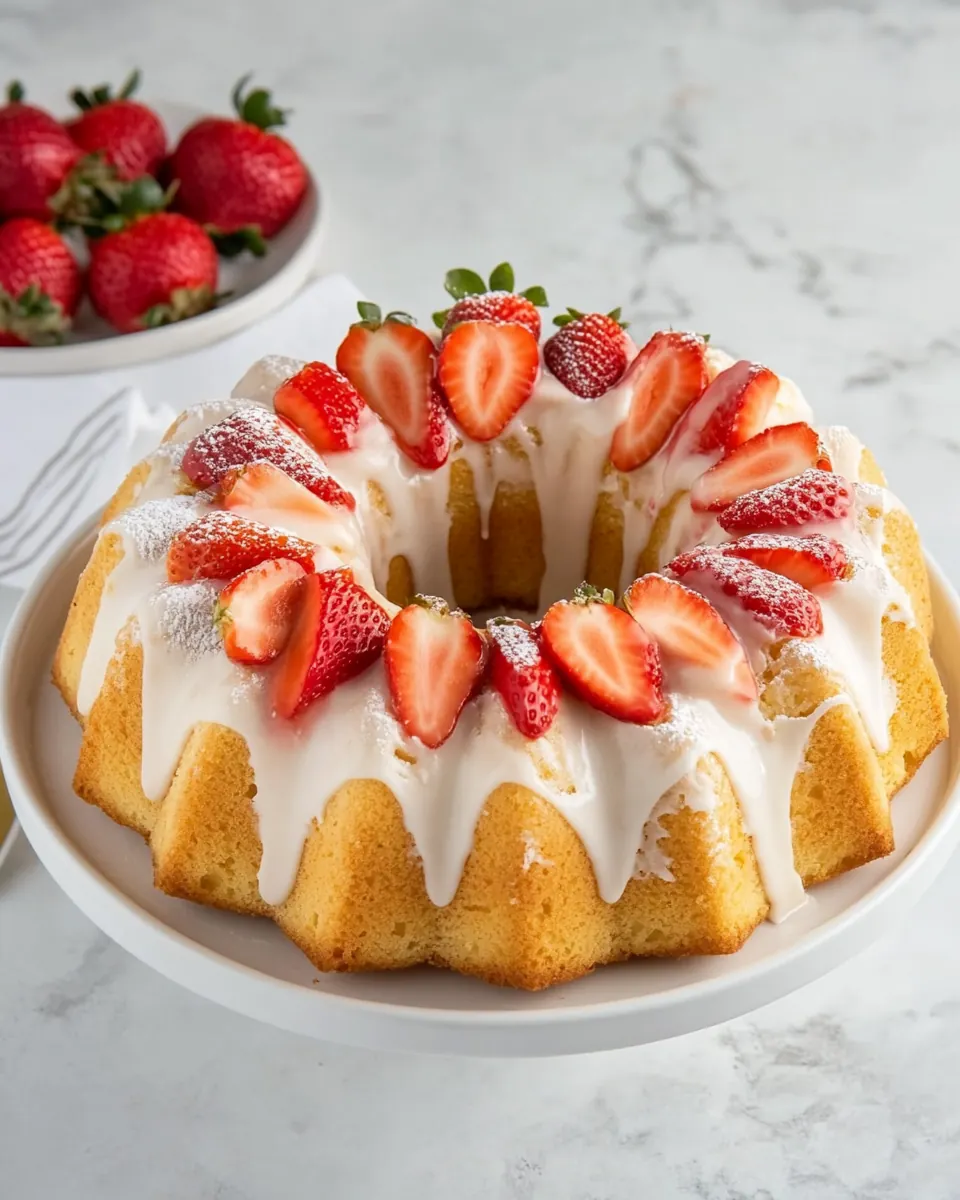
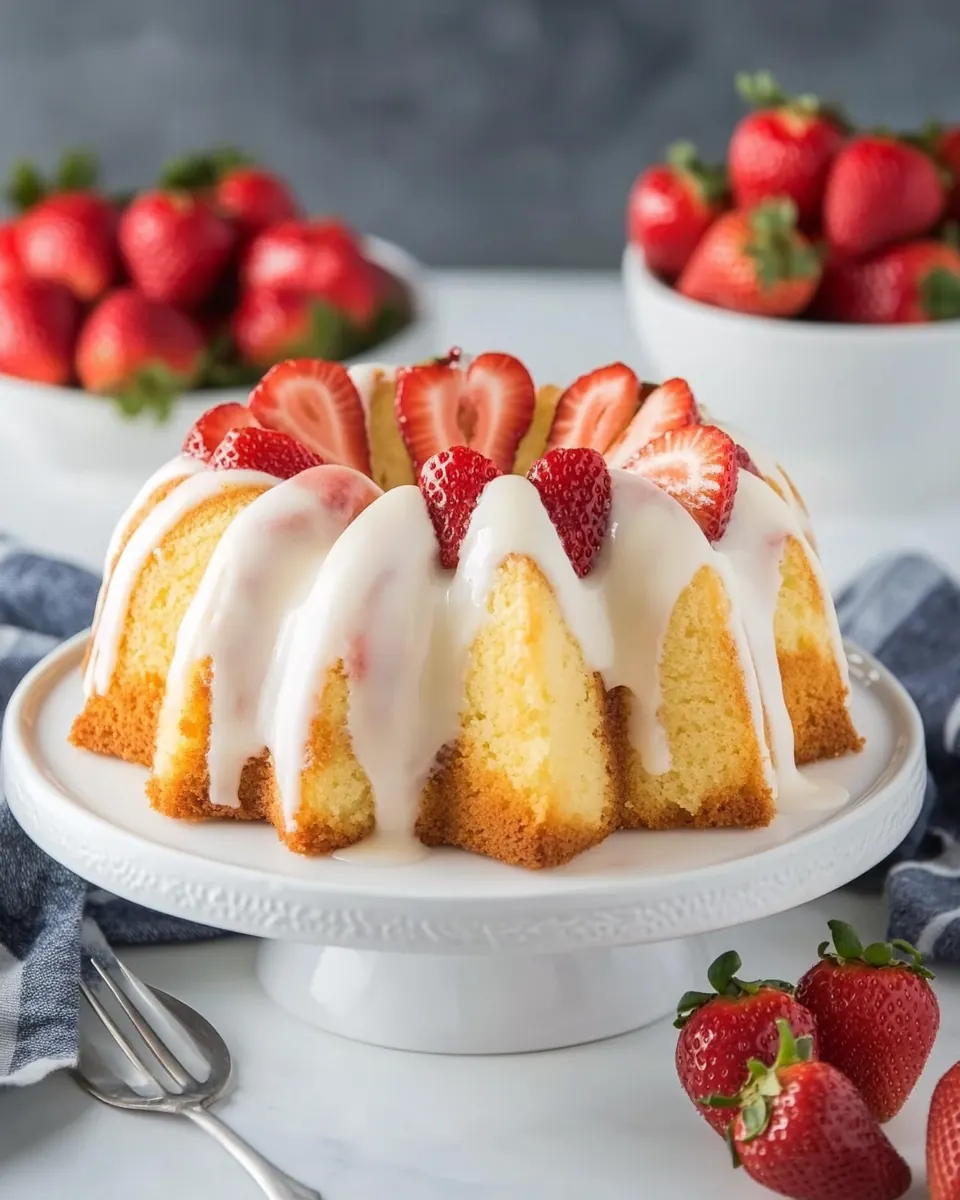
Marbled Strawberry Bundt Cake
Marbled Strawberry Bundt Cake has been my go to when I want a showstopper with a soft, tender crumb and a ribbon of bright strawberry color running through it.
I remember the first time I made this cake for a friend who was celebrating a new job. I mixed the batter late into the evening, humming along to a playlist, and when I pulled the pan from the oven the entire kitchen smelled of warm, buttery butter and a faint roasted fruit aroma from the Roasted Strawberry Purée. We sliced through it slowly, each forkful offering a contrast between the pale vanilla swirls and the rosy strawberry pockets. My friend kept saying it tasted homemade and elegant at once.
Another moment that sticks with me happened on a breezy spring afternoon. I brought the cake to a small tea, and the garnish of fresh strawberries made everyone smile before the first bite. People often ask how the marbling stays defined without becoming one muddy tone, and it comes down to gentle folding and the right balance of batters, which I learned by trial and error. That patience is what makes this cake memorable.
Recipe Snapshot
1 hr 28 mins
30 mins
58 mins
Medium
420 kcal
American
Gluten-Free, Low FODMAP
Desserts
Stand mixer, Paddle attachment, 10 cup Bundt pan, Pastry bags, Wire rack
Why This Marbled Strawberry Bundt Cake Works
It looks stunning without being complicated
I love that Marbled Strawberry Bundt Cake makes a big visual impact while the techniques are approachable. You do not need advanced piping skills, just two batters and a little patience, and you end up with a cake that looks bakery level.
Texture is everything
What keeps me coming back to this recipe is the tender crumb created by creaming the butter and granulated sugar until light and airy, then folding in the dry ingredients with care. The result is a cake that is soft yet structured enough to hold the marbled pattern when sliced.
Fresh strawberry flavor that sings
Using Roasted Strawberry Purée gives real depth to the strawberry swirl, not just artificial sweetness. Roasting concentrates the fruit flavor and adds a subtle caramelized note that separates this cake from ordinary strawberry batters.
Versatile for occasions
I serve this at brunches, birthdays, and casual get togethers because it feels celebratory but not fussy. The garnish of fresh strawberries and a simple Buttermilk Glaze keeps it approachable while enhancing each slice.
Make ahead friendly
One practical reason I adore this cake is that it holds up well when stored, making it a reliable choice for planning ahead. With simple refrigeration and a short return to room temperature before serving, the cake keeps its texture and flavor beautifully.
What’s In This Marbled Strawberry Bundt Cake
These ingredients are chosen to create a fine crumb, bright strawberry ribbons, and a glossy finish. The balance of cake flour, leavening, and butter gives tenderness while the Roasted Strawberry Purée provides concentrated fruit flavor. The buttermilk adds tang and moisture so the cake stays soft rather than dry. Each component plays a clear role in structure, flavor, or finish.
- 1 cup plus 2 tablespoons (255 grams) unsalted butter, softened: Creamed with sugar to provide rich fat, moisture, and structure while delivering a tender crumb and golden crust when softened and beaten.
- 1 cup (333 grams) granulated sugar: Sweetens the batter, helps with creaming to incorporate air for structure, and balances flavor while promoting browning during baking.
- 4 large eggs (200 grams), room temperature: Beaten in to add lift, richness, and structure; eggs also emulsify fats and liquids to create a stable, tender crumb.
- 2 teaspoons (8 grams) vanilla extract: Added for aromatic depth and to enhance overall flavor, contributing a warm sweet note that complements the strawberries and butter.
- 2 1/4 cups (281 grams) unbleached cake flour*, divided, plus more for dusting: Sifted and measured carefully to form the cake’s primary structure; divided use allows control of texture and density throughout the batter.
- 1/2 teaspoon (2.5 grams) baking powder, divided: Leavened in small portions to provide a gentle rise and lightness; divided use helps balance lift across the batter for even crumb.
- 1/2 teaspoon kosher salt, divided: Seasoned into the batter in portions to enhance overall flavor and balance sweetness while strengthening the dough’s structure.
- 6 tablespoons (90 grams) whole buttermilk, room temperature: Folded into the batter to add tenderness and slight tang, helping achieve a moist, delicate crumb with balanced acidity.
- 1 cup (160 grams) Roasted Strawberry Purée (recipe follows): Swirled or layered to impart concentrated roasted strawberry flavor and natural fruit moisture, creating marbled color and aroma.
- 6 to 7 drops red liquid food coloring: Tinted into the strawberry portion to intensify the pink-red marbling for visual impact without altering flavor significantly.
- Buttermilk Glaze (recipe follows): Poured over the cooled cake to add a sweet, tangy finish that complements the strawberry notes and enhances moistness and sheen.
- Garnish: fresh strawberries: Placed as a fresh, bright garnish to reinforce strawberry flavor, add visual appeal, and provide a fresh-texture contrast to the cake.
Marbled Strawberry Bundt Cake Instructions
Below are the steps adapted from the original directions, rewritten as detailed, sensory, and practical guidance. Read each carefully so you know what to look for at every stage; the small details make a big difference in the final texture and appearance.
- Preheat oven to 325°F (170°C).: The warm smell of the oven coming to temperature feels like the first note of a recipe. A correctly preheated oven ensures even rise and consistent bake, preventing a sunken center. A common mistake is skipping preheating, which causes uneven texture. Make sure the oven racks are centered for balanced airflow, and avoid opening the door during the early minutes when the structure is setting.
- In the bowl of a stand mixer fitted with the paddle attachment, beat butter and sugar at medium speed until light and fluffy, about 5 minutes, stopping to scrape sides of bowl. Add eggs, one at a time, beating well after each addition. Beat in vanilla. (Mixture may look slightly broken, but batter will come together.) Transfer half of butter mixture (about 402 grams) to a medium bowl.: You will notice the mixture turn pale and airy as butter and granulated sugar aerate, a soft, slightly grainy scent giving way to a smooth creaminess. When you add eggs one at a time, the batter becomes glossy and cohesive, the paddle leaving ribbons as it lifts. If the mixture looks slightly broken, that is okay, the batter will come together when the dry ingredients and liquids are folded in. A typical slip is rushing the creaming, producing a denser cake. Scrape the bowl often so all ingredients are evenly incorporated and weigh out the half portion accurately when separating for two batters.
- In a small bowl, whisk together 1 1/4 cups (156 grams) flour, 1/4 teaspoon (1.25 grams) baking powder, and 1/4 teaspoon salt. Fold flour mixture into half of butter mixture alternately with buttermilk, beginning and ending with flour mixture, folding just until combined. Set aside.: As you whisk, you get a faint floury aroma that quiets the sweetness, and folding preserves the air you trapped earlier. Alternate additions of the dry mix and buttermilk so the batter stays smooth and uniform, preventing lumps. The texture should become dense but soft, like thick velvet. Overmixing will develop gluten and make the crumb tough, so fold until streaks disappear. A common error is pouring everything at once, which can form lumps and uneven pockets.
- In another small bowl, whisk together remaining 1 cup (125 grams) flour, remaining 1/4 teaspoon (1.25 grams) baking powder, and remaining 1/4 teaspoon salt. In another small bowl, stir together Roasted Strawberry Purée and food coloring. Fold flour mixture into remaining butter mixture alternately with strawberry mixture, beginning and ending with flour mixture, folding just until combined.: The strawberry batter takes on a fragrant, roasted fruit scent and a glossy, rosy hue after adding Roasted Strawberry Purée and drops of red liquid food coloring . As you fold, watch for even color without overworking the batter. The strawberry batter will be slightly more tender in appearance due to the purée. Avoid vigorous mixing which can break down the purée and release extra liquid, thinning the batter. If it seems too loose, pause and check measurements; maintaining proportion is key.
- Spray a 10-cup Bundt pan with cooking spray. Using a pastry brush, spread any excess spray evenly in pan, blotting brush with a paper towel as needed, and lightly flour pan, tapping any excess out to make a very thin layer.: Greasing and flouring the pan properly gives a clean release and preserves the decorative ridges of a Bundt. When you brush the spray, you can feel the surface become glossy and slightly slick; dusting with a light film of flour creates a protective barrier. Too much flour creates lumps that mar the exterior, and too little oil can cause sticking. Be gentle when tapping to remove excess flour so the coating is even and thin.
- Spoon plain and strawberry batters into separate large pastry bags; cut a 1/2-inch opening in tips. Pipe random small and medium dollops of batter in a ring in bottom of prepared pan. Repeat procedure, piping strawberry batter on top of vanilla batter and vanilla batter on top of strawberry batter to create a checkerboard-like pattern until all of batter is used up. Using a butter knife, swirl batters using a figure-8 motion, being careful not to touch bottom and sides of pan. Firmly tap pan on a kitchen towel-lined counter several times to settle batters and release any air bubbles.: The act of piping creates a playful pattern, and as the batters nestle together you can almost hear the soft plops as each dollop lands. Swirling with a butter knife in a figure eight gives a natural marbled effect without overblending. If you touch the pan sides or bottom, you risk scraping the nonstick coating and losing the clean pattern. Tapping the pan helps bubbles rise and escape, which prevents large holes in the bake. A frequent misstep is over swirling which muddles distinct colors, so keep motions light and precise.
- Bake until a wooden pick inserted in center comes out clean, 52 to 58 minutes, rotating pan halfway through baking and loosely covering with foil during final 5 to 6 minutes of baking to prevent excess browning. Let cool in pan for 10 minutes. Invert cake onto a wire rack, and let cool completely.: As the cake bakes, the kitchen fills with warm notes of butter and roasted berry, and the top develops a pale golden edge. Rotating the pan halfway ensures even browning. The wooden pick test is more reliable than time alone because ovens vary; it should come out mostly clean with a few moist crumbs. Tent with foil near the end to avoid over coloring. Cooling in the pan for 10 minutes allows the structure to set, and inverting onto a rack prevents sogginess from trapped steam. Removing too early can break the cake, while leaving it too long may cause sticking.
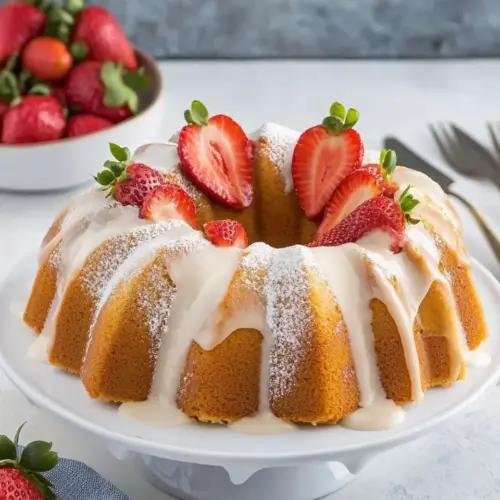
- Transfer cooled cake to a serving plate, and spoon Buttermilk Glaze on top. Garnish with strawberries, if desired. Refrigerate in an airtight container for up to 5 days; let come to room temperature before serving.: Glazing adds a glossy, tangy finish that contrasts the sweet crumb. The cold glaze will set slightly on a cool cake, creating a lovely sheen while seeping into the cut surfaces for added moisture. Fresh strawberries lend a bright note and texture contrast. When storing, refrigeration keeps the cake safe and preserves freshness, but bring slices to room temperature before serving so the crumb regains its softness. A common error is glazing a warm cake which causes the glaze to run off and thin excessively.
Ways to Adapt This Recipe
This cake is forgiving and versatile, so small adjustments let you customize flavor, color, or presentation without changing technique. Below are practical ideas to adapt it while keeping the same excellent texture and structure you expect from Marbled Strawberry Bundt Cake.
- Use frozen roasted strawberries by thawing and straining excess liquid, this concentrates flavor and is great when fresh berries are out of season.
- Adjust sweetness of glaze by increasing or decreasing powdered sugar to taste, balancing the tartness of the buttermilk for a personalized finish.
- Swap cake flour with all purpose plus cornstarch by removing two tablespoons of all purpose flour per cup and adding the same amount of cornstarch, mimicking cake flour for tender crumb.
- Make mini Bundts by dividing batter among multiple mini pans and reducing bake time, yielding elegant individual servings for events.
- Add texture with a sprinkle of finely chopped toasted nuts on top of the glaze for crunch and a nutty contrast to the soft cake.
What to Serve Alongside Marbled Strawberry Bundt Cake
This cake shines on its own, but pairing it thoughtfully elevates the experience. Consider beverages, light accompaniments, and serving styles that complement the sweet tang of strawberry and buttery crumb. Below are ideas and practical serving tips for several occasions.
- Brunch pairing: Serve slices with a pot of freshly brewed tea or coffee and a small bowl of mixed berries to echo the strawberry notes.
- Afternoon tea: Present thin slices on a tiered tray alongside delicate finger sandwiches and lemon curd for a refined spread.
- Celebration dessert: Top with a handful of sliced strawberries and a dusting of powdered sugar, pairing with a light fruit salad for balance.
- Casual gathering: Offer the cake on a platter with small dessert plates and forks, letting guests help themselves, and keep extra glaze on the side.
- Storage for later: Wrap tightly and refrigerate in an airtight container for up to 5 days; allow to come to room temperature before serving to restore softness.
- Seasonal serving: In spring, pair with fresh citrus segments or a mint garnish to brighten flavors and reflect seasonal produce.
FAQ
Conclusion
This cake stands out for its combination of tender, buttery crumb and bright, roasted strawberry ribbons that create both visual appeal and layered flavor. I encourage you to try making the Marbled Strawberry Bundt Cake, it rewards a little patience with a beautiful result and comforting texture. Share it with friends, or keep a slice for a quiet afternoon treat, and enjoy how the roasted purée and buttermilk glaze elevate a classic Bundt into something special.
Marbled Strawberry Bundt Cake
Equipment
- Stand mixer
- Paddle attachment
- 10 cup Bundt pan
- Pastry bags
- Wire Rack
Ingredients
- 1 cup plus 2 tablespoons (255 grams) unsalted butter, softened Creamed with sugar to provide rich fat, moisture, and structure while delivering a tender crumb and golden crust when softened and beaten.
- 1 cup (333 grams) granulated sugar Sweetens the batter, helps with creaming to incorporate air for structure, and balances flavor while promoting browning during baking.
- 4 large eggs (200 grams), room temperature Beaten in to add lift, richness, and structure; eggs also emulsify fats and liquids to create a stable, tender crumb.
- 2 teaspoons (8 grams) vanilla extract Added for aromatic depth and to enhance overall flavor, contributing a warm sweet note that complements the strawberries and butter.
- 2 1/4 cups (281 grams) unbleached cake flour*, divided, plus more for dusting Sifted and measured carefully to form the cake’s primary structure; divided use allows control of texture and density throughout the batter.
- 1/2 teaspoon (2.5 grams) baking powder, divided Leavened in small portions to provide a gentle rise and lightness; divided use helps balance lift across the batter for even crumb.
- 1/2 teaspoon kosher salt, divided Seasoned into the batter in portions to enhance overall flavor and balance sweetness while strengthening the dough’s structure.
- 6 tablespoons (90 grams) whole buttermilk, room temperature Folded into the batter to add tenderness and slight tang, helping achieve a moist, delicate crumb with balanced acidity.
- 1 cup (160 grams) Roasted Strawberry Purée (recipe follows) Swirled or layered to impart concentrated roasted strawberry flavor and natural fruit moisture, creating marbled color and aroma.
- 6 to 7 drops red liquid food coloring Tinted into the strawberry portion to intensify the pink-red marbling for visual impact without altering flavor significantly.
- Buttermilk Glaze (recipe follows) Poured over the cooled cake to add a sweet, tangy finish that complements the strawberry notes and enhances moistness and sheen.
- Garnish: fresh strawberries Placed as a fresh, bright garnish to reinforce strawberry flavor, add visual appeal, and provide a fresh-texture contrast to the cake.
Instructions
- Preheat oven to 325°F (170°C).: The warm smell of the oven coming to temperature feels like the first note of a recipe. A correctly preheated oven ensures even rise and consistent bake, preventing a sunken center. A common mistake is skipping preheating, which causes uneven texture. Make sure the oven racks are centered for balanced airflow, and avoid opening the door during the early minutes when the structure is setting.
- In the bowl of a stand mixer fitted with the paddle attachment, beat butter and sugar at medium speed until light and fluffy, about 5 minutes, stopping to scrape sides of bowl. Add eggs, one at a time, beating well after each addition. Beat in vanilla. (Mixture may look slightly broken, but batter will come together.) Transfer half of butter mixture (about 402 grams) to a medium bowl.: You will notice the mixture turn pale and airy as butter and granulated sugar aerate, a soft, slightly grainy scent giving way to a smooth creaminess. When you add eggs one at a time, the batter becomes glossy and cohesive, the paddle leaving ribbons as it lifts. If the mixture looks slightly broken, that is okay, the batter will come together when the dry ingredients and liquids are folded in. A typical slip is rushing the creaming, producing a denser cake. Scrape the bowl often so all ingredients are evenly incorporated and weigh out the half portion accurately when separating for two batters.
- In a small bowl, whisk together 1 1/4 cups (156 grams) flour, 1/4 teaspoon (1.25 grams) baking powder, and 1/4 teaspoon salt. Fold flour mixture into half of butter mixture alternately with buttermilk, beginning and ending with flour mixture, folding just until combined. Set aside.: As you whisk, you get a faint floury aroma that quiets the sweetness, and folding preserves the air you trapped earlier. Alternate additions of the dry mix and buttermilk so the batter stays smooth and uniform, preventing lumps. The texture should become dense but soft, like thick velvet. Overmixing will develop gluten and make the crumb tough, so fold until streaks disappear. A common error is pouring everything at once, which can form lumps and uneven pockets.
- In another small bowl, whisk together remaining 1 cup (125 grams) flour, remaining 1/4 teaspoon (1.25 grams) baking powder, and remaining 1/4 teaspoon salt. In another small bowl, stir together Roasted Strawberry Purée and food coloring. Fold flour mixture into remaining butter mixture alternately with strawberry mixture, beginning and ending with flour mixture, folding just until combined.: The strawberry batter takes on a fragrant, roasted fruit scent and a glossy, rosy hue after adding Roasted Strawberry Purée and drops of red liquid food coloring . As you fold, watch for even color without overworking the batter. The strawberry batter will be slightly more tender in appearance due to the purée. Avoid vigorous mixing which can break down the purée and release extra liquid, thinning the batter. If it seems too loose, pause and check measurements; maintaining proportion is key.
- Spray a 10-cup Bundt pan with cooking spray. Using a pastry brush, spread any excess spray evenly in pan, blotting brush with a paper towel as needed, and lightly flour pan, tapping any excess out to make a very thin layer.: Greasing and flouring the pan properly gives a clean release and preserves the decorative ridges of a Bundt. When you brush the spray, you can feel the surface become glossy and slightly slick; dusting with a light film of flour creates a protective barrier. Too much flour creates lumps that mar the exterior, and too little oil can cause sticking. Be gentle when tapping to remove excess flour so the coating is even and thin.
- Spoon plain and strawberry batters into separate large pastry bags; cut a 1/2-inch opening in tips. Pipe random small and medium dollops of batter in a ring in bottom of prepared pan. Repeat procedure, piping strawberry batter on top of vanilla batter and vanilla batter on top of strawberry batter to create a checkerboard-like pattern until all of batter is used up. Using a butter knife, swirl batters using a figure-8 motion, being careful not to touch bottom and sides of pan. Firmly tap pan on a kitchen towel-lined counter several times to settle batters and release any air bubbles.: The act of piping creates a playful pattern, and as the batters nestle together you can almost hear the soft plops as each dollop lands. Swirling with a butter knife in a figure eight gives a natural marbled effect without overblending. If you touch the pan sides or bottom, you risk scraping the nonstick coating and losing the clean pattern. Tapping the pan helps bubbles rise and escape, which prevents large holes in the bake. A frequent misstep is over swirling which muddles distinct colors, so keep motions light and precise.
- Bake until a wooden pick inserted in center comes out clean, 52 to 58 minutes, rotating pan halfway through baking and loosely covering with foil during final 5 to 6 minutes of baking to prevent excess browning. Let cool in pan for 10 minutes. Invert cake onto a wire rack, and let cool completely.: As the cake bakes, the kitchen fills with warm notes of butter and roasted berry, and the top develops a pale golden edge. Rotating the pan halfway ensures even browning. The wooden pick test is more reliable than time alone because ovens vary; it should come out mostly clean with a few moist crumbs. Tent with foil near the end to avoid over coloring. Cooling in the pan for 10 minutes allows the structure to set, and inverting onto a rack prevents sogginess from trapped steam. Removing too early can break the cake, while leaving it too long may cause sticking.
- Transfer cooled cake to a serving plate, and spoon Buttermilk Glaze on top. Garnish with strawberries, if desired. Refrigerate in an airtight container for up to 5 days; let come to room temperature before serving.: Glazing adds a glossy, tangy finish that contrasts the sweet crumb. The cold glaze will set slightly on a cool cake, creating a lovely sheen while seeping into the cut surfaces for added moisture. Fresh strawberries lend a bright note and texture contrast. When storing, refrigeration keeps the cake safe and preserves freshness, but bring slices to room temperature before serving so the crumb regains its softness. A common error is glazing a warm cake which causes the glaze to run off and thin excessively.
Notes
- Use frozen roasted strawberries by thawing and straining excess liquid, this concentrates flavor and is great when fresh berries are out of season.
- Adjust sweetness of glaze by increasing or decreasing powdered sugar to taste, balancing the tartness of the buttermilk for a personalized finish.
- Swap cake flour with all purpose plus cornstarch by removing two tablespoons of all purpose flour per cup and adding the same amount of cornstarch, mimicking cake flour for tender crumb.
- Make mini Bundts by dividing batter among multiple mini pans and reducing bake time, yielding elegant individual servings for events.
- Add texture with a sprinkle of finely chopped toasted nuts on top of the glaze for crunch and a nutty contrast to the soft cake.