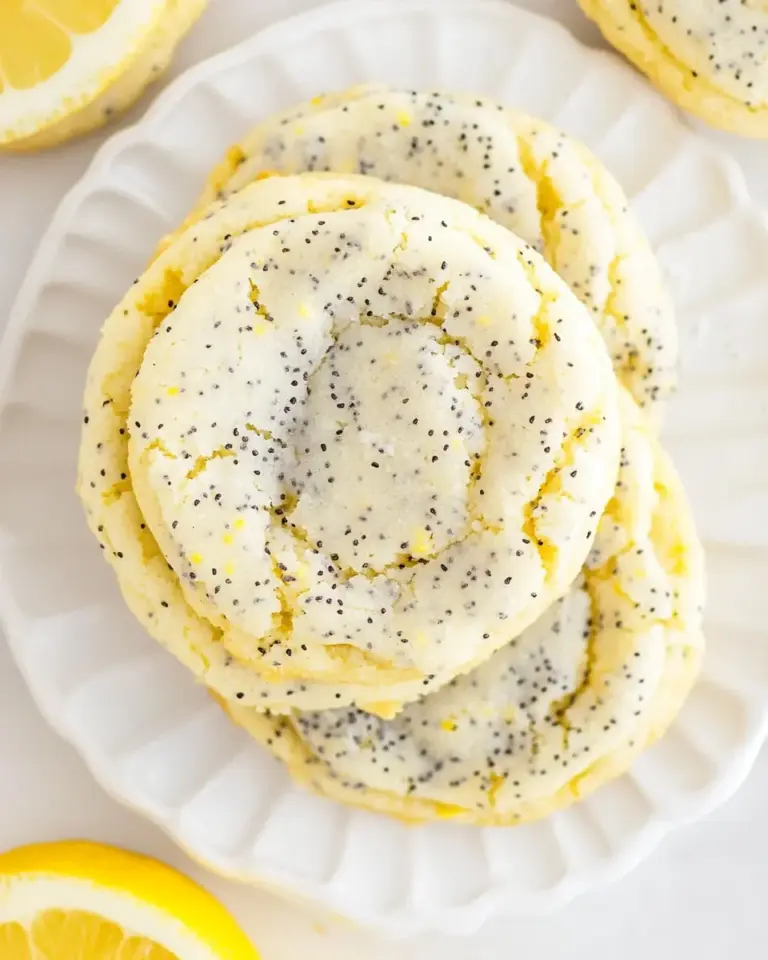
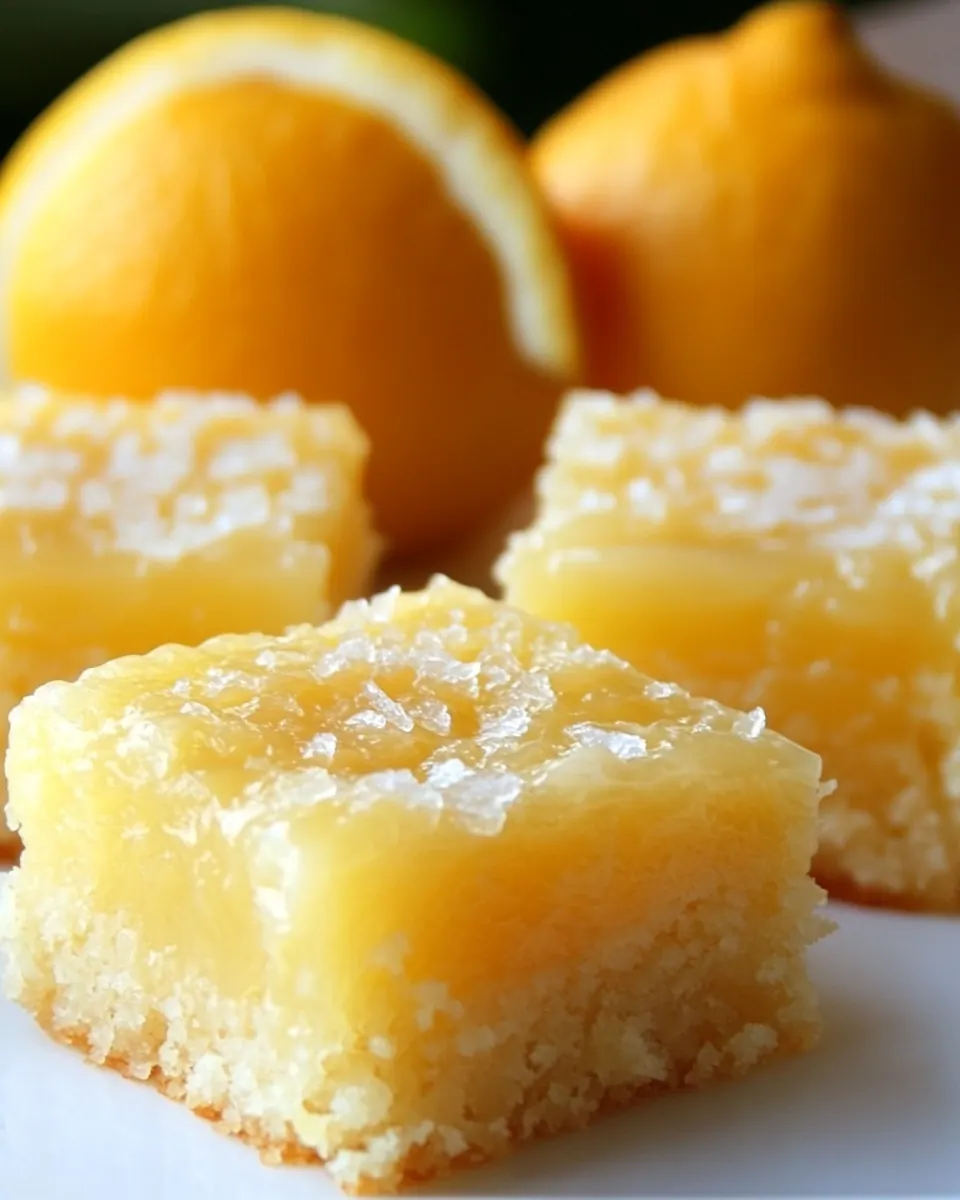
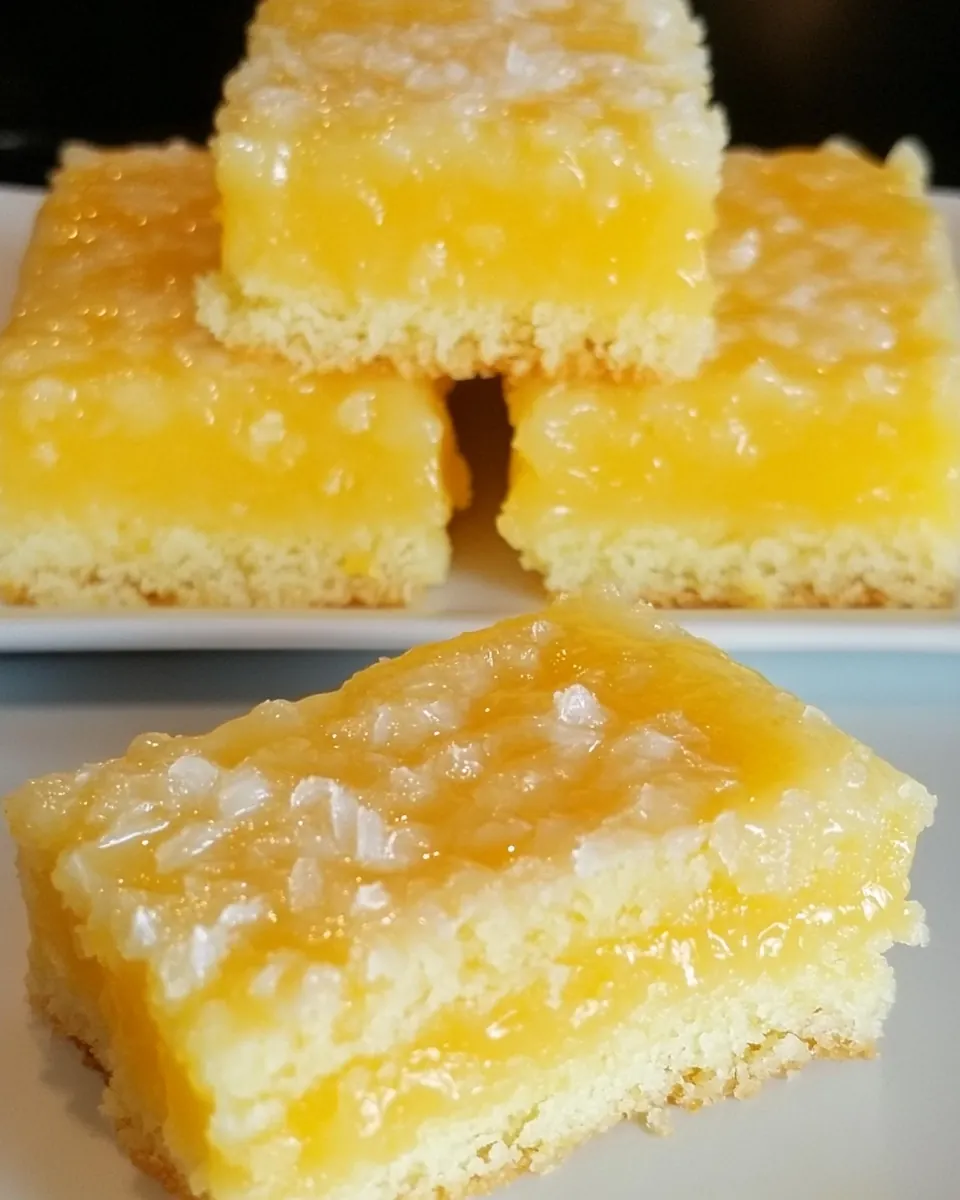
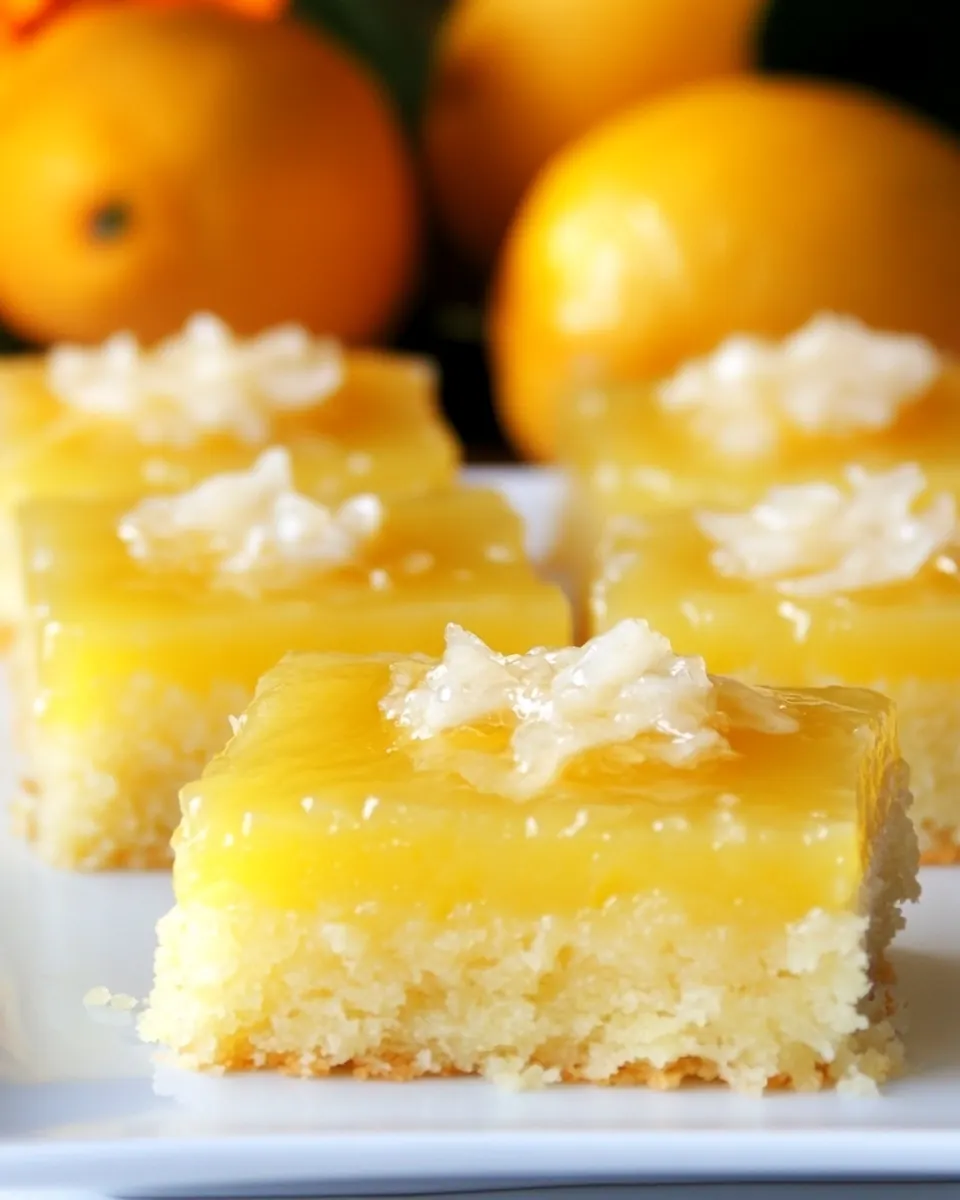
Meyer Lemon Cake Bars
Meyer Lemon Cake Bars are the kind of dessert I reach for when I want something bright, comforting, and a little bit nostalgic. The very first time I tasted these, I was sitting at my grandmother’s sunroom table, watching late afternoon light pool on the floor as the tart, floral citrus cut through a rich, buttery crumb. That memory has followed me into my own kitchen, and every time I make Meyer Lemon Cake Bars I think about that gentle sunshine and simple conversation.
There is a familiar rhythm to making them, which is partly why they feel like home. I start by creaming butter and sugar, and the aroma is instantly cozy, like a warm bakery corner. Mixing in the eggs and the fragrant Meyer lemon zest lifts the batter into something lively, a contrast between richness and bright acidity that makes the bars sing. I love that they are both elegant enough for guests and easy enough for a restless weeknight baking session.
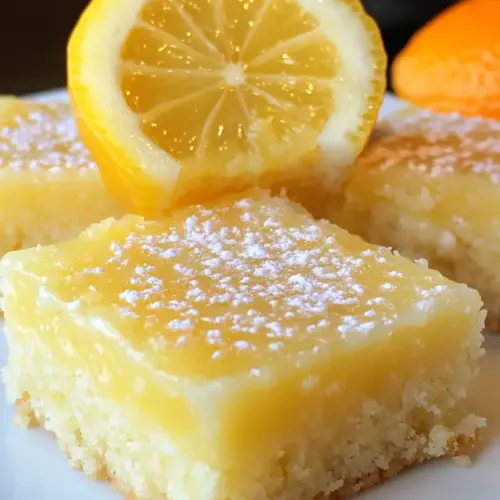
What I also adore about Meyer Lemon Cake Bars is how forgiving they are. Even if you rush a little on cooling, or overwork the batter just slightly, the final result is still tender and satisfying. When the glaze of powdered sugar and extra Meyer lemon juice is poured over the warm cake squares, the room fills with a floral lemon perfume that always prompts compliments. Serve them with tea, coffee, or simply on their own, and watch everyone smile.
Recipe Snapshot
50 mins
20 mins
30 mins
Medium
200 kcal
American
Gluten-Free, Low FODMAP
Desserts
9 x 9 baking pan, Stand mixer or mixing bowl, Spatula, Whisk, Sifter
The Magic of This Meyer Lemon Cake Bars
Bright citrus flavor that stands out
I adore how Meyer Lemon Cake Bars balance sweetness and tartness. The Meyer lemon zest gives a floral, almost perfume like note that ordinary lemons do not. I find that this brightness keeps the dessert from feeling too heavy, so you can enjoy a square without feeling weighed down. When I offer these to guests, they often remark on the distinct aroma before they even taste them.
Buttery, tender crumb
The use of room temperature butter creamed with sugar creates a light, airy texture that every bite benefits from. I appreciate how easy it is to achieve a tender crumb without fancy techniques. When I bake these, I watch for a faint golden edge and a set center, cues I trust more than a timer alone. That buttery backbone makes these bars comforting and craveable.
Simple, approachable method
I love sharing recipes that are achievable for beginners, and these bars fit the bill. The steps are straightforward, and there is little that can go drastically wrong if you follow the basic sequence. For busy afternoons when I want something homemade fast, I know I can pull these together and still produce a dessert that looks and tastes impressive.
Versatile for gatherings
These bars are perfect for casual coffees, brunch, or springtime gatherings. I often bring them to potlucks because they travel well and slice neatly into squares. I find that the glaze helps keep each piece moist, and it also makes the bars feel special without much extra work.
Fresh ingredients make a difference
Using fresh eggs, real butter, and live Meyer lemon juice and zest transforms a simple cake into something remarkable. I always tell friends that the quality of those few ingredients is what turns a recipe from ordinary to memorable. When I take a bite, I can taste that attention to detail.
Essential Ingredients for Meyer Lemon Cake Bars
These ingredients form a concise, harmonious lineup. The batter relies on simple pantry staples to build structure and richness, while the lemons provide lift and aromatic charm. The key players are the butter for tenderness, the sugar for sweetness and aeration, the eggs for structure, and the Meyer lemon components for bright, floral acidity. Together they produce a bar that is buttery, tender, and lively.
- 1 cup 2 sticks unsalted butter (room temperature): Cream until light and fluffy to create the cake's tender, moist base and help incorporate air for lift.
- 1 1/2 cups sugar: Sweeten and tenderize the batter while aiding in browning and providing structure when creamed with butter.
- 4 eggs: Bind ingredients, add moisture, and help create structure and richness through protein coagulation during baking.
- 1 tablespoon Meyer lemon juice: Brighten flavor with a concentrated citrus tang and enhance the lemon character throughout the cake layers.
- 2 teaspoons Meyer lemon zest (about one medium lemon): Provide intense citrus aroma and flavor oil to intensify lemon notes and balance sweetness in the bars.
- 1 1/2 cup all-purpose flour: Structure the batter by supplying gluten and starch, yielding the crumb and bulk of the finished bars.
- 1/2 teaspoon baking powder: Leaven slightly to add a gentle rise and lightness, working with beaten eggs for crumb texture.
- 1/8 teaspoon baking soda: React with acidic components to provide additional lift and a finer crumb without an overt chemical taste.
- 1/2 teaspoons salt: Enhance overall flavor by balancing sweetness and intensifying other tastes while stabilizing dough chemistry.
- 1 cup powdered sugar: Dust over finished bars to add a delicate sweetness, a light decorative finish, and slight textural contrast.
- 2 tablespoons fresh Meyer lemon juice: Introduce a bright, fresh citrus punch to the glaze or topping, cutting sweetness and elevating flavor.
- 2 teaspoons Meyer lemon zest (another medium lemon): Add a concentrated citrus aroma and bold lemon oil to the finishing glaze, boosting fragrance and taste.
The Method for Meyer Lemon Cake Bars
The method is straightforward and paced, designed to produce a tender cake with a vibrant lemon finish. I like to follow the steps in order, paying attention to visual and textural cues rather than racing the clock. Below, I expand each direction with sensory notes, reasons why the technique matters, and common pitfalls to avoid so your results are consistent and delightful.
- Preheat oven to 350 degrees Fahrenheit. Butter a 9" x 9" baking pan and set aside.: When the oven reaches 350 degrees Fahrenheit , the heat gives immediate lift to the batter, creating gentle oven spring and a fine crumb. As you preheat, you can hear the oven click and the rack warm, and that steady hum indicates readiness. Buttering the pan ensures the bars will release cleanly, leaving those golden edges intact. A key reason for preheating is to set the structure early, which prevents dense or uneven baking. Common mistake, not preheating long enough, results in under risen or gummy centers.
- In a large mixing bowl or in the bowl of a stand mixer affixed with the paddle attachment, beat together the butter and sugar on medium speed until fluffy, about two minutes.: You will notice the butter lighten in color and sugar crystals begin to dissolve, creating a pillowy texture. The creaming traps small air bubbles that help the bars rise and become tender. The sound is a steady mechanical whir, and visually the mixture changes from firm to soft and spreadable. This stage matters because it determines the crumb structure, and skipping it yields denser bars. Troubleshooting tip, if your butter is too cold, it will not cream properly; if too warm, it will be greasy and collapse while baking.
- Add the eggs, one at a time, beating well after each addition.: As each egg is incorporated, the batter becomes smoother and more cohesive, and you may hear a lighter mixing sound as it emulsifies. The eggs contribute protein which sets during baking to provide stability, while their yolks enrich the flavor. Adding them one at a time prevents curdling and ensures even distribution. Why it matters, proper incorporation avoids a separated batter that can produce uneven texture. Common pitfall, adding all the eggs at once especially if cold, can create a curdled mixture which is harder to fix.
- Add the lemon juice and lemon zest and beat on low just until combined.: When the Meyer lemon juice and Meyer lemon zest join the batter, the aroma changes immediately, releasing floral and bright citrus oils. I lower the mixer to avoid over aerating and to preserve the delicate lemon oils in the zest. This step builds that signature flavor, integrating acidity which balances the richness from the butter . A common mistake is overmixing at this point, which can knock out the air created earlier and make the crumb tight.
- In a medium bowl, sift together the flour, baking powder, baking soda and salt.: Sifting introduces air and eliminates lumps from the all-purpose flour and leaveners. You will see a light, powdery cloud as you sift, and the mixture should feel fine and even. This preparation is important so the dry ingredients blend evenly into the wet, ensuring uniform rise. If you skip sifting and the flour has compacted, you risk pockets of dry flour and inconsistent texture.
- Pour the flour mixture into the butter/sugar/lemon mixture and mix together until blended.: As you fold in the dry mix, the batter will thicken and become smoother, and you may hear a slower, heavier sound from the mixer. The all-purpose flour provides the frame that holds moisture and rise, while the leaveners activate in the warm oven. Mixing until just blended preserves the lightness created earlier; over mixing develops gluten, which causes toughness. One mistake to avoid is vigorous mixing which leads to a dense, chewy bar rather than tender.
- Spread mixture in the baking pan.: Use a spatula to press the batter evenly into the prepared 9 inch by 9 inch pan, smoothing the top so it bakes uniformly. You should see a glossy, even surface with no high peaks, and the batter should reach the pan corners. An even layer bakes consistently, guarding against edges overcooking while the center remains raw. A common misstep is leaving the batter piled in the center, which causes uneven browning and doneness.
- Bake for 30 minutes, until the cake bars begin to get golden brown around the edges, and are set in the middle.: During baking you will notice the kitchen filling with a sweet, citrus tinged aroma and the top turning a warm golden hue at the edges. The center should feel set to a gentle fingertip press and a toothpick inserted in the center should come out mostly clean with a few moist crumbs. This timing yields the ideal tender but fully cooked texture. If you underbake, the center will be gummy; if you overbake, the bars dry out and lose their tenderness.
- Cool for about 20 – 30 minutes.: Cooling allows the bars to firm up and makes slicing neater, and you will notice the smell concentrating as steam decreases. During this period the crumb settles and the glaze will adhere better when added. Patience here ensures clean slices and a pleasant mouthfeel, whereas cutting too soon leads to a sticky mess. A typical error is rushing this step and attempting to glaze while the cake is too warm, which causes the glaze to run off.
- Make the glaze. Whisk together the powdered sugar, lemon juice and lemon zest.: When you whisk powdered sugar with extra Meyer lemon juice and zest , the mixture becomes glossy and fragrant. The sugar dissolves into a smooth, pourable glaze that carries bright citrus notes. This glaze balances the sweetness and adds a shiny finish that signals freshness. Troubleshooting, if the glaze is too thin add more powdered sugar , if too thick add a drop more lemon juice .
- Drizzle glaze over the top of the cake bars.: As the glaze hits the warm but cooled surface, it sets into a satin sheen and releases a burst of fragrance. Use a spoon or a small whisk to create thin ribbons of glaze that form delicate lines across the top. This final flourish enhances both taste and appearance, contributing a tangy counterpoint to the buttery base. Avoid soaking the bars with too much glaze, which makes them overly sweet and soggy.
- Cut into squares and serve.: After the glaze has set slightly, use a sharp knife to cut into even squares, wiping the blade between cuts for clean edges. The bars should present a tender, pale crumb with a glossy top and a subtle golden rim. Serving them at room temperature ensures the flavors are balanced and the texture is soft but stable. A common mistake is cutting while the bars are too warm, producing ragged slices and a sticky presentation.
Helpful Hints
These hints collect practical notes I use every time I make these bars. They cover technique, ingredient handling, and small adjustments that improve consistency. Read them before you start so that you bake with confidence.
- Room temperature ingredients: Bring butter and eggs to room temperature so they incorporate smoothly and the batter emulsifies properly.
- Fresh Meyer lemons: Use freshly zested and juiced Meyer lemons for the most aromatic, floral citrus impact in both batter and glaze.
- Pan preparation: Butter the 9 inch by 9 inch pan thoroughly and consider lining with parchment for the easiest removal and cleanest edges.
- Watch the edges: Check the bars at the 25 minute mark for golden edges and set center, oven temperatures vary and visual cues prevent overbaking.
- Glaze consistency: Aim for a glaze that is pourable but not watery; adjust with more powdered sugar or a touch more Meyer lemon juice as needed.
Serving Suggestions
These Meyer Lemon Cake Bars are versatile and bright, great for many occasions. I often serve them at casual gatherings, brunches, or as a light dessert after a rich meal. They pair well with warm beverages and are easy to pack for picnics. Below are detailed serving ideas, storage tips, and pairing suggestions to make the most of these bars.
- Brunch centerpiece: Arrange squares on a large platter alongside fresh fruit and small pastries for a spring brunch, they complement soft cheeses and mild pastries well.
- Tea time: Serve with hot tea or coffee, the citrus cuts through the warmth of the beverages and refreshes the palate between sips.
- Potluck friendly: These bars travel well, so bring them to gatherings; slice into neat squares and place on a simple tray for easy serving.
- Seasonal pairing: Highlight their spring notes by pairing with light floral garnishes or edible flowers for a special occasion presentation.
- Storage tips: Store in an airtight container at room temperature for up to two days, or refrigerate up to five days. For longer storage, freeze wrapped squares for up to one month, thawing overnight in the fridge.
- Occasions: Great for casual lunches, afternoon tea, springtime celebrations, or a sweet reminder during Ramadan evenings when something citrus and light is appreciated.
- Presentation: Dust with extra powdered sugar or finish with a hint of reserved Meyer lemon zest before serving for an elegant touch.
FAQ
Conclusion
These Meyer Lemon Cake Bars stand out because they pair a rich, buttery base with bright, floral citrus for a dessert that feels both homey and refined. The combination of creamed butter, eggs, and fresh Meyer lemon creates a tender crumb balanced by a glossy, tangy glaze. I encourage you to try them when you want a crowd pleasing dessert that is straightforward to prepare yet memorable in flavor. Make a batch on a lazy afternoon or bring them to your next gathering, and enjoy the way simple ingredients transform into something special.
Meyer Lemon Cake Bars
Equipment
- 9 x 9 baking pan
- Stand mixer or mixing bowl
- Spatula
- Whisk
- Sifter
Ingredients
- 1 cup 2 sticks unsalted butter (room temperature) Cream until light and fluffy to create the cake's tender, moist base and help incorporate air for lift.
- 1 1/2 cups sugar Sweeten and tenderize the batter while aiding in browning and providing structure when creamed with butter.
- 4 eggs Bind ingredients, add moisture, and help create structure and richness through protein coagulation during baking.
- 1 tablespoon Meyer lemon juice Brighten flavor with a concentrated citrus tang and enhance the lemon character throughout the cake layers.
- 2 teaspoons Meyer lemon zest (about one medium lemon) Provide intense citrus aroma and flavor oil to intensify lemon notes and balance sweetness in the bars.
- 1 1/2 cup all-purpose flour Structure the batter by supplying gluten and starch, yielding the crumb and bulk of the finished bars.
- 1/2 teaspoon baking powder Leaven slightly to add a gentle rise and lightness, working with beaten eggs for crumb texture.
- 1/8 teaspoon baking soda React with acidic components to provide additional lift and a finer crumb without an overt chemical taste.
- 1/2 teaspoons salt Enhance overall flavor by balancing sweetness and intensifying other tastes while stabilizing dough chemistry.
- 1 cup powdered sugar Dust over finished bars to add a delicate sweetness, a light decorative finish, and slight textural contrast.
- 2 tablespoons fresh Meyer lemon juice Introduce a bright, fresh citrus punch to the glaze or topping, cutting sweetness and elevating flavor.
- 2 teaspoons Meyer lemon zest (another medium lemon) Add a concentrated citrus aroma and bold lemon oil to the finishing glaze, boosting fragrance and taste.
Instructions
- Preheat oven to 350 degrees Fahrenheit. Butter a 9" x 9" baking pan and set aside.: When the oven reaches 350 degrees Fahrenheit , the heat gives immediate lift to the batter, creating gentle oven spring and a fine crumb. As you preheat, you can hear the oven click and the rack warm, and that steady hum indicates readiness. Buttering the pan ensures the bars will release cleanly, leaving those golden edges intact. A key reason for preheating is to set the structure early, which prevents dense or uneven baking. Common mistake, not preheating long enough, results in under risen or gummy centers.
- In a large mixing bowl or in the bowl of a stand mixer affixed with the paddle attachment, beat together the butter and sugar on medium speed until fluffy, about two minutes.: You will notice the butter lighten in color and sugar crystals begin to dissolve, creating a pillowy texture. The creaming traps small air bubbles that help the bars rise and become tender. The sound is a steady mechanical whir, and visually the mixture changes from firm to soft and spreadable. This stage matters because it determines the crumb structure, and skipping it yields denser bars. Troubleshooting tip, if your butter is too cold, it will not cream properly; if too warm, it will be greasy and collapse while baking.
- Add the eggs, one at a time, beating well after each addition.: As each egg is incorporated, the batter becomes smoother and more cohesive, and you may hear a lighter mixing sound as it emulsifies. The eggs contribute protein which sets during baking to provide stability, while their yolks enrich the flavor. Adding them one at a time prevents curdling and ensures even distribution. Why it matters, proper incorporation avoids a separated batter that can produce uneven texture. Common pitfall, adding all the eggs at once especially if cold, can create a curdled mixture which is harder to fix.
- Add the lemon juice and lemon zest and beat on low just until combined.: When the Meyer lemon juice and Meyer lemon zest join the batter, the aroma changes immediately, releasing floral and bright citrus oils. I lower the mixer to avoid over aerating and to preserve the delicate lemon oils in the zest. This step builds that signature flavor, integrating acidity which balances the richness from the butter . A common mistake is overmixing at this point, which can knock out the air created earlier and make the crumb tight.
- In a medium bowl, sift together the flour, baking powder, baking soda and salt.: Sifting introduces air and eliminates lumps from the all-purpose flour and leaveners. You will see a light, powdery cloud as you sift, and the mixture should feel fine and even. This preparation is important so the dry ingredients blend evenly into the wet, ensuring uniform rise. If you skip sifting and the flour has compacted, you risk pockets of dry flour and inconsistent texture.
- Pour the flour mixture into the butter/sugar/lemon mixture and mix together until blended.: As you fold in the dry mix, the batter will thicken and become smoother, and you may hear a slower, heavier sound from the mixer. The all-purpose flour provides the frame that holds moisture and rise, while the leaveners activate in the warm oven. Mixing until just blended preserves the lightness created earlier; over mixing develops gluten, which causes toughness. One mistake to avoid is vigorous mixing which leads to a dense, chewy bar rather than tender.
- Spread mixture in the baking pan.: Use a spatula to press the batter evenly into the prepared 9 inch by 9 inch pan, smoothing the top so it bakes uniformly. You should see a glossy, even surface with no high peaks, and the batter should reach the pan corners. An even layer bakes consistently, guarding against edges overcooking while the center remains raw. A common misstep is leaving the batter piled in the center, which causes uneven browning and doneness.
- Bake for 30 minutes, until the cake bars begin to get golden brown around the edges, and are set in the middle.: During baking you will notice the kitchen filling with a sweet, citrus tinged aroma and the top turning a warm golden hue at the edges. The center should feel set to a gentle fingertip press and a toothpick inserted in the center should come out mostly clean with a few moist crumbs. This timing yields the ideal tender but fully cooked texture. If you underbake, the center will be gummy; if you overbake, the bars dry out and lose their tenderness.
- Cool for about 20 - 30 minutes.: Cooling allows the bars to firm up and makes slicing neater, and you will notice the smell concentrating as steam decreases. During this period the crumb settles and the glaze will adhere better when added. Patience here ensures clean slices and a pleasant mouthfeel, whereas cutting too soon leads to a sticky mess. A typical error is rushing this step and attempting to glaze while the cake is too warm, which causes the glaze to run off.
- Make the glaze. Whisk together the powdered sugar, lemon juice and lemon zest.: When you whisk powdered sugar with extra Meyer lemon juice and zest , the mixture becomes glossy and fragrant. The sugar dissolves into a smooth, pourable glaze that carries bright citrus notes. This glaze balances the sweetness and adds a shiny finish that signals freshness. Troubleshooting, if the glaze is too thin add more powdered sugar , if too thick add a drop more lemon juice .
- Drizzle glaze over the top of the cake bars.: As the glaze hits the warm but cooled surface, it sets into a satin sheen and releases a burst of fragrance. Use a spoon or a small whisk to create thin ribbons of glaze that form delicate lines across the top. This final flourish enhances both taste and appearance, contributing a tangy counterpoint to the buttery base. Avoid soaking the bars with too much glaze, which makes them overly sweet and soggy.
- Cut into squares and serve.: After the glaze has set slightly, use a sharp knife to cut into even squares, wiping the blade between cuts for clean edges. The bars should present a tender, pale crumb with a glossy top and a subtle golden rim. Serving them at room temperature ensures the flavors are balanced and the texture is soft but stable. A common mistake is cutting while the bars are too warm, producing ragged slices and a sticky presentation.
Notes
- Room temperature ingredients: Bring butter and eggs to room temperature so they incorporate smoothly and the batter emulsifies properly.
- Fresh Meyer lemons: Use freshly zested and juiced Meyer lemons for the most aromatic, floral citrus impact in both batter and glaze.
- Pan preparation: Butter the 9 inch by 9 inch pan thoroughly and consider lining with parchment for the easiest removal and cleanest edges.
- Watch the edges: Check the bars at the 25 minute mark for golden edges and set center, oven temperatures vary and visual cues prevent overbaking.
- Glaze consistency: Aim for a glaze that is pourable but not watery; adjust with more powdered sugar or a touch more Meyer lemon juice as needed.