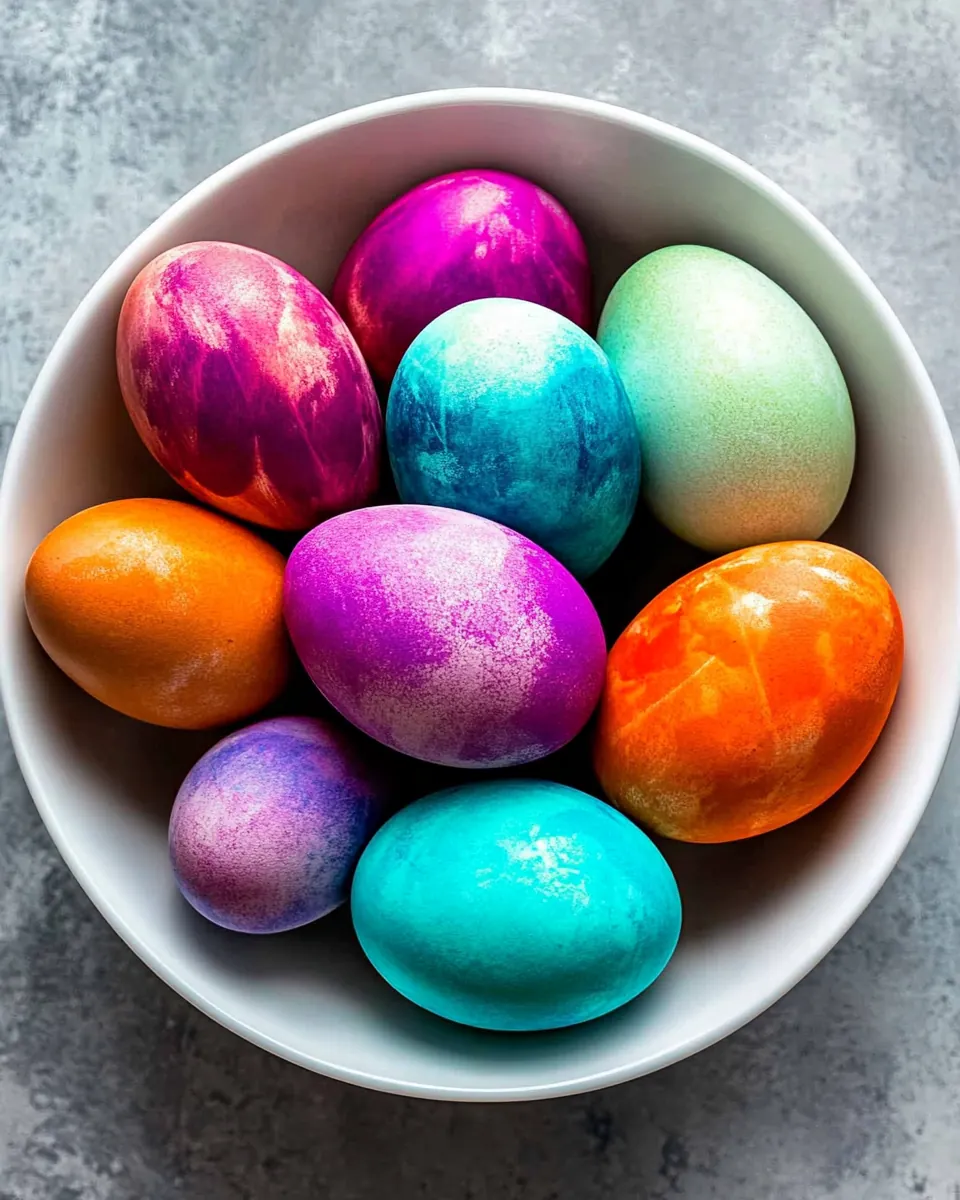
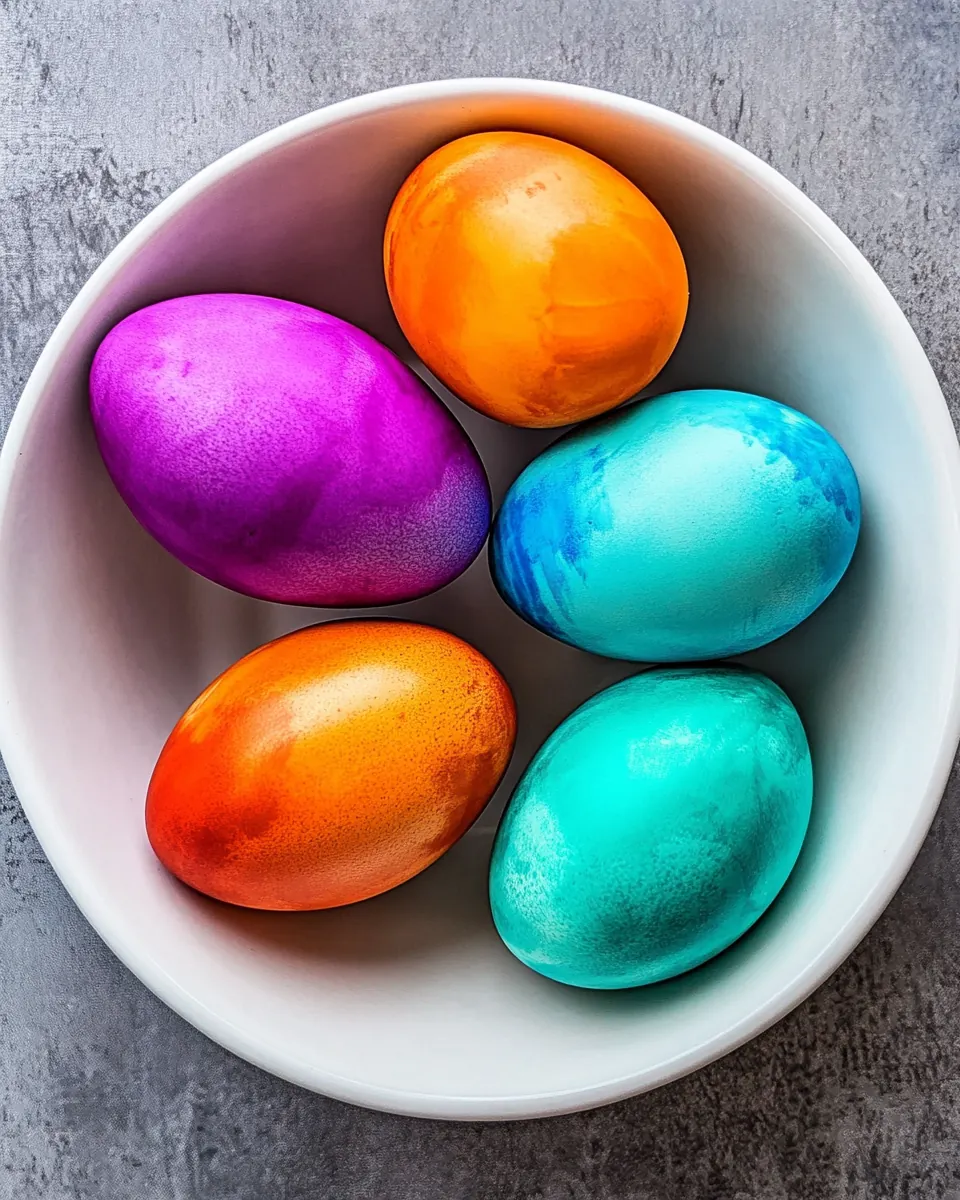
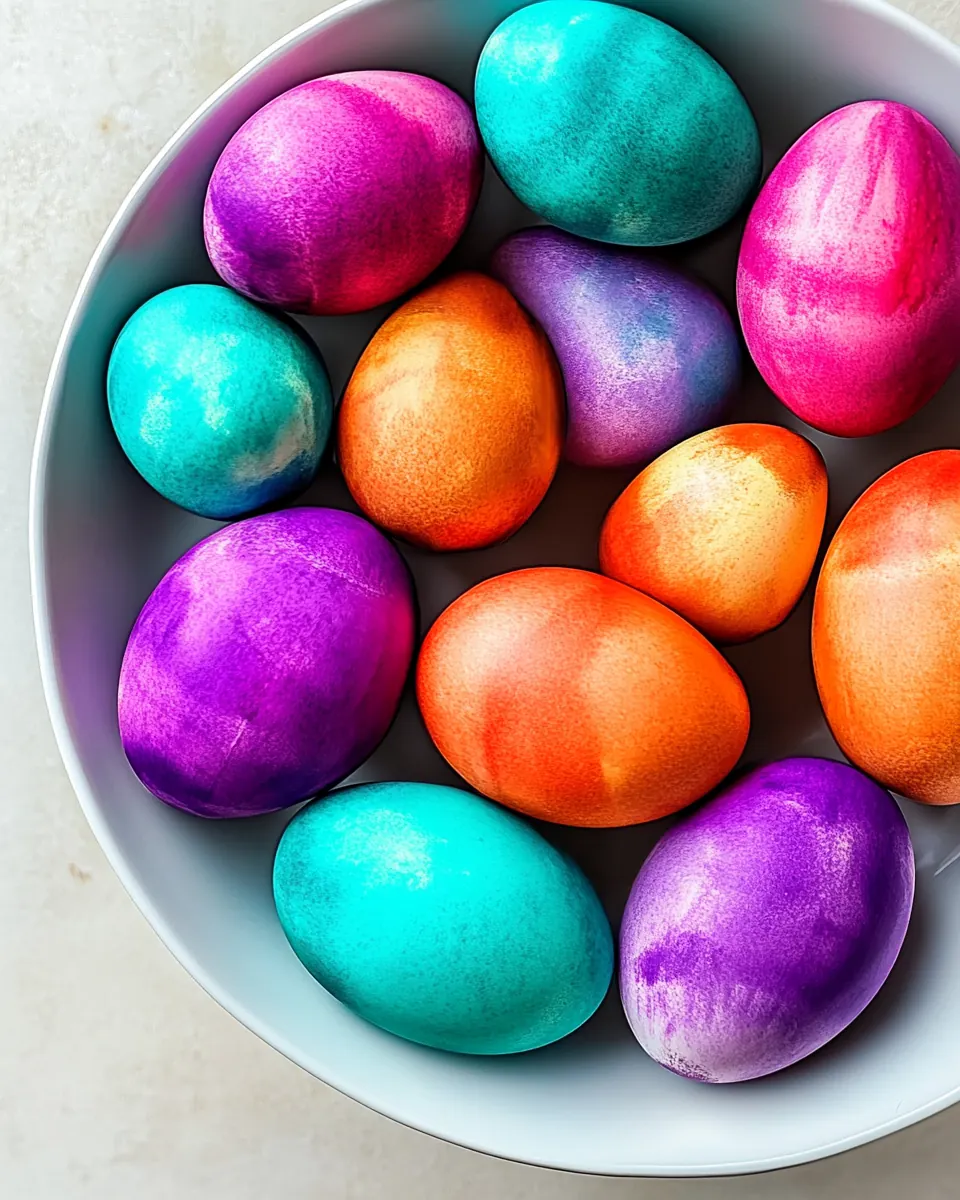
Instant Pot Easter Eggs
Instant Pot Easter Eggs have been my go to little kitchen magic trick every spring since I first squeezed a jar into my Instant Pot and watched colors bloom around shells like tiny stained glass windows.
I remember the first time I made these for a community brunch, balancing mason jars on the trivet and feeling equal parts nervous and excited, because you never know if a kitchen experiment will charm a group. As the lid sealed and the pot hummed, I chatted with friends, and when I finally lifted the lid, the steam smelled faintly of vinegar and warm egg, and the jars looked like miniature color labs. The eggs came out vibrant, and people kept asking how I got such even color and that glossy finish. Over the years I refined quantities and timing, learned about shocking eggs in ice to stop cooking, and found that gel coloring makes hues pop without staining hands.
What I love most about Instant Pot Easter Eggs is how approachable the whole process is, whether you are dye curious or a seasoned host. I like that you can prep jars ahead, choose a palette that matches your table, and then let the Instant Pot do the heavy lifting while you focus on setting the table, arranging baskets, or helping kids pick colors. Every batch teaches me a tiny detail, like how more vinegar deepens colors and how cooler shock water prevents overcooking. If you enjoy a short, hands on craft with a big payoff, these eggs will become a recurring favorite in your spring rotation.
Recipe Snapshot
10 mins
5 mins
5 mins
Easy
150 kcal
American
Keto, Gluten-Free
Breakfast
Instant Pot – 6 Quart, 16 oz Mason Jars (5 pack)
Why This Instant Pot Easter Eggs Shines
Fast, reliable results
I love that Instant Pot Easter Eggs deliver consistently tender whites and set yolks with minimal babysitting. The pressure environment guarantees steady heat, which means I do not worry about cracked shells or uneven doneness. For busy mornings when I am juggling baskets and last minute prep, this reliability is everything.
Brilliant, even color
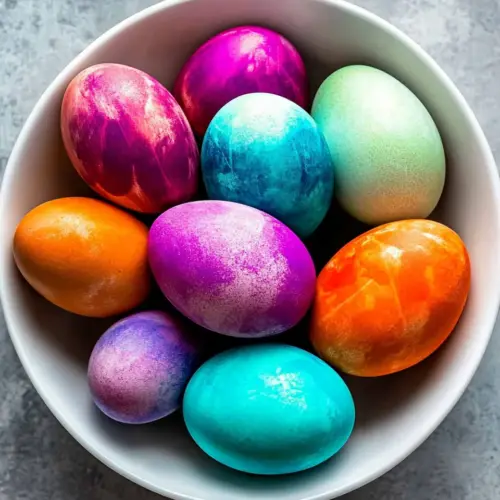
Because each jar gets its own little dye bath, the colors come out more controlled and vivid than dipping methods. I prefer gel food coloring for punchy shades, it uses fewer drops and gives a richer look. Vinegar helps the dye cling to the shells, so the finished eggs look deliberate and polished, which is great when I want centerpiece worthy results.
Customizable and creative
One of my favorite parts about these eggs is the creative freedom. You can layer hues, experiment with ombre effects, or keep things classic with single color jars. The method is forgiving, so I can encourage kids to pick combinations while still delivering beautiful eggs for guests.
Space saving and scalable
Using mason jars inside the cooker is surprisingly space efficient. I can color a dozen eggs in four jars and cook them all together, which saves countertop real estate and reduces cleanup. That scalability makes it ideal for small parties or larger gatherings when I need to multiply batches.
Minimal equipment, maximum charm
The required gear is simple, and I already keep a set of mason jars handy. That low barrier to entry is why I keep returning to this technique when spring arrives, it turns a simple ingredient list into a festive table without a lot of fuss.
What to Gather for Instant Pot Easter Eggs
These elements work together like a small chemistry set. The key players are the water and vinegar which create the dye solution, the food coloring which provides the visual impact, and the eggs themselves which carry the color and texture. Together they make a predictable environment for even cooking and vibrant results, while the mason jars let you control individual shades without cross contamination. This combination balances safety, color adhesion, and ease.
- 4 cups water (or more if needed): Provide moisture and steam during pressure cooking to ensure eggs cook evenly and prevent burning; add enough water to reach Instant Pot’s minimum fill line and adjust if using multiple racks or additional space.
- 1/2 cup white vinegar: Acidify the cooking water to help prevent egg whites from leaching through small shell cracks and to slightly alter shell pH for easier peeling after pressure cooking; pour into the pot before sealing.
- 20 drops food coloring (different colors, I used gel): Add concentrated color to create vibrant dye baths when cracking and soaking eggs post-cooking; use gel or liquid coloring sparingly to achieve desired hues and avoid staining hands excessively.
- 12 large white eggs (uncooked): Contain the raw egg contents and transform into firm, set eggs when cooked under pressure; select large white eggs for consistent size and predictable cooking times in the Instant Pot.
Making This Instant Pot Easter Eggs
These directions are simple but precise. I like to set up my jars and coloring station before turning on the cooker so the process flows smoothly from start to finish. Read through the steps and gather a bowl of ice water, tongs, and a towel before you begin.
- Prep the Instant Pot: Pour 2 cups of water in the instant pot liner. Place the trivet inside.: Pour 2 cups of water in the instant pot liner. Place the trivet inside. : As the pot warms you should smell a faint mineral steam from the water, and see small bubbles forming along the liner edge, which signals the unit is ready to build pressure. The trivet keeps jars elevated so heat circulates evenly, preventing direct contact with the hot base. If the trivet is omitted, jars might overheat and crack, so always set it in place. A common troubleshooting note is to double check that the sealing ring is clean and properly seated; a noisy or failed seal often comes from debris or a misaligned ring.
- Prepare Eggs: Place 3 eggs in each mason jar. You'll need 4 jars that will fit together in your Instant Pot. Pour about 1/2 cup of water in each jar, or enough to reach the top of the eggs. Add 2 tbsp of vinegar to each mason jar and combine different food coloring in each one. Next, place the mason jars into the Instant Pot. Secure the lid onto the pot and make sure to turn the vent at the top of it to the 'Sealing' position.: Place 3 eggs in each mason jar. You'll need 4 jars that will fit together in your Instant Pot. Pour about 1/2 cup of water in each jar, or enough to reach the top of the eggs. Add 2 tbsp of vinegar to each mason jar and combine different food coloring in each one. Next, place the mason jars into the Instant Pot. Secure the lid onto the pot and make sure to turn the vent at the top of it to the 'Sealing' position. : When you assemble jars, you will notice how the dye pools around the curved shells, making little crescents of color where bubbles and air pockets sit; gentle tilting or a quick swirl helps the pigment touch every inch of shell surface. The added vinegar immediately smells a bit sharp, that is normal and necessary for color adherence. Place jars snugly but not forced together, so steam can circulate around them. Avoid spilling dye on the outside of jars, which can create sticky residue; if a drop runs down the jar wipe it promptly to prevent staining the Instant Pot liner. Make sure each jar lid is screwed on loosely or left off to allow pressure to equalize, and double check the pot lid is locked correctly before pressing any buttons.
- Cook: Press the 'Manual' button on the Instant Pot then the '-' sign to lower the time to 5 minutes.: Press the 'Manual' button on the Instant Pot then the '-' sign to lower the time to 5 minutes. : Once the cooker begins, you will hear a soft beep and a steady hum as pressure rises, and small wisps of steam may escape around the seal until it fully engages. The sealed environment cooks the eggs evenly, so the whites set gently and do not become rubbery, while the yolks reach a perfect firmness. One thing I watch for is accidental selection of a different program, so confirm the display shows manual or pressure cook and that the time is set correctly. If you notice unusual rattling, pause and check the lid alignment before continuing.
- Pressure Release: Once the Instant Pot cycle is complete, wait 5 minutes for natural release then use quick release, change the valve to 'Venting' position and place a towel over the valve so steam doesn’t get everywhere. Carefully unlock and remove the lid from the pot.: Once the Instant Pot cycle is complete, wait 5 minutes for natural release then use quick release, change the valve to 'Venting' position and place a towel over the valve so steam doesn’t get everywhere. Carefully unlock and remove the lid from the pot. : During the natural release you will feel the pot relax and a gentle hiss as pressure reduces; after the quick release the steam will whoosh out, carrying that sharp vinegar note. Lifting the lid away from you prevents a face full of steam, and you will catch a warm, tangy aroma. If you do not allow any natural release you may experience vigorous sputtering of jar liquids, so follow the brief wait to reduce boil over. A common mistake is standing too close to the vent, which can cause a steam burn, so keep your hands and face clear.
- Shock: Use tongs to carefully remove the eggs from the jars, place the eggs in a bowl with ice water and let them sit for 5 minutes. Doing this stops the eggs from cooking further. After 5 minutes they are ready for you to serve!: Use tongs to carefully remove the eggs from the jars, place the eggs in a bowl with ice water and let them sit for 5 minutes. Doing this stops the eggs from cooking further. After 5 minutes they are ready for you to serve! : The ice bath is cold and pleasantly crisp against the warm shells, and it instantly halts residual cooking, preserving a creamy yolk texture without the grayish ring. I always listen for a small clink when eggs meet the ice, that moment confirms they have cooled and will not overcook. Be gentle when lifting eggs, as sudden banging can crack the shells and ruin the color. A frequent issue is insufficient ice, which leads to gradual cooling and a tougher yolk, so load the bowl generously with ice to maintain the chill throughout the five minute shock.
Recipe Tips about Instant Pot Easter Eggs

I like to have everything staged before starting, because the Instant Pot moves quickly once sealed. Below are my most used tips that save time and help you get consistent, beautiful eggs every batch.
- Organize jars first so you can assemble dyes and eggs quickly, minimizing spills and ensuring jars fit snugly but not forced.
- Measure vinegar accurately since it affects color adherence, too little will result in faded shades and uneven dye uptake.
- Use gel coloring for intensity because it requires fewer drops and yields richer hues without diluting the dye baths.
- Keep a big ice bath ready to immediately stop cooking and prevent that green ring around yolks, which forms if eggs cool too slowly.
- Label your jars if you are mixing colors, this helps you repeat favorites and prevents accidental color blending.
Serving Options for Instant Pot Easter Eggs
These eggs are versatile, from casual brunch spreads to holiday centerpieces. Below are thoughtful serving ideas and storage suggestions to help you plan meals or parties.
- Party platter Arrange sliced halves on a platter with cut sides up for visual contrast, displaying the colorful shells around neutral whites to highlight the yolks.
- Holiday brunch Serve whole or halved with a sprinkle of salt and pepper for a simple addition to a spring buffet during Easter or family gatherings.
- Picnic friendly Keep them chilled in a cooler, the shells protect the interior, making these eggs a sturdy option for outdoor meals.
- Decorative centerpiece Nest eggs in a bowl of fresh greens or straw for a seasonal table display that guests can take as favors.
- Storage tip Keep the eggs in their shells in the fridge for up to one week, and only peel them just before serving to preserve freshness.
FAQ
Conclusion
These Instant Pot Easter Eggs stand out because they combine convenience with creative results, giving you vibrant, evenly cooked eggs with minimal fuss. I encourage you to give this method a try, assemble a palette of colors, and enjoy the process of making something both decorative and delicious. Making them can be a relaxed group activity, a quick holiday prep, or a charming addition to any spring table. Have fun experimenting with shades and presentations, and remember that the real joy is sharing them with friends and family.
Instant Pot Easter Eggs
Equipment
- Instant Pot 6 Quart
- 16 oz Mason Jars (5 pack)
Ingredients
- 4 cups water (or more if needed) Provide moisture and steam during pressure cooking to ensure eggs cook evenly and prevent burning; add enough water to reach Instant Pot’s minimum fill line and adjust if using multiple racks or additional space.
- 1/2 cup white vinegar Acidify the cooking water to help prevent egg whites from leaching through small shell cracks and to slightly alter shell pH for easier peeling after pressure cooking; pour into the pot before sealing.
- 20 drops food coloring (different colors, I used gel) Add concentrated color to create vibrant dye baths when cracking and soaking eggs post-cooking; use gel or liquid coloring sparingly to achieve desired hues and avoid staining hands excessively.
- 12 large white eggs (uncooked) Contain the raw egg contents and transform into firm, set eggs when cooked under pressure; select large white eggs for consistent size and predictable cooking times in the Instant Pot.
Instructions
- Prep the Instant Pot: Pour 2 cups of water in the instant pot liner. Place the trivet inside.: Pour 2 cups of water in the instant pot liner. Place the trivet inside. : As the pot warms you should smell a faint mineral steam from the water, and see small bubbles forming along the liner edge, which signals the unit is ready to build pressure. The trivet keeps jars elevated so heat circulates evenly, preventing direct contact with the hot base. If the trivet is omitted, jars might overheat and crack, so always set it in place. A common troubleshooting note is to double check that the sealing ring is clean and properly seated; a noisy or failed seal often comes from debris or a misaligned ring.
- Prepare Eggs: Place 3 eggs in each mason jar. You'll need 4 jars that will fit together in your Instant Pot. Pour about 1/2 cup of water in each jar, or enough to reach the top of the eggs. Add 2 tbsp of vinegar to each mason jar and combine different food coloring in each one. Next, place the mason jars into the Instant Pot. Secure the lid onto the pot and make sure to turn the vent at the top of it to the 'Sealing' position.: Place 3 eggs in each mason jar. You'll need 4 jars that will fit together in your Instant Pot. Pour about 1/2 cup of water in each jar, or enough to reach the top of the eggs. Add 2 tbsp of vinegar to each mason jar and combine different food coloring in each one. Next, place the mason jars into the Instant Pot. Secure the lid onto the pot and make sure to turn the vent at the top of it to the 'Sealing' position. : When you assemble jars, you will notice how the dye pools around the curved shells, making little crescents of color where bubbles and air pockets sit; gentle tilting or a quick swirl helps the pigment touch every inch of shell surface. The added vinegar immediately smells a bit sharp, that is normal and necessary for color adherence. Place jars snugly but not forced together, so steam can circulate around them. Avoid spilling dye on the outside of jars, which can create sticky residue; if a drop runs down the jar wipe it promptly to prevent staining the Instant Pot liner. Make sure each jar lid is screwed on loosely or left off to allow pressure to equalize, and double check the pot lid is locked correctly before pressing any buttons.
- Cook: Press the 'Manual' button on the Instant Pot then the '-' sign to lower the time to 5 minutes.: Press the 'Manual' button on the Instant Pot then the '-' sign to lower the time to 5 minutes. : Once the cooker begins, you will hear a soft beep and a steady hum as pressure rises, and small wisps of steam may escape around the seal until it fully engages. The sealed environment cooks the eggs evenly, so the whites set gently and do not become rubbery, while the yolks reach a perfect firmness. One thing I watch for is accidental selection of a different program, so confirm the display shows manual or pressure cook and that the time is set correctly. If you notice unusual rattling, pause and check the lid alignment before continuing.
- Pressure Release: Once the Instant Pot cycle is complete, wait 5 minutes for natural release then use quick release, change the valve to 'Venting' position and place a towel over the valve so steam doesn’t get everywhere. Carefully unlock and remove the lid from the pot.: Once the Instant Pot cycle is complete, wait 5 minutes for natural release then use quick release, change the valve to 'Venting' position and place a towel over the valve so steam doesn’t get everywhere. Carefully unlock and remove the lid from the pot. : During the natural release you will feel the pot relax and a gentle hiss as pressure reduces; after the quick release the steam will whoosh out, carrying that sharp vinegar note. Lifting the lid away from you prevents a face full of steam, and you will catch a warm, tangy aroma. If you do not allow any natural release you may experience vigorous sputtering of jar liquids, so follow the brief wait to reduce boil over. A common mistake is standing too close to the vent, which can cause a steam burn, so keep your hands and face clear.
- Shock: Use tongs to carefully remove the eggs from the jars, place the eggs in a bowl with ice water and let them sit for 5 minutes. Doing this stops the eggs from cooking further. After 5 minutes they are ready for you to serve!: Use tongs to carefully remove the eggs from the jars, place the eggs in a bowl with ice water and let them sit for 5 minutes. Doing this stops the eggs from cooking further. After 5 minutes they are ready for you to serve! : The ice bath is cold and pleasantly crisp against the warm shells, and it instantly halts residual cooking, preserving a creamy yolk texture without the grayish ring. I always listen for a small clink when eggs meet the ice, that moment confirms they have cooled and will not overcook. Be gentle when lifting eggs, as sudden banging can crack the shells and ruin the color. A frequent issue is insufficient ice, which leads to gradual cooling and a tougher yolk, so load the bowl generously with ice to maintain the chill throughout the five minute shock.
Notes
- Organize jars first so you can assemble dyes and eggs quickly, minimizing spills and ensuring jars fit snugly but not forced.
- Measure vinegar accurately since it affects color adherence, too little will result in faded shades and uneven dye uptake.
- Use gel coloring for intensity because it requires fewer drops and yields richer hues without diluting the dye baths.
- Keep a big ice bath ready to immediately stop cooking and prevent that green ring around yolks, which forms if eggs cool too slowly.
- Label your jars if you are mixing colors, this helps you repeat favorites and prevents accidental color blending.