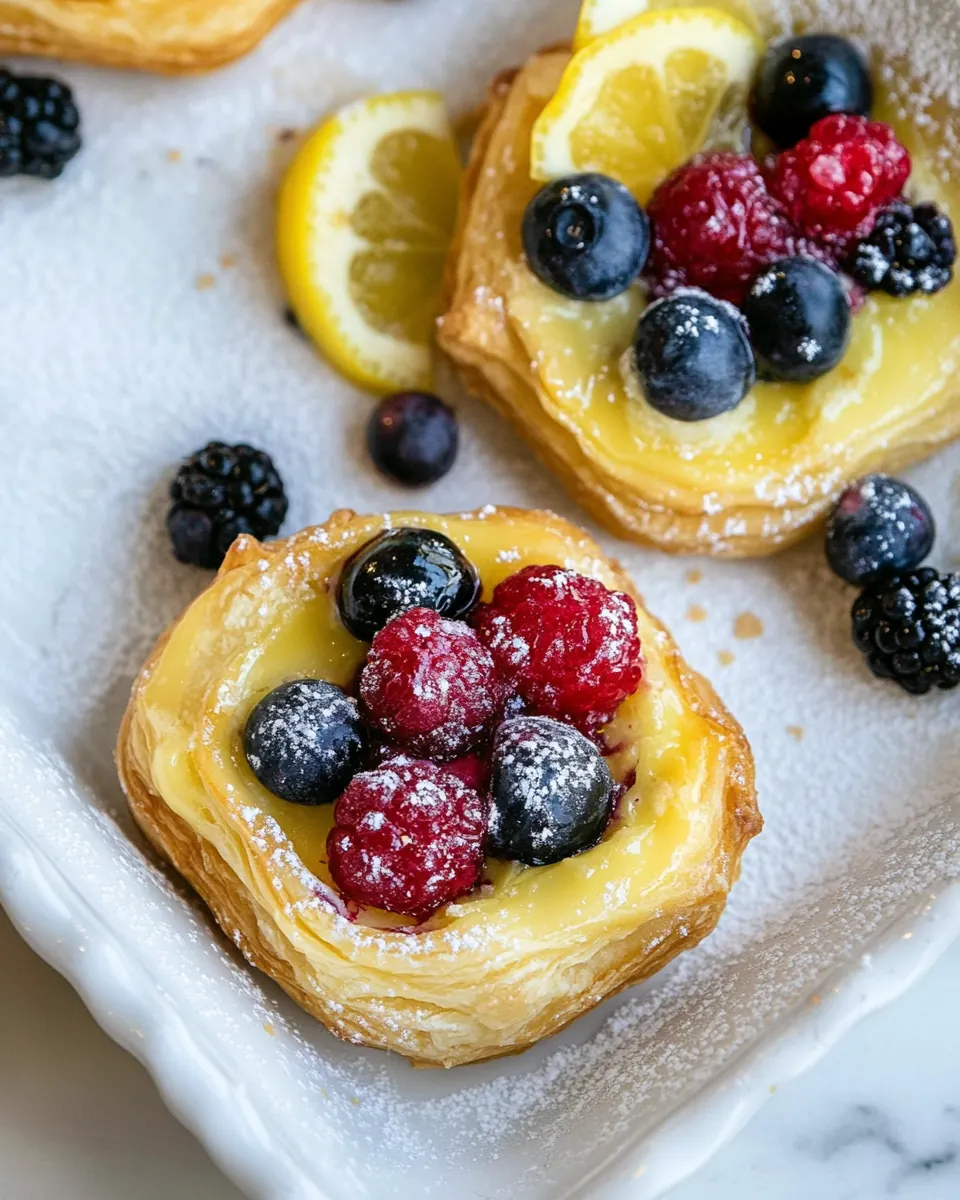
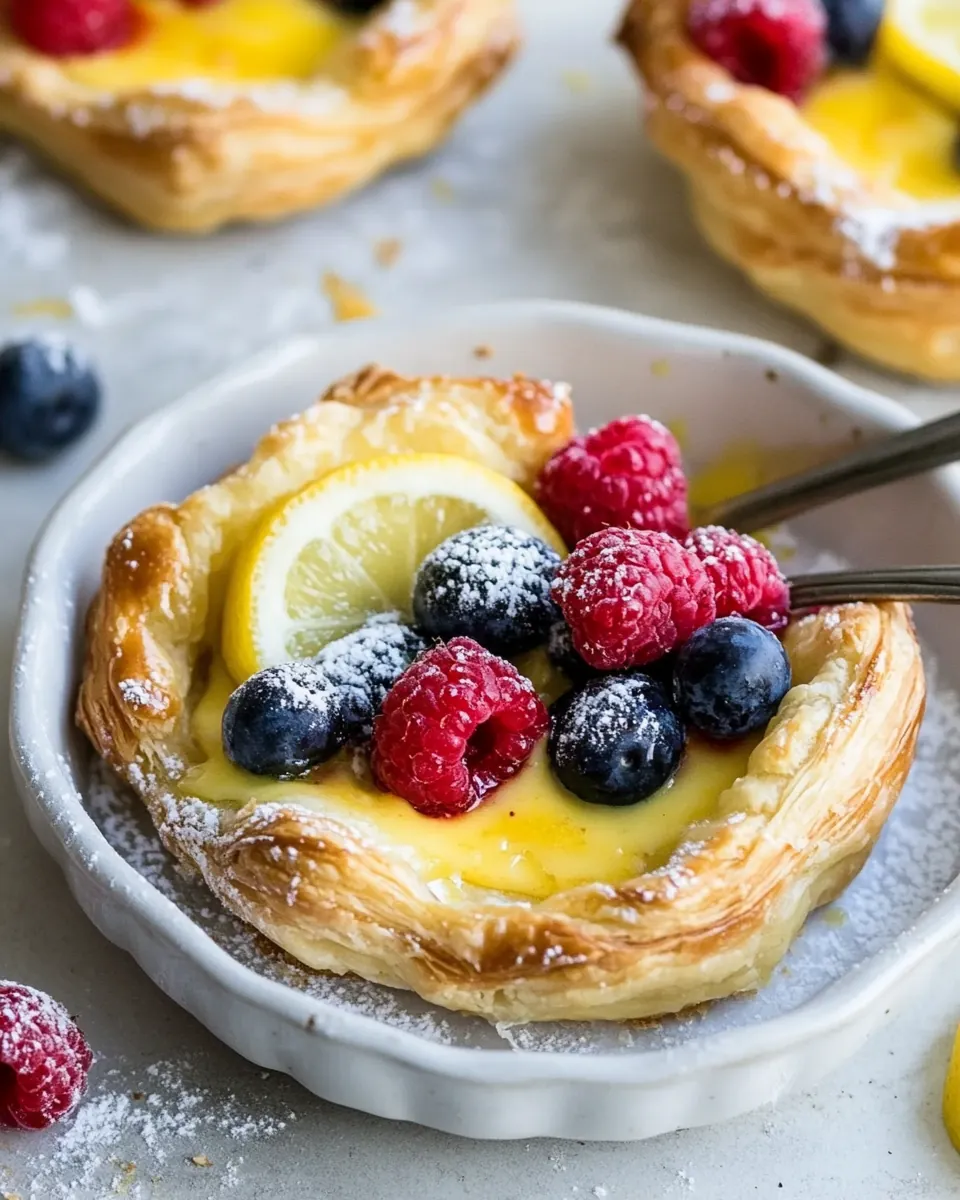
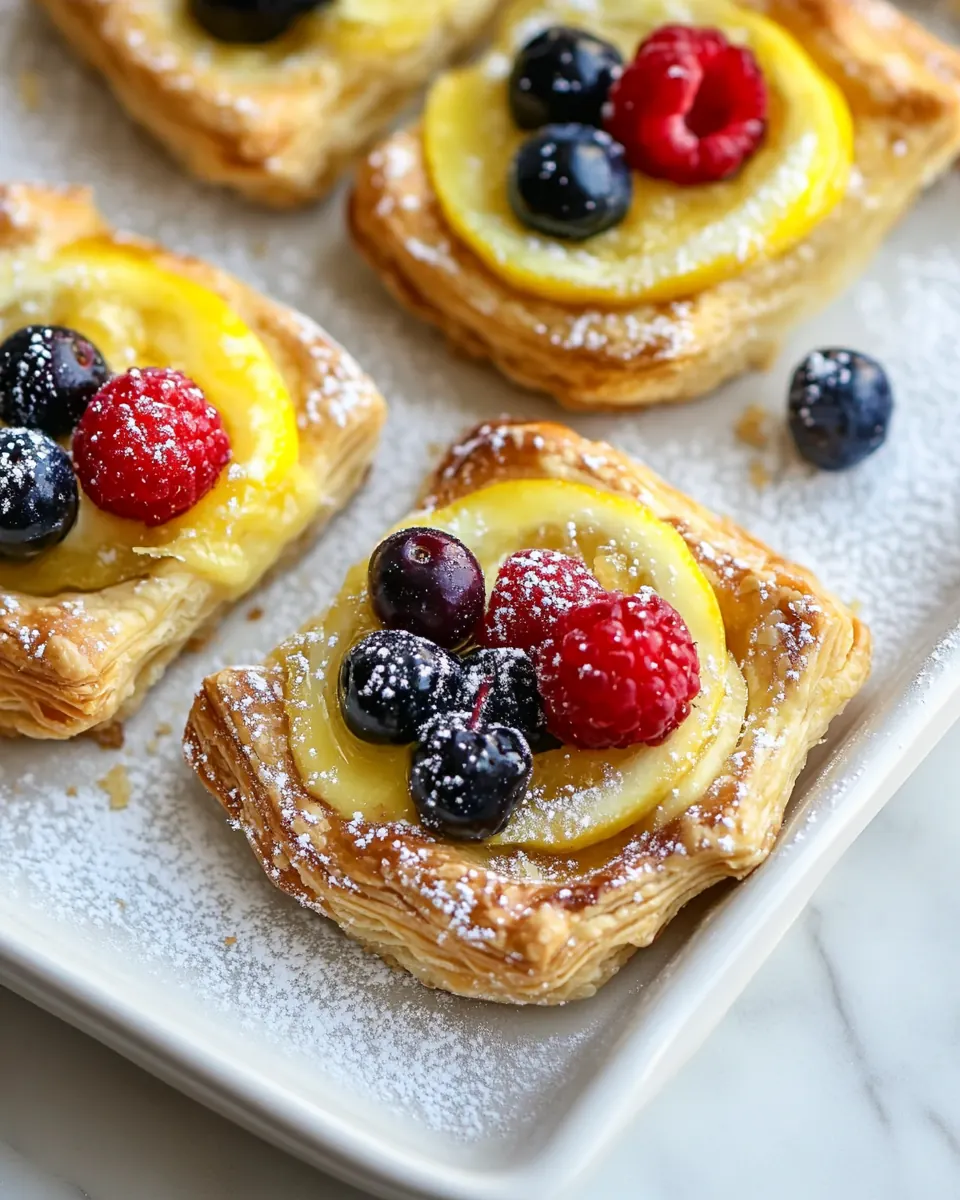
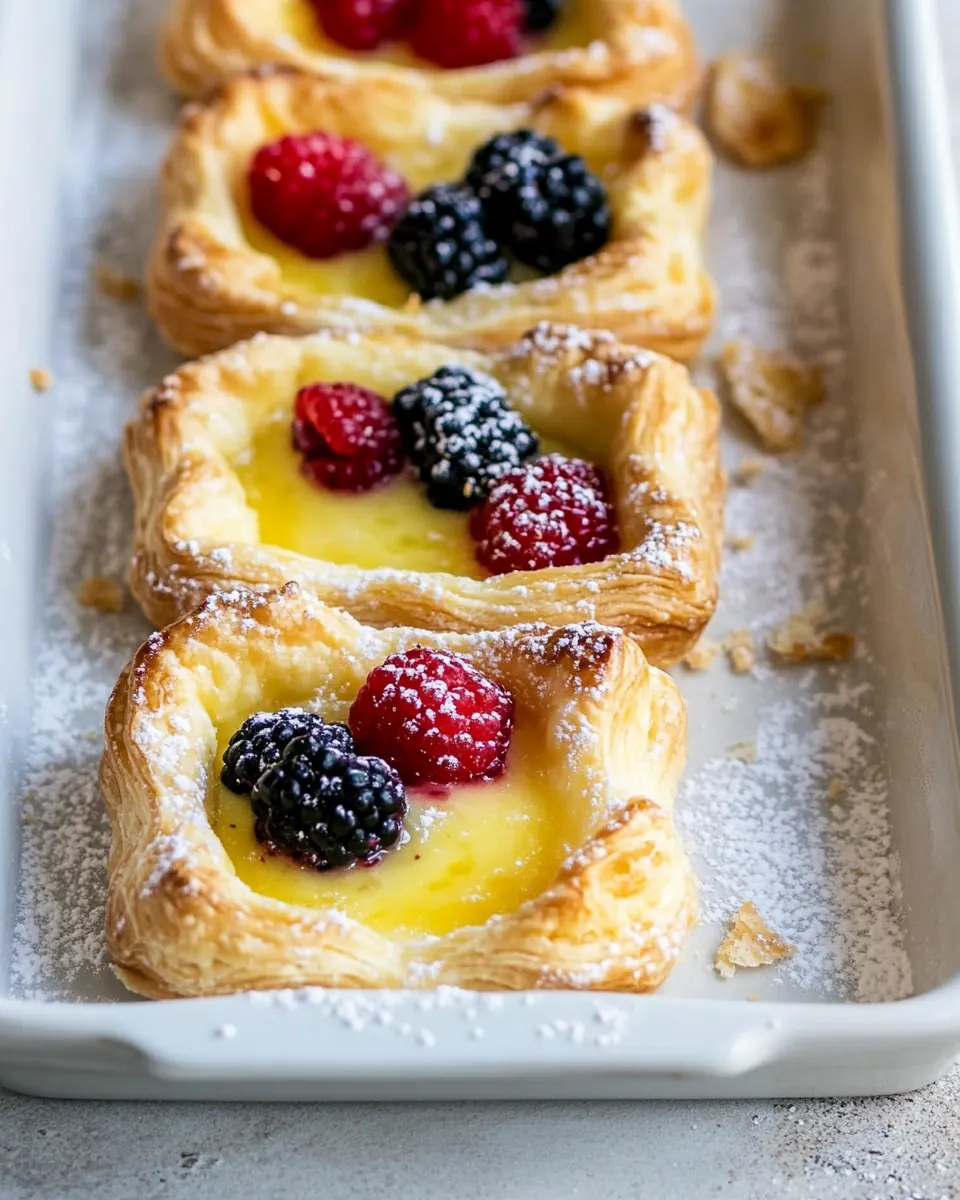
Lemon Berry Cheesecake Puff Pastries
Lemon Berry Cheesecake Puff Pastries came into my life on a sunlit spring afternoon when I wanted something bright, a little creamy, and undeniably festive for a gathering with close friends.
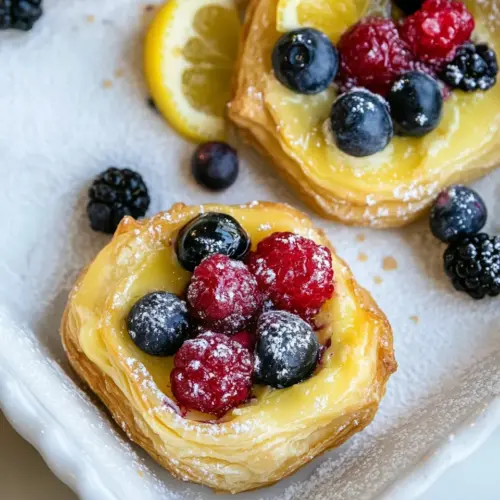
I remember unrolling a sheet of flaky puff pastry sheets on my counter while a lemon tree outside my window offered the faint scent of citrus on the breeze. We were laughing in the kitchen, passing bowls and spoons, and I loved how the simple act of assembling these little tarts turned everyone into a collaborator. The combination of velvety cream cheese filling, tangy lemon curd, and jewel tone berries felt like spring on a plate, and the crisp, layered pastry gave a satisfying crunch under a cloud of powdered sugar. Over time I learned subtle tweaks that make each bite sing, like gently folding the filling until glossy, or chilling the finished pastries briefly so the curd stays silky when you serve them. I always keep a jar of lemon curd on hand because it speeds assembly and keeps the flavors consistent, but fresh-squeezed lemon juice and bright zest are small gestures that lift the whole pastry. These are the kind of treats you can bring to brunch, serve after a light dinner, or unwrap at a picnic when you want something impressive yet easy.
Recipe Snapshot
40 mins
20 mins
20 mins
Easy
300 kcal
American
Gluten-Free, Low FODMAP
Desserts
Oven, Mixing bowl, Parchment paper, Baking sheet, Spatula
What Sets This Lemon Berry Cheesecake Puff Pastries Apart
Bright, unforgettable flavor
I love that Lemon Berry Cheesecake Puff Pastries balance tang and sweet so naturally. The interplay of lemon zest and curd with creamy cream cheese gives each bite a layered taste profile, making them feel much fancier than the effort required.
Texture contrast that excites
The flaky, buttery crunch of the puff pastry sheets against the smooth, slightly dense cheesecake filling is a texture story I never tire of. It’s what keeps people going back for seconds, and it’s also forgiving if your oven runs a touch hot or cold.
Customizable for any occasion
We can dress these up for a bridal shower, simplify them for a weeknight dessert, or make them festive with extra berries for a holiday table. They adapt well without losing their identity.
Speedy but impressive
Using thawed puff pastry sheets and a simple whipped cream cheese mixture means you get an elegant result in a short time. I reach for this recipe when I want the wow factor with minimal stress.
Kid friendly and crowd pleasing
When kids help spoon curd and place berries, they feel involved and proud, which makes serving time even more joyful. The bright colors make them irresistible, and the portions are perfect for parties.
Lemon Berry Cheesecake Puff Pastries Ingredients
These ingredients are simple, seasonal, and intentionally chosen to highlight contrast. The puff pastry sheets provide the structure and crunch, while the cream cheese filling offers richness. Lemon components cut through the fat and bring lift, and a scattering of fresh berries adds freshness and color. Together they create a dessert that is bright, textural, and easy to assemble.
- 1 puff pastry sheets, box frozen (thawed according to package instructions): Folded sheet provides the flaky, buttery base for each pastry and should be thawed according to package directions to ensure proper handling and puffing when baked. Keep chilled until ready to shape to maintain its layers and avoid overworking the dough. Use a lightly floured surface and handle gently to preserve the lamination for optimal rise.
- 8 oz . cream cheese, softened: Softened cream cheese creates the creamy, tangy filling that complements the lemon and berries; bring to room temperature for easy mixing and a smooth texture. Beat until lump-free to incorporate with sugar and flavorings, ensuring a silky consistency that spreads evenly inside the pastry. Avoid overheating to prevent the filling from becoming runny when baked.
- 1/4 cups sugar: Granulated sugar provides sweetness to balance the cream cheese and lemon flavors and helps achieve a pleasant texture in the filling. Measure accurately to avoid overly sweet results that mask the bright citrus and berry notes. Cream with the cheese until dissolved to create a uniform, velvety mixture.
- 1/4 tsp lemon zest: Bright lemon zest adds concentrated citrus aroma and fresh, zesty flavor that elevates the filling without adding liquid. Finely grate the outer yellow layer only to avoid bitter pith, incorporating it into the cream cheese mixture for an immediate burst of brightness. Use as a subtle flavor enhancer rather than a dominant note.
- 1/2 tbsp lemon juice, fresh: Fresh lemon juice contributes acidity and a clean citrus tang that balances the richness of the cream cheese and lemon curd. Add sparingly to avoid curdling the dairy; incorporate gradually and taste to reach the desired brightness. Prefer fresh-squeezed juice for the best flavor.
- 1/4 tsp vanilla extract: Fragrant vanilla extract rounds out the filling with warm, sweet aromatic notes and enhances the perception of other flavors. Add a small measure to the cream cheese mixture and whisk thoroughly to distribute evenly. Use pure extract for the most natural taste.
- 1 egg: Beaten egg acts as a light binder and gives the filling a silkier texture while also providing wash for the pastry if needed; whisk thoroughly before adding. Use at room temperature to blend smoothly into the cream cheese mixture without cooling the batter. Reserve a little for an egg wash to achieve a golden, glossy finish on the pastry tops if desired.
- 1 cup lemon curd, found either by the jellies or pie fillings: Smooth lemon curd delivers concentrated, glossy citrus flavor and a luscious layer of tart-sweet filling that pairs perfectly with berries. Spoon or dollop into pastries for pockets of intense lemon taste and vibrant color, being careful not to overfill and cause leakage. Choose a quality curd from the jellies or pie fillings section for convenience.
- assortment of fresh blueberries, raspberries, strawberries, blackberries: Mixed fresh berries supply juicy bursts of sweetness and tartness, offering textural contrast and visual appeal when arranged atop or inside the pastries. Gently rinse and pat dry to prevent excess moisture, and slice larger berries if necessary for even distribution. Combine different varieties for balanced flavor and an attractive presentation.
- powdered sugar: Powdered sugar provides a delicate, snowy finish that adds a touch of sweetness and visual polish when dusted over the baked pastries. Sift lightly over cooled pastries to prevent clumping and dissolve quickly on the surface. Use sparingly to avoid overwhelming the citrus and berry flavors.
- extra lemon zest (optional): Optional extra lemon zest offers an additional lift of fresh citrus aroma and bright visual flecks for garnish when desired; apply sparingly. Grate just before serving to maximize fragrance and avoid bitterness from pith. Use as a finishing touch to accentuate the lemon components.
Directions for Lemon Berry Cheesecake Puff Pastries
These directions walk you through assembly, baking, and finishing so your pastries emerge crisp and balanced. Read through the steps before you start, keep your ingredients chilled where noted, and prepare a parchment lined sheet for flawless bakes. The process is straightforward, and small attentions pay off in texture and appearance.
- Preheat the oven to 375 degrees F.: The smell of warming air and the faint hint of butter in the oven tells you it is reaching temperature, which ensures the puff pastry sheets will rise and become crisp. Preheating is essential because if the oven is too cool the pastries will spread and become greasy rather than laminating into flaky layers. A common mistake is not waiting for a full preheat, which can lead to uneven browning. Use an oven thermometer if your oven is temperamental, and place the rack in the center so the heat distributes evenly.
- Cut the both sheets of dough to make 12 small rectangles. Lay the dough on a parchment lined baking sheet.: You will feel the cool, slightly tacky texture of the dough as you slice, and clean, confident cuts create neat edges that puff evenly. Working quickly keeps the layers cold and helps the pastry maintain lift. If the dough softens or becomes sticky, chill it for five to ten minutes before proceeding. Avoid pressing too hard with the knife, which can seal the layers and reduce flakiness.
- In a bowl beat the cream cheese, sugar, lemon zest, lemon juice and vanilla until smooth. Add the egg and beat until combined. Divide the cheesecake mixture among the 12 pastries, leaving space around the edges. Bake for 20 to 25 minutes, or until the pastries are a light golden brown. Let cool completely.: As you beat the cream cheese mixture it will shift from lumpy to glossy, and you should smell the citrus brighten the dairy notes. Smoothness is key because it affects how the filling bakes and feels in the mouth. Scrape the sides of the bowl to incorporate everything evenly, and avoid overbeating which can introduce too much air and cause tunnel holes when baked. If lumps persist, pause and warm the bowl slightly by hand or use a spatula to press them out gently.
- Divide the lemon curd among the cooled pastries. Top with your desired fresh berries then dust with powdered sugar before serving. If desired, sprinkle with extra lemon zest for a nice pop of flavor. Keep chilled until ready to serve.: Once the egg is incorporated the mixture will become a touch looser and silkier, a sign it will set properly when baked. The protein from the egg helps stabilize the filling and keeps it from separating. Mix until just combined to prevent overworking the mixture which can make it dense. Watch for curdling if the cream cheese was too cold; temper the egg by whisking a spoonful of filling into it first if needed.
- Divide the cheesecake mixture among the 12 pastries, leaving space around the edges.: Spooning or piping the filling gives you control, and seeing the glossy dollops sitting in the chilled pastry is satisfying. Leaving a border protects the edges so they bake crisp and golden. If you overfill, the center may spill and prevent the pastry from browning properly. Tap the tray gently to settle the filling and keep the center slightly domed rather than overflowing.
- Bake for 20 to 25 minutes, or until the pastries are a light golden brown.: The oven will reward you with a sound of gentle crackle as the layers crisp and the filling sets, and visually you will see the pastry’s edges lift and take on a warm golden tone. This color signals Maillard reactions that add depth of flavor. If you bake too long the filling may crack and the pastry can become overly dark, while underbaking leaves the interior dough raw. Rotate the pan halfway through if your oven browns unevenly.
- Let cool completely.: Cooling lets the internal steam settle so the filling firms and the curdation step later does not slide off. The pastry will crisp further as it cools and the flavors will meld, so resist cutting into them too soon. A frequent error is serving hot which makes the pastry soft and the filling too runny; patience yields a cleaner slice and better texture.
- Divide the lemon curd among the cooled pastries.: The lemon curd adds a glossy, concentrated burst of citrus when spooned on top. Spoon it gently so it sits as a jewel like layer, and if the curd is slightly loose chill it first so it settles. Using warm curd can make the filling soft and encourage sliding, so handle with care.
- Top with your desired fresh berries then dust with powdered sugar before serving.: Placing the berries gives a fresh contrast in texture and a bright visual pop, and the dusting of powdered sugar adds a tender sweetness and prettifies the tarts. Pat the berries dry first so they do not bleed onto the curd, and arrange them in small clusters for balance. Avoid stacking heavy berries that could bruise the curd beneath.
- If desired, sprinkle with extra lemon zest for a nice pop of flavor. Keep chilled until ready to serve.: A final sprinkle of fresh lemon zest releases aromatic oils that greet the nose and heighten the taste, while chilling preserves structure and keeps the curd stable. Refrigerate loosely covered to prevent condensation, and remove from chill a few minutes before serving so the pastry regains some crispness. The main pitfall is leaving them out too long which softens the crust and dampens the overall experience.
Pro Tips and Tweaks
I like to think of these tips as small investments that pay big dividends in texture and presentation. Below are practical suggestions I use in the kitchen every time I make these pastries, from handling the dough to finishing touches.
- Chill between steps Try placing the cut pastry on the tray in the fridge for about ten minutes before filling, this keeps the layers firm and encourages stronger rise in the oven which yields a crisper final texture.
- Temper the egg If your cream cheese is quite cold, whisk a tablespoon of the filling into the beaten egg before adding it back to the bowl to prevent curdling and ensure a silky, lump free texture.
- Use a small ice cream scoop or piping bag Portion the filling consistently for uniform baking times and an even appearance, which also makes the finished tray look polished and professional.
- Dry your berries After washing, lay them on a paper towel and gently pat dry to prevent moisture from seeping into the curd and softening the pastry bottom.
- Store properly Keep finished pastries loosely covered in the refrigerator for up to two days, arranging them in a single layer to avoid squashing the berries and preserving the crispness of the pastry as much as possible.
How to Serve Lemon Berry Cheesecake Puff Pastries
These pastries are versatile for many settings from casual brunch to holiday dessert tables. Present them thoughtfully and the colors and textures will do much of the work for you. Below are serving methods and pairing ideas to elevate the experience.
- Brunch centerpiece Arrange the pastries on a wide platter with a few extra berries scattered around, serving alongside coffee and light salads to create a bright morning spread that feels celebratory.
- After dinner dessert Serve one or two slightly chilled with a small spoon of lemon curd on the side for guests who want extra citrus, pairing with a light tea or decaffeinated coffee to finish the meal gently.
- Picnic friendly Pack them in a sturdy container with a paper layer between tiers; keep chilled in a cooler and dust with powdered sugar just before serving to maintain their look and texture outdoors.
- Party platter Build a tiered stand with these pastries alternated with fresh fruit skewers so guests can graze, and include small tongs so they can pick without touching other pieces which keeps presentation tidy.
- Storage and make ahead Bake and cool the pastries fully, then top with lemon curd and berries shortly before serving. Store components separately for up to two days in the fridge to maintain optimal texture.
FAQ
Conclusion
These pastries shine because they combine crisp, buttery layers with tangy lemon and fresh berries for a light yet indulgent treat. Try them when you want a dessert that looks special but comes together in a short amount of time, and enjoy how the textures and flavors complement each other. I hope you give this recipe a go and find it becomes a trusted option for brunches, gatherings, or a sweet finish to weeknight meals. When you serve them, notice how the color and aroma draw people in, and how small details like chilled curd and dry berries transform the result from good to memorable.
Lemon Berry Cheesecake Puff Pastries
Equipment
- Oven
- Mixing Bowl
- Parchment Paper
- Baking Sheet
- Spatula
Ingredients
- 1 puff pastry sheets, box frozen (thawed according to package instructions) Folded sheet provides the flaky, buttery base for each pastry and should be thawed according to package directions to ensure proper handling and puffing when baked. Keep chilled until ready to shape to maintain its layers and avoid overworking the dough. Use a lightly floured surface and handle gently to preserve the lamination for optimal rise.
- 8 oz . cream cheese, softened Softened cream cheese creates the creamy, tangy filling that complements the lemon and berries; bring to room temperature for easy mixing and a smooth texture. Beat until lump-free to incorporate with sugar and flavorings, ensuring a silky consistency that spreads evenly inside the pastry. Avoid overheating to prevent the filling from becoming runny when baked.
- 1/4 cups sugar Granulated sugar provides sweetness to balance the cream cheese and lemon flavors and helps achieve a pleasant texture in the filling. Measure accurately to avoid overly sweet results that mask the bright citrus and berry notes. Cream with the cheese until dissolved to create a uniform, velvety mixture.
- 1/4 tsp lemon zest Bright lemon zest adds concentrated citrus aroma and fresh, zesty flavor that elevates the filling without adding liquid. Finely grate the outer yellow layer only to avoid bitter pith, incorporating it into the cream cheese mixture for an immediate burst of brightness. Use as a subtle flavor enhancer rather than a dominant note.
- 1/2 tbsp lemon juice, fresh Fresh lemon juice contributes acidity and a clean citrus tang that balances the richness of the cream cheese and lemon curd. Add sparingly to avoid curdling the dairy; incorporate gradually and taste to reach the desired brightness. Prefer fresh-squeezed juice for the best flavor.
- 1/4 tsp vanilla extract Fragrant vanilla extract rounds out the filling with warm, sweet aromatic notes and enhances the perception of other flavors. Add a small measure to the cream cheese mixture and whisk thoroughly to distribute evenly. Use pure extract for the most natural taste.
- 1 egg Beaten egg acts as a light binder and gives the filling a silkier texture while also providing wash for the pastry if needed; whisk thoroughly before adding. Use at room temperature to blend smoothly into the cream cheese mixture without cooling the batter. Reserve a little for an egg wash to achieve a golden, glossy finish on the pastry tops if desired.
- 1 cup lemon curd, found either by the jellies or pie fillings Smooth lemon curd delivers concentrated, glossy citrus flavor and a luscious layer of tart-sweet filling that pairs perfectly with berries. Spoon or dollop into pastries for pockets of intense lemon taste and vibrant color, being careful not to overfill and cause leakage. Choose a quality curd from the jellies or pie fillings section for convenience.
- assortment of fresh blueberries, raspberries, strawberries, blackberries Mixed fresh berries supply juicy bursts of sweetness and tartness, offering textural contrast and visual appeal when arranged atop or inside the pastries. Gently rinse and pat dry to prevent excess moisture, and slice larger berries if necessary for even distribution. Combine different varieties for balanced flavor and an attractive presentation.
- powdered sugar Powdered sugar provides a delicate, snowy finish that adds a touch of sweetness and visual polish when dusted over the baked pastries. Sift lightly over cooled pastries to prevent clumping and dissolve quickly on the surface. Use sparingly to avoid overwhelming the citrus and berry flavors.
- optional: extra lemon zest Optional extra lemon zest offers an additional lift of fresh citrus aroma and bright visual flecks for garnish when desired; apply sparingly. Grate just before serving to maximize fragrance and avoid bitterness from pith. Use as a finishing touch to accentuate the lemon components.
Instructions
- Preheat the oven to 375 degrees F.: The smell of warming air and the faint hint of butter in the oven tells you it is reaching temperature, which ensures the puff pastry sheets will rise and become crisp. Preheating is essential because if the oven is too cool the pastries will spread and become greasy rather than laminating into flaky layers. A common mistake is not waiting for a full preheat, which can lead to uneven browning. Use an oven thermometer if your oven is temperamental, and place the rack in the center so the heat distributes evenly.
- Cut the both sheets of dough to make 12 small rectangles. Lay the dough on a parchment lined baking sheet.: You will feel the cool, slightly tacky texture of the dough as you slice, and clean, confident cuts create neat edges that puff evenly. Working quickly keeps the layers cold and helps the pastry maintain lift. If the dough softens or becomes sticky, chill it for five to ten minutes before proceeding. Avoid pressing too hard with the knife, which can seal the layers and reduce flakiness.
- In a bowl beat the cream cheese, sugar, lemon zest, lemon juice and vanilla until smooth. Add the egg and beat until combined. Divide the cheesecake mixture among the 12 pastries, leaving space around the edges. Bake for 20 to 25 minutes, or until the pastries are a light golden brown. Let cool completely.: As you beat the cream cheese mixture it will shift from lumpy to glossy, and you should smell the citrus brighten the dairy notes. Smoothness is key because it affects how the filling bakes and feels in the mouth. Scrape the sides of the bowl to incorporate everything evenly, and avoid overbeating which can introduce too much air and cause tunnel holes when baked. If lumps persist, pause and warm the bowl slightly by hand or use a spatula to press them out gently.
- Divide the lemon curd among the cooled pastries. Top with your desired fresh berries then dust with powdered sugar before serving. If desired, sprinkle with extra lemon zest for a nice pop of flavor. Keep chilled until ready to serve.: Once the egg is incorporated the mixture will become a touch looser and silkier, a sign it will set properly when baked. The protein from the egg helps stabilize the filling and keeps it from separating. Mix until just combined to prevent overworking the mixture which can make it dense. Watch for curdling if the cream cheese was too cold; temper the egg by whisking a spoonful of filling into it first if needed.
- Divide the cheesecake mixture among the 12 pastries, leaving space around the edges.: Spooning or piping the filling gives you control, and seeing the glossy dollops sitting in the chilled pastry is satisfying. Leaving a border protects the edges so they bake crisp and golden. If you overfill, the center may spill and prevent the pastry from browning properly. Tap the tray gently to settle the filling and keep the center slightly domed rather than overflowing.
- Bake for 20 to 25 minutes, or until the pastries are a light golden brown.: The oven will reward you with a sound of gentle crackle as the layers crisp and the filling sets, and visually you will see the pastry’s edges lift and take on a warm golden tone. This color signals Maillard reactions that add depth of flavor. If you bake too long the filling may crack and the pastry can become overly dark, while underbaking leaves the interior dough raw. Rotate the pan halfway through if your oven browns unevenly.
- Let cool completely.: Cooling lets the internal steam settle so the filling firms and the curdation step later does not slide off. The pastry will crisp further as it cools and the flavors will meld, so resist cutting into them too soon. A frequent error is serving hot which makes the pastry soft and the filling too runny; patience yields a cleaner slice and better texture.
- Divide the lemon curd among the cooled pastries.: The lemon curd adds a glossy, concentrated burst of citrus when spooned on top. Spoon it gently so it sits as a jewel like layer, and if the curd is slightly loose chill it first so it settles. Using warm curd can make the filling soft and encourage sliding, so handle with care.
- Top with your desired fresh berries then dust with powdered sugar before serving.: Placing the berries gives a fresh contrast in texture and a bright visual pop, and the dusting of powdered sugar adds a tender sweetness and prettifies the tarts. Pat the berries dry first so they do not bleed onto the curd, and arrange them in small clusters for balance. Avoid stacking heavy berries that could bruise the curd beneath.
- If desired, sprinkle with extra lemon zest for a nice pop of flavor. Keep chilled until ready to serve.: A final sprinkle of fresh lemon zest releases aromatic oils that greet the nose and heighten the taste, while chilling preserves structure and keeps the curd stable. Refrigerate loosely covered to prevent condensation, and remove from chill a few minutes before serving so the pastry regains some crispness. The main pitfall is leaving them out too long which softens the crust and dampens the overall experience.
Notes
- Chill between steps Try placing the cut pastry on the tray in the fridge for about ten minutes before filling, this keeps the layers firm and encourages stronger rise in the oven which yields a crisper final texture.
- Temper the egg If your cream cheese is quite cold, whisk a tablespoon of the filling into the beaten egg before adding it back to the bowl to prevent curdling and ensure a silky, lump free texture.
- Use a small ice cream scoop or piping bag Portion the filling consistently for uniform baking times and an even appearance, which also makes the finished tray look polished and professional.
- Dry your berries After washing, lay them on a paper towel and gently pat dry to prevent moisture from seeping into the curd and softening the pastry bottom.
- Store properly Keep finished pastries loosely covered in the refrigerator for up to two days, arranging them in a single layer to avoid squashing the berries and preserving the crispness of the pastry as much as possible.