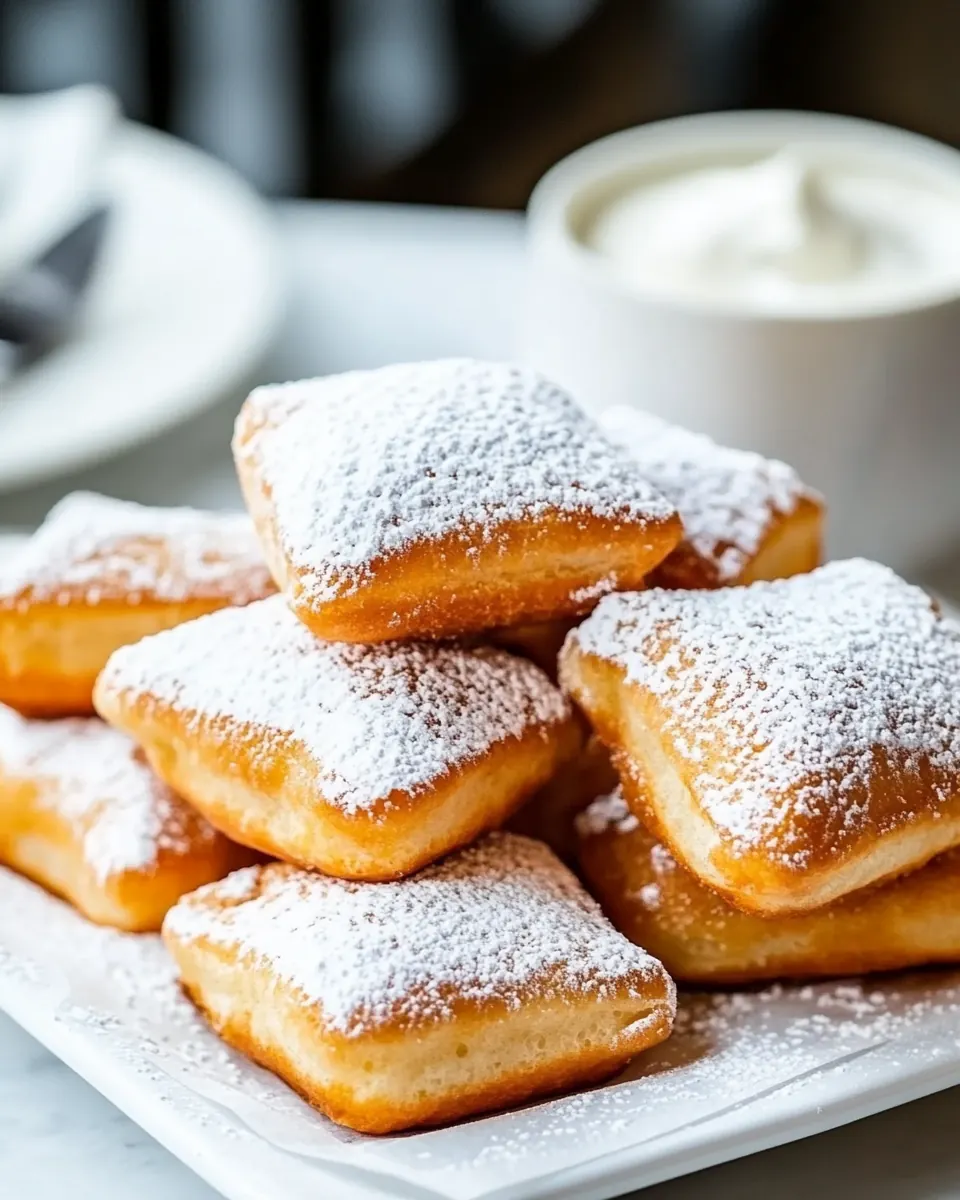
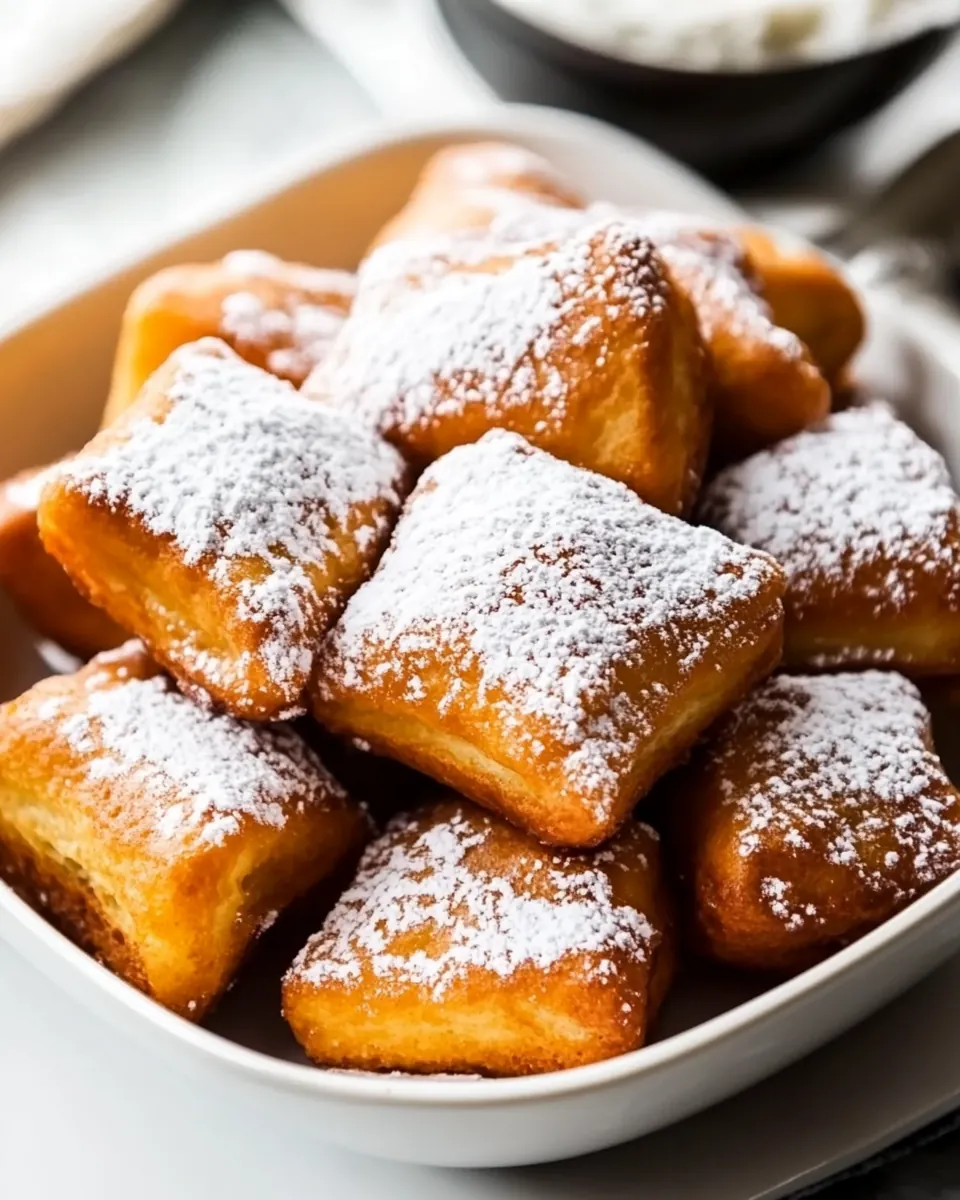
Homemade Beignets
Homemade Beignets have a way of pulling people into the kitchen, and my earliest memory of them begins with a flour dusted counter and laughter spilling from the next room. I first learned this recipe on a rainy afternoon when a neighbor knocked and offered a cup of coffee and a pastry she had just fried, warm and glossy with powdered sugar. I remember thinking how a few humble pantry items could transform into something that felt celebratory, even on an ordinary weekday.
Over the years I’ve adapted that lesson into a dependable routine I reach for when friends are coming over or when the mood calls for something comforting and slightly indulgent. The process is forgiving, the dough is soft and pillowy, and the frying stage fills the house with an irresistible aroma that makes it hard to behave until the first batch is sugared and served. I like to keep the rhythm simple, and I always tell guests to arrive hungry because these treats are best eaten right away, still warm and slightly steaming.
Recipe Snapshot
2 hr 40 mins
145 mins
15 mins
Hard
200 kcal
American
Gluten-Free, Low FODMAP
Desserts
Dutch Oven, Pizza Cutter
The Magic of This Homemade Beignets
Classic, timeless flavor
I adore how Homemade Beignets capture a crisp exterior with a tender, airy interior. Each bite is both light and satisfyingly sweet, and the contrast is why I come back to this recipe again and again. When I make them, I focus on the dough texture and the frying temperature so the center stays pillowy while the outside reaches that perfect golden color.
Simple pantry ingredients
One reason I recommend this recipe is how approachable the ingredient list is. With basics like water, flour, and sugar, you can create something special without a trip to the store. The straightforward components mean you can riff on the technique without worrying about sourcing exotic items.
Make ahead flexibility
I’ve made the dough the night before and let it rest in the refrigerator, which deepens the flavor and frees up the morning for frying. That overnight option is a lifesaver when I need dessert ready for a gathering. It also gives me control over timing, so I can wake up and fry fresh beignets when guests arrive.
Showstopper presentation
There’s an immediate sense of theatre in frying and sugar dusting. I enjoy the communal aspect, passing hot trays around and seeing people smile with powdered sugar on their lips. This dish creates memories because it invites interaction, and that is one of the strongest reasons I keep it in my repertoire.
Comfort food with a crisp edge
Finally, the texture contrast is what seals the deal for me. That initial crunch gives way to a soft crumb that practically melts. If you like foods that combine comfort with a little technique, these beignets strike that balance beautifully.
Main Ingredients for Homemade Beignets
These ingredients work together to create a dough that is both elastic and tender, able to trap air during fermentation and then puff when fried. The balance of liquid, sugar, and fat helps the crust brown while the interior stays soft. Key players are the bread flour for structure, the shortening and evaporated milk for richness, and the active dry yeast for lift and airy texture.
- 1 1/2 cups lukewarm water: Hydrate and activate the yeast while providing a warm base for dough development; lukewarm temperature helps dissolve sugar and yeast for proper fermentation. Use as the primary liquid to achieve the intended dough consistency and encourage gluten formation during mixing and kneading.
- 1/2 cup granulated sugar: Sweeten the dough and feed the yeast to boost fermentation; granulated sugar contributes to browning and flavor in the beignets. Dissolve thoroughly in the water to ensure even distribution and consistent rise throughout the dough.
- 1 envelope active dry yeast: Leaven the dough by producing carbon dioxide during fermentation; active dry yeast creates light, airy beignets when properly proofed. Sprinkle or dissolve into the warm liquid to check for foam and ensure yeast viability before combining with dry ingredients.
- 2 eggs, slightly beaten: Enrich the dough with fat and structure by incorporating proteins and moisture; slightly beaten eggs add tenderness and help bind ingredients. Beat gently to combine yolks and whites for an even texture and to improve dough elasticity.
- 1 1/4 teaspoons salt: Season the dough and balance flavors while aiding in gluten strength regulation; salt controls yeast activity and enhances overall taste. Measure carefully to avoid inhibiting fermentation, and add with dry ingredients for even dispersion.
- 1 cup evaporated milk: Add richness and a creamy note to the dough while contributing additional fat and milk solids; evaporated milk intensifies flavor and alters texture. Warm slightly to match dough temperature and incorporate smoothly for consistent hydration.
- 7 cups bread flour: Provide the main structure and bulk for the dough; bread flour supplies higher protein to develop strong gluten needed for chewy, airy beignets. Sift or measure accurately to maintain proper flour-to-liquid ratios and achieve the expected dough firmness.
- 1/4 cups shortening: Introduce solid fat to create tenderness and flakiness in the dough; shortening helps produce a delicate interior by coating flour proteins. Cut in or blend until distributed evenly to prevent overly dense spots and ensure uniform texture.
- Vegetable oil: Supply the frying medium and control frying temperature for proper puffing and browning; vegetable oil should be neutral-flavored and heated to the correct temperature. Maintain consistent oil temperature to avoid greasy beignets and ensure rapid expansion when frying.
- 3 cups confectioners’ sugar: Finish the beignets with a sweet, powdery coating that enhances visual appeal and flavor; confectioners’ sugar adheres well to warm doughnuts and melts slightly on the surface. Dust generously after frying to achieve the classic presentation and a pleasant sweetness.
Cooking Instructions for Homemade Beignets
These instructions walk you through the rhythm of mixing, rising, and frying so you end up with beignets that are golden on the outside and pillowy inside. Take your time during the rise, and keep an eye on oil temperature during frying for consistent results.
- Mix water, sugar, and yeast in a large bowl and let sit 10 minutes.: You should notice a faint yeasty, sweet aroma and tiny foam forming on the surface within about ten minutes, signaling active fermentation. This step ensures the active dry yeast is alive and ready to leaven the dough, and it sets the tone for a sturdy rise later. If no bubbles appear check the water temperature and yeast freshness as common causes for failure. Avoid adding salt at this stage, since it can inhibit yeast activity.
- In a medium bowl, whisk the eggs, salt, and evaporated milk together.: The mixture will look smooth and slightly glossy, and you may detect a mild milky scent from the evaporated milk . This combination builds richness and helps the dough hydrate evenly, which improves tenderness. A common mistake is to under-whisk, leaving bits of uneven yolk that affect texture, so whisk until uniform but not frothy.
- Add egg mixture to yeast mixture and mix.: Expect an immediate softening of the yeast mixture, with steam rising slightly if your liquids were warm. Stirring these together distributes flavors and begins gluten formation. If the mixture feels too wet, resist the urge to add extra flour right away; allow a few minutes for absorption. Overmixing at this point can toughen the final product.
- Stir in 3 cups of bread flour. (A wooden spoon is good for stirring.): As you fold in the first portion of bread flour , the texture will shift from soupy to tacky, and you might hear a faint scraping sound as the dough pulls away from the bowl. This measured addition helps you control hydration, giving the dough the chance to form bonds gradually. Adding all the flour at once risks a dense, dry dough, so portioning matters.
- Add shortening and stir it in. Stir in remaining flour.: When you work the shortening into the dough, it will create small, lubricated layers that contribute to tenderness. The dough should become more cohesive as you incorporate the remaining bread flour . If the shortening lumps, warm it slightly in your hands until it blends smoothly. Avoid overworking the dough here, which can develop too much gluten and make beignets tough.
- Place dough on a lightly floured surface and knead until smooth.: Kneading brings the dough to a silky, elastic state and you will feel it change under your palms, becoming springy and less sticky. The sound of the flour rubbing will lessen as gluten develops. A common pitfall is kneading too long, producing a tight dough that resists puffing; aim for elastic and smooth, not overly firm.
- Coat a large bowl with oil, place dough in bowl and cover with plastic wrap.: Toss a thin film of vegetable oil in the bowl so the dough can expand without sticking, and sealing it with plastic helps retain humidity. The enclosed environment encourages even rising and prevents a dry crust. If you skip the coating the dough may cling and tear during rise, impacting texture.
- Let rise at least 2 hours or place in refrigerator overnight.: During this time the aroma becomes mildly fermented and the dough roughly doubles in size, with visible bubbles underneath the surface. A slow, overnight chill will deepen flavor and develop better structure, while a two hour rise is quicker for same day service. Avoid rushing with high heat, which can cause uneven fermentation and off flavors.
- Pour about 3 inches of oil in a Dutch oven and heat to 350 degrees.: The oil should shimmer but not smoke; you will hear a faint sizzle when a small scrap of dough is tested. Maintaining a steady 350 degrees yields a crisp exterior and cooked center. Too low a temperature will make the beignets greasy, and too high will brown the outside before the middle cooks.
- Roll dough to 1/4-inch thickness and cut 2-inch squares. (This is easy to do with a pizza cutter.): Rolling to a uniform 1/4-inch thickness gives consistent puff and frying time, and cutting into 2-inch squares ensures even cooking. A pizza cutter makes clean edges and speeds the process. If pieces vary in size you will get mismatched frying results, so aim for uniformity.
- Working about 4 at a time, place in oil and fry, flipping continuously until they are golden brown.: When frying, listen for a lively sizzle and watch the surface turn an even golden brown; flipping keeps both sides uniform. The aroma will be rich and toasty as the exterior caramelizes. Avoid overcrowding which drops oil temperature and yields soggy beignets; keep batches small for consistent results.
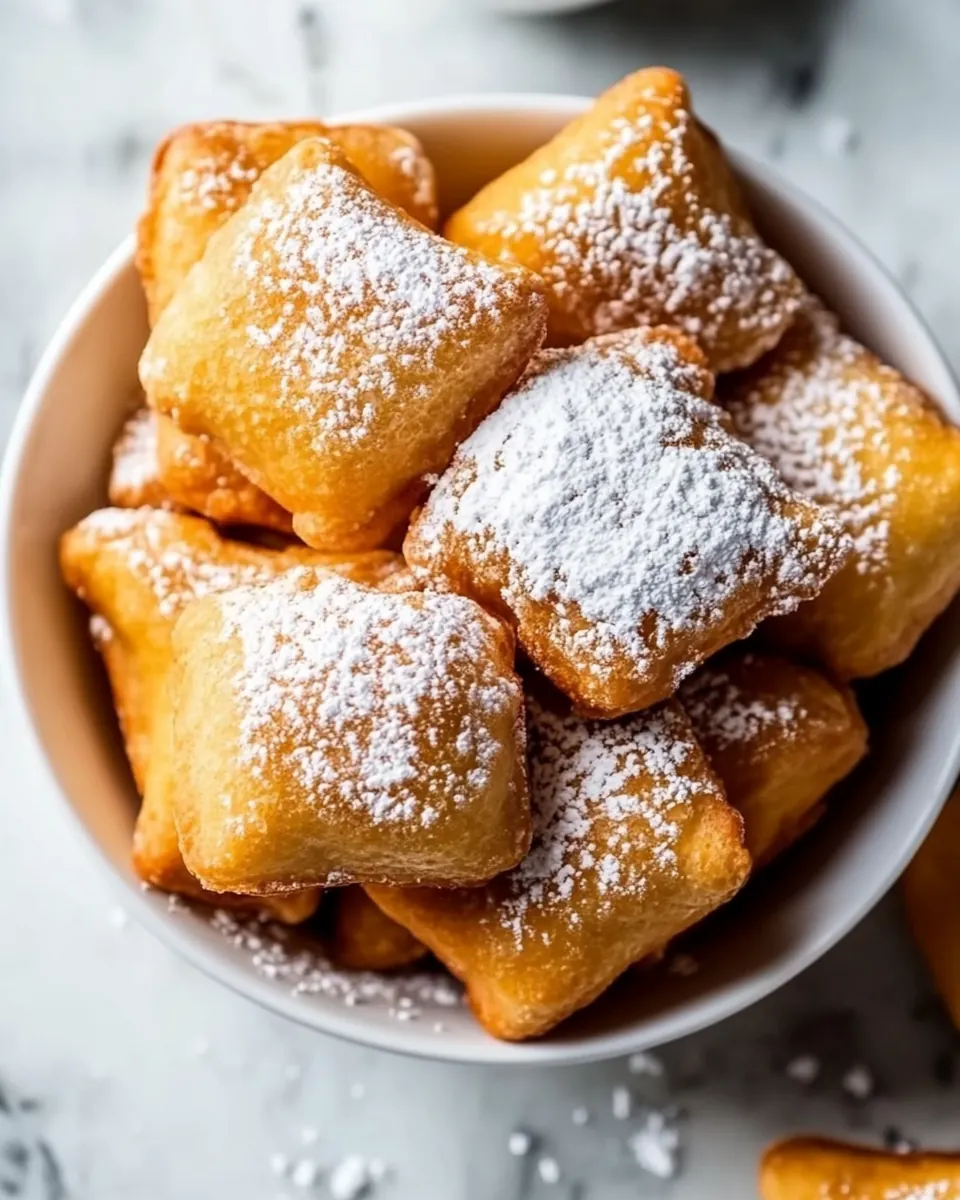
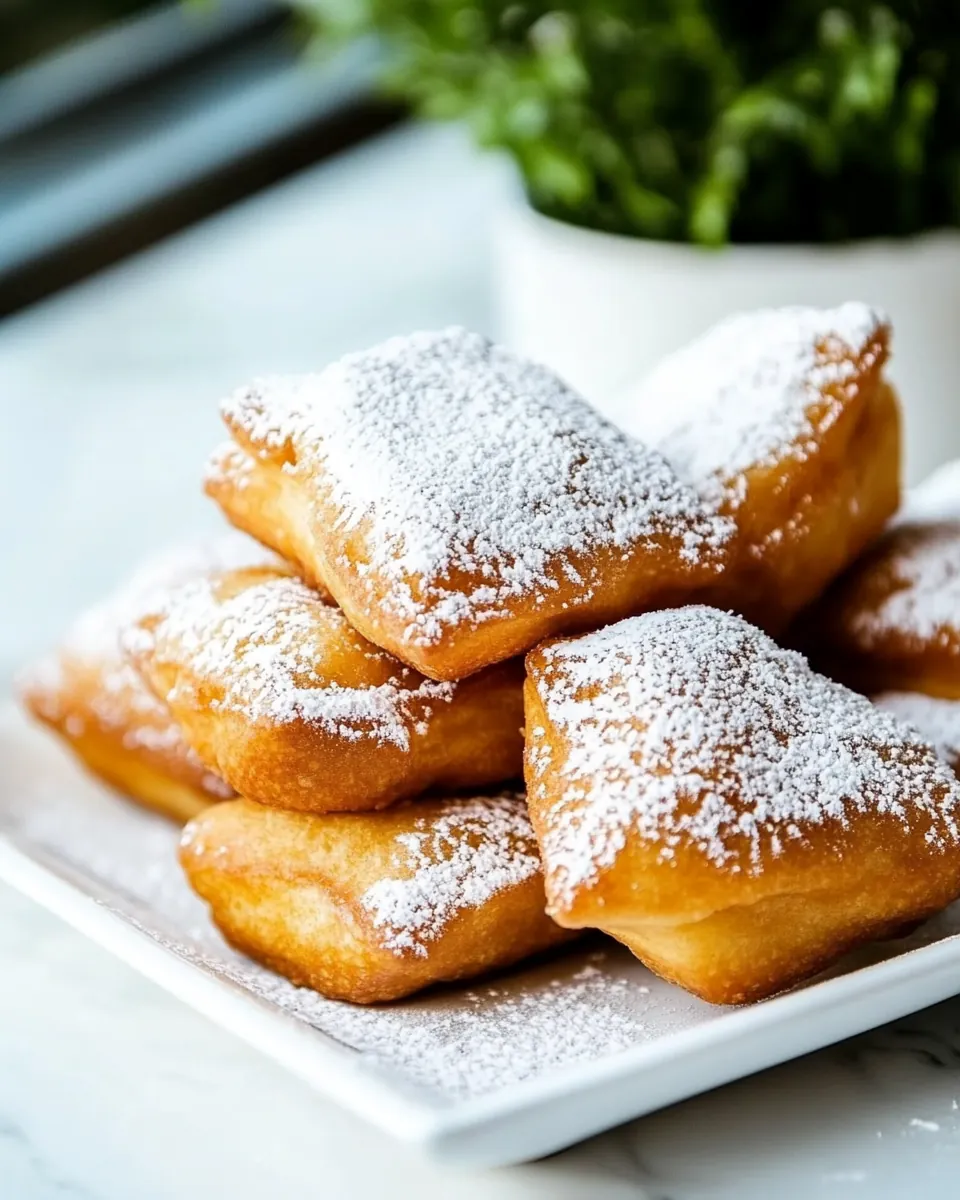
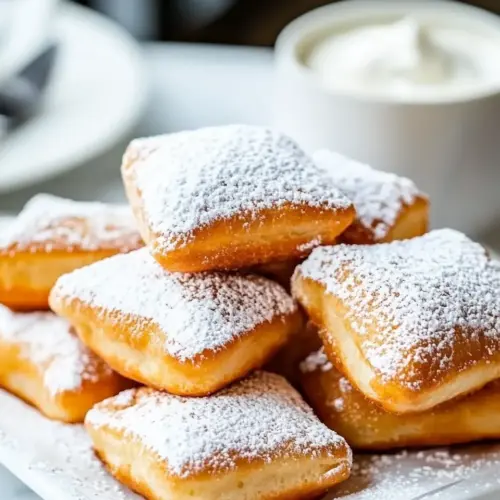
- Test one to make sure it is cooked through. Drain on paper towels and coat with powdered sugar.: Cut a test beignet to check for a fully cooked interior, which should be soft, airy, and free of raw dough. Drain briefly on paper towels to remove excess oil then toss in confectioners’ sugar while still warm so the sugar adheres and slightly melts into the surface. A common error is leaving them too long on the towel, which cools them and reduces sugar adhesion, so dust while warm.
Pro Tips and Tweaks
I like to share practical adjustments that have helped me refine this recipe over many batches. These tips focus on technique, timing, and finishing touches so you get the best possible beignets every time.
- Proof the yeast properly – Always proof your active dry yeast in lukewarm water with a pinch of granulated sugar to confirm activity; if no foam appears, replace the yeast to avoid flat dough.
- Measure flour by weight if possible – For consistent results use a scale for the bread flour, because cup measures can vary and affect dough hydration and texture.
- Chill for flavor depth – Letting the dough rest overnight in the refrigerator develops a richer flavor profile and makes shaping easier the next day.
- Maintain oil temperature – Use a thermometer to keep the vegetable oil at a steady 350 degrees, avoiding greasy or burnt beignets caused by temperature swings.
- Sift confectioners’ sugar – Sifting confectioners’ sugar before dusting prevents clumps and yields a smoother, more attractive finish on warm beignets.
What to Serve Alongside Homemade Beignets
These treats are wonderfully versatile and pair well with both beverages and simple sides for casual or festive occasions. Think morning gatherings, afternoon coffee breaks, or late night dessert spreads where the beignets star as the showpiece.
- Serve with strong coffee – A hot cup of coffee or espresso complements the sweet confectioners’ sugar coating and balances the richness.
- Accompany with fruit compote – A warm fruit compote adds a bright contrast and can be spooned over beignets for a more decadent presentation.
- Offer multiple dipping options – Small bowls of jam, chocolate spread, or honey let guests personalize each bite.
- Choose casual occasions – These are ideal for brunch, family gatherings, or festive mornings when you want a comforting sweet that feels homemade and special.
- Store briefly – Beignets are best eaten immediately; if you must hold them for a short time, keep them loosely covered to preserve texture but know they lose their peak quality after a few hours.
- Seasonal pairings – In cooler months I like to pair them with spiced hot drinks, while in spring they are lovely with bright citrus compotes.
FAQ
Conclusion
Homemade Beignets stand out for their simple ingredients and impressive results, offering a crisp outside and a pillow soft inside that makes every bite memorable. Give these a try when you want a treat that brings people together, and allow a little time for the dough to develop so the texture reaches its full potential. I hope you enjoy the warming ritual of frying and sugaring these beignets, and that they become one of your go to recipes for special mornings and cozy gatherings.
Homemade Beignets
Equipment
- Dutch Oven
- Pizza Cutter
Ingredients
- 1 1/2 cups lukewarm water Hydrate and activate the yeast while providing a warm base for dough development; lukewarm temperature helps dissolve sugar and yeast for proper fermentation. Use as the primary liquid to achieve the intended dough consistency and encourage gluten formation during mixing and kneading.
- 1/2 cup granulated sugar Sweeten the dough and feed the yeast to boost fermentation; granulated sugar contributes to browning and flavor in the beignets. Dissolve thoroughly in the water to ensure even distribution and consistent rise throughout the dough.
- 1 envelope active dry yeast Leaven the dough by producing carbon dioxide during fermentation; active dry yeast creates light, airy beignets when properly proofed. Sprinkle or dissolve into the warm liquid to check for foam and ensure yeast viability before combining with dry ingredients.
- 2 eggs, slightly beaten Enrich the dough with fat and structure by incorporating proteins and moisture; slightly beaten eggs add tenderness and help bind ingredients. Beat gently to combine yolks and whites for an even texture and to improve dough elasticity.
- 1 1/4 teaspoons salt Season the dough and balance flavors while aiding in gluten strength regulation; salt controls yeast activity and enhances overall taste. Measure carefully to avoid inhibiting fermentation, and add with dry ingredients for even dispersion.
- 1 cup evaporated milk Add richness and a creamy note to the dough while contributing additional fat and milk solids; evaporated milk intensifies flavor and alters texture. Warm slightly to match dough temperature and incorporate smoothly for consistent hydration.
- 7 cups bread flour Provide the main structure and bulk for the dough; bread flour supplies higher protein to develop strong gluten needed for chewy, airy beignets. Sift or measure accurately to maintain proper flour-to-liquid ratios and achieve the expected dough firmness.
- 1/4 cups shortening Introduce solid fat to create tenderness and flakiness in the dough; shortening helps produce a delicate interior by coating flour proteins. Cut in or blend until distributed evenly to prevent overly dense spots and ensure uniform texture.
- Vegetable oil Supply the frying medium and control frying temperature for proper puffing and browning; vegetable oil should be neutral-flavored and heated to the correct temperature. Maintain consistent oil temperature to avoid greasy beignets and ensure rapid expansion when frying.
- 3 cups confectioners’ sugar Finish the beignets with a sweet, powdery coating that enhances visual appeal and flavor; confectioners’ sugar adheres well to warm doughnuts and melts slightly on the surface. Dust generously after frying to achieve the classic presentation and a pleasant sweetness.
Instructions
- Mix water, sugar, and yeast in a large bowl and let sit 10 minutes.: You should notice a faint yeasty, sweet aroma and tiny foam forming on the surface within about ten minutes, signaling active fermentation. This step ensures the active dry yeast is alive and ready to leaven the dough, and it sets the tone for a sturdy rise later. If no bubbles appear check the water temperature and yeast freshness as common causes for failure. Avoid adding salt at this stage, since it can inhibit yeast activity.
- In a medium bowl, whisk the eggs, salt, and evaporated milk together.: The mixture will look smooth and slightly glossy, and you may detect a mild milky scent from the evaporated milk . This combination builds richness and helps the dough hydrate evenly, which improves tenderness. A common mistake is to under-whisk, leaving bits of uneven yolk that affect texture, so whisk until uniform but not frothy.
- Add egg mixture to yeast mixture and mix.: Expect an immediate softening of the yeast mixture, with steam rising slightly if your liquids were warm. Stirring these together distributes flavors and begins gluten formation. If the mixture feels too wet, resist the urge to add extra flour right away; allow a few minutes for absorption. Overmixing at this point can toughen the final product.
- Stir in 3 cups of bread flour. (A wooden spoon is good for stirring.): As you fold in the first portion of bread flour , the texture will shift from soupy to tacky, and you might hear a faint scraping sound as the dough pulls away from the bowl. This measured addition helps you control hydration, giving the dough the chance to form bonds gradually. Adding all the flour at once risks a dense, dry dough, so portioning matters.
- Add shortening and stir it in. Stir in remaining flour.: When you work the shortening into the dough, it will create small, lubricated layers that contribute to tenderness. The dough should become more cohesive as you incorporate the remaining bread flour . If the shortening lumps, warm it slightly in your hands until it blends smoothly. Avoid overworking the dough here, which can develop too much gluten and make beignets tough.
- Place dough on a lightly floured surface and knead until smooth.: Kneading brings the dough to a silky, elastic state and you will feel it change under your palms, becoming springy and less sticky. The sound of the flour rubbing will lessen as gluten develops. A common pitfall is kneading too long, producing a tight dough that resists puffing; aim for elastic and smooth, not overly firm.
- Coat a large bowl with oil, place dough in bowl and cover with plastic wrap.: Toss a thin film of vegetable oil in the bowl so the dough can expand without sticking, and sealing it with plastic helps retain humidity. The enclosed environment encourages even rising and prevents a dry crust. If you skip the coating the dough may cling and tear during rise, impacting texture.
- Let rise at least 2 hours or place in refrigerator overnight.: During this time the aroma becomes mildly fermented and the dough roughly doubles in size, with visible bubbles underneath the surface. A slow, overnight chill will deepen flavor and develop better structure, while a two hour rise is quicker for same day service. Avoid rushing with high heat, which can cause uneven fermentation and off flavors.
- Pour about 3 inches of oil in a Dutch oven and heat to 350 degrees.: The oil should shimmer but not smoke; you will hear a faint sizzle when a small scrap of dough is tested. Maintaining a steady 350 degrees yields a crisp exterior and cooked center. Too low a temperature will make the beignets greasy, and too high will brown the outside before the middle cooks.
- Roll dough to 1/4-inch thickness and cut 2-inch squares. (This is easy to do with a pizza cutter.): Rolling to a uniform 1/4-inch thickness gives consistent puff and frying time, and cutting into 2-inch squares ensures even cooking. A pizza cutter makes clean edges and speeds the process. If pieces vary in size you will get mismatched frying results, so aim for uniformity.
- Working about 4 at a time, place in oil and fry, flipping continuously until they are golden brown.: When frying, listen for a lively sizzle and watch the surface turn an even golden brown; flipping keeps both sides uniform. The aroma will be rich and toasty as the exterior caramelizes. Avoid overcrowding which drops oil temperature and yields soggy beignets; keep batches small for consistent results.
- Test one to make sure it is cooked through. Drain on paper towels and coat with powdered sugar.: Cut a test beignet to check for a fully cooked interior, which should be soft, airy, and free of raw dough. Drain briefly on paper towels to remove excess oil then toss in confectioners’ sugar while still warm so the sugar adheres and slightly melts into the surface. A common error is leaving them too long on the towel, which cools them and reduces sugar adhesion, so dust while warm.
Notes
- Proof the yeast properly - Always proof your active dry yeast in lukewarm water with a pinch of granulated sugar to confirm activity; if no foam appears, replace the yeast to avoid flat dough.
- Measure flour by weight if possible - For consistent results use a scale for the bread flour, because cup measures can vary and affect dough hydration and texture.
- Chill for flavor depth - Letting the dough rest overnight in the refrigerator develops a richer flavor profile and makes shaping easier the next day.
- Maintain oil temperature - Use a thermometer to keep the vegetable oil at a steady 350 degrees, avoiding greasy or burnt beignets caused by temperature swings.
- Sift confectioners’ sugar - Sifting confectioners’ sugar before dusting prevents clumps and yields a smoother, more attractive finish on warm beignets.