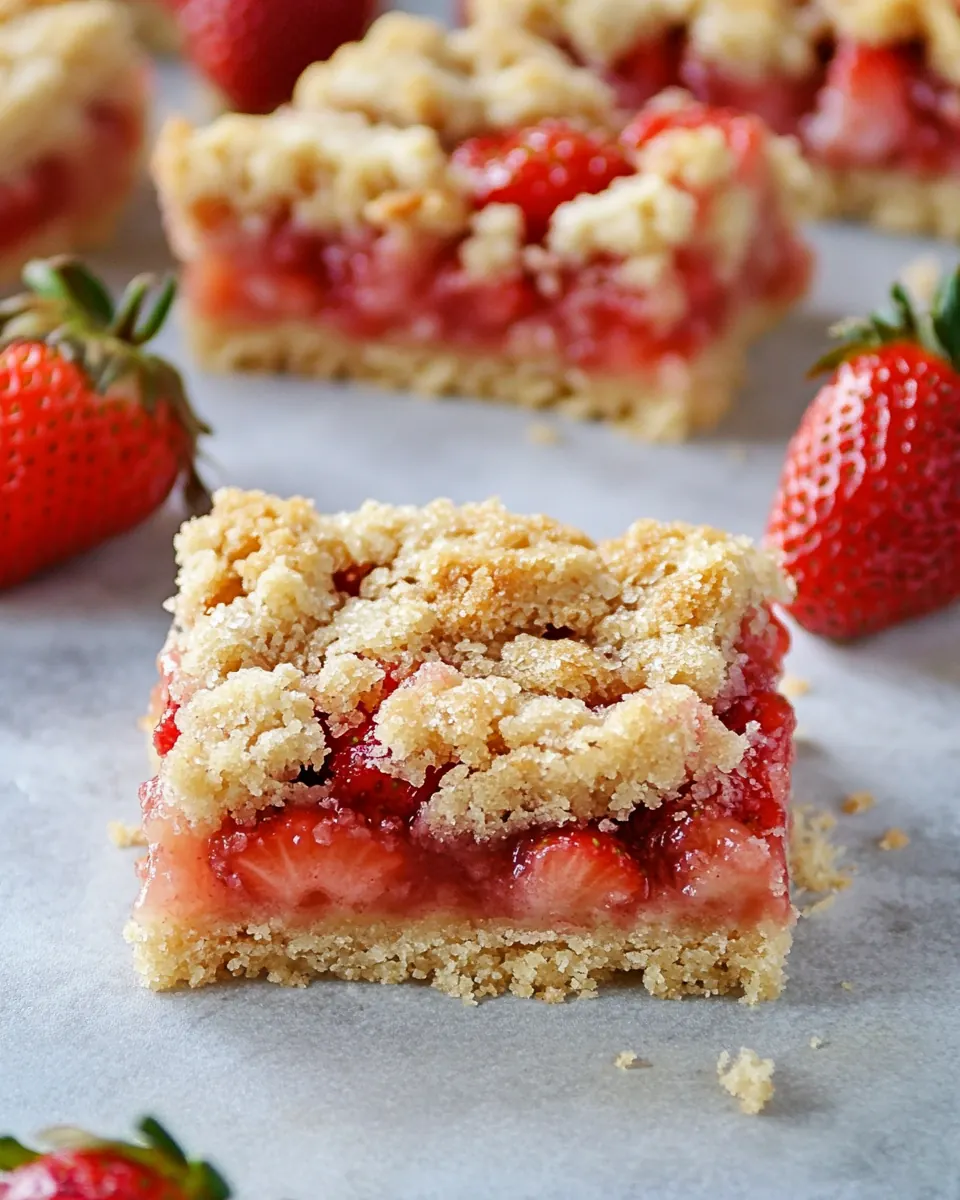
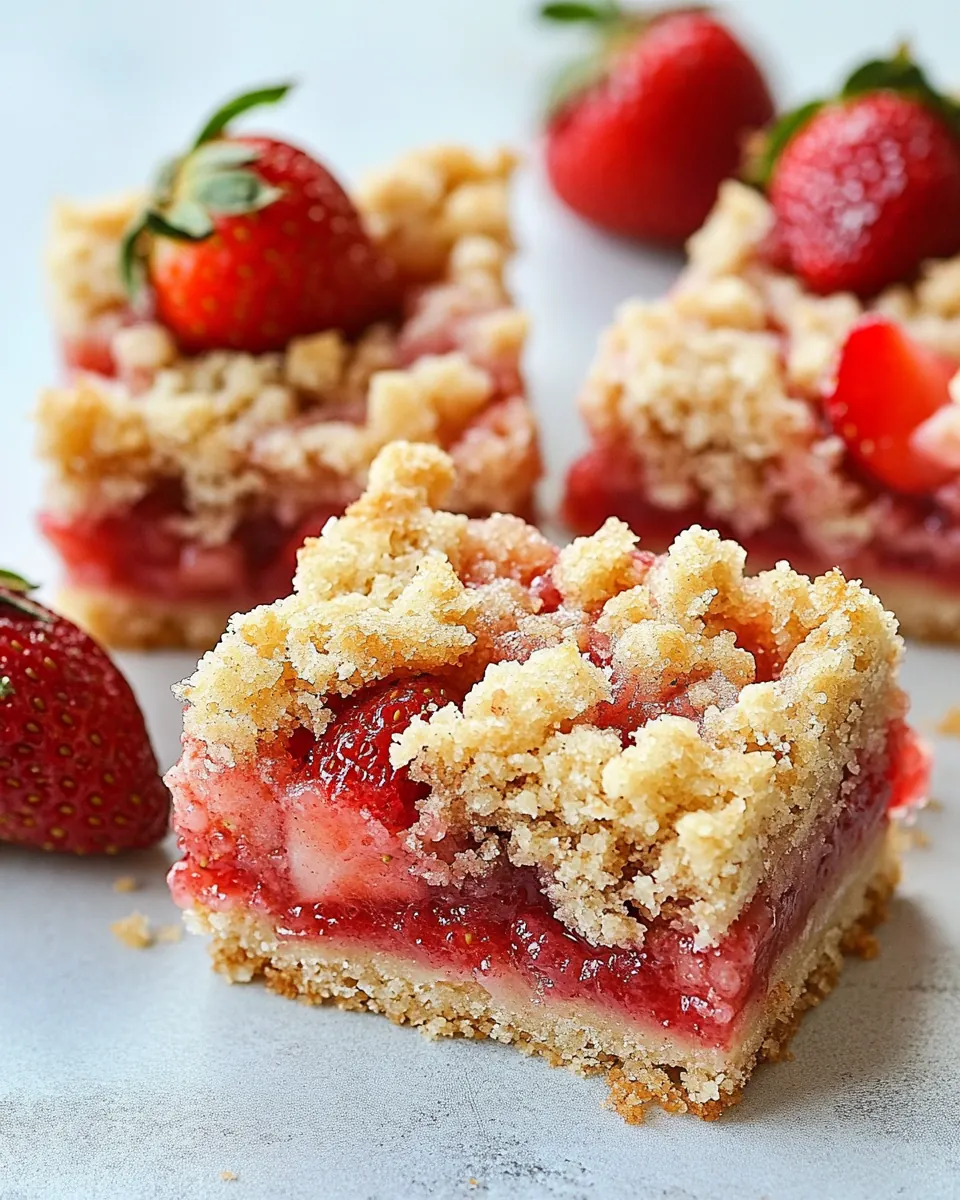
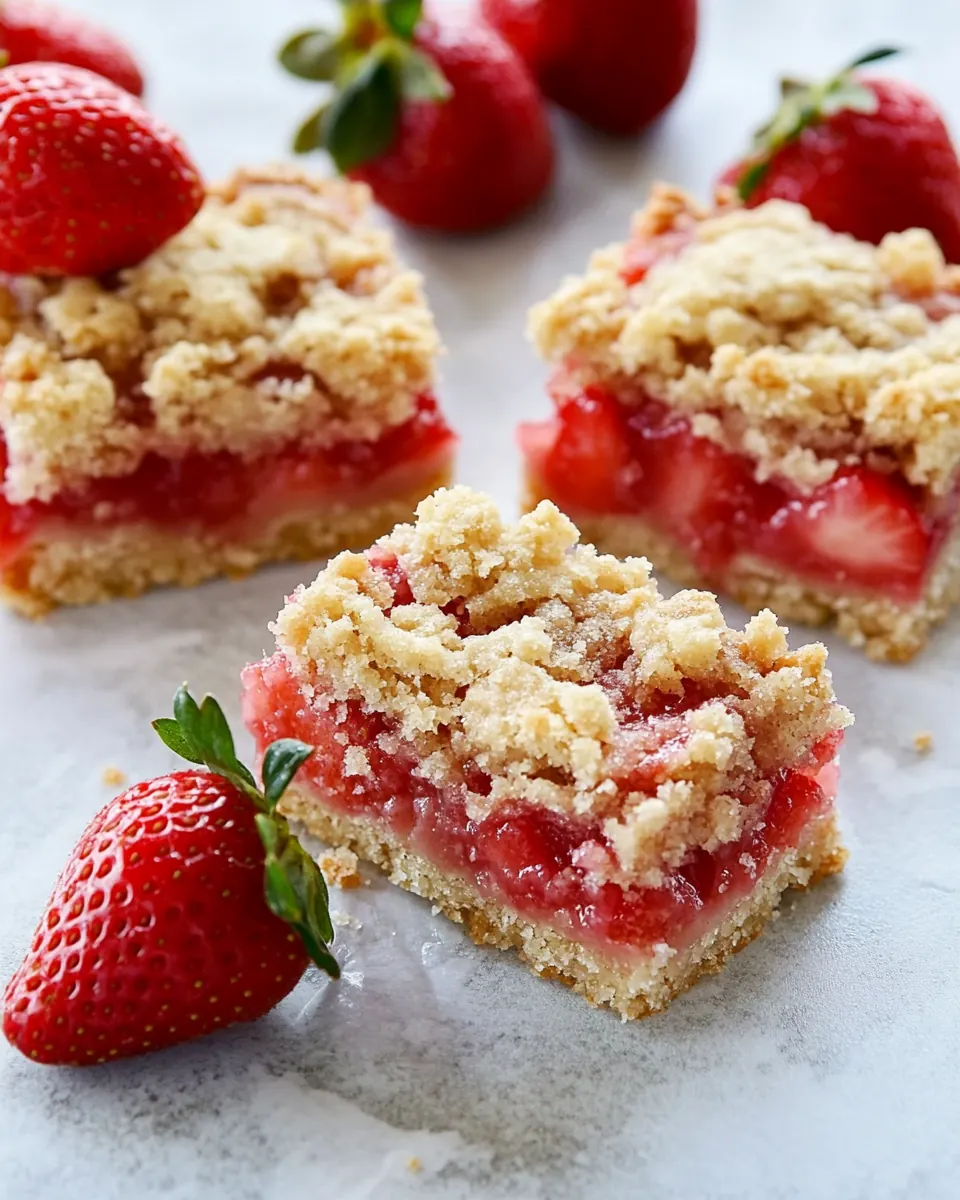
Strawberry Crumb Bars
Strawberry Crumb Bars are the kind of recipe I reach for when I want something that tastes like a warm, sunlit afternoon in my kitchen. The first time I made these I was short on time but craving something berry forward and homey, so I adapted a basic crumb base into a handheld treat that friends could grab between stories and laughter. I still remember the way the kitchen smelled as the crumbs browned, that sweet strawberry perfume lifting and weaving with butter and vanilla.
Over the years I have refined the balance between the buttery flour crust and the juicy strawberries. I love how the crumb topping gives a little crisp contrast to the soft fruit, and how a touch of lemon juice brightens the whole bar. When I bring a pan to a gathering people always ask for the recipe, which makes me happy because it is simple and forgiving. These bars travel well, they slice into generous squares, and they are a favorite for picnic baskets in spring when strawberries are at their best.
Recipe Snapshot
55 mins
15 mins
40 mins
Medium
180 kcal
American
Gluten-Free, Low FODMAP
Desserts
8×8 inch pan, Parchment paper, Measuring cup, Mixing bowls, Fork or food processor
The Magic of This Strawberry Crumb Bars
1. A perfect balance of texture
I adore how Strawberry Crumb Bars layer a tender, slightly sandy crust with a juicy, jam like strawberries center and a crisp, golden crumb top. The contrast between soft and crunchy keeps every bite interesting, and I often find myself closing my eyes at the last chew because the mouthfeel is that satisfying.
2. Simple pantry ingredients, big payoff
We are talking about staples like flour, sugar, unsalted butter, and a single egg. I appreciate recipes that do not demand specialty items, yet deliver a dessert that tastes elevated. The technique amplifies humble components into something that feels celebratory.
3. Seasonal star ingredient
When strawberries are ripe and fragrant, they become the true hero. I like that this recipe showcases bright, fresh fruit rather than masking it. A splash of lemon juice sharpens the flavor, and a little cornstarch creates a glossy filling that holds up when sliced.
4. Crowd friendly and portable
I often bring these to potlucks because they are easy to portion and travel without fuss. You can make them ahead and refrigerate them, then let them warm slightly before serving for the best texture. They are also forgiving if you press the crust a bit thicker or thinner, which I find comforting when baking with unpredictable schedules.
5. Versatile for tweaks
Although I love the classic approach, this formula invites small creativity. I sometimes add a pinch more sugar on top before baking for extra caramelized crunch, or I adjust the fruit sweetness depending on the berries. It’s a recipe that responds well to small nudges, which is why it has stayed in my rotation.
Ingredients Required for Strawberry Crumb Bars
These ingredients form a simple, classic assembly: a buttery base, a bright fruit filling, and a crumbly topping. The key players are the flour and unsalted butter which create a tender, sandy structure, and the strawberries which provide fresh acidity and sweetness. Sugar plays both preservative and caramelizing roles, while a little cornstarch thickens the fruit juices for clean slices.
- 1 1/2 cups flour: Combine to create the base structure and tender crumb of the bars; provides gluten for binding and texture when mixed with fats and liquids. Sift or whisk with leavening to ensure even distribution and avoid lumps. Measure precisely for consistent dough consistency and bake performance.
- 1/2 cups sugar: Sweeten and balance flavors while contributing to slight caramelization at the crust edges; helps tenderize the crumb when creamed with butter. Adjust granulation for texture differences between coarse and fine sugars.
- 1/2 teaspoon baking powder: Leaven lightly to give a subtle lift and prevent a dense crust; reacts with moisture and contributes to a delicate crumb. Measure carefully to avoid chemical aftertastes and ensure even distribution with dry ingredients.
- 1/4 teaspoons salt: Enhance and balance overall flavor by moderating sweetness and strengthening structure; helps highlight the fruit notes. Dissolve evenly into dry ingredients to prevent concentrated salty pockets.
- 1/2 cup unsalted butter: Provide richness, moisture, and buttery flavor while contributing to the tender, flaky texture of the crust; melts during baking to create a cohesive dough. Use chilled or softened butter as specified to control spread and crumb.
- 1 large egg: Bind ingredients together, add moisture, and contribute to structure and richness; eggs also aid in browning and help set the bars during baking. Beat lightly or incorporate as directed to achieve even distribution without overworking the dough.
- 1 teaspoon vanilla extract: Impart aromatic warmth and deepen overall flavor profile; enhances the sweetness and complements the fruit filling. Stir into wet ingredients to distribute aroma evenly throughout the bars.
- 2 cups strawberries, chopped: Provide fresh fruity body and texture for the filling; chopped strawberries release juices and create natural sweetness and slight acidity. Macerate or toss with sugar and thickener to develop a jammy consistency before layering.
- 1 tablespoon lemon juice: Brighten and balance sweetness by adding acidity to the fruit; helps preserve color and accentuates strawberry flavor. Mix into chopped fruit to evenly distribute tartness and freshness.
- 1 teaspoon vanilla extract: Add a second layer of aromatic vanilla to reinforce flavor complexity in the filling or dough; deepens the overall profile for a more pronounced vanilla presence. Stir into wet fruit mixture so the aroma infuses evenly.
- 1/4 cups sugar: Increase sweetness of the filling while helping to draw out fruit juices during maceration; contributes to a cohesive, jammy texture. Combine with fruit and thickeners to balance tartness and achieve desired consistency.
- 1 tablespoon cornstarch: Thicken fruit juices to create a stable, jam-like filling that prevents sogginess; binds released liquid into a glossy, sliceable layer. Dissolve with a small amount of liquid or sugar before heating to avoid lumps and ensure smooth texture.
Directions for Strawberry Crumb Bars
These directions will guide you through assembly with small sensory cues and troubleshooting notes so you can bake confident, tidy bars. I like to move deliberately through each step, sensing the textures and aromas as the dish develops. Follow the timeline and watch the visual cues to know when each phase is complete.
- Preheat oven to 375 degrees and grease an 8×8 inch pan or line with parchment paper.: As the oven warms to 375 degrees , you will notice a gentle, dry heat settling in the kitchen, which primes the pan for even baking. Greasing or lining the 8×8 inch pan ensures the crust releases cleanly, so you end up with tidy bars rather than a sticky mess. I press a sheet of parchment into the pan and leave a small overhang for easy removal, which saves time and stress. A common misstep is skipping the parchment and struggling to lift the bars, so take this small step for a neater result. Expect the oven to hum and the kitchen air to feel warmer as it approaches temperature.
- FOR THE CRUST: Whisk together the flour, sugar, baking powder, and salt. Cut in the butter with a fork until mixture is crumbly. Mix in the egg and vanilla. Note: If you’re using a food processor you can just add everything to the food processor and pulse until crumbly. Then add in the egg and vanilla and process until combined.: Whisk together the flour, sugar, baking powder, and salt. Cut in the butter with a fork until mixture is crumbly. Mix in the egg and vanilla. Note: If you’re using a food processor you can just add everything to the food processor and pulse until crumbly. Then add in the egg and vanilla and process until combined : The dry ingredients should look uniformly pale and powdery once whisked, with no streaks of unblended flour . When you cut in the unsalted butter , aim for pea size pieces so the mixture resembles coarse crumbs; these bits of butter melt during baking to create pockets of tenderness. After adding the egg and vanilla extract , the dough will come together into a slightly sticky mass that holds if pressed; this signals proper binding. If the dough feels too wet, chill it briefly rather than adding more flour , which can dry out the bars. Over-processing in a machine can make the texture too fine, so pulse carefully and stop as soon as the dough binds.
- Press half of the mixture into the prepared pan. Reserve the other half for later.: When you press half the dough into the pan, use even pressure so the base is level and compact without being overworked; this creates a uniform foundation that bakes consistently. I press with the bottom of a measuring cup to get a smooth surface and consistent thickness. The reserved half will become the crumb topping, so keep it in a bowl or covered while you prepare the fruit. One mistake I see is pressing too thin a base which becomes overbrowned before the filling sets, so aim for moderate thickness for the best balance.
- FOR THE Strawberries: Toss strawberries with lemon juice and vanilla extract. Sprinkle with the sugar and cornstarch. Toss to coat.: Toss strawberries with lemon juice and vanilla extract. Sprinkle with the sugar and cornstarch. Toss to coat : As you toss, the strawberries will start releasing a bit of juice, and the lemon juice will brighten their color and scent. The cornstarch combined with sugar should coat the fruit in a light, slightly dusty sheen, which will thicken into a glossy filling while baking. The smell should be fresher and slightly tangy from the citrus, which balances the sweetness. Avoid letting them sit too long after coating, or they will become overly macerated and watery; mix and proceed to the next step promptly.
- Spoon strawberries over the bottom crust discarding the liquid at the bottom of the strawberries. Sprinkle reserved dough on top of strawberries.: Use a slotted spoon if there is excess liquid at the bottom of the fruit bowl, because too much syrup will make the base soggy during baking. Spread the fruit in an even layer so each bar gets a consistent amount of filling, and then crumble the reserved dough across the top so there are both larger chunks and fine crumbs for texture. The contrast between generous fruit pockets and crisp crumbs is part of the charm. A common error is overloading the pan with fruit which pushes the topping into the base, so keep a balanced ratio for tidy slices.
- Bake for 35-45 minutes or until topping is lightly browned. Cool completely and cut into bars. Store in the refrigerator but I like to serve closer to room temperature.: As the bars bake, listen for a gentle crackle as moisture evaporates and watch the crumbs change from pale to a warm golden tan, which signals caramelization. The aroma will shift from raw dough to a warm, buttery fragrance with a hint of jammy fruit. Allowing the pan to cool completely is crucial because warm filling will bleed and the bars will not slice cleanly; chilling firms the filling and makes cutting neat. Store in the refrigerator to prolong freshness, but bring them near room temperature before serving to let flavors open and the crumb soften slightly. Cutting too soon is the most common mistake, so be patient and give them time to set.
Substitutions and Tips
These tips expand on small choices that make a big difference when baking Strawberry Crumb Bars. I include practical swaps and techniques I use most often so you can get reliable results.
- Cold butter technique is key: Keep your unsalted butter cold until you cut it in to form pea sized pieces, which creates tender pockets as it melts during baking.
- Strawberry sweetness check helps balance sugar: Taste your strawberries before adding sugar and adjust the sugar in the filling if berries are very sweet or quite tart.
- Draining excess juices avoids sogginess: After tossing the fruit with cornstarch and sugar, let it sit briefly and skim off any puddled liquid so the crust stays crisp.
- Parchment overhang simplifies removal: Line the pan with parchment leaving two opposite sides long so you can lift the whole slab out easily for slicing.
- Even pressing ensures uniform bake: Use a measuring cup or your hands to press the base evenly, preventing thin spots that overbrown while the center finishes.
- Proper cooling gives clean slices: Cool the bars completely at room temperature, then chill briefly before cutting to achieve tidy squares without the filling oozing.
Perfect Matches for Strawberry Crumb Bars
These serving ideas and pairings will help you present Strawberry Crumb Bars beautifully. The list includes pairings for occasions, storage notes, and seasonal suggestions so you can match the bars to the moment.
- Casual picnic, pack bars in layers separated by parchment for a perfect outdoor treat that travels well and pairs with iced tea.
- Spring brunch, serve bars alongside a bowl of fresh fruit and light coffee for a bright, seasonal spread that highlights ripe strawberries.
- Potluck friendly, cut the slab into squares and arrange on a platter with a dusting of powdered sugar or a simple drizzle, then let guests help themselves.
- Storage tips, refrigerate in an airtight container for up to five days, and bring to near room temperature before serving to restore the ideal crumb texture.
- Make ahead, bake a day in advance and store chilled; the flavors meld and the bars are easier to slice cleanly after cooling.
- Seasonal pairing, in spring serve with light herbal teas or a citrusy beverage to complement the fruit brightness and buttery crust.
FAQ
Conclusion
These Strawberry Crumb Bars combine a buttery, tender base with a bright, slightly thickened strawberry filling and a crisp crumb topping, making them a standout spring dessert. Give them a try when you want a dessert that is both homey and elegant, one that travels well to gatherings and slices into satisfying squares. They reward small attentions like chilling before cutting and careful draining of juicy fruit, and they always seem to disappear fast at any table. I hope you enjoy baking them and sharing the warm, fruity aroma they bring to your kitchen.
Strawberry Crumb Bars
Equipment
- 8×8-inch pan
- Parchment Paper
- Measuring Cup
- Mixing Bowls
- Fork or food processor
Ingredients
- 1 1/2 cups flour Combine to create the base structure and tender crumb of the bars; provides gluten for binding and texture when mixed with fats and liquids. Sift or whisk with leavening to ensure even distribution and avoid lumps. Measure precisely for consistent dough consistency and bake performance.
- 1/2 cups sugar Sweeten and balance flavors while contributing to slight caramelization at the crust edges; helps tenderize the crumb when creamed with butter. Adjust granulation for texture differences between coarse and fine sugars.
- 1/2 teaspoon baking powder Leaven lightly to give a subtle lift and prevent a dense crust; reacts with moisture and contributes to a delicate crumb. Measure carefully to avoid chemical aftertastes and ensure even distribution with dry ingredients.
- 1/4 teaspoons salt Enhance and balance overall flavor by moderating sweetness and strengthening structure; helps highlight the fruit notes. Dissolve evenly into dry ingredients to prevent concentrated salty pockets.
- 1/2 cup unsalted butter Provide richness, moisture, and buttery flavor while contributing to the tender, flaky texture of the crust; melts during baking to create a cohesive dough. Use chilled or softened butter as specified to control spread and crumb.
- 1 large egg Bind ingredients together, add moisture, and contribute to structure and richness; eggs also aid in browning and help set the bars during baking. Beat lightly or incorporate as directed to achieve even distribution without overworking the dough.
- 1 teaspoon vanilla extract Impart aromatic warmth and deepen overall flavor profile; enhances the sweetness and complements the fruit filling. Stir into wet ingredients to distribute aroma evenly throughout the bars.
- 2 cups strawberries, chopped Provide fresh fruity body and texture for the filling; chopped strawberries release juices and create natural sweetness and slight acidity. Macerate or toss with sugar and thickener to develop a jammy consistency before layering.
- 1 tablespoon lemon juice Brighten and balance sweetness by adding acidity to the fruit; helps preserve color and accentuates strawberry flavor. Mix into chopped fruit to evenly distribute tartness and freshness.
- 1 teaspoon vanilla extract Add a second layer of aromatic vanilla to reinforce flavor complexity in the filling or dough; deepens the overall profile for a more pronounced vanilla presence. Stir into wet fruit mixture so the aroma infuses evenly.
- 1/4 cups sugar Increase sweetness of the filling while helping to draw out fruit juices during maceration; contributes to a cohesive, jammy texture. Combine with fruit and thickeners to balance tartness and achieve desired consistency.
- 1 tablespoon cornstarch Thicken fruit juices to create a stable, jam-like filling that prevents sogginess; binds released liquid into a glossy, sliceable layer. Dissolve with a small amount of liquid or sugar before heating to avoid lumps and ensure smooth texture.
Instructions
- Preheat oven to 375 degrees and grease an 8×8 inch pan or line with parchment paper.: As the oven warms to 375 degrees , you will notice a gentle, dry heat settling in the kitchen, which primes the pan for even baking. Greasing or lining the 8×8 inch pan ensures the crust releases cleanly, so you end up with tidy bars rather than a sticky mess. I press a sheet of parchment into the pan and leave a small overhang for easy removal, which saves time and stress. A common misstep is skipping the parchment and struggling to lift the bars, so take this small step for a neater result. Expect the oven to hum and the kitchen air to feel warmer as it approaches temperature.
- FOR THE CRUST: Whisk together the flour, sugar, baking powder, and salt. Cut in the butter with a fork until mixture is crumbly. Mix in the egg and vanilla. Note: If you’re using a food processor you can just add everything to the food processor and pulse until crumbly. Then add in the egg and vanilla and process until combined.: Whisk together the flour, sugar, baking powder, and salt. Cut in the butter with a fork until mixture is crumbly. Mix in the egg and vanilla. Note: If you’re using a food processor you can just add everything to the food processor and pulse until crumbly. Then add in the egg and vanilla and process until combined : The dry ingredients should look uniformly pale and powdery once whisked, with no streaks of unblended flour . When you cut in the unsalted butter , aim for pea size pieces so the mixture resembles coarse crumbs; these bits of butter melt during baking to create pockets of tenderness. After adding the egg and vanilla extract , the dough will come together into a slightly sticky mass that holds if pressed; this signals proper binding. If the dough feels too wet, chill it briefly rather than adding more flour , which can dry out the bars. Over-processing in a machine can make the texture too fine, so pulse carefully and stop as soon as the dough binds.
- Press half of the mixture into the prepared pan. Reserve the other half for later.: When you press half the dough into the pan, use even pressure so the base is level and compact without being overworked; this creates a uniform foundation that bakes consistently. I press with the bottom of a measuring cup to get a smooth surface and consistent thickness. The reserved half will become the crumb topping, so keep it in a bowl or covered while you prepare the fruit. One mistake I see is pressing too thin a base which becomes overbrowned before the filling sets, so aim for moderate thickness for the best balance.
- FOR THE Strawberries: Toss strawberries with lemon juice and vanilla extract. Sprinkle with the sugar and cornstarch. Toss to coat.: Toss strawberries with lemon juice and vanilla extract. Sprinkle with the sugar and cornstarch. Toss to coat : As you toss, the strawberries will start releasing a bit of juice, and the lemon juice will brighten their color and scent. The cornstarch combined with sugar should coat the fruit in a light, slightly dusty sheen, which will thicken into a glossy filling while baking. The smell should be fresher and slightly tangy from the citrus, which balances the sweetness. Avoid letting them sit too long after coating, or they will become overly macerated and watery; mix and proceed to the next step promptly.
- Spoon strawberries over the bottom crust discarding the liquid at the bottom of the strawberries. Sprinkle reserved dough on top of strawberries.: Use a slotted spoon if there is excess liquid at the bottom of the fruit bowl, because too much syrup will make the base soggy during baking. Spread the fruit in an even layer so each bar gets a consistent amount of filling, and then crumble the reserved dough across the top so there are both larger chunks and fine crumbs for texture. The contrast between generous fruit pockets and crisp crumbs is part of the charm. A common error is overloading the pan with fruit which pushes the topping into the base, so keep a balanced ratio for tidy slices.
- Bake for 35-45 minutes or until topping is lightly browned. Cool completely and cut into bars. Store in the refrigerator but I like to serve closer to room temperature.: As the bars bake, listen for a gentle crackle as moisture evaporates and watch the crumbs change from pale to a warm golden tan, which signals caramelization. The aroma will shift from raw dough to a warm, buttery fragrance with a hint of jammy fruit. Allowing the pan to cool completely is crucial because warm filling will bleed and the bars will not slice cleanly; chilling firms the filling and makes cutting neat. Store in the refrigerator to prolong freshness, but bring them near room temperature before serving to let flavors open and the crumb soften slightly. Cutting too soon is the most common mistake, so be patient and give them time to set.
Notes
- Cold butter technique is key: Keep your unsalted butter cold until you cut it in to form pea sized pieces, which creates tender pockets as it melts during baking.
- Strawberry sweetness check helps balance sugar: Taste your strawberries before adding sugar and adjust the sugar in the filling if berries are very sweet or quite tart.
- Draining excess juices avoids sogginess: After tossing the fruit with cornstarch and sugar, let it sit briefly and skim off any puddled liquid so the crust stays crisp.
- Parchment overhang simplifies removal: Line the pan with parchment leaving two opposite sides long so you can lift the whole slab out easily for slicing.
- Even pressing ensures uniform bake: Use a measuring cup or your hands to press the base evenly, preventing thin spots that overbrown while the center finishes.
- Proper cooling gives clean slices: Cool the bars completely at room temperature, then chill briefly before cutting to achieve tidy squares without the filling oozing.